


 Loading...
Line 6 POD xt Pro, TonePort UX2, TonePort UX8, TonePort GX, TonePort KB37 Setup Guide
...Version 3.5
Recording Setup Guide
Using Line 6 Hardware & GearBox with Popular Recording Applications

GearBox 3.5 - Recording Setup Guide
Table of Contents
Getting Started........................................................................................ |
1•1 |
Installing Line 6 Audio Drivers and GearBox Software................................................. |
1•1 |
About GearBox............................................................................................................... |
1•1 |
Updating & Registering with Line 6 Monkey................................................................ |
1•2 |
About This Guide…....................................................................................................... |
1•3 |
Additional Online Resources.......................................................................................... |
1•4 |
Audio Driver & GearBox Settings.......................................................... |
2•1 |
Line 6 Audio Driver Configuration................................................................................ |
2•1 |
Mac® Driver Settings ..................................................................................................... |
2•1 |
Mac® OS X® System Preferences Settings.................................................................... |
2•11 |
Configuration as an Aggregate Device (Mac® only).................................................... |
2•13 |
Windows® Driver Settings ............................................................................................ |
2•18 |
Windows® XP® Sound Device Settings......................................................................... |
2•27 |
S/PDIF Digital Output from Line 6 Hardware to an External Device......................... |
2•30 |
GearBox Recording Settings......................................................................................... |
2•31 |
Choosing Your GearBox Source .................................................................................. |
2•31 |
Record Send Controls in GearBox............................................................................... |
2•33 |
TonePort UX8 - Multiple Record Sends....................................................................... |
2•35 |
ToneDirect™ Monitoring............................................................................................. |
2•36 |
Using the Line 6 GearBox™ Plug-In........................................................ |
3•1 |
Activation & USB Hardware......................................................................................... |
3•1 |
Using the GearBox VST or AU Plug-In - Ableton Live 7............................................ |
3•2 |
Using the RTAS GearBox Plug-In - Digidesign Pro Tools LE 7................................... |
3•11 |
Mac® Audio Applications ......................................................................... |
4•1 |
Ableton Live® 7 Setup.................................................................................................... |
4•2 |
Apple GarageBand® ‘08 Setup........................................................................................ |
4•7 |
Apple Logic® Pro 8 Setup.............................................................................................. |
4•12 |
Digidesign® Pro Tools® LE™ 7 Setup ............................................................................ |
4•17 |
MOTU Digital Performer® 5 Setup.............................................................................. |
4•32 |
Propellerhead Reason® 4 Setup..................................................................................... |
4•39 |
Sonoma Wire Works RiffWorks® 2, Line 6 Edition Setup........................................... |
4•45 |
Steinberg Cubase®/Cubase® Studio 4 Setup................................................................. |
4•49 |
Windows® Audio Applications................................................................. |
5•1 |
Ableton Live® 7 Setup.................................................................................................... |
5•2 |

GearBox 3.5 - Recording Setup Guide
Adobe® Audition® 3 Setup ............................................................................................. |
5•8 |
Cakewalk SONAR® 7 Studio/Producer Setup.............................................................. |
5•19 |
Digidesign® Pro Tools® LE™ 7 Setup ............................................................................ |
5•26 |
Image Line Software FL Studio® 7 Setup ..................................................................... |
5•41 |
Propellerhead Reason® 4 Setup..................................................................................... |
5•46 |
Sonoma Wire Works RiffWorks® 2, Line 6 Edition Setup........................................... |
5•53 |
Steinberg Cubase®/Cubase® Studio 4 Setup................................................................. |
5•57 |
Line 6, GearBox, GuitarPort, GuitarPort Online, POD, TonePort, TonePort UX1/UX2/UX8/KB37, Custom Tone, the Line 6 logo and the GearBox logo are trademarks of Line 6, Inc. © 2007 Line 6, Inc. All rights reserved.
Apple, Mac, Mac OS X, AU, Logic, GarageBand, Safari and QuickTime are trademarks of Apple Computer, Inc.; Windows, Windows XP, Windows Vista and Internet Explorer are trademarks of Microsoft Corporation;
Intel and Pentium are trademarks of Intel Corporation; Ableton and Ableton Live are trademarks of Ableton AG;
Adobe Audition and Adobe Soundbooth are registered trademarks of Adobe Systems, Incorporated; Cakewalk and SONAR are trademarks of Twelve Tone Systems, Inc.;
Cubase, Nuendo, ASIO and VST are trademarks of Steinberg Media Technologies GmbH; Digidesign, RTAS, Pro Tools and Mbox 2 are either trademarks or registered trademarks of Avid Technology, Inc.;
MOTU, Mark of the Unicorn and Digital Performer are trademarks of MOTU, Inc.: Reason, ReWire and Remote are trademarks of Propellerhead Software AB:
RiffWorks is a trademark of Sonoma Wire Works: Fl Studio is a trademark of Image Line Software:
All other product names, trademarks, and artists’ names are the property of their respective owners, which are in no way associated or affiliated with Line 6.

Getting Started
Getting Started
Before we dive right into the world of recording, here are some helpful tips about getting your Line 6
gear setup, as well as links to other related resources for you...
Installing Line 6 Audio Drivers and GearBox Software
To use your Line 6 TonePort®, GuitarPort®, POD® X3 or POD®xt with your computer, you’ll need to install the Line 6 USB audio driver for your device. A “driver” is a software component that installs on a Mac® or Windows® computer that allows a hardware device to work with the computer’s operating system. For TonePort, GuitarPort or PODxt, just pop in the GearBox® software CD that came with your Line 6 device and you can simply install GearBox and it will automatically install the Line 6 drivers for you. For POD X3 (as well as for any Line 6 device), you can go to the Line 6 web site and download the GearBox installer, or just the driver installer for your specific hardware:
www.line6.com/software/
Since this document covers GearBox version 3.5, you’ll of course want to be sure you’ve updated to this version of GearBox (or a later version, if available) - no worries, it’s a free update! You can grab the GearBox installer from the Line 6 site link above, or, if you already have Line 6 Monkey installed you can launch it with your Line 6 USB hardware connected and it will sniff out your current version and offer to walk you through an update if needed (see the following Line 6 Monkey section).
POD X3 owners... GearBox 3.5 does not yet include support for POD X3 devices. But you can download the Line 6 USB audio driver for your Mac or Windows PC - please visit the GearBox Online Help site
for the latest news and developments for GearBox and driver support.
GuitarPort owners... You’ll need to use Line 6 Monkey to update the USB Firmware of your GuitarPort
device to version 2.07 (or later) to allow full compatibility with GearBox 3.5. You’ll benefit from several new models and additional GearBox features too! See the following Line 6 Monkey section for more about
running Monkey to check for updates.
About GearBox
Line 6 GearBox is the free Mac and Windows software companion or all Line 6 TonePort, GuitarPort, and PODxt devices. You can think of GearBox as an elaborate “user interface” for your Line 6 device, where you can load, customize and save presets of your Tones, fiddle about with amp & effects knobs and switches on your computer, and access the optional GuitarPort Online membership service. With TonePort and GuitarPort USB devices, GearBox is of course a necessary “front-end” since all the Tone models and processing run on your computer.
For POD X3 & PODxt devices, GearBox is really optional, since POD units perform their processing internally and already include all their own knobs, switches and LCD display. If you install only the Line 6 audio device driver on your computer, then you can certainly use POD X3 or PODxt as your USB audio device and tweak all your settings strictly on the POD unit itself. But you’ll likely find that using GearBox along with your POD is very convenient, since it makes it quite easy to tweak, save and recall Tones and settings... and just looks pretty darn cool too! If you want to take things further and invest in the GearBox Plug-in Add-On or subscribe to the GuitarPort Online service, then you will need to install GearBox.
1•1

Getting Started
GearBox Plug-in
The GearBox Plug-in is an optional Add-on software component you can purchase for TonePort, GuitarPort and PODxt devices that additionally allows GearBox to function as a Mac AU, Windows VST or Pro Tools RTAS audio effect plug-in. This of course offers some very nice advantages for use of your tones with your recording software. We go into more detail about using the GearBox Plug-in in the chapter aptly titled Using the GearBox Plug-in. You can launch Line 6 Monkey and purchase it directly from the Add-Ons page, or head to the Line 6 site now if you want to see about how to get your hands on it:
Line 6 GearBox Plug-in
Updating & Registering with Line 6 Monkey
OK, so maybe you already read about doing this updating & registration stuff for your Line 6 hardware, but in case you were too excited with your new gear to get to that yet, now is the time to do it! This is all very easy using Line 6 Monkey on your computer with an Internet connection...
Line 6 Monkey is the intelligent updater software utility that is installed automatically along with the Line 6 GearBox software. Alternatively, you can also get Line 6 Monkey free from the Line 6 web site:
www.line6.com/monkey/
Go ahead and connect your Line 6 USB device to your computer’s USB port, power it on, and then launch Line 6 Monkey (on Mac, go to Applications > Line6, on Windows, go to Start > Program Files > Line 6).
Login Account
You’ll need to Login so that Line 6 Monkey can communicate with the online Line 6 Server to provide the specific product updates for your gear. It’s just a few clicks, and it’s free!
•If you have a Line 6 account, type in your User Name and Password at the top of the Monkey dialog.
•If you have not yet created an account, click the New User button and you’ll be walked right through the steps.
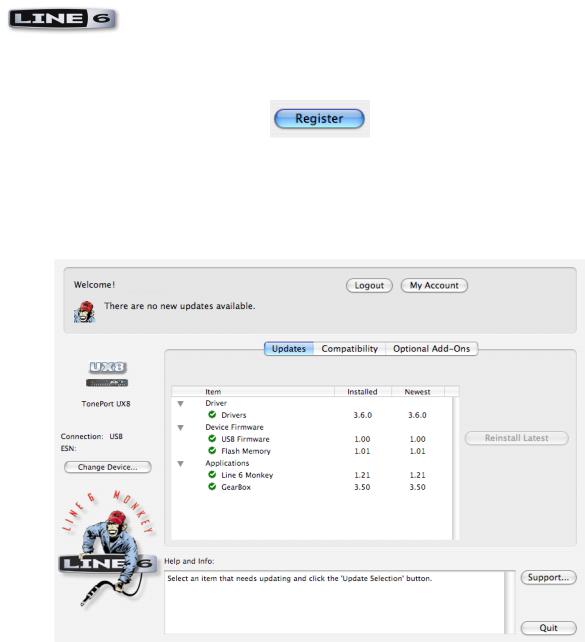
RegisterYour Hardware
Registering your Line 6 hardware is important because it insures that you’re dialed in for warranty service and makes it possible for us to contact you if new software versions or other cool enhancements are offered - cutting edge technology and such!
If you have not already done so, you’ll be prompted to Register your connected Line 6 hardware. It’s a
1•2
Getting Started
painless process really, so click that Register button and fill in the blanks on the web page. This page will list all your registered Line 6 gear in one place.
Once you’ve logged into your account, Monkey will automatically check to see if you have all the latest updates to allow you to get the most out of your Line 6 hardware, and check to make sure you have the latest versions of the audio device driver, as well as the GearBox software itself. Be sure to choose any recommended updates and choose the Install/Reinstall Latest button at the right to allow Monkey to update these items for you. It’s also a great idea to do this every so often to keep things up to date.
AboutThis Guide…
This guide is intended to provide basic setup information for Line 6 USB hardware and GearBox software with most popular audio recording applications. The following sections provide setup information for both Mac® and Windows® systems. Use the Table of Contents or the Acrobat® Reader® Bookmarks to jump directly to the chapter and sections relevant to your setup. Remember, more GearBox info can be found by going to Help > Open Help within the GearBox application, and just read on for more resources...
1•3

Getting Started
Additional Online Resources
Hungry for more info? We’ve got plenty of helpful resources just a click away...
-Several more Help documents covering the latest GearBox news and support info, MIDI Control, product Release Notes and more are available here:
GearBox Online Help
-For technical support, choose from the many options listed on the Line 6 Support page:
Line 6 Support
-Official Line 6 hardware Product Manuals can be downloaded here:
Line 6 Product Manuals
1•4
Audio Driver & GearBox Settings
Audio Driver & GearBox Settings
Now that you have your Line 6 USB audio device driver and GearBox software installed, its time to get take a look at the settings and options for using your Line 6 gear in a computer recording setup!
Note that there are some different options available in GearBox depending on which Line 6 USB hardware you are using. Be sure to refer to the details covering your specific Line 6 device in the following sections.
Line 6 Audio Driver Configuration
In the world of computer recording, the audio driver is the key element of your audio hardware that you will see referred to by software applications, control panels and know-it-all computer audio geeks, so it’s a good idea that you learn a few things about your Line 6 device’s audio driver and its options! Things are a bit different on Mac® versus Windows® systems, and there are some feature differences between the specific Line 6 devices, so it is recommended that you refer to the GearBox Help documentation, as well as the product manual for your specific device for the full info. To get you going, we’ll run through the main points here regarding the audio driver and its settings.
Attention POD X3 owners... As of GearBox version 3.50, POD X3 devices are not yet supported by the GearBox software. But, like PODxt devices, POD X3 processes all its tones onboard and includes a USB audio device driver, so you can certainly connect to your Mac or Windows computer and record with all
the same audio applications! Please refer to the POD X3-specific steps in the following sections. Please also check out the GearBox Online Help site for the latest breaking news regarding GearBox and POD
X3 support!
Mac® Driver Settings
Driver settings for your Line 6 hardware are configured within the Mac OS X Audio-MIDI Setup dialog and the Line 6 Audio-MIDI Settings dialog.
Note - GearBox version 3.5 is not officially supported to run on Apple’s OS X version 10.5 (Leopard) - please check the GearBox Online Help site for the latest news regarding GearBox and OS X support.
OS X® Audio-MIDI Setup Dialog
Once you’ve installed the Line 6 audio driver on your Mac and have your Line 6 hardware connected to your computer’s USB port (a USB 2.0 port is required for TonePort UX8 and POD X3 devices, all other Line 6 devices can use a USB 1.1 or USB 2.0 port), go to the Audio-MIDI Setup Dialog. To launch this dialog, go into the Mac System Preferences, select the Line 6 Audio-MIDI Devices (in the Other category), and in the Driver tab of the Line 6 dialog, click on the Run Audio MIDI Setup button.
Note: For TonePort UX8, please see the following UX8 Audio-MIDI Settings section.
2•1
Audio Driver & GearBox Settings
1
2
5
3
4
 6
6
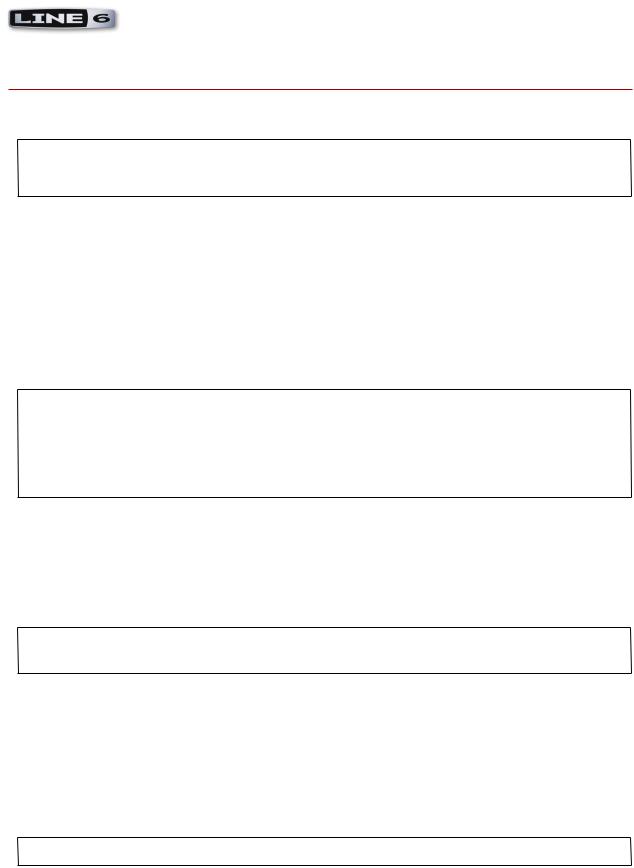
1 – System Settings:
•The Default Input and Default Output options allow you to choose the sound card you want ALL audio applications to use by default. If you want this to be your Line 6 device, select it here.
•The System Output option allows you to choose which sound card the Mac System Settings are played through. You may NOT want to choose this to be your Line 6 device, since it can be rather annoying to hear those dings, beeps or frogs croaking at blaring volumes in your headphones or monitors when working in your audio application! Even better, you can turn these system settings off completely in the System Preferences > Sounds dialog.
2 – Properties For: Choose your Line 6 device here to allow the Audio Input and Audio Output options display its settings.
3 – Audio Input:
•In the top selector, you will be able to choose a Record Send for your Line 6 device to configure its Format options below.
•TonePort & GuitarPort devices show Record Send 1-2 and Record Send 3-4 here.
•TonePort UX8 shows several Sends and more options - please see next section.
•PODxt devices show a “fixed” Master Stream here as the only option.
•POD X3 devices show four stereo Record Sends here.
•The Format selectors show you the Sample Rate* and Bit Depth that the Line 6 device will is operating at for recording. The Bit Depth for all Line 6 devices is fixed at 24 bit.
2•2

Audio Driver & GearBox Settings
*It is recommended that you do not use the Sample Rate selector here in the Mac Audio-MIDI Setup dialog to set your sample rate when your recording software is running. Typically, your recording software will offer a Sample Rate option per project within its own “Preferences” or “Audio Setup” settings. It is best to configure the Sample Rate within the recording software, and you will see the device’s sample rate switch automatically to match it.
4 – Volume sliders (audio input): These sliders 1 - 12 are not functional with UX8 - use the GearBox Record Send knob and/or Tone volume instead of using these sliders to set your Record Send levels for Line 6 devices.
5 – Audio Output:
•The Format selectors show you the Sample Rate* and Bit Depth that the Line 6 device will is operating at for playback. The Bit Depth for all Line 6 devices is fixed at 24 bit.
6 – Volume sliders (audio output): These sliders are not functional for Line 6 hardware - use the GearBox Out To Monitor controls (or the Volume knobs on your Line 6 hardware) instead of these sliders to adjust output levels.
2•3

Audio Driver & GearBox Settings
Mac OS X Audio-MIDI Setup Dialog -TonePort UX8
To launch this dialog, go into the Mac System Preferences, select the Line 6 Audio-MIDI Devices (in the Other category), and in the Driver tab of the Line 6 dialog, click on the Run Audio MIDI Setup button.
1
2
5
3
4
 6
6
1 – System Settings:
•The Default Input and Default Output options allow you to choose the sound card you want ALL your audio applications to use by default. If you want this to be your Line 6 device, select your UX8 here.
•The System Output option allows you to choose which sound card the Mac System Settings are played through. You may NOT want to choose this to be your UX8, since it can be rather annoying to hear those dings, beeps or frogs croaking at blaring volumes in your headphones or monitors when working in your audio application! Even better, you can turn these system settings off completely in the System Preferences > Sounds dialog.
2 – Properties For: Choose your TonePort UX8 here to allow the Audio Input and Audio Output options display its settings.
2•4

Audio Driver & GearBox Settings
3 – Audio Input:
•In the top selector, you will be able to choose your Record Send for the TonePort UX8 to configure its Format options below.
•The Format selectors show you the Sample Rate* and Bit Depth that the Line 6 device will is operating at for recording. The Bit Depth is fixed at 24 bit.
*It is recommended that you do not use the Sample Rate selector here in the Mac Audio-MIDI Setup dialog to set your sample rate when your recording software is running. Typically, your recording software will offer a Sample Rate option within its own “Preferences” or “Audio Setup” settings. It is best to configure the Sample Rate within the recording software, and you will see the device’s sample rate switch automatically to match it.
4 – Volume sliders (audio input):
These sliders 1 - 12 are not functional with UX8 - use the GearBox Record Send knob and/or Tone volume instead of using these sliders to set your Record Send levels for Line 6 devices.
5 – Audio Output:
•The Format selectors show you the Sample Rate* and Bit Depth that the TonePort UX8 is operating at for playback. The Bit Depth for all Line 6 devices is fixed at 24 bit.
6 – Volume sliders (audio output):
These sliders are not functional for Line 6 hardware - use the GearBox Out To Monitor controls (or the Volume knobs on your Line 6 hardware) instead of these sliders to adjust output levels.
2•5

Audio Driver & GearBox Settings
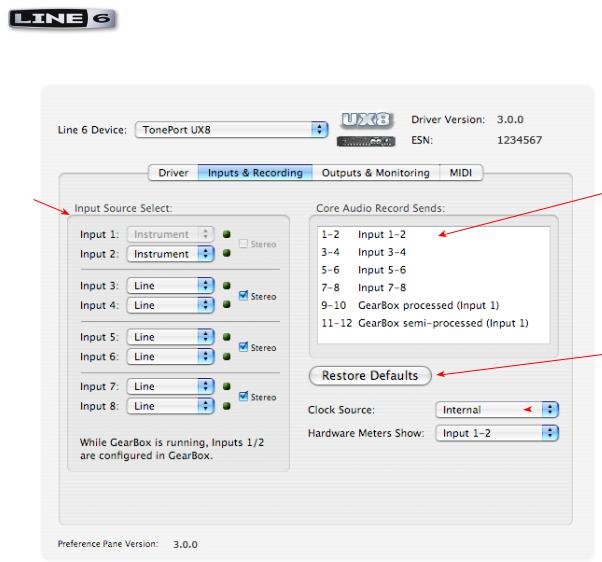
Line 6 Audio MIDI Settings Dialog - Inputs & Recording Tab
To launch this dialog, go into the Mac System Preferences, select the Line 6 Audio-MIDI Devices (in the Other category).
Note: For TonePort UX8, please see the following UX8 Inputs & Recording Tab section.
1
2
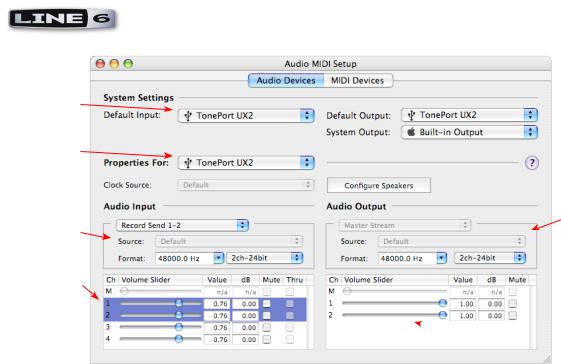
1 – Input Source Select: This is a mirrored control for the Source Select within the GearBox application where it allows you to select which physical input is used on the device. Note that this control is ONLY selectable when the GearBox software is not in use by the current device. When GearBox is in use, this selector remains grayed out, but displays the current Source that is selected within GearBox.
When GearBox is not launched, this Input Source Select, like the Source Select in the GearBox application, offers a list of input options. The list of options will match those offered by your specific Line 6 device. TonePort UX2 displays the following:
2•6
Audio Driver & GearBox Settings
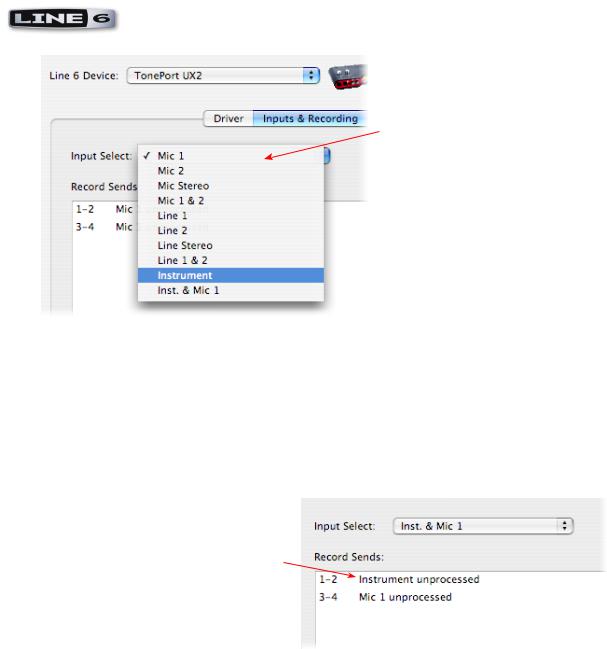
When GearBox is not in use, the Input Select menu is available. As shown here, TonePort devices offer several input Sources to choose from. The selected Source is what gets routed to the Device Sends
TonePort GX, DI and GuitarPort devices offer only an “instrument” 1 /4 input, therefore, this Input Select list shows only “Instrument” as the source.
PODxt & POD X3 devices do not offer an Input Source menu in this dialog.
TonePort UX8 has a larger set of options - see the next section for its Inputs & Recording tab.
2 – Device Sends info box: One line for each GearBox Record Send appears here along with a description for exactly what signal each Send is carrying.
The Record Sends description shows the input Source, and informs you if that signal is “processed” or not. Shown here, since GearBox is not running, the Send 1-2 signal is unprocessed.
TonePort & GuitarPort devices display Sends information as follows (for TonePort UX8 please see the following TonePort UX8 Inputs & Recording Tab section):
•Single Tone Source (Mono/Stereo): When the GearBox application is not running, Record 1-2 and 3-4 both carry a raw, unprocessed signal. When GearBox is running, Record Send 1-2 will carry the fully GearBox-processed signal. For Record Send 3-4, you can choose between a “semiprocessed” signal with no post-effects, and a fully unprocessed signal. These options are available in the GearBox software.
•Dual-Tone Source: If you’ve selected one of the dual input configurations from the input menu, Record 3-4 will always carry the signal from the second audio source. When GearBox is running, these sends will carry the Tone 2 signal of a Dual-Tone configuration. Please see the GearBox Help documentation for more about Dual-Tone operation. (TonePort GX, D.I. and GuitarPort devices do not support Dual-Tone operation and run only in Single-Tone configuration).
2•7

Audio Driver & GearBox Settings
PODxt devices show only one Record Send (Record 1-2). The type of signal that is routed to the Record Send 1-2 is determined by the PODxt Signal Routing menu option. Note that this Audio Signal Routing determines this signal routing regardless if GearBox is running or not for PODxt devices. Please refer to your PODxt Pilot’s Handbook for the information regarding the PODxt Signal Routing options and “Re-amping”. Note that PODxt also offers a Monitor Level slider in this tab as well - this slider only affects the monitor volume and not the level fed to the Record Sends so you can use this to independently adjust your monitor signal while recording.
POD X3 devices show a list of 5 Record Sends, which are configured on the POD X3’s on-board Outputs settings screen. Please refer to your POD X3 Pilot’s Handbook for details on how to configure the signal routed out each Send. Note that POD X3 also offers a Monitor Level slider in this tab as well - this slider only affects the monitor volume and not the level fed to the Record Sends so you can use this to independently adjust your monitor signal while recording.
2•8
Audio Driver & GearBox Settings
Inputs & RecordingTab - TonePort UX8
1 |
2 |
3
 4
4
 5
5
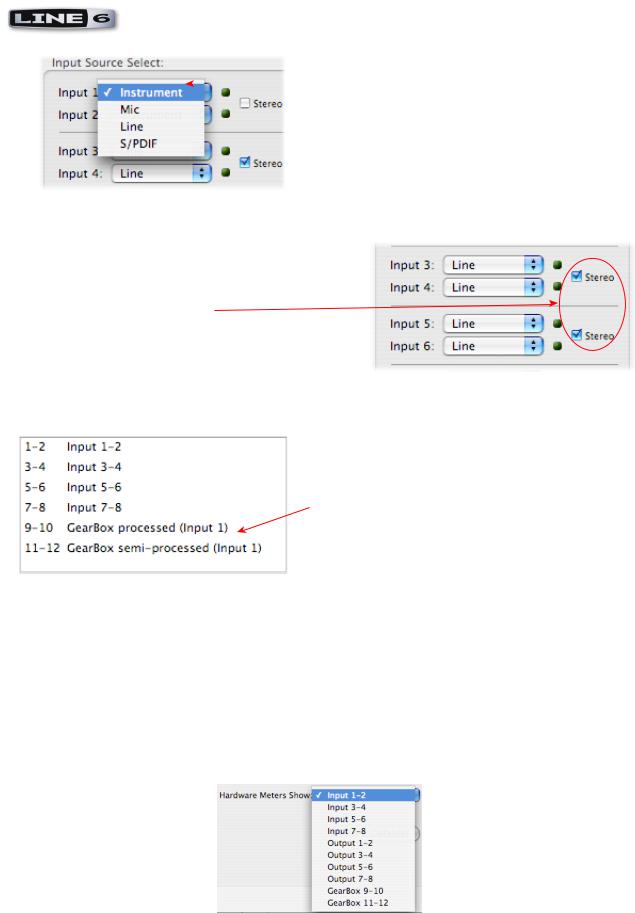
1 – Input Source Select: TonePort UX8 offers 8 individual input sources, each with its own selector where you can choose which physical input is to be used for each. Input source options are as follows:
Input 1: Instrument 1 or XLR 1 or Line 1 or S/PDIF (L)
Input 2: Instrument 2 or XLR 2 or Line 2 or S/PDIF (R)
Input 3: XLR 3 or Line 3
Input 4: XLR 4 or Line 4
Input 5: XLR 5 or Line 5
Input 6: XLR 6 or Line 6
Input 7: XLR 7 or Line 7
Input 8: XLR 8 or Line 8
Using Inputs 1 & 2 with GearBox
The GearBox application works with the TonePort UX8 driver to provide ultra-low latency via ToneDirect™ monitoring for Inputs 1 & 2 of the UX8, which includes two high-Z Instrument inputs, two XLR inputs, two Line level inputs and stereo S/PDIF input. GearBox’s ToneDirect Monitoring is ideally suited for recording guitar and bass with amp and effects processing, providing the instantaneous feel necessary for competent performance while tracking.
2•9
Audio Driver & GearBox Settings
When GearBox is not in use, the Input 1 & input
 2 selectors are available. As shown here, TonePort
UX8 offers several input Sources to choose from.
The selected Source is what gets routed to the
Device Send.
Stereo Paired Inputs
You can also link inputs into stereo pairs. This affects hardware monitoring controls in the Outputs & Monitoring tab (see below).
2 – Device Sends info box: One line for each GearBox Record Send appears here along with a general description for each Send.
On UX8, Send 9-10 carries the GearBox -processed signal, so you can select this Send as the track input in your audio software to record the full GearBox Tone. Send 11-12 carries the “semi-processed” Tone, which can vary depending on what GearBox effects you select as either “Pre” or “Post” the Send 11-12. All other Sends carry an unprocessed signal of whatever is plugged into the respective Input jack on the UX8 hardware.
3 - Restore Defaults - click this button to restore all this tabs settings to their original default values.
4 - Clock Source - Set your preferred TonePort UX8 clock source with this menu. Select S/PDIF to sync the UX8 to an external S/PDIF clock source from another device’s digital output. If you are not connecting anything into UX8’s digital S/PDIF input, then keep this set to Internal to use the UX8’s
own clock.
5 - Hardware Meters Show - This selector allows you to choose what the VU meters on the front of the UX8 are measuring. Note that these hardware meters function even if the GearBox software is not currently running.
2•10
Audio Driver & GearBox Settings
Mac® OS X® System Preferences Settings
There are a few System Preferences that you should configure when using your Mac for audio recording. Launch the Mac OS X System Preferences dialog to make the following settings.
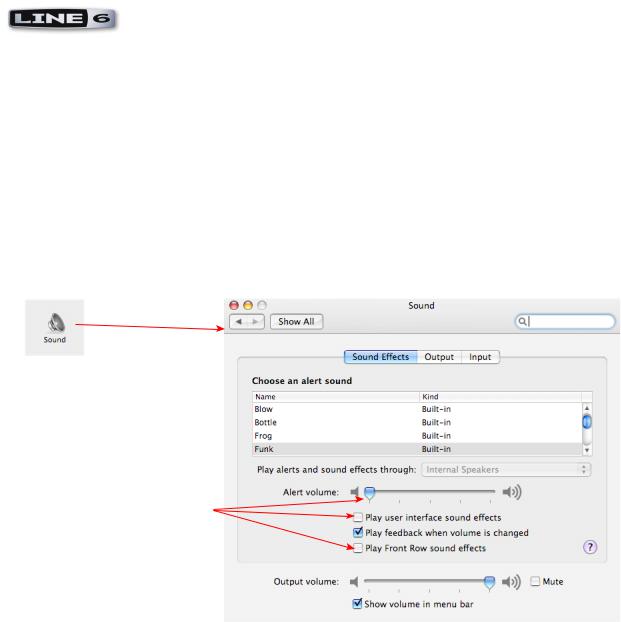
System Sounds and Alerts
When using your Line 6 USB hardware as your audio device, you likely will not want to hear these system sounds, and you certainly don’t want to end up recording them by mistake! You can adjust the volume independently for these system sounds and alerts by going to the Sound page.
Choose Sound in your Mac’s
System Preferences dialog
In the Sound Effects page, adjust
the Alert volume slider down, and uncheck the Play user
interface sound effects and Play user interface sound effects checkboxes
2•11
Audio Driver & GearBox Settings
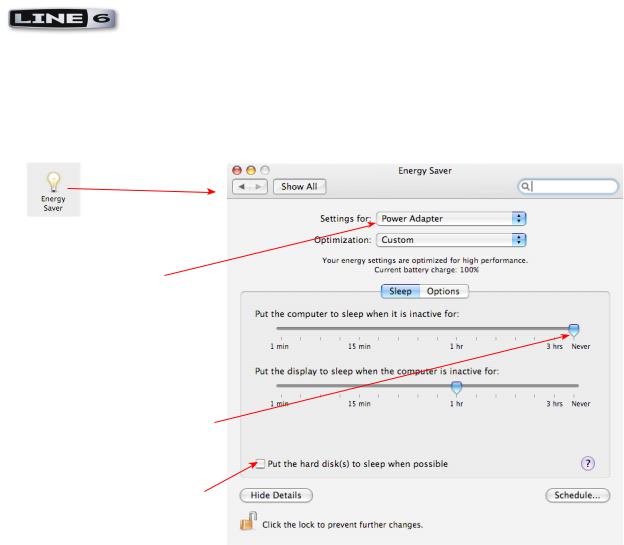
Energy Settings
It is also a good idea to configure your Energy settings so that critical computer components do not go to “sleep” or run at less than full.
Choose Energy Saver in the
System Preferences dialog
Choose Power Adapter
You can also select Battery if you have a laptop and repeat all the steps in this section, but you may want your settings to conserve battery power - just keep these settings in mind if recording when running on battery power.
Set the top slider all the way to Never so that the computer is not allowed to enter “sleep” mode
Uncheck the box so that your hard disk does not go to sleep
2•12

Audio Driver & GearBox Settings
Configuration as an Aggregate Device (Mac® only)
Combine your Line 6 TonePort, GuitarPort, POD X3 or PODxt with other Core Audio devices using the Mac® OS X® Aggregate Device feature.
Note - The OS X Aggregate Devices functionality is not fully supported by Line 6 or most audio hardware manufacturers since of course it is not feasible to test the great number of combinations of devices possible. However, it is possible to combine one Line 6 USB device with another (non-Line 6) audio device for the combined functionality as described here - your exact performance may vary with different hardware.
Mac® OS X® version 10.4.x (Tiger) allows you to configure two or more Core Audio sound card devices into one Aggregate Device. As the name suggests, this makes it possible to combine multiple connected audio devices allowing audio applications to utilize all inputs and outputs as one virtual Core Audio device. The Aggregate Device feature also provides the ability to sync the devices, and resample if needed to allow them to work together with your audio applications. This can be quite useful if you have another Core Audio sound card and want to use your Line 6 hardware along with it to provide additional inputs for recording, or additional outputs for sending multiple playback or monitoring mixes.
In this section, we’ll be showing you how to create a simple Aggregate Device using your Line 6 hardware and your Mac’s Built-in Audio device Inputs and Outputs. The steps are similar for combining Line 6 hardware with other models of audio devices, as long as they offer a Core Audio driver that supports this OS X feature.
Be sure to connect the USB cable from your Line 6 hardware into your computer’s USB port, and then proceed with the following steps…
Creating an Aggregate Device
First, connect and your Line 6 hardware to your Mac USB port (a USB 2.0 port is required for TonePort UX8 and POD X3 devices, all other Line 6 devices can use a USB 1.1 or USB 2.0 port). All the required settings you need to make to create an “Aggregate” device are made within the Aggregate Device Editor window, which is found in the Mac Audio MIDI Setup dialog.
Go into the Mac System Preferences, select the Line 6 Audio-MIDI Devices (in the Other category), and in the Driver tab of the Line 6 dialog, click on the Run Audio MIDI Setup button.
2•13
Audio Driver & GearBox Settings
 Select Open Aggregate Device
Editor from the Audio menu
Click on the “+” button to create a new Aggregate Device - it will then  appear in the above pane
All detected Core Audio devices are then listed in the Structure pane
Click on the Use boxes for all Audio Devices to activate them. (Click your Line 6 device’s Use box first to make it the first device in the list). Check the boxes for both the Built-in Input and Output so they can be used for both recording and playback.
IMPORTANT! Always set your Line
6 hardware to be the assigned Clock
device Keep the Resample checkboxes unchecked unless necessary *
When creating an Aggregate Device, only one audio device can be designated as the “Clock”. This means that this device acts as the “master” and all other devices follow its digital clock, thus keeping all your audio in sync. Even though the Aggregate Device dialog allows you to set any individual Audio Device as the Clock, be sure that your Line 6 hardware is set as the clock as shown above to ensure proper sync.
*The Aggregate Device Resample function - When combining audio devices, the sample rates must match to allow them to be used together. But if you run into sync problems when using some devices together, or in the case where you need to choose a sample rate not commonly supported by all audio devices, you can check the Resample checkbox for the device. This instructs the Aggregator to automatically perform a sample rate conversion to allow the audio devices to sync.
Once above settings are made, click the Done button to return to the Audio MIDI Setup dialog…
2•14

Audio Driver & GearBox Settings
You are now able to choose this new “Aggregate Device” in the menus of the System Settings. Choose your new Aggregate Device as the Properties For device
Now you will be able to access settings for all combined inputs and outputs!
For the device we created, this totals 6 Audio Inputs and 4
Audio Outputs.
The Audio Input and Audio Output sections each have a selector to allow you to choose each Stereo device, and then make settings for each with the set of controls below.
You will now see all devices’ inputs in the Audio Input selector. Likewise, you will see all outputs in the Audio Output selector
Note of the order of how all these Inputs and Outputs appear in the Audio-MIDI Setup dialog. In our example, Line 6 device “Record Send” inputs are listed first because we made it the first device in the Aggregate Device Editor dialog. The “Stream 3” input is from the Built-in Audio device, and appears last. These input and output ports will also appear in this same order within your audio recording software, but likely will not have any other identifying name other than their order number.
2•15
Audio Driver & GearBox Settings
Using an Aggregate Device with Audio Recording Software
Once an Aggregate Device is created on your Mac, you should then be able to access it in your recording software. As an example, we’ll be showing you how it appears in the included Ableton Live software…
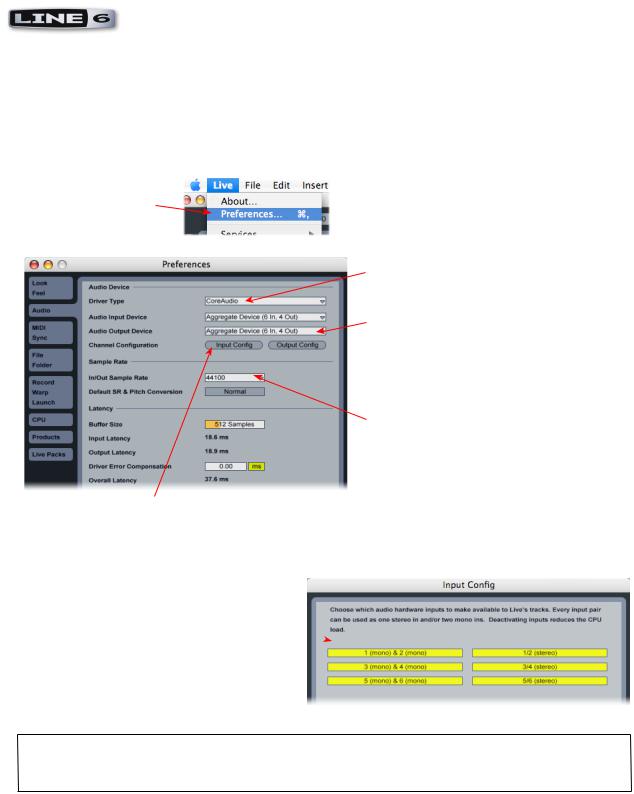
Launch the Ableton Live software and open the Preferences dialog to configure the audio device.
Go to the Live menu and choose Preferences
Go to the Audio tab
Choose CoreAudio as the driver type…
Then choose the Aggregate Device that  was just created for both the Input and
Output Audio Device. Note that this appears along with the individual audio devices in these menus as an additional selectable device.
Set a Sample Rate – preferably this should be one supported by all the audio devices that make up your Aggregate Device. Once all other settings are complete, click the Input Config button
Just as with most Multitrack recording software, in Live you also need to configure the individual inputs and outputs once a Multi-in/out device is selected. Click on the Input Config button to access the Inputs.
By default, Live will usually have only the first device enabled. Activate the desired devices here to allow them be available as recording
inputs in the Live software. Note that each  additional active devices utilizes more CPU, so
only activate the ones you need!
Click OK when done
As noted earlier, you’ll need to refer to the order of the devices in the Audio MIDI Setup dialog to know which are Line 6 hardware ins, and which are from the other device since Live does not show the individual device names.
Next, click the Output Config button in the Live Preferences dialog to similarly activate multiple outputs…
2•16

Audio Driver & GearBox Settings
Click on additional output devices to make them available as playback outputs in Live if desired.* Here again, activate only the ones you need to avoid excess CPU usage.
Click OK when done
Note - The Ableton Live Lite 5, Line 6 version has a restriction that allows only one stereo output to be used at a time. To be able to choose two or more different output devices in a Live Set, you must switch into Demo mode, or upgrade to a full version of Ableton Live
You can now continue to use Ableton Live and all inputs and outputs will appear within the audio track menus, just as if all exist on one sound card!
All inputs appear in the Live audio track input menu
For more information regarding the Aggregate Device feature, check your Mac® OS X documentation.
2•17
Audio Driver & GearBox Settings
Windows® Driver Settings
Be sure to first connect your Line 6 hardware directly to your computer’s USB port (a USB 2.0 port is required for TonePort UX8 and POD X3 devices, all other Line 6 devices can use a USB 1.1 or USB 2.0 port). You can launch the Line 6 Audio-MIDI Devices dialog from within the Windows® Control Panel (Start button > Settings > Control Panel). This is the place where you can access the audio driver settings for your connected device to see and configure things such as the current Sample Rate, Bit Depth, Buffer settings, Record Sends, etc. For the Windows recording software applications covered in this document, it is always recommended that you use the ASIO audio driver. When prompted for ASIO driver settings, this is where you will make them. This dialog offers controls specifically for your connected Line 6 hardware.
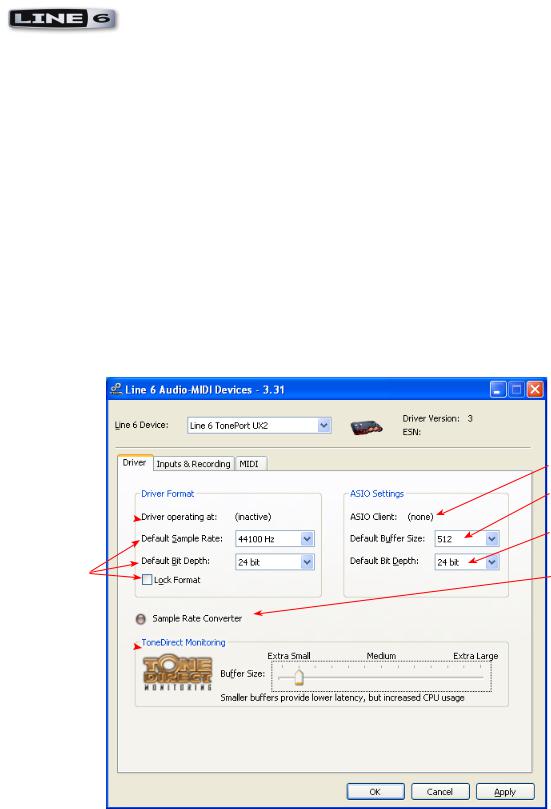
Driver Tab
TonePort & GuitarPort: This following screenshot shows TonePort UX2 as the connected device - the options in this tab are the same for all TonePort and GuitarPort devices.
PODxt & POD X3: Options for PODxt & POD X3 family devices are called out where they differ in this section.
1
2
5 
3
6 |
4 |
7 
1 – ASIO Client indicator: If you are running audio software that is using this Line 6 device as its ASIO sound card, the name of the software will appear here. If not in use by an ASIO software, “none” is displayed here as shown.
2•18

Audio Driver & GearBox Settings
2 – Buffer Size: The ASIO buffer size in use. As your Windows audio software documentation will likely tell you, the ASIO Buffer Size will affect the “responsiveness” and “latency” of the audio. The lower the setting, the faster the response, but with the trade-off of higher processor usage and the risk of audio dropouts. Raise the value if you are getting inconsistent playback or recording in the audio software. 512 is a good starting value, and you can try a lower value if your computer is snappy enough to support it.
3 – Bit Depth: The ASIO bit depth in use. It is recommended that you always use the 24 Bit option and configure your audio software to record at 24 Bit (or 32 Bit if your audio software offers the option). If you NEED to set your audio software to record at 16 bit (such as to reserve hard disk space) then it is recommended that you also set this Line 6 driver bit setting to 16 Bit to match.
4 – Sample Rate Converter: For all Line 6 USB devices, for recording you can simply choose any one of the supported sample rates (44,100, 48,000, 88,100 or 96,000 Hz) within your audio recording software, and your Line 6 gear will switch automatically. (Note that the Lock Format option changes this behavior - see #6 below). A little info for you on what this light means...
TonePort & GuitarPort devices support 44,100 Hz and 48,000 Hz sample rates natively. However, they will also support 88,200 and 96,000 Hz sample rates by way of an internal sample rate converter. This indicator lights up to show you when this converter is active, which can be any time your ASIO software is requesting a different sample rate you’re your device “natively” supports or is “fixed” at.
PODxt & POD X3 devices operate at their own internal sample rates. They will automatically use an internal converter when needed, and you’ll see this little light on when that is happening.
5 – Driver Operation Indicator:
TonePort & GuitarPort devices display the sample rate and bit depth the current device is operating at (or with no text if not in use).
PODxt devices do not utilize this feature and therefore no text will appear here when a PODxt is the selected device.
6 - Lock Format & Default options: When checked, the Lock Format forces the Line 6 audio driver to operate at the Sample and Bit rate settings entered in the two default settings fields above (as opposed to following the sample rate requested by a host audio application). In most cases you’ll want to leave the Lock box unchecked and choose the Sample Rate in your audio software - the Line 6 ASIO driver will follow the application’s sample rate.
Note – These default options and Lock checkbox will remain grayed-out while the current Line 6 device is in use by the GearBox application and/or any 3rd party audio application. To access the Lock Driver Format feature, you will need to exit GearBox as well as any audio software that might be using the currently selected Line 6 device as its audio device. This checkbox will then be selectable. This can be useful for using S/PDIF digital connections.
7 - ToneDirect™ Monitoring/USB Audio Streaming Buffer Slider:
TonePort & GuitarPort devices offer the Line 6 exclusive ToneDirect™ Monitoring feature, which provides an ultra low latency audio signal path for you to hear your GearBox tone, even while
2•19

Audio Driver & GearBox Settings
recording. ToneDirect Monitoring has its own buffer to allow you to keep your ASIO Buffer Size at a high value, for more solid performance and more efficiency with your ASIO-based audio software. The initial default is one tick to the right of “Extra Small” as shown. Raise this slider if you are getting any dropouts in your monitor signal.
PODxt & POD X3 devices utilize a USB audio buffer (similar to ToneDirect™ Monitoring) which provides an independent, direct monitor signal with its own buffer adjustment. When a PODxt or POD X3 device is selected as the Line 6 device in this dialog, the “USB Audio Streaming” buffer slider is displayed. The initial default is just a few ticks to the right of “Extra Small” as shown. Raise this slider if you are getting any dropouts in your monitor signal.
Inputs & Recording Tab
Input Source Select menu: This is a mirrored control for the Source Select within the GearBox application where it allows the user to select which physical input is used on the device. Note that this control is ONLY selectable when the GearBox software is not open. When GearBox is in use, it remains grayed out, but displays the current Source that is selected within GearBox as shown here:
When GearBox is not in use by the selected Line 6 device, this Input Source Select, like the Source Select in the GearBox application, shows the list of input options offered by the connected Line 6 hardware.
TonePort GX, DI and GuitarPort devices offer only an “instrument” 1 /4 input, therefore, this Input Source Select list offers only “Instrument” as the source.
PODxt & POD X3 devices do not offer an Input Source menu in this dialog.
TonePort UX8 has a larger set of options - see the next section for its Inputs & Recording tab.
Record Sends info box: One line for each Record Send appears here along with a description for exactly what signal each Send is carrying. This information is useful in that it tells you what will
2•20

Audio Driver & GearBox Settings
actually be recorded in your audio application when you select one of these Record Sends as your track input.
TonePort & GuitarPort devices display Sends information as follows (for TonePort UX8 please see the following TonePort UX8 Inputs & Recording Tab section):
•Single Tone Source (Mono/Stereo): When the GearBox application is not running, Record 1-2 and 3-4 both carry a raw, unprocessed signal. When GearBox is running, Record Send 1-2 will carry the fully GearBox-processed signal. For Record Send 3-4, you can choose between a “semiprocessed” signal with no post-effects, and a fully unprocessed signal. These options are available in the GearBox software.
•Dual-Tone Source: If you’ve selected one of the dual input configurations from the input menu, Record 3-4 will always carry the signal from the second audio source. When GearBox is running, these sends will carry the Tone 2 signal of a Dual-Tone configuration. Please see the GearBox Help documentation for more about Dual-Tone operation. (TonePort GX, D.I. and GuitarPort devices do not support Dual-Tone operation and run only in Single-Tone configuration).
NOTE: If using TonePort or GuitarPort with an audio recording software that is configured to use the device’s WDM or DirectSound drivers, then only one Send will be available in the recording software (Send 1-2). You must access TonePort via its ASIO driver on Windows to utilize the additional Send 3-4.
PODxt devices show only one Record Send (Record 1-2). The type of signal that is routed to the Record Send 1-2 is determined by the PODxt Signal Routing menu option. Note that this Audio Signal Routing determines this signal routing regardless if GearBox is running or not for PODxt devices. Please refer to your PODxt Pilot’s Handbook for the information regarding the PODxt Signal Routing options and “Re-amping”. Note that PODxt also offers a Monitor Level slider in this tab as well - this slider only affects the monitor volume and not the level fed to Send 1-2 so you can use this to independently adjust your monitor signal while recording.
2•21

Audio Driver & GearBox Settings
POD X3 devices show a list of 5 Record Sends, which are configured on the POD X3’s on-board Outputs settings screen. Please refer to your POD X3 Pilot’s Handbook for details on how to configure the signal routed out each Send. Note that POD X3 also offers a Monitor Level slider in this tab as well - this slider only affects the monitor volume and not the level fed to the Record Sends so you can use this to independently adjust your monitor signal while recording.
NOTE: If using POD X3 with an audio recording software that is configured to use the device’s WDM or DirectSound drivers, then only one Send will be available in the recording software (Send 1-2, which will carry the combined Tone 1 and Tone 2 processed signals). You must access TonePort via its ASIO driver on Windows to utilize the additional, individual Record Sends.
2•22
Audio Driver & GearBox Settings
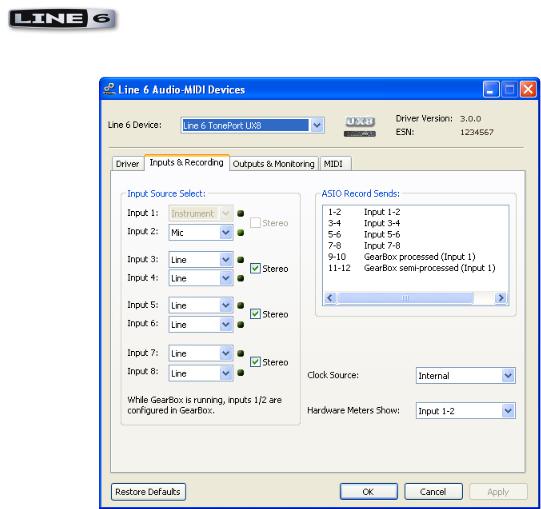
Inputs & Recording Tab (TonePort UX8 only)
TonePort UX8 offers many additional options to control it’s multiple inputs and Sends. The Inputs & Recording tab lets you select specific inputs for recording. To follow is a brief description - for more information please see the TonePort UX8 sections in the GearBox Help documentation.
Input Source Select drop-downs
Here is where you choose specifically which type of physical input you are plugging into for each input channel on the UX8:
Input 1: Instrument 1 or XLR 1 or Line 1 or S/PDIF (L)
Input 2: Instrument 2 or XLR 2 or Line 2 or S/PDIF (R)
Input 3: XLR 3 or Line 3
Input 4: XLR 4 or Line 4
Input 5: XLR 5 or Line 5
Input 6: XLR 6 or Line 6
Input 7: XLR 7 or Line 7
Input 8: XLR 8 or Line 8
2•23
Loading...