


bizhub C220/C280/C360
Shortcut Manual

1. Touch Pen
2.Touch Panel
3.Main Power indicator
4.Sub power switch
5.Function key
6.Data indicator
7.Keypad
8. Brightness Adjustment Dial
2
Konica Minolta
C220/C280/C360
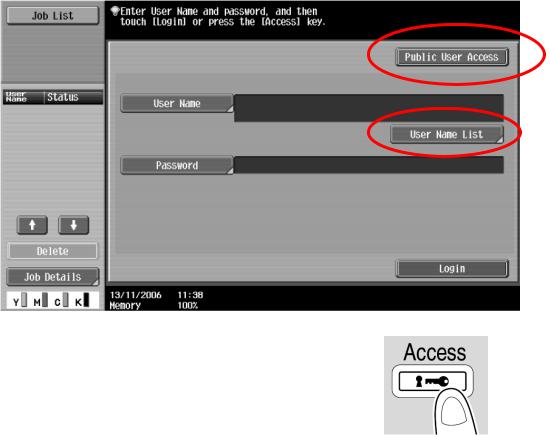
**
** If device with public authentication function, please follow the below steps
Color Copy
1.
Press User Name List Select user name and Press OK
2.
Press password press OK 3. Access Press Access
B/W Copy
[ ]
Press [Public User access]
: ( ) Access 2
Press Access twice times to logout
3

Basic (I)
1.–
Auto Color – This setting to automatically detect the documents are in color or black and white
2.–
Full Color – The copy in full color
3.–
Black – The copy in black and white
4.--
2 Color – Print all areas of the document determined to be in color with the specified color, and print all areas determined to be black in black
5.–
Single Color – Print copies in the
specified color, regardless of whether
the document is in color or in black and
white
4

Basic (II)
-- Paper
Change Bypass Tray Setting
1
Press Basic, Press Paper
2
Select Paper Type
Press change Tray Settings
Press Select Paper Type
5
Input paper size
Touch Standard Size
bX
Y 90mm 0900
(
Memory1 -5 )
Touch Custom Size input
(Length) X and (width) Y e.g. 90mm please input 0900 (If stored paper size touch Store then choose Memory1 -5 )
6 OK
Press OK
5

Basic (III)
-- Zoom
Press ZOOM
Select fixed zoom size
a /A3 A4
0.707
Touch default zoom ratios
e.g. A3 A4 default zoom ratio is 0.707
b -
 +
+
Touch-
 + to change zoom ratio
2 , OK
Touch Manual , Using the keypad type in the desired zoom ratio then touch OK
6
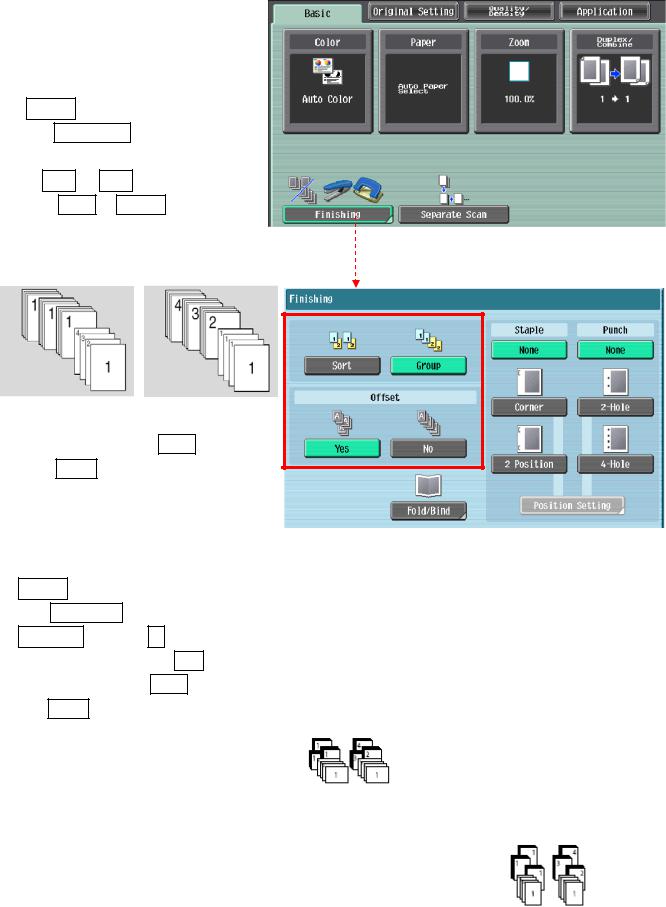
/ Sort/Group
Press Finishing
Press Sort or Group
Sort |
Group |
|
|
3.Start
Press Start to Copy
Offset
Press Finishing
In Offset option select Yes
3.Start
Press Start to Copy
* ,
If no finisher is installed, printed copies are sorted in crisscross pattern
,
zIf a finisher is installed, the copies are stacked on top of each other with each set shifted to separate it
7
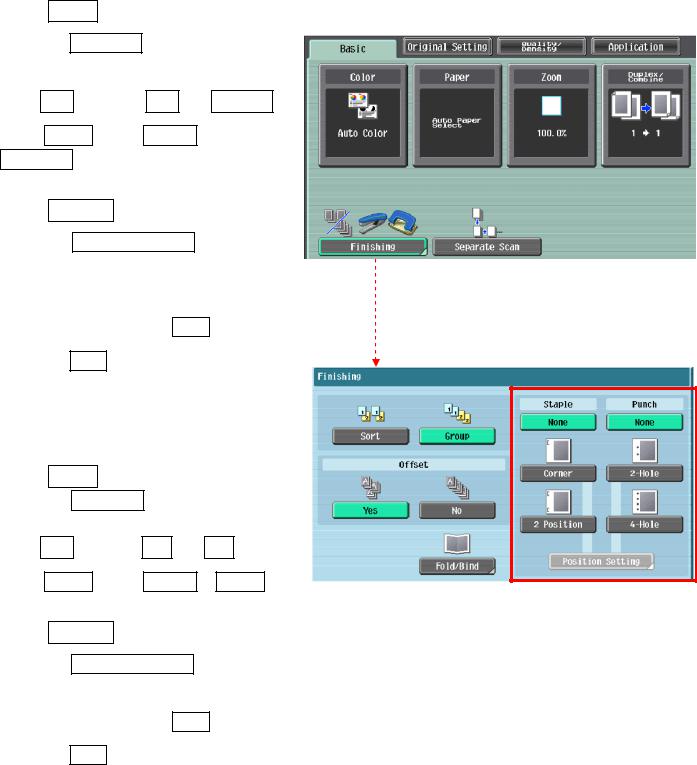
( )
(Optional Function)
Staple
Press Finishing
2.2
At Staple select Corner or
2position
Press position Setting to desired staple positions
4.Start
Press Start to Copy
Punch
Touch Finishing
2.2 4
At Staple select 2 Hole or 4 Hole
Touch position Setting
4.Start
Press Start to Copy
8

/ Fold/Bind
Press Finishing
2./ Yes
At Fold/Bind select Yes
3.

Touch Half-Fold
 Center Staple & Fold or Tri-Fold
Half-Fold
Center Staple & Fold
Tri-Fold
9
 Loading...