


 Loading...
Online Manual
Table of Contents
Navigating the online manual . . . . . . . . . . . . . . . . . . . . . . . . . . . . . . . . . .2
Printing Basics. . . . . . . . . . . . . . . . . . . . . . . . . . . . . . . 3
How to choose paper. . . . . . . . . . . . . . . . . . . . . . . . . . . . . . . . . . . . . . . . . . .3 How to put the paper in the printer . . . . . . . . . . . . . . . . . . . . . . . . . . . . . 4 Finding the HP print settings box. . . . . . . . . . . . . . . . . . . . . . . . . . . . . . . 6 How to print on standard paper sizes . . . . . . . . . . . . . . . . . . . . . . . . . . . .8 How to print on nonstandard paper sizes . . . . . . . . . . . . . . . . . . . . . . .10 How to print on both sides of the paper . . . . . . . . . . . . . . . . . . . . . . . . 11 How to flip a document . . . . . . . . . . . . . . . . . . . . . . . . . . . . . . . . . . . . . . . 13 About color. . . . . . . . . . . . . . . . . . . . . . . . . . . . . . . . . . . . . . . . . . . . . . . . . . .14 About pictures . . . . . . . . . . . . . . . . . . . . . . . . . . . . . . . . . . . . . . . . . . . . . . . . 15
Beyond the Basics . . . . . . . . . . . . . . . . . . . . . 17
Cards . . . . . . . . . . . . . . . . . . . . . . . . . . . . . . . . . . . . . . . . . . . . . . . . . . . . . . . . 18
Envelopes . . . . . . . . . . . . . . . . . . . . . . . . . . . . . . . . . . . . . . . . . . . . . . . . . . . .20
Labels. . . . . . . . . . . . . . . . . . . . . . . . . . . . . . . . . . . . . . . . . . . . . . . . . . . . . . . . 22
Photographs . . . . . . . . . . . . . . . . . . . . . . . . . . . . . . . . . . . . . . . . . . . . . . . . . 23
Transparencies . . . . . . . . . . . . . . . . . . . . . . . . . . . . . . . . . . . . . . . . . . . . . . . 25
Iron-On Transfers . . . . . . . . . . . . . . . . . . . . . . . . . . . . . . . . . . . . . . . . . . . . .26
Getting Help . . . . . . . . . . . . . . . . . . . . . . . . . . . . . . . .28
The HP Toolbox . . . . . . . . . . . . . . . . . . . . . . . . . . . . . . . . . . . . . . . . . . . . . . 28 Troubleshooting with the Toolbox . . . . . . . . . . . . . . . . . . . . . . . . . . . . .29 HP Customer Support. . . . . . . . . . . . . . . . . . . . . . . . . . . . . . . . . . . . . . . . .30
Appendices . . . . . . . . . . . . . . . . . . . . . . . . . . . . . . . . . 35
Print Cartridges. . . . . . . . . . . . . . . . . . . . . . . . . . . . . . . . . . . . . . . . . . . . . . . 35 Aligning the print cartridges. . . . . . . . . . . . . . . . . . . . . . . . . . . . . . . . . . . 41 Minimum printing margins . . . . . . . . . . . . . . . . . . . . . . . . . . . . . . . . . . . .42 Ordering supplies and accessories. . . . . . . . . . . . . . . . . . . . . . . . . . . . . 43 Uninstalling the printer software. . . . . . . . . . . . . . . . . . . . . . . . . . . . . . . 47 Environmental Attributes of the DeskJet Printer . . . . . . . . . . . . . . . .48
1

Navigating the online manual
Use the navigation controls at the bottom of each page to move through the guide:
Go to the Table of Contents
Go to previous page
Go to next page
Acrobat Reader provides a number of ways to page through a document. You may use the navigation buttons in the toolbar.
Previous Page |
|
|
|
Next Page |
||||||||
|
|
|
||||||||||
First Page |
|
|
|
|
|
|
|
|
Last Page |
|||
|
|
|
|
|
|
|
||||||
|
|
|
|
|
|
|
|
|
|
|
|
Goes to next view |
|
Goes to previous view |
|
|
|
|
|||||||
|
|
|
|
|
||||||||
|
|
|
|
|
||||||||
You may also press the arrow keys or choose an action from the View menu. Refer to the Acrobat Reader Online Guide for more information.
2

Printing Basics
How to choose paper
Most plain photocopy paper works fine in your printer, particularly paper that is marked for use in inkjet printers. To get the best results, use one of the Hewlett-Packard papers, which were developed especially for HP inks and your printer.
What to consider:
•Size. You can use any size paper that fits easily within the paper adjusters of the printer.
width = 5 to 8.5 inches (127 to 215 mm)
length = 5.83 to 14 inches (148 to 356 mm)
•Weight. You can choose from a wide range of paper weights. Use 20-24 lb or 75-90 g/m2 plain paper for multipurpose, everyday use.
•Brightness. Some papers are whiter than others and produce sharper, more vibrant colors. Use HP Photo Paper or HP Premium Photo Paper for printing photographs and documents with photographs; use white paper, such as HP Bright White Inkjet Paper for everyday color printing.
•Surface smoothness. The smoothness of the paper affects how crisp the printing looks on the paper. Paper with a high cotton content (25% to 100%) tends to offer greater surface smoothness. Glossy, coated paper works well for pictures and charts (where you want crisp lines with intense, high-quality colors) and for photocopying.
•Opacity. Opacity refers to the degree to which printing on one side of the paper shows through to the other side. Use paper high in opacity (or thicker paper) for two-sided printing.
3

Determining the print side of paper
Be sure to insert all paper, transparencies, cards, envelopes, and paper labels print side down into the IN tray of the printer. For plain paper, the print side is identified by a symbol or word on the packaging.
•For letterhead paper, load the letterhead side down and forward.
•For HP Premium Transparency Film, load the rough side down with the adhesive strip forward.
•For HP Premium Inkjet Paper, load the print side down with the corner arrow pointed forward.
•For HP Premium Inkjet Glossy Paper, load the glossy side down.
•For paper labels, load the label side down.
Labels
HP Premium
Inkjet Paper
HP Premium
Transparency Film
Letterhead Paper
How to put the paper in the printer
The lower (IN) tray is the printer’s launch pad. Careful preparation ensures a successful journey. Make sure all the paper in the tray is the same size and is stacked neatly and snugly for a smooth take-off.
Let’s walk through the process step-by-step:
1Slide out the paper-width and paper-length adjusters to make room for the paper.
Do this no matter what size paper you’re using.
Paper-width adjuster |
Paper-length adjuster |
4

2Fan the edges of the paper stack to separate the pages. Then tap the stack on a flat surface to even it.
3 Put the paper in the lower (IN) tray, print side down.
4Slide the paper-width adjuster to the right until it aligns with the left edge of the paper stack.
Make sure the paper still lies flat in the tray.
5 Slide the paper-length adjuster in toward the paper until it stops.
Make sure the paper does not bend in the IN Tray.
5

Finding the HP print settings box
After you lay out the page and choose the text, pictures, fonts, and colors from your software program, you need to select settings such as paper type, paper size, orientation, and print quality in the HP print settings dialog box. Where it is?
The way you get there varies depending on the software program and the operating system you’re using. Try these strategies from the File menu of your document, and you’re sure to get there.
Try This...
1 Click File and then click Print.
2 Then click whichever button you see—Properties, Setup, or Printer.
3 If you still don’t see the box, click Setup, Options, or Properties.
...Or Try This
1 If Print isn’t there, click Printer Setup or Print Setup.
6

2 Then click whichever button you see—Setup or Options.
...then click a tab, and then click a setting.
Show your finished work at its best.
Click Best print quality.
Save time and ink.
Click EconoFast print quality.
Select the appropriate settings.
Choose the correct paper size and type for the job.
Save money and trees.
Print on both sides of the paper.
Fine-tune your printing.
Pick options to create the effect you want.
Save time and color ink.
Click here to print drafts of color documents in shades of gray
Print clearly.
Align your black and color print cartridges,
and clean them when necessary.
7

How to print on standard paper sizes
1Check your print settings.
Choose your print settings in the HP print settings dialog box. (See “Finding the HP print settings box” on page 6.)
Choose color options on the Color tab.
Click the Color tab.
Note: Depending on the operating system on your computer, your boxes might differ from the Windows 95 boxes shown throughout this document.
Choose print quality, paper size, and paper type on the
Setup tab.
Click the Setup tab.
First click the down arrow, and then click your selection.
Choose two-sided printing, orientation, and flip horizontal options on the Features tab.
Click the Features tab.
Click OK to save.
8

2Click OK in the Print box of your software program to save your settings and start printing.
You might need to click File and then click Print to reach the Print box.
If you run out of paper before you’re finished
The printer prompts you to add more paper. Put the paper in the lower (IN) tray and press Resume  .
.
Click OK.
That’s all there is to it. The printer prints one page at a time until it finishes, delivering each printed page neatly into the printer’s upper (OUT) tray.
While you’re printing
It takes a few moments for the printing to start, because the printer is receiving information from the computer. During printing, the printer might pause occasionally to receive more information. (Don’t worry, it’s normal.)
9

If something goes wrong
Sometimes, in spite of your best efforts, something goes wrong during printing. Maybe a sheet of paper jams in the printer or nothing happens at all.
•If the printer detects a problem, it displays a message on your screen.
If you notice that something is wrong, click the Troubleshooting tab in the HP Toolbox and follow the instructions on the screen.
(See “Finding the HP print settings box” on page 6.)
Click the Troubleshooting tab.
How to print on nonstandard paper sizes
Most of the time, when you print on plain paper, cards, labels, and envelopes, you select one of the standard sizes in the Paper Size box on the Setup tab of the HP print settings dialog box. However, you’re not limited to the sizes listed. Just make sure that the size of the paper falls within the following dimensions (so both of the printer rollers can pick up the paper):
Width: 5 to 8.5 inches (127 to 215 mm)
Length: 5.83 to 14 inches (148 to 356 mm)
Then follow these steps:
In the HP print settings dialog box, click the Setup tab, and then select Custom in the Paper Size list. (See “Finding the HP print settings box” on page 6.)
10
Click Custom.
3Type the dimensions of the paper in the Custom Paper Size dialog box, and click OK.
4Put the paper in the printer, and print as you would for normal paper sizes.
Remember to change the paper size back to Letter, or A4, or whatever paper size you plan to print on next.
How to print on both sides of the paper
The easiest way to save paper is to print on both sides. Just put the paper through the printer twice: the first time through it prints the odd-numbered pages and the second time through it prints the even.
1 Put the paper in the lower (IN) tray.
Make sure that there’s no paper in the upper (OUT) tray.
2In the HP print settings dialog box, click the Setup tab, and click Plain Paper or HP Photo Paper as the paper type. (See “Finding the HP print settings box” on page 6.)
3 Click the Features tab and then click Book or Tablet.
Click the Features tab.
Click Book so the sheets can be bound on the left.
Click Tablet so the sheets can be bound at the top.
11
4 |
Print your document. |
|
|
The printer automatically prints only the odd-numbered pages. |
Tablet option |
5 |
Put the printed pages back in the lower (IN) tray of the printer. |
|
|
A message on your screen tells you which direction to put the |
|
|
printed pages back in the printer. The following illustrations show |
|
|
how to put the paper back in the printer for the Book option and |
|
|
the Tablet option. |
|
Book option
Odd-numbered pages |
Reload to print the |
print first. |
even-numbered pages. |
|
|
6 When the paper is ready, click Continue. |
|
|
The printer prints the even-numbered pages on the reverse side of |
|
|
the odd-numbered pages. |
|
|
After printing, remember to change the Two-Sided Printing option |
Odd-numbered pages |
Reload to print the |
back to None. |
print first. |
even-numbered pages. |
|
12

How to flip a document |
2 In the HP print settings dialog box, click the Features tab, and then |
||||||||||||||||
|
|
|
|
|
|
|
|
|
|
|
|
|
|
|
|
|
click Flip Horizontal. (See “Finding the HP print settings box” on |
When you print a flipped document, the text and pictures are |
page 6.) |
||||||||||||||||
reversed, so they’ll be correct when transferred. |
|
||||||||||||||||
|
|
|
|
|
|
|
|
|
|
|
|
|
|
|
|
|
|
|
|
|
|
|
|
|
|
|
|
|
|
|
|
|
|
|
|
|
|
|
|
|
|
|
|
|
|
|
|
|
|
|
|
|
|
|
|
|
|
|
|
|
|
|
|
|
|
|
|
|
|
|
|
|
|
|
|
|
|
|
|
|
|
|
|
|
|
|
|
|
|
|
|
|
|
|
|
|
|
|
|
|
|
|
|
|
|
|
|
|
|
|
|
|
|
|
|
|
|
|
|
|
|
|
|
|
|
|
|
|
|
|
|
|
|
|
|
|
|
|
|
|
|
|
|
The original |
The flipped document |
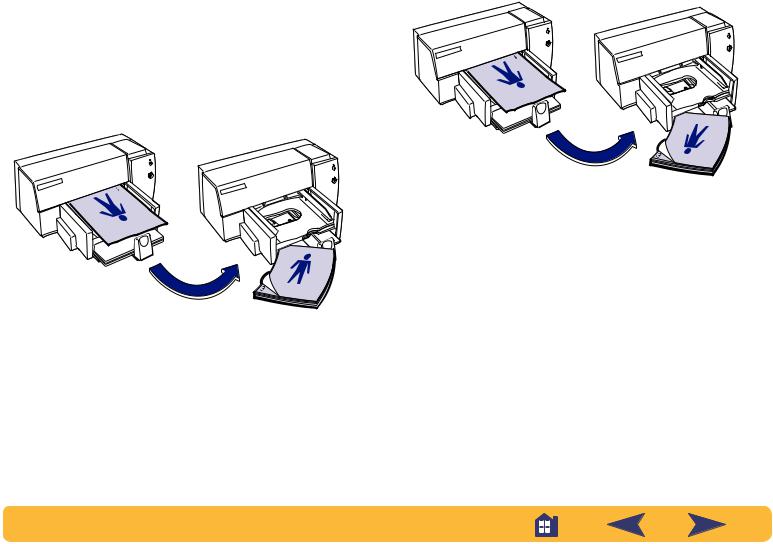
1Put the paper in the lower (IN) tray, print side down.
If you’re using transparencies or special paper, you might need to follow additional directions. (See page 25 for information about printing transparencies.)
Click Flip Horizontal.
3Print your document.
The text and pictures are backwards. Hold it up to a mirror to see how the final product will look.
After printing, remember to:
•Click Flip Horizontal box again to clear it.
•If you used transparencies or special paper, replace it with your everyday paper.
13
About color
Your HP DeskJet 610C Series printer prints in color when a colorcapable software program is used with the printing software. Believe it or not, your color printer prints with only four colors—cyan, magenta, yellow, and black. By printing overlapping dots of different intensity and color, it creates practically any color you can imagine.
Cyan |
Magenta |
Yellow |
Black |
Your printer is especially smart about printing color. (That’s why HP called the technology ColorSmart™!) When you print a document in color, the printer marks each element in your document—text, fullcolor photographs, and graphics (such as pie charts with solid blocks of color)—and renders each at its vivid best. (If you use the photo cartridge when you print color photographs, you’ll get photo-quality images!) Not only is the color quality high, for whatever you’re printing, but it’s also less expensive than making color copies at a copy shop.
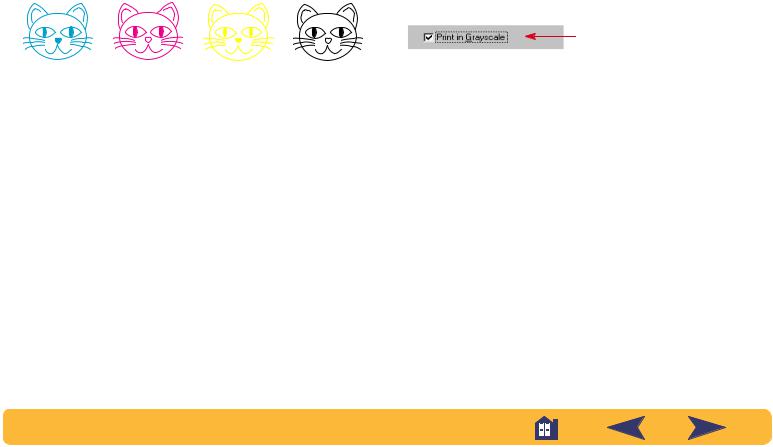
How to turn off color
The color text and pictures that you create in your documents automatically print in color. You can print drafts of your documents in grayscale if you’re going to photocopy them in black and white, or if you want to save time and ink.
•In the HP print settings dialog box, click the Color tab, and then click Print in Grayscale.
A “ ” means that color is turned off.
Now your color documents print in shades of gray until you change the setting. For faster draft printing in grayscale, use the black print cartridge, not the photo cartridge.
14

About pictures
Pictures (also called graphics) include photographs, illustrations, charts, and decorative elements.
Photographs |
Charts and |
Decorative |
Illustrations |
|
Graphs |
elements |
|
100,000 |
|
|
|
80,000 |
|
|
|
60,000 |
|
|
|
40,000 |
|
|
|
20,000 |
|
|
|
0 |
|
|
|
1992 |
1994 |
1996 |
2000 |
•Use ready-made clip art. You can purchase libraries of clip art from a variety of sources or browse the Internet for what’s available there. Look through computer magazines for the names of companies that sell clip art. They’ll be happy to send you full-color pictures of their extensive offerings. Or browse in the art sections of bookstores for books of copyright-free pictures.
How to get a picture on your computer
To put a picture in a computer document, you first need to convert it into an electronic form (a computer file). Then it’s simple to copy it into a document—the guide for the application you’re using tells you how. Here are some possibilities for getting your pictures into an electronic form:
• Draw the pictures, using the drawing tools in a software application.
Remember that it is against the law to copy any photograph unless you have been given specific permission to do so by the person or company who owns the original.
•Scan the pictures yourself. Use your own scanner or gather your pictures together and rent a scanner at a local copy shop.
15
Loading...