


Desk-Jet Printer
1
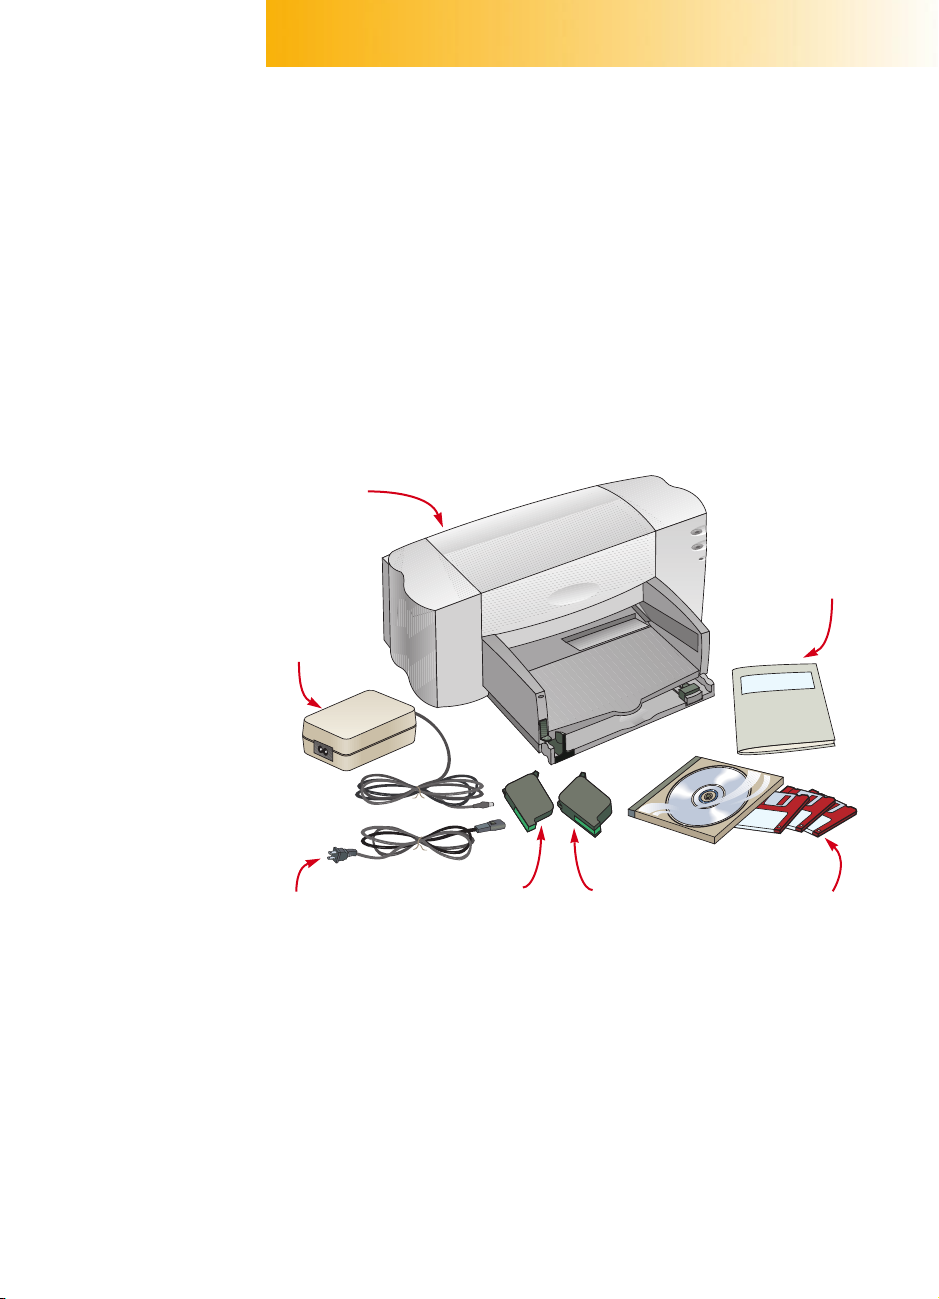
Congratulations on the purchase
of your HP DeskJet printer!
ere’s what comes in the box. If anything’s
missing, talk to your HP dealer or call
Customer Support (see “Customer Support” in Chapter 4
of the user’s guide for the telephone number).
Microsoft Windows or Windows NT 4.0 is required to use this printer. Please refer
to the minimum system requirements listed in Chapter 5 of the user’s guide.
If your computer does not have a CD-ROM drive and disks were not included with
your printer, see page 45 of the user’s guide for information on getting printer
software.
H
Black print
cartridge
Printer software
(CD and/or disks)
Color print
cartridge
Printer
Power
adapter
Booklet about
your printer
Power cord
You’ll need to buy
a printer cable that
supports bidirectional
communication
(IEEE-1284-compliant),
such as HP C2950A.
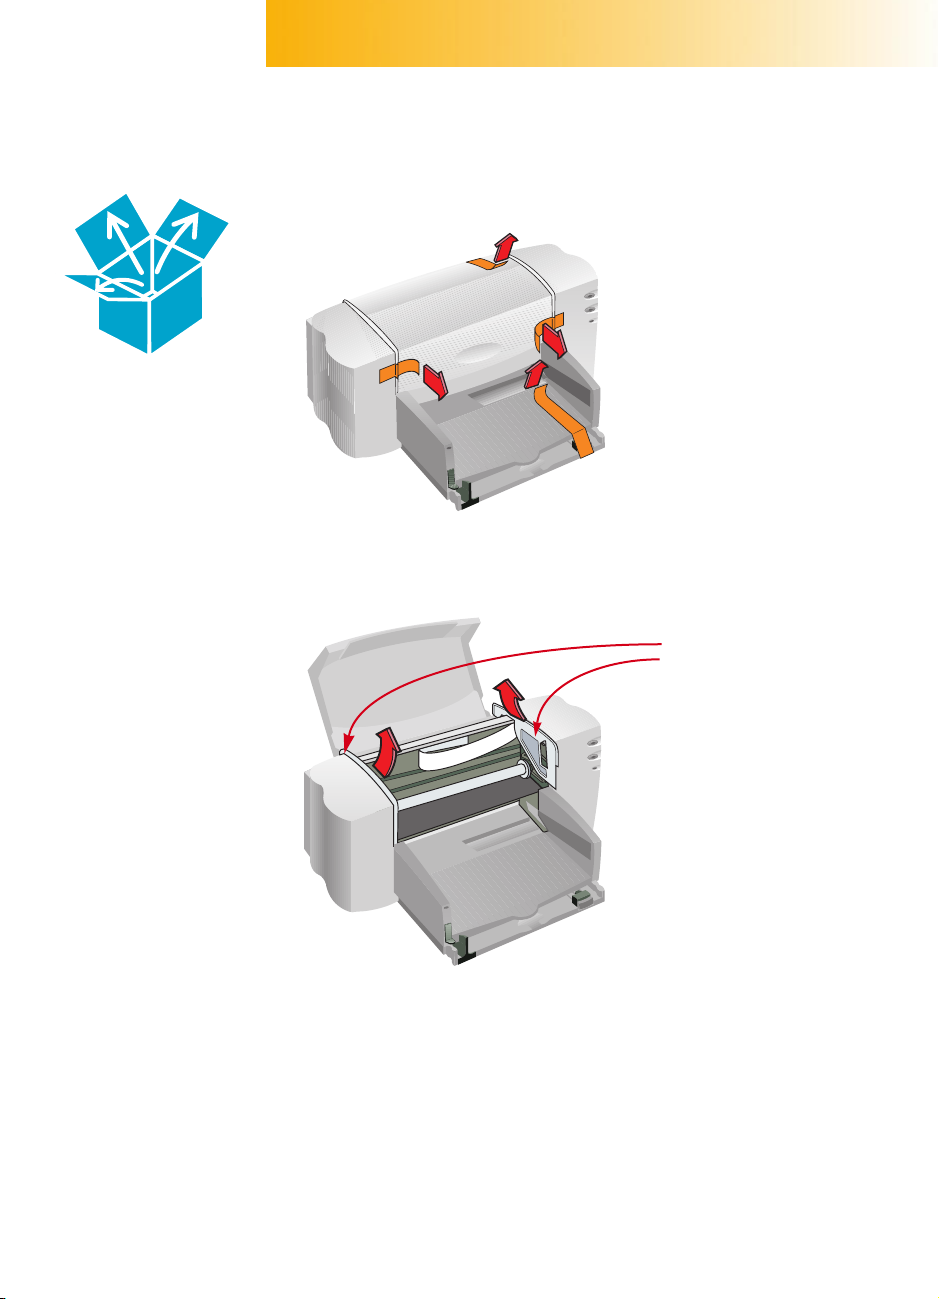
2
Unpack Your Printer
1
Remove the packing tape from the outside of the printer.
2
Open the top cover and remove the plastic packing material from the
inside of the printer.
3
Close the top cover.
Remove packing
material.
STEP
1
Now would be a good
time to take a second
and make note of the
serial number on the
bottom of your printer.
Write the serial number
in the blank provided
inside the front cover of
your user’s guide. This
way you can easily
access the serial number
when you need it.
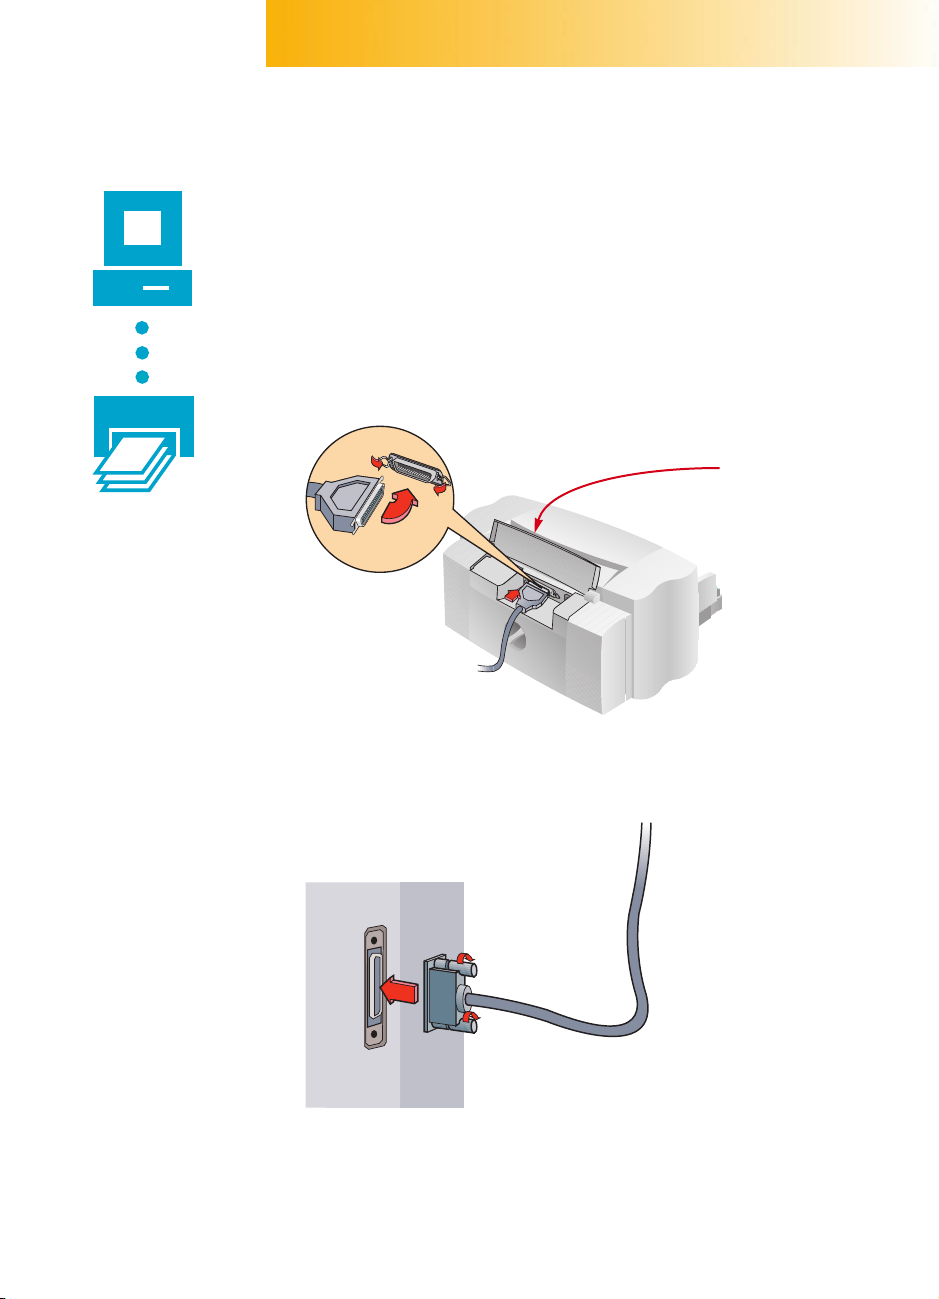
3
STEP
2
Connect Your Printer
to Your Computer
1
Make sure the computer is turned off.
2
Lift the cable access door on the back of the printer.
3
Plug the end of the cable with the notches into the printer. Snap both
clips into the notches.
4
Plug the other end of the cable into the computer, and tighten
the screws.
Cable access door
You’ll need to buy
a printer cable that
supports bidirectional
communication
(IEEE-1284-compliant),
such as HP C2950A.
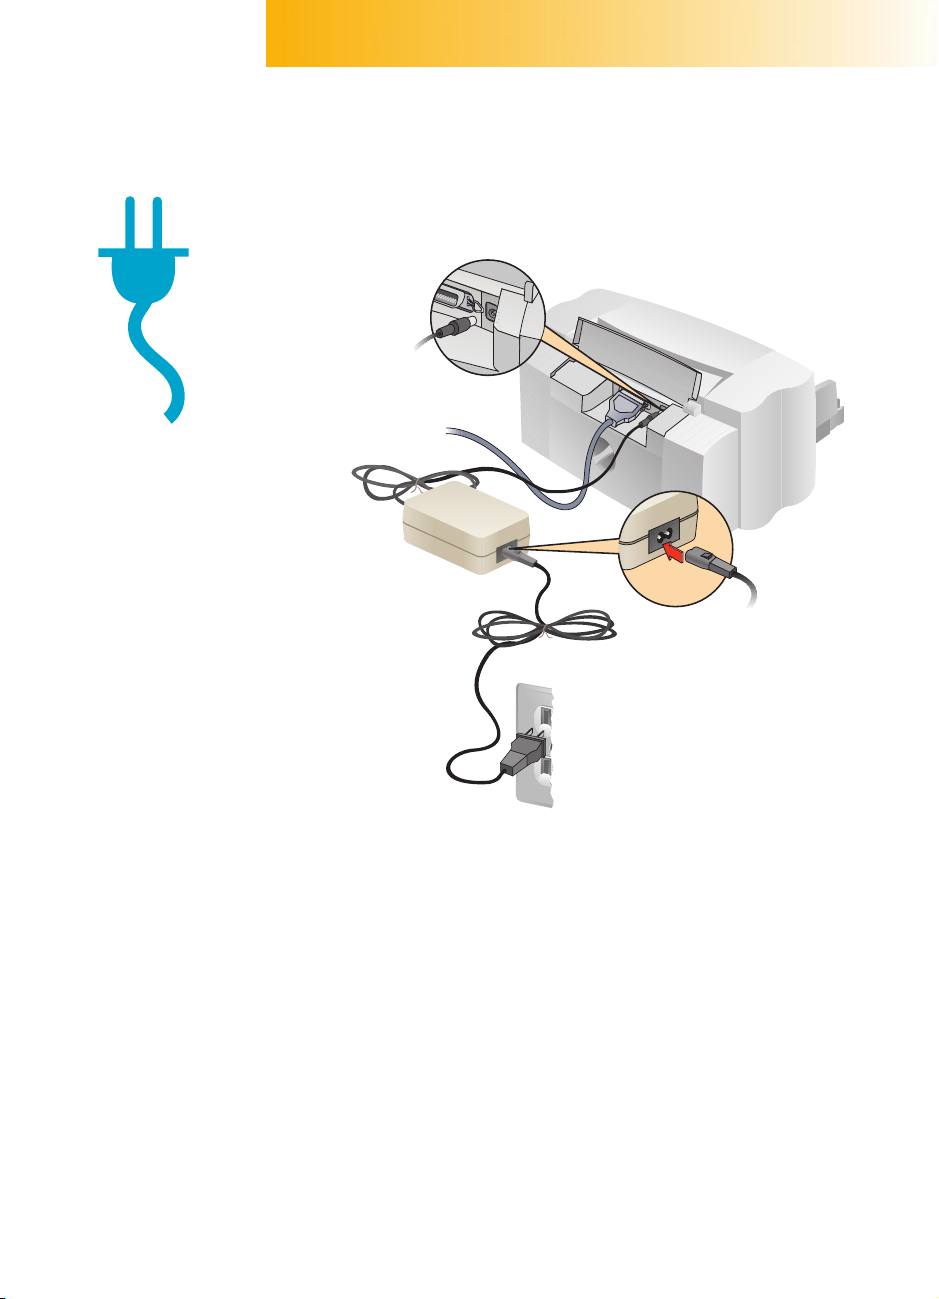
4
Plug in Your Printer
1
Lift the cable access door and plug the power adapter cord firmly into
the connector.
2
Plug the appropriate end of the power cord into the power adapter.
3
Plug the other end of the power cord into an electrical outlet.
Electrical outlet
1
2
3
Power adapter
Power adapter cord
Power cord
STEP
3
5
STEP
4
Insert the Print
Cartridges
1
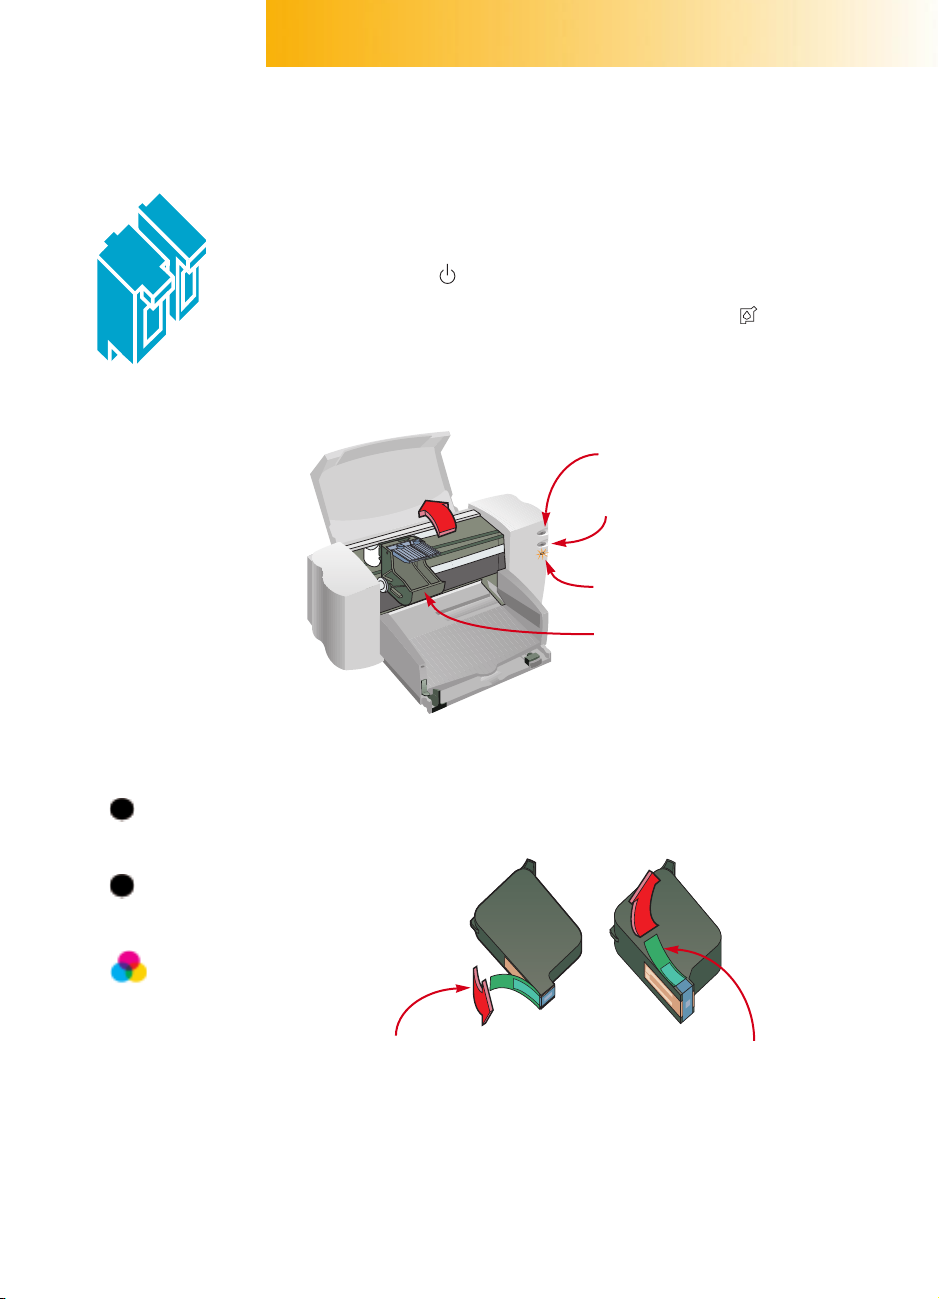
Press the Power button to turn on your printer.
The power light comes on and the print cartridge light blinks.
2
Open the top cover.
The cartridge cradles move to the center of the printer.
3
Carefully remove the protective vinyl tape from the color and black
print cartridges.
Be sure not to touch the ink nozzles or the electrical contacts.
Cartridge cradles
Print cartridge light (blinking)
Power button and light (on)
Resume button and light (off)
When buying print
cartridges check the
part numbers carefully
to make sure you buy
the right ones.
Black
HP 51645G
Large Black
HP 51645A
Tri-Color
HP C1823A
These print cartridges
have been specifically
designed to work with
your printer.
Remove tape Remove tape
Black print cartridge Color print cartridge
6
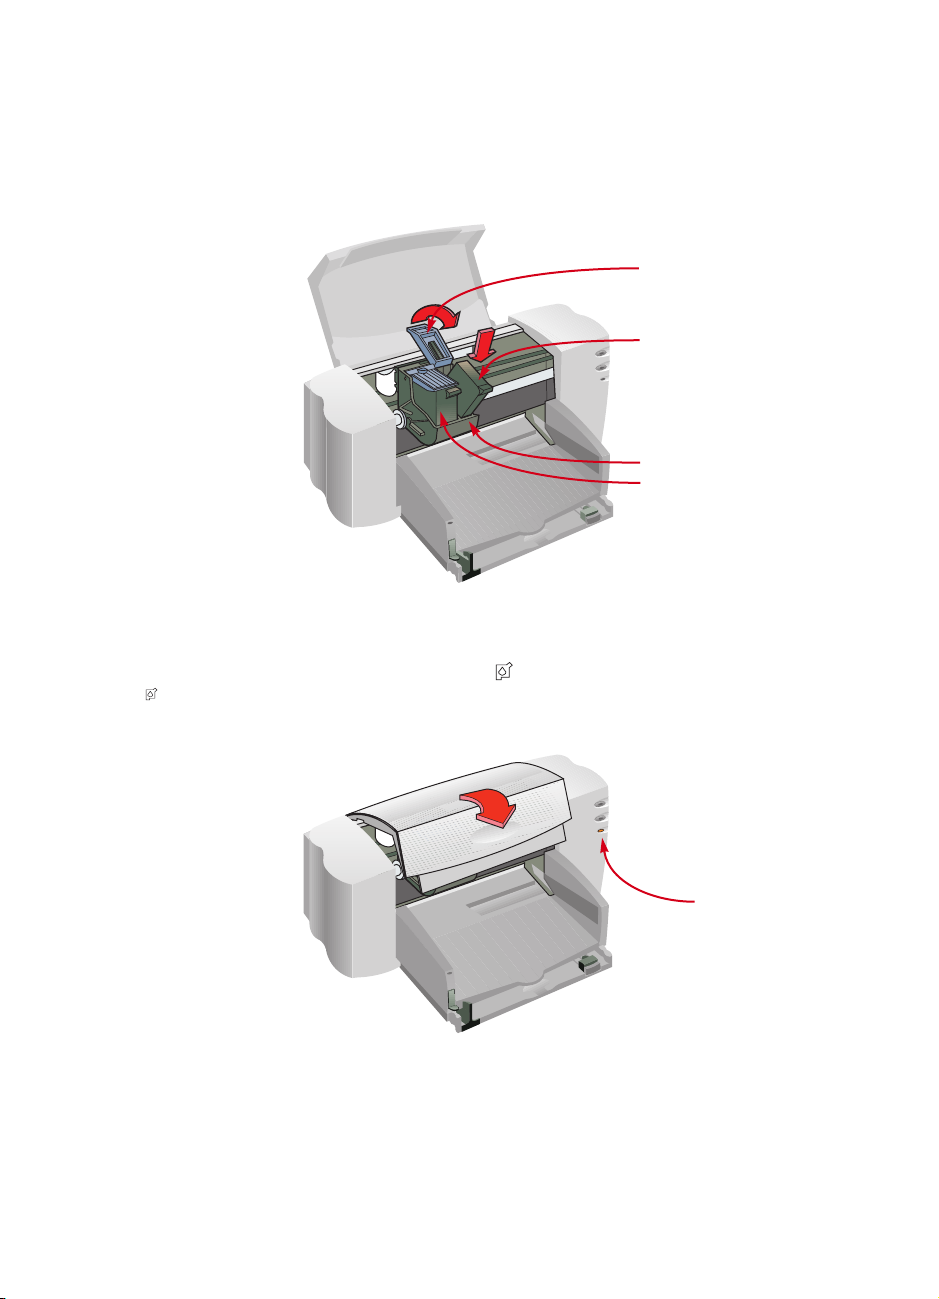
4
For each print cartridge, lift the green cradle latch. With the electrical
contacts toward the rear of the printer, push the cartridge firmly down
into the cradle. Close the latch.
You will hear a click, and the cartridges will sit firmly in the cradles. You
must insert both cartridges for the printer to operate.
5
Close the top cover.
The print cartridge light continues to blink for a few seconds and then
goes off. (You’ll hear the cartridges return to their home position on the
right side of the printer.)
Black print cartridge
Color print cartridge
Cradle latch
Cartridge cradles
If the print cartridge
light continues
to blink, take out
both cartridges
and reinsert them.
Print cartridge
light (blinking)

7
Load Paper in
Your Printer
1
Grab the sides of the IN drawer and pull the drawer out. Slide the
paper adjusters out as far as possible. (You can flip up the OUT tray to
see better.)
2
Load the paper in the IN drawer.
You can insert as much paper as fits comfortably under the tab on the
paper-length adjuster.
3
Move both paper adjusters in until they fit snugly against the paper’s
edges and slide the IN drawer all the way back in.
Flip the OUT tray back down if it’s up.
OUT tray
IN drawer
Paper-length adjuster
Paper-width
adjuster
Grab to pull IN
drawer out
Grab to pull IN
drawer out
IN drawer
Paper-length
adjuster tab
STEP
5

8
STEP
6
Install the Printer
Software
To ensure successful installation of the
printer software:
1
Make sure your computer is fully set up and operational.
2
Check that the printer is properly set up and ready to print using the
instructions in this setup guide.
3
Make sure that the printer is connected directly to the computer
(remove any switch boxes or other devices using the same port)
and check that all cable connections are firm.
4
Make sure the computer and the printer are turned on.
5
Close any virus protection programs or other software programs that
are running on your computer (see page 14 for instructions).
Follow the installation instructions for the operating system on your computer.
If your computer does
not have a CD-ROM
drive and disks were
not included with your
printer see page 45 of
the user’s guide for
information on getting
printer software.
9
Installing from the CD:
Windows 95, Windows 98, and Windows NT 4.0
6
Insert the CD into your CD-ROM drive.
After a few seconds, the HP DeskJet opening screen appears.
7
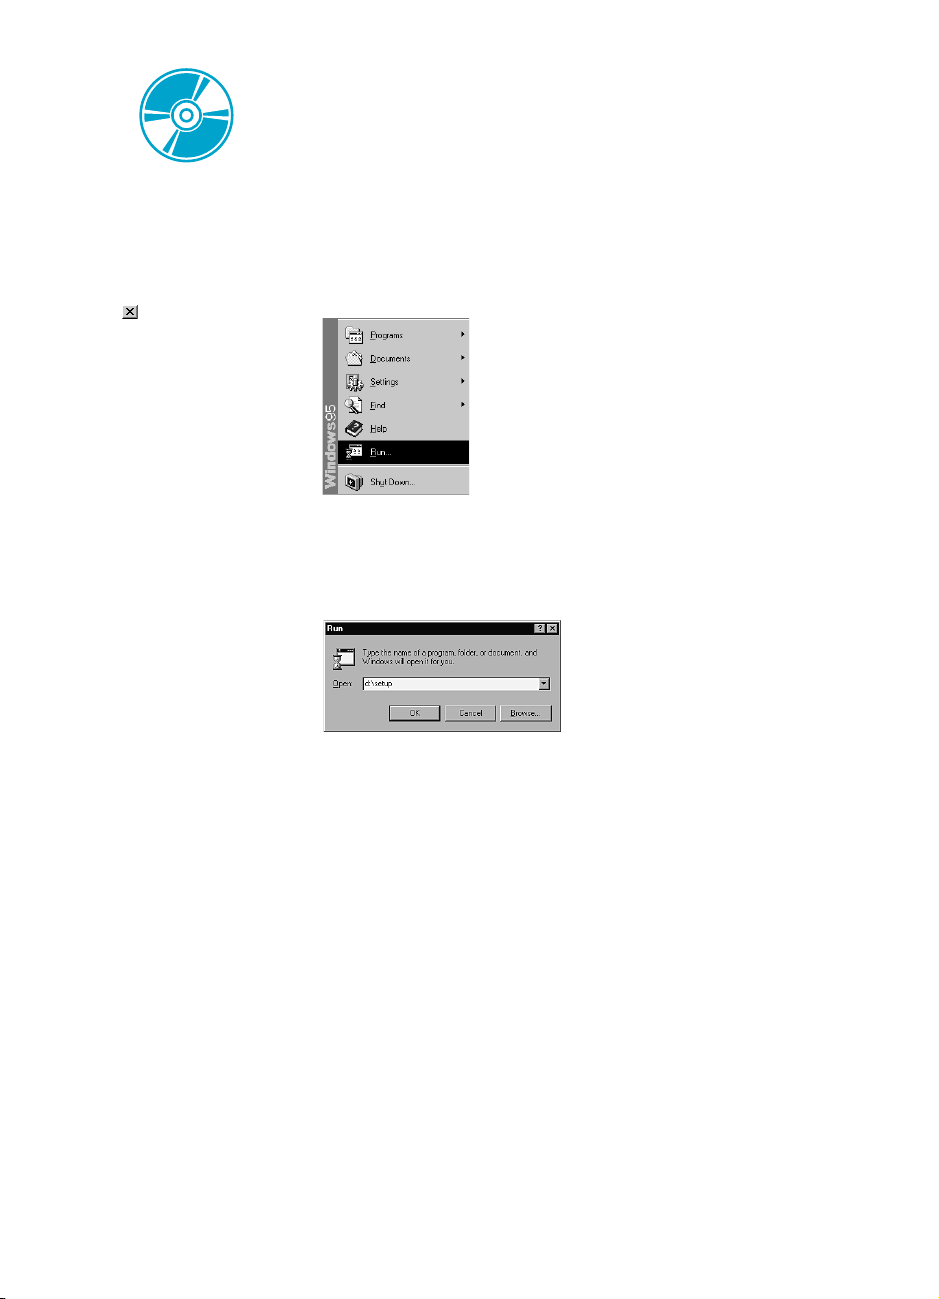
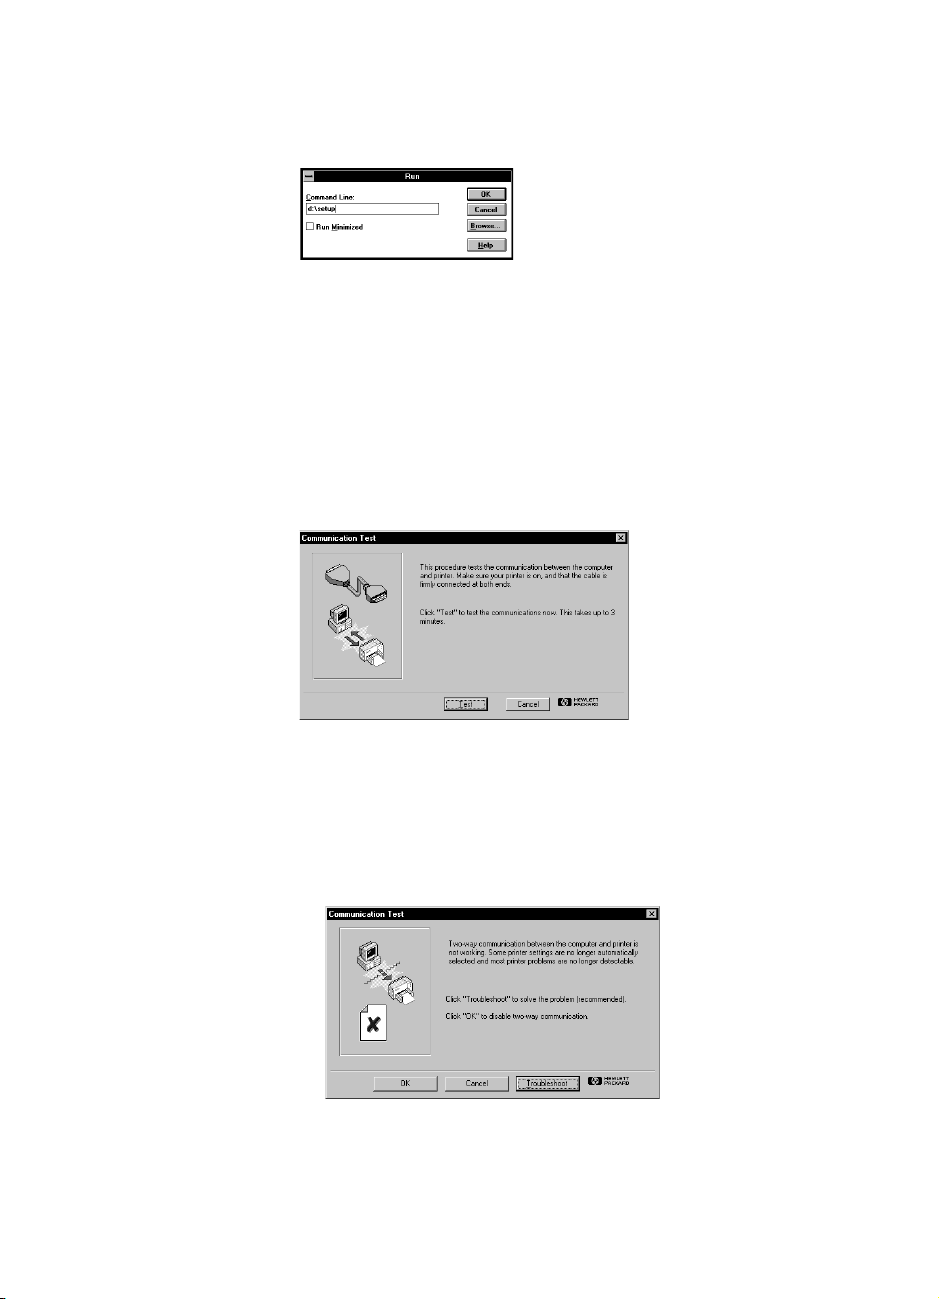
If the opening screen does not appear, do the following:
a. Click
Start
on the taskbar, and then click
Run
.
b. Type
d:\setup
and click
OK
.
If your CD-ROM drive is assigned to a letter other than “d”, type that
letter instead or browse to locate the CD-ROM drive.
8
When the opening screen appears, click
Install the HP DeskJet
710C Series Software
on your PC
and follow the instructions
on the screen.
If something goes wrong, see page 13.
9
When the installer instructs you to restart Windows, the installation
is almost complete. Remove the CD from your CD-ROM drive and
restart Windows.
If the “New Hardware
Found” dialog box
appears at any time
during the installation,
click in the upper-
right corner of the box.
or click Cancel.
Depending upon
the operating system
on your computer, your
boxes might differ from
the Windows 95 boxes
shown throughout
this document and
the user’s guide.
Windows NT 4.0 users:
You need to set the
HP DeskJet Printer as
the default printer. See
page 14 for instructions.
10
10
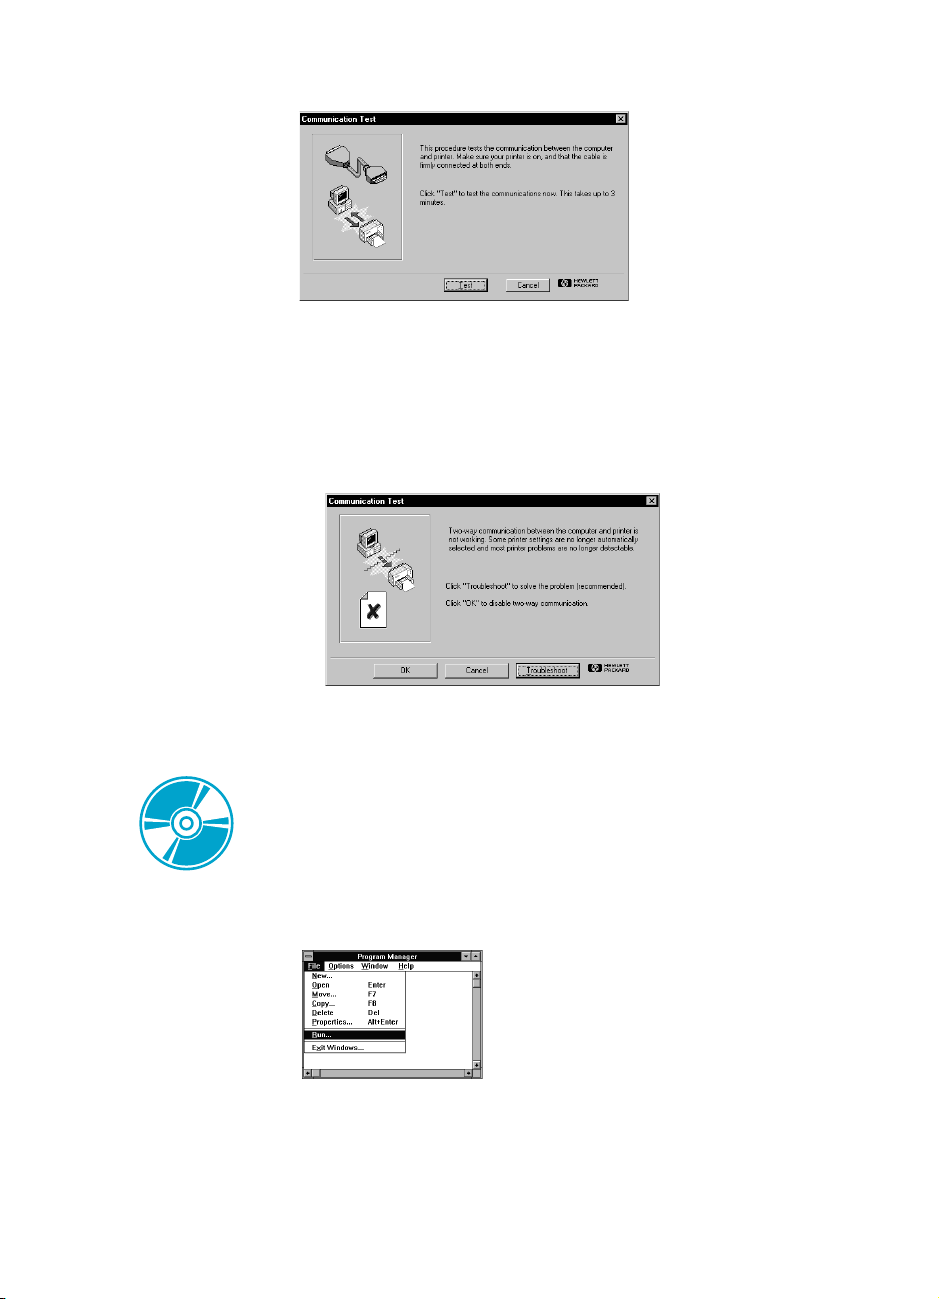
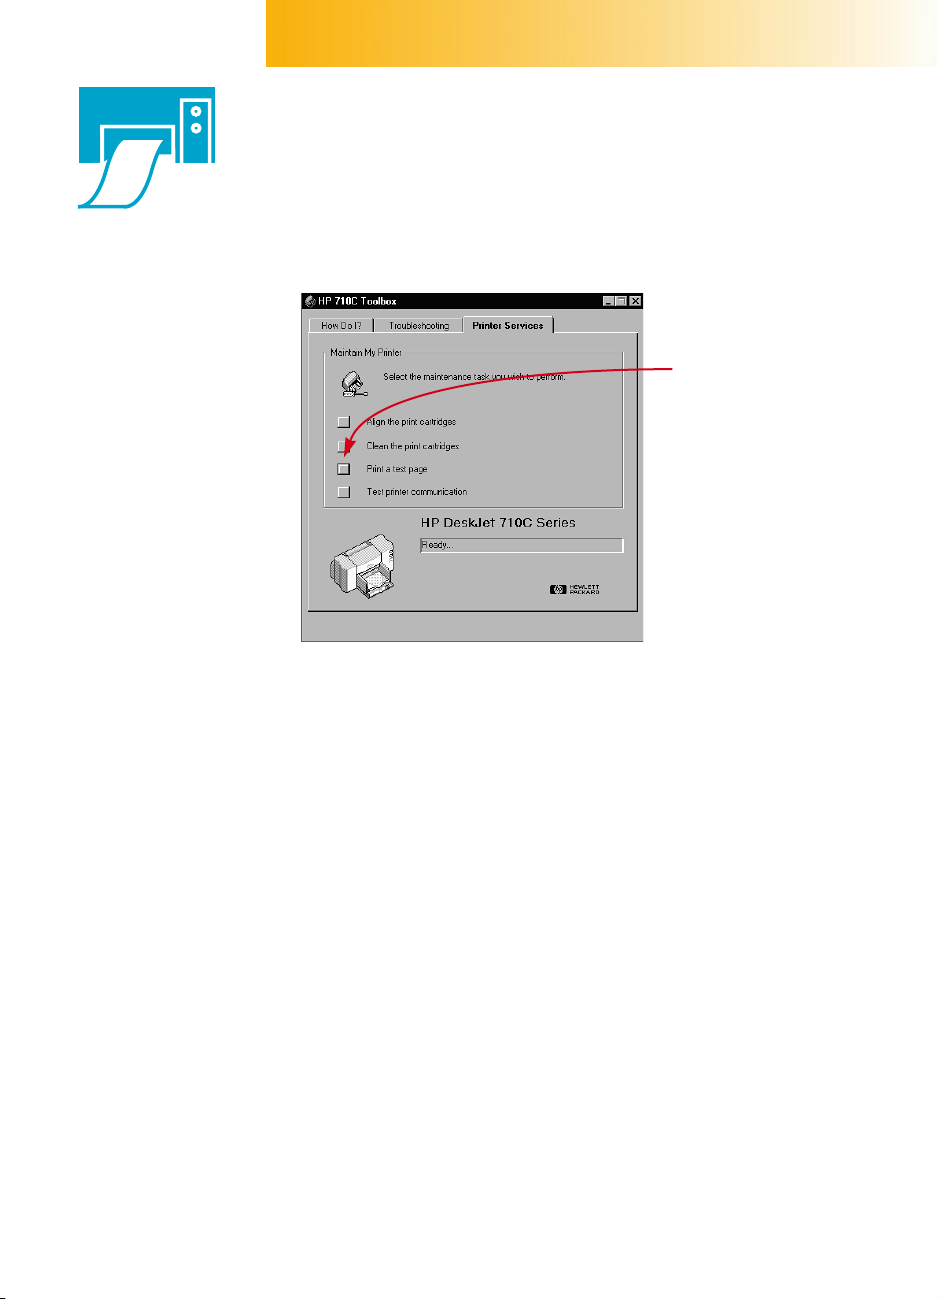
If a Communication Test dialog box appears, click
Test
.
11
Do one of the following:
•Ι
f the test is successful, skip the rest of this section and go to page 15.
•Ι
f the test is not successful, click
Troubleshoot
and try to correct
this problem. If you cannot correct this problem, click
OK
. For more
information about printer communications, see page 14.
Installing from the CD:
Windows 3.1
x
6
Insert the CD into your CD-ROM drive.
7
In the Program Manager, click
File
and then click
Run
.
11
8
Type d:\setup and click
OK
.
If your CD-ROM drive is assigned to a letter other than “d”, type that
letter instead or browse to locate the CD-ROM drive.
9
When the opening screen appears, click
Install the HP DeskJet 710C
Series Software on your PC
and follow the instructions on the screen.
If something goes wrong, see page 13.
10
When the installer instructs you to restart Windows, the installation
is almost complete. Remove the CD from your CD-ROM drive and
restart Windows.
11
If a Communication Test dialog box appears, click
Test
.
12
Do one of the following:
• If the test is successful, skip the rest of this section and go to page 15.
• If the test is not successful, click Troubleshoot and try to correct this
problem. If you cannot correct this problem, click OK. For more
information about printer communications, see page 14.

12
Installing from Disks:
Windows 95, Windows 98, or Windows 3.1x
6
Insert Disk 1 into the disk drive.
7 Windows 95 and Windows 98 users: click Start on the taskbar and then
click Run.
Windows 3.1x users: in the Program Manager, click File, and then
click Run.
8 Type a:\setup and click OK.
If your disk drive is assigned to a letter other than “a”, type that letter
instead or browse to locate the disk drive.
9 When the opening screen appears, click Install the HP DeskJet 710C
Series Software on your PC and follow the instructions on the screen.
If something goes wrong, see page 13.
10 When the installer instructs you to restart Windows, the installation is
almost complete. Remove the disk from your disk drive and restart
Windows.
11 If a Communication Test dialog box appears, click Test.
12 Do one of the following:
• If the test is successful, skip the rest of this section and go to page 15.
• If the test is not successful, click Troubleshoot and try to correct
this problem. If you cannot correct this problem, click OK. For more
information about printer communications, see page 14.

13
If you have problems installing
1
Make sure your printer is on and all connections are firm. Ensure
that no other peripherals (such as a scanner, switch box, tape backup,
etc.) are connected to the printer cable. Make sure your cable is
IEEE-1284-compliant.
2 Exit your software program and turn off the computer and the printer.
Turn on the printer and then turn on the computer.
3 Close any virus protection programs that are running on your
computer. Right-click the virus protection program icon in the taskbar
status area, and then click Disable.
4 Uninstall the printer software using the instructions on page 55 of the
user’s guide.
5 Try the installation process again.
6 If you get a message that two-way communication is not working,
click OK and continue with the rest of the installation. For more
information on the communication test, see page 14.
If you’re still having problems with the installation
Try the installation process again. If you still have problems, call an
authorized HP dealer or call your HP Customer Care service technician.
For the phone number nearest you, see page 45 in the user’s guide.

14
Additional information about installing your
printer software
Closing software programs
In Windows 3.1x:
1 While holding down ALT, press TAB to locate an open software
program.
2 When you locate an open software program, release both keys.
3 Click File, and then click Exit.
4 Repeat steps 1 through 3 for each open software program.
In Windows 95, Windows 98, and Windows NT 4.0:
1 Right-click the software program on the taskbar and click Close.
2 Repeat step 1 for each open software program.
Setting your printer as the default
To set your printer as the default in Windows NT 4.0:
1 Click Start on the taskbar, click Settings, and then click Printers.
2 Right-click the HP DeskJet 710C Series Printer icon and choose
Set As Default.
Communications test and two-way communications
The printer software tests the communication between your computer and
your printer and tells you if you have two-way communication. Two-way
communication allows your printer and computer to communicate and gives you
access to all the features of your HP DeskJet printer. The cable between your
printer and computer must be bidirectional to allow two-way communication–
the HP IEEE-1284-compliant Parallel Interface Cable (C2950A) is best. If you do
not have two-way communication, your printer cannot send messages to the
computer. However, you can still print.
If you are installing
printer software,
close all software
programs except the
HP DeskJet installer.
When all software
programs are
closed, only Program
Manager appears.

15
Align the Print
Cartridges
You’re ready for the final step in setting up your printer: aligning the cartridges to
make sure you get the best print quality. Be sure to align the cartridges whenever
you install a new cartridge.
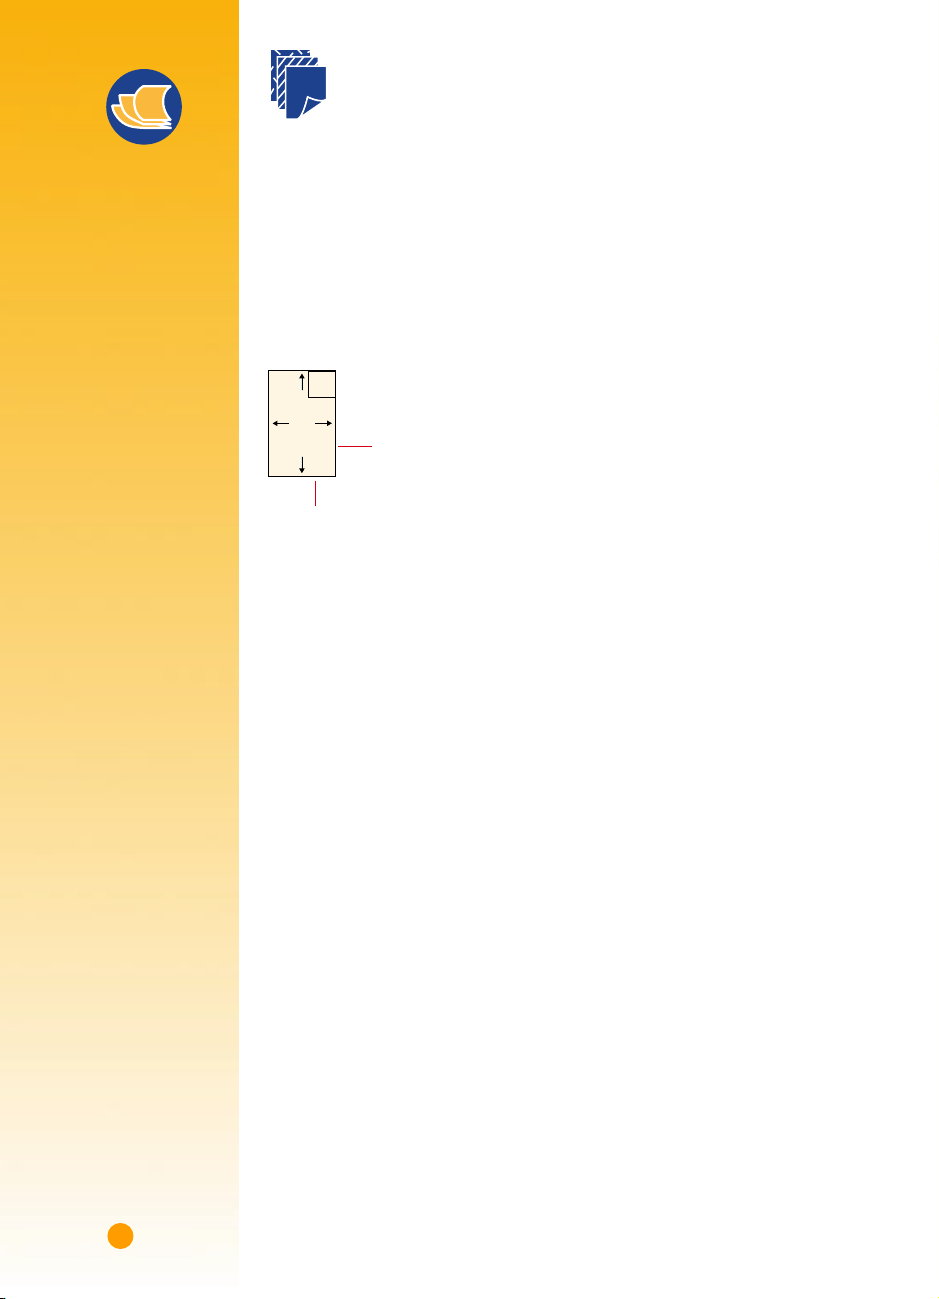
1 Be sure there’s paper in the printer’s IN drawer and that the drawer
and the paper adjusters are pushed in.
2 Double-click the HP Toolbox icon on the computer screen:
3 Click the Printer Services tab, then click Align the print cartridges.
Follow the instructions on the computer screen.
Windows 95, Windows 98, or NT 4.0
Windows 3.1x
Click here to
align the print
cartridges.
STEP
7
16
Print a Page
You’re done setting up your printer! While you still have the HP Toolbox open,
you can try printing a page, just to see what your printer can do.
1 On the Printer Services tab of the HP Toolbox, click Print a test page.
2 Check out the results!
You’re ready to print your own work. For instructions, tips, and some fun
suggestions, see the user’s guide.
Click here to
print a test page.

Support and Registration
For DeskJet support and printer registration, please refer to the HP Customer
Care Web site:
http://www.hp.com/go/support
HP is dedicated to giving you fast and accurate customer support. So that we
can give you the best service possible, please have the following information
available:
■ What is the serial number of your _________________________
printer? (The serial number label is on the
bottom of the printer.)
■ What model of printer do you have? _________________________
■ What brand and model is _________________________
your computer?
■ What version of printer software _________________________
are you using? (See your Printer Setup
dialog box for the name of the selected driver.)
HP DeskJet 710C

The HP DeskJet
Printer User’s Guide
English

Acknowledgments
Microsoft
®
and MS-DOS
®
are U.S. registered trademarks and Windows™ is a trademark
of Microsoft Corporation.
TrueType
™ is a U.S. trademark of Apple Computer, Inc.
Arial
®
and Times New Roman
®
are U.S. registered trademarks of The Monotype
Corporation.
Snowdrift
™ is a trademark of Agfa Division of Bayer Corporation.
Creepy
™ is a trademark of the Monotype Corporation which may be registered in
certain jurisdictions.
Kodak is a trademark of the Eastman Kodak Company.
Notice
The information contained in this document is subject to change without notice.
Hewlett-Packard makes no warranty of any kind with regard to this material, including,
but not limited to, the implied warranties of merchantability and fitness for a
particular purpose.
Hewlett-Packard shall not be liable for errors contained herein or for incidental or
consequential damages in connection with the furnishing, performance, or use of
this material.
No part of this document may be photocopied, reproduced, or translated to another
language without the prior written consent of Hewlett-Packard Company.
Printing History
Edition 1, March 1998
© Copyright 1998 by Hewlett-Packard Company


Table of Contents
CHAPTER 1 Printing Basics 1
How to Choose Paper 2
How to Put Paper in the Printer 3
How to Print 5
Printer Software 8
CHAPTER 2 Beyond the Basics 13
How to Print on Different Paper Sizes 14
How to Print on Both Sides of the Paper 16
How to Flip a Document 18
About Color 19
About pictures 21
About Text 23
CHAPTER 3 What You Can Print 25
Envelopes 26
Labels 29
Transparencies 31
Photographs 33
Cards 34
Banners 36
Iron-On Transfers 39
CHAPTER 4 Getting Help When Things Go Wrong 40
Click your way to a solution 40
Printer Communications 44
Buttons and Lights 44
HP Customer Care 45
CHAPTER 5 More About Your Printer 48
Print cartridges 49
Uninstalling the software 55
Printing from DOS 56
Specifications 57
Ordering supplies and accessories 60
Ordering information 62
Regulatory Notices 63
Limited Warranty Statement 64
INDEX 65

Printing Basics
lthough your printer can do some pretty fancy
stuff, most of the time you’ll be printing words
and pictures on paper. The process is simple: First choose
the paper you want to use; load the paper in your printer;
choose your print settings from the printer software;
and then print from the computer software program
you’re using.
If you want to know more about the printing basics, read
on. And don’t miss the tips on each page.
A
C HAPTER
1
How to
Choose Paper
How to Put
Paper in
the Printer
How to Print
1
2
3
Printer Software:
Your Printer’s
Remote Control
2
How to Choose Paper
Most plain photocopy paper works fine in your printer, particularly paper
that is marked for use in inkjet printers. To get the best results, use one of the
Hewlett-Packard papers, which were developed especially for HP inks and
your printer.
What to Consider
Size. You can use any size paper that fits easily within the paper adjusters of the
printer.
Weight. You can choose from a wide range of paper weights, as listed on page 57.
Use 20–24-pound or 75–90 g/m2 plain paper for multipurpose, everyday use.
Brightness. Some papers are whiter than others and produce sharper, more vibrant
colors. Use HP Deluxe Photo Paper or HP Premium Photo Paper for documents with
photographs; use HP Bright White Inkjet Paper or HP Premium Inkjet Paper for
documents with any other pictures.
Surface smoothness. The smoothness of the paper affects how crisp the printing
looks on the paper. Paper with a high cotton content (25% to 100%) tends to offer
greater surface smoothness. Glossy, coated paper works well for pictures and charts
(where you want crisp lines with intense, high-quality colors) and for photocopying.
Opacity. Opacity refers to the degree to which printing on one side of the paper
shows through to the other side. Use paper high in opacity (or thicker paper) for
two-sided printing. HP Photo Paper and HP Premium Heavyweight Inkjet Paper are
ideal for two-sided projects.
width = 3 to 8.5 inches (77 to 215 mm)
length = 3 to 14 inches (77 to 356 mm)
Paper Pointers
GET THE RIGHT PAPER
Use HP paper for vivid
color and the sharpest
text. Here are some of
your choices:
❚ HP Premium Inkjet
Paper. Its matte finish
captures brighter
colors and sharper
images for more
brilliant documents
and presentations.
❚ HP Deluxe Photo Paper.
It uses Kodak Image
Enhancements
technology to give
you excellent skintones
and true-to-life land-
scape colors.
❚ HP Bright White Inkjet
Paper. It produces high-
contrast colors and
sharp text. This bright
white inkjet paper gives
you the ability to print
on both sides without
show-through.
❚ HP Premium Photo
Paper. It produces
spectacular photos
that look and feel like
traditional photos.
HP papers are available at
most office supply or
computer supply stores
or by calling HP Direct
(see page 62).

3
How to Put Paper in the Printer
Take a second to load the paper correctly in the IN drawer. Make sure all the
paper in the drawer is the same size and type, and that the paper adjusters
rest snugly against the paper. The printer will do the rest.
Let’s walk through the process step by step:
Slide out the paper-width and paper-length adjusters to make room for the
paper.
If you want, you can slide out the IN drawer to insert the paper more easily. You
can flip up the OUT tray if you want to see better.
Fan the edges of the paper stack to separate the pages. Then tap the stack on a
flat surface to even it up.
You can insert up to 3/8 in or 10 mm (about 100 sheets) at a time.
Paper-width
adjuster
Paper-length
adjuster
OUT tray
Paper Pointers
PAPER THAT MIGHT
NOT WORK
❚ Highly textured stock
such as linen might not
print evenly; the ink
could bleed into these
papers.
❚ Extremely smooth,
shiny, or coated
papers not specifically
designed for inkjet
printers could jam
the printer and might
actually repel ink.
❚ Multi-part forms
(such as duplicate or
triplicate forms) could
wrinkle in the printer
or get stuck; the ink
is also more likely
to smear. In addition,
only the top page will
have print on it.
❚ Paper in poor
condition—with tears,
dust, wrinkles, or
curled or bent edges,
or that doesn’t lie
flat—could jam
the printer.

4
Put the paper in the IN drawer, print side down.
Push the paper in toward the back of the paper drawer until it stops.
Slide the paper adjusters in so they fit snugly against the edges of
the paper.
Make sure the paper still lies flat in the drawer and that the paper fits easily
under the tab of the paper-length adjuster. (See page 28 for more information if
you’re loading small-sized paper.)
Push the paper drawer back in and flip the OUT tray back down.
IN drawer
Paper Pointers
PRINTSIDE DOWN
Most paper prints better
on one side than on the
other. This is especially
true for coated or
specially treated paper.
The print side is usually
indicated on the paper
package.
PRINTING ZONE
Your printer can’t print
right to the edge of the
paper. Be sure to set the
margins so that the
document falls within
the printable area, or part
of it could be cut off. For
details, see page 57.
5
How to Print
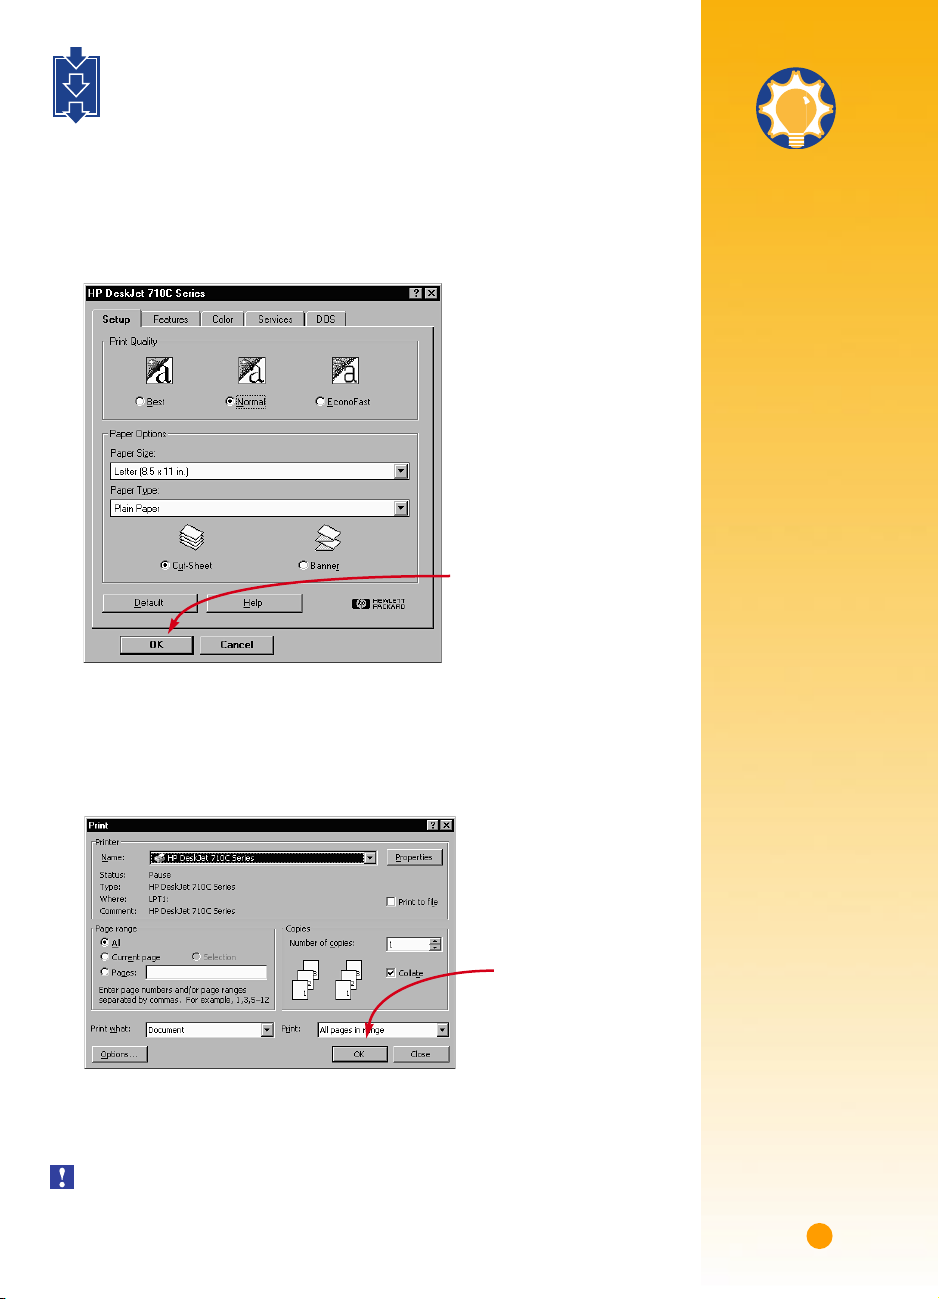
Check your print settings in the HP print settings box. (See page 9 to find out
how to get to the box.)
If you’re printing one copy, on plain paper with portrait orientation, the default
settings will work fine for you. (Chapters 2 and 3 explain why you might want to
change the settings for different types of printing.)
Click OK in the HP print settings box to save your settings.
Click OK in the Print box of your software program to start printing.
(You might need to click File and then Print to reach the Print box.)
That’s all there is to it. The printer will print one page at a time until it finishes,
delivering each printed page into the printer’s OUT tray.
Depending upon the operating system on your computer, your boxes might differ
from the Windows 95 boxes shown throughout the manuals.
1
2
3
HP print settings box
Click OK to save your settings.
Click OK to print.
The Print box in your
software program
Handy Hints
PRINTING FROM DOS
For information about
printing from DOS
programs, turn to
page 56.
PICK A PAPER TYPE
If you’re using HP paper
in your printer, in the HP
print settings box select
the right paper type for
your paper.
❚ Select Plain Paper for
• HP Bright White
Inkjet Paper
• HP Banner Paper
❚ Select HP Premium
Inkjet Paper for
• HP Premium
Inkjet Paper
• HP Greeting
Card Paper
• HP Iron-On
T-Shirt Transfers
• HP Premium Inkjet
Heavyweight Paper
❚ Select HP Deluxe
Photo Paper to
use Kodak Image
Enhancements
technology with
HP Deluxe Photo
Paper.
❚ Select HP Premium
Photo Paper for HP
Premium Photo Paper.
6
While You’re Printing
It takes a few moments for the printing to start, while the printer gets information
from the computer. Even after it’s started printing, the printer might pause
occasionally to receive more information.
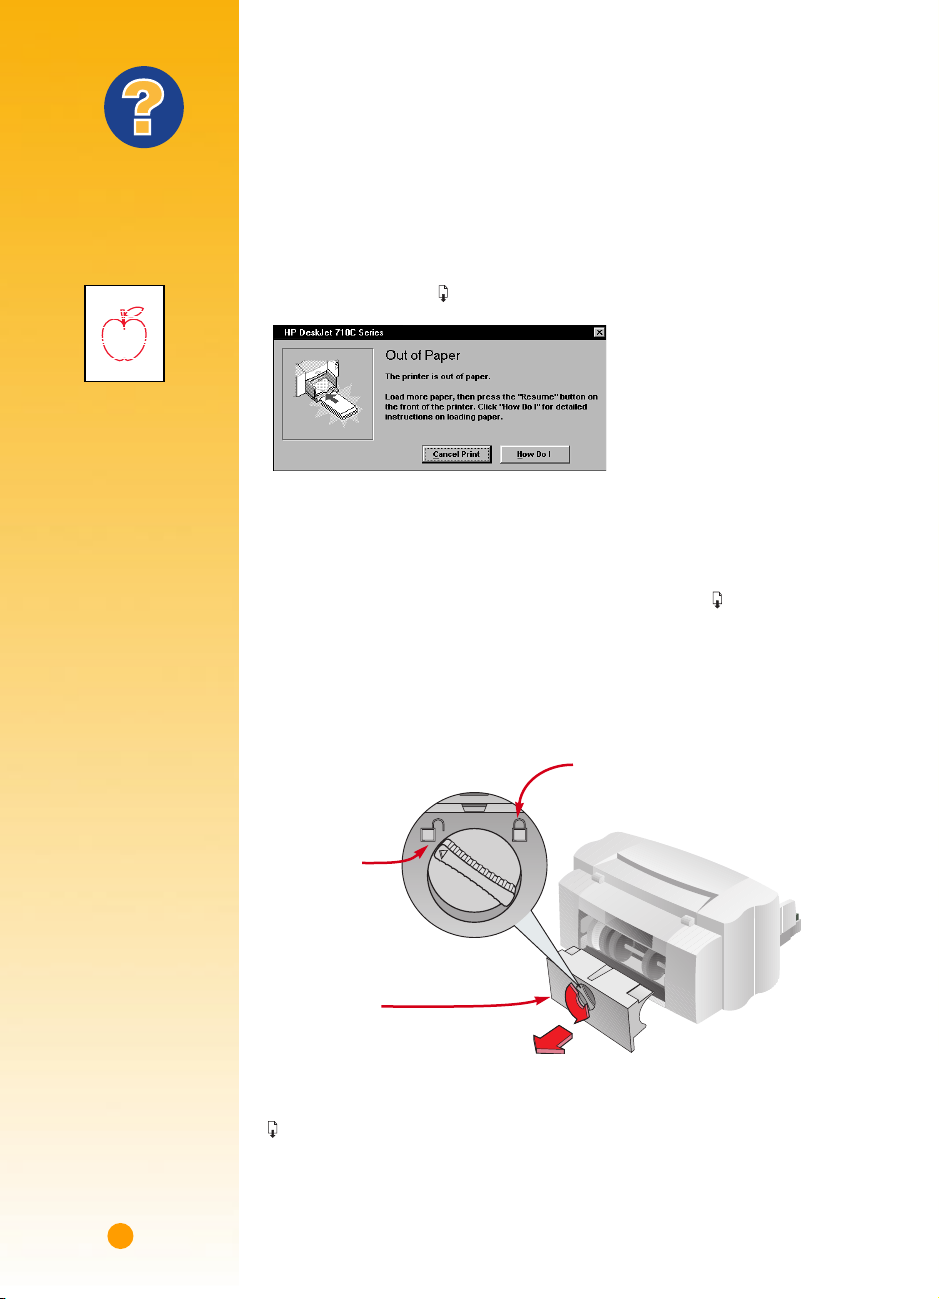
If you run out of paper before you’ve finished
The printer will prompt you to add more paper. Put the paper in the IN drawer, and
then press the Resume button on the front of the printer.
If the paper jams in the printer
If the paper jams in the printer, you’ll usually be able to pull the paper out from
either the IN drawer or the OUT tray. Then press the Resume button on the front
of the printer. The printer will turn off and then on again on its own. You’ll need to
resend your job to the printer.
Sometimes the paper jams in the back of the printer. If you can’t reach the jammed
paper, turn the knob on the rear access door at the back of the printer 1/4 turn
counter clockwise and remove the door.
Pull the jammed paper out of the printer and then replace the door, making sure to
lock the door by turning the knob clockwise to the locked position. Press the Resume
button on the front of the printer and resend your print job.
To lock
Remove rear
access door.
To unlock
What If
THE PRINTOUTS ARE
SPLOTCHY AND UNEVEN
If you are using a new
paper, this could be the
problem. See page 2 for
the best paper choices. If
not, check the print
cartridges—they might
be dirty or running out
of ink. To find out how to
clean or replace them,
open the HP Toolbox
(see page 11) and click
the Printer Services tab
for cleaning or the
How Do I? tab for
replacing cartridges.
YOU CAN’T FIND
THE JAMMED PAPER
If you can’t see the paper
causing the jams, check to
see if a label has come
unglued from a label
sheet while going
through the printer.
 Loading...