


Deskjet 1010

HP Deskjet 1010 series


Table of contents
1 HP Deskjet 1010 series Help ............................................................................................................................ 1
2 Get to know the HP Deskjet 1010 series .......................................................................................................... 3
Printer parts .......................................................................................................................................... 4
On button light ...................................................................................................................................... 5
Auto-Off ................................................................................................................................................ 6
3 Print ................................................................................................................................................................... 7
Print documents ................................................................................................................................... 8
Print photos ........................................................................................................................................ 10
Print envelopes ................................................................................................................................... 11
Print using maximum dpi .................................................................................................................... 12
Tips for print success ......................................................................................................................... 13
4 Paper basics ................................................................................................................................................... 15
Recommended papers for printing ..................................................................................................... 16
Load media ......................................................................................................................................... 18
5 Work with ink cartridges .................................................................................................................................. 23
Check estimated ink levels ................................................................................................................. 24
Order ink supplies .............................................................................................................................. 25
Choose right ink cartridges ................................................................................................................. 26
Replace ink cartridges ........................................................................................................................ 27
Use single-cartridge mode ................................................................................................................. 29
Cartridge warranty information ........................................................................................................... 30
Tips for working with ink cartridges .................................................................................................... 31
6 Connectivity .................................................................................................................................................... 33
Connect a new printer ........................................................................................................................ 34
USB connection .................................................................................................................................. 35
ENWW iii

7 Solve a problem .............................................................................................................................................. 37
Improve print quality ........................................................................................................................... 38
Clear paper jam .................................................................................................................................. 41
Unable to print .................................................................................................................................... 44
Clear print carriage ............................................................................................................................. 48
Identify a defective cartridge .............................................................................................................. 49
Prepare trays ...................................................................................................................................... 50
Printer failure ...................................................................................................................................... 51
Ink cartridge problem .......................................................................................................................... 52
Older generation cartridges ................................................................................................................ 54
HP support ......................................................................................................................................... 55
Appendix A Technical information ..................................................................................................................... 59
Hewlett-Packard Company notices .................................................................................................... 60
Specifications ..................................................................................................................................... 61
Environmental product stewardship program ..................................................................................... 64
Regulatory notices .............................................................................................................................. 68
Index ................................................................................................................................................................... 73
iv ENWW

1 HP Deskjet 1010 series Help
Learn how to use your HP Deskjet 1010 series
●
Printer parts on page 4
●
On button light on page 5
●
Load media on page 18
●
Replace ink cartridges on page 27
●
Clear paper jam on page 41
ENWW 1

2 Chapter 1 HP Deskjet 1010 series Help ENWW

2 Get to know the HP Deskjet 1010 series
●
Printer parts
●
On button light
●
Auto-Off
ENWW 3
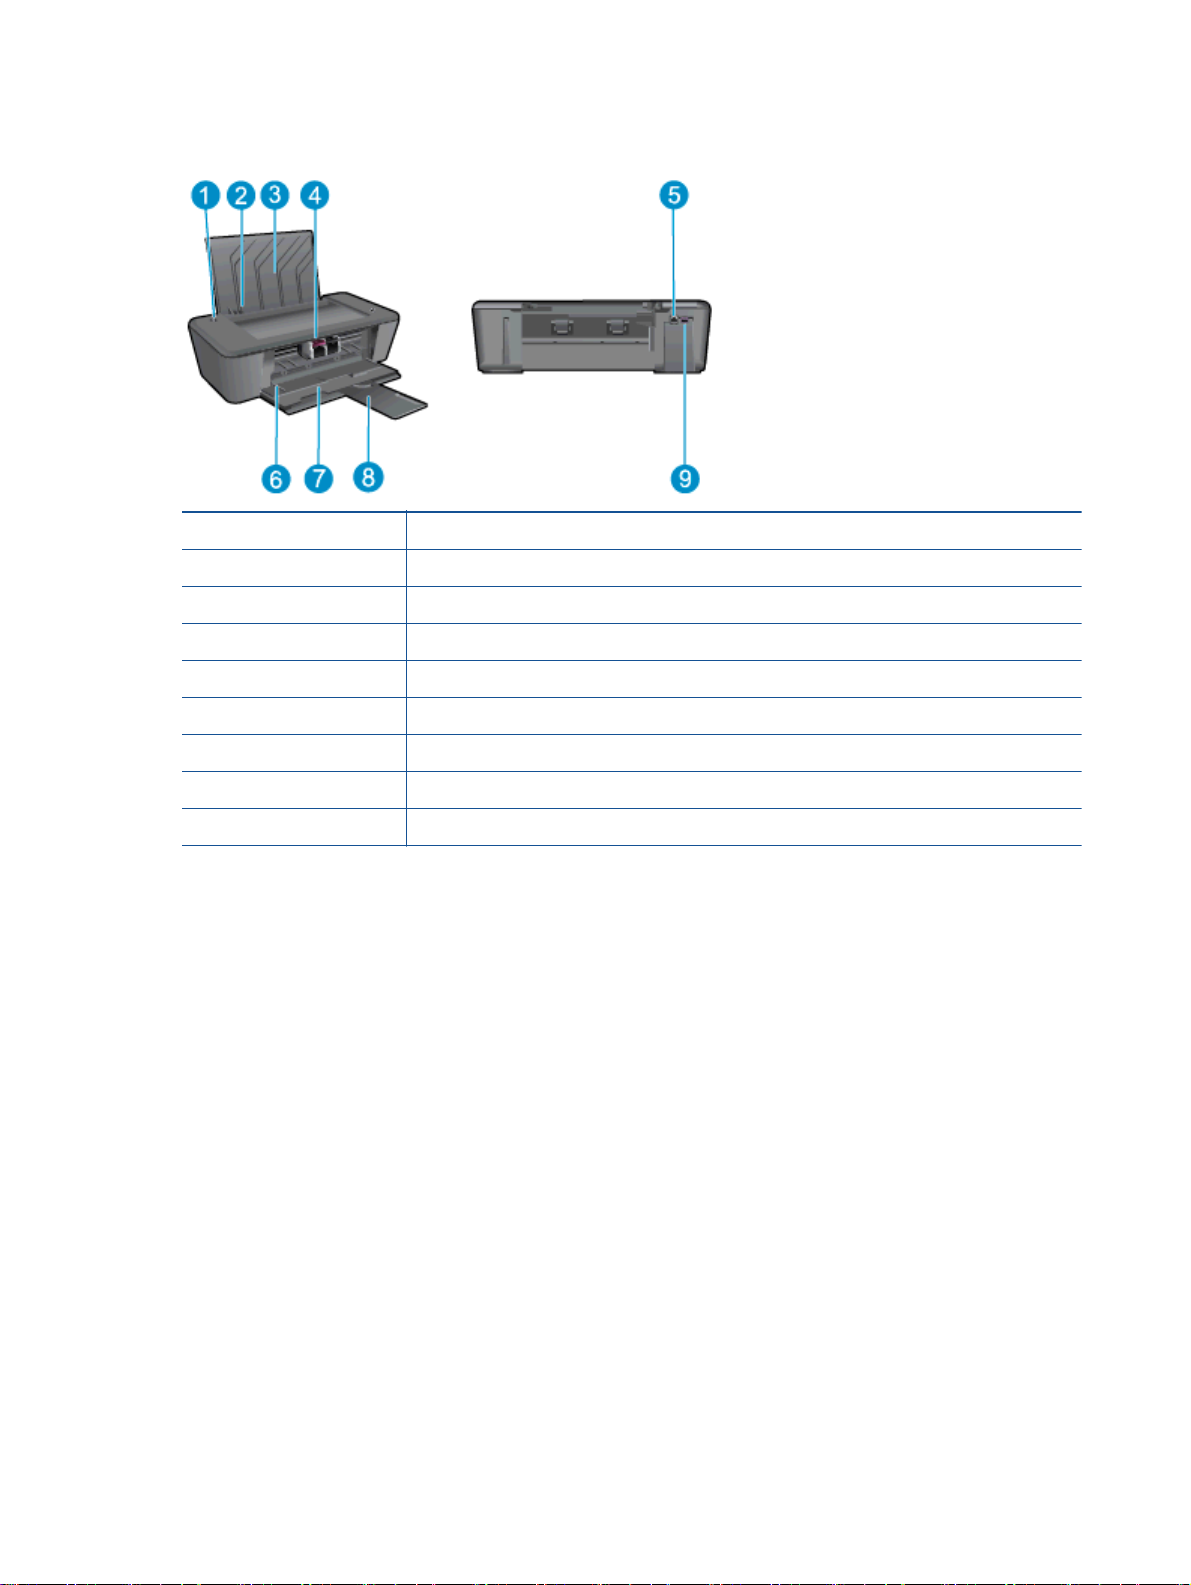
Printer parts
1 On button
2 Paper-width guide for the input tray
3 Input tray
4 Ink cartridges
5 USB port
6 Cartridge access door
7 Output tray
8 Output tray extender (also referred to as the tray extender)
9 Power connection
4 Chapter 2 Get to know the HP Deskjet 1010 series ENWW

On button light
Figure 2-1 On button light
Light behavior Description
Off The printer is powered off.
Dim Indicates the printer is in Sleep mode. The printer automatically enters Sleep mode after 5
minutes of inactivity.
Fast blinking The printer is in an error state that you can resolve by following the on-screen messages
from the computer. If you do not see any on-screen messages, try printing a document to
generate an on-screen message.
Blinking The printer is processing a job. To cancel the job, press the On button.
On The printer is on and ready to print.
NOTE: If you cleared a paper jam, the carriage was stalled, or the printer was out of paper, you
need to press the On button once to resume printing. If you press the On button twice within two
seconds, the printer turns off.
ENWW On button light 5

Auto-Off
Auto-Off is automatically enabled by default when you turn on the printer. When Auto-Off is enabled,
the printer will automatically turn off after 2 hours of inactivity to help reduce energy use. Auto-Off
turns the printer off completely, so you must use the On button to turn the printer back on. For printer
models with wireless or Ethernet network capability, Auto-Off is automatically disabled when the
printer establishes a wireless or Ethernet network connection. Even when Auto-Off is disabled, the
printer enters Sleep mode after 5 minutes of inactivity to help reduce energy use.
To change the Auto-Off setting from the printer software
1. Depending on your operating system, do one of the following to open the printer software:
●
Windows 8: On the Start screen, right-click an empty area on the screen, click All Apps on
the app bar, and then click the icon with the printer's name.
●
Windows 7, Windows Vista, and Windows XP: From the computer desktop, click Start,
select All Programs, click HP, click HP Deskjet 1010 series, and then click HP Deskjet 1010
series.
2. In the printer software, select Print, and then click Maintain Your Printer to access the printer
toolbox.
3. The printer toolbox appears.
4. Click Advanced Settings, and then follow the on-screen instructions.
Once you change the setting, the printer maintains the setting that you choose.
6 Chapter 2 Get to know the HP Deskjet 1010 series ENWW

3Print
This section contains the following topics:
●
Print documents
●
Print photos
●
Print envelopes
●
Print using maximum dpi
●
Tips for print success
ENWW 7

Print documents
Load paper
1. Make sure the output tray is open.
2. Make sure you have paper loaded in the input tray.
To print a document
1. From your software, click the Print button.
2. Make sure your printer is selected.
3. Click the button that opens the Properties dialog box.
Depending on your software application, this button might be called Properties, Options, Printer
Setup, Printer Properties, Printer, or Preferences.
4. Select the appropriate options.
●
On the Layout tab, select Portrait or Landscape orientation.
●
On the Paper/Quality tab, select the appropriate paper type and print quality from the Media
drop-down list.
●
Click Advanced to select the appropriate paper size from the Paper Size drop-down list.
5. Click OK to close the Properties dialog box.
6. Click Print or OK to begin printing.
To print on both sides of the page
1. From your software, click the Print button.
2. Make sure your printer is selected.
3. Click the button that opens the Properties dialog box.
Depending on your software application, this button might be called Properties, Options, Printer
Setup, Printer Properties, Printer, or Preferences.
8 Chapter 3 Print ENWW

4. Select the appropriate options.
●
On the Layout tab, select Portrait or Landscape orientation.
●
On the Paper/Quality tab, select the appropriate paper type and print quality from the Media
drop-down list.
●
Click Advanced to select the appropriate paper size from the Paper Size drop-down list.
5. On the Layout tab, select an appropriate option from the Print on Both Sides Manually drop-
down list.
6. Click OK to print.
7. After the even numbered pages of the document have been printed, remove the document from
the output tray.
8. Follow the on-screen instructions, reload the paper in the input tray with the blank side up and
top of page down, and then click Continue.
ENWW Print documents 9
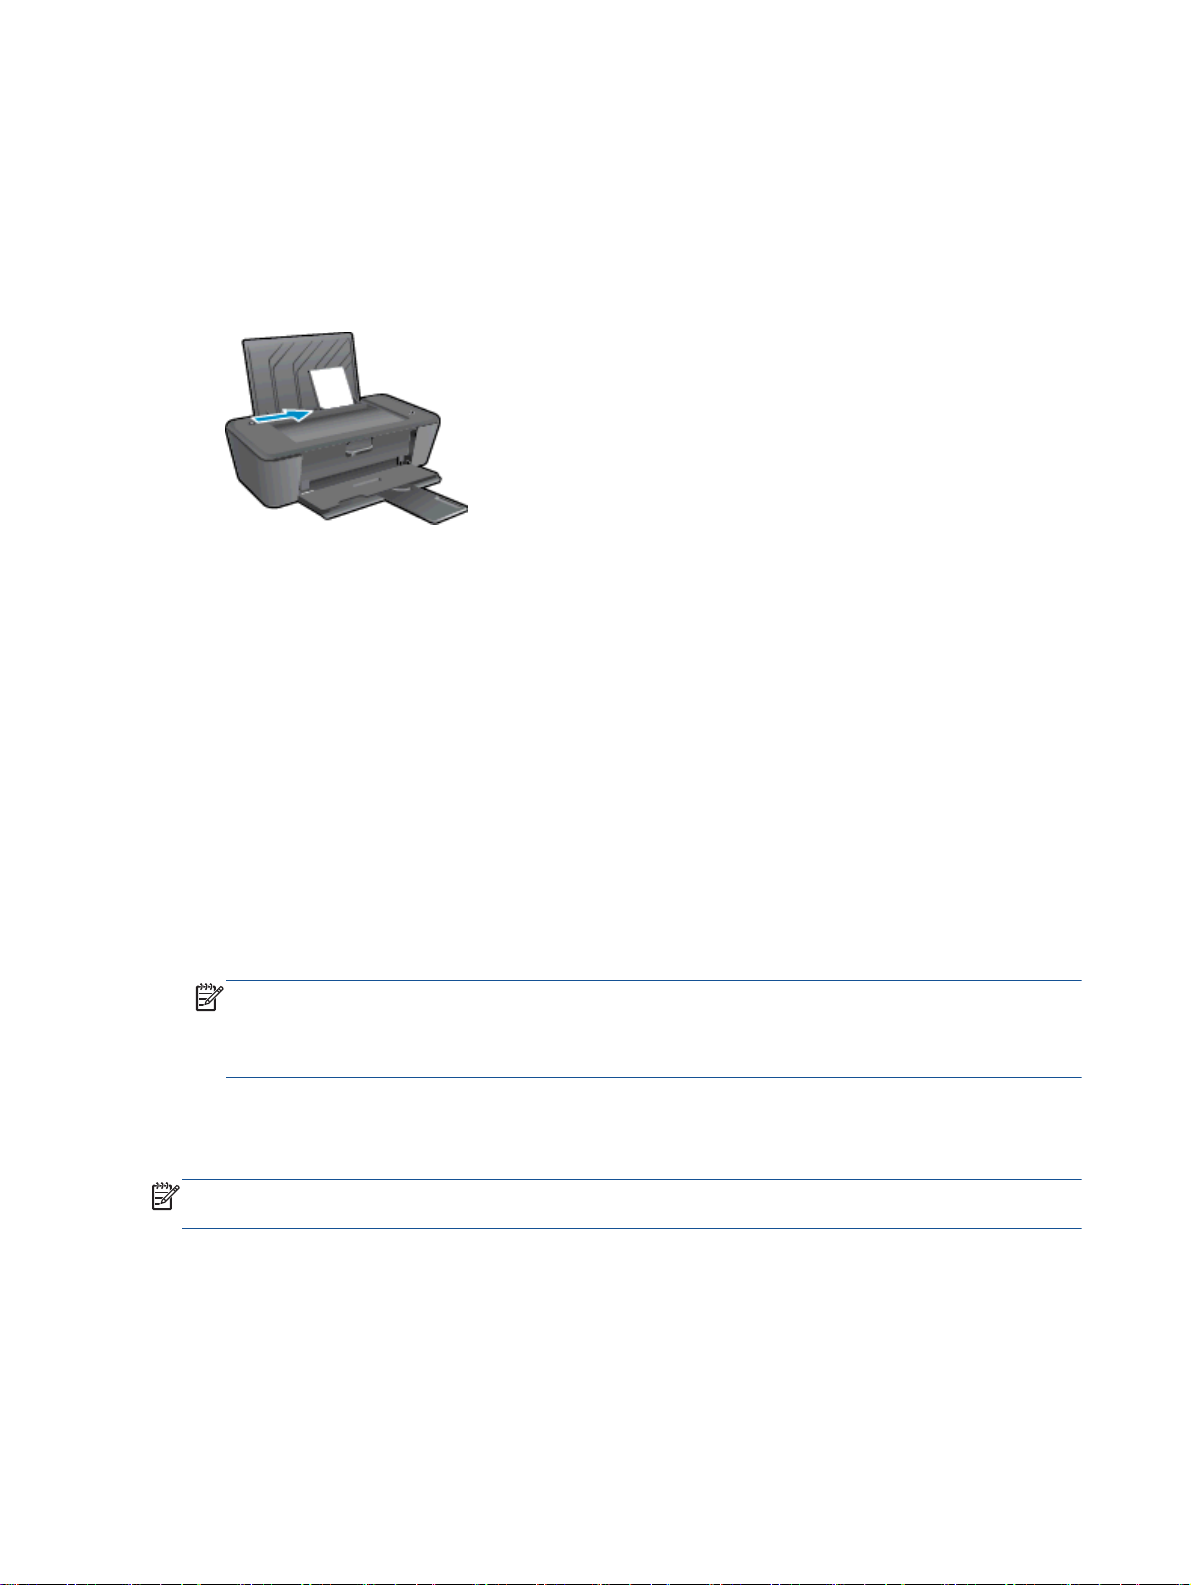
Print photos
Load photo paper
1. Make sure the output tray is open.
2. Remove all paper from the paper input tray, and then load the photo paper with side to be
printed on facing up.
To print a photo on photo paper
1. On the File menu in your software, click Print.
2. Make sure your printer is selected.
3. Click the button that opens the Properties dialog box.
Depending on your software application, this button might be called Properties, Options, Printer
Setup, Printer Properties, Printer, or Preferences.
4. Select the appropriate options.
●
On the Layout tab, select Portrait or Landscape orientation.
●
On the Paper/Quality tab, select the appropriate paper type and print quality from the Media
drop-down list.
●
Click Advanced to select the appropriate paper size from the Paper Size drop-down list.
NOTE: For maximum dpi resolution, go to the Paper/Quality tab and select Photo Paper, Best
Quality from the Media drop-down list. Then go to the Advanced tab and select Yes from the
Print in Max DPI drop-down list. If you want to print Max DPI in grayscale, select High Quality
Grayscale from the Print in Grayscale drop-down list.
5. Click OK to return to the Properties dialog box.
6. Click OK, and then click Print or OK in the Print dialog box.
NOTE: After the printing is finished, remove unused photo paper from the input tray. Store the photo
paper so it does not start to curl, which could reduce the quality of your printout.
10 Chapter 3 Print ENWW

Print envelopes
You can load one or more envelopes into the input tray of the HP Deskjet 1010 series. Do not use
shiny or embossed envelopes or envelopes that have clasps or windows.
NOTE: For details on how to format text on envelopes, see the help files in your word processing
software.
Load envelopes
1. Make sure the output tray is open.
2. Slide the paper-width guide all the way to the left.
3. Place the envelopes in the right side of the input tray. The side to be printed on should face up.
4. Push the envelopes into the printer until they stop.
5. Slide the paper-width guide firmly against the edge of the envelopes.
To print an envelope
1. On the File menu in your software, click Print.
2. Make sure your printer is selected.
3. Click the button that opens the Properties dialog box.
Depending on your software application, this button might be called Properties, Options, Printer
Setup, Printer Properties, Printer, or Preferences.
4. Select the appropriate options.
●
On the Layout tab, select Portrait or Landscape orientation.
●
On the Paper/Quality tab, select the appropriate paper type and print quality from the Media
drop-down list.
●
Click Advanced to select the appropriate paper size from the Paper Size drop-down list.
5. Click OK, and then click Print or OK in the Print dialog box.
ENWW Print envelopes 11

Print using maximum dpi
Use maximum dots per inch (dpi) to print high-quality, sharp images on photo paper.
Printing in maximum dpi takes longer than printing with other settings and requires a large amount of
memory.
To print in Maximum dpi mode
1. On the File menu in your software, click Print.
2. Make sure your printer is selected.
3. Click the button that opens the Properties dialog box.
Depending on your software application, this button might be called Properties, Options, Printer
Setup, Printer Properties, Printer, or Preferences.
4. Click the Paper/Quality tab.
5. From the Media drop-down list, must select Photo Paper, Best Quality to enable printing in
maximum dpi.
6. Click the Advanced button.
7. In the Printer Features area, select Yes from the Print in Max DPI drop-down list.
8. Select the appropriate paper size from the Paper Size drop-down list.
9. Click OK to close the advanced options.
10. Confirm Orientation on the Layout tab, and then click OK to print.
12 Chapter 3 Print ENWW

Tips for print success
To print successfully, the HP ink cartridges should be functioning properly with sufficient ink, the
paper should be loaded correctly, and the product should have the appropriate settings.
Ink tips
●
Use original HP ink cartridges.
●
Install both the black and tri-color cartridges correctly.
For more information, see
Replace ink cartridges on page 27.
●
Check the estimated ink levels in the ink cartridges to make sure there is sufficient ink.
For more information, see
Check estimated ink levels on page 24.
●
If the print quality is not acceptable, see Improve print quality on page 38 for more information.
Paper loading tips
●
Load a stack of paper (not just one page). All of the paper in the stack should be the same size
and type to avoid a paper jam.
●
Load paper with side to be printed on facing up.
●
Ensure that paper loaded in the input tray lays flat and the edges are not bent or torn.
●
Adjust the paper-width guide in the input tray to fit snugly against all paper. Make sure the
paper-width guide does not bend the paper in the input tray.
For more information, see
Load media on page 18.
Printer settings tips
●
On the Paper/Quality tab, select the appropriate paper type and print quality from the Media
drop-down list.
●
Select the appropriate paper size from the Paper Size drop-down list in the Advanced Options
dialog box. Access the Advanced Options dialog box by clicking the Advanced button on the
Layout or Paper/Quality tab.
●
To change default print settings, click Print and then click Set Preferences in the printer
software.
Depending on your operating system, do one of the following to open the printer software:
◦
Windows 8: On the Start screen, right-click an empty area on the screen, click All Apps on
the app bar, and then click the icon with the printer's name.
◦
Windows 7, Windows Vista, and Windows XP: From the computer desktop, click Start,
select All Programs, click HP, click HP Deskjet 1010 series, and then click HP Deskjet 1010
series.
●
If you want to print a black and white document using black ink only, click the Advanced button.
From the Print in Grayscale drop-down menu, select Black Ink Only, then click the OK button.
ENWW Tips for print success 13

Notes
●
Original HP ink cartridges are designed and tested with HP printers and papers to help you
easily produce great results, time after time.
NOTE: HP cannot guarantee the quality or reliability of non-HP supplies. Product service or
repairs required as a result of using a non-HP supply will not be covered under warranty.
If you believe you purchased original HP ink cartridges, go to:
www.hp.com/go/anticounterfeit
●
Ink level warnings and indicators provide estimates for planning purposes only.
NOTE: When you receive a low-ink warning message, consider having a replacement ink
cartridge available to avoid possible printing delays. You do not need to replace the ink
cartridges until print quality becomes unacceptable.
●
You can print your document on both sides of the paper.
14 Chapter 3 Print ENWW

4 Paper basics
You can load many different types and sizes of paper in the HP Printer, including letter or A4 paper,
photo paper, and envelopes.
This section contains the following topics:
●
Recommended papers for printing
●
Load media
ENWW 15

Recommended papers for printing
If you want the best print quality, HP recommends using HP papers that are specifically designed for
the type of project you are printing.
Depending on your country/region, some of these papers might not be available.
ColorLok
●
HP recommends plain papers with the ColorLok logo for printing and copying of everyday
documents. All papers with the ColorLok logo are independently tested to meet high standards
of reliability and print quality, and produce documents with crisp, vivid color, bolder blacks, and
dry faster than ordinary plain papers. Look for papers with the ColorLok logo in a variety of
weights and sizes from major paper manufacturers.
Photo printing
●
HP Premium Plus Photo Paper
HP Premium Plus Photo Paper is HP’s highest-quality photo paper for your best photos. With
HP Premium Plus Photo Paper, you can print beautiful photos that are instant-dry so you can
share them right off the printer. It is available in several sizes, including A4, 8.5 x 11 inch, 4 x 6
inch (10 x 15 cm), 5 x 7 inch (13 x 18 cm), and 11 x 17 inch (A3), and in two finishes - glossy or
soft gloss (semi-gloss). Ideal for framing, displaying, or gifting your best photos and special
photo projects. HP Premium Plus Photo Paper delivers exceptional results with professional
quality and durability.
●
HP Advanced Photo Paper
This thick photo paper features an instant-dry finish for easy handling without smudging. It
resists water, smears, fingerprints, and humidity. Your prints have a look and feel comparable to
a store-processed photo. It is available in several sizes, including A4, 8.5 x 11 inch, 10 x 15 cm
(4 x 6 inch), 13 x 18 cm (5 x 7 inch). It is acid-free for longer lasting documents.
●
HP Everyday Photo Paper
Print colorful, everyday snapshots at a low cost, using paper designed for casual photo printing.
This affordable photo paper dries quickly for easy handling. Get sharp, crisp images when you
use this paper with any inkjet printer. It is available in glossy finish in several sizes, including A4,
8.5 x 11 inch, and 10 x 15 cm (4 x 6 inch). For longer-lasting photos, it is acid-free.
Business documents
●
HP Premium Presentation Paper or HP Professional Paper 120
These papers are heavy two-sided matte papers perfect for presentation, proposals, reports,
and newsletters. They are heavyweight for an impressive look and feel.
●
HP Brochure Paper or HP Professional Paper 180
16 Chapter 4 Paper basics ENWW

These papers are glossy-coated or matte-coated on both sides for two-sided use. They are the
perfect choice for near-photographic reproductions and business graphics for report covers,
special presentations, brochures, mailers, and calendars.
Everyday printing
●
HP Bright White Inkjet Paper
HP Bright White Inkjet Paper delivers high-contrast colors and sharp text. It is opaque enough
for two-sided color usage with no show-through, which makes it ideal for newsletters, reports,
and flyers. It features ColorLok Technology for less smearing, bolder blacks, and vivid colors.
●
HP Printing Paper
HP Printing Paper is a high-quality multifunction paper. It produces documents that look and feel
more substantial than documents printed on standard multipurpose or copy paper. It features
ColorLok Technology for less smearing, bolder blacks, and vivid colors. It is acid-free for longer
lasting documents.
●
HP Office Paper
HP Office Paper is a high-quality multifunction paper. It is suitable for copies, drafts, memos, and
other everyday documents. It features ColorLok Technology for less smearing, bolder blacks,
and vivid colors. It is acid-free for longer lasting documents.
●
HP Office Recycled Paper
HP Office Recycled Paper is a high-quality multifunction paper made with 30% recycled fiber. It
features ColorLok Technology for less smearing, bolder blacks and vivid colors.
Special projects
●
HP Iron-On Transfers
HP Iron-on Transfers (for light or white fabrics) are the ideal solution for creating custom T-shirts
from your digital photos.
ENWW Recommended papers for printing 17
Load media
Select a paper size to continue.
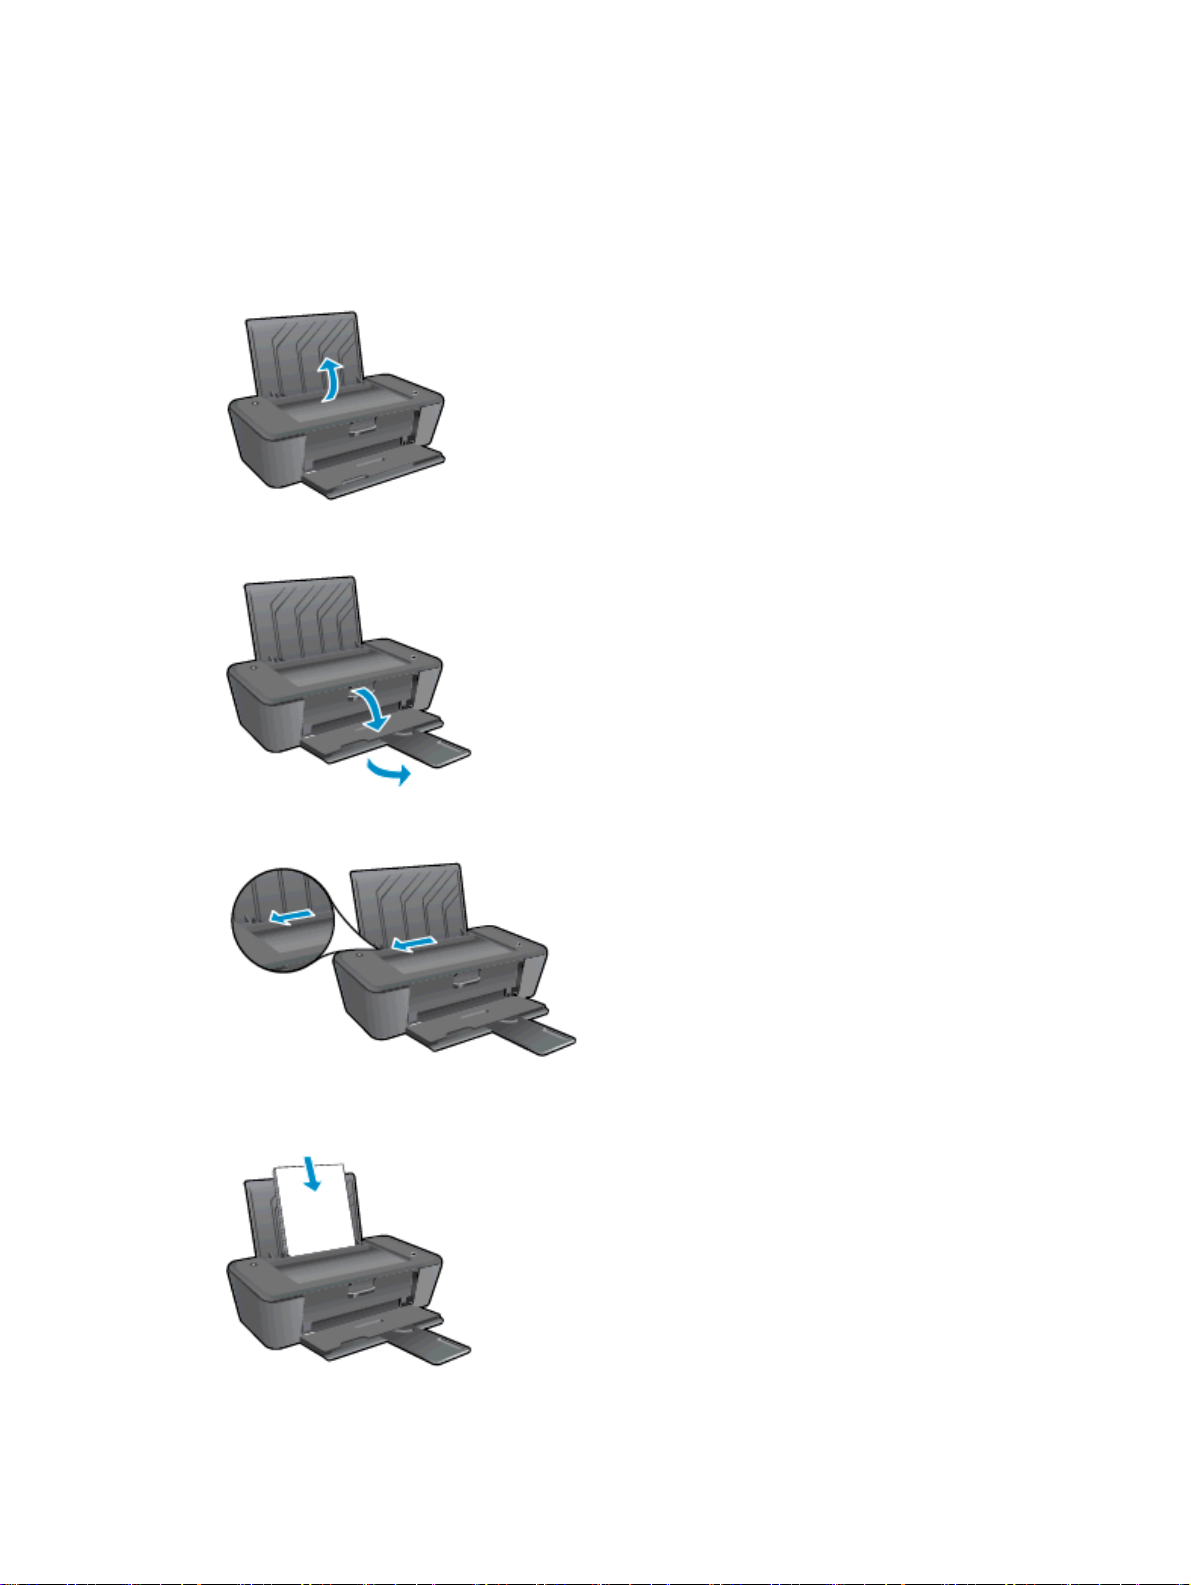
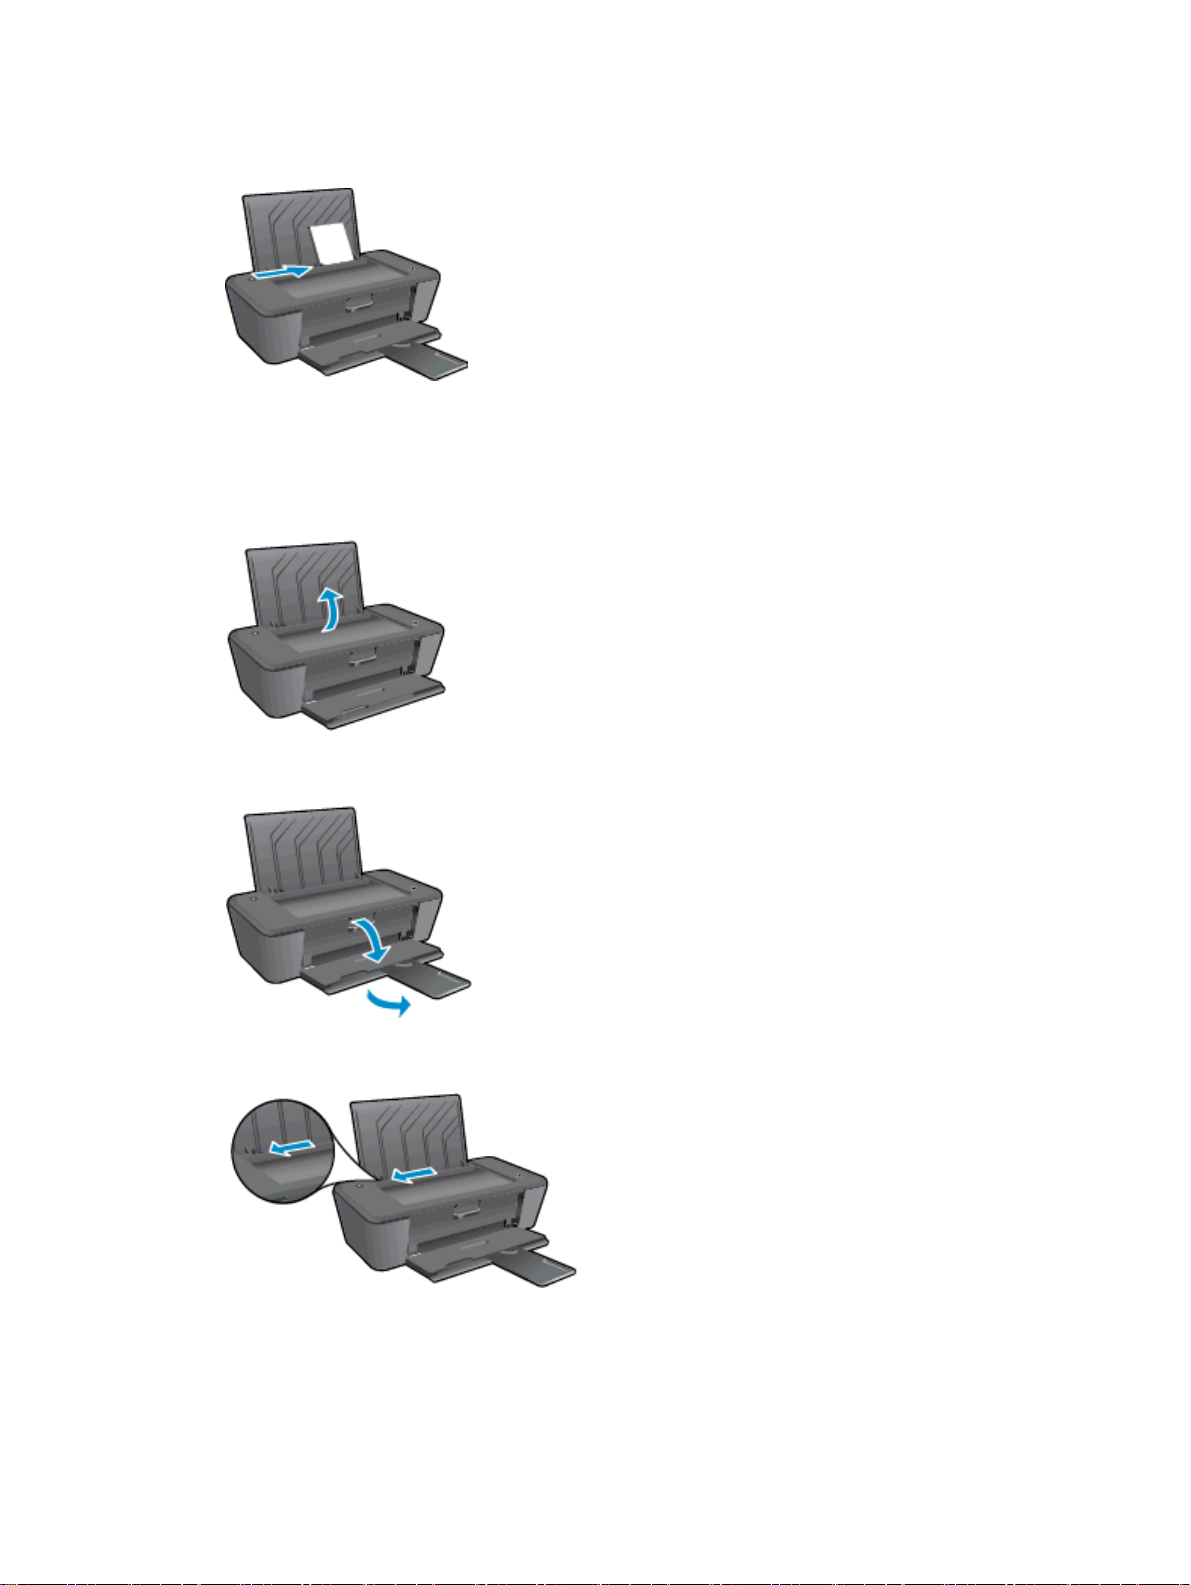
Load full-size paper
1. Raise the input tray.
2. Lower the output tray and pull out the output tray extender.
3. Slide the paper-width guide to the left.
4. Insert a stack of paper into the input tray with the short edge down and the print side up, and
slide the stack of paper down until it stops.
18 Chapter 4 Paper basics ENWW
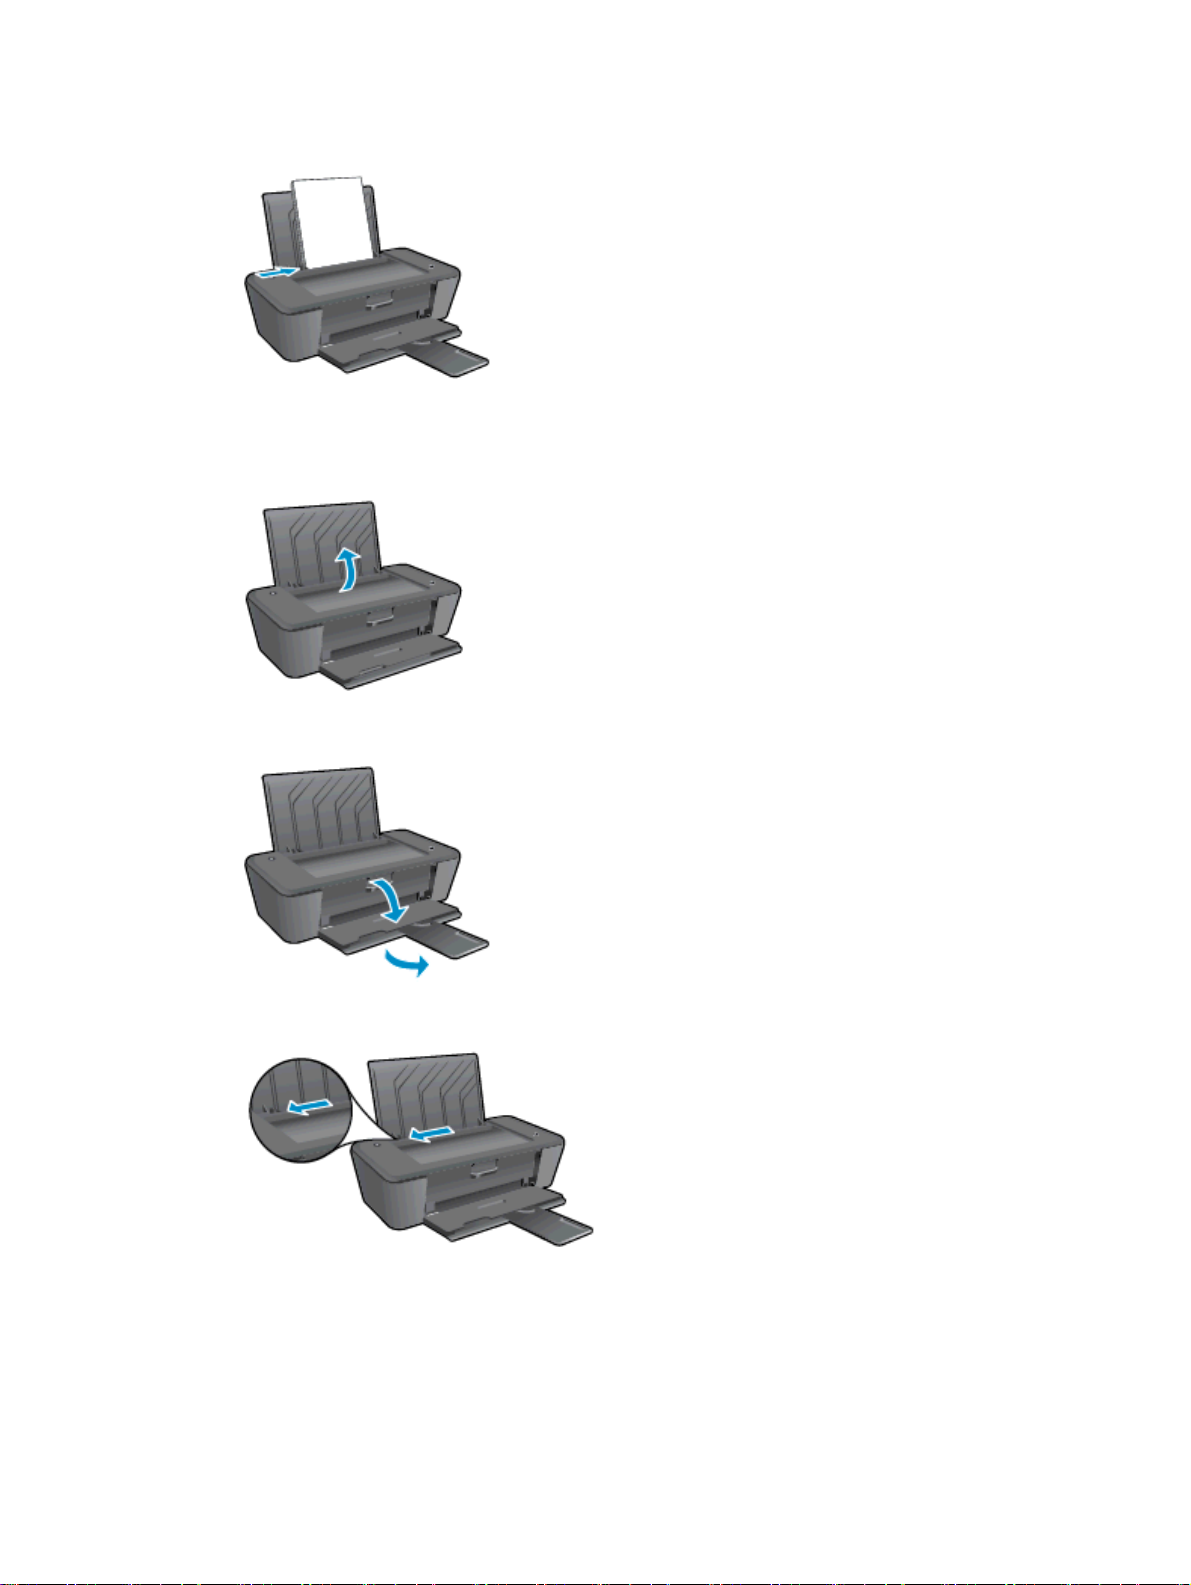
5. Slide the paper-width guide to the right until it stops at the edge of paper.
Load small-size paper
1. Raise the input tray.
2. Lower the output tray and pull out the output tray extender.
3. Slide the paper-width guide to the left.
ENWW Load media 19
4. Insert a stack of photo paper with the short edge down and the print side up, and slide the stack
of paper forward until it stops.
5. Slide the paper-width guide to the right until it stops at the edge of paper.
Load envelopes
1. Raise the input tray.
2. Lower the output tray and pull out the output tray extender.
3. Slide the paper-width guide to the left and remove all paper from the input tray.
20 Chapter 4 Paper basics ENWW
 Loading...