


FU-7814
Manual de instalación y uso de la lavadora
Manuel d’installation et d’utilisation du lave-linge
Manual de instalação e utilização da máquina de lavar roupa
Washing machine installation and operation manual
lavadora
índice
ADVERTENCIAS
ESPECIFICACIONES
INSTALACIÓN Y MONTAJE
USO DEL APARATO
Y CONSEJOS PRÁCTICOS
MANTENIMIENTO
Y LIMPIEZA DEL APARATO
SEGURIDAD
Y SOLUCIÓN DE PROBLEMAS
ADVERTENCIAS SOBRE
EL MEDIO AMBIENTE
lave-linge
AVERTISSEMENTS
index
4
5
6
10
20
22
25
26
SPÉCIFICATIONS
INSTALLATION ET MONTAGE
UTILISATION DE L’APPAREIL
ET CONSEILS PRATIQUES
MAINTENANCE
ET ENTRETIEN DE L’APPAREIL
SÉCURITÉ
ET RÉSOLUTION DE PROBLÈMES
AVERTISSEMENTS SUR
L’ENVIRONNEMENT
27
28
32
42
44
47

máquina de lavar roupa
índice
ADVERTÊNCIAS
QUADRO TÉCNICO
INSTALAÇÃO E MONTAGEM
UTILIZAÇÃO DO APARELHO
E CONSELHOS PRÁTICOS
MANUTENÇÃO
E LIMPEZA DO APARELHO
SEGURANÇA
E SOLUÇÃO DE PROBLEMAS
ADVERTÊNCIAS SOBRE
O MEIO AMBIENTE
washing machine
WARNINGS
contents
48
49
50
54
64
66
69
70
SPECIFICATIONS
INSTALLATION AND ASSEMBLY
USING THE APPLIANCE.
PRACTICAL TIPS
MAINTENANCE
AND CLEANING
SAFETY
AND TROUBLESHOOTING
ENVIRONMENTAL
WARNINGS
71
72
76
86
88
91

thanks for placing your trust in us
Our new range of washing machines has been designed to make life more convenient for you:
WITH YOUR CONVENIENCE ALWAYS IN MIND
Large hatch.
Maximum opening.
• Designed higher than the normal axis and
with the drum tilted to achieve maximum
ergonomics.
• Its maximum opening makes it much
easier to put clothes in.
Hatch opening button.
• Opens instantly at the simple press of a
button (Depending on model).
Easy-access filter.
• And simple maintenance.
WITH SAVINGS ALWAYS IN MIND
8 kg capacity.
• Which allows you to do less washes and
make savings.
Washing in less time.
• The wash programmes do not last as
long giving you more free time.
Time delay.
• To take advantage of cheap electricity
rates.
WITH INNOVATION ALWAYS IN MIND
LCD screens.
• Which allows you to have constant
information about the wash programme
and its duration.
Detergent dispenser designed to offer
maximum convenience.
• Easy to remove for cleaning.
• Possibility of using liquid detergent.
warnings
To avoid the risk of fire, electrical shocks, injury or damage when using your washing
machine, please take the following precautions:
This washing machine comes with a
manual that includes operating, maintenance
and installation instructions. Please read all
the instructions before using the washing
machine.
Do not wash items that have previously
been cleaned, washed, soaked or treated
with petrol, solvents for dry cleaning, other
inflammable substances or explosives, as
they produce fumes that could catch fire or
explode.
Do not add petrol, solvents for dry cleaning
or other inflammable or explosive substances
to the wash water as they produce fumes
that could catch fire or explode.
Do not repair or replace any part of the
washing machine or try to carry out any type
of servicing unless it is recommended in the
maintenance instructions in the manual.
Do not climb onto the machine or stand
on the open hatch door.
Do NOT use an extension lead or adaptor
to connect your washing machine to the
mains supply.
The machine should only be used for the
purpose it is designed for.
Follow the washing instructions
recommended by the manufacturer of the
garment to be washed.
Do not turn your washing machine on until
you are sure that:
• It has been installed in accordance with
the installation instructions.
• All the water, drainage, mains electricity and
earth connections meet the local regulations
and/or other applicable regulations.
70
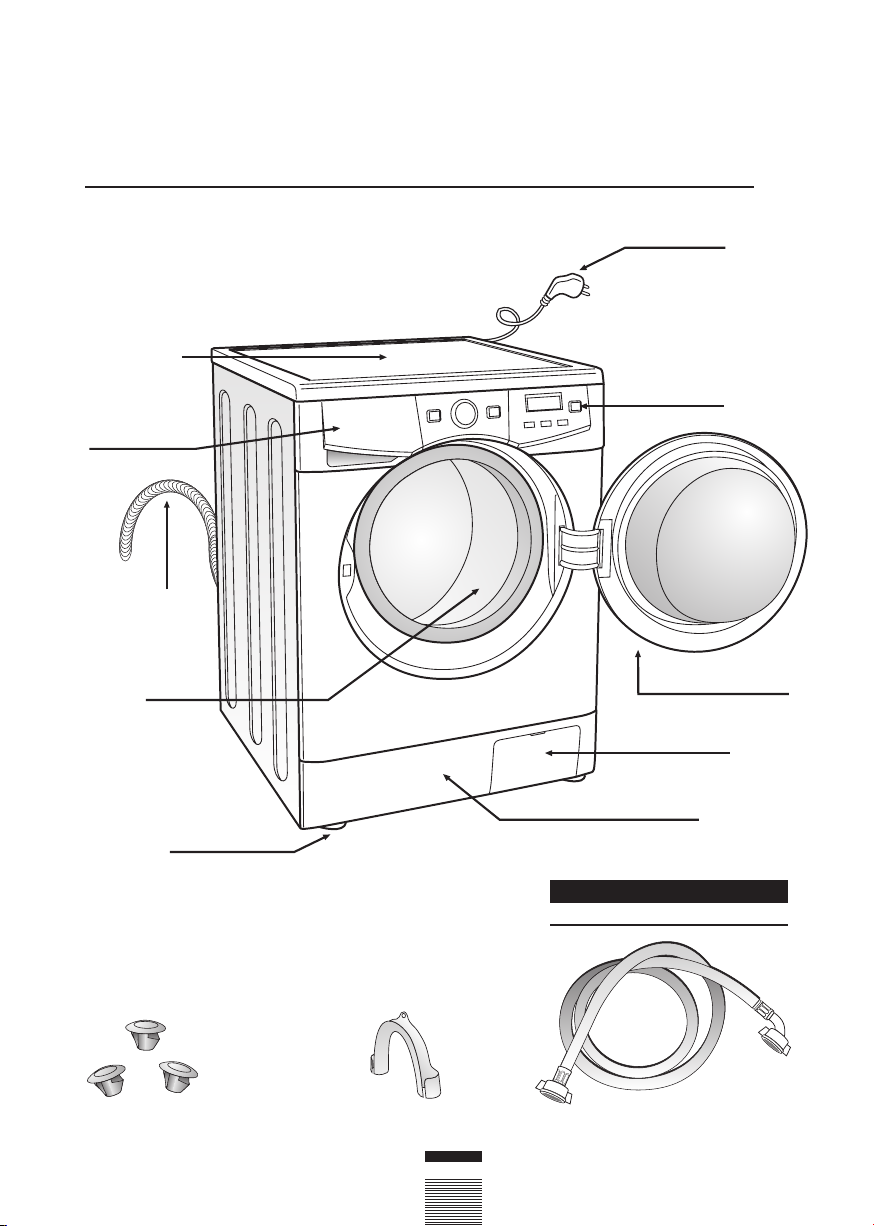
washing machine
Work top
Detergent
dispenser
Drain hose
specifications
Power
cord
Control
panel
Stainless
steel
drum
Levelling
feet
Rear plugs Drain pipe bender
Hatch
Filter
Kickplate
ACCESSORIES LOCATED
INSIDE THE DRUM
Water inlet hose
71
washing machine
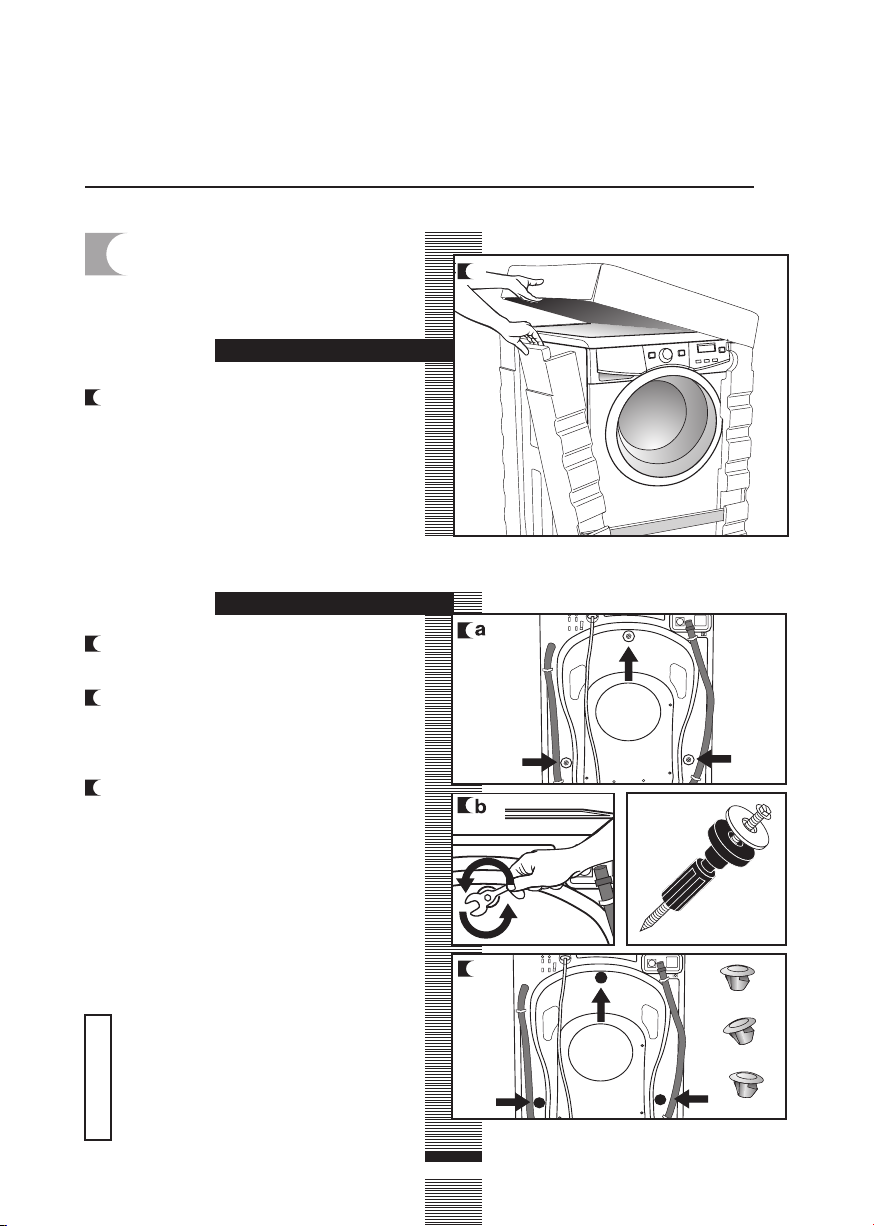
UNPACKING AND
1
UNBLOCKING THE
WASHING MACHINE
a Remove the base, corner protectors and
top cover.
a There are 3 blocking screws on the back
of the washing machine.
b To loose and completely remove the 3
screws together with the metal washer
and the black rubber and plastic tubes
that make up the blocking system.
installation and assembly
a
UNPACKING
UNBLOCKING
c Fit the 3 plastic plugs supplied in the
holes you removed the screws from.
Do not throw the blocking screws away.
You may need to move the washing
machine at a later date.
Important
c
72

CONNECTION TO THE MAINS WATER SUPPLY AND
2
DRAINAGE
installation and assembly
CONNECTION TO THE
MAINS WATER SUPPLY
The water supply hose is inside the drum:
a Connect the bent end of the hose to the
threaded inlet of the electrovalve located
at the rear of the washing machine.
b Connect the other end of the hose to the
water intake. Then securely tighten the
connection nut.
It is important that the drain hose bend
is correctly fastened to the outlet, to
prevent any risk of it becoming
detached and causing flooding.
If your washing machine has a hot
water intake, connect the hose with
the red threaded end to the hot water
tap, and to the electrovalve with the
red filter.
The washing machine must be
connected to the mains water supply,
Important
using the new supply hoses supplied
with the appliance. Do not use water
supply hoses that have been used
before. For your washing machine to
work properly, the mains water
pressure must be between 0.05 and
1MPa (0.05 and 10 Kgr/cm
2
).
DRAINAGE
CONNECTION
a It is recommended that you have a fixed
drainage outlet 50 tom 70 cm from the
floor.
Avoid the drain hose being too tight,
kinked or restricted. Use the bend
supplied.
a
73
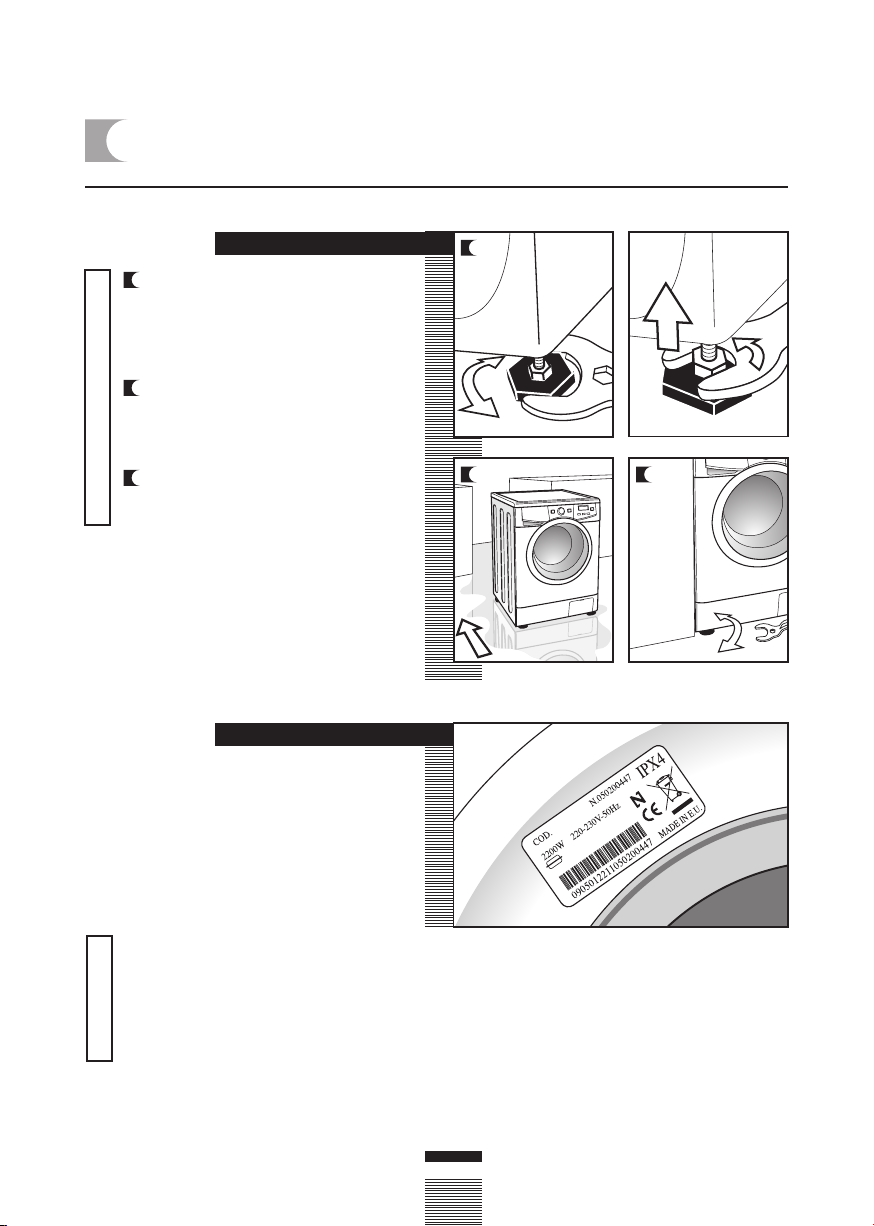
LEVELLING THE WASHING MACHINE AND CONNECTING
3
IT TO THE MAINS ELECTRICITY SUPPLY
installation and assembly
LEVELLING
a First of all, we recommend that
you fix and level the rear feet. When
they are properly fixed, secure the
metal locknut tightly to the top
part.
b Put the washing machine into its
niche. Dampen the floor to help
you move the machine into its final
Important
position.
c Finally level and secure the front
feet in the same way as you
levelled the rear feet.
ELECTRICAL CONNECTION
Consult the specifications plate located on the
hatch door of the washing machine before
making the electrical connections. Ensure that
the voltage reaching the plug is the same as
that on the plate.
Do not remove the specifications plate. The
information on it is important.
a
b c
It is very important to correctly earth the
washing machine.
The electrical installation, plug, socket,
fuses or automatic switch and counter
must be correctly dimensioned for the
Important
maximum power indicated on the
specifications plate.
Do not plug the washing machine plug into
the socket with wet or damp hands.
To remove the power cord, pull on the body
of the plug.
If the power cord is damaged, it must be
replaced by a cord or special unit provided
by either the manufacturer or your aftersales service.
With built-in washing machines, the plug
must be accessible after installation.
74
 Loading...