


99639111_A_ML.qxp 02/03/2006 16:49 Page 1
EN User Manual for Your Oven
FR Le guide d’utilisation de votre four
5H-730*
99639111_A_ML.qxp 02/03/2006 16:49 Page 2
Table of Contents
Introduction |
P.3 |
What does your oven look like? |
P.4 |
Description of the appliance |
P.4 |
Accessories |
P.5 |
Safety recommendations |
P.6 |
How do you install your oven? |
|
Electrical connection |
P.7-8 |
How do you change the bulb? |
P.8 |
Useful dimensions for installing your oven |
P.9 |
How does your oven work? |
|
Close-up of your programmer |
P.10 |
How do you set the clock on the oven? |
P.11 |
How do you program for immediate cooking? |
P.12 |
How do you set a cooking programme? |
P.12-14 |
How do you use the timer? |
P.15 |
Oven cooking modes |
P.16-17 |
How do you clean the cavity of your oven? |
|
What is pyrolysis? |
P.18 |
In what situations should pyrolysis be used? |
P.18 |
How do you use the pyrolysis function? |
P.18-19 |
What do you do in case of operating |
|
malfunctions? |
P.20 |
Throughout the manual, |
indicates safety recommendations, |


 indicates advice and tips
2

99639111_A_ML.qxp 02/03/2006 16:49 Page 3
Introduction
EN
Dear Customer,
You have just acquired a FAGOR oven and we would like to thank you.
Our research teams have created this new generation of appliances for you so that cooking is a pleasure every day.
With pure lines and modern aesthetics, your new FAGOR oven will blend harmoniously into your kitchen and will perfectly combine cooking performance and ease of use.
In the FAGOR product line, you will also find a wide range of hobs, ventilation hoods, dishwashers and referigerators that you can coordinate with your new FAGOR oven.
Of course, in an ongoing effort to best satisfy your demands with regard to our products, our after-sales service department is at your disposal and ready to listen in order to respond to all of your questions and suggestions (contact information at the end of this booklet).
At the cutting edge of innovation, FAGOR helps to improve the quality of everyday life by bringing you products that are ever more effective, easy to use, environmentally friendly, attractive and reliable.
The FAGOR Brand
3

99639111_A_ML.qxp 02/03/2006 16:49 Page 4
What does your oven look like?
1 |
2 |
3 |
T˚c |
40 |
|
275 |
|
|
|
|
|
240 |
65 |
|
220 |
100 |
210 |
150 |
200 |
165 |
|
180 |
4
5
5
1
6
99
3
2
-5361
7
DESCRIPTION |
THE APPLIANCE |
1
2
3
4
Temperature selector
Programmer
Function selector
Light
5Shelf support indicator
6Hole for turnspit
7Contact for open door detector
4

99639111_A_ML.qxp 02/03/2006 16:49 Page 5
Accessories
EN
REAR |
FRONT |
Anti-tipping safety grid
The grid can be used to hold all dishes and moulds containing foodstuffs to be cooked or browned. It can be used for barbecues (to be placed directly on the grid).
Multi-purpose dish
(cake dish or drip tray)
It serves as a cake dish and has a sloped edge. It is used for cooking pastries such as cream puffs, meringues, madeleines, puff pastry, etc.
Inserted under the grid, it catches barbecue juices and grease. It can also be used half-full of water for double-boiler cooking methods.
Avoid placing roasts or meats directly in the dish because you are certain to have major splattering on the oven walls.
Turn spit
To use it:
•Place the hollow dish on the grid on shelf support number 1 to catch the cooking juices or on the bottom heating element if the piece of meat being roasted is too big.
•Attach one of the forks onto the spit; pierce the piece of meat being roasted; insert the
second fork; centre the meat and tighten the assembly by screwing in the two forks.
•Place the spit in its support.
•Gently push to lodge the tip of the spit in the guide slot located at the back of the oven (6).
•Remove the handle by unscrewing it. After cooking, screw the handle back into the spit to remove it without burning yourself.
5

99639111_A_ML.qxp 02/03/2006 16:49 Page 6
 Safety recommendations
Please become familiar with these recommendations before installing and using your oven. This oven was designed for use by private persons in their homes. It is intended solely for cooking foodstuffs. This oven does not contain any asbestos-based components.
FIRST USE:
Before using your oven for the first time, heat it up while empty with the door closed for approximately 15 minutes using the maximum setting in order to "cure" the appliance. The rock wool that surrounds the oven cavity may initially release a particular odour caused by its composition. Similarly, you may notice the release of some smoke. All of this is normal.
SUBSEQUENT USE:
-Ensure that the door of your oven is completely closed so that the seal can properly do its job.
-Do not let anyone lean against or sit on the oven door when it is open.
-When using the grill with the door semi-open, exposed parts and surfaces may become hot. Keep small children away.
-When in use, the appliance becomes hot. Be careful not to touch the heating elements located inside the oven.
-After cooking, do not use bare hands to touch the dishes or accessories (grid, turnspit, drip tray, turnspit support, etc.); use a potholder or heat-resistant material.
-Do not line your oven with sheets of aluminium. Otherwise, the result could be an accumulation of heat that could have an undesirable effect on cooking and roasting results and could damage the enamel.
-Before beginning a pyrolysis cleaning cycle in your oven, remove all parts of your grids, trays and accessories and remove major spill residue.
-Do not use a steam cleaner or high-pressure cleaner.
-During pyrolysis, the exposed surfaces become hotter than during normal use.
Keep small children away.
-Before any cleaning is undertaken in the oven cavity, the oven must be turned off.
ENVIRONMENTAL PROTECTION
This appliance’s packaging material is recyclable. Help recycle it and protect the environment by dropping it off in the municipal receptacles provided for this purpose.
Your appliance also contains a great amount of recyclable material. It is marked with this label to indicate the used appliances that should not be mixed with other waste. This way, the appliance recycling organised by your manufacturer will be done under the best possible conditions, in compliance with European Directive 2002/96/EC on Waste Electrical and
 Electronic Equipment. Contact your town hall or your retailer for the used appliance collection points closest to your home.
We thank you doing your part to protect the environment.
The function selector absolutely must be returned to 0 in order to use your oven again.
6

99639111_A_ML.qxp 02/03/2006 16:50 Page 7
How do you install your oven?
Electrical connection |
EN |
Monophase 20A Meter
220-240 V ~ 50 Hz
Monophase line 220-240 V ~
16A fuse or differential circuit breaker
Electrical outlet 2-prong receptacle
+ ground lead
IEC Standard 60083
 Power cable length: approximately 1.5 m
Before making the connection, ensure that the wires in your electrical set-up have enough cross-sectional area to properly supply electricity to the appliance (cross-sectional area must be
at least equal to that of the power cable). The fuse in your set-up must be 16 amperes.
The electrical connection should be performed before the appliance is installed in the cabinet.
•The oven must be connected with a power cable (standardised) with three 1.5 mm2 conductors (1 ph +1 N + ground) that must be connected to a monophase 220-240 V network via a IEC 60083 standardised receptacle (1 ph +1 N + ground lead) or an
all-pole cut-off device with a minimum distance between contact openings of 3 mm. The safety wire (green-yellow) is connected to the appliance's terminal  and must be connected to the ground lead of the electrical set-up.
•In the case of connections with an electric receptacle, it must remain accessible after installation of the appliance.
•The oven's neutral conductor (blue wire) must be connected to the network's neutral conductor.
7

99639111_A_ML.qxp 02/03/2006 16:50 Page 8
How do you install your oven?
Changing the power cable
•The power cable (H05 RR-F, H05 RN-F or H05 VV-F) must be of sufficient length to be connected to the build-in oven while it sits on the floor in front of the cabinet.
To do this the appliance must be disconnected from the electrical network:
•Open the inspection flap located at the lower right of the back cover by unscrewing the two screws, then pivot the inspection flap.
•Strip 12 mm along each wire of the new power cable.
•Carefully twist together the strands.
•Loosen the screws from the terminal board and remove the power cord to be replaced.
•Introduce the power cable through the side of the cover in the cable clip located to the right of the terminal board.
•Connect the power cord wires in accordance with the written markings on the terminal board.
•All the strands of the electricity wires must be captured under the screws.
•The phase wire on the L terminal.
•The green-yellow coloured ground wire should be connected to the  terminal.
•The neutral conductor (blue) on the N terminal.
•Screw down tightly the screws on the terminal board and check the connection by pulling on each wire.
•Attach the cable with the cable clip located to the right of the terminal board.
•Close the inspection flap using the two screws.
We cannot be held liable for any accident resulting from an inexistent, defective or incorrect ground lead.
How do you change the bulb?
• The bulb is located on the ceiling of your oven's cavity.
Disconnect your oven before performing any task on the bulb to avoid the risk of electric shock and, if necessary, let the appliance cool down.
a) Unscrew the view port (see |
|
adjacent diagram). |
Bulb |
b) Unscrew the light bulb in the |
|
same direction. |
|
Bulb specifications: |
|
- 15 W |
|
- 220-240 V |
|
- 300°C |
Unscrew |
- E 14 cap |
|
c) Replace the bulb then reposition |
View port |
|
|
the view port and reconnect your oven. |
|


 To unscrew the view port and the light, use a rubber glove, which


 will make disassembly easier.
8

99639111_A_ML.qxp 02/03/2006 16:50 Page 9
How do you install your oven?
Useful dimensions for installing your oven
|
EN |
577 |
|
600 |
585 |
577 |
|
The oven can be installed under a work top or in a column of cabinetry (open* or closed) having the appropriate dimensions for built-in installation (see adjacent diagram).
Your oven has optimised air circulation that allows it to achieve remarkable cooking and cleaning results if the following guidelines are respected:
•Centre the oven in the cabinet so as to guarantee a minimum distance of 5 mm between the appliance and the neighbouring cabinet.
•The material of the built-in cabinetry must be heat resistant (or be covered with such a material).
•For greater stability, attach the oven in the cabinet with two screws through the holes provided for this purpose on either side of the front inner panel (see diagram).
To do this:
1)Remove the rubber screw covers to access the mounting holes.
2)Drill a Ø 3 mm hole in the cabinet panel to avoid splitting the wood.
3)Attach the oven with the two screws.
4)Replace the rubber screw covers (they also serve to absorb the shock caused by closing the oven door).
(*) If the cabinet is open, its opening must be 70 mm (maximum).


 To be certain that you have properly installed your appliance, do


 not hesitate to call on a household appliance specialist.
9
99639111_A_ML.qxp 02/03/2006 16:50 Page 10
How does your oven work?
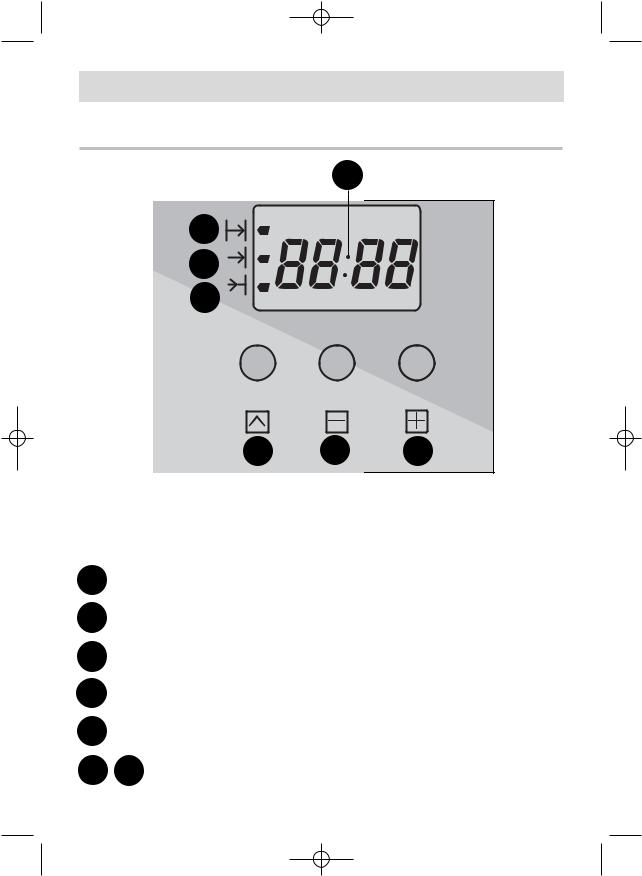
1. Close-up of your programmer
1
2
3
4
5 6 7
APPLIANCE DESCRIPTION
1
2
3
4
Display area for clock and cooking times
Cooking time icon
Cooking end time icon
Independent timer
5Touch control for accessing various time setting programmes
6 |
7 Touch controls for setting time |
10
99639111_A_ML.qxp 02/03/2006 16:50 Page 11
How does your oven work?
2. How do you set the clock on the oven? |
EN |
a) When supplied with electricity
•The display flashes.
•Set the time by pressing the  or
or  touch controls (holding your finger on the touch control allows for rapid number advancement).
•Press the  touch control to enter.
Example:12:30.
b) Resetting the clock time
•Simultaneously press the  and
and  touch controls for a few seconds until the display flashes.
•Adjust the clock setting with the  or
or  touch controls.
•Press the  touch control to enter.
 1
1


2
1 |
1 |
3 |
2 |
|
If the  touch control is not pressed, the setting will be automatically recorded after a few seconds.
11

99639111_A_ML.qxp 02/03/2006 16:50 Page 12
How does your oven work?
3. How do you program for immediate cooking?
The analogue programmer should display only the time; it should not be flashing.
• Choose the cooking mode:
Turn the selector knob to the position of your choice.
Example: " " position.
• Choose the cooking temperature
Turn the thermostat (temperature selector) to the temperature recommended in your recipe.
Example: Temperature set to 200°.
|
T˚c |
275 |
40 |
|
|
240 |
65 |
|
|
220 |
100 |
210 |
150 |
200 |
165 |
|
180 |
4.How do you set a cooking programme?
a)Program a cooking cycle with a defined duration:
• Choose the cooking mode.
Turn the selector knob to the position of your choice.
Example: " " position.
• Choose the cooking temperature.
Turn the selector knob(temperature selector) to the temperature recommended in your recipe.
Example: Temperature set to 200°.
|
T˚c |
275 |
40 |
|
|
240 |
65 |
|
|
220 |
100 |
210 |
150 |
200 |
165 |
|
180 |
12
 Loading...