


99638961_A_FR GB.qxp 02/03/2006 10:38 Page 1
EN User Manual for Your Oven
FR Le guide d’utilisation de votre four
5H-741* - 5H-745*
99638961_A_FR GB.qxp 02/03/2006 10:38 Page 2
C o n t e n t s
Introduction |
P.3 |
Your oven |
|
How it works |
P.4 |
Accessories |
P.5 |
Safety recommendations |
P.6 |
How to install your oven |
|
Electrical connections |
P.7-8 |
Dimensions for installation use |
P.9 |
How to use your oven |
|
The oven programmer |
P.10 |
How to set the clock |
P.11 |
How to cook straightaway |
P.12 |
How to programme the cooking |
P.13 |
How to use the timer |
P.14 |
Changing a bulb |
P.15 |
Cooking methods |
P.16-17 |
Cleaning the oven cavity |
|
Pyrolysis explained |
P.18 |
When to clean by pyrolysis |
P.18 |
Starting pyrolysis |
P.19 |
Troubleshooting |
P.20 |
Throughout this manual, |
indicates safety recommendations, |
indicates advice to help you make the best use of your oven
2

99638961_A_FR GB.qxp 02/03/2006 10:38 Page 3
Introduction
Dear Customer, |
EN |
You have just acquired a FAGOR oven and we would like to thank you.
Our research teams have created this new generation of appliances for you so that cooking is a pleasure every day.
With pure lines and modern aesthetics, your new FAGOR oven will blend harmoniously into your kitchen and will perfectly combine cooking performance and ease of use.
In the FAGOR product line, you will also find a wide range of hobs, ventilation hoods, dishwashers and referigerators that you can coordinate with your new FAGOR oven.
Of course, in an ongoing effort to best satisfy your demands with regard to our products, our after-sales service department is at your disposal and ready to listen in order to respond to all of your questions and suggestions (contact information at the end of this booklet).
At the cutting edge of innovation, FAGOR helps to improve the quality of everyday life by bringing you products that are ever more effective, easy to use, environmentally friendly, attractive and reliable.
The FAGOR Brand
3

99638961_A_FR GB.qxp 02/03/2006 10:38 Page 4
Your oven
1 |
2 |
3 |
6
4
5
5 3
1
OVEN FEATURES
1
2
3
Temperature control
Programme selector
Feature selector
4
5
6
Light
Rail positions
Door-open detector plate
4

99638961_A_FR GB.qxp 02/03/2006 10:38 Page 5
Accessories
EN
REAR |
FRONT |
Anti-tipping safety grid
The grid can be used to hold all dishes and moulds containing foodstuffs to be cooked or browned. It can be used for barbecues (to be placed directly on the grid).
Multi-purpose dish
(cake dish or drip tray)
It serves as a cake dish and has a sloped edge. It is used for cooking pastries such as cream puffs, meringues, madeleines, puff pastry, etc.
Inserted under the grid, it catches barbecue juices and grease. It can also be used half-full of water for double-boiler cooking methods.
Avoid placing roasts or meats directly in the dish because you are certain to have major splattering on the oven walls.
Hollow dish
It is used to collect juices and grease from cooking with the high grill or the pulsed grill. It can be used as a cooking dish when suitable for the size of the item to be cooked (e.g. whole poultry surrounded with vegetables, at moderate temperature).
Never place this dish directly on the bottom heating element, except in the GRILL position.
Turn spit
To use it:
•Place the hollow dish on the grid on shelf support number 1 to catch the cooking juices or on the bottom heating element if the piece of meat being roasted is too big.
•Attach one of the forks onto the spit; pierce the piece of meat being roasted; insert the
second fork; centre the meat and tighten the assembly by screwing in the two forks.
•Place the spit in its support.
•Gently push to lodge the tip of the spit in the guide slot located at the back of the oven (6).
•Remove the handle by unscrewing it. After cooking, screw the handle back into the spit to remove it without burning yourself.
5
99638961_A_FR GB.qxp 02/03/2006 10:38 Page 6
 Safety recommendations
Please read these instructions before installing and using your oven.
The oven has been designed for domestic use only for cooking food. No asbestos has been used in its construction.
USING FOR THE FIRST TIME:
Before you use your oven for the first time, leave it empty and, with the door closed, turn it on to maximum temperature and let it heat up for 15 minutes. This "runs the oven in". During this time there may be some smell from the mineral wool that insulates the oven and there could be some smoke. This is perfectly normal.
NORMAL USE:
-Always close the door properly. The oven is fitted with a seal designed to work with a closed door.
-Never lean or let anyone sit on the oven door when it is open.
-The oven parts and accessories can become hot when the door is left partially open and the grill on. Always keep children at a safe distance.
-When the oven is on it will get hot. Take care not to touch the heating elements inside the oven.
-Always protect your hands with oven gloves or something similar when removing food, accessories or containers from the oven.
-Do not line your oven with kitchen foil. The metal will increase the heat produced and could ruin the food and damage the enamel.
-Never use a spray or a high-pressure washer to clean the oven.
-During self-cleaning, surfaces can become hotter than in normal use. Children must be kept at a distance.
During the action of pyrolysis, accessible surfaces become much hotter than during normal cooking. Keep children at a distance.
Always check that the oven is off before you clean the inside.
ENVIRONMENTAL PROTECTION
This appliance’s packaging material is recyclable. Help recycle it and protect the environment by dropping it off in the municipal receptacles provided for this purpose.
Your appliance also contains a great amount of recyclable material. It is marked with this label to indicate the used appliances that should not be mixed with other waste. This way, the appliance recycling organised by your manufacturer will be done under the best possible conditions, in compliance with European Directive 2002/96/EC on Waste Electrical and Electronic Equipment. Contact your town hall or your retailer for the used appliance collection points closest to your home.
We thank you doing your part to protect the environment.
Ensure that the function selector is returned to 0 to re-use your oven.
6
99638961_A_FR GB.qxp 02/03/2006 10:38 Page 7
How to install your oven
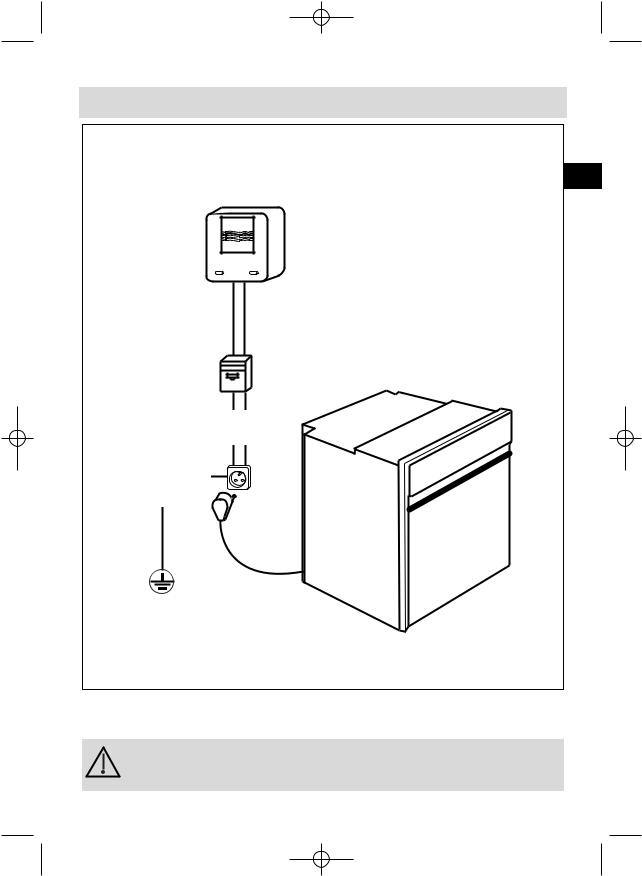
Electrical connections
EN
Electricity meter (mains) (20A, single-phase 220-240 V alternating current 50 Hz)
Fused 16A or differential circuit breaker
220-240 V single phase alternating current supply
Socket
2 -pin with earth
Connecting cable approx 1.50 m. long
Before connecting your oven, make sure you are using the correct size cable. The cross-section should be the same as the cable connected to the oven. Use a 16-amp fuse.
7
99638961_A_FR GB.qxp 02/03/2006 10:38 Page 8
How do you install your oven?
The electrical connections are made before the oven is installed in its housing.
• The oven must be connected using an approved 3-core cable (live, neutral and earth ) with 1.5 mm square conductors. This should be connected via a 3- pin-
socket (live, neutral, and earth  to the main supply which should be should be a 220-240V, alternating single-phase current. If the oven is not connected using a plug and socket, it must be connected to a multi-pole switch with a minimum gap of 3 mm between contacts. The earth wire (green and yellow) should be connected
to the terminal marked with the earth symbol  on the appliance and to the earth in the switch.
•Where the oven is connected using a separate plug and socket this must be accessible after the oven has been installed.
•The neutral wire (blue) of the oven must be connected to the neutral in the main supply.
Fitting new wiring and/or changing cables.
• The supply cable (H05 RR-F, H05 RN-F or H05 W-F) must be long enough to allow the oven to rest on the floor in front of its housing.
With the oven sitting on the floor and disconnected:
•Open the trapdoor at the bottom right hand side at the back of the oven by removing the 2 screws and swinging the door away.
•Remove the sheath from each wire in the new cable up to 12 mm.
•Twist the ends carefully together.
•Unscrew the terminal screws and remove the wires that need changing.
•Pass the new cable through the wire clamp to the right of the terminals.
•Connect the wires up in accordance with the markings on the terminals.
•Make sure all wires are trapped under the screws.
•The brown wire (live) going to terminal marked L.
•The green and yellow wire (earth) going to the one marked  .
.
•The blue wire (neutral) going to the terminal marked N.
•Tighten the screws and check, by tugging on each wire, that they are firmly connected.
•Tighten the clamp to hold the cable.
•Close the trapdoor using the two screws.
We cannot accept any liability in the event of an accident resulting from non-existent or faulty earthing.
8
99638961_A_FR GB.qxp 02/03/2006 10:38 Page 9
How do you install your oven?
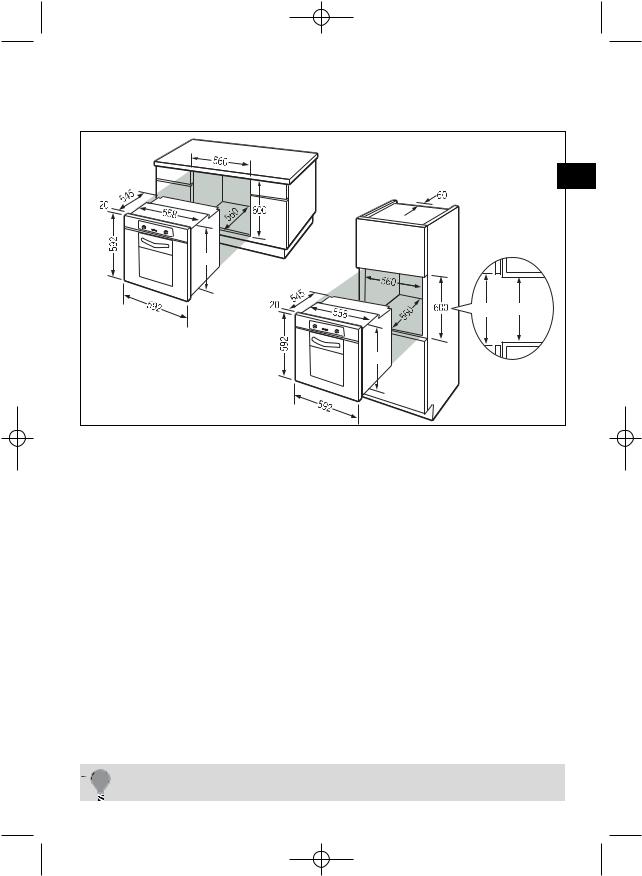
Useful dimensions for installing your oven
|
EN |
577 |
|
600 |
585 |
577 |
|
The oven can be installed under a work top or in a column of cabinetry (open* or closed) having the appropriate dimensions for built-in installation (see adjacent diagram).
Your oven has optimised air circulation that allows it to achieve remarkable cooking and cleaning results if the following guidelines are respected:
•Centre the oven in the cabinet so as to guarantee a minimum distance of 5 mm between the appliance and the neighbouring cabinet.
•The material of the built-in cabinetry must be heat resistant (or be covered with such a material).
•For greater stability, attach the oven in the cabinet with two screws through the holes provided for this purpose on either side of the front inner panel (see diagram).
To do this:
1)Remove the rubber screw covers to access the mounting holes.
2)Drill a Ø 3 mm hole in the cabinet panel to avoid splitting the wood.
3)Attach the oven with the two screws.
4)Replace the rubber screw covers (they also serve to absorb the shock caused by closing the oven door).
(*) If the cabinet is open, its opening must be 70 mm (maximum).


 To be certain that you have properly installed your appliance, do


 not hesitate to call on a household appliance specialist.
9

99638961_A_FR GB.qxp 02/03/2006 10:38 Page 10
How to use your oven
1. The oven programmer
1 7 6
2 


 5
5
3 |
4 |
|
8 9 10
1
2
3
4
5
Clock and cooking time display |
6 |
|
ECO (economical) cooking indicator |
|
Temperature display |
7 |
|||
|
Door locked indicator |
|||
|
|
|
|
|
Cooking time symbol |
8 |
|
Button for setting timed |
|
|
|
|
programmes |
|
End of cooking time symbol |
|
|
|
|
|
9 |
|
Buttons for adjusting the time |
|
Timer symbol |
10 |
|
|
|
|
|
|
|
10
99638961_A_FR GB.qxp 02/03/2006 10:38 Page 11
How to use your oven
2. How to set the clock
a) When the oven is first switched on at the mains EN
• The display blinks to 12h00.
• Press on the  and
and  buttons until the correct time is shown (Keeping a finger on the button, rather than tapping it, is quicker)
The example shows 12.30
Registration of the amended time is automatic after
a few seconds. -> the display no longer flashes
b) Altering the clock |
|
|
|
|
• Press on both |
and |
buttons together for a |
1 |
1 |
|
|
few |
||
seconds until the display blinks. |
|
|
||
The time display blinks and you can alter the time.
Press on both  and
and  buttons together to obtain the correct time (back or forwards).
• Press button |
to confirm the time. |
3 |
2 |
Setting the hour is not possible if the cooking method selector is in the "Pyro" or "Pyro Eco" position.
If you forget to confirm the time by pressing button  , the oven will do it automatically after a few seconds.
11

99638961_A_FR GB.qxp 02/03/2006 10:38 Page 12
How to use your oven
3. How to cook straightaway
The timer display only shows the time of day. It should not be blinking.
• Choose how you want to cook your food:
Turn the dial until it is indicating your choice.
The example chosen is “ ”-> the oven start functioning.
Your oven will give the temperature normally used.
Place your food in the oven as suggested by the |
T˚c |
|
|
cooking guide. |
|
You can alter the temperature by moving the switch
TºC towards + or -
E.g “ ” altered to 210°.
After this, the oven heats up and the temperature (210ºC) blinks.
You will hear a series of beeps when the correct temperature is reached and the temperature itself will cease blinking.
After cooking, the fan will continue to work for a while in order to cool the oven down.
12
 Loading...