


FEINGL.05/05 29/6/05 10:36 Página 1

FEINGL.05/05 29/6/05 10:36 Página 2
OVENS
 CONTENTS
 2.1.
2.1.
GREETING
1. SAFETY ADVICE . . . . . . . . . . . . . . . . . . . . . . . . . . . . . . . . . . . . . . . . . . . . . .6 1.1. Installation . . . . . . . . . . . . . . . . . . . . . . . . . . . . . . . . . . . . . . . . . . . . . . . .6 1.2. Use and operation . . . . . . . . . . . . . . . . . . . . . . . . . . . . . . . . . . . . . . . . . .7 1.3. Child safety . . . . . . . . . . . . . . . . . . . . . . . . . . . . . . . . . . . . . . . . . . . . . . .8 1.4. Care and cleaning . . . . . . . . . . . . . . . . . . . . . . . . . . . . . . . . . . . . . . . . . .8
2. ASSEMBLY AND INSTALLATION . . . . . . . . . . . . . . . . . . . . . . . . . . . . . . . . .9 2.1. Unpacking . . . . . . . . . . . . . . . . . . . . . . . . . . . . . . . . . . . . . . . . . . . . . . . .9 2.2. Assembly and Connection to the mains power supply . . . . . . . . . . . . . . .9
3. YOUR NEW OVEN . . . . . . . . . . . . . . . . . . . . . . . . . . . . . . . . . . . . . . . . . . . .12 3.1. General Description . . . . . . . . . . . . . . . . . . . . . . . . . . . . . . . . . . . . . . . .12 a) Control panel . . . . . . . . . . . . . . . . . . . . . . . . . . . . . . . . . . . . . . . . . . .12 b) LCD display. . . . . . . . . . . . . . . . . . . . . . . . . . . . . . . . . . . . . . . . . . . .13
3.2. Before using the oven for the first time . . . . . . . . . . . . . . . . . . . . . . . . . .14 a) Set-up menu . . . . . . . . . . . . . . . . . . . . . . . . . . . . . . . . . . . . . . . . . . .14 b) Initial cleaning . . . . . . . . . . . . . . . . . . . . . . . . . . . . . . . . . . . . . . . . . .16
3.3. How to use your new oven . . . . . . . . . . . . . . . . . . . . . . . . . . . . . . . . . .16 a) How to turn the oven on and off . . . . . . . . . . . . . . . . . . . . . . . . . . . . .16 b) Step-by-step guide to cooking with the oven . . . . . . . . . . . . . . . . . . .16 c) How to select a cooking function . . . . . . . . . . . . . . . . . . . . . . . . . . . .17 d) Electronic temperature control and adjustment . . . . . . . . . . . . . . . . .19
3.4. Accessories . . . . . . . . . . . . . . . . . . . . . . . . . . . . . . . . . . . . . . . . . . . . . .20 3.5. AVANSSIS ventilation system . . . . . . . . . . . . . . . . . . . . . . . . . . . . . . . . .24
4. TIMER FUNCTIONS . . . . . . . . . . . . . . . . . . . . . . . . . . . . . . . . . . . . . . . . . . .25 4.1. Setting the timer . . . . . . . . . . . . . . . . . . . . . . . . . . . . . . . . . . . . . . . . . . .25 4.2. Cooking time . . . . . . . . . . . . . . . . . . . . . . . . . . . . . . . . . . . . . . . . . . . . .26 4.3. Auto-Stop cooking . . . . . . . . . . . . . . . . . . . . . . . . . . . . . . . . . . . . . . . . .27 4.4. Beeper . . . . . . . . . . . . . . . . . . . . . . . . . . . . . . . . . . . . . . . . . . . . . . . . . .28 4.5. Cancellation of timer functions . . . . . . . . . . . . . . . . . . . . . . . . . . . . . . . .29

FEINGL.05/05 29/6/05 10:36 Página 3
 2.1.
2.1.
5. HOW TO PROGRAMME THE AUTOMATIC RECIPES IN A “COOKBOOK”OVEN . . . . . . . . . . . . . . . . . . . . . . . . . . . . . . . . . . . . . . . . . .30
6. HOW TO PROGRAMME COOKING TIMES IN AN “AUTO-CHEF” OVEN . . .32
7. HOW TO MEMORIZE YOUR OWN RECIPES . . . . . . . . . . . . . . . . . . . . . . . . |
34 |
8. SAFETY FUNCTIONS . . . . . . . . . . . . . . . . . . . . . . . . . . . . . . . . . . . . . . . . .36 8.1. Automatic cut-off . . . . . . . . . . . . . . . . . . . . . . . . . . . . . . . . . . . . . . . . . .36 8.2. Child safety lock . . . . . . . . . . . . . . . . . . . . . . . . . . . . . . . . . . . . . . . . . . .36
9. CLEANING AND MAINTENANCE . . . . . . . . . . . . . . . . . . . . . . . . . . . . . . . .37 9.1. How to clean … . . . . . . . . . . . . . . . . . . . . . . . . . . . . . . . . . . . . . . . . . . .37 9.1.1. The outside of the oven . . . . . . . . . . . . . . . . . . . . . . . . . . . . . . . .37 9.1.2. The inside of the oven . . . . . . . . . . . . . . . . . . . . . . . . . . . . . . . . . .38 9.1.3. The Accessories . . . . . . . . . . . . . . . . . . . . . . . . . . . . . . . . . . . . . .40 9.1.4. The side grilles . . . . . . . . . . . . . . . . . . . . . . . . . . . . . . . . . . . . . . .40 9.1.5. The smoke filter . . . . . . . . . . . . . . . . . . . . . . . . . . . . . . . . . . . . . .41 9.1.6. The grease filter . . . . . . . . . . . . . . . . . . . . . . . . . . . . . . . . . . . . . .41 9.2. How to replace the interior light bulb . . . . . . . . . . . . . . . . . . . . . . . . . . .42
10. PRACTICAL ADVICE AND COOKING TABLE . . . . . . . . . . . . . . . . . . . . . . .43
11. LOCATING AND TROUBLESHOOTING PROBLEMS . . . . . . . . . . . . . . . . . .49
12. NET Comp@tible Oven: Connection to mains networks . . . . . . . . . . . . . .51
13. ENVIRONMENTAL NOTE . . . . . . . . . . . . . . . . . . . . . . . . . . . . . . . . . . . . . . .52 13.1. Protecting the environment . . . . . . . . . . . . . . . . . . . . . . . . . . . . . . . . . .52 13.2. Energy-saving tips . . . . . . . . . . . . . . . . . . . . . . . . . . . . . . . . . . . . . . . .53

FEINGL.05/05 29/6/05 10:36 Página 4
FEINGL.05/05 29/6/05 10:36 Página 5
GREETING
Dear client,
You are now the proud owner of a FAGOR oven and we would like to thank you for the confidence you have shown in us.
FAGOR provides you with a new generation of domestic appliances that contribute to an improvement in your quality of life thanks to our range of innovative, easy-to use and environmentally-friendly products.
The range of FAGOR products offers you a wide selection of cooking hobs, extractor fans, microwave ovens, dishwashers, washing machines, and refrigerators that you can combine with your new oven.
We aim to offer an on-going response to your demands regarding our products as best we can. In addition, you will be able to contact us via the Internet on our web page, www.fagor.com, where you will also be able to find updated information about the latest innovations from the FAGOR brand. Don’t hesitate to ask us.
Before using your oven for the first time, we recommend you read the user manuals carefully. You will find there the information you will need to make the most of your new FAGOR oven. Please pay special attention to the safety advice and to the comments on how to use and care for your oven correctly.
At the same time, we recommend you keep these manuals in a safe place as you may find them useful for reference in the future for any question that might arise. If you pass the appliance on to another person, please be sure to enclose the manuals.
Warm greetings and welcome to the family of FAGOR customers.
The FAGOR brand.
5
FEINGL.05/05 29/6/05 10:36 Página 6
1.SAFETY ADVICE
1.1.INSTALLATION
•Once all the packaging materials have been removed, check that the oven is not damaged and that the power cable is in perfect condition. If you detect any damage or minor problems caused in transit, call the Customer Service Centre, and do not use the oven.
•Any work required for installing and repairing this oven must be done solely and exclusively by an authorised fitter and following the manufacturer’s instructions. The manufacturer declines any and all liability if the current standards are not complied with.
•The identification plate on the lower front part of the oven provides the technical details and identification number of the apparatus. This must be consulted before proceeding with any electrical connections.
•It is dangerous to alter the characteristics or modify the product in any way.
•For electrical safety reasons, fitted ovens must be installed in appropriate units and these must comply with the standards currently in force for this purpose.
IMPORTANT
Any manipulation of the oven or cooking hob for the purposes of installation, maintenance, etc. must be carried out with the oven disconnected from the mains electricity.
6
FEINGL.05/05 29/6/05 10:36 Página 7
1.2.USAGE AND OPERATION
•This oven has been designed solely for domestic use. Use it solely and exclusively for cooking food, never for any other purpose.
•The oven must always be operated with the door closed, for all programmes, including the grill.
•Open the oven door carefully, as hot steam may come out.
•Never pour water directly onto the inside of a hot oven, as this might damage the enamel.
•Never pick up the bowls or pans used for cooking with your bare hands; always use an insulating cloth or oven glove.
•Do not leave the oven to cool down with the door open. Even if the oven door is only left a little ajar, the front panels of the adjacent units may be damaged over time.
•Never store inflammable objects inside the oven.
•Never place food or dishes directly onto the floor of the oven. Always use a tray or rack.
•Do not sit or lean on the oven door, it might lead to problems with the door closure mechanism.
•If the oven breaks down for any reason, disconnect it and call Technical Service.
•Your oven is equipped with a fan that helps with vapour extraction and ensures the furniture unit remains cool. The fan is always working when the oven is on. Once the oven has been turned off, the fan continues to run for a time to reduce the oven's external temperature. It is possible to feel the air emerging from between the oven door and front panel.
7

FEINGL.05/05 29/6/05 10:36 Página 8
1.3.CHILD SAFETY
•Always keep children at a safe distance and make sure they do not operate the appliance without supervision.
•Never allow small children to play with the oven or turn the control knobs. The programmer on your oven includes a child-safety lock, so be sure to use it.
1.4.CARE AND CLEANING
•For reasons of safety and hygiene, always keep the oven clean. The accumulation of dried grease or other remains of food may cause unpleasant odours.
•To ensure a longer working life for your oven, it is recommended that a careful general cleaning be carried out frequently.
•The oven must be turned off and sufficiently cooled down before any cleaning or maintenance work is done, so that it can be touched without danger.
•The oven door must always be tightly closed. Keep the door seal clean at all times.
•Never clean the oven with high-pressure cleaners or steam-cleaning machines.
•Do not use corrosive or abrasive cleaners. If a product of this type comes into contact with the oven front, wash it off immediately with water.
•Avoid the use of hard sponges or scouring pads on the inside of the oven, as they might damage the enamel. Follow the instructions provided in the part entitled “Cleaning and Maintenance”.
8
FEINGL.05/05 29/6/05 10:36 Página 9
2.ASSEMBLY AND INSTALLATION
2.1.UNPACKING
1. Cut the plastic film covering the package.
2. Carefully remove all the oven’s protective elements: top cover, edge protection and polystyrene base.
To protect the environment, please follow the advice given in the part entitled “Environmental Note”.
2.2.ASSEMBLY AND CONNECTION TO MAINS ELECTRICITY
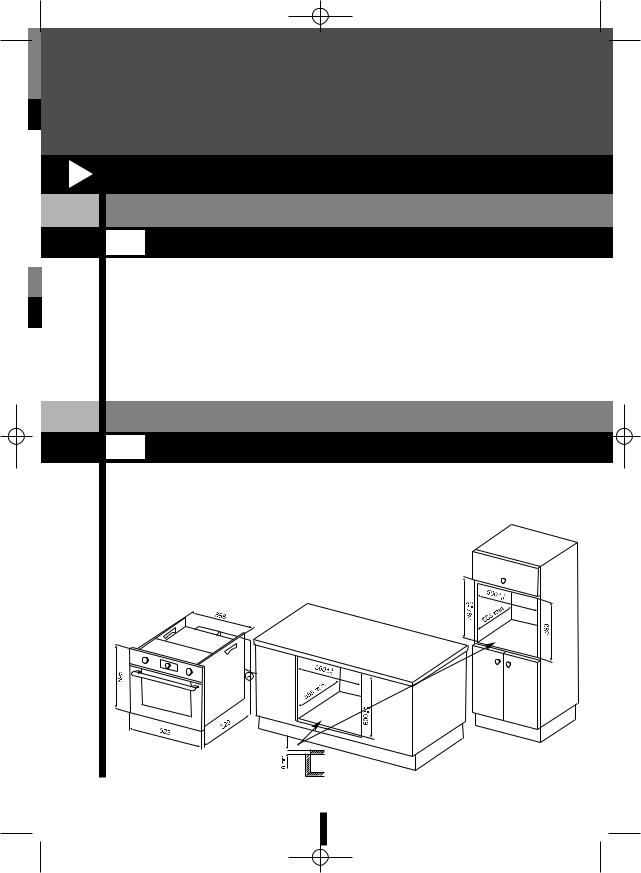
1.The measurements of the unit into which the oven is to be mounted must coincide with those indicated in the diagrams, depending on whether the unit is wall-mounted or floor-based.
-Figure 1-
9
FEINGL.05/05 29/6/05 10:36 Página 10
2.At the back of the oven you will find cable “A” which is used to make the electrical connection.
WARNING: Before plugging the appliance in, check the following:
•that the mains voltage corresponds to the voltage indicated on the feature identification plate;
•that the electrical mains the oven is to be connected to is powerful enough for the oven's maximum power load, indicated on the feature identification plate.
Connect the cable to a socket with a good earth connection. This is essential to ensure the correct operation of the electronic elements.
3.After it is plugged in, place the oven in the space, taking special care not to leave any surplus cable on top of the oven.
4.A switch for disconnecting the oven must be placed in the most accessible site possible, with a minimum of 3 mm between the contacts.
10
FEINGL.05/05 29/6/05 10:36 Página 11
5.Fasten the oven to the unit with the 2 screws you will find in the accessories bag.
-Figure 2-
6. Access the oven’s set-up menu.
11
FEINGL.05/05 29/6/05 10:36 Página 12
3.YOUR NEW OVEN
3.1.GENERAL DESCRIPTION
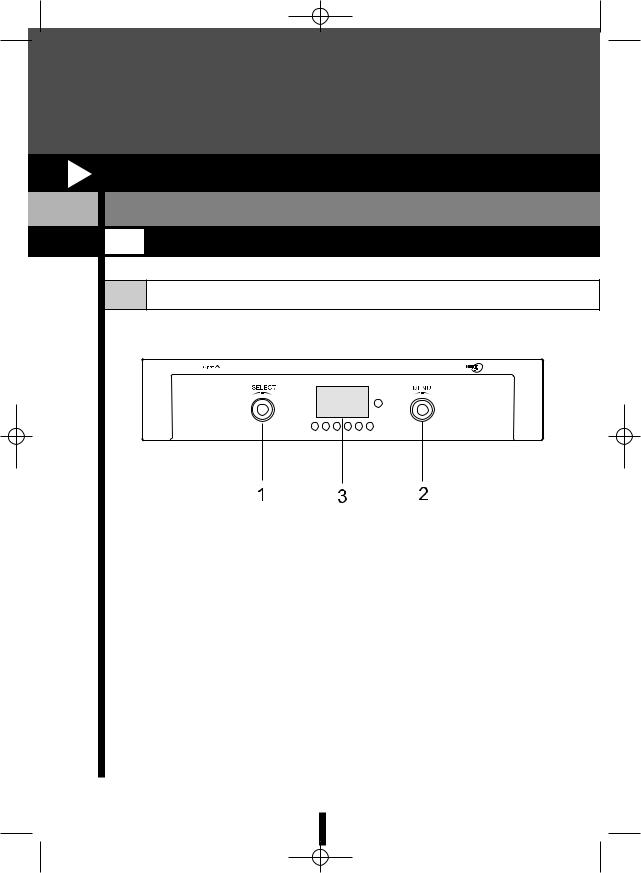
a Control panel
1.SELECT Control.
2.MENU Control.
3.LCD display.
Your oven has 2 rotating controls that can be turned to the left or right.
12
FEINGL.05/05 29/6/05 10:36 Página 13
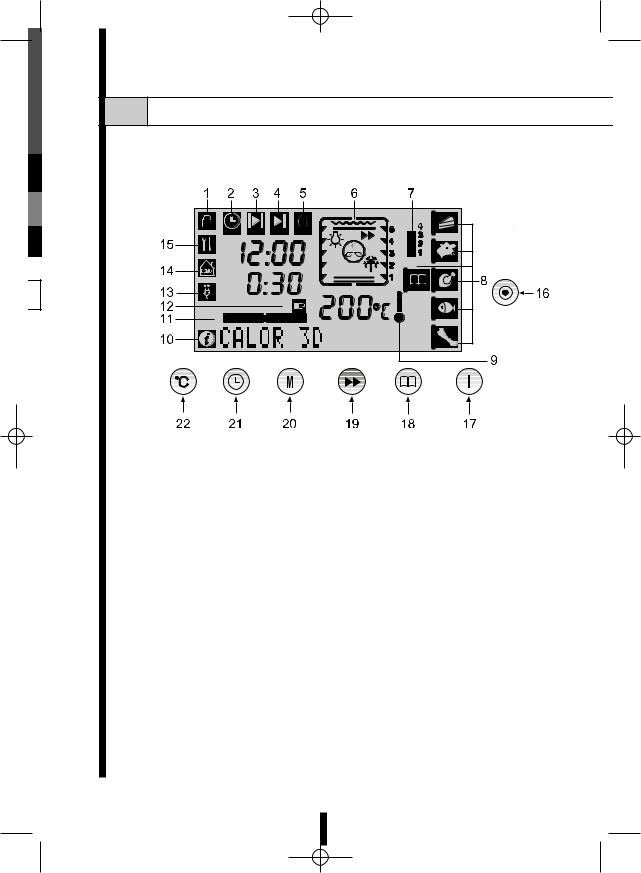
b LCD display
1.Symbol indicating oven blocked
2.Time adjustment symbol
3.Cooking time symbol
4.End Cooking time symbol
5.Beeper symbol
6.Function representation symbol
7.Memories and cooking phases symbol
8.Recipes menu and food type symbol
9.Temperature scale symbol
10.Set-up symbol
11.Progress bar symbol
12.Oven stopped symbol
13.Automatic disconnection indicator symbol
14.NET Comp@tible oven symbol
15.Technical Service symbol
16.On/Off and stop button
17.Information and set-up menu button
18.Recipe selector button
19."CELERIS" special function button
20.Memory button
21.Timer function button
22.Temperature button
13
FEINGL.05/05 29/6/05 10:36 Página 14
3.2.BEFORE USING THE OVEN FOR THE FIRST TIME
a SET-UP MENU
You now have an electric oven with multiple possibilities for personalization. In order to set up your oven to suit your preferences:
1.Keep the  button pressed in until you hear a beep (for about 3 seconds) and then the oven will be on.
2. |
Keep the i button pressed until you hear a beep. |
3. |
Then follow each of the steps indicated below: |
LANGUAGE
Turn the MENU control round until it shows the desired language and then press it in to confirm the selection made.
DATE AND TIME
1.Set the current date (dd-mm-yy) and time using the SELECT control and confirm each setting by pressing in the control button.
2.Once you have set the time and date, choose of these two options and then press the MENU control to confirm the setting made:
ON: when the oven is off, the display will show the time and date. OFF: when the oven is off, the display will not show the time and date.
NOTE:
•Once the time and date have been set for the first time, your oven includes a system to allow it to remember these even after a power cut
SOUND
Choose one of these four options and confirm your selection by pressing the control:
KEY: the oven will only beep when a button is pressed.
CONTROL: the oven will only beep when the rotating controls are turned. YES: the oven will beep whenever a button is pressed or one of the controls is turned.
NO: the oven will not beep at any time when buttons are pressed or controls are turned.
14
FEINGL.05/05 29/6/05 10:36 Página 15
ALERT END
Whenever the pre-set cooking programme has finished or the beeper has reached the end of its countdown, the oven will beep continuously. You can choose how long this beeping should last. Choose a duration from 0 to 60 seconds using the rotating control and then confirm the setting made by pressing the control button in.
LIGHTING
You can choose how and when to illuminate the interior of the oven. Choose one of these three options using the rotating control and then confirm the setting made by pressing the control button in:
YES: whenever the oven is on, the interior light will remain lit. NO: the oven light will remain off all the time.
AUTO: the oven itself will handle the lighting depending on whether it is in interactive mode or not. If the light is off, press any button to turn it on.
LIGHT AT LOW TEMPERATURES
Certain recipes involve cooking at low temperatures, and so the oven’s interior light remains off during cooking so as not to affect the temperature inside. For specific recipes of this type, you can choose one or other of these options:
YES: the light will remain off during the cooking process.
NO: the light will remain on during the cooking process.
Once you have chosen one of these two options using the rotating control, confirm it by pressing the control button in.
AUTO SHUT-OFF
To avoid the possibility of you leaving the oven on and forgetting about it, you can set the “Auto Shut-off" option so that it switches itself off. Turn the rotating control to select the amount of time you would like the oven to wait (you can choose between 5 and 30 minutes) before switching itself off after you last operate a control. Once you have selected the amount of time, confirm the selection by pressing the control in and the on the display the 

 symbol will be lit.
Confirming this last selection will take you out of the set-up menu.
15
FEINGL.05/05 29/6/05 10:36 Página 16
b INITIAL CLEANING
Before using your new oven for the first time, heat it up when empty for about 30 minutes, with the door closed. Select the cooking function  and adjust the temperature to 250º C, having previously checked that all protective plastic sheeting and labels have been removed.
At the beginning, the oven may give off a strange smell. You may also notice a little smoke. All of this is normal. This is how any possible remains of grease inside the oven left over from the manufacturing process are removed. Once the oven has cooled down, clean it following the instructions given in the part entitled “Cleaning and Maintenance”.
Before using any of the accessories included with your new oven for the first time, clean them with water, a little soap and a cloth.
3.3.HOW TO USE YOUR NEW OVEN
a HOW TO TURN YOUR OVEN ON AND OFF
•To turn on the oven, press the  button and keep it pressed until you hear a beep (approximately 3 seconds).
At that point, the display will light up and show the last selection made and the 


 symbol will be lit up to indicate that the oven is not warming up.
•To turn off the oven, press the  button and keep it pressed until you hear a beep (approximately 3 seconds).
b STEPS TO TAKE TO COOK WITH YOUR OVEN
Follow these steps to turn on your oven:
1.Turn on the oven by pressing the  button.
2.Select a cooking function using the MENU control.
3.Set the desired temperature by using the  button and the SELECT control, then accept the setting made by pressing in either of the controls.
4.If you wish, you can set the cooking time by following the steps described in the section entitled “Timer functions”.
5.Press either of the controls to operate the oven.
16
FEINGL.05/05 29/6/05 10:36 Página 17
c HOW TO SELECT A COOKING FUNCTION
Once the oven is on, the display will show one or other of the functions available. Turn the MENU control and you will be able to display the different cooking functions described below. Select the function you want to use and press in the MENU control. At this point the oven will start operating.
•Your oven offers the following cooking functions:
 Defrosting: The oven heats up all the elements at a very low temperature, so that frozen food defrosts quickly and evenly. The defrost function can be used with any type of frozen food: meat, fish or vegetables.
Traditional Cooking: With this function, the heat comes from both above and below, baking the food in the traditional way.
 Gentle Grill: Only the central part of the grill resistance is connected, allowing you to save power when finishing off small gratinees or toasting or grilling smaller portions of food. To ensure optimal results, place the items in the central part of the tray or grille.
 Fast Grill: The action of the grill covers the entire surface of the tray or grille, allowing you to toast large trays or several items of food at the same time. Very appropriate for all types of toasting and gratinees.
 Strong Grill with Fan: The action of the grill covers the entire surface of the tray or grille, allowing you to toast large trays or several items of food at the same time. The fan ensures that the heat is uniformly distributed throughout the oven, browning the food on all sides.
Turbo Plus: The oven is heated by the circular element located at the rear. The fan drives the hot air around the oven to distribute the heat more evenly. Ideal for working with different trays at various heights.
Traditional Heat with Fan: The heat comes from both the top and the bottom of the oven and the fan distributes the temperature evenly. You can cook different dishes on different levels at the same time without mixing smells or flavours.
In addition to these functions, your oven includes a series of special functions for highly specific applications:
Intensive Bottom Heat (Pizza): The strong heat coming from the lower part of the oven and even temperature distribution due to the fan give pizzas a particularly crisp base.
17
 Loading...