


H750
User Manual for Your Oven
Manual de utilización del horno
Guia de utilização do seu forno
Le guide d’utilisation de votre four
Bedienungsanleitung Ihres Backofens
PT
FR
DE
EN
ES

2

3
EN
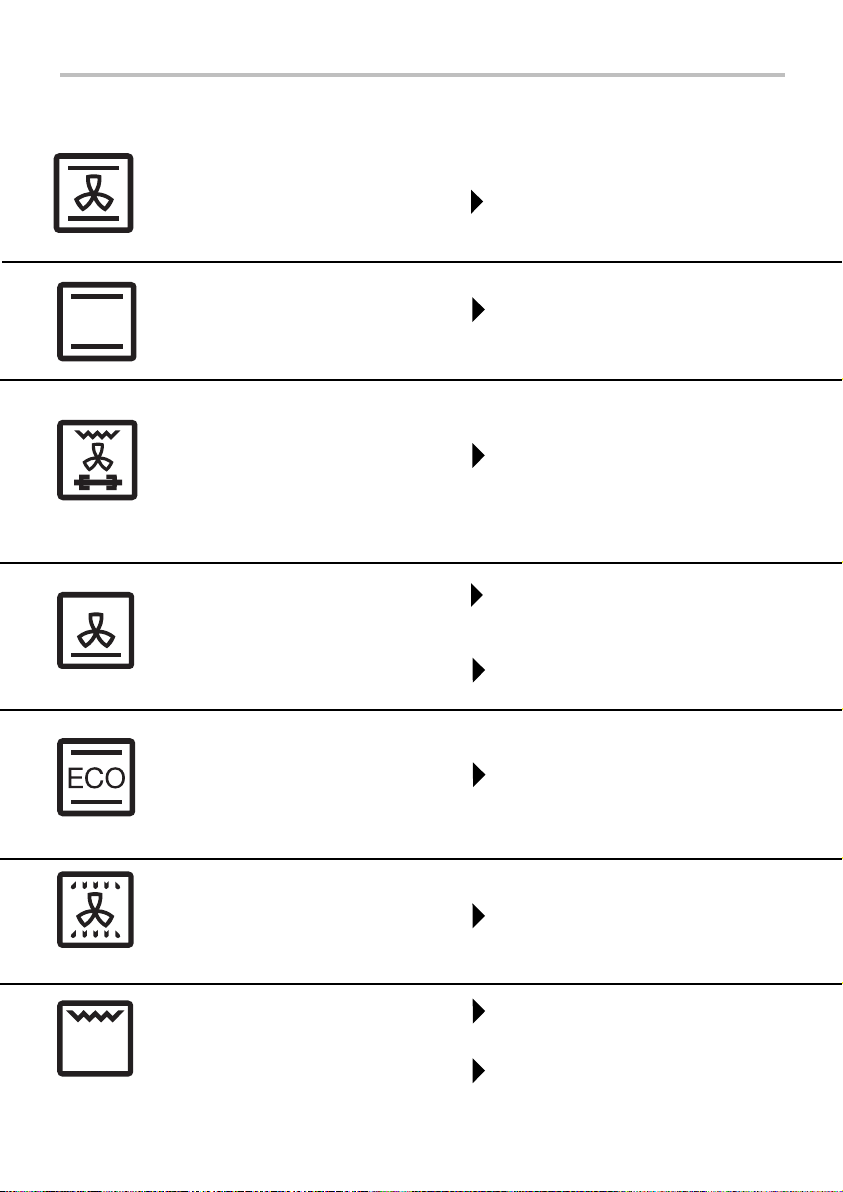
Table of Contents
What does your oven look like?
Description of the appliance P.3
Accessories P.4
Safety recommendations P.5
How do you install your oven?
Electrical connection P.6-7
How do you change the bulb? P.7
Useful dimensions for installing your oven P.8
How does your oven work?
Close-up of your programmer P.9
How do you set the clock on the oven? P.10
How do you program for immediate cooking? P.11
How do you set a cooking programme? P.11-12
How do you program for energy-saving cooking ?* P.13
How do you use the timer? P.14
What do you do in case of operating
malfunctions? P.15
Oven cooking modes P.16-17
How do you clean the cavity of your oven?
What is pyrolysis? P.18
In what situations should pyrolysis be used? P.18
How do you program for immediate pyrolysis? P.19
Throughout the manual,
indicates safety recommendations,
indicates advice and tips

4
1
3
5
ECO
ECO
0
PYRO System
40
65
100
150
165
180
200
210
220
240
275
0
4
1
2
3
4
5
6
7
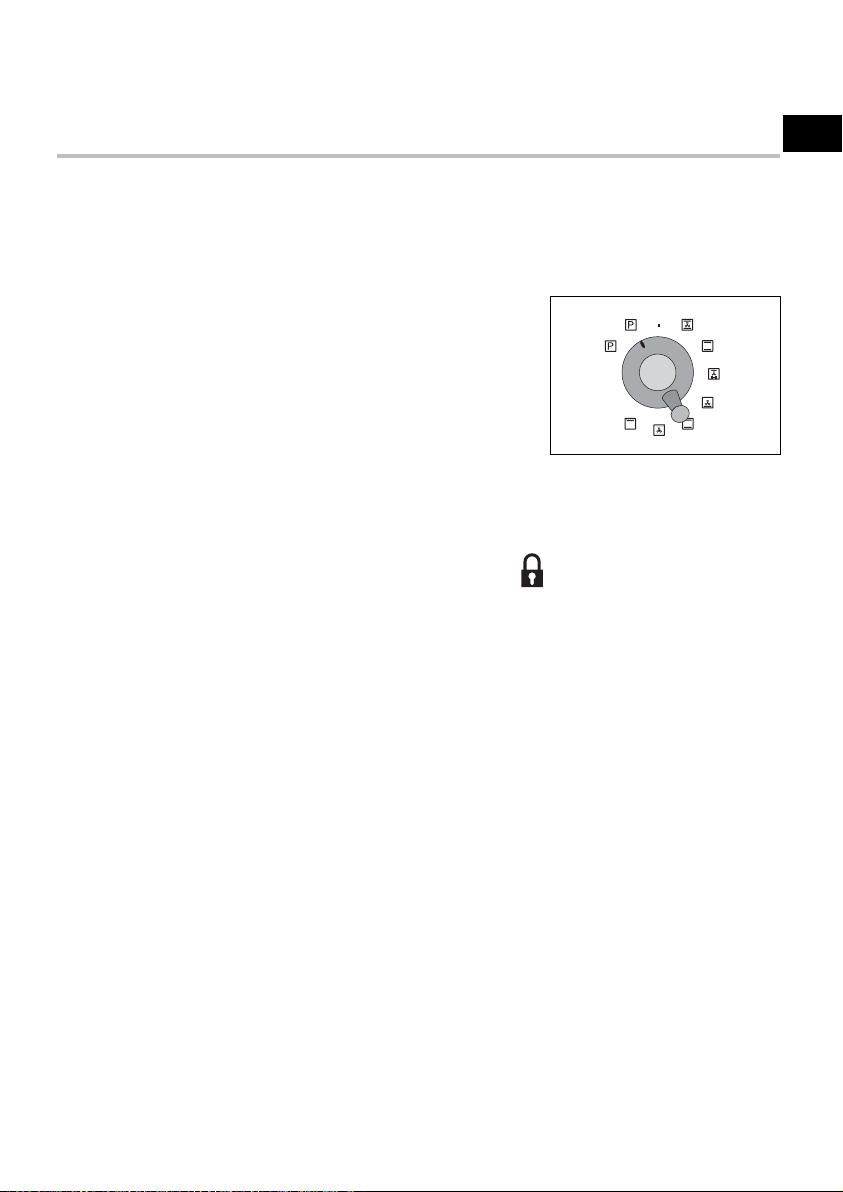
What does your oven look like?
DESCRIPTION OF THE APPLIANCE
1
2
5
6
73
4
Shelf support indicator
Hole for turnspit
Contact for open door
detector
Temperature selector
Programmer
Function selector
Light

5
EN
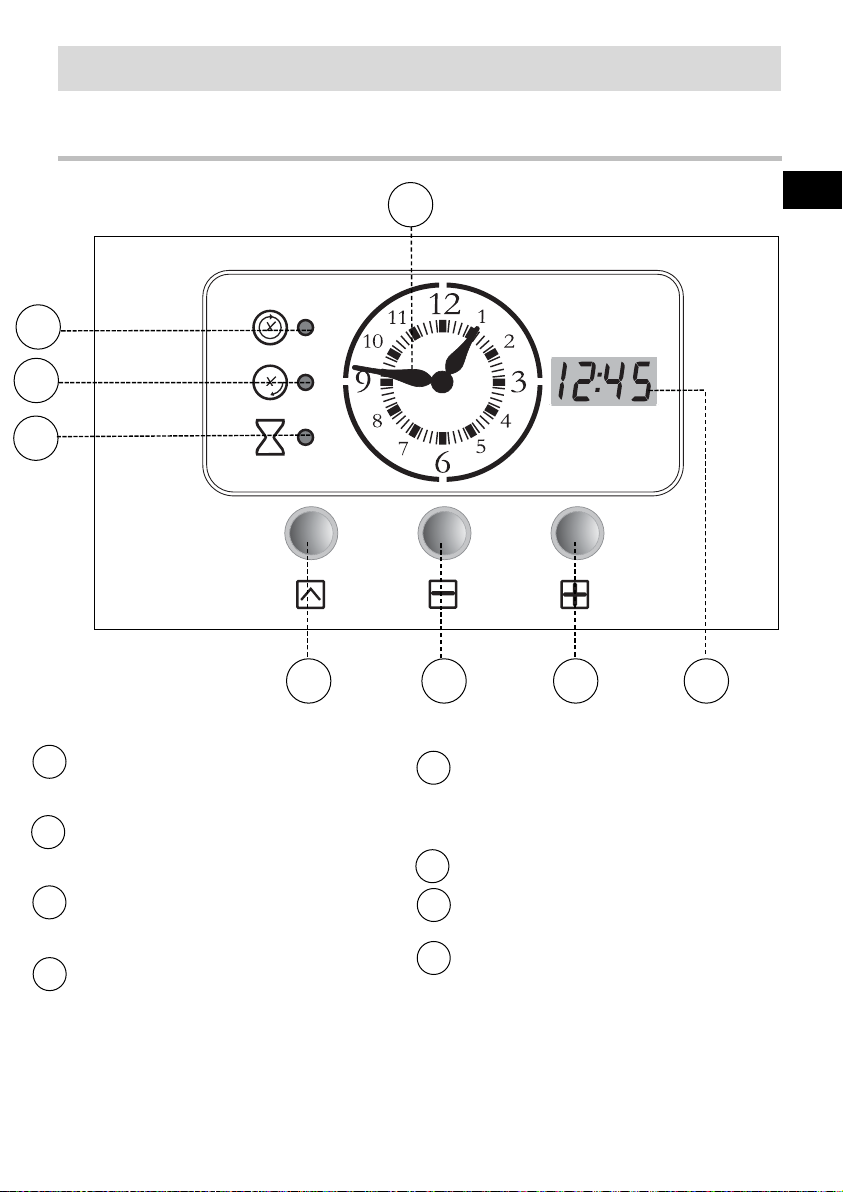
How does your oven work ?
1. Close-up of your programmer
1
2
3
4
1
3
4
5
6
7
8
2
Time display
Cooking time indicator
End of cooking indicator
Timer indicator
Touch control for accessing
various time setting
programmes
Touch controls for setting
times
Digital display (cooking time,
end of cooking, timer)
5 6 7 8

6
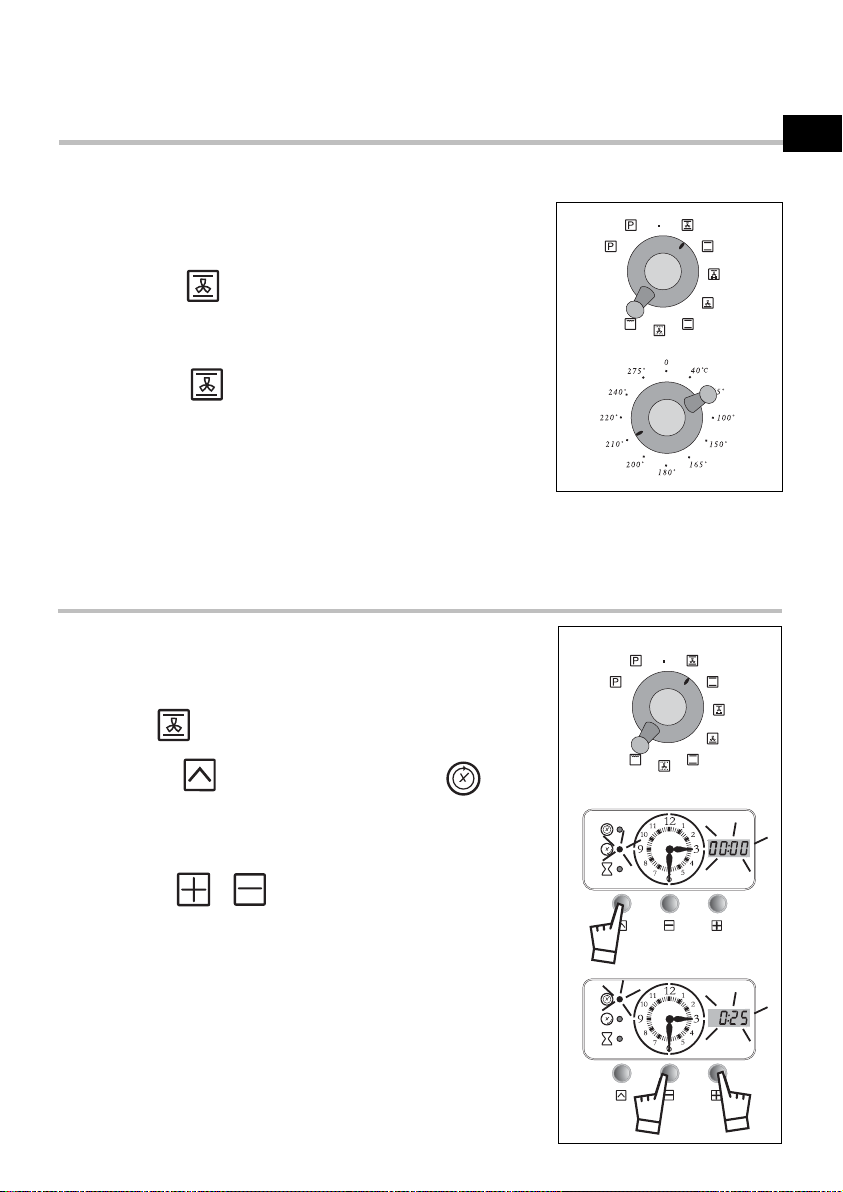
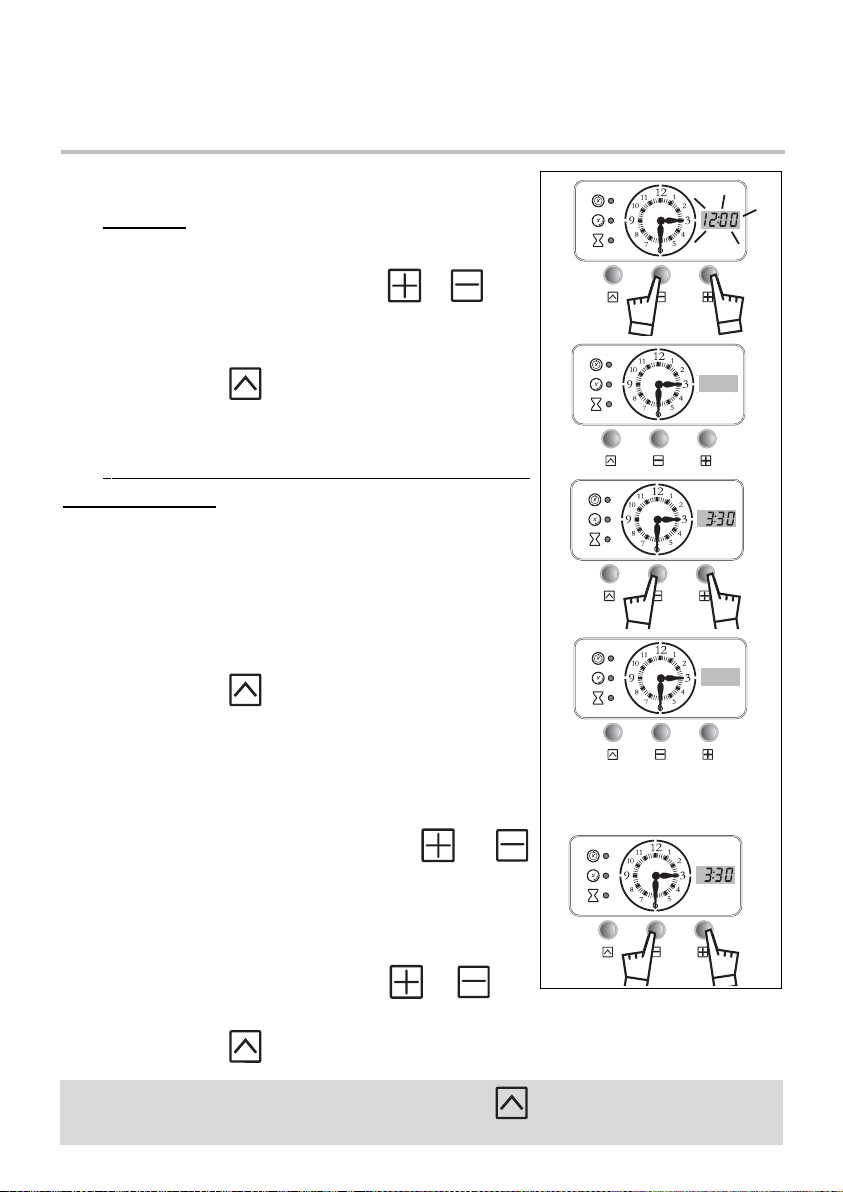
a) When supplied with electricity
- CLOCK:
• The digital display flashes.
• Set the time by pressing on the and touch
controls to adjust the clock (the digital display is no
longer flashing).
• Press the “ ” touch control to enter.
Example: 3:30.
- DIGITAL DISPLAY (used for
programming):
After a few seconds, the digital display starts flashing
again.
Set the time the same as for the clock by pressing on
the + and - touch controls to increase or decrease
the displayed time.
• Confirm the time by pressing the “ ” touch
control.
When the time is set, the digital display turns off.
b) Resetting the clock
• Simultaneously press the and touch controls
for a few seconds until the digital display flashes.
The time display flashes, indicating that it is now
possible to adjust the time.
To set the time, press the or touch controls
to advance or turn back the displayed time.
• Confirm the time by pressing the “ ” touch control.
2. How do you set the clock on the oven?
How does your oven work?
If you do not confirm the time by pressing the “ ” touch control,
the oven will do it automatically after a few seconds.
7
EN
How does your oven work?
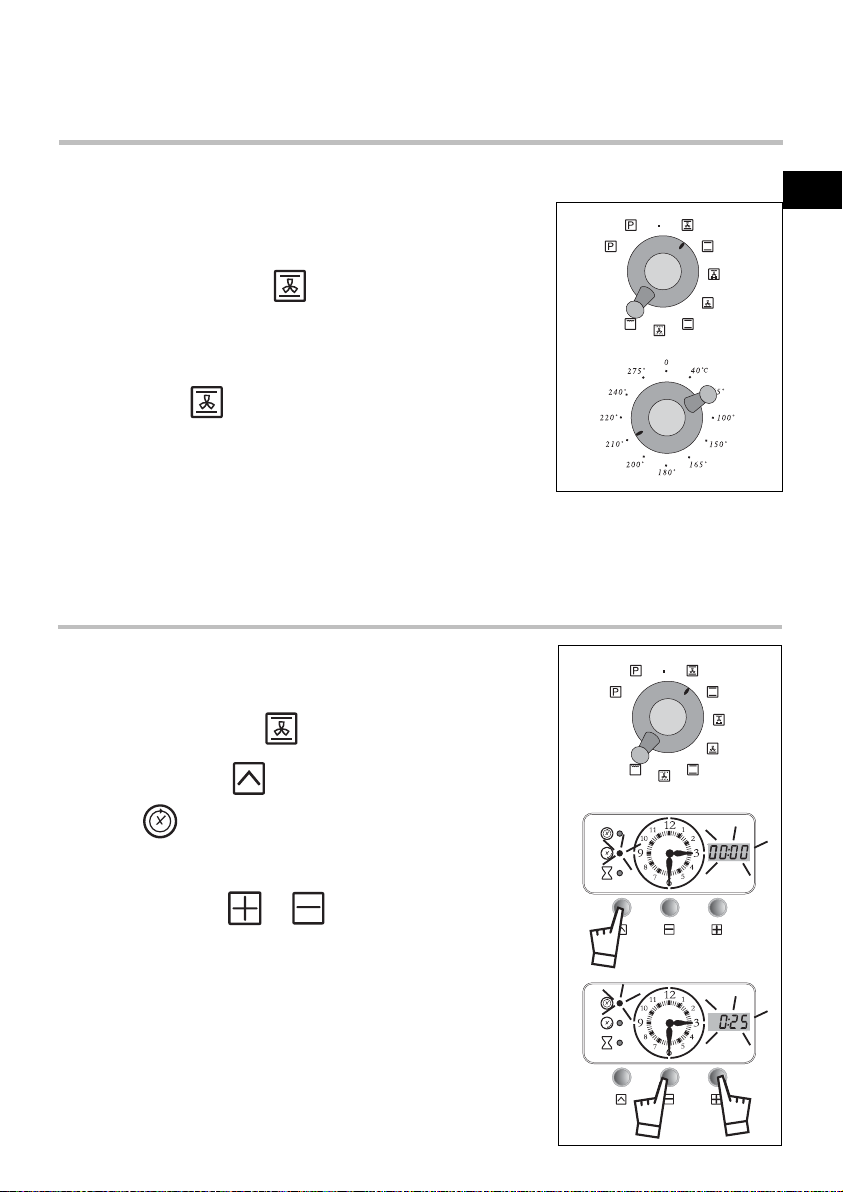
3. How do you program for immediate cooking?
4. How do you set a cooking programme?
a) With immediate start
1. Choose the cooking mode and set the temperature.
Example: “ ” position
2. Press the “ ” touch control until the
“”
display begins flashing.
The display flashes 0:00 to indicate that you can now
adjust the setting.
3. Press the or touch controls to set the
desired cooking time.
Example: 25 min cooking time.
The setting is automatically entered after a few
seconds -> the display no longer flashes.
The countdown of the length of time begins
immediately after it has been set.
After these three steps, the oven heats up.
The digital display should not be flashing.
• Choose the cooking mode:
Turn the function selector to the position of your
choice.
Example: “ ” position -> the oven turns on.
Place your dish in the oven based on the
recommendations provided by the cook book.
Example “ ” at 200°.
After these steps, the oven heats up and the
temperature light comes on.
You can set the end of cooking time for any time within
the coming 12 hours.
After a cooking cycle, the circulating fan continues to function for a
period in order to cool the oven.
C
O
ECO
0
ECO
ECO
0
8
How does your oven work?
It is possible to modify at any moment the cooking time by performing the steps
described above.
You can cancel a cooking programme by setting the cooking time to 0:00.
At the end of cooking, a series of beeps is emitted for a few minutes.
The beeps can be stopped by pressing the or touch controls. After these
steps you can use your oven again.
Return the temperature and function selectors to the off position so that your oven
does not begin heating up again.
b) How do you set a delayed cooking programme? (programming
the time at which cooking is complete)
Proceed as with programmed cooking.
After setting the cooking time,
press the “ ” touch control until the
“”.
display
begins flashing
The display flashes to indicate that you can now adjust
the setting.
Press the or touch control to set the desired
end time.
Example: End of cooking at 6:00.
After these steps, the oven heating is delayed so that
cooking ends at 6:00.
The digital display is locked until cooking begins.
At the end of cooking, a series of beeps is emitted for a few minutes.
When your cooking programme is finished, return the cooking selector to "0" and
the temperature control to the off position.
You can set the end of cooking time for any time within the coming 12 hours.

9
EN
How does your oven work?
5. How do you program for energy-saving cooking?*
The analogue programmer should display only the time; it should not be
flashing.
• Turn the function selector to the " ".
• Place your dish in the oven according to the
recommendations provided in your cooking guide.
• Turn the thermostat knob to the 200° position.
The thermostat indicator light goes out when the
temperature is reached.
After these steps, the oven heats up
To optimise the ECO cooking mode, do not pre-heat
and do not open the door.
*This position makes it possible to save up to 20%
energy while still offering identical cooking results.
The ECO position is used for the energy label performance.
ECO
After a cooking cycle, the fan continues to function for a
period to ensure the heating elements are properly cooled
down.
ECO
ECO
0
10
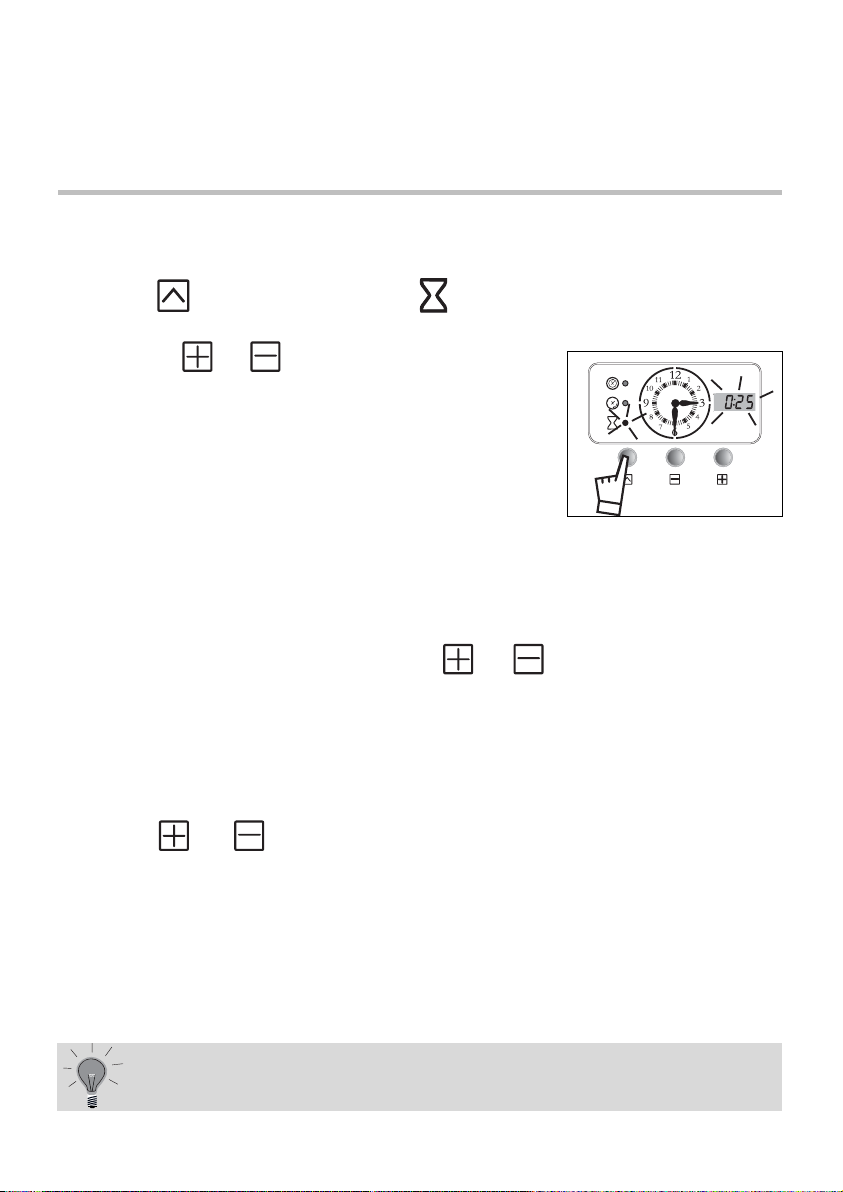
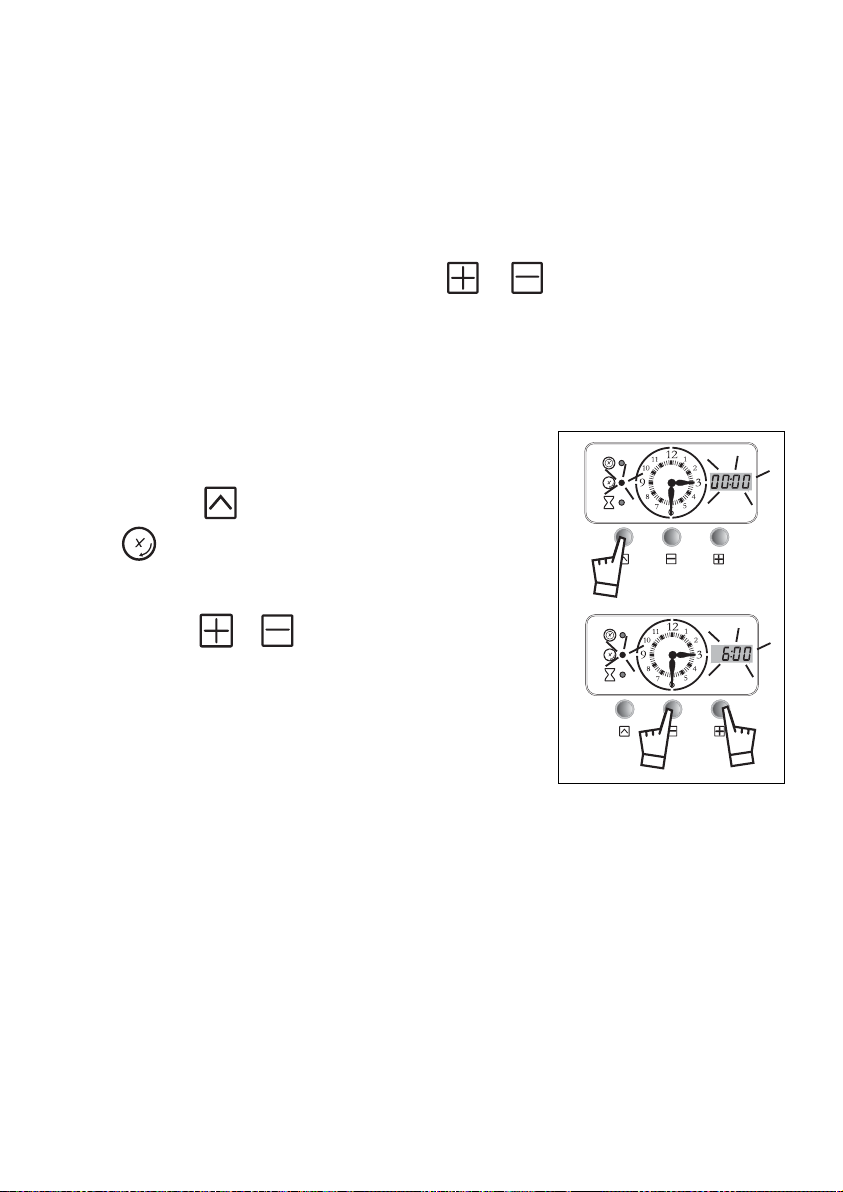
6. How do you use the timer?
Your oven is equipped with an electronic timer that is independent of
the oven functions, making it possible to measure times.
Press the “ ” touch control until the “ ” display begins flashing.
Press on the ( or ) touch control until the desired
length of time is displayed (12:00 maximum)
Example: 25 minutes.
The setting advances by 10-second intervals until 19:30,
at which point the setting begins advancing in one-
minute intervals.
The display shows minutes and seconds from 00:00 to 19:30.
Example: 19:30 equals 19 minutes and 30 seconds.
The display shows hours and minutes beginning at 20 minutes:
Example: 00:20 equals 0 hours and 20 minutes.
The beeps can be stopped by pressing the or touch controls.
- If there is no programme under way, the digital display turns off.
- If a cooking cycle has been programmed, the remaining cooking time will
appear in the digital display.
- If a scheduled cooking programme ends before the timer goes off, a
series of beeps is emitted for three minutes to indicate the end of cooking.
Press the or touch controls to stop the beeps. The digital display
indicates the time remaining on the timer countdown.
The display stops flashing after a few seconds, the timer starts counting down.
Once the time has expired, the timer emits a series of beeps for 30 seconds to
notify you.
It is possible to change or cancel the timer programme at any
time.
How does your oven work?

11
EN
What do you do in case of operating
malfunctions?
If you have a doubt about the functioning of your oven, this does not
necessarily mean that there is a malfunction.
In any event, check the following
items:
You observe that... Possible causes What should you do?
The oven is not heating.
• The oven is not connected.
• The fuse in your electrical set-up
is not working.
• The selected temperature is too
low.
• The sensor is defective.
• The thermostat is faulty.
• The oven has experienced
overheating and has engaged
safety steps.
• Check the time on the clock and
the digital display (as described on
p.11)
- Connect the oven.
- Replace the fuse in your electrical
set-up and check its capacity (16A).
- Increase the selected
temperature.
- Call the After-Sales Service
Department.
- Call the After-Sales Service
Department.
- Call the After-Sales Service
Department.
The temperature indicator is
flashing.
• The door lock is faulty.
• Defective temperature sensor.
- Call the After-Sales Service
Department.
- Call the After-Sales Service
Department.
The oven light is not working.
• The light is out of order.
• The oven is not connected or the
fuse is not working.
- Replace the light.
- Connect the oven or replace the
fuse.
The pyrolysis cleaning cycle
does not begin.
• The door is not properly closed.
• The locking system is defective.
• The temperature sensor is
defective.
• The contact for "closed door"
detection is defective.
- Verify that the door is locked.
- Call the After-Sales Service
Department.
- Call the After-Sales Service
Department.
- Call the After-Sales Service
Department.
12
Traditional fan heating
Cooking controlled by the upper
and lower heating elements and
by the fan.
Grill, fan-assisted
Cooking controlled, alternately, by
the upper element and by the fan.
Traditional ECO
Cooking controlled by the upper
and lower heating elements with
no fan.
Grill
Only the top element heats up.
The fan is not used.
Quick temperature increase.
Some dishes can be placed in the
oven while it is still cold.
Preheating unnecessary.
Roasts and poultry that are juicy
crispy and all over.
The turnspit continues to work
until the door is opened.
Slide the drip tray onto the
bottom shelf support.
This position allows for energy
savings while preserving the
quality of the cooking.
The ECO position is used for the
energy label performance.
Preheat the oven for five minutes.
Slide the drip tray onto the
bottom shelf support.
Hold warm function
Heat regulated by the upper and
lower elements with use of fan.
Stabilisation at low temperatures.
Symbol
Name of cooking mode Description of cooking
mode
Oven cooking modes
* Programme(s) used for the notice written on the energy label in compliance with Eu
Traditional
Cooking controlled by the upper
and lower heating elements with
no fan.
Requires preheating before
placing the dish in the oven.
Fan-assisted bottom element
Cooking controlled by the bottom
element combined with a slight
dose of the grill and the fan.
Cooking heat from the bottom
with a small amount of heat from
the top.
Place the grid on the lower shelf
support.
*
*
*
13
EN
Recommended for meats, fish and vegetables, preferably placed in a
terracotta dish.
Recommended for all poultry or roasts on the turnspit.
To sear and fully cook legs of lamb, beef roasts.
To keep fish steaks' moist texture.
Recommended for quiches, potpies and juicy fruit tarts.
Recommended for grilling chops, sausages, slices of bread and
prawns placed on the grid.
Recommended for letting dough rise for bread, brioche, kouglof...
without exceeding 40° C (plate warming, defrosting).
Recommendations
Oven cooking modes
Recommended for slow, gentle cooking: tender game meat, etc.
To seal roasts of red meat
To simmer in a covered stew pan dishes that were begun on the hob
(coq au vin, stew, etc.).
Recommended for moist dishes (quiches, juicy fruit tarts, etc.).
The crust will be thoroughly cooked on the bottom.
Recommended for dishes that rise (cake, brioche, kouglof, etc.) and for
soufflés that will not be stuck by a crust formed on the top.
uropean standard EN 50304 and in accordance with European Directive 2002/40/EC.

14
1. What is pyrolysis?
RELATIVELY Biscuits, vegetables, Splatter-free cooking
CLEAN COOKING pastry, quiches, Pyrolysis is not warranted
APPLICATIONS soufflés
DIRTY COOKING Meats, fish, (in a dish) Pyrolysis is warranted after
APPLICATIONS stuffed vegetables three cooking cycles
VERY DIRTY Large cuts of meat Pyrolysis can be performed
COOKING on the spit after one cooking application
APPLICATIONS of this kind if there is
a lot of splattering
If your oven emits smoke during preheating or releases large volumes of smoke
during cooking.
If your oven releases an unpleasant odour when cooled after various cooking
applications (lamb, fish, barbecue, etc.).
2. In what situations should pyrolysis be used?
You should not wait until the oven is coated in grease to initiate
a cleaning cycle.
- Pyrolysis is a cycle during which the oven cavity is heated to a very high
temperature in order to eliminate soiling from splattering and spills. The smoke
and odours released are destroyed as they move through catalyse
- Pyrolysis is not necessary after each cooking cycle, but simply when the dirtiness
warrants it.
- As a safety measure, the cleaning operation only begins after the door has
automatically locked. As soon as the internal temperature of the oven exceeds
cooking temperatures, it is impossible to unlock the door--even if the "function
selector" knob is turned to 0.
How do you clean the cavity of your oven?
15
EN
3. How do you program for immediate pyrolysis?
How do you clean the cavity of your oven?
a) Remove the grids and trays from the oven and clean any major spill
residue.
b) Ensure that the digital display is off.
c) Turn the "function selector" knob to the
"PYRO" or "PYRO ECO" position.
The non-adjustable pyrolysis times are 1 hour,
30 minutes in "PYRO ECO" mode and 2 hours in "PYRO"
mode.
The oven is unavailable for use for 2:00 in "PYRO ECO" mode and for 2:30 in
"PYRO" mode.
This time includes the cooling time until the door can be unlocked.
• During the pyrolysis cycle, the lock warning light
is activated to indicate that the door is locked.
• During pyrolysis, the thermostat indicator light comes on while the oven is
heating.
• The pyrolysis cleaning process turns off automatically when the lock symbol
disappears. It is then possible to open the door.
d) Return the function selector to the position 0.
e) When the oven is cool, use a damp cloth to remove the white ashes. The oven is
clean and once again ready for the cooking application of your choice.
ECO
ECO
0

16

17
ES
Índice
A lo largo del manual, le indica las consignas de seguridad,
le señala los consejos y trucos
¿Cómo se presenta el horno?
Descripción del aparato P.21
Accesorios P.22
Consejos de seguridad P.23
¿Cómo instalar el horno?
Conexión eléctrica P.24-25
¿Cómo cambiar la bombilla? P.25
Dimensiones útiles para empotrar el horno P.26
¿Cómo utilizar el horno?
Detalle del programador P.27
¿Cómo poner en hora el reloj del horno? P.28
¿Cómo programar una cocción inmediata? P.29
¿Cómo programar una cocción? P.29-30
¿Cómo hacer una cocción ECONÓMICA? P.31
¿Cómo utilizar el minutero? P.32
¿Qué hacer en caso de producirse
anomalías en el funcionamiento? P.33
Modos de cocción del horno P.34-35
¿Cómo limpiar el interior del horno?
¿Qué es una pirólisis? P.36
¿Cuándo se debe realizar una pirólisis? P.36
¿Cómo hacer una pirólisis inmediata? P.37

18
1
3
5
ECO
ECO
0
PYRO System
40
65
100
150
165
180
200
210
220
240
275
0
18
1
2
3
4
5
6
7
¿Cómo se presenta el horno?
DESCRIPCIÓN DEL APARATO
1
2
5
6
73
4
Selector de temperatura
Programador
Selector de funciones
Lámpara
Indicador de altura del
soporte de la bandeja
Orificio para asador rotativo
Contacto de detección de
apertura de la puerta
19
ES
¿Cómo utilizar el horno?
1. Detalle del programador
1
2
3
4
1
3
4
5
6
7
8
2
Visualización de la hora
Indicador del tiempo de cocción
Indicador de fin de cocción
Indicador del minutero
Mando de acceso a los
distintos programas de
regulación del tiempo
Mando de regulación de
tiempo
Visor digital (tiempo de
cocción, fin de cocción,
minutero)
5 6 7 8
20
a) Al conectar el horno
- RELOJ:
• El visor digital parpadea.
• Regule la hora pulsando las teclas o para
regular el reloj de agujas (el visor digital deja de
parpadear).
• Pulse el mando “ ” para validar.
Ejemplo: 3:30.
- VISOR DIGITAL (utilizado para la
programación):
Unos segundos después, el visor digital parpadea de
nuevo.
Regule la hora del mismo modo que con el reloj,
pulsando los mandos + o - para aumentar o disminuir
la hora que aparece en la pantalla.
• Pulse el mando “ ” para validar.
Una vez efectuada la regulación, el visor digital se
apaga.
b) Puesta en hora del reloj
• Pulse simultáneamente los mandos y
durante unos segundos hasta que el visor digital
parpadee.
La hora parpadea para indicarle que puede comenzar
la regulación.
Para la regulación, pulse las teclas o para
aumentar o disminuir la hora en la pantalla.
• Pulse el mando “ ” para validar.
2. ¿Cómo poner en hora el reloj del horno?
¿Cómo utilizar el horno?
Si no se valida con el mando “ ” se grabará
automáticamente al cabo de unos segundos.
21
ES
¿Cómo utilizar el horno?
3. ¿Cómo hacer una cocción inmediata?
4. ¿Cómo programar una cocción?
a) Con puesta en marcha inmediata
1. Elija el modo de cocción y ajuste la temperatura.
Ejemplo: posición “ ”.
2. Pulse el mando “ ” hasta que comience parpadear
el piloto
“”.
La pantalla parpadea en 0:00 para indicar que se puede
comenzar la regulación.
3. Pulse el mando o para regular el tiempo de
cocción que desea.
Ejemplo: 25 min de cocción.
Se valida automáticamente al cabo de unos segundos,
-> el visor deja de parpadear.
La cuenta atrás se inicia inmediatamente después de la
validación.
Una vez efectuadas estas 3 operaciones, el horno
comienza a calentar.
El visor digital no debe parpadear.
• Elija el modo de cocción:
Gire el selector de funciones hasta la posición
elegida.
Ejemplo: posición “ ” -> el horno se pone en
marcha.
Coloque la bandeja en el horno siguiendo las
recomendaciones indicadas en el manual de cocción.
Ejemplo: “ ” a 200°.
Una vez que se han realizado estas operaciones, el horno
comienza a calentar y se enciende el piloto del termostato.
Sólo se puede regular la hora de fin de cocción dentro del
intervalo horario de las doce horas siguientes.
Después de realizar un ciclo de cocción, la turbina de ventilación continúa
funcionando durante un cierto tiempo para que se enfríe el horno.
C
O
ECO
0
ECO
ECO
0
22
¿Cómo utilizar el horno?
b) ¿Cómo retardar una cocción? (hora de fin de cocción elegida)
Proceda como para una cocción programada.
Una vez regulada la duración de la cocción,
Pulse el mando “ ” hasta que comience a parpadear el
piloto
“”
La pantalla parpadea para indicar que se puede comenzar
la regulación.
Pulse el mando o para regular la hora de fin de
cocción que desea.
Ejemplo: Fin de cocción a las 6:00.
Una vez efectuadas estas operaciones, la puesta en
marcha queda retardada para que la cocción termine a las
6:00.
El visor digital queda fijo hasta que comience la cocción.
Al finalizar la cocción, se emitirán una serie de pitidos durante unos minutos.
Cuando la cocción haya terminado, vuelva a poner el selector de cocción en “0” y el
selector de temperatura en parada.
Sólo se puede regular la hora de fin de cocción dentro del intervalo horario de las
doce horas siguientes.
Se puede modificar en todo momento el tiempo de cocción efectuando la operación
arriba descrita.
Puede desprogramar una cocción regulando el tiempo de cocción en 0.00.
Al finalizar la cocción, se emitirán una serie de pitidos durante unos minutos.
Los pitidos se detienen pulsando las teclas o . Una vez efectuadas estas
operaciones, ya puede volver a utilizar el horno.
Vuelva a colocar los selectores de temperatura y de funciones en parada para que
el horno no comience a calentar de nuevo.
 Loading...