


Manual de instalación y uso de la lavadora Manuel d’installation et d’utilisation de l’appareil Manual de instalação e utilização da máquina de lavar roupa Washing machine installation and operation manual

lavadoraíndice
ADVERTENCIAS |
4 |
ESPECIFICACIONES |
5 |
INSTALACIÓN Y MONTAJE |
6 |
USO DEL APARATO |
|
Y CONSEJOS PRÁCTICOS |
10 |
MANTENIMIENTO |
|
Y LIMPIEZA DEL APARATO |
20 |
SEGURIDAD |
|
Y SOLUCIÓN DE PROBLEMAS |
22 |
ADVERTENCIAS SOBRE |
25 |
EL MEDIO AMBIENTE |
|
lave-lingeindex
|
AVERTISSEMENTS |
26 |
|
||
|
||
|
||
|
||
|
SPÉCIFICATIONS |
27 |
|
||
|
||
|
||
|
||
|
||
|
||
|
||
|
||
|
||
|
||
|
||
|
INSTALLATION ET MONTAGE |
28 |
|
||
|
||
|
||
|
||
|
||
|
||
|
||
|
||
|
||
|
||
|
||
|
||
|
UTILISATION DE L’APPAREIL |
|
|
|
|
|
|
|
|
|
|
|
|
|
|
|
|
|
|
|
|
|
|
|
|
|
|
|
|
|
|
|
|
|
|
|
ET CONSEILS PRATIQUES |
32 |
|
||
|
||
|
||
|
||
|
||
|
||
|
||
|
||
|
MAINTENANCE |
|
|
|
|
|
|
|
|
|
|
|
|
|
|
|
|
|
|
|
|
|
|
|
|
|
|
|
|
|
|
|
|
|
|
|
ET ENTRETIEN DE L’APPAREIL |
42 |
|
||
|
||
|
||
|
||
|
||
|
||
|
||
|
||
|
SÉCURITÉ |
|
|
|
|
|
|
|
|
|
|
|
|
|
|
|
|
|
|
|
|
|
|
|
|
|
|
|
|
|
|
|
|
|
|
|
ET RÉSOLUTION DE PROBLÈMES |
44 |
|
||
|
||
|
||
|
||
|
||
|
||
|
||
|
AVERTISSEMENTS SUR |
|
|
|
|
|
|
|
|
|
|
|
|
|
|
|
|
|
|
|
|
|
|
|
|
|
|
|
|
|
|
|
|
|
|
|
|
|
|
L’ENVIRONNEMENT |
47 |
|
||
|
||
|
||
|
||
|
||
|
||
|
||
|
|
|
|
|
|
|
|
|
|
|
|
|
|
|
|
|
|
|
|
|
|
|
|
|
|
|
|
|
|
|
|
|
|
|
|
|
|
|
|
|
|
|
|
|
|
|
|
|
|
|
|
|
|
|
|
|
|
|
|
|
|
|
|
|
|
|
|
|
|
|
|
|
|
|
|
|
|
|
|
|
|
|
|
|
|
|
|
|
|
|
|
|

máquinadelavarroupaíndice
ADVERTÊNCIAS |
48 |
QUADRO TÉCNICO |
49 |
INSTALAÇÃO E MONTAGEM |
50 |
UTILIZAÇÃO DO APARELHO |
|
E CONSELHOS PRÁTICOS |
54 |
MANUTENÇÃO |
|
E LIMPEZA DO APARELHO |
64 |
SEGURANÇA |
|
E SOLUÇÃO DE PROBLEMAS |
66 |
ADVERTÊNCIAS SOBRE |
|
O MEIO AMBIENTE |
69 |
washingmachinecontents
|
WARNINGS |
70 |
|
||
|
||
|
||
|
||
|
SPECIFICATIONS |
71 |
|
||
|
||
|
||
|
||
|
||
|
||
|
||
|
||
|
||
|
||
|
||
|
INSTALLATION AND ASSEMBLY |
72 |
|
||
|
||
|
||
|
||
|
||
|
||
|
||
|
||
|
||
|
||
|
||
|
||
|
USING THE APPLIANCE. |
|
|
|
|
|
|
|
|
|
|
|
|
|
|
|
|
|
|
|
|
|
|
|
|
|
|
|
|
|
|
|
|
|
|
|
PRACTICAL TIPS |
76 |
|
||
|
||
|
||
|
||
|
||
|
||
|
||
|
||
|
MAINTENANCE |
|
|
|
|
|
|
|
|
|
|
|
|
|
|
|
|
|
|
|
|
|
|
|
|
|
|
|
|
|
|
|
|
|
|
|
AND CLEANING |
86 |
|
||
|
||
|
||
|
||
|
||
|
||
|
||
|
||
|
SAFETY |
|
|
|
|
|
|
|
|
|
|
|
|
|
|
|
|
|
|
|
|
|
|
|
|
|
|
|
|
|
|
|
|
|
|
|
AND TROUBLESHOOTING |
88 |
|
||
|
||
|
||
|
||
|
||
|
||
|
||
|
ENVIRONMENTAL |
|
|
|
|
|
|
|
|
|
|
|
|
|
|
|
|
|
|
|
|
|
|
|
|
|
|
|
|
|
|
|
|
|
|
|
|
|
|
WARNINGS |
91 |
|
||
|
||
|
||
|
||
|
||
|
||
|
||
|
|
|
|
|
|
|
|
|
|
|
|
|
|
|
|
|
|
|
|
|
|
|
|
|
|
|
|
|
|
|
|
|
|
|
|
|
|
|
|
|
|
|
|
|
|
|
|
|
|
|
|
|
|
|
|
|
|
|
|
|
|
|
|
|
|
|
|
|
|
|
|
|
|
|
|
|
|
|
|
|
|
|
|
|
|
|
|
|
|
|
|
|

warnings
To avoid the risk of fire, electric shocks, injury or damage when using your washing machine, please take the following precautions:
 This washing machine comes with a manual that includes operating, maintenance and installation instructions. Please read all the instructions before using the washing machine.
 Do not wash items that have previously been cleaned, washed, soaked or treated with petrol, solvents for dry cleaning, other inflammable substances or explosives, as they produce fumes that could catch fire or explode.
 Do not add petrol, solvents for dry cleaning or other inflammable or explosive substances to the wash water as they produce fumes that could catch fire or explode.
 Do not repair or replace any part of the washing machine or try to carry out any type of servicing unless it is recommended in the maintenance instructions in the manual.
 Do not climb onto the machine or stand on the open hatch door.
 Do not use an extension lead or adaptor to connect your washing machine to the mains supply.
 The machine should only be used for the purpose it is designed for.
 Follow the washing instructions recommended by the manufacturer of the garment to be washed.
 Do not turn your washing machine on until you are sure that:
•It has been installed in accordance with the installation instructions.
•All the water, drainage, mains electricity and earth connections meet the local regulations and/or other applicable regulations.
70
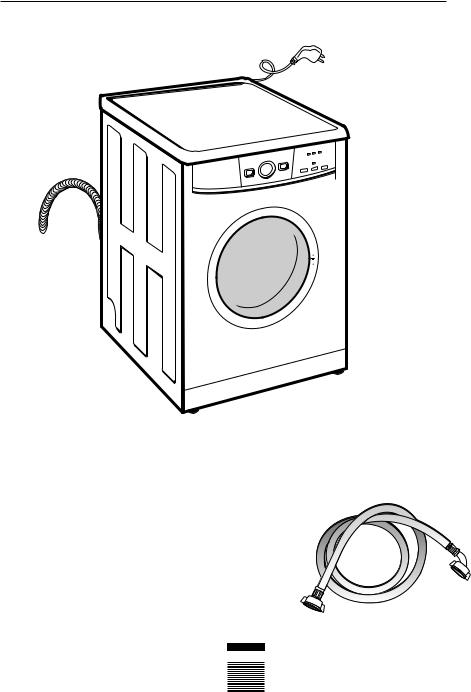
washingmachinespecifications
Power cord
Work top
Control
panel
 Detergent
dispenser
Drain hose |
Stainless |
|
steel drum |
Hatch |
|
 Accesible filter (behind kickplate)
Adjustable |
Kickplate |
feet |
|
ACCESSORIES
Water inlet hose.
71

washinginstallationmachineand assembly
1 UNPACKING AND |
|
UNBLOCKING THE |
a |
WASHING MACHINE |
|
UNPACKING |
|
a Remove the base, corner protectors and |
|
top cover. |
|
UNBLOCKING |
|
a Remove the screws holding the plastic |
|
covers to the back of the washing |
|
machine. |
|
b Loosen and remove the 3 blocking |
|
screws. |
|
c Cover the holes with the plastic covers |
|
you have just removed. |
a/c |
|
Important
Do not throw the blocking screws away. You may need to move the washing machine at a later date.
72
2 CONNECTIONDRAINAGE TO THE MAINS WATER SUPPLY AND
CONNECTION TO THE
MAINS WATER SUPPLY
The water supply hose is inside the drum:
 a Connect the bent end of the hose to the threaded inlet of the electrovalve located at the rear of the washing machine.
 b Connect the other end of the hose to the water intake. Then securely tighten the connection nut.
|
It is important that the drain hose |
|
bend is correctly fastened to the |
|
outlet, to prevent any risk of it |
|
becoming detached and causing |
|
flooding. |
|
If your washing machine has a hot |
Important |
water intake, connect the hose with |
connected to the mains water supply, |
|
|
the red threaded end to the hot water |
|
tap, and to the electrovalve with the |
|
red filter. |
|
The washing machine must be |
|
using the new supply hoses supplied |
|
with the appliance. Do not use water |
|
supply hoses that have been used |
|
before. For your washing machine to |
|
work properly, the mains water |
|
pressure must be between 0.05 and |
|
1MPa (0.05 and 10 Kgr/cm2). |
|
DRAINAGE |
|
CONNECTION |
aIt is recommended that you have a fixed drainage outlet 50 to 70 cm from the floor.
Avoid the drain hose being too tight,
kinked or restricted.
a |
73
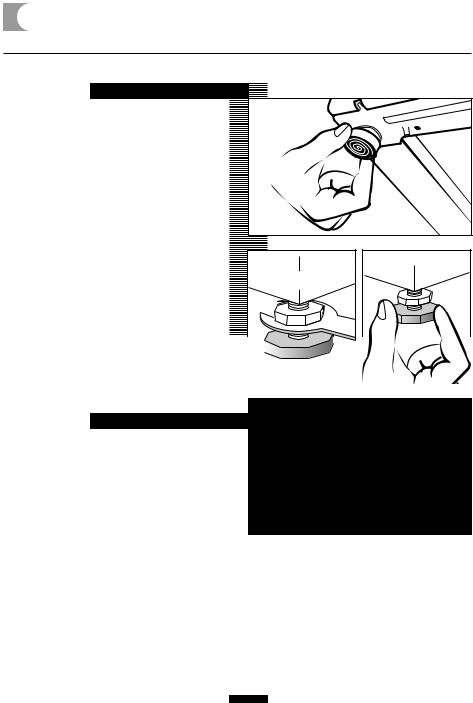
3LEVELLING THE WASHING MACHINE AND CONNECTING IT TO THE MAINS ELECTRICITY SUPPLY
installation and assembly
LEVELLING
|
Use the adjustable feet to level the |
|
Important |
washing machine. This will reduce |
|
the noise level and prevent it from |
||
|
||
|
moving during use. |
|
|
Do not bring the feet too far out, you |
|
|
will achieve better stability. |
|
|
You need to use a spanner for the |
|
|
models that have a nut. |
|
|
|
ELECTRICAL CONNECTION
Consult the specifications plate located on the hatch door of the washing machine before making the electrical connections. Ensure that the voltage reaching the plug is the same as that on the plate.
Do not remove the specifications plate. The information on it is important.
|
It is very important to correctly earth the |
|
|
||
Important |
washing machine. The electrical |
|
installation, plug, socket, fuses or |
||
|
||
|
automatic switch and counter must be |
|
|
correctly dimensioned for the maximum |
|
|
power indicated on the specifications |
|
|
plate. |
|
|
Do not plug the washing machine plug |
|
|
||
|
into the socket with wet or damp hands. |
To remove the power cord, pull on the body of the plug.
If the power cord is damaged, it must be replaced by a cord or special unit provided by either the manufacturer or your aftersales service.
With built-in washing machines, the plug must be accessible after installation.
74
 Loading...