


Administrator's Guide
NPD 4956-00 EN

Administrator's Guide
Contents
Contents
Copyright and Trademarks
About this Manual
Marks and Symbols. . . . . . . . . . . . . . . . . . . . . . . . . 5
Artworks. . . . . . . . . . . . . . . . . . . . . . . . . . . . . . . . .5
Operating System References. . . . . . . . . . . . . . . . . . 5
Notices. . . . . . . . . . . . . . . . . . . . . . . . . . . . . . . . . . 6
Introduction
SSL/TLS Communication. . . . . . . . . . . . . . . . . . . . .7
Encryption of IP Communication and
Connection to an Authentication Network. . . . . . . . 8
Configuration of Scan and Fax Destination. . . . . . . . 8
User Features Restriction and the Administrator
Password. . . . . . . . . . . . . . . . . . . . . . . . . . . . . . . . .9
Using Network Configuration
Software
About Web Config. . . . . . . . . . . . . . . . . . . . . . . . . 10
Accessing Web Config. . . . . . . . . . . . . . . . . . . . . . 11
About EpsonNet Conf ig. . . . . . . . . . . . . . . . . . . . . 12
Using EpsonNet Conf ig – Windows. . . . . . . . . . . . .13
Installing EpsonNet Conf ig – Windows. . . . . . . . 13 Running EpsonNet Conf ig - Windows. . . . . . . . .13 Uninstalling EpsonNet Config - Windows. . . . . . 13
Using EpsonNet Conf ig – Mac OS X. . . . . . . . . . . . 13
Installing EpsonNet Conf ig – Mac OS X. . . . . . . 13 Running EpsonNet Conf ig - Mac OS X. . . . . . . . 13 Uninstalling EpsonNet Config – Mac OS X. . . . . 13
Web Config and EpsonNet Config Feature
Comparison. . . . . . . . . . . . . . . . . . . . . . . . . . . . . 14
Other Network Software. . . . . . . . . . . . . . . . . . . . .15
About EpsonNet Print (Windows Only). . . . . . . 15
About EpsonNet SetupManager. . . . . . . . . . . . . 15
Using the Printer in a Secure Network
Configuring SSL/TLS Communication. . . . . . . . . . 16
Conf iguring Basic SSL/TLS Settings. . . . . . . . . . 16 Configuring a Server Certificate for the Printer. . 17
Conf iguring IPsec/IP Filtering. . . . . . . . . . . . . . . . 18
About IPsec/IP Filtering. . . . . . . . . . . . . . . . . . . 18 Configuring Default Policy. . . . . . . . . . . . . . . . . 18 Conf iguring Group Policy. . . . . . . . . . . . . . . . . 20
Configuration Examples of IPsec/IP Filtering. . . 24 Configuring a Certificate for IPsec/IP Filtering. . 25
Using SNMPv3 Protocol. . . . . . . . . . . . . . . . . . . . .26
Conf iguring SNMPv3. . . . . . . . . . . . . . . . . . . . .26
Connecting the Printer to an IEEE802.1X
Network. . . . . . . . . . . . . . . . . . . . . . . . . . . . . . . . 27
Configuring an IEEE802.1X Network. . . . . . . . . 27 Configuring a Certificate for IEEE802.1X. . . . . . 29 Checking IEEE802.1X Network Status. . . . . . . . .29
Using a Digital Certificate. . . . . . . . . . . . . . . . . . . .30
About Digital Certif ication. . . . . . . . . . . . . . . . . 30 Obtaining and Importing a CA-signed
Certif icate. . . . . . . . . . . . . . . . . . . . . . . . . . . . . 31 Deleting a CA-signed Certif icate. . . . . . . . . . . . . 34 Updating a Self-signed Certif icate. . . . . . . . . . . . 35
Configuring Scan and Fax Destination
Destination Setting Features. . . . . . . . . . . . . . . . . . 37
Conf iguring Contacts. . . . . . . . . . . . . . . . . . . . . . .37
Contacts Conf iguration Comparison. . . . . . . . . .37 Registering a Destination to Contacts. . . . . . . . . 38 Registering Destinations as a Group. . . . . . . . . . 40
Using the LDAP Server. . . . . . . . . . . . . . . . . . . . . .41
Conf iguring the LDAP Server. . . . . . . . . . . . . . . 41 Configuring the LDAP Server Search Settings. . . 43 Checking the LDAP Server Connection. . . . . . . .44
Using a Mail Server. . . . . . . . . . . . . . . . . . . . . . . . 45
Conf iguring a Mail Server. . . . . . . . . . . . . . . . . 45 Checking a Mail Server Connection. . . . . . . . . . 47
Restricting Available Features and
Configuring the Administrator
Password
User Features Restriction. . . . . . . . . . . . . . . . . . . . 48
Configuring User Features. . . . . . . . . . . . . . . . . 48
Configuring the Administrator Password. . . . . . . . 50
Solving Problems
Tips for Solving Problems. . . . . . . . . . . . . . . . . . . . 52
Problems Using Network Software. . . . . . . . . . . . . 52
Cannot Access Web Conf ig. . . . . . . . . . . . . . . . .52 Model name and/or IP address are not
displayed on EpsonNet Config. . . . . . . . . . . . . . 53
Problems Using Network Security Features. . . . . . . 53
2

Administrator's Guide
Contents
Forgot a Pre–shared Key. . . . . . . . . . . . . . . . . . .53 Cannot Communicate with IPsec
Communication. . . . . . . . . . . . . . . . . . . . . . . . 53 Cannot Communicate Suddenly. . . . . . . . . . . . . 54 Cannot Create the Secure IPP Printing Port. . . . .55 Cannot Access the Printer after Configuring IEEE802.1X. . . . . . . . . . . . . . . . . . . . . . . . . . . . 55
Problems on Using a Digital Certif icate. . . . . . . . . . 55
Cannot Import a CA-signed Certificate. . . . . . . . 55 Cannot Update a Self-Signed Certificate. . . . . . . 56 Cannot Create a CSR. . . . . . . . . . . . . . . . . . . . . 56 Warning Relating to a Digital Certificate
Appears. . . . . . . . . . . . . . . . . . . . . . . . . . . . . . .56 Delete a CA-signed Certificate by Mistake. . . . . . 58
Printing Problems. . . . . . . . . . . . . . . . . . . . . . . . . 59
Cannot Print with AirPrint. . . . . . . . . . . . . . . . .59 Printed Random Characters. . . . . . . . . . . . . . . . 59
Appendix
Receiving Email Notifications When Events
Occur. . . . . . . . . . . . . . . . . . . . . . . . . . . . . . . . . . 60
About Email Notif ications. . . . . . . . . . . . . . . . . 60 Conf iguring Email Notif ication. . . . . . . . . . . . . .60
Configuring a Network for the Printer
Individually. . . . . . . . . . . . . . . . . . . . . . . . . . . . . . 61
Conf iguring a Network Interface - Ethernet. . . . . . .61
Conf iguring a Network Interface - Wi-Fi. . . . . . . . . 62
Configuring a Computer Connected to the Printer. .64
Installing the Printer Driver - Windows. . . . . . . .64 Installing the Printer Driver - Mac OS X. . . . . . . 65 Using the Scanner on a Network. . . . . . . . . . . . . 65 Mapping an External Storage as a Network
Drive. . . . . . . . . . . . . . . . . . . . . . . . . . . . . . . . .67
Configuring to Share the Printer - Windows. . . . . . 68
Sharing the Printer. . . . . . . . . . . . . . . . . . . . . . .68
Installing Additional Drivers. . . . . . . . . . . . . . . 68
Using the Shared Printer. . . . . . . . . . . . . . . . . . . . .68
Using the Shared Printer – Windows. . . . . . . . . . 68 Using the Shared Printer – Mac OS X. . . . . . . . . 69
3
Administrator's Guide
Copyright and Trademarks
Copyright and Trademarks
EPSON is a registered trademark, and EPSON EXCEED YOUR VISION or EXCEED YOUR VISION is a trademark of Seiko Epson Corporation.
Microsoft, Windows, and Windows Vista are registered trademarks of Microsoft Corporation.
Mac OS, OS X, Bonjour, and Safari are registered trademarks of Apple Inc, registered in the U.S. and other countries. AirPrint is a trademark of Apple Inc.
General Notice: Other product names used herein are for identification purposes only and may be trademarks of their respective owners. Epson disclaims any and all rights in those marks.
© 2013 Seiko Epson Corporation. All rights reserved.
4
Administrator's Guide
About this Manual
About this Manual
Marks and Symbols
!Caution:
Instructions that must be followed carefully to avoid bodily injury.
cImportant:
Instructions that must be observed to avoid damage to your equipment.
Note:
Instructions containing useful tips and restrictions on printer operation.
& Related Information
Clicking this icon takes you to related information.
Artworks
Details of screen shots and illustrations may vary by model, but the instructions are the same.
Screen shots are from Windows 7. Details may vary between OS versions.
Some of the menu items in the screen shots may vary by model.
Operating System References
Windows
In this manual, terms such as "Windows 8.1", "Windows 8", "Windows 7", "Windows Vista", "Windows XP", "Windows Server 2012 R2", "Windows Server 2012","Windows Server 2008 R2", "Windows Server 2008", "Windows Server 2003 R2" and "Windows Server 2003" refer to the following operating systems. Additionally, "Windows" refers to all versions.
Microsoft® Windows® 8.1 operating system
Microsoft® Windows® 8 operating system
Microsoft® Windows® 7 operating system
Microsoft® Windows Vista® operating system
Microsoft® Windows® XP operating system
Microsoft® Windows® XP Professional x64 Edition operating system
Microsoft® Windows Server®2012 R2 operating system
Microsoft® Windows Server®2012 operating system
Microsoft® Windows Server®2008 R2 operating system
5

Administrator's Guide
About this Manual
Microsoft® Windows Server®2008 operating system
Microsoft® Windows Server®2003 R2 operating system
Microsoft® Windows Server®2003 operating system
Mac OS X
In this manual, “Mac OS X v10.9.x” refers to OS X Mavericks and “Mac OS X v10.8.x” refers to OS X Mountain Lion. Additionally, “Mac OS X” refers to “Mac OS X v10.9.x” , “Mac OS X v10.8.x” , “Mac OS X v10.7.x” , “Mac OS X v10.6.x”, and “Mac OS X v10.5.8”.
Notices
Reproduction of information in this manual is prohibited.
All information in this manual is subject to change without notice.
If you find inaccuracies or have concerns about this manual, contact Epson.
Notwithstanding the preceding article, Epson cannot be held responsible for any effects resulting from the use of the product.
Epson cannot be held responsible for any failures caused by the improper use of the product and the improper repair of the product by a third party.
6
Administrator's Guide
Introduction
Introduction
This manual is the common manual for Epson ink jet printers and multifunctional printers and this manual is for an system administrator who manages an office network. A system administrator means a person who is in charge of devices' configuration and authorization to access to a network for clients, printers, and computers. Detailed procedures may be left out depending on the topic and the glossary is not in this manual because this manual is for an administrator. Therefore knowledge about system of networks and computers is required to read.
There are two pieces of software to configure the printer’s advanced network settings, Web Config and EpsonNet Config. In this manual, instructions for configuring each feature are basically from Web Config. For information on operations of EpsonNet Config, see the documentation or help of EpsonNet Config. Descriptions of the OS menu items are based on Windows 7 and Mac OS X 10.8.x.
Note:
To configure the system administration features, the printer must be connected to a network. For more information on connecting the printer to a network, see the printer's documentation or the appendix in this manual.
The sections below are the system administration features that Epson products support. The available features vary by model. For information on the availability of features, see the printer's documentation. Choose the features to be used that match your network environment.
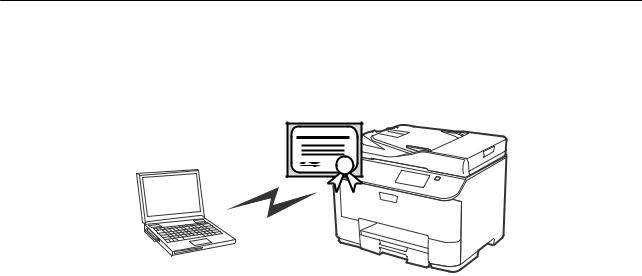
SSL/TLS Communication
You can set a server certificate for the printer and encrypt communications between the printer and a computer by an SSL/TLS (Secure Sockets Layer/Transport Layer Security) communication. Use this feature to avoid spoofing and unauthorized access to the printer.
Related Information
& “Configuring SSL/TLS Communication” on page 16
7

Administrator's Guide
Introduction
Encryption of IP Communication and Connection to an Authentication Network
You can encrypt communications and control access to the printer. If you want to avoid interception of communications and data tampering, use the IPsec/IP Filtering feature or the SNMPv3 protocol. If you want to authenticate access to the printer, use the IEEE802.1X feature.
Related Information
&“Configuring IPsec/IP Filtering” on page 18
&“Using SNMPv3 Protocol” on page 26
&“Connecting the Printer to an IEEE802.1X Network” on page 27
Configuration of Scan and Fax Destination
You can use an LDAP server to choose a destination for scans and faxes. If you want to send scan and fax data by an email or avoid faxing errors, configure a mail server and an LDAP server.
Related Information
&“Using the LDAP Server” on page 41
&“Using a Mail Server” on page 45
8

Administrator's Guide
Introduction
User Features Restriction and the Administrator
Password
You can restrict printer features on a per user basis. For example, User A can copy and scan, while User B can only fax.
When you set the administrator password, only an administrator can change the printer's settings. It is recommended that you set the administrator password to improve security.
Related Information
&“User Features Restriction” on page 48
&“Configuring the Administrator Password” on page 50
9
Administrator's Guide
Using Network Configuration Software
Using Network Configuration Software
About Web Config
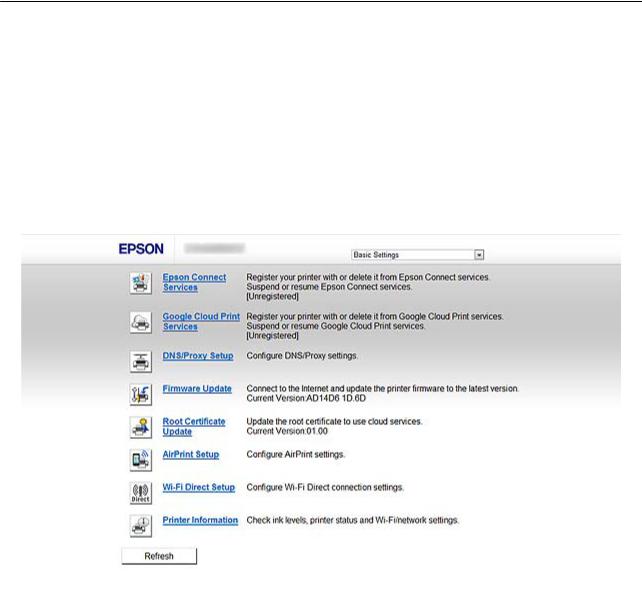
Web Config is a browser-based application for configuring the printer's settings.
To access the printer's Web Config, you need to have first assigned an IP address to the printer.
Note:
You can lock the settings by configuring the administrator password to the printer.
There are two setting pages as below.
Basic Settings
You can configure the basic settings for the printer.
10
Administrator's Guide
Using Network Configuration Software
Advanced Settings
You can configure the advanced settings for the printer. This page is mainly for an administrator.
Related Information
& “Web Config and EpsonNet Config Feature Comparison” on page 14
Accessing Web Config
Enter the printer's IP address into a web browser. JavaScript must be enabled. When accessing Web Config via HTTPS, a warning message will appear in the browser since a self-signed certificate, stored in the printer, is used.
Accessing via HTTP
IPv4: http://<printer IP address> (without the < >) IPv6: http://[printer IP address]/ (with the [ ])
Accessing via HTTPS
IPv4: https://<printer IP address> (without the < >) IPv6: https://[printer IP address]/ (with the [ ])
11

Administrator's Guide
Using Network Configuration Software
Note:
Examples IPv4:
http://192.168.100.201/
https://192.168.100.201/
IPv6:
http://[2001:db8::1000:1]/
https://[2001:db8::1000:1]/
If the printer name is registered with the DNS server, you can use the printer name instead of the printer’s IP address.
Not all menus are displayed when accessing Web Config via HTTP. To see all the menus, access Web Config via HTTPS.
You can also access to Web Config from EpsonNet Config. Select the printer from the printer listed screen and click
Launch Browser.
Related Information
&“Web Config and EpsonNet Config Feature Comparison” on page 14
&“Configuring SSL/TLS Communication” on page 16
&“Using a Digital Certificate” on page 30
About EpsonNet Config
EpsonNet Config allows the administrator to configure the printer's network settings, such as assigning an IP address and changing the connection mode. The batch setting feature is supported on Windows. For more information, see the documentation or help of EpsonNet Config.
Related Information
& “Web Config and EpsonNet Config Feature Comparison” on page 14
12

Administrator's Guide
Using Network Configuration Software
Using EpsonNet Config – Windows
Installing EpsonNet Config – Windows
Install EpsonNet Config from the following folder on the software disc that came with the printer:
\Network\EpsonNetConfig
Running EpsonNet Config - Windows
Select All Programs > EpsonNet > EpsonNet Config Vxx > EpsonNet Config.
Note:
If the firewall alert appears, allow access for EpsonNet Config.
Related Information
& “Web Config and EpsonNet Config Feature Comparison” on page 14
Uninstalling EpsonNet Config - Windows
Select Control Panel > Programs > Programs and Features > Uninstall a program > EpsonNet Config Vxx and then click Uninstall.
Using EpsonNet Config – Mac OS X
Installing EpsonNet Config – Mac OS X
Download EpsonNet Config from EPSON Software Updater, and then install it by following the on-screen instructions.
Running EpsonNet Config - Mac OS X
Select Go > Applications > Epson Software > EpsonNet > EpsonNet Config Vxx > EpsonNet Config.
Related Information
& “Web Config and EpsonNet Config Feature Comparison” on page 14
Uninstalling EpsonNet Config – Mac OS X
Use the Uninstaller to uninstall applications. You can download the Uninstaller using EPSON Software Updater or from Epson support website.
When running the Uninstaller, all the installed Epson applications are displayed. Select EpsonNet Config, and then follow the on-screen instructions.
Note:
If you do not have the Uninstaller, drag and drop the program folder in Applications on the trash icon in the dock.
13

Administrator's Guide
Using Network Configuration Software
Web Config and EpsonNet Config Feature Comparison
There are two pieces of software to configure the printer’s network settings, Web Config and EpsonNet Config.
The following are features covered in this manual and a comparison between the two pieces of software.
Features |
Web Config |
EpsonNet Config |
|
|
|
|
|
Configuring SSL/TLS communication |
|
|
|
|
|
|
|
Configuring a server certificate for the |
|
|
|
printer |
|||
|
|
||
|
|
|
|
Configuring IPsec/IP Filtering |
|
|
|
|
|
|
|
Configuring SNMPv3 protocol |
|
– |
|
|
|
|
|
Connecting the printer to an |
|
|
|
IEEE802.1X network (Ethernet/Wi-Fi) |
|||
|
|
||
|
|
|
|
Obtaining and importing a CA-signed |
|
– |
|
certificate |
|||
|
|
||
|
|
|
|
Updating a self-signed certificate |
|
– |
|
|
|
|
|
Registering a destination to Contacts |
|
|
|
|
|
|
|
Configuring LDAP server |
|
|
|
|
|
|
|
Configuring a mail server |
|
|
|
|
|
|
|
Restricting available printer features |
|
|
|
|
|
|
|
Configuring the administrator |
|
|
|
password |
|||
|
|
||
|
|
|
|
Configuring email notification |
|
– |
|
|
|
|
|
Making batch settings for multiple |
– |
|
|
printers |
(Windows only) |
||
|
|
||
|
|
|
|
Importing and exporting Contacts and |
– |
|
|
other settings |
|||
|
|
||
|
|
|
Related Information
&“About Web Config” on page 10
&“Accessing Web Config” on page 11
&“About EpsonNet Config” on page 12
&“Running EpsonNet Config - Windows” on page 13
&“Running EpsonNet Config - Mac OS X” on page 13
&“Configuring Basic SSL/TLS Settings” on page 16
&“Configuring a Server Certificate for the Printer” on page 17
&“Configuring IPsec/IP Filtering” on page 18
&“Using SNMPv3 Protocol” on page 26
&“Connecting the Printer to an IEEE802.1X Network” on page 27
14

Administrator's Guide
Using Network Configuration Software
&“Obtaining and Importing a CA-signed Certificate” on page 31
&“Updating a Self-signed Certificate” on page 35
&“Registering a Destination to Contacts” on page 38
&“Using the LDAP Server” on page 41
&“Using a Mail Server” on page 45
&“User Features Restriction” on page 48
&“Configuring the Administrator Password” on page 50
&“Configuring Email Notification” on page 60
Other Network Software
About EpsonNet Print (Windows Only)
EpsonNet Print is a software to print on the TCP/IP network. There are features and restrictions listed below. For more information, visit your regional Epson website.
The printer’s status is displayed on the spooler screen.
If the printer’s IP address is changed by DHCP, the printer is still detected.
You can use a printer located on a different network segment.
You can print using one of the following protocols: LPD, Enhanced LPD and RAW.
IPv6 address is not supported.
Related Information
&“Configuring a Network Interface - Ethernet” on page 61
&“Configuring a Network Interface - Wi-Fi” on page 62
&“Installing the Printer Driver - Windows” on page 64
About EpsonNet SetupManager
EpsonNet SetupManager is a software to create a package for a simple printer installation, such as installing the printer driver, installing EPSON Status Monitor and creating a printer port.
This software allows the administrator to create unique software packages and distribute them among groups.
For more information, visit your regional Epson website.
15
Administrator's Guide
Using the Printer in a Secure Network
Using the Printer in a Secure Network
In this topic, the security features that Epson products support are explained. The available features vary by model. For information on availability of features, see the printer's documentation.
Configuring SSL/TLS Communication
Configuring Basic SSL/TLS Settings
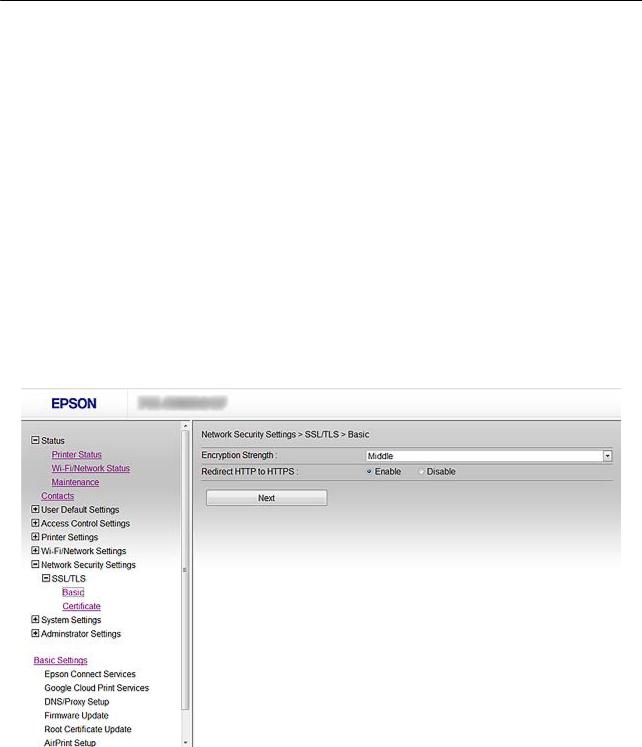
If the printer supports the HTTPS server feature, you can use an SSL/TLS communication to encrypt communications. You can configure and manage the printer using Web Config while ensuring security.
Configure encryption strength and redirect feature.
1.Access the printer's Web Config and select Network Security Settings > SSL/TLS > Basic.
2.Select a value for each item.
Encryption Strength
You can select one of the followings.
High: AES256/3DES
Middle: AES256/3DES/AES128/RC4
Redirect HTTP to HTTPS
You can configure to redirect to HTTPS when accessing with HTTP.
16

Administrator's Guide
Using the Printer in a Secure Network
3.Click Next.
A confirmation message is displayed.
4.Click OK.
The printer is updated.
Related Information
& “Accessing Web Config” on page 11
Configuring a Server Certificate for the Printer
1.Access the printer’s Web Config and select Network Security Settings >SSL/TLS> Certificate.
2.Specify a certificate to use on Server Certificate.
Self-signed Certificate
A self-signed certificate has been generated by the printer. If you do not obtain a CA-signed certificate, select this.
CA-signed Certificate
If you obtain and import a CA-signed certificate in advance, you can specify this.
3.Click Next.
A confirmation message is displayed.
4.Click OK.
The printer is updated.
17

Administrator's Guide
Using the Printer in a Secure Network
Related Information
&“Accessing Web Config” on page 11
&“Obtaining and Importing a CA-signed Certificate” on page 31
Configuring IPsec/IP Filtering
About IPsec/IP Filtering
If the printer supports IPsec/IP Filtering, you can filter traffic based on IP addresses, services, and port. By combining of the filtering, you can configure the printer to accept or block specified clients and specified data. Additionally, you can improve security level by using an IPsec.
To filter traffic, configure the default policy. The default policy applies to every user or group connecting to the printer. For more fine-grained control over users and groups of users, configure group policies. A group policy is one or more rules applied to a user or user group. The printer controls IP packets that match with configured policies. IP packets are authenticated in the order of a group policy 1 to 10 then a default policy.
Note:
Computers that run Windows Vista or later or Windows Server 2008 or later support IPsec.
Configuring Default Policy
1.Access the printer's Web Config and select Network Security Settings > IPsec/IP Filtering > Basic.
2.Enter a value for each item.
3.Click Next.
A confirmation message is displayed.
4.Click OK.
The printer is updated.
Related Information
&“Accessing Web Config” on page 11
&“Default Policy Setting Items” on page 19
18

Administrator's Guide
Using the Printer in a Secure Network
Default Policy Setting Items
Items |
|
Settings and Explanation |
|
|
|
IPsec/IP Filtering |
You can enable or disable an IPsec/IP Filtering feature. |
|
|
|
|
Access Control |
Configure a control method for traffic of IP packets. |
|
|
|
|
|
Permit Access |
Select this to permit configured IP packets to pass through. |
|
|
|
|
Refuse Access |
Select this to refuse configured IP packets to pass through. |
|
|
|
|
IPsec |
Select this to permit configured IPsec packets to pass |
|
|
through. |
|
|
|
Authentication Method |
To select Certificate, you need to obtain and import a CA-signed certificate in advance. |
|
|
|
|
Pre-Shared Key |
If you select Pre-Shared Key for Authentication Method, enter a pre-shared key between 1 |
|
|
and 127 characters. |
|
|
|
|
Confirm Pre-Shared Key |
Enter the key you configured for confirmation. |
|
|
|
|
Encapsulation |
If you select IPsec for Access Control, you need to configure an encapsulation mode. |
|
|
|
|
|
Transport Mode |
If you only use the printer on the same LAN, select this. IP |
|
|
packets of layer 4 or later are encrypted. |
|
|
|
|
Tunnel Mode |
If you use the printer on the Internet-capable network such |
|
|
as IPsec-VPN, select this option. The header and data of the |
|
|
IP packets are encrypted. |
|
|
|
Remote Gateway(Tunnel |
If you select Tunnel Mode for Encapsulation, enter a gateway address between 1 and 39 |
|
Mode) |
characters. |
|
|
|
|
19
Administrator's Guide
|
|
Using the Printer in a Secure Network |
|
|
|
|
|
Items |
|
|
Settings and Explanation |
|
|
|
|
Security Protocol |
If you select IPsec for Access Control, select an option. |
||
|
|
|
|
|
ESP |
|
Select this to ensure the integrity of an authentication and |
|
|
|
data, and encrypt data. |
|
|
|
|
|
AH |
|
Select this to ensure the integrity of an authentication and |
|
|
|
data. Even if encrypting data is prohibited, you can use |
|
|
|
IPsec. |
|
|
|
|
Related Information
& “Configuring Default Policy” on page 18
Configuring Group Policy
1.Access the printer's Web Config and select Network Security Settings > IPsec/IP Filtering > Basic.
2.Click a numbered tab you want to configure.
3.Enter a value for each item.
4.Click Next.
A confirmation message is displayed.
5.Click OK.
The printer is updated.
Related Information
&“Accessing Web Config” on page 11
&“Group Policy Setting Items” on page 21
20
Administrator's Guide
Using the Printer in a Secure Network
Group Policy Setting Items
Items |
|
Settings and Explanation |
|
|
|
Enable this Group Policy |
You can enable or disable a group policy. |
|
|
|
|
Access Control |
Configure a control method for traffic of IP packets. |
|
|
|
|
|
Permit Access |
Select this to permit configured IP packets to pass through. |
|
|
|
|
Refuse Access |
Select this to refuse configured IP packets to pass through. |
|
|
|
|
IPsec |
Select this to permit configured IPsec packets to pass |
|
|
through. |
|
|
|
Local Address(Printer) |
Select an IPv4 address or IPv6 address that matches your network environment. If an IP |
|
|
address is assigned automatically, you can select Use auto-obtained IPv4 address. |
|
|
|
|
Remote Address(Host) |
Enter a device's IP address to control access. The IP address must be between 0 and 43 |
|
|
characters. If you do not enter an IP address, all addresses are controlled. |
|
|
Note: |
|
|
If an IP address is assigned automatically (e.g. assigned by DHCP), the connection may |
|
|
be unavailable. Configure a static IP address. |
|
|
|
|
Method of Choosing Port |
Select a method to specify ports. |
|
|
|
|
Service Name |
If you select Service Name for Method of Choosing Port, select an option. |
|
|
|
|
Transport Protocol |
If you select Port Number for Method of Choosing Port, you need to configure an |
|
|
encapsulation mode. |
|
|
|
|
|
Any Protocol |
Select this to control all protocol types. |
|
|
|
|
TCP |
Select this to control data for unicast. |
|
|
|
|
UDP |
Select this to control data for broadcast and multicast. |
|
|
|
|
ICMPv4 |
Select this to control ping command. |
|
|
|
21
 Loading...