


WF-C20590
Table of contents
 Loading...
WorkForce Enterprise
User's Guide
Provides information for general using of the printer, maintenance, solving problems,
and product
specications.
NPD5875-05 EN

Contents
About the Manuals
Introduction to the Manuals...................6
Using the Manual to Search for Information. . . . . . . 6
Marks and Symbols.........................8
Descriptions Used in is Manual.............. 8
Operating System References..................8
Important Information.......................9
Important Safety Instructions
Setting Up the Printer.......................10
Using the Printer..........................11
Handling the Consumable Products............11
Protecting Your Personal Information...........12
Disposing of European Printer Models..........12
Printer Basics
Part Names and Functions...................13
Turning the Power On and O................16
Control Panel............................ 18
Control Panel Part Names................. 18
Touch Screen Operations..................19
Home Screen Conguration................20
Menu Screen Conguration................21
Access Control and Login..................22
Preparing the Printer
Managing Contacts........................ 23
Registering Contacts..................... 23
Registering Grouped Contacts.............. 24
Registering Frequently Used Contacts.........24
Register Contacts on a Computer............25
Backing up Contacts using a Computer........25
Registering a Favorite Setting.................25
How to Register.........................25
How to Use............................26
Adding a Shortcut to the Home Screen........26
Loading Papers...........................27
Available Paper Types and Capacities......... 27
Unavailable Paper Types...................29
Paper Handling.........................30
Paper Storage...........................30
How to Load Papers......................30
Setting the Paper Type....................32
Placing Originals..........................32
Placing Originals on the ADF...............33
Placing Originals on the Scanner Glass. . . . . . . . 34
Detecting the Original Size Automatically. . . . . . 35
Inserting an External USB Device..............36
Inserting and Removing an External USB
Device................................36
Menu Options for Settings...................36
Menu Options for Basic Settings in General
Settings...............................36
Menu Options for Printer Settings in General
Settings...............................38
Menu Options for Network Settings in
General Settings.........................42
Menu Options for Web Service Settings in
General Settings.........................43
Menu Options for Fax Settings in General
Settings...............................43
Menu Options for Scan Settings in General
Settings...............................44
Menu Options for System Administration in
General Settings.........................44
Menu Option for Print Counter............. 44
Menu Option for Supply Status..............44
Menu Options for Maintenance............. 44
Menu Option for Language.................44
Menu Options for Printer Status/Print.........45
Menu Options for Contacts Manager......... 45
Menu Options for User Settings............. 46
Menu Option for Authentication System.......46
Saving Power.............................46
Saving Power - Control Panel...............46
Copying
Copying................................ 48
Copying Basics......................... 48
Performing 2-Sided Copying............... 49
Copying Multiple Originals onto One Sheet
of Paper...............................49
Stacking Each Set of Copies by Alternately
Rotating 90 Degrees or by Osetting..........50
Menu Options for Copying...................51
Basic Settings Menu Options for Copying. . . . . . 51
Advanced Menu Options for Copying.........54
User's Guide
Contents
2

Faxing
Preparing to Fax.......................... 56
Connecting to a Phone Line................56
Making Basic Fax Settings................. 59
Sending Faxes Using the Printer...............63
Basic Fax Sending Operations...............63
Various Ways of Sending Faxes..............66
Receiving Faxes on the Printer................ 72
Setting Receive Mode.....................72
Various Ways of Receiving Faxes.............73
Saving and Forwarding Received Faxes
(Unconditional Save/Forward)..............75
Saving and Forwarding Received Faxes from
a Specied Sender or at a Specied Time
(Conditional Save/Forward)................80
Sending a Fax from a Computer...............87
Sending Documents Created Using an
Application (Windows)................... 88
Sending Documents Created Using an
Application (Mac OS).................... 89
Receiving Faxes on a Computer............... 91
Setting to Save a Received Fax on a Computer. . . 91
Receiving Faxes and Printing on the Computer. . 91
Canceling Received Faxes on the Computer. . . . .92
Checking for New Faxes (Windows)..........92
Checking for New Faxes (Mac OS)...........93
Using the Fax Box Features...................94
Using the Inbox.........................94
Using the Condential Box.................95
Using the Stored Documents Box............96
Using the Polling Send Box.................96
Using the Board Box..................... 97
Using Other Faxing Features..................98
Printing Fax Report and List................98
Setting Security for Faxing.................99
Checking Fax Jobs......................100
Menu Options for Fax Mode.................102
Frequent.............................102
Recipient.............................102
Fax Settings...........................103
More................................105
Menu Options for Fax Settings...............106
User Settings..........................106
Basic Settings..........................107
Send Settings..........................108
Receive Settings........................109
Report Settings........................ 112
Security Settings........................113
Check Fax Connection...................113
Fax Setting Wizard......................113
Menu Options for Fax Box..................114
Scanning
Scanning Using the Control Panel.............115
Saving the Scanned Image to a Shared Folder
or FTP Server..........................115
Scanning to an Email....................123
Scanning Using the Settings Registered on
the Computer (Document Capture Pro)...... 126
Scanning to a Memory Device............. 129
Scanning to the Cloud...................132
Scanning Using WSD....................133
Scanning from a Computer..................136
Authenticating Users on Epson Scan 2 when
Using Access Control....................136
Scanning Using Epson Scan 2..............136
Scanning from Smart Devices................139
Installing Epson iPrint...................139
Scanning Using Epson iPrint...............139
Scanning by Touching Smart Devices to the
N-Mark..............................140
Printing
Printing Files from a Memory Device.......... 142
Printing JPEG Files from a Memory Device. . . . 142
Printing PDF or TIFF Files from a Memory
Device...............................143
Menu Options for Memory Device..........143
Printing from the Printer Driver on Windows. . . . 146
Accessing the Printer Driver...............147
Printing Basics.........................147
Printing on 2-Sides......................149
Printing Several Pages on One Sheet.........150
Printing and Stacking in Page Order (Reverse
Order Printing)........................150
Printing a Reduced or Enlarged Document. . . . 151
Stacking Each Set of Copies by Alternately
Rotating 90 Degrees or by Osetting.........151
Inserting Separator Sheets................ 152
Storing Data in the Printer's Memory for
Printing..............................153
Printing One Image on Multiple Sheets for
Enlargement (Creating a Poster)............154
Printing with a Header and Footer.......... 160
Printing a Watermark....................161
Printing Password-Protected Files...........162
Printing Multiple Files Together............162
User's Guide
Contents
3

Printing Using the Color Universal Print
Feature.............................. 163
Adjusting the Print Color.................164
Printing to Emphasize in Lines...........164
Printing Clear Bar Codes.................165
Canceling Printing......................165
Menu Options for the Printer Driver.........166
Printing from the PostScript Printer Driver on
Windows...............................169
Using an Optional Device with a PostScript
Printer Driver......................... 170
Menu Options for the PostScript Printer Driver 171
Canceling Printing......................173
Printing from the Printer Driver on Mac OS. . . . . 173
Printing Basics.........................173
Printing on 2-Sides......................175
Printing Several Pages on One Sheet.........176
Printing and Stacking in Page Order (Reverse
Order Printing)........................176
Printing a Reduced or Enlarged Document. . . . 177
Stacking Each Set of Copies by Alternately
Rotating 90 Degrees or by Osetting.........178
Adjusting the Print Color.................178
Canceling Printing......................179
Menu Options for the Printer Driver.........179
Making Operation Settings for the Mac OS
Printer Driver......................... 181
Printing from the PostScript Printer Driver on
Mac OS................................182
Using an Optional Device with a PostScript
Printer Driver......................... 183
Menu Options for the PostScript Printer Driver 183
Canceling Printing......................184
Printing from Smart Devices.................185
Using Epson iPrint......................185
Canceling Ongoing or Queued Jobs............187
Options
Types and codes of Optional Items............188
Printer Settings When Using the Finisher Unit. . . . 188
Ejecting Paper and Stapling Using the Finisher
Unit...................................188
Using the Manual Staple....................189
Using the Paper Cassette Lock................190
Consumables
Ink Cartridge............................192
Ink Cartridge Handling Precautions.........192
Ink Cartridge Codes.....................193
Ink Cartridge Replacement Method......... 194
Checking the Ink Levels..................194
Maintenance Box.........................194
Maintenance Box Handling Precautions. . . . . . 194
Maintenance Box Code...................195
Replacing the Maintenance Box............ 195
Checking the Available Space in the
Maintenance Box.......................196
Staple Cartridge..........................196
Staple Cartridge Replacing................196
Network Service and Software
Information
Application for Scanning Documents and
Images (Epson Scan 2).....................199
Adding the Network Scanner..............199
Application for Conguring Scanning from the
Computer (Document Capture Pro)...........200
Application for
Conguring
Fax Operations and
Sending Faxes (FAX Utility).................201
Application for Sending Faxes (PC-FAX Driver). . 201
Application for Conguring Printer Operations
(Web Cong)............................202
Running Web Cong on a Web Browser. . . . . . 202
Running Web Cong on Windows.......... 203
Running Web
Cong
on Mac OS............203
Soware Update Tools (Soware Updater). . . . . . 203
Installing the Latest Applications..............204
Installing a PostScript Printer Driver...........205
Installing a PostScript Printer Driver Using
USB Interface - Windows.................205
Installing a PostScript Printer Driver Using
Network Interface - Windows..............206
Installing a PostScript Printer Driver - Mac OS. 207
Installing the Epson Universal Printer Driver
(for Windows Only).......................208
Uninstalling Applications...................208
Uninstalling Applications - Windows.........208
Uninstalling Applications - Mac OS..........209
Printing Using a Network Service.............210
Maintenance
Cleaning the Printer.......................211
Checking the Circuit Breaker................212
Checking the Clogged Nozzles...............214
User's Guide
Contents
4

Solving Problems
Descriptions on the Screen..................216
Clearing a Paper Jam......................217
Paper Jam Occurs Frequently................218
Paper is Smeared or Scued.................218
Checking Messages on the LCD Screen.........218
Error Code on the Status Menu.............220
Copying Problems........................226
Cannot Copy..........................226
Copy Quality Problems...................226
Cannot Copy as Expected.................227
Faxing Problems......................... 228
Cannot Send or Receive as Expected.........228
Other Faxing Problems...................233
Scanning Problems........................234
Cannot Start Scanning...................234
Scanned Image Problems.................235
Cannot Save Scanned Images to the Shared
Folder...............................238
Other Scanning Problems.................242
Printing Problems........................ 243
Cannot Print from a Computer.............243
Cannot Print from an iPhone or iPad........ 244
Printing is Paused...................... 244
Printout Problems......................244
Other Printing Problems................. 247
PostScript Printer Driver Problems..........247
Problems with Optional Items................248
e
Finisher Unit and High Capacity Tray are
not Recognized........................ 248
Paper is not Ejected to the Finisher Unit. . . . . . 249
Lost the Paper Cassette Lock Key........... 249
Other Printing Problems................... 249
Banding or Unexpected Colors Appear.......250
Power does not Turn
On/O
...............250
Control panel gets dark...................250
Slight Electric Shock when Touching the Pinter 250
Operations Sounds Are Loud..............250
e
Date and Time Are Incorrect........... 250
External memory is not recognized..........251
Cannot save data in the external memory. . . . . 251
Forgot your Password....................251
2-sided Printing is Slow..................251
Control Panel does not Respond............251
Appendix
Technical Specications....................252
Printer
Specications
....................252
Scanner Specications...................252
Interface Specications...................253
Fax Specications.......................253
Network Function List...................254
Wi-Fi Specications.....................255
Ethernet Specications...................256
Security Protocol.......................256
PostScript Level 3 Compatibility............256
Supported ird Party Services.............256
External USB Device Specications..........256
Supported Data Specications..............257
Dimensions...........................258
Electrical Specications..................259
Environmental Specications..............259
System Requirements....................260
Optional Product Specications..............260
Finisher Unit Specication................260
Finisher Bridge Unit Specication...........261
High Capacity Tray Specication........... 261
Font Information.........................262
Available Fonts for PostScript..............262
Available Fonts for PCL (URW)............ 263
List of Symbol Sets......................265
Regulatory Information....................267
Standards and Approvals................. 267
German Blue Angel.....................269
Restrictions on Copying..................269
Where to Get Help........................270
Technical Support Web Site................270
Contacting Epson Support................270
Copyright.............................. 277
Trademarks.............................277
User's Guide
Contents
5

About the Manuals
Introduction to the Manuals
e following manuals are provided with the product.
❏ Important Safety Instructions (paper manual)
Provides instructions to ensure the safe use of this product. Read the instructions before using the product.
❏ Basic Guide (paper manual)
Explains the basic contents of this product, preparing the soware, and connecting with a computer.
❏ User's Guide (digital manual)
Provides information for general using of the printer, maintenance, solving problems, and product
specications.
❏ Administrator's Guide (digital manual)
Provides network administrators with information on management and printer settings.
e latest manuals and useful information that in each language are available from the site.
http://epson.sn/
e
latest versions are also available from the following.
❏ Paper manual
Visit the Epson Europe support website at http://www.epson.eu/Support, or the Epson worldwide support
website at http://support.epson.net/.
❏ Digital manual
Start EPSON Soware Updater on your computer. EPSON Soware Updater checks for available updates of
Epson soware applications and the digital manuals, and allows you to download the latest version.
Related Information
& “
Soware
Update Tools
(Soware
Updater)” on page 203
Using the Manual to Search for Information
e
PDF manual allows you to search for information you are looking for by keyword, or jump directly to
specic
sections using the bookmarks. You can also print only the pages you need. is section explains how to use a PDF
manual that has been opened in Adobe Reader X on your computer.
User's Guide
About the Manuals
6

Searching by keyword
Click Edit > Advanced Search. Enter the keyword (text) for information you want to nd in the search window,
and then click Search. Hits are displayed as a list. Click one of the displayed hits to jump to that page.
Jumping directly from bookmarks
Click a title to jump to that page. Click + to view the lower level titles in that section. To return to the previous
page, perform the following operation on your keyboard.
❏ Wi n d o w s: Ho ld do wn Alt, and then press ←.
❏ Mac OS: Hold down the command key, and then press ←.
Printing only the pages you need
You can extract and print only the pages you need. Click Print in the File menu, and then specify the pages you
want to print in Pages in Pages to Print.
❏ To specify a series of pages, enter a hyphen between the start page and the end page.
Example: 20-25
❏ To specify pages that are not in series, divide the pages with commas.
Example: 5, 10, 15
User's Guide
About the Manuals
7

Marks and Symbols
!
Caution:
Instructions that must be followed carefully to avoid bodily injury.
c
Important:
Instructions that must be observed to avoid damage to your equipment.
Note:
Provides complementary and reference information.
Related Information
& Links to related sections.
Descriptions Used in This Manual
❏ Screenshots may vary depending on your computer's environment (such as OS or settings).
❏ Screens and procedures that appear in this manual are from Windows 10 or OS X El Capitan unless otherwise
specied.
❏ Screens and menu items on the control panel may vary depending on the settings and situations.
Operating System References
Windows
In this manual, terms such as "Windows 10", "Windows 8.1", "Windows 8", "Windows 7", "Windows Vista",
"Windows XP", "Windows Server 2016", "Windows Server 2012 R2", "Windows Server 2012", "Windows Server 2008
R2", "Windows Server 2008", "Windows Server 2003 R2", and "Windows Server 2003" refer to the following
operating systems. Additionally, "Windows" is used to refer to all versions.
❏
Microso
®
Win dow s
®
10 operating system
❏ Microso
®
Win dow s
®
8.1 operating system
❏ Microso
®
Win dow s
®
8 operating system
❏ Microso
®
Win dow s
®
7 operating system
❏ Microso
®
Win dow s Vis ta
®
operating system
❏ Microso
®
Win dow s
®
XP operating system
❏ Microso
®
Win dow s
®
XP Professional x64 Edition operating system
❏
Microso
®
Win dow s S e r ve r
®
2016 operating system
❏ Microso
®
Win dow s S e r ve r
®
2012 R2 operating system
❏ Microso
®
Win dow s S e r ve r
®
2012 operating system
❏
Microso
®
Win dow s S e r ve r
®
2008 R2 operating system
User's Guide
About the Manuals
8

❏ Microso
®
Win dow s S e r ve r
®
2008 operating system
❏
Microso
®
Win dow s S e r ve r
®
2003 R2 operating system
❏ Microso
®
Win dow s S e r ve r
®
2003 operating system
Mac OS
In this manual, "Mac OS" is used to refer to macOS Sierra, OS X El Capitan, OS X Yosemite, OS X Mavericks, OS X
Mountain Lion, Mac OS X v10.7.x, and Mac OS X v10.6.8.
Important Information
❏ Unauthorized copying for all or any part of the contents of this manual is prohibited.
❏ e contents of this manual is subject to change without notice.
❏
e
specications
and appearance of this product may vary in the future without prior notice for product
improvement.
❏ If you have any questions, nd any mistakes, missing descriptions in the manuals, please contact Epson support.
❏ Epson cannot assume responsibility for any damage caused as a result of operations performed in this manual.
❏ Epson cannot assume responsibility for any damage caused by not following the instructions in the manual, or
for any damage caused by repairs or modications performed by third parties other than Epson or a certied
Epson engineer.
User's Guide
About the Manuals
9

Important Safety Instructions
Read and follow these instructions to ensure safe use of this printer. Make sure you keep this manual for future
reference. Also, be sure to follow all warnings and instructions marked on the printer.
Some of the symbols used on your printer are to ensure safety and proper use of the printer. Visit the following
Web site to learn the meaning of the symbols.
http://support.epson.net/symbols
Setting Up the Printer
❏ Do not move the printer by yourself.
❏ Do not place or store the printer outdoors, near excessive dirt or dust, water, heat sources, or in locations
subject to shocks, vibrations, high temperature or humidity.
❏ Place the printer on a at, stable surface that extends beyond the base of the printer in all directions. e printer
will not operate properly if it is tilted at an angle.
❏ Avoid places subject to rapid changes in temperature and humidity. Also, keep the printer away from direct
sunlight, strong light, or heat sources.
❏ Do not block or cover the vents and openings in the printer.
❏ Allow space above the printer so that you can fully raise the ADF Unit (Automatic Document Feeder Unit).
❏ Leave enough space in front of the printer and to the le and right to perform printing and maintenance.
❏ Be sure the AC power cord meets the relevant local safety standards. Use only the power cord that comes with
this product. Use of another cord may result in
re
or electric shock.
is
product’s power cord is for use with
this product only. Use with other equipment may result in re or electric shock.
❏ Use only the type of power source indicated on the printer's label.
❏ Place the printer near a wall outlet where the plug can be easily unplugged.
❏ Avoid using outlets on the same circuit as photocopiers or air control systems that regularly switch on and o.
❏ Avoid electrical outlets controlled by wall switches or automatic timers.
❏ Keep the entire computer system away from potential sources of electromagnetic interference, such as
loudspeakers or the base units of cordless telephones.
❏ e power-supply cords should be placed to avoid abrasions, cuts, fraying, crimping, and kinking. Do not place
objects on top of the power-supply cords and do not allow the power-supply cords to be stepped on or run over.
Be particularly careful to keep all the power-supply cords straight at the ends and the points where they enter
and leave the transformer.
❏ If you use an extension cord with the printer, make sure that the total ampere rating of the devices plugged into
the extension cord does not exceed the cord's ampere rating. Also, make sure that the total ampere rating of all
devices plugged into the wall outlet does not exceed the wall outlet's ampere rating.
❏ If you plan to use the printer in Germany, the building installation must be protected by a 10 or 16 amp circuit
breaker to provide adequate short-circuit protection and over-current protection for the printer.
User's Guide
Important Safety Instructions
10

Using the Printer
❏ Never disassemble, modify, or attempt to repair the power cord, plug, printer unit, scanner unit, or options by
yourself, except as specically explained in the printer’s manuals.
❏ Unplug the printer and refer servicing to qualied service personnel under the following conditions:
e power cord or plug is damaged; liquid has entered the printer; the printer has been dropped or the casing
damaged; the printer does not operate normally or exhibits a distinct change in performance. Do not adjust
controls that are not covered by the operating instructions.
❏ Take care not to spill liquid on the printer and not to handle the printer with wet hands.
❏ If the LCD screen is damaged, contact your dealer. If the liquid crystal solution gets on your hands, wash them
thoroughly with soap and water. If the liquid crystal solution gets into your eyes, ush them immediately with
water. If discomfort or vision problems remain aer a thorough ushing, see a doctor immediately.
❏ Avoid touching the components inside the printer unless instructed to do so in this guide.
❏ Do not touch the areas indicated by caution labels inside the printer and the optional items.
❏ Avoid using a telephone during an electrical storm. ere may be a remote risk of electric shock from lightning.
❏ Do not use a telephone to report a gas leak in the vicinity of the leak.
❏ When connecting the printer to a computer or other device with a cable, ensure the correct orientation of the
connectors. Each connector has only one correct orientation. Inserting a connector in the wrong orientation
may damage both devices connected by the cable.
❏ Do not insert objects through the slots in the printer.
❏ Do not put your hand inside the printer during printing.
❏ Do not use aerosol products that contain ammable gases inside or around the printer. Doing so may cause re.
❏ Be careful not to trap your ngers when opening the covers, trays, cassettes, or when performing operations
inside the printer.
❏ Do not press too hard on the scanner glass when placing the originals.
❏ Always turn the printer o using the
P
button. Do not unplug the printer or turn o the circuit breaker until
the power light stops ashing.
❏ If you are not going to use the printer for a long period, be sure to unplug the power cord from the electrical
outlet.
❏ Do not sit or lean on the printer. Do not put heavy objects on the printer.
❏ When using the printer, make sure you lock the adjuster bolts of the printer.
❏ Do not move the printer when the adjuster bolts are locked.
Handling the Consumable Products
❏ Be careful when you handle used ink cartridge, as there may be some ink around the ink supply port.
❏ If ink gets on your skin, wash the area thoroughly with soap and water.
❏ If ink gets into your eyes, ush them immediately with water. If discomfort or vision problems continue aer
a thorough
ushing,
see a doctor immediately.
❏ If ink gets into your mouth, see a doctor right away.
User's Guide
Important Safety Instructions
11

❏ Do not disassemble the ink cartridge and the maintenance box; otherwise ink may get into your eyes or on your
skin.
❏ Do not shake ink cartridge too vigorously; otherwise ink may leak from the ink cartridge.
❏ Keep ink cartridge and maintenance box out of the reach of children.
❏ Do not let the paper’s edge slide across your skin because the edge of the paper may cut you.
Related Information
& “Ink Cartridge Handling Precautions” on page 192
& “Maintenance Box Handling Precautions” on page 194
Protecting Your Personal Information
When you give the printer to someone else or dispose of it, erase all the personal information stored in the printer's
memory by selecting the menus on the control panel as described below.
❏ Settings > General Settings > System Administration > Restore Default Settings > Clear All Data and
Settings
❏ Settings > General Settings > System Administration > HDD Erase Settings > Erase All Memory > High
Speed or Overwrite
Data on the HDD can be completely erased by High Speed or Overwrite. e Overwrite function overwrites
any invalid data in the memory which can take some time to process.
❏ Settings > General Settings > System Administration > Clear Internal Memory Data > PDL Font, Macro,
and Working Area
Disposing of European Printer Models
ere is a battery in the printer.
e crossed out wheeled bin label that can be found on your product indicates that this product and incorporated
batteries should not be disposed of via the normal household waste stream. To prevent possible harm to the
environment or human health please separate this product and its batteries from other waste streams to ensure
that it can be recycled in an environmentally sound manner. For more details on available collection facilities
please contact your local government
oce
or the retailer where you purchased this product. Use of the chemical
symbols Pb, Cd or Hg indicates if these metals are used in the battery.
User's Guide
Important Safety Instructions
12
Printer Basics
Part Names and Functions
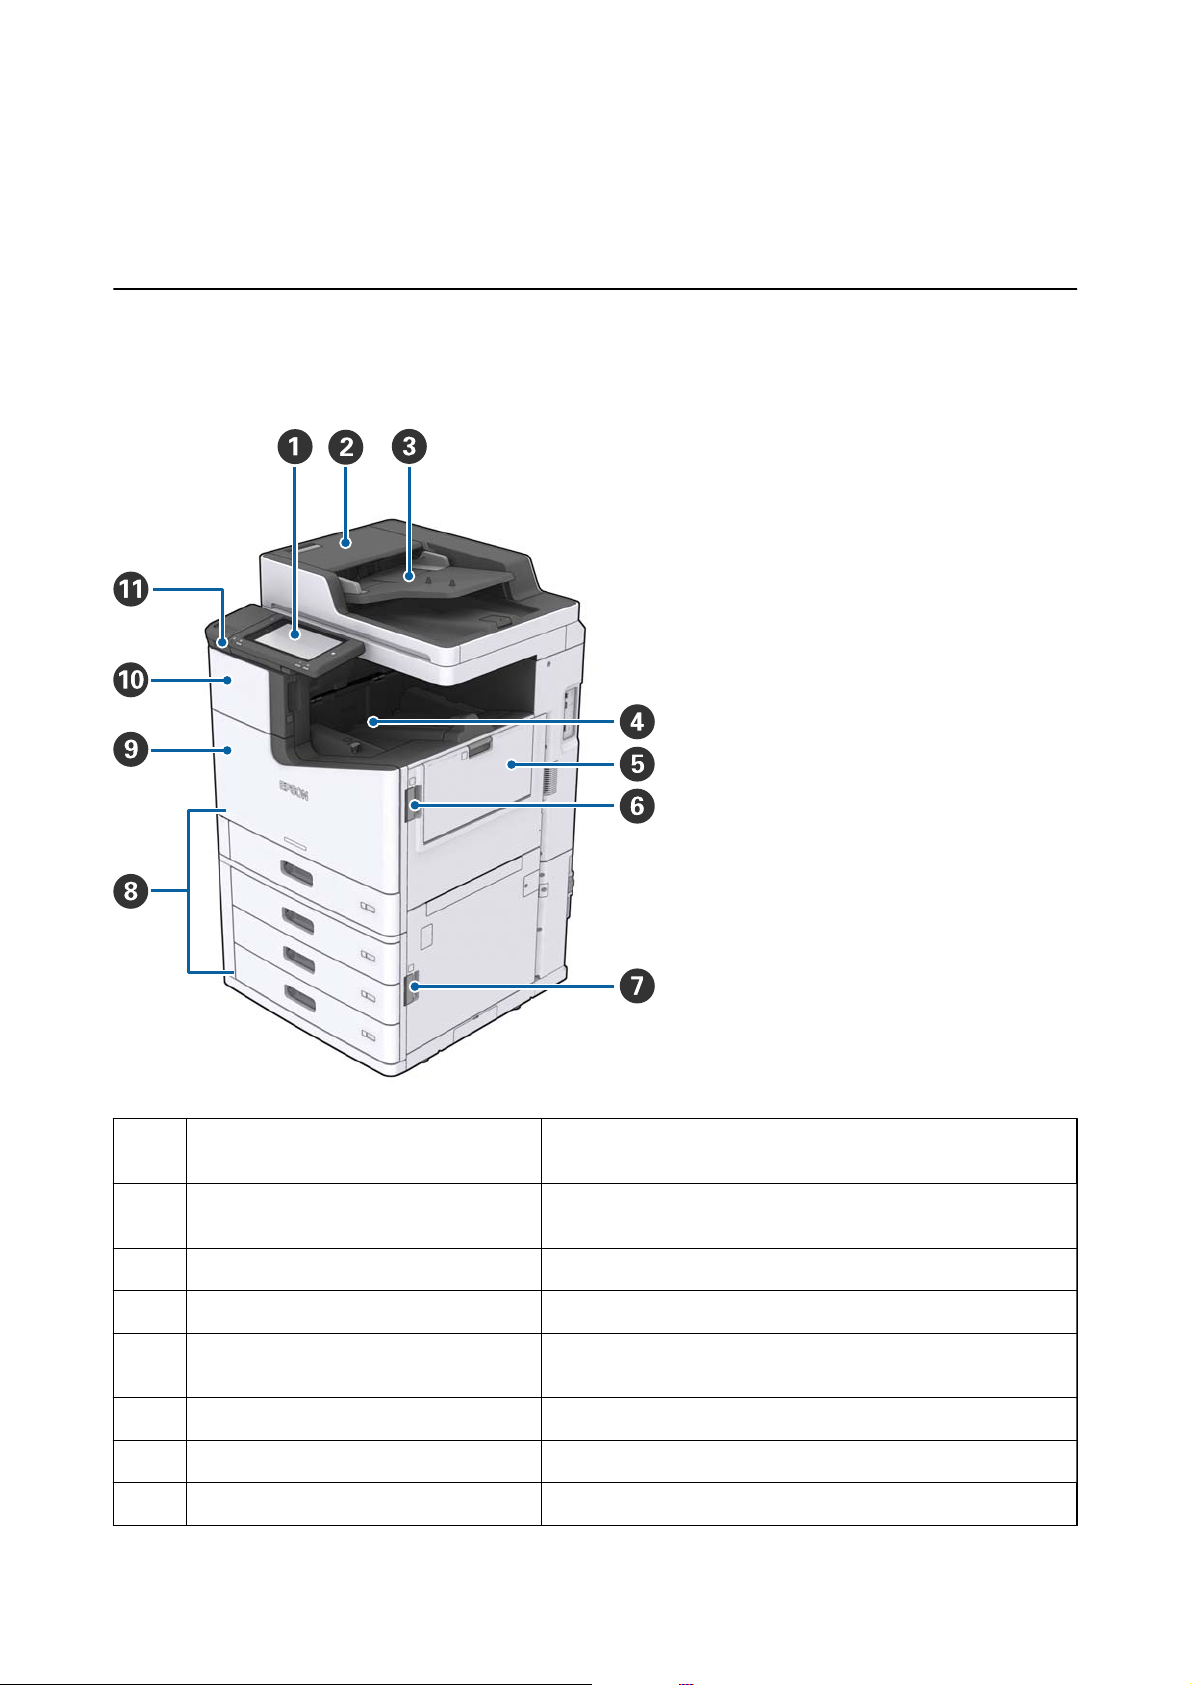
Front/Right side
A
Control panel Allows you to make settings and perform operations on the printer.
Also displays the printer’s status.
B
ADF cover (F) Open when paper is jammed in the ADF (Automatic Document
Feeder).
C
ADF (Automatic Document Feeder) Device that automatically loads documents.
D
Face down tray Holds the print outs.
E
MP tray Loads the paper. You can load all types of paper (thick paper and
envelopes) that can be used in this printer.
F
Cover (J) Open when paper is jammed.
G
Cover (E) Open when paper is jammed.
H
Paper cassette 1, 2, 3, 4 (C1, C2, C3, C4) Loads the paper.
User's Guide
Printer Basics
13
I
Front cover (L) Open when paper is jammed or when replacing the maintenance
box.
J
Ink cartridge cover (A) Open when replacing the ink cartridge.
K
External interface USB port Connects memory devices.
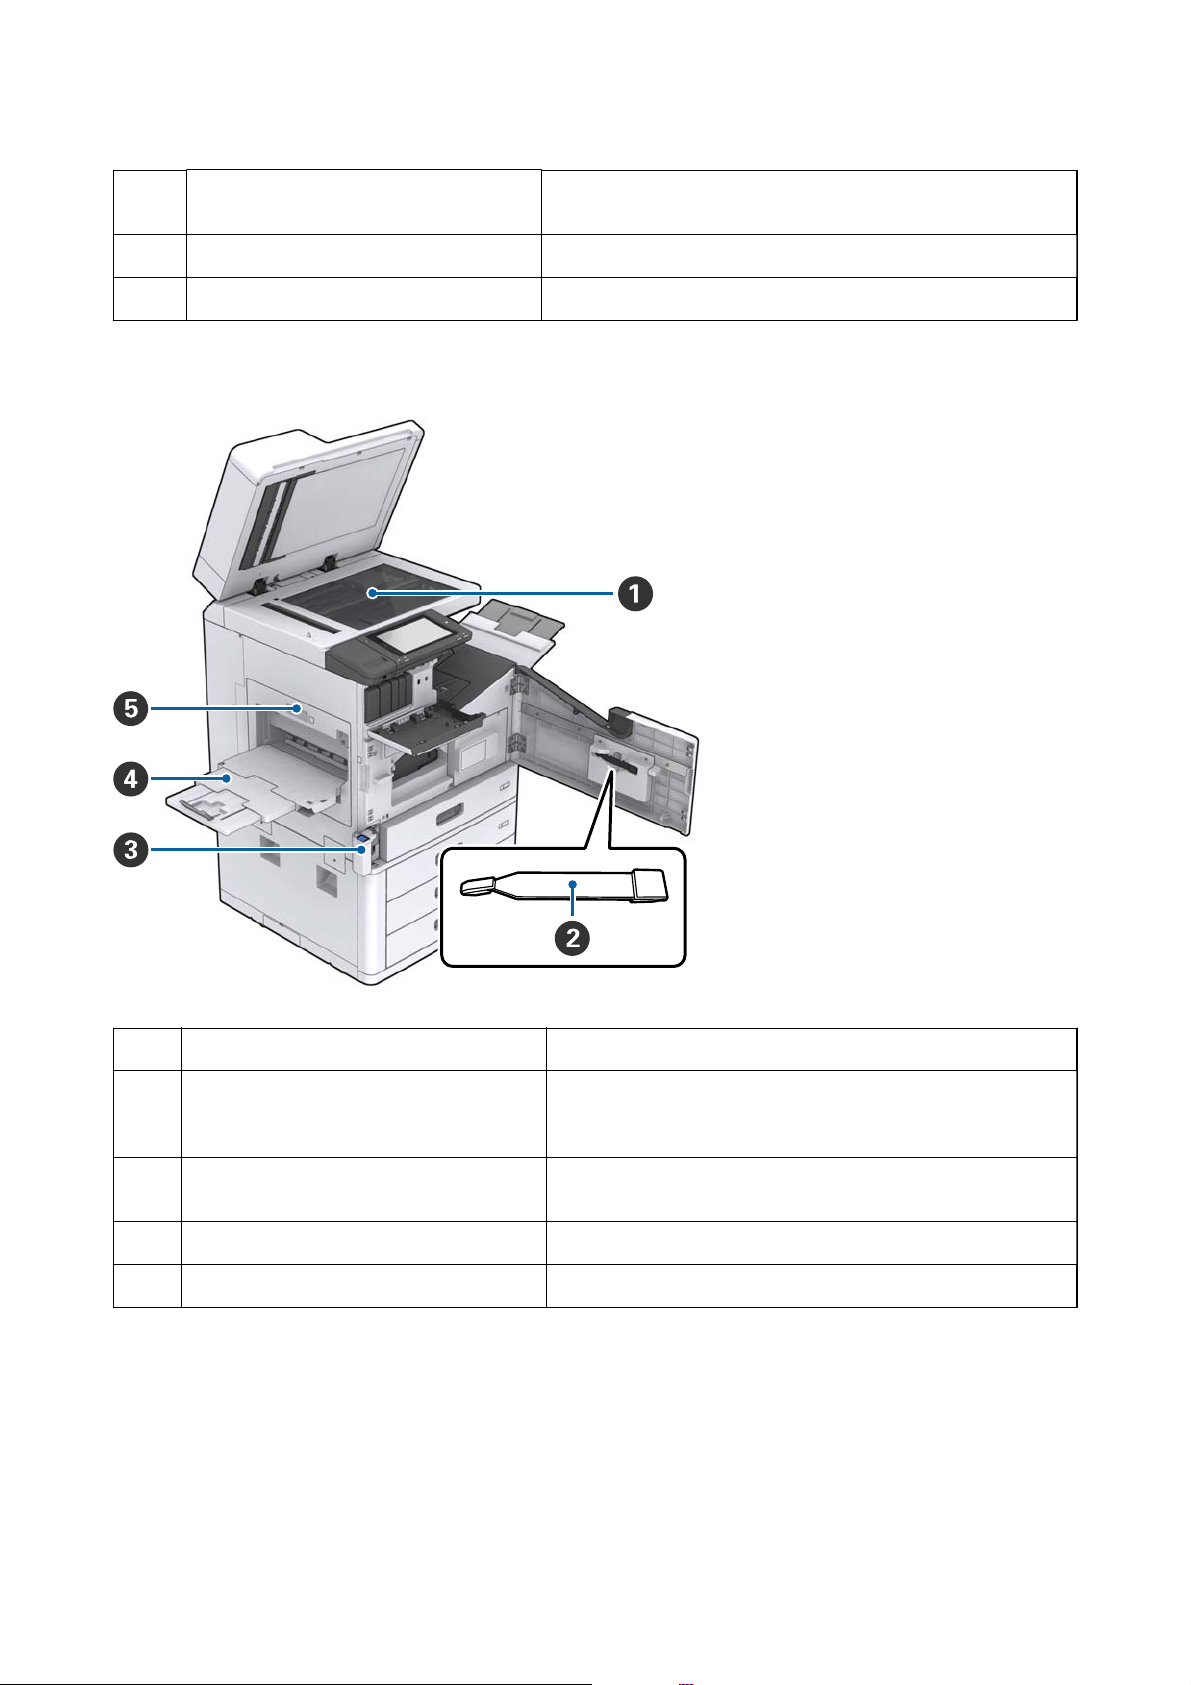
Front/Left side
A
Scanner glass Place the document face-down on the scanner glass.
B
Cleaner This is a service part for cleaning the inside of the printer. (It can
also be used as a substitute for a soft cloth when wiping the
scanner glass surface.)
C
Maintenance box cover (H) Open when replacing the maintenance box. You need to open the
front cover (L) rst.
D
Face up tray Holds the print outs.
E
Duplexing unit (D1) Open when paper is jammed.
User's Guide
Printer Basics
14
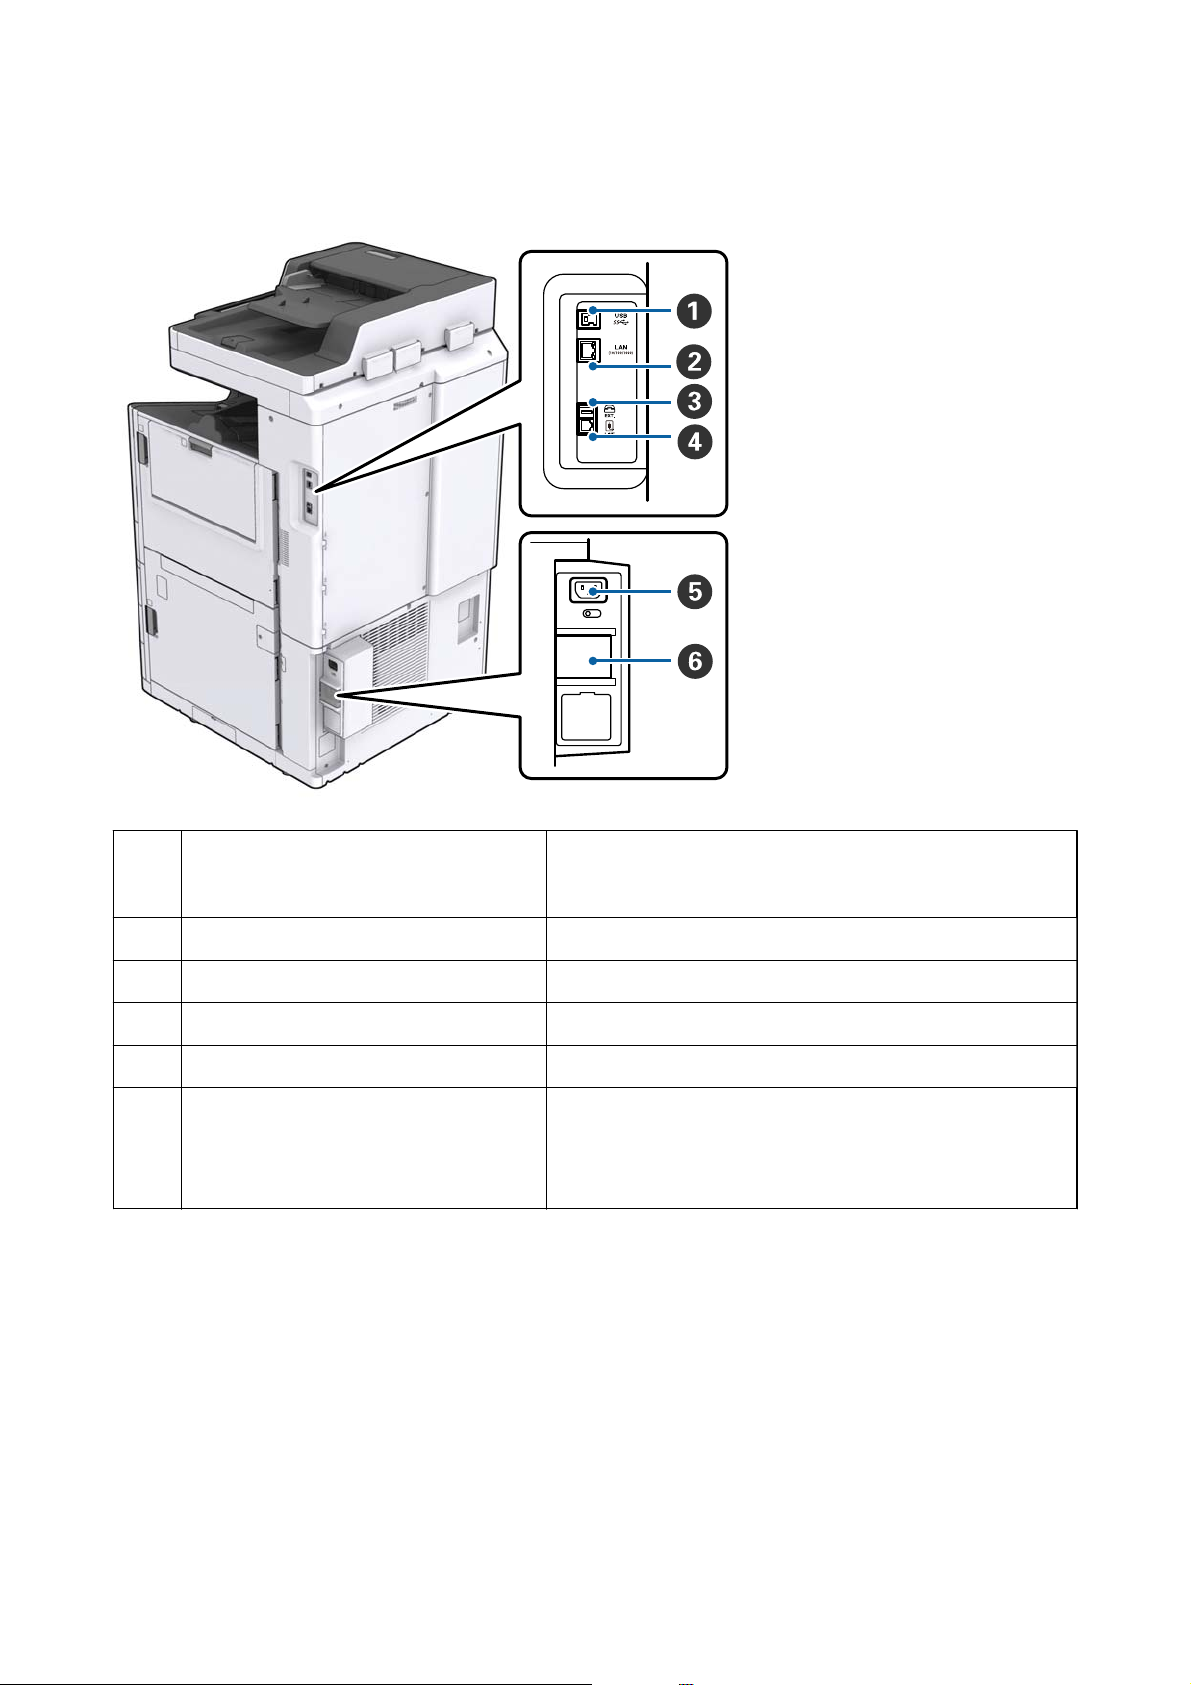
Back/Right side
A
USB port Connects a USB cable. Make sure that you check the direction on
the label stuck to the printer, and then connect in the right
direction.
B
LAN port Connects a LAN cable.
C
EXT. port Connects external phone devices.
D
LINE port Connects a phone line.
E
AC inlet Connects the power cord.
F
Circuit breaker If a short-circuit occurs within the printer, the power supply circuit
shuts o automatically. Do not operate the printer without
performing periodic inspections.
Some printers do not have circuit breakers.
User's Guide
Printer Basics
15
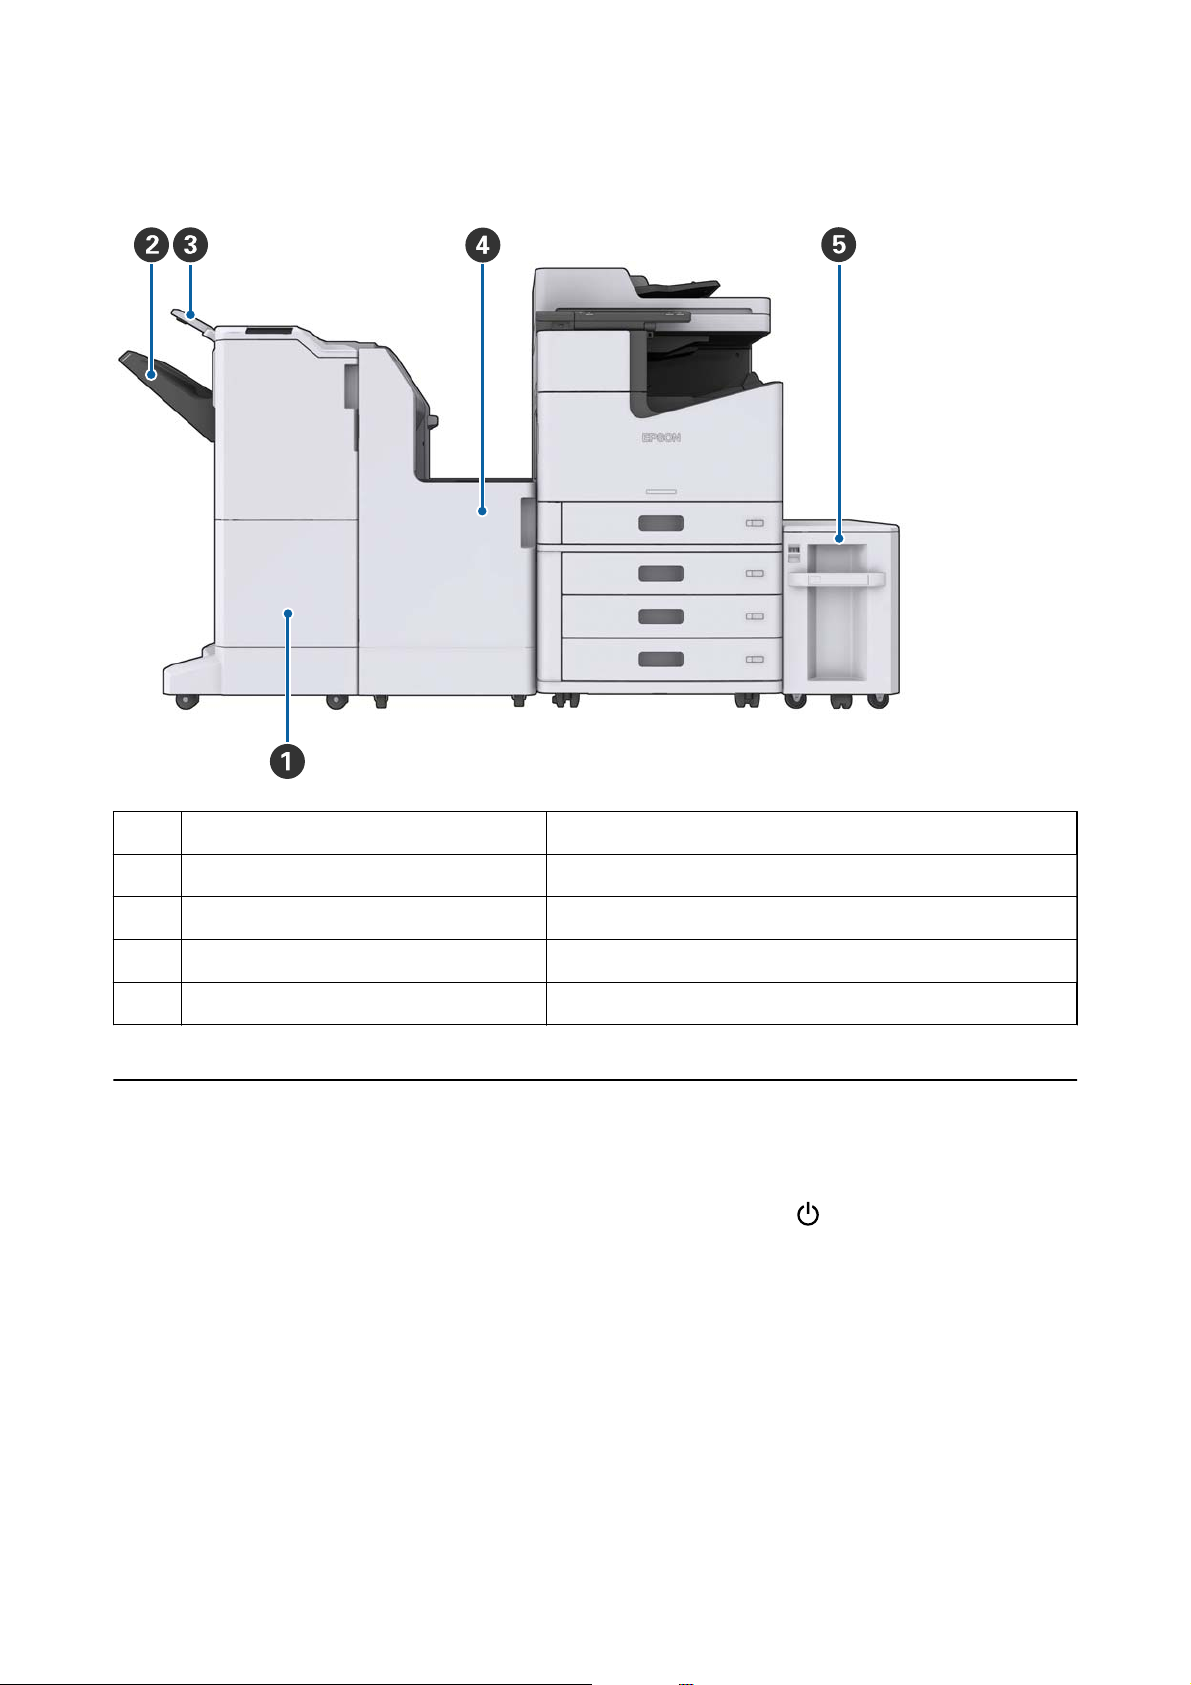
When Optional Extras are Installed
A
Finisher unit Outputs sorted or stapled documents.
B
Finisher tray Holds sorted or stapled documents.
C
Output tray Holds received faxes.
D
Finisher bridge unit Connects the main unit and the nisher.
E
High capacity tray Loads the paper.
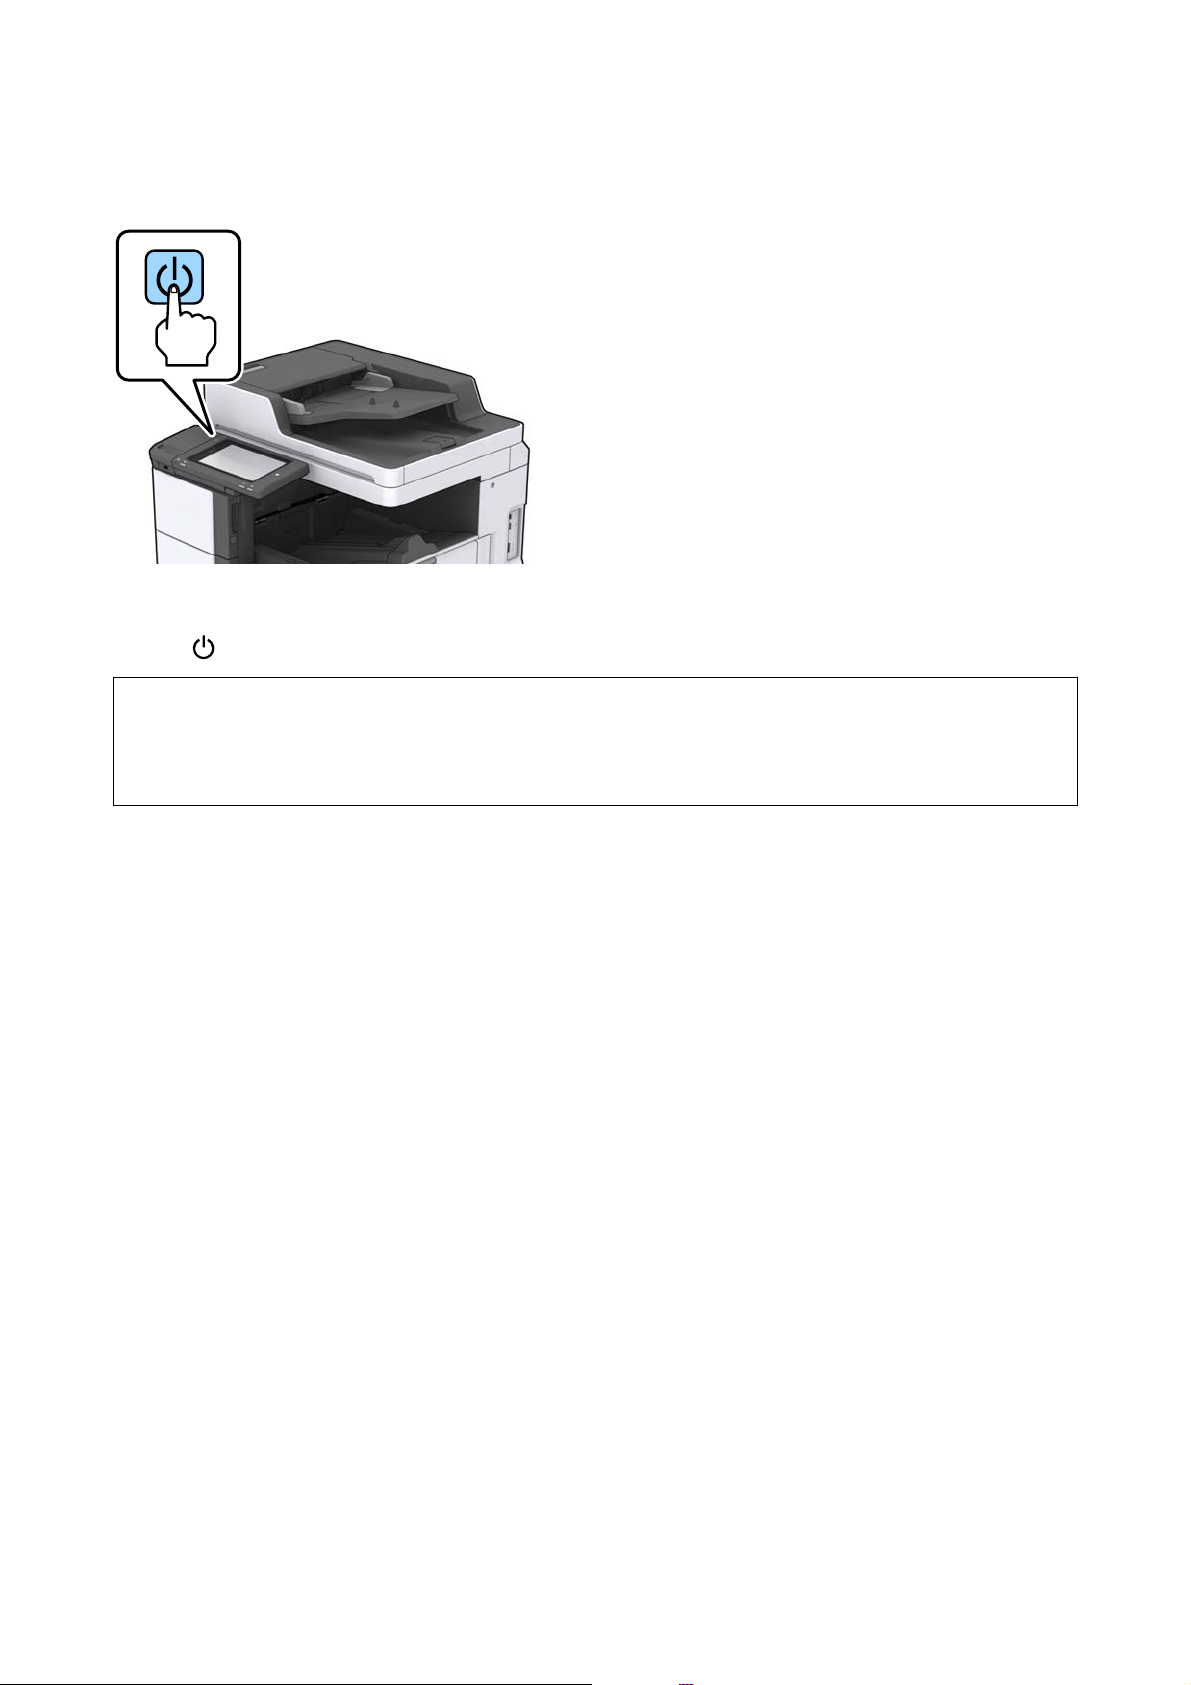
Turning the Power On and O
Turning the Power On
Press the power button on the control panel to turn on the power. Hold down the
button until the LCD screen
is displayed. Make sure that the circuit breaker is on before turning on the power.
User's Guide
Printer Basics
16
e home screen is displayed when startup is complete.
Turning the Power O
Press the
button, then follow the on-screen instructions to turn o the power.
c
Important:
❏ Do not unplug the power cord directly or turn
o
the power using the circuit breaker.
❏ When unplugging the power cord, wait until the power light is
o
and the LCD screen has disappeared.
Related Information
& “Control Panel Part Names” on page 18
User's Guide
Printer Basics
17
Control Panel
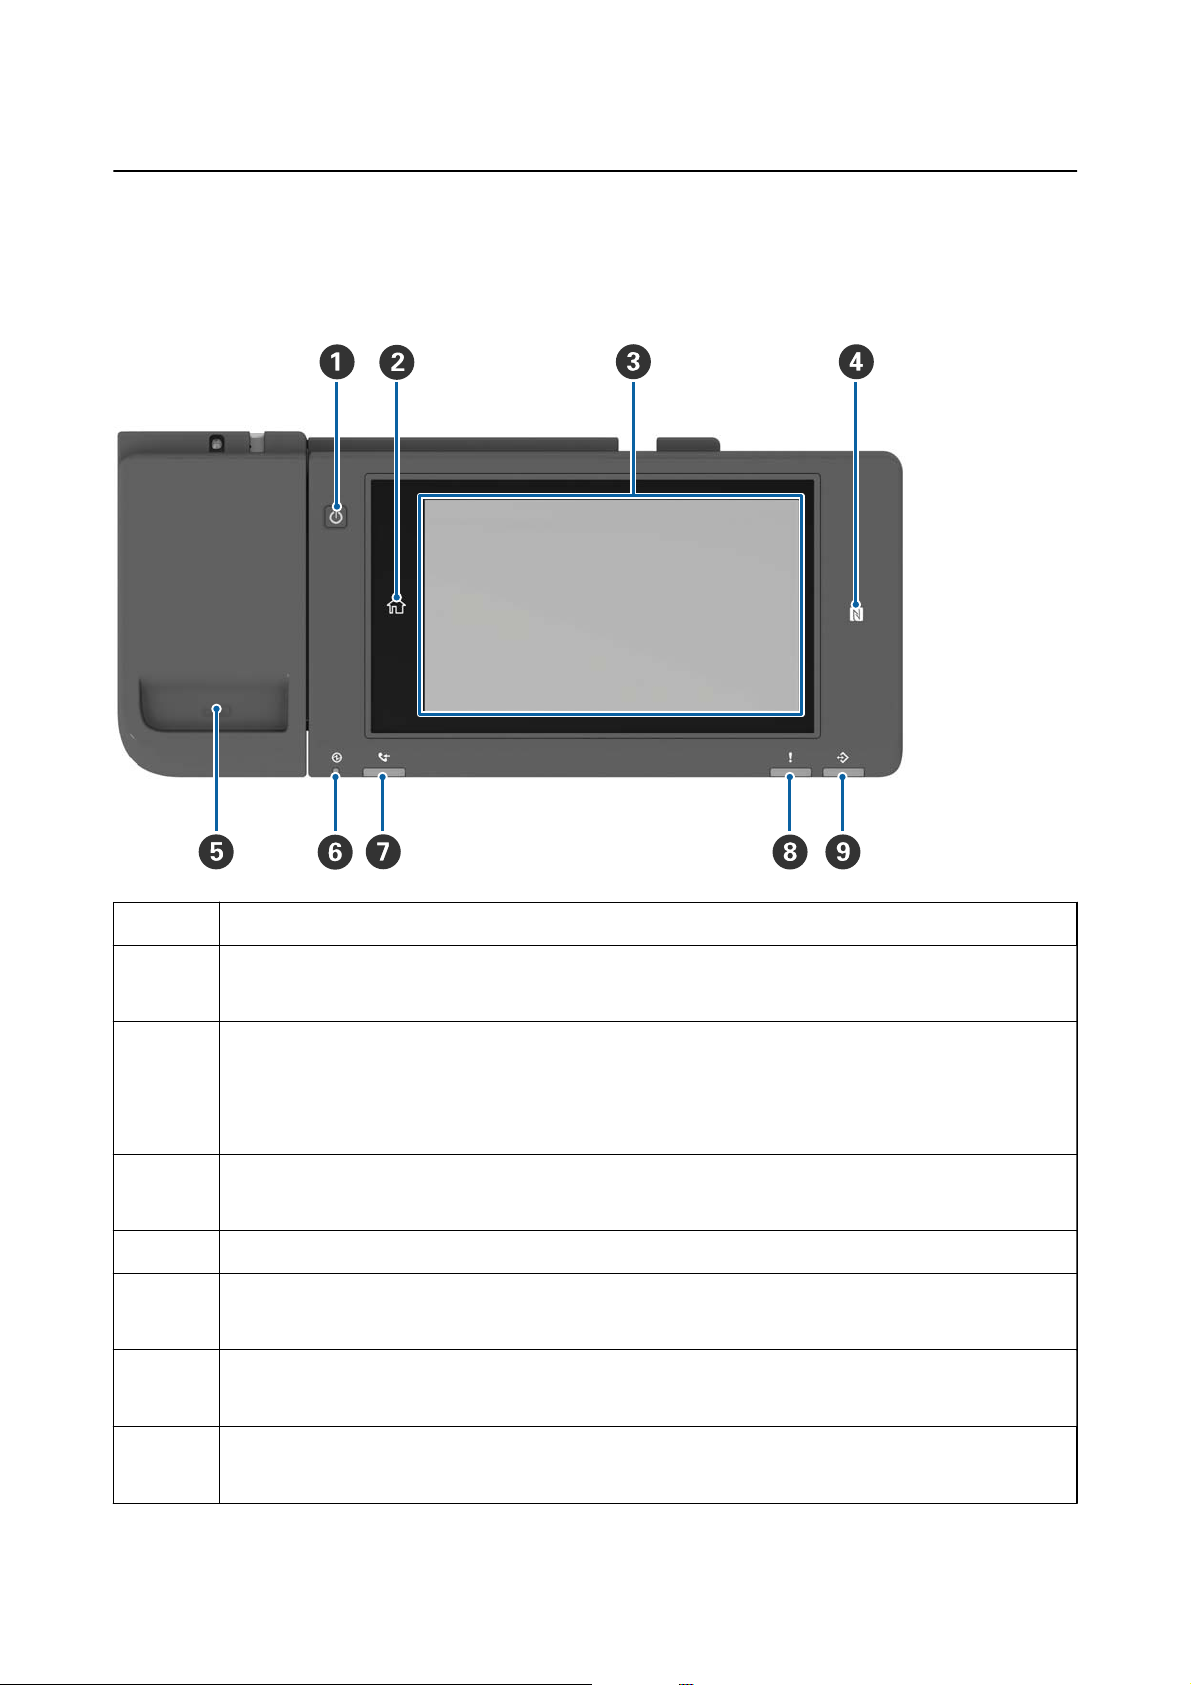
Control Panel Part Names
A
Power button
B
Home button
Returns you to the home screen.
C
Touch scre e n
Displays the setting items and messages.
When no operations are performed for a
specic
length of time, the printer enters sleep mode and the display
turns o. Tap anywhere on the touch screen to turn on the display.
D
N-Mark
Pass a smart device such as smartphone and tablet that support NFC over this mark to print or scan directly.
E
Paper Clip holder
F
Power light
Turns on or ashes when the printer is on. Turns o when the printer turns o.
G
Fax reception light
Turns on when received documents that have not yet been processed.
H
Error light
Turns on or ashes when an error occurs.
User's Guide
Printer Basics
18

I
Data light
Flashes when the printer is processing data, and turns on when there are jobs waiting to be processed.
You can tilt the control panel.
Touch Screen Operations
e
touchscreen is compatible with the following operations.
Ta p Press or select the items or the icons.
Flick
Scroll the screen swiftly.
Slide
Hold and move the items around.
User's Guide
Printer Basics
19
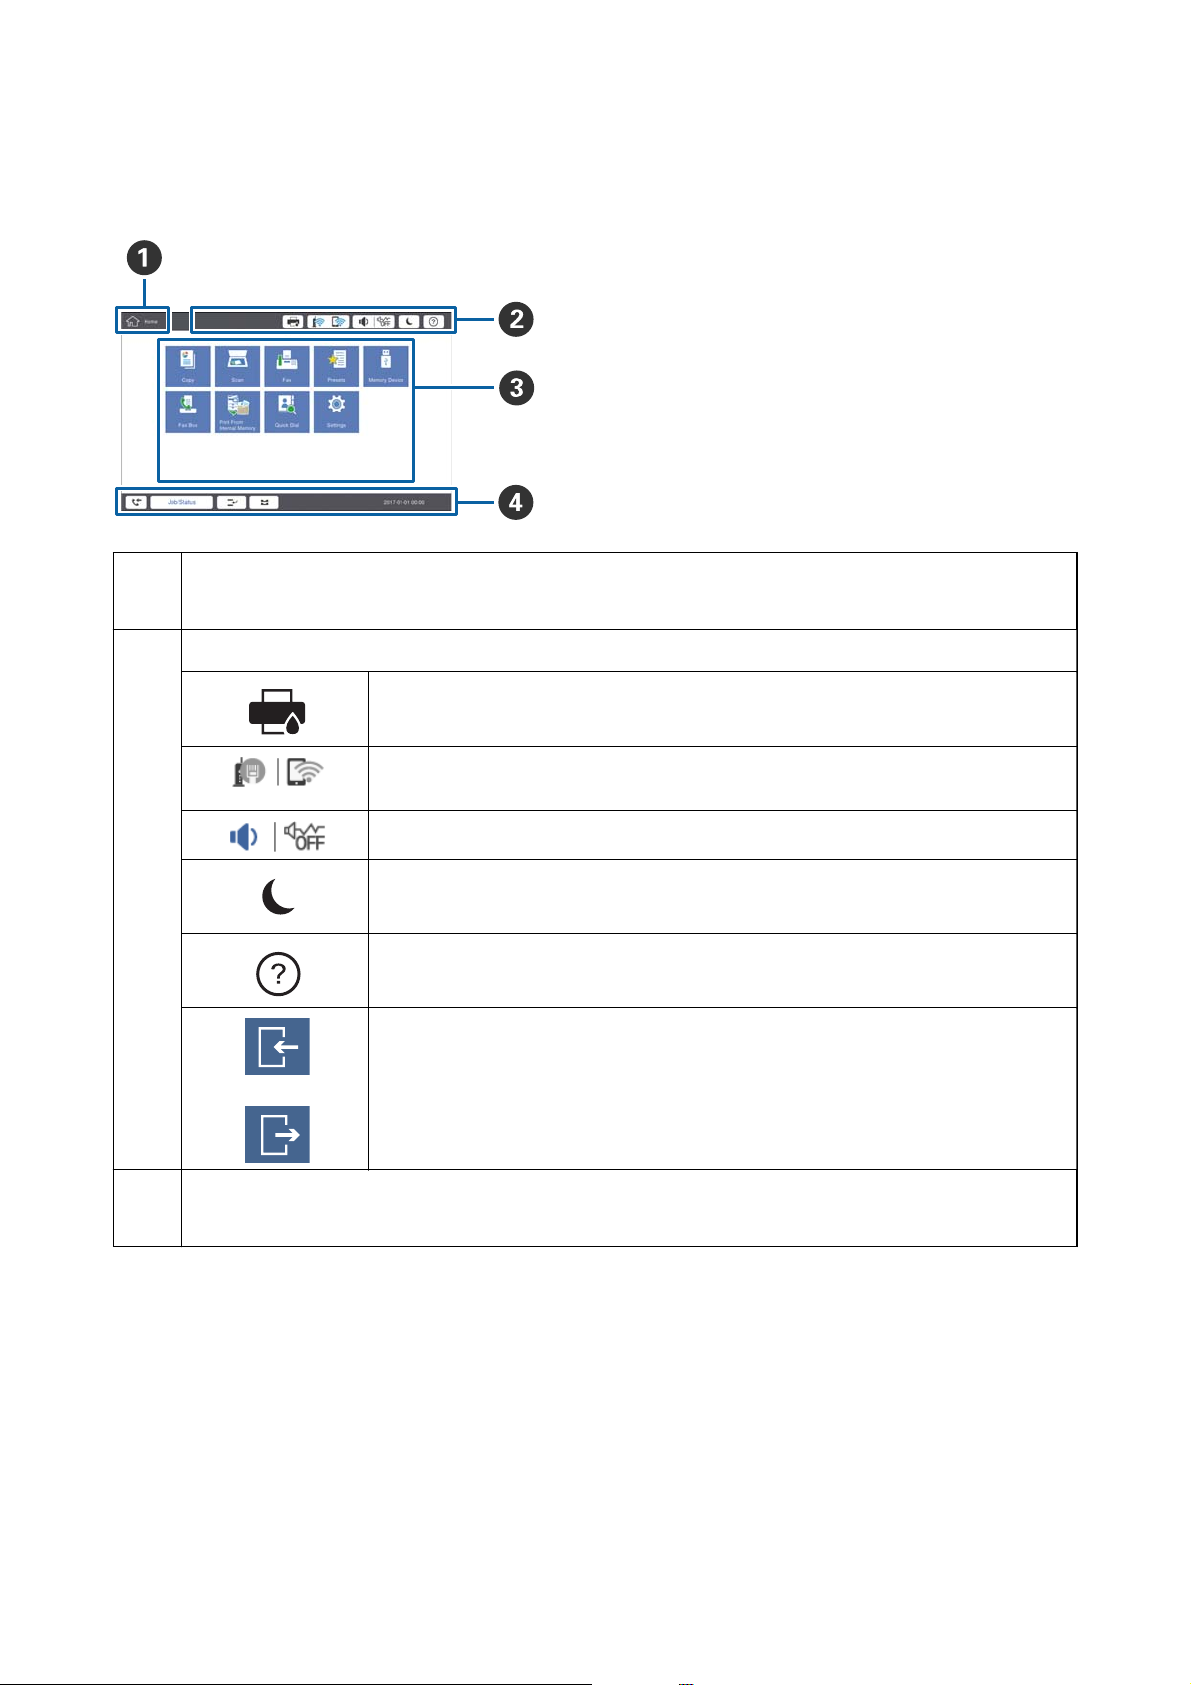
Home Screen Conguration
A
Ti tl e
indicates the current screen.
B
Displays information on each item. Grayed out items are not available.
Displays the Printer Status.
Indicates the network connection status. Tap to displays the guide screen of the network
connection.
Displays the volume setting screen.
Enters the printer into sleep mode.
Displays the help screen contains operating instructions and troubleshooting.
Tap to display the log in screen. Tap the log out icon after using the printer. This icon is
displayed when users operations are restricted by the administrator.
C
Menu selection screen. Tap to display each menu screen.
You can change the position and order of the menu icon.
User's Guide
Printer Basics
20

D
Displays the status of jobs and printer. The contents of display change depending on the printer’s status.
Displays the number of faxes that have not been processed. Tap to display the list of jobs.
Job/Status Displays on-going jobs and jobs that are standing by. Tap to display the type of jobs, arrival
time, user names, and so on as a list.
Pauses the current job and allows you to interrupt another job. You cannot interrupt from a
computer.
Sets the paper size and paper type for the output sources.
An information for
the interrupted job,
error or unread fax,
and job name
Displays the printer’s status such as the Interrupt status, Error status, current job, and
unprocessed faxes.
Stop Pauses the processing job.
Clock Displays the current time when there is no specic printer status to display.
Menu Screen
Conguration
A
Switch the setting screen. The contents of each tab diers depending on each menu.
B
Displays the contents of each tab. Tap on each item to change the setting.
C
Displays the common operation buttons.
❏ Presets:
Tap to display the preset list. Select a preset or save the current settings as a preset.
❏ Reset:
Tap to cancel changes you have made and return to the original settings.
❏ Preview:
Tap to conrm the scanned image on the screen before copying, scanning, or sending a fax.
❏
x
Tap to execute Copy, Scan, or Fax jobs.
User's Guide
Printer Basics
21
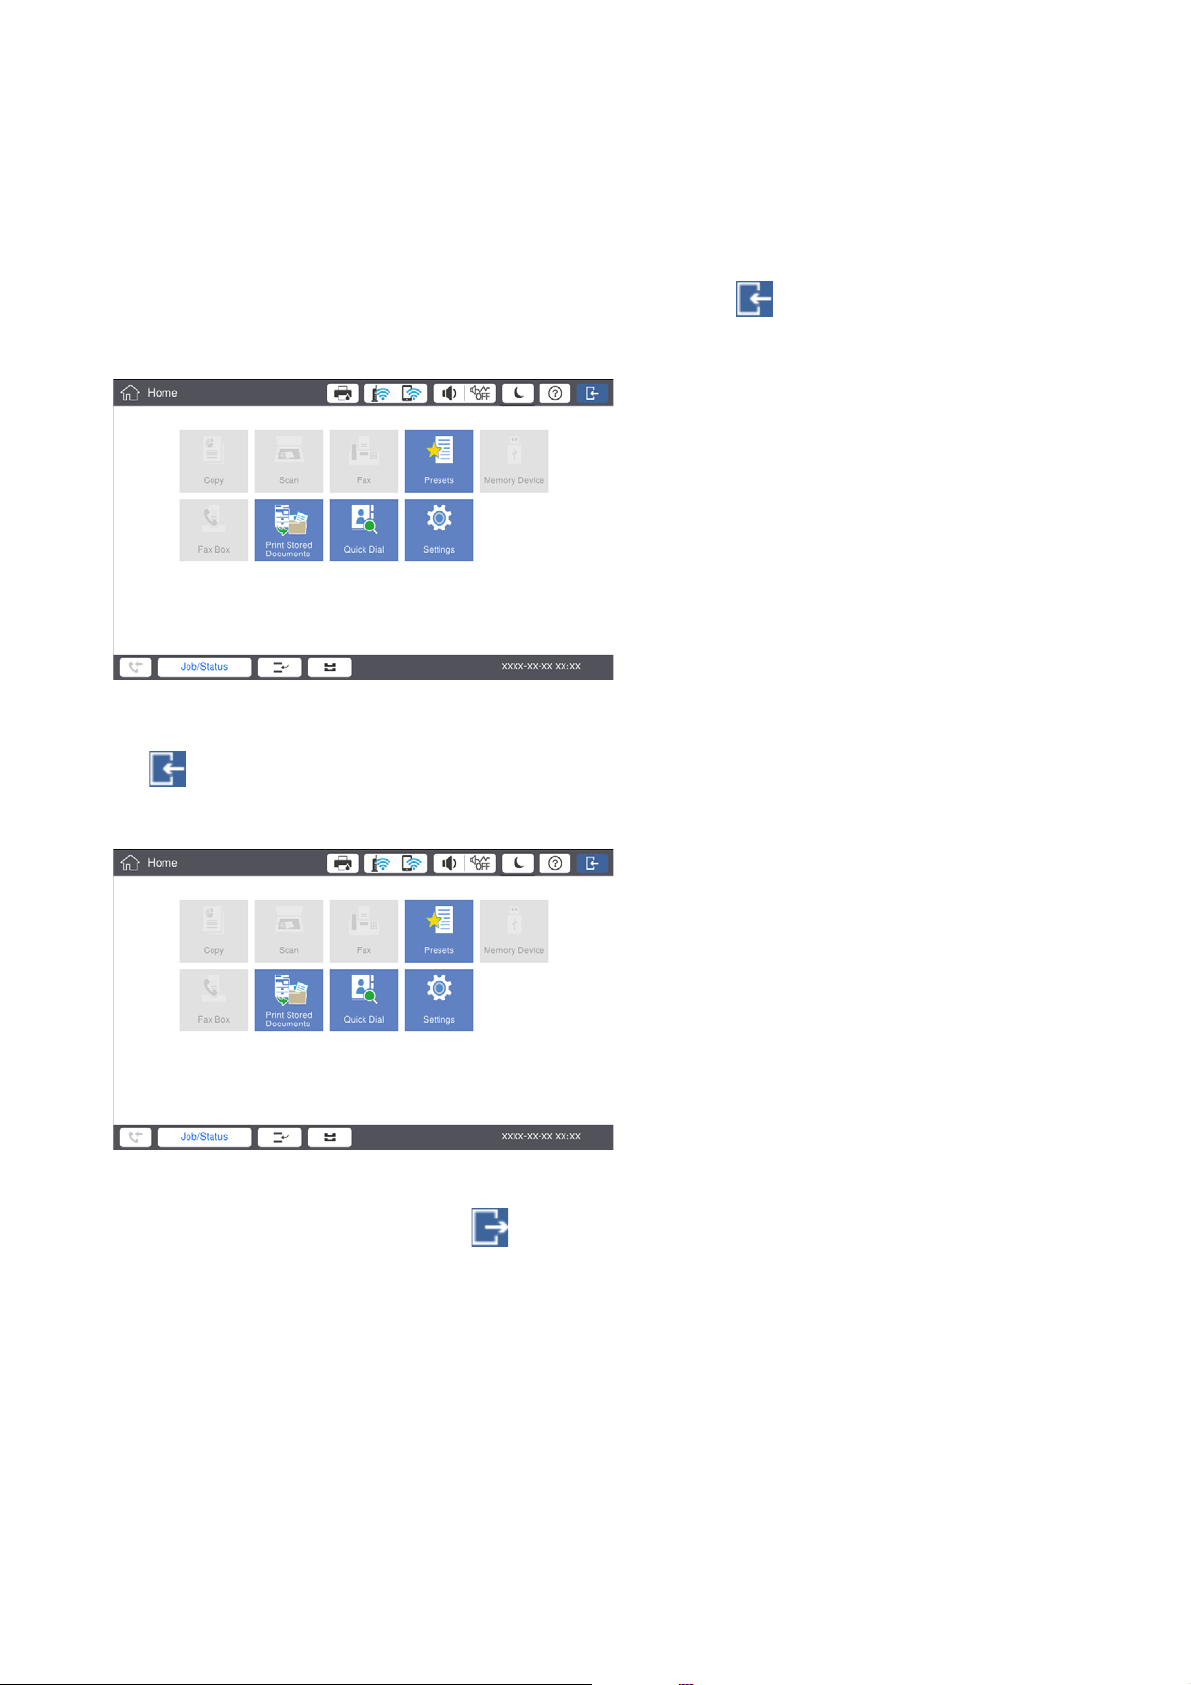
Access Control and Login
Conrmation method of Access Control
is printer has functions that can be limited users by an administrator. If
is displayed on the home screen,
Access Control has been applied. It is also displayed if the administrator has locked some functions.
Login method to the printer
Ta p
to log in to the printer. Select the user name and enter a password. Contact your printer administrator for
login information.
Note:
When you have nished using the printer, tap
to log out.
Related Information
& “Menu Options for System Administration in General Settings” on page 44
User's Guide
Printer Basics
22

Preparing the Printer
Managing Contacts
You can register up to 2000 entries that can be used for fax destination, sending scanned image by mail, or saving
scanned image to network folder.
You can also use contacts in the LDAP server. For registering a destination of LDAP server, see the Administrator's
Guide for details.
Note:
❏ You need to set the email server for registering a email address. Make sure to check the email server in advance.
❏ When a password conrmation screen displays during performance, contact your printer administrator.
Registering Contacts
1.
Ta p Settings on the home screen.
2. Tap Contacts Manager > Add/Edit/Delete.
3. Tap Add New > Add Contact.
4.
Select the type of contact that you want to register.
❏ Fax:
Register a contact (fax number) to send a fax.
❏ Email:
Register an email address to send a scanned image or forward a received fax.
❏ Network Folder/FTP:
Register a network folder to save a scanned image of received fax.
5. Make the necessary settings.
Items that must be entered are displayed as "XXXXX (Required)".
User's Guide
Preparing the Printer
23

Note:
Selecting the Browse icon searches a folder on computers connected to the network. You can use the icon only when
Communication Mode is set to SMB.
6.
Ta p OK.
Related Information
& “Menu Options for Contacts Manager” on page 45
Registering Grouped Contacts
Adding contacts to a group allows you to send a fax or send a scanned image by an email to multiple destinations
at the same time. Up to 200 destinations can be registered to a group.
1. Tap Settings on the home screen.
2. Tap Contacts Manager > Add/Edit/Delete.
3.
Ta p Add New > Add Group.
4. Select the type of contact that you want to register.
❏ Fax:
Register a contact (fax number) to send a fax.
❏ Email:
Register an email address to send a scanned image or forward a received fax.
5. Enter group name and make the other necessary settings.
Items that must be entered are displayed as "XXXXX (Required)".
6. Tap Contact(s) Added to the Group (Required).
7. Select the contacts that you want to register in the group, and then tap Close. To cancel the selection, tap it
again.
8.
Ta p OK.
Related Information
& “Menu Options for Contacts Manager” on page 45
Registering Frequently Used Contacts
1. Tap Settings on the home screen.
2.
Ta p Contacts Manager > Frequent.
3. Select the type of contact that you want to register.
4. Tap Edit.
User's Guide
Preparing the Printer
24

5. Select frequently used contacts that you want to register, and then tap OK. To cancel the selection, tap it again.
6. Tap Close.
Related Information
&
“Menu Options for Contacts Manager” on page 45
Register Contacts on a Computer
Using Epson Net
Cong
or Web
Cong
, you can create a contact list on your computer and import it to the printer.
See the Administrator's Guide for details.
Backing up Contacts using a Computer
Using Epson Net Cong or Web Cong, you can back up the contact data stored in the printer to the computer. See
the Administrator's Guide for details.
Contacts data may be lost due to a printer malfunction. We recommend that you make a backup of the data
whenever you update the data. Epson shall not be responsible for the loss of any data, for backing up recovering
data and/or settings even during a warranty period.
Registering a Favorite Setting
You can register frequently used copy, fax, and scan settings as presets for up to 50 contacts. You can easily select
them from the preset list.
How to Register
You can register presets from each menu screen such as Copy or the home screen.
Note:
If you cannot edit the presets, they may have been locked by the administrator. Contact your printer administrator for
assistance.
Registering from Each Menu
1. Make settings on the screen of the menu that you want to register a preset.
2.
Ta p
and then tap Save as Preset.
3. Do one of the following.
❏ To register a new preset, tap Add New.
❏ To edit a preset, select the target that you want to overwrite.
4.
Tap t he Name box and enter the name.
User's Guide
Preparing the Printer
25

5. Tap OK.
Registering from Home Screen
1. Tap Presets from the home screen.
2. Tap Add New and then select the feature for which you want to register a preset.
3.
Make settings and then tap Save.
4. Tap the Name box and enter the name.
5. Tap OK.
How to Use
Displays the registered preset list by tapping on the screen of each menu or Presets from the home screen.
Select the preset that you want to load and then tap
.
Note:
Only the list registered on that function is displayed from the screen of each menu.
Adding a Shortcut to the Home Screen
You can add a registered preset to the home screen as shortcuts. is allows you to easily start copying, scanning,
or faxing using the preset settings.
1. Tap Presets on the home screen.
e
Presets list is displayed.
2. Tap next to the preset that you want to add as a shortcut, and then tap Add Shortcut on Home Screen.
When you add Quick Copy as the shortcut for copying, you can make a copy by simply tapping the preset on
the home screen.
User's Guide
Preparing the Printer
26

Loading Papers
Available Paper Types and Capacities
Followings are the available papers for this printer. Using other papers causes paper jams and damage to the
printer.
e paper quality may change depending on the environment. We recommend purchasing paper aer checking
your environment beforehand. Make sure that you perform a test print before using paper such as recycled paper
and envelopes with large variations in quality.
Paper Type/Paper Name Paper Size Loading Capacity (Sheets or Envelopes) Automatic
2-Sided
Printing
MP tray Paper Cassette 1 to 4
Plain paper
Copy paper
Letterhead
Recycled
paper
Color paper
Preprinted
paper
Thick paper
High Quality
Paper
60 to 160
g/m
2
A3+, SRA3, 12
x 18 in
Up to the line indicated
by the triangle symbol
on the edge guide.
(80 g/m
2
: 150)
––
A3, Tabloid,
B4, Legal,
Indian-Legal,
8.5 x 13 in,
Letter, A4, B5,
Executive, A5,
Half letter,
16K (195×270
mm), 8K
(270×390
mm)
Up to the line indicated
by the triangle symbol
on the edge guide.
(80 g/m
2
: 550)
✓
B6, A6 – –
User Dened
(mm)
(55 to 330.2 x
127 to 1200)
–
✓
*1
User Dened
(mm)
(139.7 to 297
x 182 to
431.8)
Up to the line indicated
by the triangle symbol
on the edge guide.
(80 g/m
2
: 550)
✓
*1
User's Guide
Preparing the Printer
27

Paper Type/Paper Name Paper Size Loading Capacity (Sheets or Envelopes) Automatic
2-Sided
Printing
MP tray Paper Cassette 1 to 4
Thick paper
Extra thick
paper
161 to 350
g/m
2
A3+, SRA3, 12
x 18 in, A3,
Tabloid, B4,
Legal, Indian-
Legal, 8.5 x 13
in, Letter, A4,
B5, Executive,
A5, Half letter,
16K (195×270
mm), 8K
(270×390
mm), B6, A6,
User Dened
(mm)
(55 to 330.2 x
127 to 1200)
Up to the line indicated
by the triangle symbol
on the edge guide.
( or 30 sheets)
––
Epson Bright White Ink Jet
Paper
*2
A4 80 450 ✓
Epson Matte Paper-
Heavyweight
*2
A3+, A3, A4 20 – –
Epson Archival Matte Paper
*2
A3+, A3, A4 20 – –
Epson Double-Sided Matte
Paper
*2
A3+, A3, A4 20 – –
Epson Photo Quality Ink Jet
Paper
*2
A3+, A3 50 – –
A4 100 – –
Envelope
*3
Envelope #10,
Envelope DL,
Envelope C4,
Envelope C5,
Envelope C6
10 – –
*1 Automatic 2-sided range (mm) Width: 139.7 to 297, Length: 182 to 431.8
*2 Genuine Epson paper
*3 If the
ap
is on the short edge, make sure you include the
ap
when setting the
user-dened
size.
Note:
❏ e availability of paper varies by location. For the latest information on paper available in your area, contact Epson
support.
❏ When printing on paper longer than 483 mm as the user
dened
size, it is printed using the standard print quality
regardless of the settings in the paper type and paper name. Also, the printer slows down the print speed for some types of
paper such as plain paper.
❏ Genuine Epson paper is not available when printing with the Epson universal printer driver.
Related Information
& “Part Names and Functions” on page 13
User's Guide
Preparing the Printer
28

& “Technical Support Web Site” on page 270
Available Paper Thickness
Followings are the available paper thickness (paper weight g/m
2
: per 1 m
2
expressed in grams). Although it meets
the thickness of the paper, deteriorations of printing quality or paper jams may occur depending on the paper
quality (such as paper grain direction, hardness, etc.).
Paper Type Paper Thickness (Paper weight)
Plain paper
Copy paper
Letterhead
Recycled paper
Color paper
Preprinted paper
Thick paper
Extra thick
High Quality Paper
60 to 350 g/m
2
Envelope #10
DL
C6
C5
75 to 90 g/m
2
(20 to 24 lb)
C4
80 to 100 g/m
2
(21 to 26 lb)
Unavailable Paper Types
Do not use the following papers. Using these papers may cause paper jams, smears on the printout, or damage to
the printer.
❏ Papers that are wavy and damp
❏ Papers that have not dried
aer
printing on one side.
❏ Papers that are wadded and curled
❏ Papers that are torn, cut, folded
❏ Papers that are too thick, too thin
❏ Preprinted papers that used other inkjet printers, thermal transfer printers, page printers or copiers
❏ Papers that are perforated
❏ Papers that have stickers
❏ Papers held together with tape, staples, paper clips, perforated and so on.
❏ Do not use envelopes with adhesive surfaces on the aps or window envelopes.
❏ Pre-punched paper
User's Guide
Preparing the Printer
29
Related Information
& “Available Paper ickness” on page 29
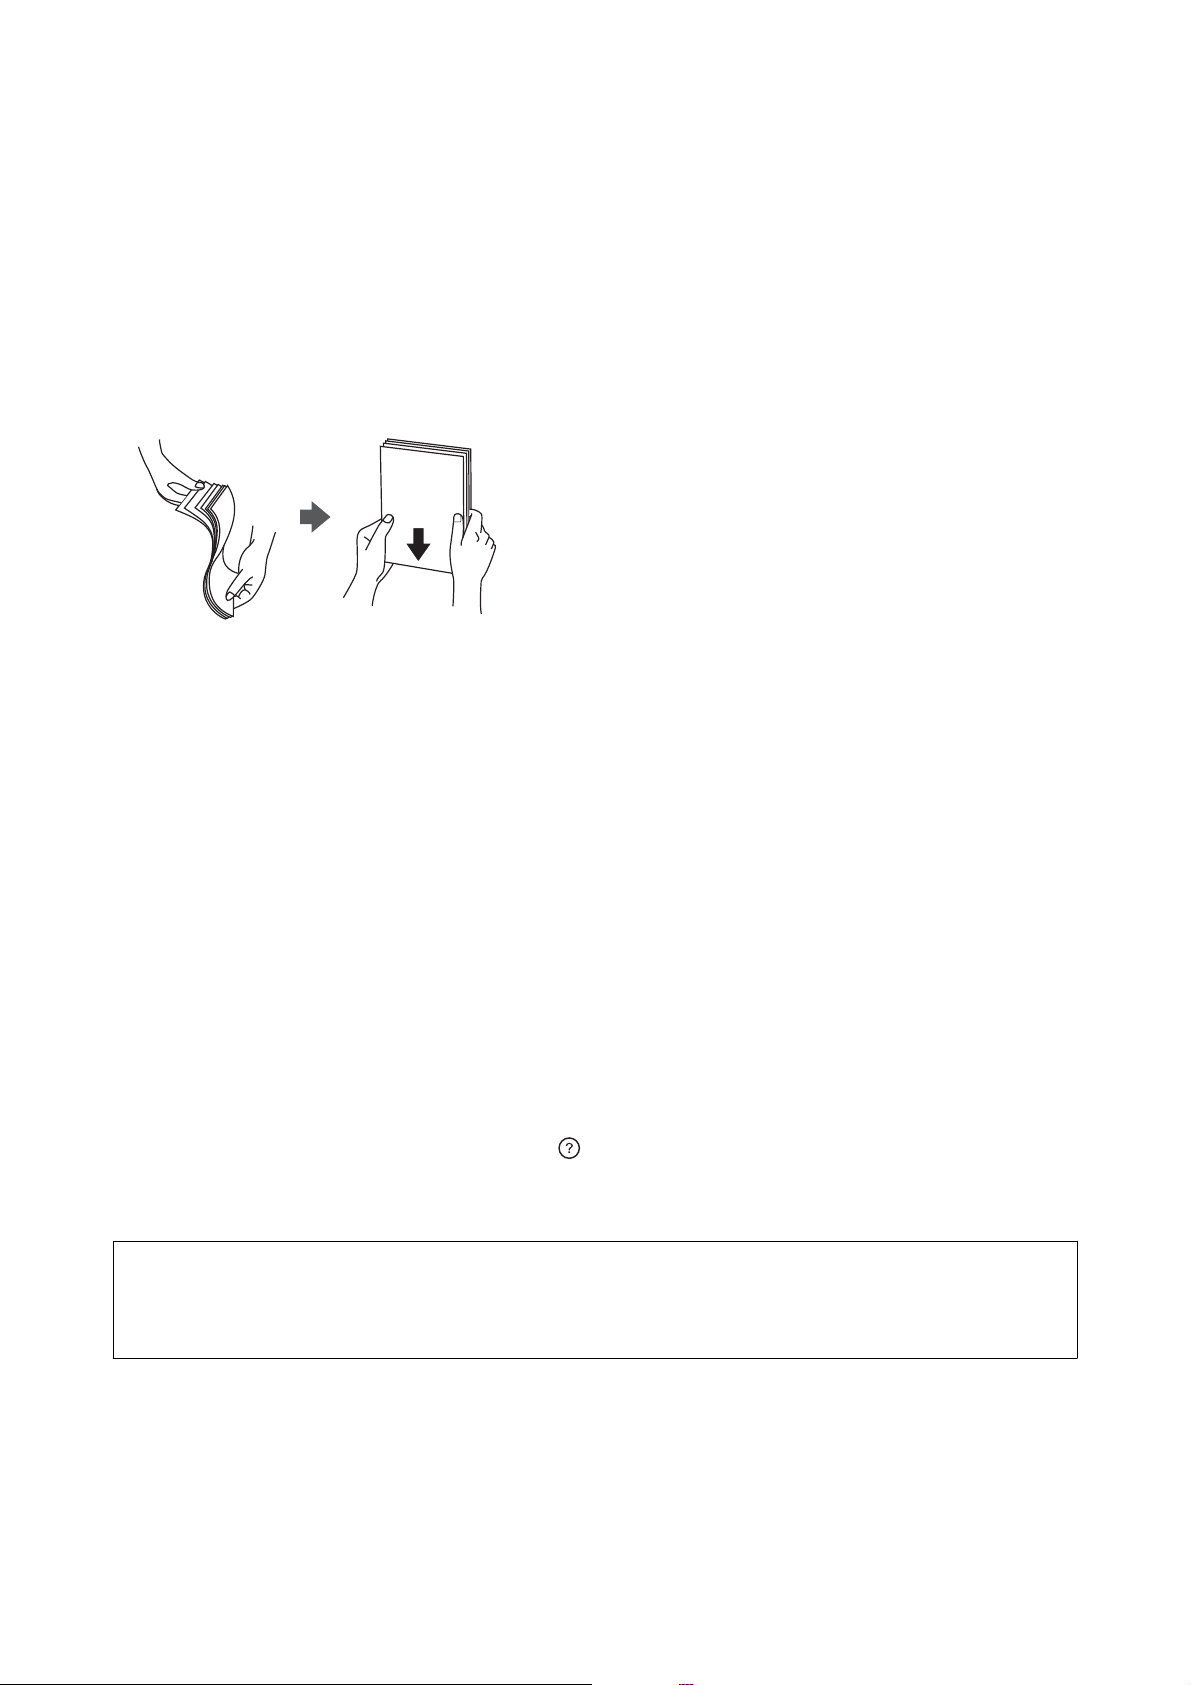
Paper Handling
❏ Read the instruction sheets supplied with the paper.
❏ Fan and align the edges of the paper before loading.
Paper Storage
Notice the following when storing papers.
❏ Seal the rest of papers in a plastic bag to avoid absorbing moisture.
❏ Keep in a place with less humidity. Also, do not wet the paper.
❏ Keep away from direct sunlight.
❏ Do not stand papers, place it on a at.
Note:
Although you store papers as mentioned above, the deterioration of print quality or paper jams may occur depending on the
environment. Before using stored paper, try printing a small amount of paper and check for paper jams or smears on the
printout.
How to Load Papers
See the printer’s help for operating instructions. Tap on the control panel, then tap How To > Load paper.
Aer
loading paper in the MP tray, set the paper size and type on the settings screen displayed on the control
panel.
c
Important:
Insert and remove the paper cassette slowly. Insert the high capacity tray slowly because the tray is heavy due to the
large amount of paper loaded in the tray.
User's Guide
Preparing the Printer
30
Loading...