


 Loading...
WorkForce® 520/525 Series
Quick Guide
Network Setup
Basic Copying, Printing, Scanning, and Faxing
Maintenance
Solving Problems
Contents
Network Setup . . . . . . . . . . . . . . . . . . . . . . . . . . . . . . . . . . . . . . . . |
4 |
Wireless Network Setup . . . . . . . . . . . . . . . . . . . . . . . . . . . . . . . . . . . . . |
4 |
Wired (Ethernet) Network Setup . . . . . . . . . . . . . . . . . . . . . . . . . . . . . . |
18 |
Loading Paper . . . . . . . . . . . . . . . . . . . . . . . . . . . . . . . . . . . . . . . . |
25 |
Using Special Papers . . . . . . . . . . . . . . . . . . . . . . . . . . . . . . . . . . . . . . . |
26 |
Placing Originals for Copying, Scanning, or Faxing . . . . . . . 28
Using the Scanner Glass . . . . . . . . . . . . . . . . . . . . . . . . . . . . . . . . . . . . 28
Using the Automatic Document Feeder . . . . . . . . . . . . . . . . . . . . . . . . . . 28
Copying a Document or Photo . . . . . . . . . . . . . . . . . . . . . . . . . 30
Copying a Document or Photo . . . . . . . . . . . . . . . . . . . . . . . . . . . . . . . 30
Printing From Your Computer . . . . . . . . . . . . . . . . . . . . . . . . . . |
32 |
Printing in Windows . . . . . . . . . . . . . . . . . . . . . . . . . . . . . . . . . . . . . . |
32 |
Printing With a Macintosh . . . . . . . . . . . . . . . . . . . . . . . . . . . . . . . . . . |
33 |
Selecting the Correct Paper Type . . . . . . . . . . . . . . . . . . . . . . . . . . . . . . |
35 |
Faxing a Document . . . . . . . . . . . . . . . . . . . . . . . . . . . . . . . . . . . |
36 |
Connecting a Phone or Answering Machine . . . . . . . . . . . . . . . . . . . . . . . |
36 |
Setting Up Fax Features . . . . . . . . . . . . . . . . . . . . . . . . . . . . . . . . . . . . |
37 |
Sending a Fax From the Control Panel . . . . . . . . . . . . . . . . . . . . . . . . . . |
39 |
Receiving Faxes . . . . . . . . . . . . . . . . . . . . . . . . . . . . . . . . . . . . . . . . . . |
40 |
Scanning a Document or Photo . . . . . . . . . . . . . . . . . . . . . . . . 41
Quick Scanning With the Scan Button . . . . . . . . . . . . . . . . . . . . . . . . . . 41
Scanning With Epson Scan Software . . . . . . . . . . . . . . . . . . . . . . . . . . . . 42
Scanning With Mac OS X 10.6 . . . . . . . . . . . . . . . . . . . . . . . . . . . . . . . 43
2 Contents
Maintaining Your Product . . . . . . . . . . . . . . . . . . . . . . . . . . . . . 44
Checking the Print Head Nozzles . . . . . . . . . . . . . . . . . . . . . . . . . . . . . . 44
Cleaning the Print Head . . . . . . . . . . . . . . . . . . . . . . . . . . . . . . . . . . . . 45
Checking Ink Levels . . . . . . . . . . . . . . . . . . . . . . . . . . . . . . . . . . . . . . . 45
Purchasing Epson Ink Cartridges . . . . . . . . . . . . . . . . . . . . . . . . . . . . . . 46
Replacing Ink Cartridges . . . . . . . . . . . . . . . . . . . . . . . . . . . . . . . . . . . . 47
. . . . . . . . . . . . . . . . . . . . . . . . . . . . . . . . . . . . . 49
Checking for Software Updates . . . . . . . . . . . . . . . . . . . . . . . . . . . . . . . 49
Error Indicators . . . . . . . . . . . . . . . . . . . . . . . . . . . . . . . . . . . . . . . . . . 49
Problems and Solutions . . . . . . . . . . . . . . . . . . . . . . . . . . . . . . . . . . . . . 50
Where to Get Help . . . . . . . . . . . . . . . . . . . . . . . . . . . . . . . . . . . . . . . . 54
Notices. . . . . . . . . . . . . . . . . . . . . . . . . . . . . . . . . . . . . . . . . . . . . . . 55
Contents 3

Network Setup
This section provides detailed instructions for setting up your product on a wireless or wired network.
Before you begin, make sure you set up your product as described on the Start Here sheet. Then follow the steps in one of these sections to set up the product on your network:
■For wireless network setup, see below.
■For wired network (Ethernet®) setup, see page 18.
Wireless Network Setup
The steps in this section provide detailed instructions for setting up your product on a wireless network.
You will need to install the software on every computer that will print to your product. Temporary use of a USB cable (not included) is recommended for the first installation only. After the printer is connected to the network, you will be prompted to remove the USB cable.
If you are using Mac OS X 10.6 or don’t have a USB cable, you can use the buttons on the printer to select wireless settings instead.
Note:
If you have trouble setting up your product, see “Network Problems” on page 50.
■If this is the first time that you’re installing the product, see “Installing for the First Time” on page 5.
■If your product is already on your wireless network and you need to set up additional computers to print to the product, see “Setting Up Additional Computers” on page 14.
4 Network Setup

Installing for the First Time
Before you begin, make sure that you have the following information ready and write it in the space provided below:
■Network name (SSID): _________________________________________
■Network password: ____________________________________________
Note:
If your network password contains uppercase (ABC) or lowercase (abc) letters, be sure to note them correctly. If you don’t know your network name (SSID) or network password, contact the person who set up your wireless network.
1.Make sure your product is turned on.
2.Insert the product software CD.
3.Windows® 7 and Windows Vista®: If you see the AutoPlay window, click Run Setup.exe. When you see the User Account Control screen, click Yes or
Continue.
Windows XP: When you see the Software Installation screen, continue with step 4.
Mac OS® X: Double-click the  Epson icon.
4.When you see this screen, click Install.
Wireless Network Setup 5
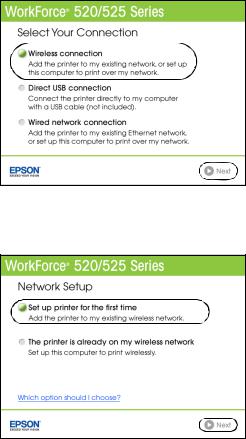
5. When you see this screen, select Wireless connection and click Next.
6.When you see this screen, select Set up printer for the first time, then click
Next.
7.Mac OS X 10.6: At the next screen, click Next. Then skip to “Setting Up With the Product Buttons” on page 11 to set up the product without using a temporary USB connection.
6 Wireless Network Setup

8.When you see this screen, select a wireless network setup method, then click
Next.
Tip:
If you need help selecting a wireless network setup method, click Which option should I choose for more information on setup methods.
9.At the next screen, click Next.
10.Do one of the following:
■If you selected Temporarily connect USB cable, continue with “Setting Up With a Temporary USB Cable” below.
■If you selected Select settings using printer buttons, continue with “Setting Up With the Product Buttons” on page 11.
Setting Up With a Temporary USB Cable
Do not connect the USB cable to your product until instructed to do so in the on-screen instructions.
1. Wait while the software is installed.
Wireless Network Setup 7

2.When you see this screen, connect the product to your computer with a USB cable.
3.Follow the on-screen instructions to continue installing the software.
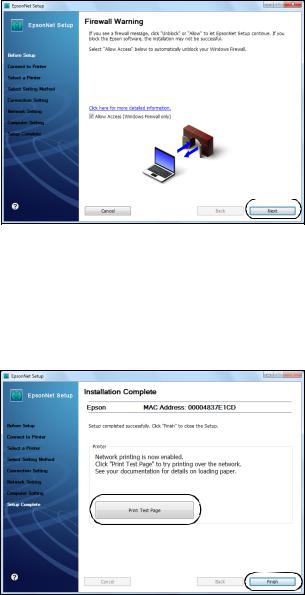
4.When you see the Firewall Warning screen, click Next.
Note:
If you see a firewall alert message, click Unblock or Allow to let EpsonNet Setup continue. Do not select Ask Me Later, Keep Blocking, or Block.
8 Wireless Network Setup

5.When you see a screen like the following, select your network name (SSID) from the list, then click Next.
Note:
If your network name isn’t in the list, select Enter Manually. If your network name contains uppercase (ABC) or lowercase (abc) letters, enter them correctly.
6.If you see a screen like the following, enter your security key or passphrase, then click Next.
Note:
If your security key contains uppercase (ABC) or lowercase (abc) letters, enter them correctly.
Wireless Network Setup 9

7.Wait while EpsonNet Setup configures your product for the network.
8.Follow the instructions on the screen to remove the USB cable from the product and your computer.
9.When you see the Installation Complete screen, print a test page, then click
Finish.
10. Follow the on-screen instructions to install the rest of your software.
When installation is complete, remove the CD.
To set up additional computers to print to the product, see “Setting Up Additional Computers” on page 14.
10 Wireless Network Setup
Setting Up With the Product Buttons
If you are using Mac OS X 10.6, or you did not connect a USB cable to set up the product on your wireless network, follow these steps to set it up using the product buttons:
1.Follow the instructions on the screen to start the product’s wireless Setup Wizard.
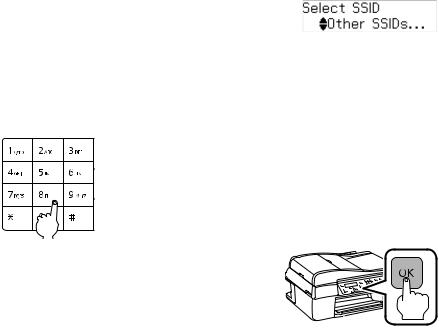
2.When you see this screen, use the product’s buttons to select the name of your wireless network, then press OK. When you’re finished, click Next.
If your network name isn’t listed, try the following:
■Make sure that your wireless router or access point is turned on and working correctly. Press the y Stop/Clear Settings button to return to the previous screen, press OK to select Setup Wizard, then repeat step 2.
■If you still can’t find the network name in the list, your router or access point is not broadcasting its network name. Press u or d to select Other SSIDs, then press OK. Continue with the steps in “Entering Your SSID Manually” on page 14.
Wireless Network Setup 11
3. When you see this screen, do one of the following:
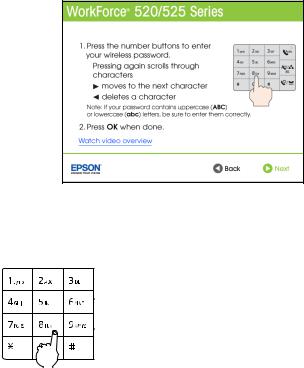
■If your wireless network has security enabled, use the product’s buttons to enter your network password. If your password has uppercase or lowercase letters, be sure to enter them correctly. Then click Next and go to step 4.
■Press the buttons repeatedly to select uppercase
letters or lowercase letters, or numbers and special characters.
■ Press r to move to the next character.
■Press l to delete a character.
■If your wireless network doesn’t have security enabled, click Next and continue with step 4.
Note:
If you’re having trouble entering your network password, click Watch video overview to watch a short video tutorial on how to enter your network password.
4.Follow the on-screen instructions to finish selecting network settings.
If you see a network setup failed message, the network password may have been entered incorrectly. If your password has uppercase or lowercase letters, or numbers, be sure to enter them correctly.
Note:
If the product still doesn’t connect to your wireless network, see “The product cannot find or connect to the wireless router or access point” on page 50.
5.Mac OS X 10.6: Skip to step 10 on page 13.
6.Wait while the software is installed.
12 Wireless Network Setup
7. When you see the Firewall Warning screen, click Next.
Note:
If you see a firewall alert message, click Unblock or Allow to let EpsonNet Setup continue. Do not select Ask Me Later, Keep Blocking, or Block.
8.Wait while EpsonNet Setup configures your product for the network.
9.When you see the Installation Complete screen, print a test page, then click
Finish.
10. Follow the instructions on the screen to install the rest of your software.
When installation is complete, remove the CD.
Wireless Network Setup 13
To set up additional computers to print to the product, see “Setting Up Additional Computers” below.
Entering Your SSID Manually
If your network doesn’t broadcast its name (SSID), follow these steps to enter it:
1.From the Select SSID screen on the product control panel, press u or d to select Other SSIDs, then press OK.
2.Use the numeric keypad on the control panel to enter your network name.
Important:
Network names are case-sensitive. Be sure to enter uppercase letters (ABC) or lowercase letters (abc) correctly.
■Press the buttons repeatedly to select uppercase
letters or lowercase letters, or numbers and special characters.
■ Press r to move to the next character.
■Press l to delete a character.
3. When you’re done entering your network name, press OK.
4. Continue with step 3 on page 12 to enter your network password.
Setting Up Additional Computers
1.Make sure your product is turned on.
2.Insert the product software CD.
3.Windows 7 and Windows Vista: If you see the AutoPlay window, click Run Setup.exe. When you see the User Account Control screen, click Yes or
Continue.
Windows XP: When you see the Software Installation screen, continue with step 4.
Mac OS X: Double-click the  Epson icon.
14 Wireless Network Setup

4. When you see this screen, click Install.
5. When you see this screen, select Wireless connection and click Next.
Wireless Network Setup 15
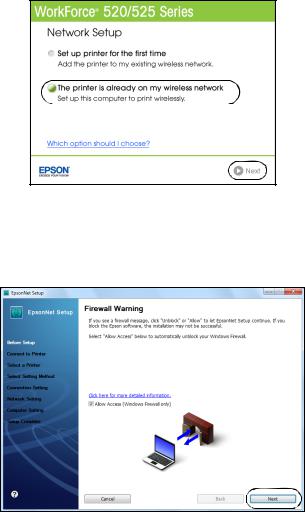
6.When you see this screen, select The printer is already on my wireless network, then click Next.
7.Wait while the software is installed.
8.Mac OS X 10.6: Skip to step 13 on page 17.
9.When you see the Firewall Warning screen, click Next.
Note:
If you see a firewall alert message, click Unblock or Allow to let EpsonNet Setup continue. Do not select Ask Me Later, Keep Blocking, or Block.
16 Wireless Network Setup

10.If you see a screen like this one, select the product you would like to set up, then click Next.
11.Wait while EpsonNet Setup configures your product for the network.
12.When you see the Installation Complete screen, print a test page, then click
Finish.
13. Follow the instructions on the screen to install the rest of your software.
When installation is complete, remove the CD.
Wireless Network Setup 17

Wired (Ethernet) Network Setup
The steps in this section provide detailed instructions for setting up your product on a wired (Ethernet) network.
Note:
If you’re having trouble setting up your product, see “Network Problems” on page 50.
■If this is the first time that you’re installing the product, follow the steps below.
■If your product is already on your wired network and you need to set up additional computers to print to the product, see page 22.
Installing for the First Time
1. Make sure your product is turned on.
Note:
If you previously set up the product on a wireless network, you must disable the wireless LAN before you can connect to a wired network. Press x Menu, press u or d to select Network Settings, then Wireless LAN Setup, then Disable Wireless LAN. Press OK, press 1 to confirm, and press x Menu to exit.
2.Insert the product software CD.
3.Windows 7 and Windows Vista: If you see the AutoPlay window, click Run Setup.exe. When you see the User Account Control screen, click Yes or
Continue.
Windows XP: When you see the Software Installation screen, continue with step 4.
Mac OS X: Double-click the  Epson icon.
18 Wired (Ethernet) Network Setup

4. When you see this screen, click Install.
5. When you see this screen, select Wired network connection and click Next.
Wired (Ethernet) Network Setup 19
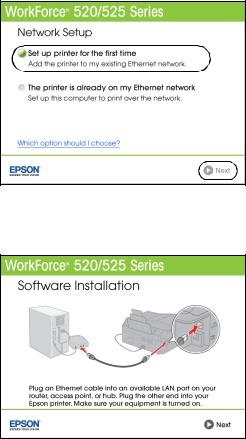
6.When you see this screen, select Set up printer for the first time, then click
Next.
7.When you see this screen, connect the product to your router, access point, or hub with an Ethernet network cable, then click Next.
8.Mac OS X 10.6: Skip to step 14 on page 21.
9.Wait while the software is installed, then click Next to start network installation.
20 Wired (Ethernet) Network Setup
Loading...