


 Loading...
WF-7210 Series
Start Here
Read these instructions before using your product.
Note for Spanish speakers/Nota para hispanohablantes:
Para obtener instrucciones de configuración en español, consulte la Guía
de instalación en www.epson.com/support/wf7210sp (requiere una conexión a Internet).
1 Unpack
French control panel stickers
Note: Do not open the ink cartridge packages until you are ready to install the ink. Cartridges are vacuum packed to maintain reliability.
1 Remove all protective materials from the product.
2Open the printer cover and remove all protective materials from inside the product.
2
3 Close the printer cover.
2 Turn on and configure
1Connect the power cord to the back of the product and to an electrical outlet.
Caution: Do not connect to your computer yet.
2 
2 Turn on the product.
3Select your language and time.
Note: You can change these settings later using the product’s control panel. For more information, see the online User’s Guide.
3 Install ink cartridges
Caution: Keep the ink cartridges out the reach of children and do not drink the ink.
1 Open the printer cover and the ink cartridge cover.
2
2 Gently shake the ink cartridges.
3 Unpack the ink cartridges.
WF7210_SH_E_CPD53890.indd 1
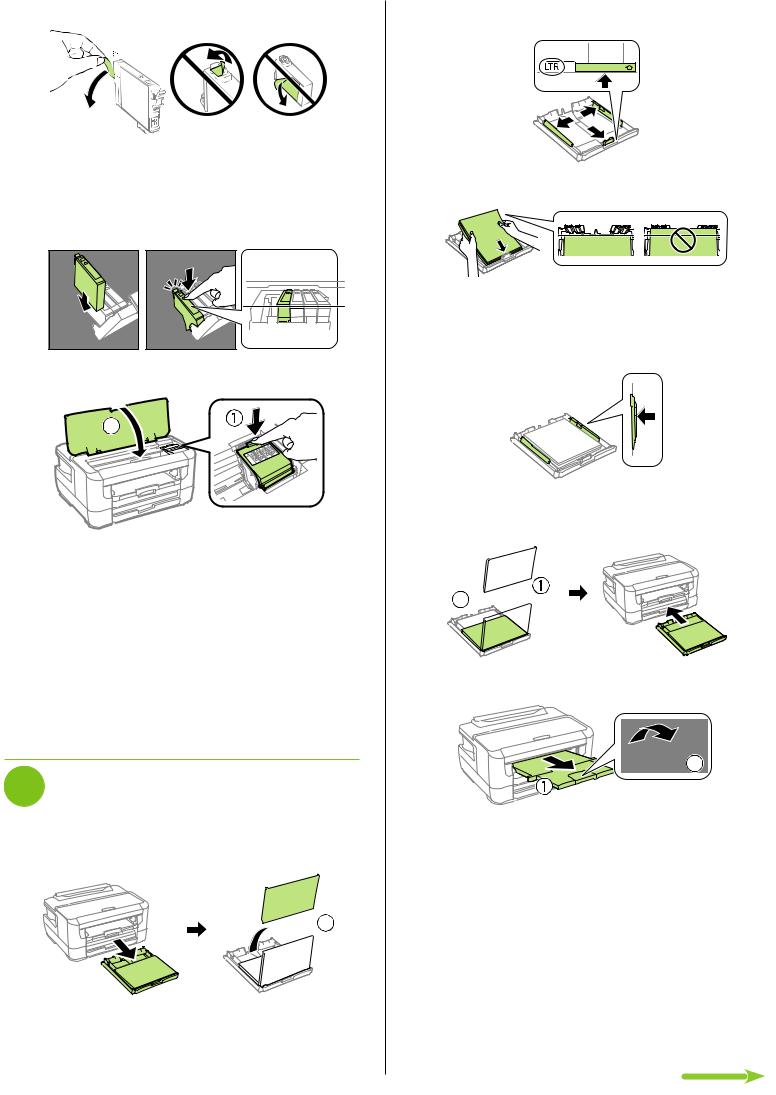
4 Remove only the yellow tape from each ink cartridge.
Caution: Do not remove any other labels or seals, or ink will leak. Do not touch the green chip on the cartridge.
5Insert the cartridge in the holder for each color. Press each cartridge down until it clicks. Make sure all cartridges are pushed down into place.
6 Close the ink cartridge cover and the printer cover.
2
7The printer starts charging the ink. Ink charging takes approximately 6 minutes. When you see a completion message on the printer’s LCD screen, charging is complete.
Caution: Don’t turn off the printer or raise the printer cover while the printer is charging or you’ll waste ink.
Note:
•The printer is designed for use with Epson® cartridges only, not third-party cartridges or ink.
•The cartridges included with the printer are designed for printer setup and not for resale. After some ink is used for charging, the rest is available for printing.
4 Load paper
1Make sure the product is done charging the ink, and then pull out the paper cassette and remove the paper cassette cover.


 2
2
2Slide the side edge guides all the way out and set the front edge guide to the paper size you are using.
3 Insert paper with the glossy or printable side down.
Note: Make sure the paper is loaded against the front edge guide and not sticking out from the end of the cassette.
4Slide the edge guides against the paper, but not too tightly.
5Reattach the paper cassette cover and keep the cassette flat as you insert it all the way.
2

6 Pull out the output tray extension.
 2
2
7 Select the paper settings on the product’s control panel.
For instructions on loading envelopes, legal-size paper, or using the rear paper feed slot, see the online User’s Guide.
Loading...