


WorkForce Pro WF-6590
Table of contents
 Loading...
Administrator's Guide


Contents
Administrator's Guide................................................................................................................................. 7
Using Web Config Network Configuration Software ................................................................................ 8
About Web Config ................................................................................................................................ 8
Accessing Web Config ......................................................................................................................... 8
Restricting Features Available for Users .............................................................................................. 9
User Feature Restriction................................................................................................................ 10
Configuring User Feature Restrictions........................................................................................... 10
Changing the Administrator Password in Web Config ................................................................... 12
Using Your Product on a Secure Network .......................................................................................... 13
Configuring SSL/TLS Communication........................................................................................... 13
Configuring SSL/TLS Settings .................................................................................................. 13
Configuring a Server Certificate for the Product........................................................................ 14
Configuring IPsec/IP Filtering ........................................................................................................ 15
About IPsec/IP Filtering ............................................................................................................ 16
Configuring Default IPsec/IP Filtering Policy............................................................................. 16
Configuring Group IPsec/IP Filtering Policies ........................................................................... 17
IPsec/IP Filtering Policy Settings .............................................................................................. 18
IPsec/IP Filtering Configuration Examples................................................................................ 22
Configuring an IPsec/IP Filtering Certificate ............................................................................. 23
Configuring SNMPv3 Protocol Settings......................................................................................... 24
SNMPv3 Settings...................................................................................................................... 25
Connecting the Product to an IEEE 802.1X Network ..................................................................... 26
Configuring an IEEE 802.1X Network ....................................................................................... 26
IEEE 802.1X Network Settings ................................................................................................. 27
Configuring a Certificate for an IEEE 802.1X Network .............................................................. 28
IEEE 802.1X Network Status .................................................................................................... 28
Using a Digital Certificate .............................................................................................................. 29
About Digital Certification.......................................................................................................... 30
Obtaining and Importing a CA-signed Client Certificate ............................................................ 30
Importing a CA-signed Server Certificate.................................................................................. 32
3

CSR Setup Settings .................................................................................................................. 33
CSR Import Settings ................................................................................................................. 34
Deleting a CA-signed Client Certificate..................................................................................... 34
Deleting a CA-signed Server Certificate ................................................................................... 35
Updating a Self-signed Certificate............................................................................................. 35
Restarting the Product's Network Service................................................................................. 36
Using an LDAP Server................................................................................................................... 36
Configuring the LDAP Server and Selecting Search Settings ................................................... 37
LDAP Server Settings ............................................................................................................... 38
LDAP Search Settings .............................................................................................................. 39
Checking the LDAP Server Connection .................................................................................... 40
LDAP Connection Report Messages ........................................................................................ 40
Using an Email Server................................................................................................................... 41
Configuring an Email Server ..................................................................................................... 41
Email Server Settings ............................................................................................................... 42
Checking the Email Server Connection .................................................................................... 43
Email Server Connection Report Messages ............................................................................. 43
Configuring Email Notification................................................................................................... 45
Configuring Protocols and Services in Web Config ....................................................................... 46
Services and Protocol Settings ................................................................................................. 47
Importing and Exporting Web Config Settings ............................................................................... 51
Exporting Settings Using Web Config ....................................................................................... 51
Importing Settings Using Web Config ....................................................................................... 51
Using EpsonNet Config Network Configuration Software ..................................................................... 53
Installing EpsonNet Config................................................................................................................. 53
Configuring a Product IP Address Using EpsonNet Config - Ethernet................................................ 53
Configuring a Product IP Address Using EpsonNet Config - WiFi ...................................................... 54
Solving Problems ...................................................................................................................................... 57
Solving Network Software Usage Problems....................................................................................... 57
Cannot Find Access Web Config................................................................................................... 57
The "Out of Date" Message Appears............................................................................................. 58
"The name of the security certificate does not match" Message Appears ..................................... 58
Model Name or IP Address Not Displayed in EpsonNet Config ..................................................... 58
4

Solving Network Security Problems ................................................................................................... 58
Pre-Shared Key was Forgotten ..................................................................................................... 59
Cannot Communicate with the Product Using IPsec Communication ........................................... 59
Communication was Working, but Stopped................................................................................... 59
Cannot Create the Secure IPP Printing Port.................................................................................. 60
Cannot Connect After Configuring IPsec/IP Filtering ..................................................................... 60
Cannot Access the Product After Configuring IEEE 802.1X .......................................................... 60
Solving Digital Certificate Problems ................................................................................................... 60
Digital Certificate Warning Messages............................................................................................ 60
Cannot Import a Digital Certificate................................................................................................. 62
Cannot Update a Certificate or Create a CSR ............................................................................... 62
Deleted a CA-signed Certificate .................................................................................................... 63
Where to Get Help.............................................................................................................................. 63
Notices ....................................................................................................................................................... 64
Trademarks........................................................................................................................................ 64
Copyright Notice................................................................................................................................. 64
Copyright Attribution...................................................................................................................... 65
5


Administrator's Guide
Welcome to the Administrator's Guide.
For a printable PDF copy of this guide, click here.
Note: Not all features mentioned in this Administrator's Guide are available with every product model.
You can use two software utilities to configure your product's advanced network settings: Web Config
and EpsonNet Config. This guide covers Web Config in detail; for information on using EpsonNet Config,
see the EpsonNet Config help utility.
The available network functions vary by product. (Unavailable functions are not displayed on the
product’s control panel or software settings screen.) Epson products support the following system
administration functions:
• SSL/TLS communication: use Secure Sockets Layer/Transport Layer Security to encrypt traffic and
avoid spoofing between the product and a computer
• IPsec/IP filtering: control access and secure communications between the product and a network
gateway
• Individual protocol control: enable and disable single services
• Remote configuration of scan and fax destinations: use an LDAP server to look up fax and email
contacts
• User feature restriction: allow or deny access to printing, scanning, faxing, and copying on a per user
basis
• Import and export printer settings: migrate settings from product to product
7

Using Web Config Network Configuration Software
Follow the instructions in these sections to configure your product's adminstrator network settings using
the Web Config software.
Note: Before you can configure system administration settings, connect the product to a network. See
the product's Start Here sheet and User's Guide for instructions.
About Web Config
Accessing Web Config
Restricting Features Available for Users
Using Your Product on a Secure Network
About Web Config
Web Config is a browser-based application you can use to configure a product's settings. Basic and
advanced setting pages are available.
Note: Before you can configure system administration settings, connect the product to a network. See
the product's Start Here sheet and User's Guide for instructions.
You can lock the settings you select by setting up an administrator password for your product. See the
product's User's Guide for instructions.
Parent topic: Using Web Config Network Configuration Software
Accessing Web Config
You can access Web Config from your browser using HTTP or HTTPS.
By default, you access Web Config for the first time using HTTP. If you continue to use HTTP, Web
Config does not display all available menus.
1. Print a network status sheet for your product and identify the product IP address. See the product's
User's Guide for instructions.
2. Start your web browser and make sure JavaScript is enabled.
3. Type the product IP address into the browser as follows, depending on the protocol you are using:
• IPv4: http://product IP address
8
• IPv6: http://[product IP address]/
The Basic Settings page appears:
4. To use HTTPS, configure the address to use HTTPS in your browser.
A message warning about the self-signed certificate appears.
To access Web Config after configuring the address to use HTTPS, enter https:// before the product IP
address, shown in step 3.
Note: If the product name is registered with the DNS server, you can use the product name instead of
the product IP address to access Web Config.
Parent topic: Using Web Config Network Configuration Software
Restricting Features Available for Users
Follow the instructions in these sections to restrict users from using certain product features and create
an administrator password to lock the restrictions using the Web Config software.
User Feature Restriction
Configuring User Feature Restrictions
Changing the Administrator Password in Web Config
Parent topic: Using Web Config Network Configuration Software
9
User Feature Restriction
You can restrict available product features for up to 10 individual users, with different features available
to each user. This requires users to log into the product control panel with their user name and password
before they can use control panel features.
With Windows, you can also restrict printing and scanning from the product software. This requires users
to log into the printing or scanning software, and allows the software to authenticate the users before
printing or scanning proceeds. For instructions on setting up software restrictions, see the help utility in
the printing or scanning software.
Parent topic: Restricting Features Available for Users
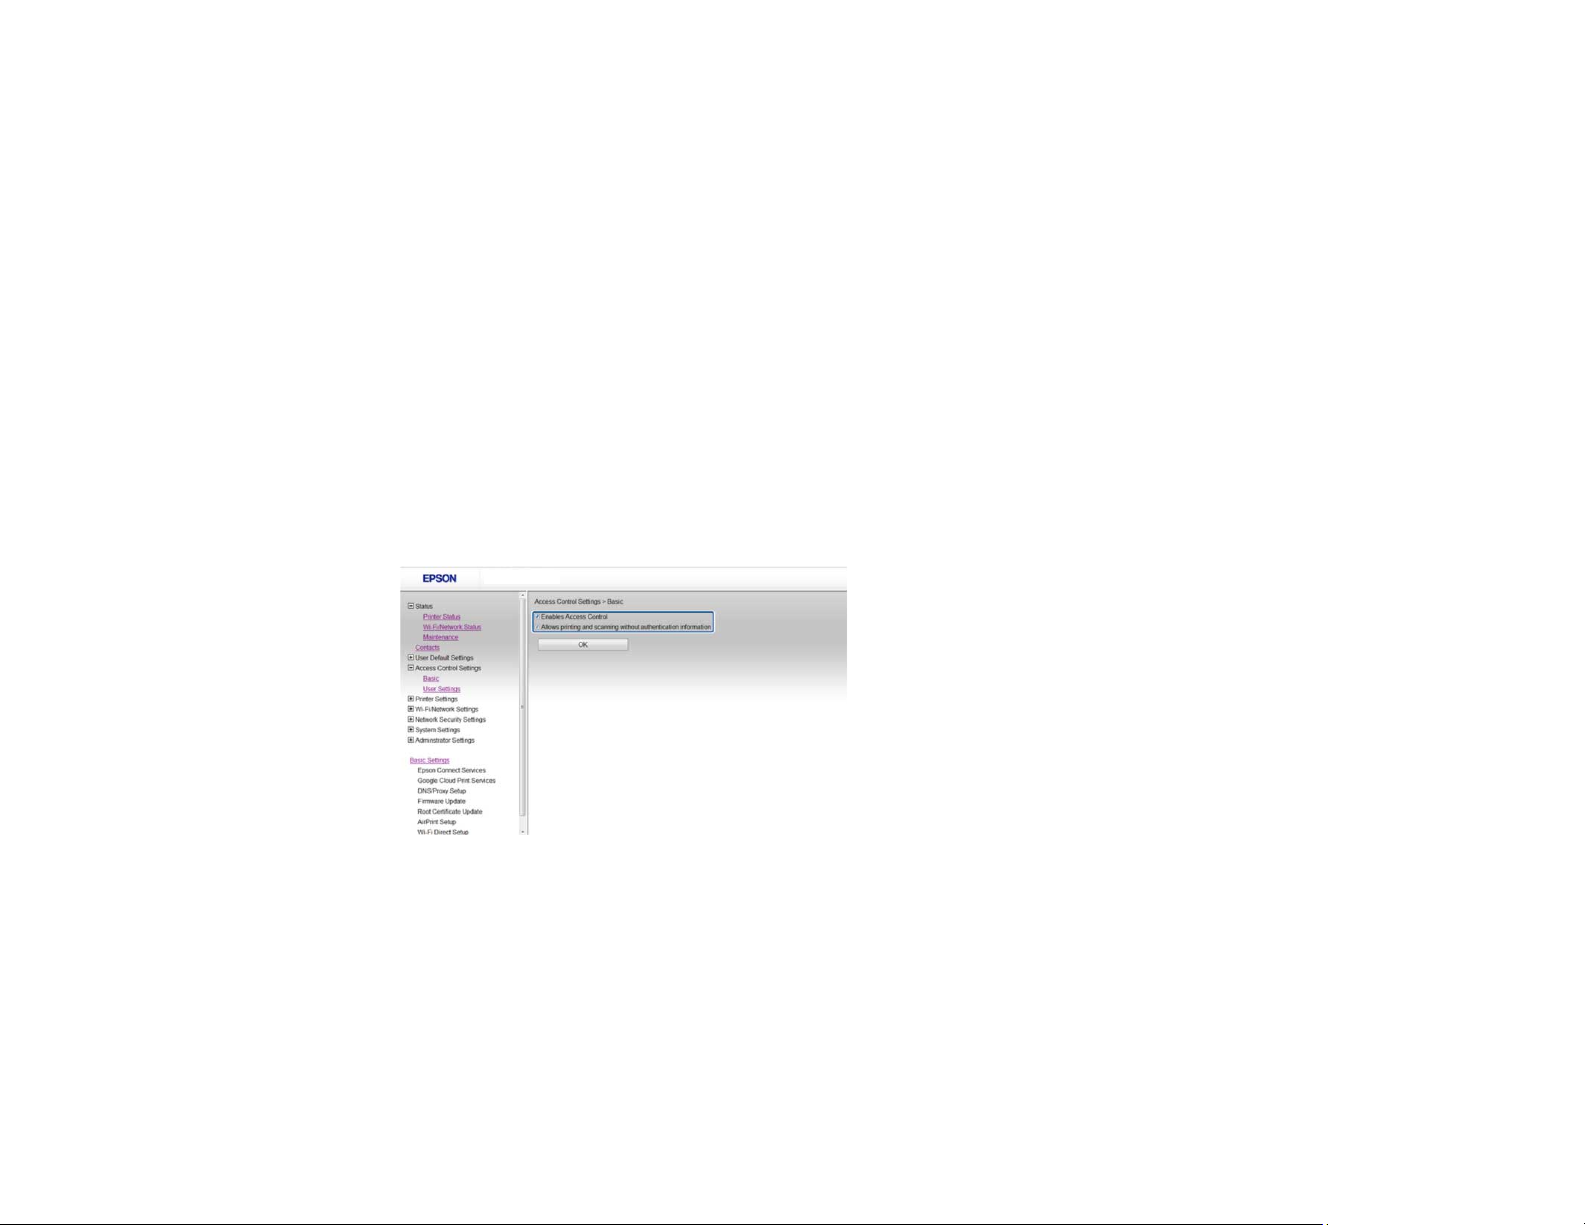
Configuring User Feature Restrictions
You can create up to 10 user accounts and restrict access to control panel features separately for each
one.
1. Access Web Config, select Access Control Settings, and select Basic.
You see a window like this:
2. Select the Enables Access Controls checkbox.
3. If you have configured the product for an LDAP server or IEEE 802.1x network, you can deselect the
Allows printing and scanning without authentication information checkbox to prevent the
product from receiving jobs sent from these sources:
• The default operating system driver
• A PCL or PostScript printer driver
10
• Web services such as Epson Connect or Google Cloud Print
• Smartphones and other mobile devices
4. Click OK.
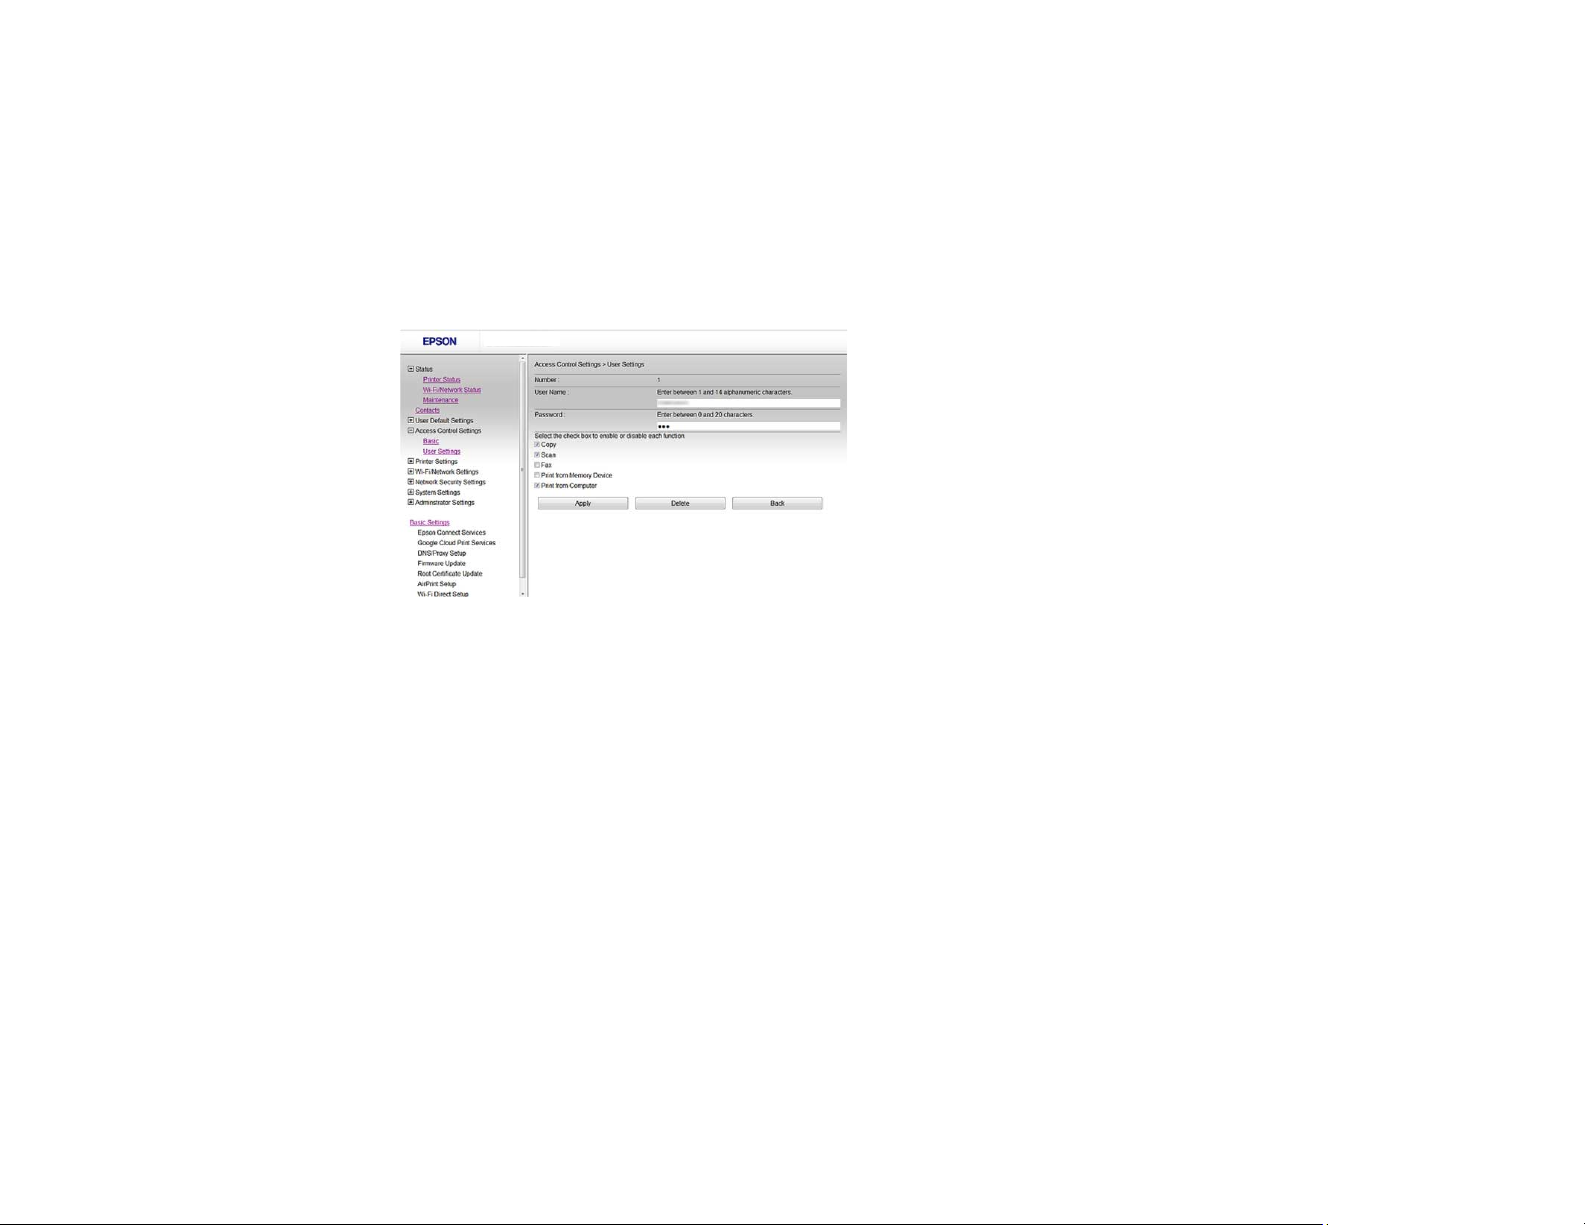
5. Select Access Control Settings and select User Settings.
6. Click Add.
You see a window like this:
7. Enter a name for a user in the User Name field following the guidelines on the screen. Use ASCII
(0x20-0x7E) characters.
8. Enter a password for the user in the Password field following the guidelines on the screen.
Note: If you need to reset a password, leave the password field blank.
9. Select the checkbox for each function you want the user to be able to perform, and deselect the
checkbox for each function you want to restrict access to.
10. Click Apply.
Note: When you edit a completed user account, you see a Delete option. Click it to delete a user, if
necessary.
Note: You can import and export a list of user features using EpsonNet Config. See the help utility in the
software for instructions.
11
Parent topic: Restricting Features Available for Users
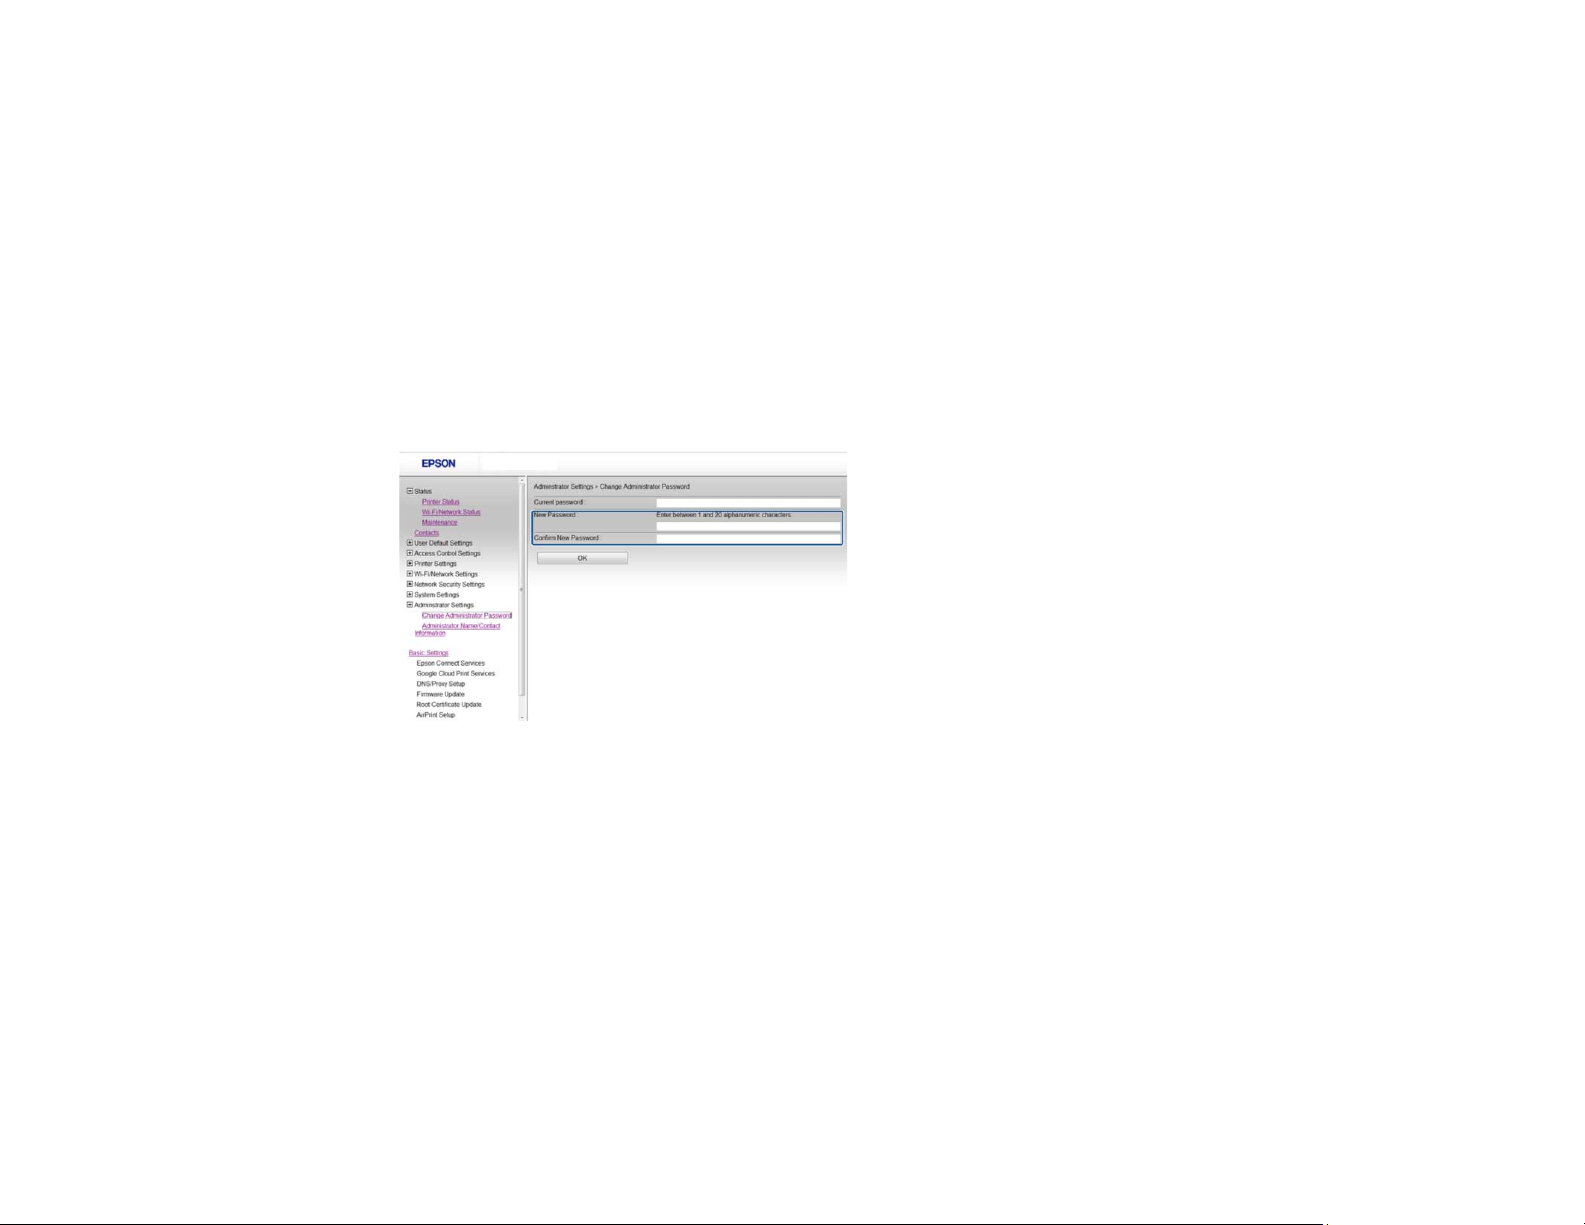
Changing the Administrator Password in Web Config
You can set an administrator password using your product's control panel or using Web Config or
EpsonNet Config. You use the same administrator password in all cases.
Note: See your product's User's Guide for instructions on setting an administrator password using the
control panel. If you forget your administrator password, contact Epson for support, as described in the
product's User's Guide.
1. Access Web Config, select Administrator Settings, and select Change Administrator Password.
You see a window like this:
2. Do one of the following:
• If you have set an administrator password before, enter the current password, then enter and
confirm the new password in the fields provided.
• If you have not set an administrator password before, enter a new password and confirm it in the
fields provided
3. Click OK
Parent topic: Restricting Features Available for Users
12

Using Your Product on a Secure Network
Follow the instructions in these sections to configure security features for your product on the network
using the Web Config software.
Configuring SSL/TLS Communication
Configuring IPsec/IP Filtering
Configuring SNMPv3 Protocol Settings
Connecting the Product to an IEEE 802.1X Network
Using a Digital Certificate
Using an LDAP Server
Using an Email Server
Configuring Protocols and Services in Web Config
Importing and Exporting Web Config Settings
Parent topic: Using Web Config Network Configuration Software
Configuring SSL/TLS Communication
Follow the instructions in these sections to configure SSL/TLS communication using Web Config.
Configuring SSL/TLS Settings
Configuring a Server Certificate for the Product
Parent topic: Using Your Product on a Secure Network
Configuring SSL/TLS Settings
If your product supports HTTPS, you can configure SSL/TLS to encrypt communications with your
product.
1. Access Web Config and select Network Security Settings.
2. Select SSL/TLS and select Basic.
13
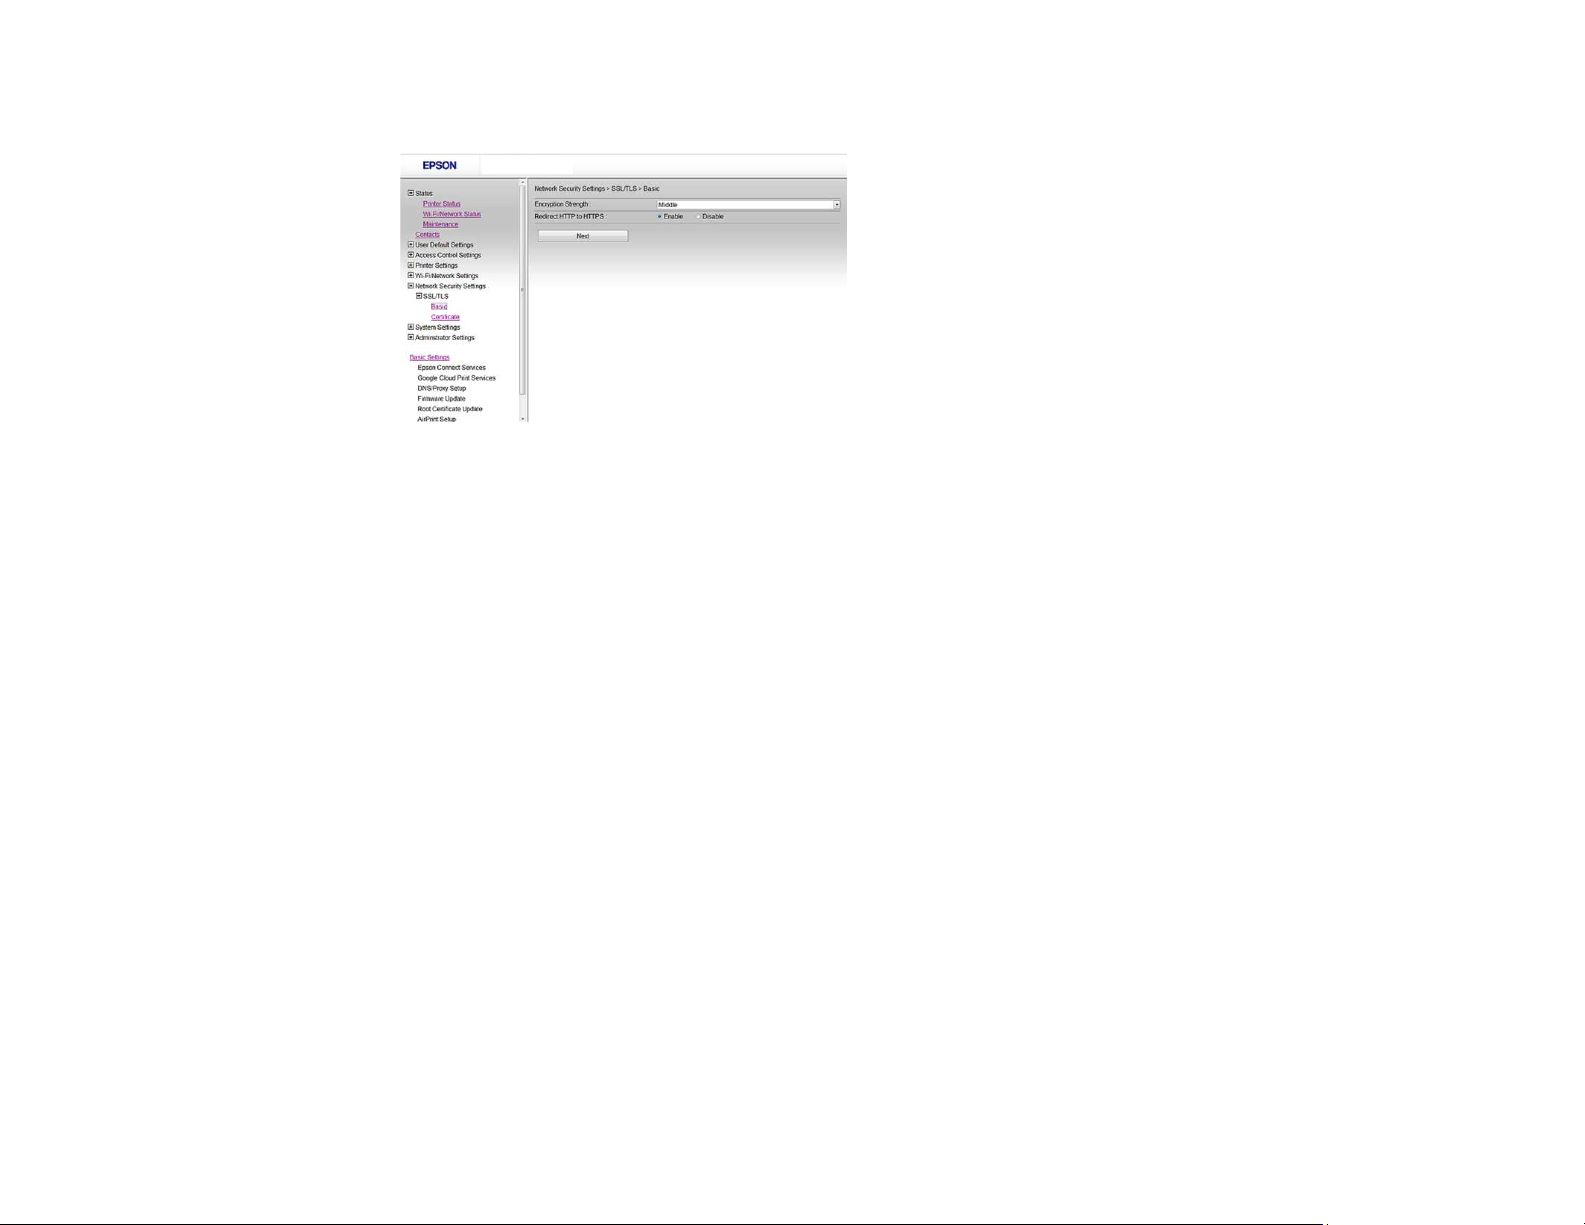
You see a window like this:
3. Select one of the options for the Encryption Strength setting
4. Select Enable or Disable for the Redirect HTTP to HTTPS setting as necessary.
5. Click Next.
You see a confirmation message.
6. Click OK.
Parent topic: Configuring SSL/TLS Communication
Configuring a Server Certificate for the Product
You can configure a server certificate for your product.
1. Access Web Config and select Network Security Settings.
2. Select SSL/TLS and select Certificate.
14
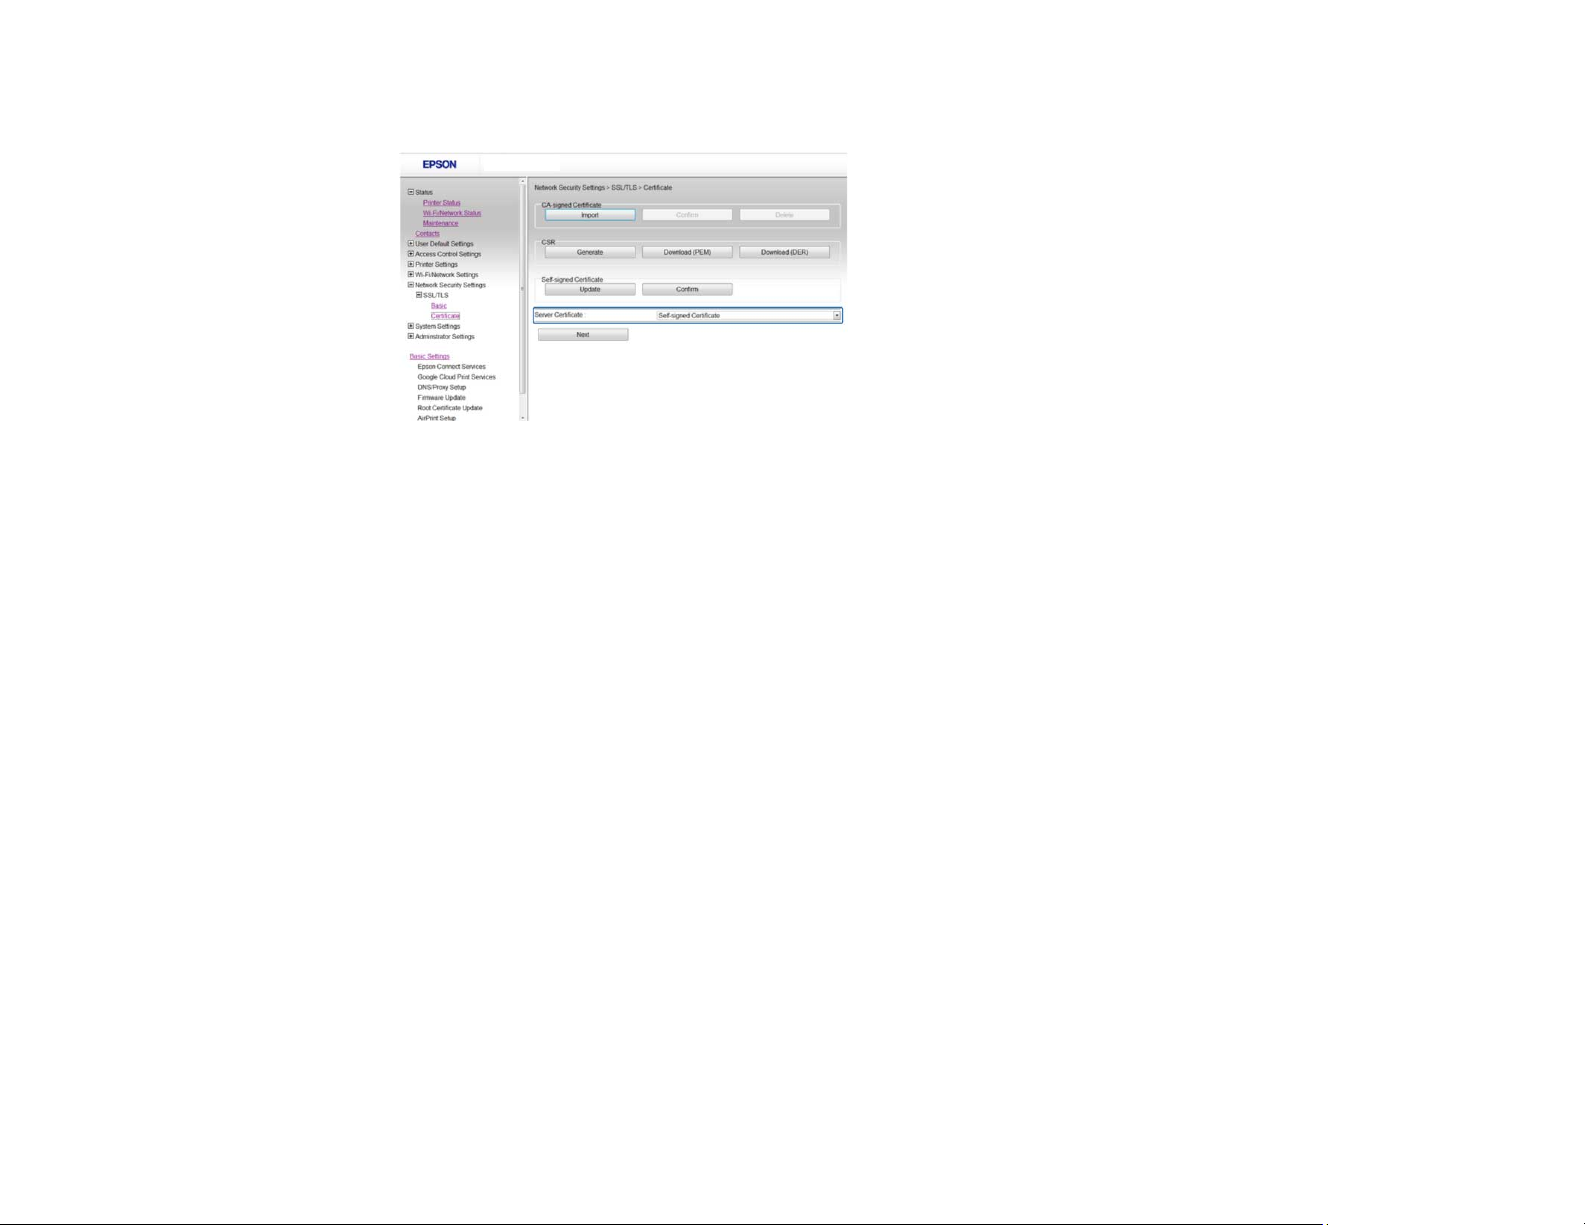
You see a window like this:
3. Select one of the following options for the Server Certificate setting:
• Self-signed Certificate: select if you have not obtained a CA-signed certificate and want the
product to generate a self-signed certificate
• CA-signed Certificate: select if you have obtained a CA-signed certificate
4. Click Next.
You see a confirmation message.
5. Click OK.
Parent topic: Configuring SSL/TLS Communication
Configuring IPsec/IP Filtering
Follow the instructions in these sections to configure IPsec/IP traffic filtering using Web Config.
About IPsec/IP Filtering
Configuring Default IPsec/IP Filtering Policy
Configuring Group IPsec/IP Filtering Policies
IPsec/IP Filtering Policy Settings
IPsec/IP Filtering Configuration Examples
Configuring an IPsec/IP Filtering Certificate
Parent topic: Using Your Product on a Secure Network
15
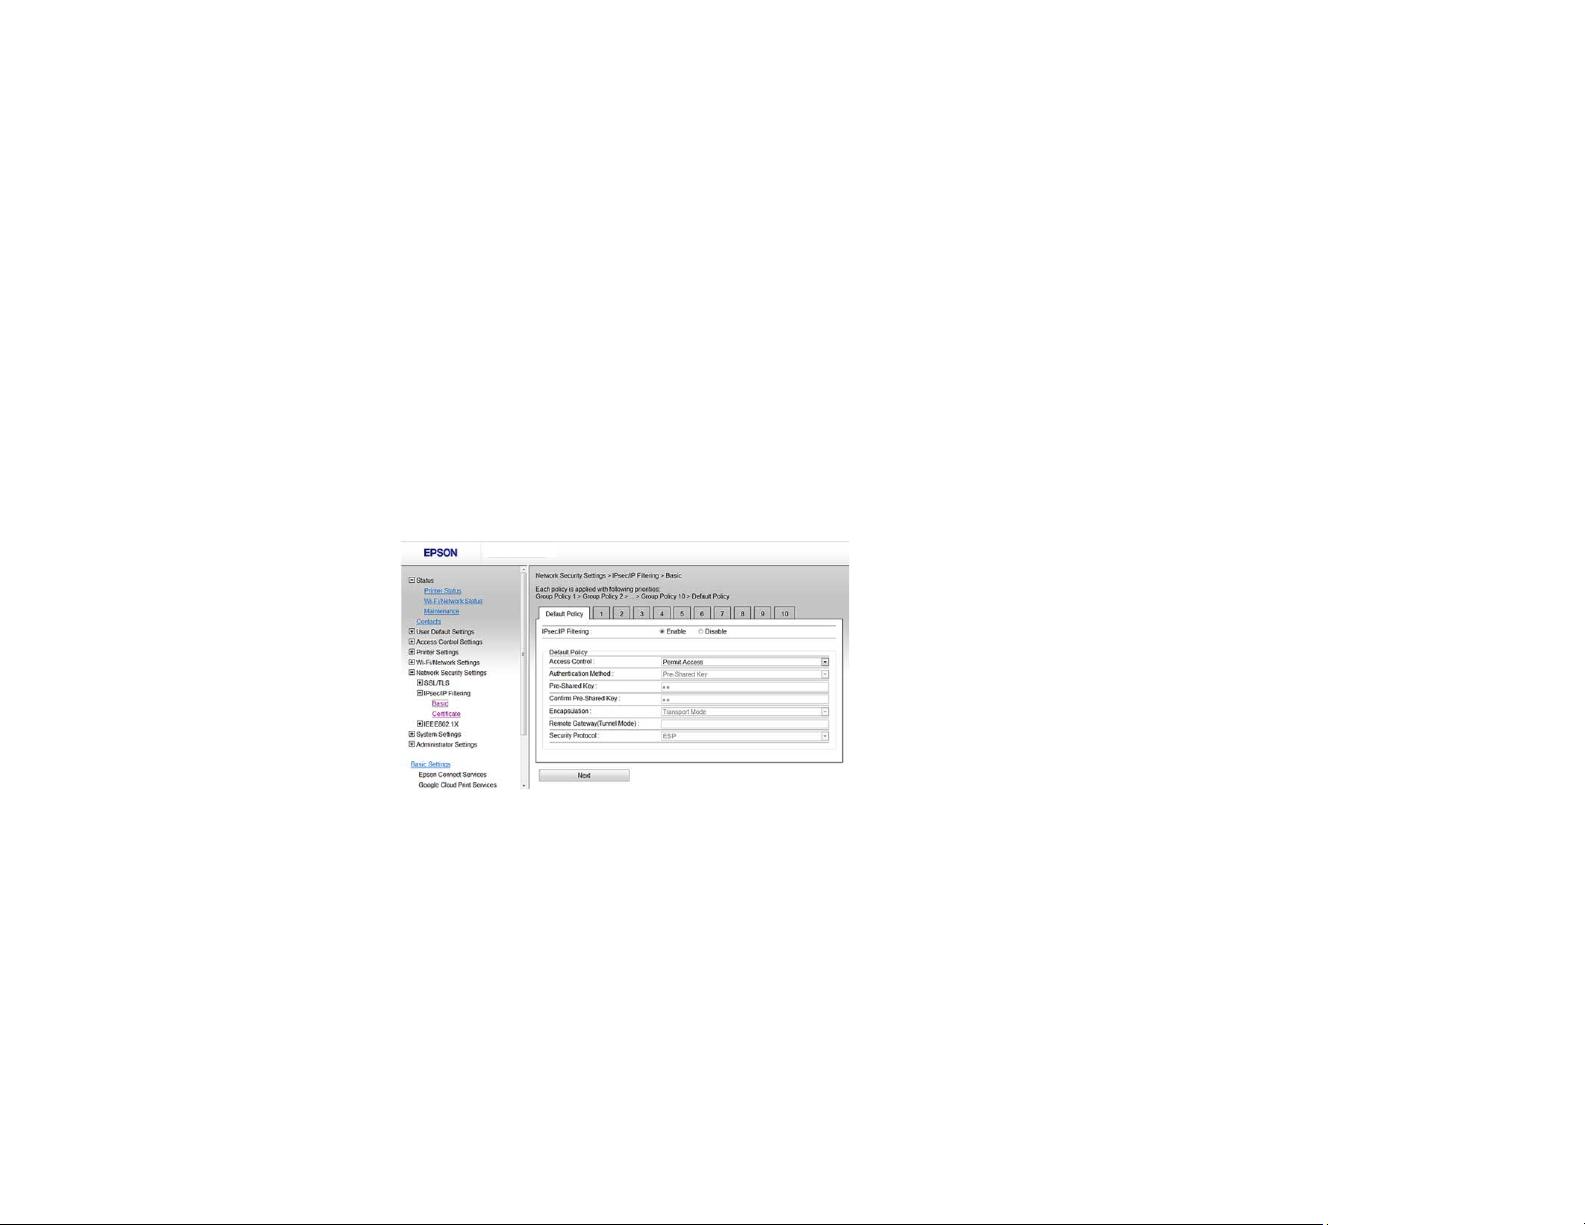
About IPsec/IP Filtering
You can filter traffic to the product over the network based on IP address, service, and port by
configuring a default policy that applies to every user or group connecting to the product. For control of
individual users or user groups, you can configure group policies.
Note: IPsec is supported only by computers running Windows Vista or later, or Windows Server 2008 or
later.
Parent topic: Configuring IPsec/IP Filtering
Configuring Default IPsec/IP Filtering Policy
You can configure the default policy for IPsec/IP traffic filtering using Web Config.
1. Access Web Config and select Network Security Settings.
2. Select IPsec/IP Filtering and select Basic.
You see a window like this:
3. Select Enable to enable IPsec/IP filtering.
4. Select the filtering options you want to use for the default policy.
5. Click Next.
You see a confirmation message.
6. Click OK.
Parent topic: Configuring IPsec/IP Filtering
16
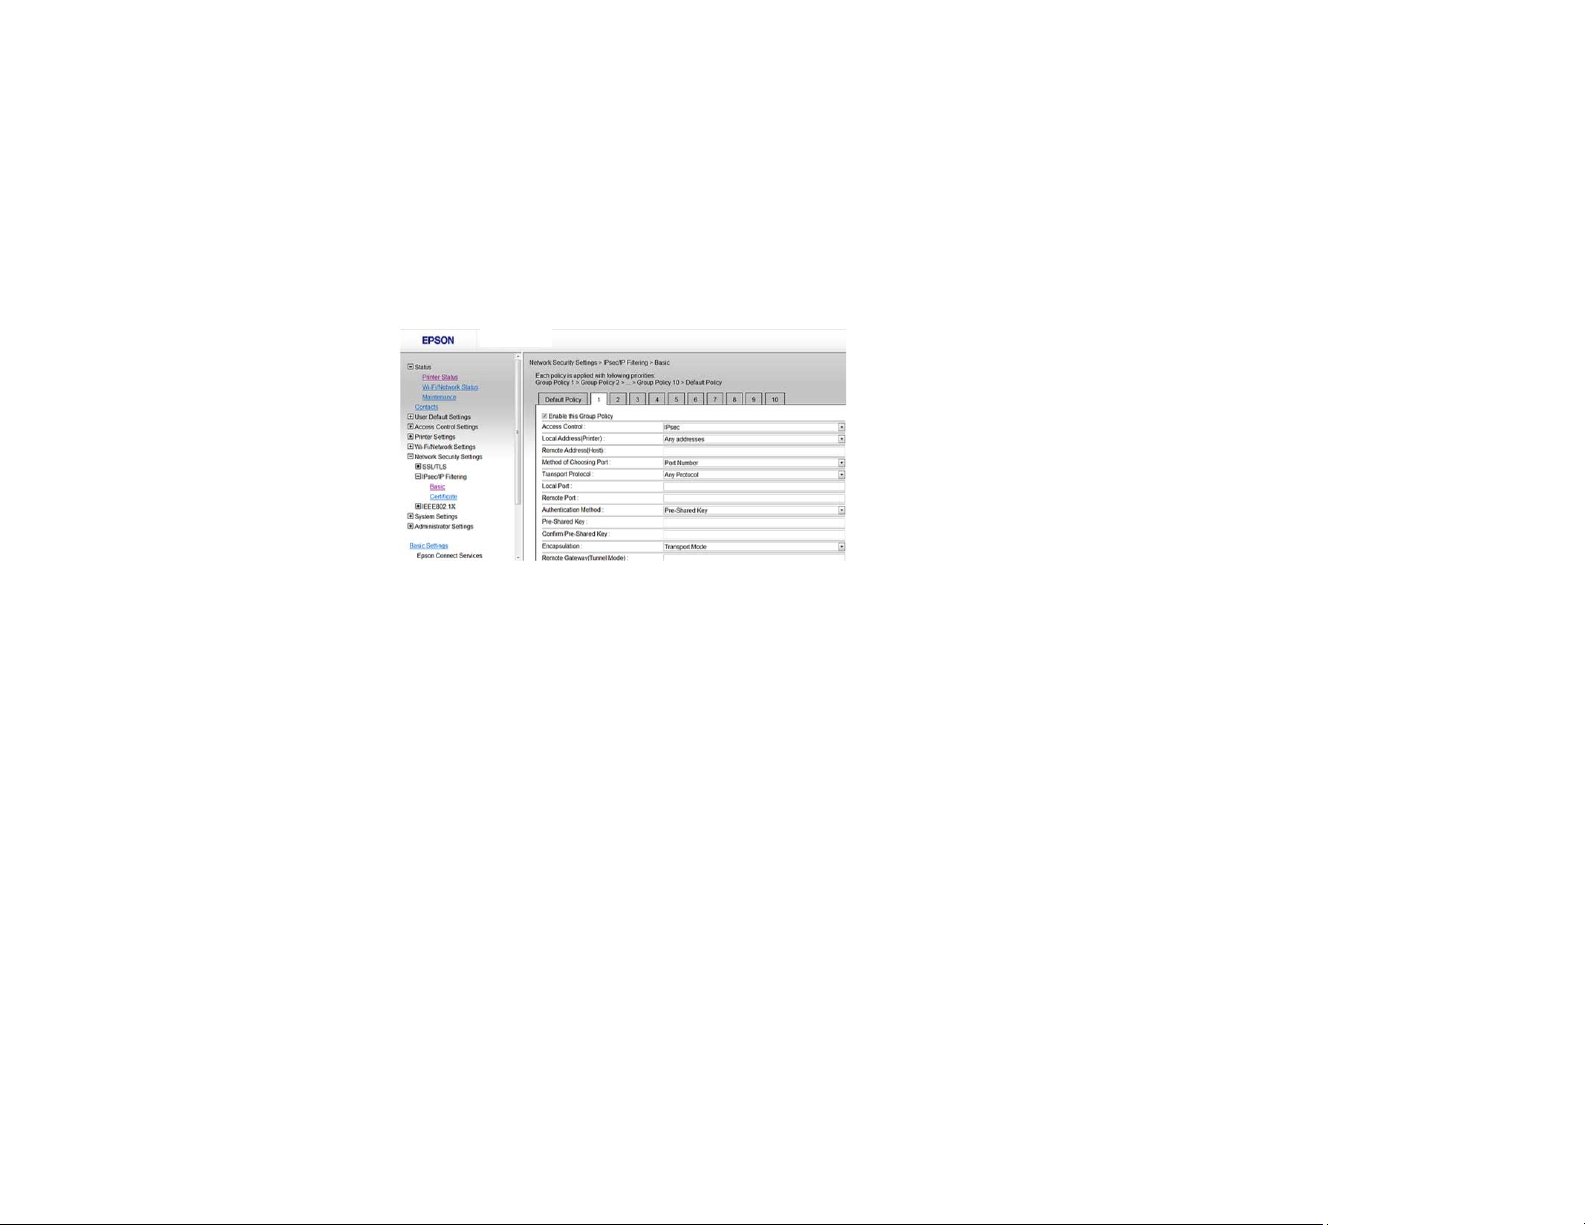
Configuring Group IPsec/IP Filtering Policies
You can configure group policies for IPsec/IP traffic filtering using Web Config.
1. Access Web Config and select Network Security Settings.
2. Select IPsec/IP Filtering and select Basic.
3. Click a tab number for the policy number you want to configure.
You see a window like this:
4. Select the Enable this Group Policy checkbox.
5. Select the filtering options you want to use for this group policy.
6. Click Next.
You see a confirmation message.
7. Click OK.
8. If you want to configure additional group policies, click the next tab number and repeat the
configuration steps as necessary.
Parent topic: Configuring IPsec/IP Filtering
17
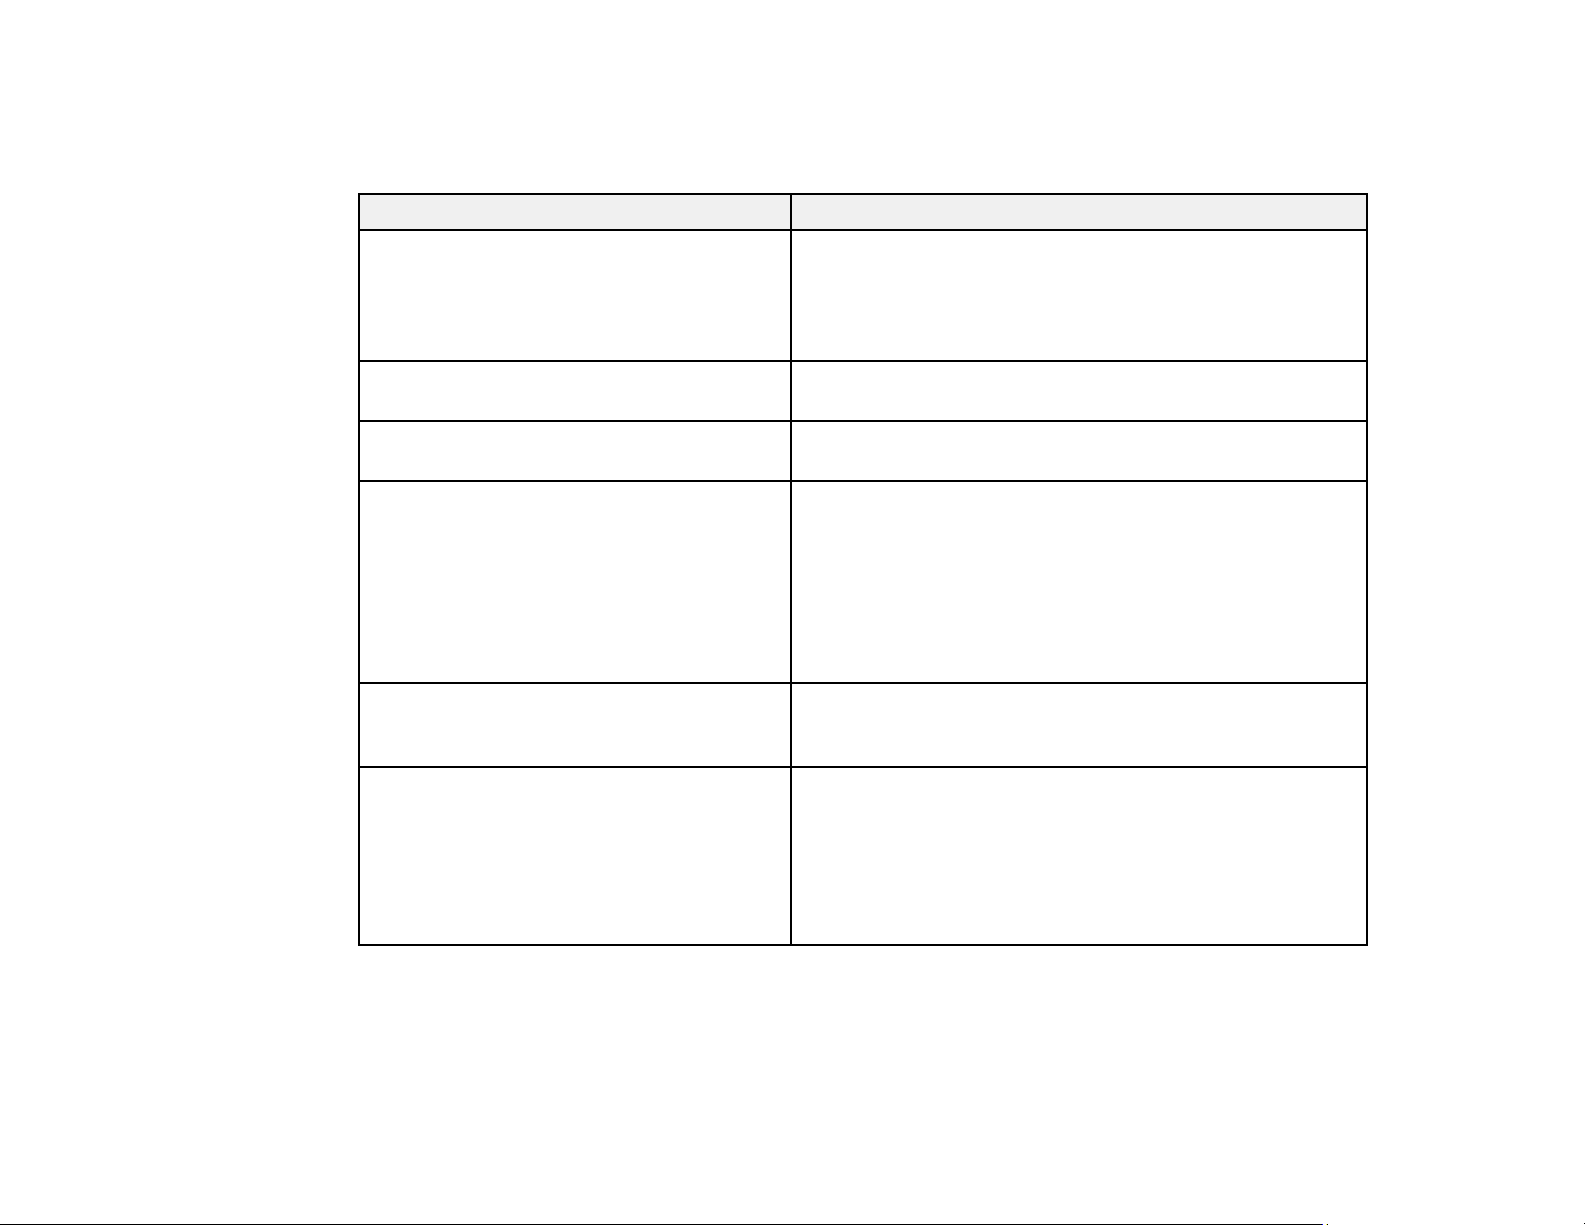
IPsec/IP Filtering Policy Settings
Default Policy Settings
Setting Options/Description
Access Control Permit Access to permit IP packets to pass through
Authentication Method Select an authentication method, or select Certificate if
Pre-Shared Key If necessary, enter a pre-shared key between 1 and 127
Encapsulation If you selected IPsec as the Access Control option,
Refuse Access to prevent IP packets from passing
through
IPsec to permit IPsec packes to pass through
you have imported a CA-signed certificate
characters long
select one of these encapsulation modes:
Transport Mode, if you are using the product on the
same LAN; IP packets of layer 4 or later are encrypted
Tunnel Mode, if you are using the product on an Internetcapable network, such as IPsec-VPN; the header and
data of IP packets are encrypted
Remote Gateway(Tunnel Mode) If you selected Tunnel Mode as the Encapsulation
option, enter a gateway address between 1 and 39
characters long
Security Protocol If you selected IPsec as the Access Control option,
select one of these security protocols:
ESP, to ensure the integrity of authentication and data,
and encrypt data
AH, to ensure the integrity of authentication and data; if
data encryption is prohibited, you can use IPsec
18
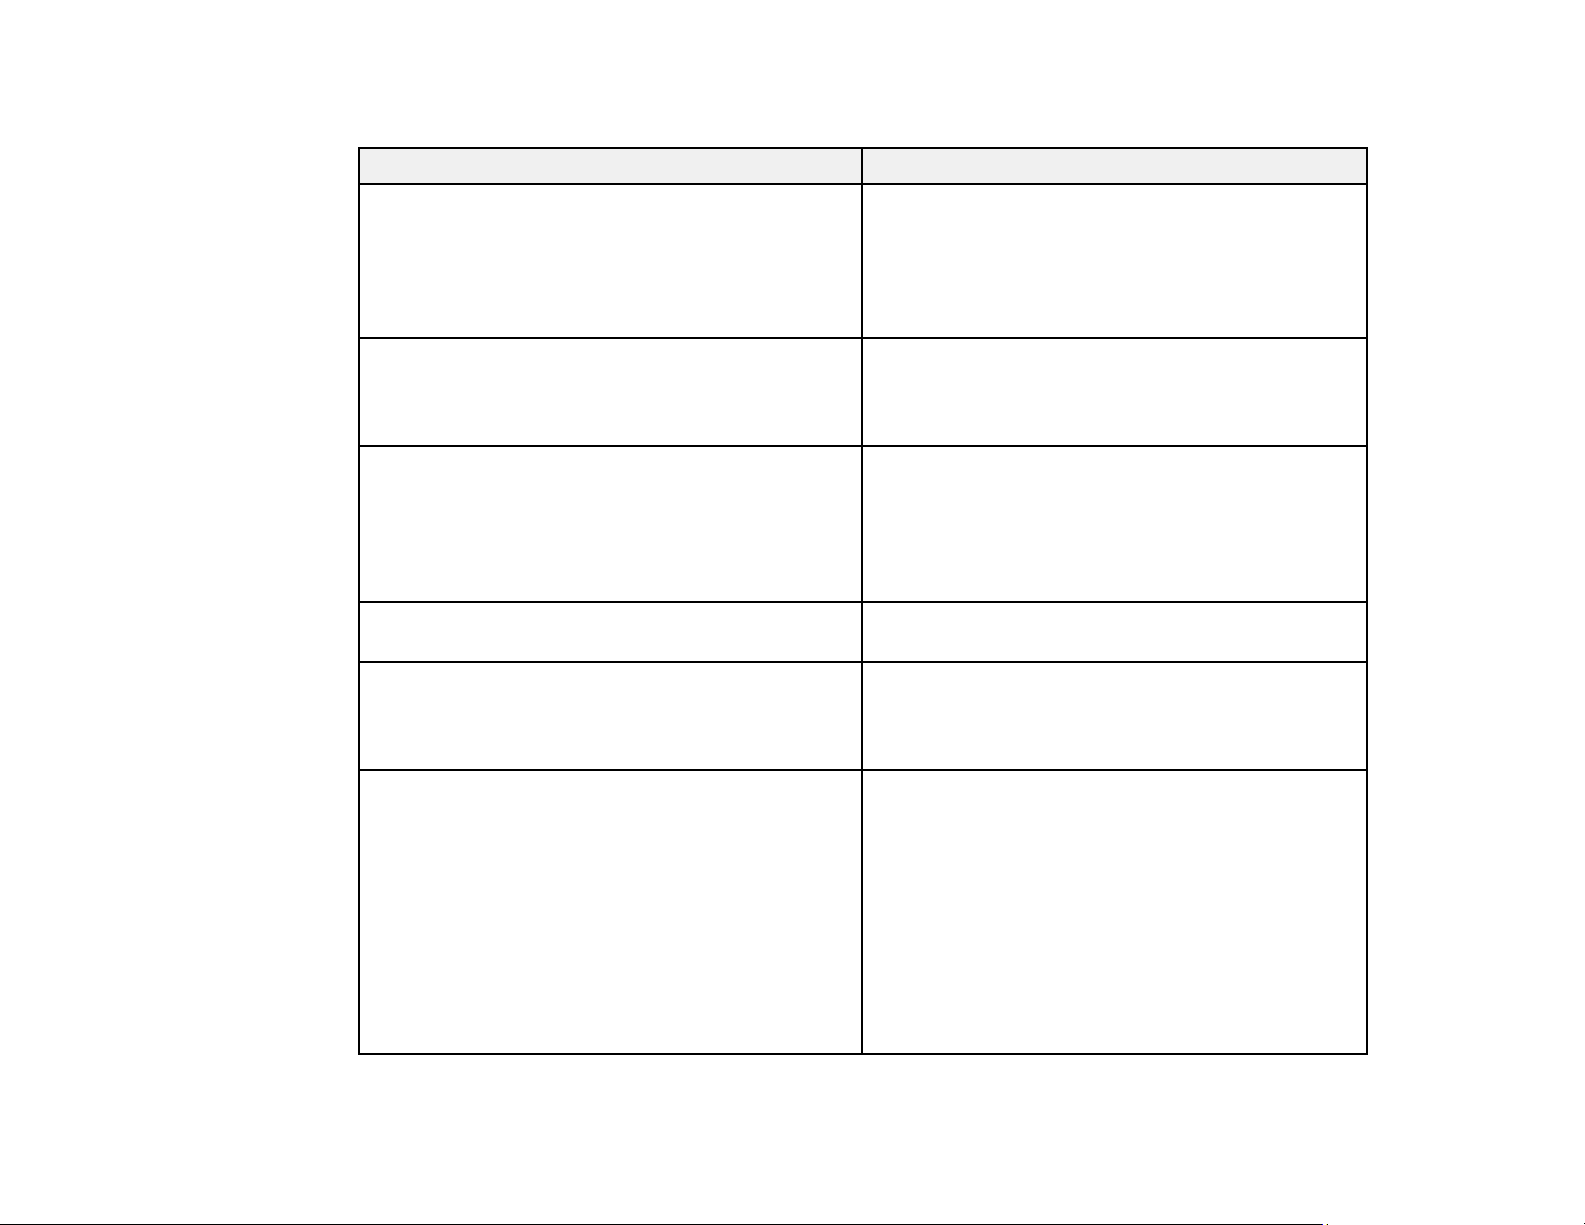
Group Policy Settings
Setting Options/Description
Access Control Permit Access to permit IP packets to pass
through
Refuse Access to prevent IP packets from
passing through
IPsec to permit IPsec packes to pass through
Local Address(Printer) Select an IPv4 or IPv6 address that matches your
network environment; if the IP address is assigned
automatically, select Use auto-obtained IPv4
address
Remote Address(Host) Enter the device's IP address (between 0 and 43
characters long) to control access, or leave blank
to control all addresses; if the IP address is
assigned automatically, such as by DHCP, the
connection may be unavailable, so configure a
static address instead
Method of Choosing Port Select the method you want to used for specifiying
ports
Service Name If you selected Service Name as the Method of
Choosing Port option, select a service name
option here; see the next table for more
information
Transport Protocol If you selected Port Number as the Method of
Choosing Port option, select one of these
encapsulation modes:
Any Protocol
TCP
UDP
ICMPv4
See the Group Policy Guidelines table for more
information
19
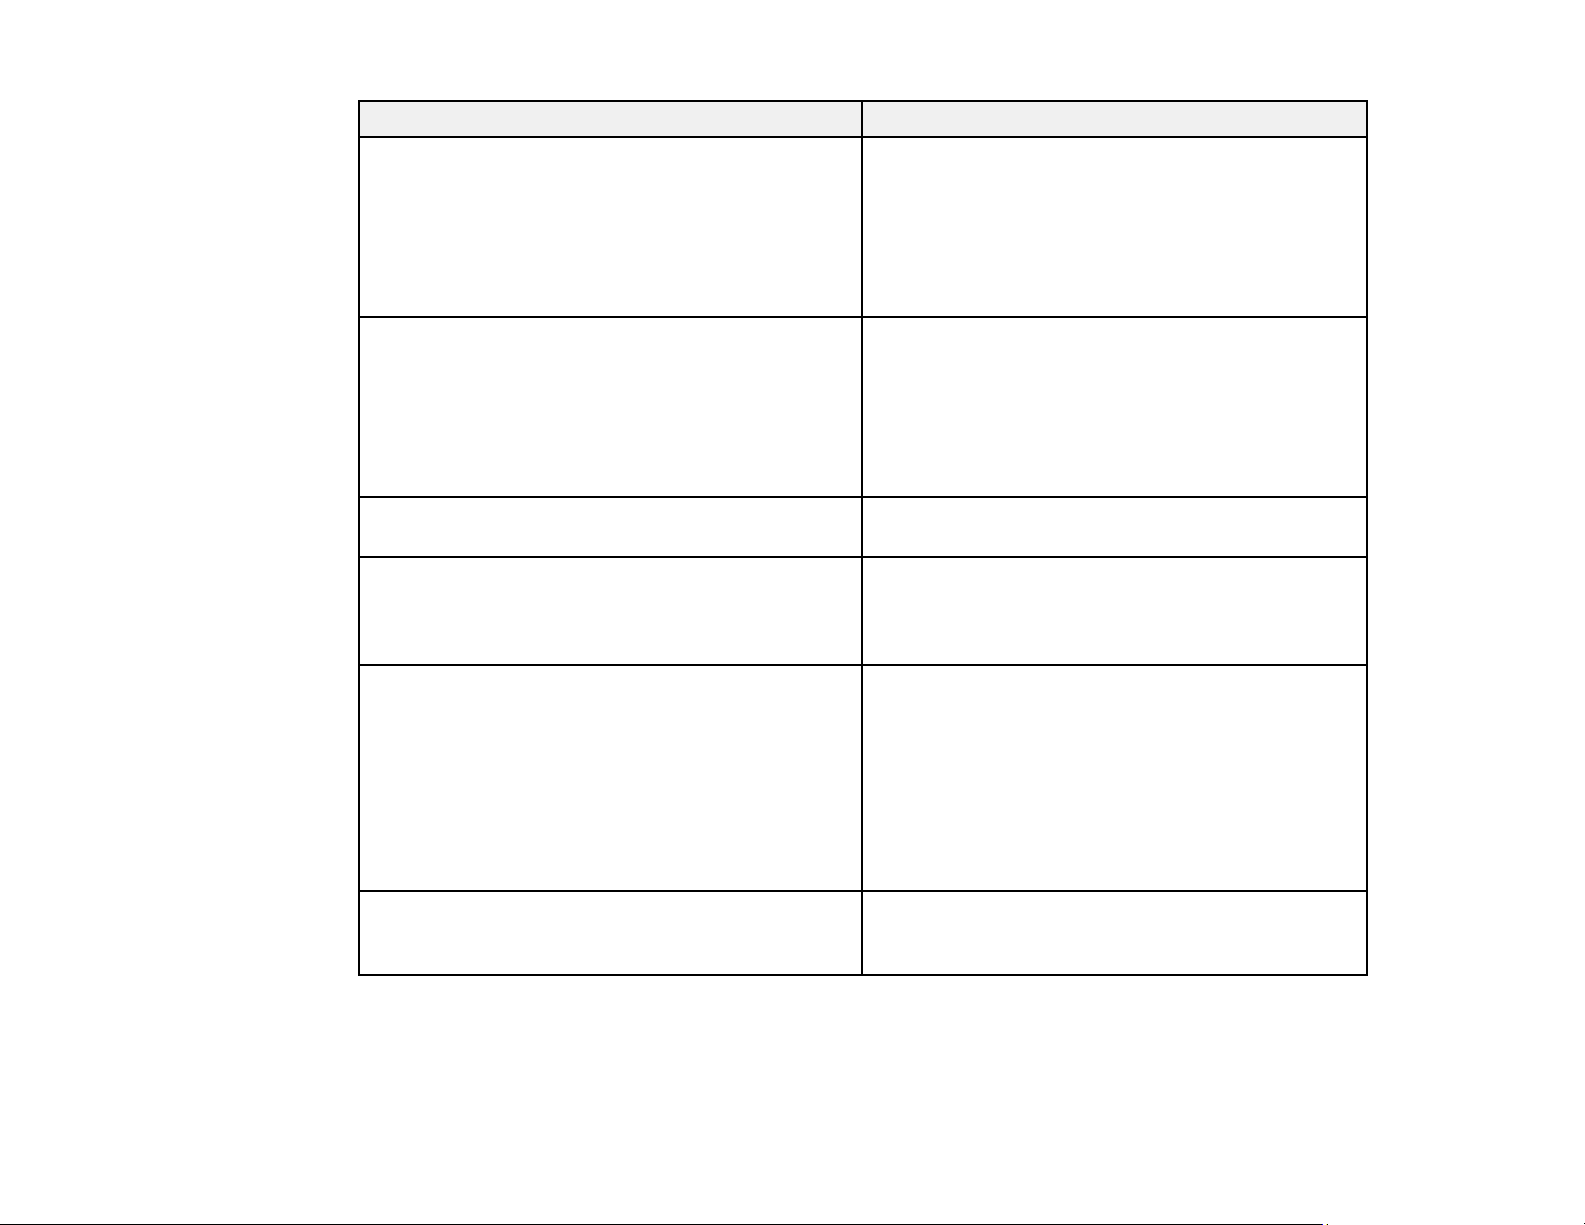
Setting Options/Description
Local Port If you selected Port Number as the Method of
Choosing Port option, and TCP or UDP for the
Transport Protocol option, enter the port
numbers that control receiving packets (up to 10
ports), separated by commas, for example
25,80,143,5220; leave this setting blank to control
all ports; see the next table for more information
Remote Port If you selected Port Number as the Method of
Choosing Port option, and TCP or UDP for the
Transport Protocol option, enter the port
numbers that control sending packets (up to 10
ports), separated by commas, for example
25,80,143,5220; leave this setting blank to control
all ports; see the next table for more information
Authentication Method If you selected IPsec as the Access Control
option, select an authentication method here
Pre-Shared Key If you selected Pre-Shared Key as the
Authentication Method option, enter a pre-
shared key between 1 and 127 characters long
here and in the Confirm Pre-Shared Key field
Encapsulation If you selected IPsec as the Access Control
option, select one of these encapsulation modes:
Transport Mode, if you are using the product on
the same LAN; IP packets of layer 4 or later are
encrypted
Tunnel Mode, if you are using the product on an
Internet-capable network, such as IPsec-VPN; the
header and data of IP packets are encrypted
Remote Gateway(Tunnel Mode) If you selected Tunnel Mode as the
Encapsulation option, enter a gateway address
between 1 and 39 characters long
20
Loading...