


 Loading...
Epson WorkForce® 600 Series
Quick Guide
Basic Printing, Copying, Scanning, and Faxing
Maintaining Your All-in-One
Solving Problems
Contents
Adjusting the Control Panel. . . . . . . . . . . . . . . . . . . . . . . . . . . . . 4
Loading Paper . . . . . . . . . . . . . . . . . . . . . . . . . . . . . . . . . . . . . . . . . |
5 |
Using Special Papers . . . . . . . . . . . . . . . . . . . . . . . . . . . . . . . . . . . . . . . . |
6 |
Placing Originals for Copying, Scanning, or Faxing . . . . . . . . |
8 |
Using the Scanner Glass . . . . . . . . . . . . . . . . . . . . . . . . . . . . . . . . . . . . . |
8 |
Using the Automatic Document Feeder . . . . . . . . . . . . . . . . . . . . . . . . . . . |
9 |
Copying a Document or Photo . . . . . . . . . . . . . . . . . . . . . . . . . |
10 |
Copying a Document . . . . . . . . . . . . . . . . . . . . . . . . . . . . . . . . . . . . . . |
10 |
Restoring, Cropping, or Copying Photos . . . . . . . . . . . . . . . . . . . . . . . . . |
11 |
Faxing a Document or Photo . . . . . . . . . . . . . . . . . . . . . . . . . . . |
14 |
Connecting a Phone or Answering Machine . . . . . . . . . . . . . . . . . . . . . . . |
14 |
Setting Up Fax Features . . . . . . . . . . . . . . . . . . . . . . . . . . . . . . . . . . . . |
15 |
Sending a Fax . . . . . . . . . . . . . . . . . . . . . . . . . . . . . . . . . . . . . . . . . . . |
20 |
Receiving Faxes . . . . . . . . . . . . . . . . . . . . . . . . . . . . . . . . . . . . . . . . . . |
22 |
Printing From Your Camera’s Memory Card . . . . . . . . . . . . . 23
Inserting Your Camera’s Memory Card . . . . . . . . . . . . . . . . . . . . . . . . . . 23
Printing From Your Computer . . . . . . . . . . . . . . . . . . . . . . . . . . |
26 |
Printing in Windows . . . . . . . . . . . . . . . . . . . . . . . . . . . . . . . . . . . . . . |
26 |
Printing With a Macintosh . . . . . . . . . . . . . . . . . . . . . . . . . . . . . . . . . . |
28 |
Selecting the Correct Paper Type . . . . . . . . . . . . . . . . . . . . . . . . . . . . . . |
32 |
Scanning a Document or Photo . . . . . . . . . . . . . . . . . . . . . . . . |
33 |
Basic Scanning . . . . . . . . . . . . . . . . . . . . . . . . . . . . . . . . . . . . . . . . . . . |
33 |
Scanning Multiple Pages . . . . . . . . . . . . . . . . . . . . . . . . . . . . . . . . . . . . |
35 |
2 Contents
Maintaining Your All-in-One . . . . . . . . . . . . . . . . . . . . . . . . . . . 36
Checking the Print Head Nozzles . . . . . . . . . . . . . . . . . . . . . . . . . . . . . . 36
Cleaning the Print Head . . . . . . . . . . . . . . . . . . . . . . . . . . . . . . . . . . . . 37
Checking the Ink Cartridge Status . . . . . . . . . . . . . . . . . . . . . . . . . . . . . 38
Purchasing Epson Ink Cartridges . . . . . . . . . . . . . . . . . . . . . . . . . . . . . . 39
Replacing Ink Cartridges . . . . . . . . . . . . . . . . . . . . . . . . . . . . . . . . . . . . 40
. . . . . . . . . . . . . . . . . . . . . . . . . . . . . . . . . . . . . 42
Checking for Software Updates . . . . . . . . . . . . . . . . . . . . . . . . . . . . . . . 42
Problems and Solutions . . . . . . . . . . . . . . . . . . . . . . . . . . . . . . . . . . . . . 42
Where To Get Help . . . . . . . . . . . . . . . . . . . . . . . . . . . . . . . . . . . . . . . 46
Notices. . . . . . . . . . . . . . . . . . . . . . . . . . . . . . . . . . . . . . . . . . . . . . . 47
Contents 3
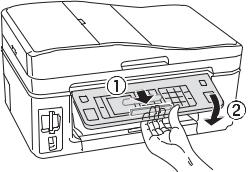
Adjusting the Control Panel
The control panel is adjustable. To raise it, lift it up from the bottom. To lower it, squeeze the release lever underneath and push the control panel down.
If you want to turn off the “beep” heard when you press a button, follow these steps:
1.Press the Home button.
2.Press r until Setup is selected and press OK.
3.Press l or r to select Printer Setup and press OK.
4.Select Sound and press OK.
5.Press d to select Off and press OK.
6.Press the Home button to return to the Home screen.
4 Adjusting the Control Panel

Loading Paper
You can load up to 100 sheets of plain paper or Epson® Bright White Paper, or 80 sheets of Epson Presentation Paper Matte. Load Premium Presentation Paper Matte and most photo papers 20 sheets at a time. Load transfer paper and adhesive sheets one sheet at a time.
1.Open the paper support and pull up the extensions. Then extend the output tray and raise the stopper.
Note: If you are using legal-size paper, do not raise the stopper.
2. Flip the feeder guard forward, then squeeze the edge guide and slide it left.
Loading Paper 5
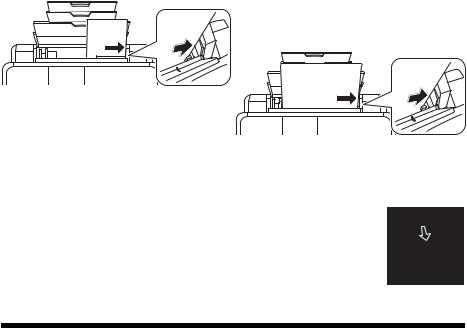
3.Insert the paper, glossy or printable side up, short edge first, against the right side. Then slide the edge guide against the paper, but not too tightly.
Letter-size
4 × 6 inches
Note:
Make sure the paper stack fits under the arrow mark inside the left edge guide.
Always load paper short edge first, even for landscape printing. Load letterhead or pre-printed paper top edge first.
For details on paper and instructions on loading envelopes, see the on-screen Epson Information Center.
Using Special Papers
Epson offers a wide array of high quality papers, making it easy to maximize the impact of your photos, presentations, and creative projects.
You can purchase genuine Epson ink and paper at Epson Supplies CentralSM at www.epson.com/ink3 (U.S. sales) or www.epson.ca (Canadian sales). You can also purchase supplies from an Epson authorized reseller. To find the nearest one, call 800-GO-EPSON (800-463-7766).
|
|
Part |
Sheet |
Paper name |
Size |
number |
count |
|
|
|
|
Epson Bright White Paper |
Letter (8.5 × 11 inches) |
S041586 |
500 |
|
|
|
|
Epson Photo Paper Glossy |
Borderless 4 × 6 inches |
S041809 |
50 |
|
|
S042038 |
100 |
|
|
|
|
|
Letter (8.5 × 11 inches) |
S041141 |
20 |
|
|
S041649 |
50 |
|
|
S041271 |
100 |
|
|
|
|
6 Loading Paper
|
|
Part |
Sheet |
|
Paper name |
Size |
number |
count |
|
|
|
|
|
|
Epson Premium Photo Paper |
Borderless 4 × 6 inches |
S041808 |
40 |
|
Glossy |
|
S041727 |
100 |
|
|
|
|
|
|
|
Borderless 5 × 7 inches |
S041464 |
20 |
|
|
|
|
|
|
|
Borderless 8 × 10 inches |
S041465 |
20 |
|
|
|
|
|
|
|
Letter (8.5 × 11 inches) |
S042183 |
25 |
|
|
|
S041667 |
50 |
|
|
|
|
|
|
Epson Ultra Premium Photo |
Borderless 4 × 6 inches |
S042181 |
60 |
|
Paper Glossy |
|
S042174 |
100 |
|
|
|
|
|
|
|
Borderless 5 × 7 inches |
S041945 |
20 |
|
|
|
|
|
|
|
Borderless 8 × 10 inches |
S041946 |
20 |
|
|
|
|
|
|
|
Letter (8.5 × 11 inches) |
S042175 |
25 |
|
|
|
S042182 |
50 |
|
|
|
|
|
|
Epson Premium Photo Paper |
Borderless 4 × 6 inches |
S041982 |
40 |
|
Semi-gloss |
|
|
|
|
Letter (8.5 × 11 inches) |
S041331 |
20 |
||
|
||||
|
|
|
|
|
Epson Presentation Paper Matte |
Letter (8.5 × 11 inches) |
S041062 |
100 |
|
|
|
|
|
|
|
Legal (8.5 × 14 inches) |
S041067 |
100 |
|
|
|
|
|
|
Epson Premium Presentation |
Borderless 8 × 10 inches |
S041467 |
50 |
|
Paper Matte |
|
|
|
|
Letter (8.5 × 11 inches) |
S041257 |
50 |
||
|
||||
|
|
S042180 |
100 |
|
|
|
|
|
|
Epson Premium Presentation |
Letter (8.5 × 11 inches) |
S041568 |
50 |
|
Paper Matte Double-sided |
|
|
|
|
|
|
|
|
|
Epson Ultra Premium |
Letter (8.5 × 11 in.) |
S041341 |
50 |
|
Presentation Paper Matte |
|
|
|
|
|
|
|
|
|
Epson Photo Quality Self- |
A4 (8.3 × 11.7 inches) |
S041106 |
10 |
|
adhesive Sheets |
|
|
|
|
|
|
|
|
|
Epson Iron-on Cool Peel Transfer |
Letter (8.5 × 11 inches) |
S041153 |
10 |
|
Paper |
|
|
|
|
|
|
|
|
Using Special Papers 7

Placing Originals for Copying, Scanning, or Faxing
Before you copy, scan, or fax, place your documents or photos on the scanner glass (below) or in the Automatic Document Feeder (see page 9).
Using the Scanner Glass
You can place one or two photos or a document up to letter-size (or A4) on the scanner glass to make color or black and white copies.
1.Open the document cover and place your original face-down on the scanner glass, with the top against the back left corner.
If you’re scanning 3 × 5- or 4 × 6-inch photos, you can place up to two at a time on the scanner glass. Place them at least 1/4 inch (5 mm) apart.
1/4 inch (5 mm)
1/4 inch (5 mm)
2. Close the cover gently so you don’t move the original(s).
8 Placing Originals for Copying, Scanning, or Faxing
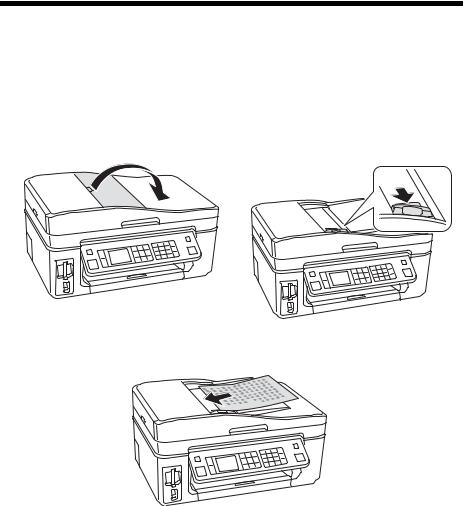
Using the Automatic Document Feeder
You can place up to 30 letter-size sheets or 10 legal-size sheets in the Automatic Document Feeder.
1.Fan the originals, then tap them on a flat surface to even the edges.
2.Open the Automatic Document Feeder paper support, and then move the edge guide outward.
3. Insert the originals face-up.
4. Slide the edge guide against the originals, but not too tightly.
Note:
When you use the Copy function, letter-size paper is automatically selected for your printed copies. If you copy a legal-size document, the image will be cropped to fit lettersize paper.
Using the Automatic Document Feeder 9
Copying a Document or Photo
Once you’ve placed your originals on the scanner glass or in the Automatic Document Feeder (see page 8), you can make color or black and white copies. See:
■“Copying a Document” below
■“Restoring, Cropping, or Copying Photos” on page 11
Copying a Document
1.Place your original(s) for copying (see page 8).
2.Load letter-size plain paper, Epson Bright White Paper, or Epson Presentation Paper Matte.
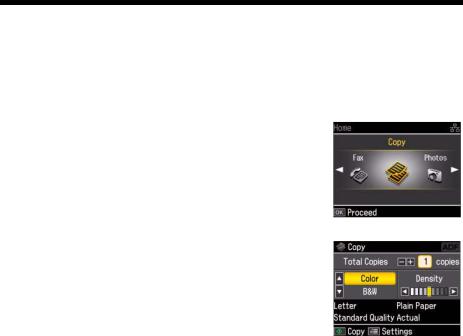
3.Press the Home button until Copy is selected.
4.Press OK.
5.Press + or – to select the number of copies you want.
6.Press u or d to select Color or B&W (black and white) copies.
7.Press l or r to change the density (make the copies lighter or darker).
10 Copying a Document or Photo
8.To change print settings, press Menu and then OK to select Paper and Copy Settings. The Layout setting should be With Border and the Paper Size should be Letter.
■To adjust the copy size, press d to select Reduce/Enlarge, press r, then press u or d to choose Actual (and select a percentage using + or –), Auto Fit Page (to automatically size the image to fit your paper), or one of the specific sizes listed. Then press OK.
Note:
If you’re using the Auto Document Feeder to copy a document, you can only select Actual at 100% or Legal –> Letter.
■Press d to scroll down to the Paper Type setting and select Plain Paper.
■For the Document Type setting, choose Text for plain documents or Text & Image if your document contains photos or graphics.
■To change the copy quality (for plain paper only), select Quality, press r, then press u or d to choose Draft, Standard Quality, or Best. Press OK.
9.After you finish selecting your settings, press OK.
10.Press x Start to begin copying. To cancel copying, press y Stop/Clear Settings.
Restoring, Cropping, or Copying Photos
You can copy one or two photos onto 4 × 6-inch, 5 × 7-inch, or letter-size photo paper for instant photo reprints. You can also restore colors in faded photos, print with or without borders, convert photos to black and white, and crop your photos.
1.Place one or two photos on the scanner glass. Place them at least 1/4 inch (5 mm) apart.
2.Load 4 × 6-inch, 5 × 7-inch, or letter-size Epson photo paper in the sheet feeder.
Restoring, Cropping, or Copying Photos 11
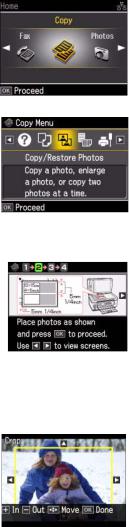
3.Press the Home button until Copy is selected. Then press OK.
4.Press Menu, then press l or r until Copy/Restore Photos is selected.
5.Press OK.
6.To turn on Color Restoration to restore colors in faded photos as you copy, press OK to select On. (If your photo is not faded, do not turn on Color Restoration; press d to select Off.) Then press OK.
7.When you see this screen, press OK to prescan your photos:
8.When you see a message asking you to select the number of copies, press OK.
9.If you placed more than one photo on the scanner glass, press l or r to move through your photos.
10.To print more than 1 copy, press + or – to select the number (up to 99). If you are copying 2 photos, do this for the other photo as well.
11.If you want to crop your photos and enlarge the resulting image area to fit onto your paper, press
Display/Crop.
■To resize the image area, press + or –.
■To move the image area, use the arrow buttons.
■To check the zoomed image, press OK.
When you finish cropping your photos, press OK.
12. Press OK again to continue.
12 Copying a Document or Photo
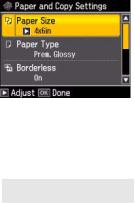
13.To change any of the settings displayed on the screen, press Menu and then OK to select
Paper and Copy Settings.
■To change the paper size, select Paper Size, press r, then press u or d to choose the size of paper you loaded. press OK. (Paper Size options depend on the Paper Type setting you choose.)
■To change the paper type, select Paper Type, press r, then press u or d to choose the setting for the paper you loaded. Then press OK.
For this paper type |
Choose this setting |
|
|
Epson Premium Photo Paper Glossy |
Prem. Glossy |
|
|
Epson Premium Photo Paper Semi-gloss |
|
|
|
Epson Ultra Premium Photo Paper Glossy |
Ultra Glossy |
|
|
Epson Photo Paper Glossy |
Glossy |
|
|
Epson Premium Presentation Paper Matte |
Matte |
|
|
Epson Ultra Premium Presentation Paper Matte |
|
|
|
■To change the print layout, select Borderless, then press r. Press u or d to choose On to expand the image all the way to the edge of the paper (slight cropping may occur) or Off to leave a small margin around the image. Then press OK.
■To adjust the amount of image expansion when printing borderless photos, select Expansion, press r, then press u or d to choose Standard, Medium, or Minimum. Then press OK. (Your printed photo may have white borders if you use the Minimum setting.)
■If you want to create a black-and-white copy of a color photo, select Filter, press r, then press u or d and choose B&W. Then press OK.
14.After you finish selecting your settings, press OK.
15.When you’re ready to copy, press x Start. To cancel copying, press y Stop/ Clear Settings.
Note:
When you scan with your computer, you can use additional options to transform faded, dusty, or badly exposed photos into ones with true-to-life color and sharpness. See the on-screen Epson Information Center for details.
Restoring, Cropping, or Copying Photos 13
Faxing a Document or Photo
Your WorkForce 600 Series lets you send faxes by entering fax numbers or selecting entries from a speed dial list. Using the Automatic Document Feeder, you can fax up to 30 pages at a time.
See these sections:
■“Connecting a Phone or Answering Machine” below
■“Setting Up Fax Features” on page 15
■“Sending a Fax” on page 20
■“Receiving Faxes” on page 22
For more information on faxing and fax settings, see the on-screen Epson Information Center.
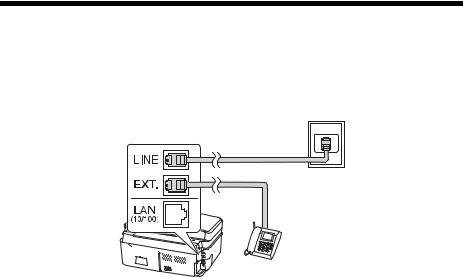
Connecting a Phone or Answering Machine
1.Connect the phone cable from the wall jack to the LINE port on the back of the WorkForce 600 Series.
Note:
If you’re connecting the WorkForce 600 Series to a DSL phone line, you must plug a DSL filter into the wall jack or you won’t be able to use the fax or telephone equipment as described below. Contact your DSL provider for the necessary filter.
14 Faxing a Document or Photo

2.To use a telephone or answering machine, you need a second phone cable. Connect one end of the cable to the telephone or answering machine, and connect the other end to the EXT. port on the back of the WorkForce 600 Series (or to another wall jack on the same line).
If your answering machine is set to pick up on the fourth ring, you should set the WorkForce 600 Series to pick up on the fifth ring or later:
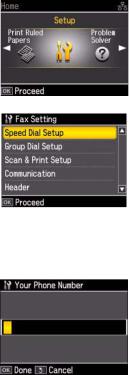
1.Press the Home button.
2.Press l or r to select Setup, then press OK
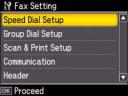
3.Press l or r to select Fax Setting, then press OK.
4.Select Communication, then press OK.
5.Press u or d to select Rings to Answer, then press r.
6.Press u or d to select the number of rings, then press OK. Select more than the number of rings needed for the answering machine to pick up.
When you receive a call, if the other party is a fax and you pick up the phone or the answering machine answers, the WorkForce 600 Series automatically begins receiving the transmission. If the other party is a caller, the phone can be used as normal or a message can be left on the answering machine.
Note:
A phone or answering machine must be connected to the EXT. port for the WorkForce 600 Series to detect an incoming fax call when a phone is picked up. If a fax call comes in, and you pick up the phone without having a phone or answering machine connected to the EXT. port, the call will be disconnected when you hang up and the WorkForce 600 Series will not receive the fax.
Setting Up Fax Features
Before sending or receiving faxes, you may want to create a fax header, select your fax preferences, and set up a speed dial list of frequently used fax numbers.
■“Entering Fax Header Information” on page 16
■“Select Scan and Print Settings” on page 17
■“Setting Up a Speed Dial or Group Dial List” on page 18
Note:
To change other settings or print fax reports, see the on-screen Epson Information Center.
Setting Up Fax Features 15
Entering Fax Header Information
You should enter fax header information before sending faxes so that recipients can identify their source.
Note:
If you leave the WorkForce 600 Series unplugged for a long period of time, the date and time settings may get lost. See the on-screen Epson Information Center for instructions on setting the date and time.
Entering Your Sender Name
1.Press the Home button.
2.Press l or r to select Setup, then press OK.
3.Press l or r to select Fax Setting, then press OK.
4.Select Header, then press OK.
5.Press OK to select Fax Header.
6.Use the numeric keypad to enter the header information; for letters, press a numeric key until you see the letter you want. (See page 17 for more information.) You can enter up to 40 digits.
7.Press OK to return to the Header menu.
Entering Your Phone Number
1.Select Your Phone Number from the Header menu, then press OK. You see the phone number input screen.
2.Use the numeric keypad to enter your phone number (see page 17). You can enter up to 20 digits. (You don’t need to enter any dashes.)
3.Press OK to return to the Header menu.
16 Faxing a Document or Photo
Using the Keypad to Enter Numbers and Characters
Follow these guidelines to enter numbers and characters.
■To move the cursor, add a space, or delete a character:
Button |
Function |
|
|
l or r |
Moves the cursor to the left or right. |
|
|
Auto Answer/Space |
Inserts a space and moves the cursor one |
|
character to the right. |
|
|
Speed Dial/Group Dial/ |
Deletes a character and moves the cursor one |
Backspace |
space to the left. |
|
|
■To enter a fax number, use the numeric keypad. Press Redial/Pause to insert a pause symbol (–) when a brief pause is required during dialing. Use the
# button to type the + symbol when entering a phone number in international dialing format.
■To enter characters, press a keypad number repeatedly to switch between uppercase, lowercase, or numbers.
Press 1symb to enter these characters: ! # % & ’ ( ) * + , – . / : ; = ? @ ~
Select Scan and Print Settings
Use these settings to adjust the image quality of incoming and outgoing faxes, select the paper size loaded in your WorkForce 600 Series, select the size at which faxes are printed, and select when you want printed reports.
1.Press the Home button.
2.Press l or r to select Setup, then press OK.
3.Press l or r to select Fax Setting, then press OK.
4.Select Scan & Print Setup, then press OK.
Setting Up Fax Features 17
Loading...