


Epson WorkForce® 310 Series
Quick Guide
Installing on a Network Basic Printing, Copying, Scanning, and Faxing Maintaining Your All-in-One Solving Problems
Contents
Introduction . . . . . . . . . . . . . . . . . . . . . . . . . . . . . . . . . . . . . . . . . . . |
4 |
Installing Your WorkForce 310 Series on a Network . . . . . . . |
5 |
Connect an Ethernet Network Cable . . . . . . . . . . . . . . . . . . . . . . . . . . . . |
5 |
Install Software . . . . . . . . . . . . . . . . . . . . . . . . . . . . . . . . . . . . . . . . . . . |
6 |
Loading Paper . . . . . . . . . . . . . . . . . . . . . . . . . . . . . . . . . . . . . . . . |
14 |
Using Special Papers . . . . . . . . . . . . . . . . . . . . . . . . . . . . . . . . . . . . . . . |
15 |
Placing Originals for Copying, Scanning, or Faxing . . . . . . . 17
Using the Scanner Glass . . . . . . . . . . . . . . . . . . . . . . . . . . . . . . . . . . . . 17
Using the Automatic Document Feeder . . . . . . . . . . . . . . . . . . . . . . . . . . 18
Copying a Document or Photo . . . . . . . . . . . . . . . . . . . . . . . . . |
20 |
Copying a Document . . . . . . . . . . . . . . . . . . . . . . . . . . . . . . . . . . . . . . |
20 |
Copying a Photo . . . . . . . . . . . . . . . . . . . . . . . . . . . . . . . . . . . . . . . . . |
21 |
Faxing a Document . . . . . . . . . . . . . . . . . . . . . . . . . . . . . . . . . . . |
22 |
Connecting a Phone or Answering Machine . . . . . . . . . . . . . . . . . . . . . . . |
22 |
Setting Up Fax Features . . . . . . . . . . . . . . . . . . . . . . . . . . . . . . . . . . . . |
24 |
Sending a Fax From the Control Panel . . . . . . . . . . . . . . . . . . . . . . . . . . |
28 |
Sending a Fax From Windows . . . . . . . . . . . . . . . . . . . . . . . . . . . . . . . . |
29 |
Receiving Faxes . . . . . . . . . . . . . . . . . . . . . . . . . . . . . . . . . . . . . . . . . . |
31 |
Printing From Your Computer . . . . . . . . . . . . . . . . . . . . . . . . . . |
32 |
Printing in Windows . . . . . . . . . . . . . . . . . . . . . . . . . . . . . . . . . . . . . . |
32 |
Printing With a Macintosh . . . . . . . . . . . . . . . . . . . . . . . . . . . . . . . . . . |
34 |
Selecting the Correct Paper Type . . . . . . . . . . . . . . . . . . . . . . . . . . . . . . |
38 |
2 Contents
Scanning a Document or Photo . . . . . . . . . . . . . . . . . . . . . . . . |
39 |
Basic Scanning . . . . . . . . . . . . . . . . . . . . . . . . . . . . . . . . . . . . . . . . . . . |
39 |
Scanning Multiple Pages . . . . . . . . . . . . . . . . . . . . . . . . . . . . . . . . . . . . |
41 |
Maintaining Your WorkForce 310 Series. . . . . . . . . . . . . . . . . |
42 |
Checking the Print Head Nozzles . . . . . . . . . . . . . . . . . . . . . . . . . . . . . . |
42 |
Cleaning the Print Head . . . . . . . . . . . . . . . . . . . . . . . . . . . . . . . . . . . . |
43 |
Checking the Ink Cartridge Status . . . . . . . . . . . . . . . . . . . . . . . . . . . . . |
44 |
Purchasing Epson Ink Cartridges . . . . . . . . . . . . . . . . . . . . . . . . . . . . . . |
45 |
Replacing Ink Cartridges . . . . . . . . . . . . . . . . . . . . . . . . . . . . . . . . . . . . |
46 |
Solving Problems . . . . . . . . . . . . . . . . . . . . . . . . . . . . . . . . . . . . . |
48 |
Checking for Software Updates . . . . . . . . . . . . . . . . . . . . . . . . . . . . . . . |
48 |
Error Indicators . . . . . . . . . . . . . . . . . . . . . . . . . . . . . . . . . . . . . . . . . . |
49 |
Problems and Solutions . . . . . . . . . . . . . . . . . . . . . . . . . . . . . . . . . . . . . |
49 |
Where To Get Help . . . . . . . . . . . . . . . . . . . . . . . . . . . . . . . . . . . . . . . |
54 |
Notices. . . . . . . . . . . . . . . . . . . . . . . . . . . . . . . . . . . . . . . . . . . . . . . 55
Contents 3
Introduction
After you have set up your Epson WorkForce® 310 Series as described on the Start Here sheet, turn here to:
■Install the WorkForce 310 Series on a network
■Load paper
■Make a copy of a document or photo
■Fax a document or photo
■Get the basic steps for printing from your computer
■Scan multiple pages
■Perform routine maintenance
■Solve simple problems
This book tells you how to do most of these things without ever turning on your computer! For additional instructions, see the on-screen Epson Information Center (which includes your user’s guide) by double-clicking its icon on your desktop.
Please follow these guidelines as you read your WorkForce 310 Series instructions:
Warning:
Warnings must be followed carefully to avoid bodily injury.
Caution:
Cautions must be observed to avoid damage to your equipment.
Note:
Notes contain important information about your WorkForce 310 Series.
Tip:
Tips contain hints for better faxing, copying, scanning, and printing.
4 Introduction
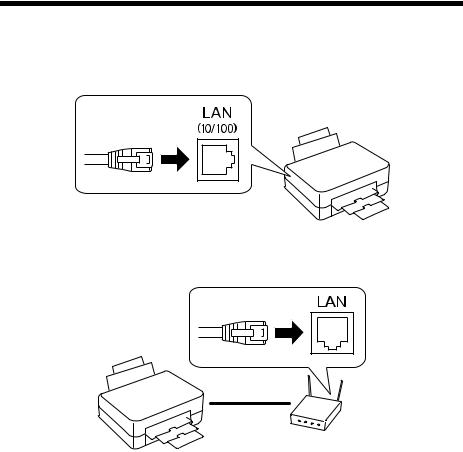
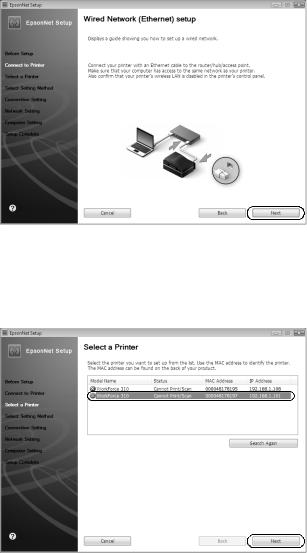
Installing Your WorkForce 310 Series on a Network
Follow the steps in this chapter to connect the WorkForce 310 Series to your network. After you have connected the printer to your network, you need to install the WorkForce 310 Series software on each computer you would like to print from.
Connect an Ethernet Network Cable
1.Connect an Ethernet network cable to the LAN (10/100) port on your WorkForce 310 Series.
2.Connect the other end to any available LAN port on your router, wireless access point, or hub.
3. Continue with the steps in the next section to install software.
Installing Your WorkForce 310 Series on a Network 5
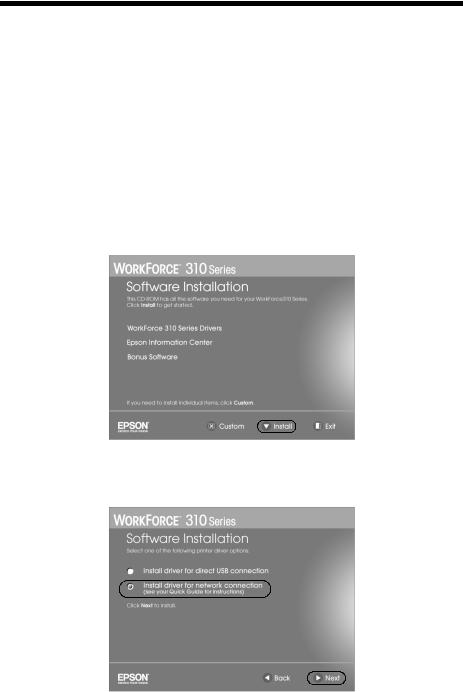
Install Software
Follow the steps in this section for each computer you want to use with your printer over the network.
1.Insert the printer software CD in your computer’s CD or DVD drive.
2.Windows Vista®: If you see the AutoPlay window, click Run SETUP.EXE. When you see the User Account Control screen, click Continue.
Windows® XP: When you see the Software Installation screen, continue with step 3.
Mac OS® X: Double-click the  icon.
icon.
3.Click Install.
4.When you see this screen, select Install driver for network connection and click Next.
6 Installing Your WorkForce 310 Series on a Network
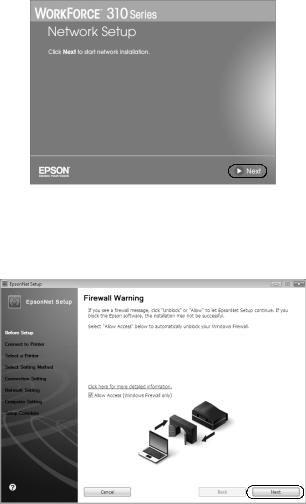
5. When you see this screen, click Next to start network setup.
6.Make sure that your printer is turned on and connected to your network as described on page 5.
7.When you see the Firewall Warning screen, click Next.
Note:
If you see a firewall alert message click Unblock or Allow to let EpsonNet Setup continue. Do not select Ask Me Later, Keep Blocking, or Block.
Install Software 7
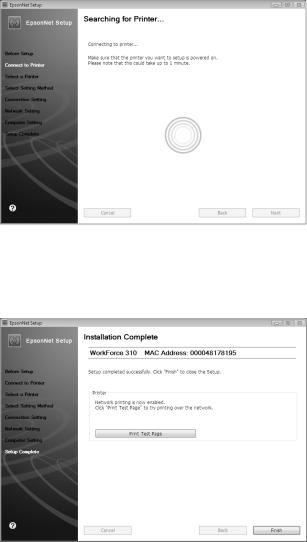
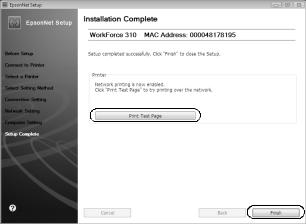
8. Wait while EpsonNet Setup configures your printer on the network.
9.Do one of the following:
■If you see the Installation Complete screen, continue with “Finish the Installation” on page 10.
8 Installing Your WorkForce 310 Series on a Network
■If no available printers are found on your network, follow the instructions on the screen and click Next.
■If EpsonNet Setup finds more than one printer on your network, select the printer you want to configure, then click Next. When you see the Installation Complete screen, continue with “Finish the Installation” below.
Install Software 9
Finish the Installation
Follow the steps for your operating system:
■“Windows” below
■“Macintosh” on page 12
Windows
1. Print a test page, then click Finish.
10 Installing Your WorkForce 310 Series on a Network
2.Do one of the following:
■To set up your Fax Header information, select Yes, click Next, then continue with step 3.
■To set up your Fax Header information later, select No, click Next, then continue with step 4.
3.Follow the prompts on the screen to set up your Fax Header information.
4.Follow the prompts on the screen to install bonus software and finish the installation.
5.When installation is complete, restart your computer.
You’re ready to scan and print. See your printed documentation and on-screen
Epson Information Center for details.
Install Software 11
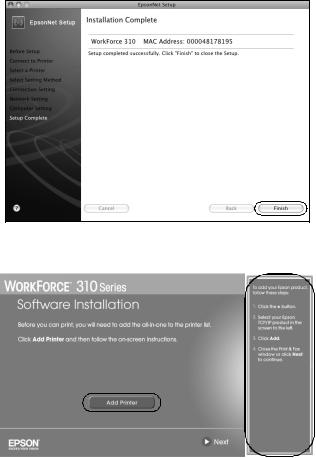
Macintosh
1. Click Finish.
2. When you see this screen, click Add Printer.
3.Follow the steps on the right side of the screen to add your EPSON TCPIP printer, then click Next.
Note:
It may take up to 90 seconds for your computer to find the EPSON TCPIP printer on the network.
12 Installing Your WorkForce 310 Series on a Network
4.Follow the prompts on the screen to print a test page, install bonus software, and finish the installation.
5.When installation is complete, restart your computer.
You’re ready to scan and print. See your printed documentation and on-screen
Epson Information Center for details.
Install Software 13

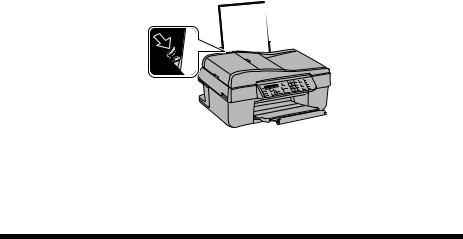
Loading Paper
You can print documents and photos on a variety of paper types and sizes. For details, see page 15.
1.Open the paper support and pull up the extensions. Then pull out the output tray extensions, and raise the paper stopper.
2. Squeeze the edge guide and slide it left.
Note:
If the feeder guard is in the way, flip it forward.
3.Insert paper, glossy or printable side up, against the right side and behind the tab. (Load letterhead or pre-printed paper top edge first.)
Always load paper short edge first, even for landscape printing.
14 Loading Paper
You can load up to 100 sheets of plain paper or 20 sheets of photo paper. Load other special papers one sheet at a time. See your on-screen Epson Information Center for more information.
Note:
The type of paper you choose affects the way your printout looks. If you are just making a copy or printing a rough draft, plain paper is fine. However, for the best results, you’ll want to use one of Epson’s special ink jet papers designed for your printer. For example, your photos will look great printed on Epson Premium Photo Paper Glossy (see “Using Special Papers” for more information).
4. Slide the edge guide against the paper, but not too tightly.
Note:
For details on paper and instructions on loading envelopes, see your on-screen Epson Information Center.
Using Special Papers
Epson offers a wide array of high quality papers, making it easy to maximize the impact of your documents, photos, presentations, and other projects.
You can purchase genuine Epson ink and paper at Epson Supplies CentralSM at epson.com/ink3 (U.S. sales) or epson.ca (Canadian sales). You can also purchase supplies from an Epson authorized reseller. To find the nearest one, call 800-GO- EPSON (800-463-7766).
|
|
Part |
Sheet |
Paper name |
Size |
number |
count |
|
|
|
|
Epson Bright White Paper |
Letter (8.5 × 11 inches) |
S041586 |
500 |
|
|
|
|
Epson Presentation Paper Matte |
Letter (8.5 × 11 inches) |
S041062 |
100 |
|
|
|
|
|
Legal (8.5 × 14 inches) |
S041067 |
100 |
|
|
|
|
Using Special Papers 15
|
|
Part |
Sheet |
|
Paper name |
Size |
number |
count |
|
|
|
|
|
|
Epson Premium Presentation |
Borderless 8 × 10 inches |
S041467 |
50 |
|
Paper Matte |
|
|
|
|
Letter (8.5 × 11 inches) |
S041257 |
50 |
||
|
||||
|
|
S042180 |
100 |
|
|
|
|
|
|
Epson Premium Presentation |
Letter (8.5 × 11 inches) |
S041568 |
50 |
|
Paper Matte Double-sided |
|
|
|
|
|
|
|
|
|
Epson Premium Photo Paper |
Borderless 4 × 6 inches |
S041808 |
40 |
|
Glossy |
|
S041727 |
100 |
|
|
|
|
|
|
|
Borderless 5 × 7 inches |
S041464 |
20 |
|
|
|
|
|
|
|
Borderless 8 × 10 inches |
S041465 |
20 |
|
|
|
|
|
|
|
Letter (8.5 × 11 inches) |
S042183 |
25 |
|
|
|
S041667 |
50 |
|
|
|
|
|
|
Epson Ultra Premium Photo |
Borderless 4 × 6 inches |
S042181 |
60 |
|
Paper Glossy |
|
S042174 |
100 |
|
|
|
|
|
|
|
Borderless 5 × 7 inches |
S041945 |
20 |
|
|
|
|
|
|
|
Borderless 8 × 10 inches |
S041946 |
20 |
|
|
|
|
|
|
|
Letter (8.5 × 11 inches) |
S042182 |
25 |
|
|
|
S042175 |
50 |
|
|
|
|
|
|
Epson Premium Photo Paper |
Borderless 4 × 6 inches |
S041982 |
40 |
|
Semi-gloss |
|
|
|
|
Letter (8.5 × 11 inches) |
S041331 |
20 |
||
|
||||
|
|
|
|
|
Epson Photo Paper Glossy |
Borderless 4 × 6 inches |
S041809 |
50 |
|
|
|
S042038 |
100 |
|
|
|
|
|
|
|
Letter (8.5 × 11 inches) |
S041141 |
20 |
|
|
|
S041649 |
50 |
|
|
|
S041271 |
100 |
|
|
|
|
|
|
Epson Photo Quality Self- |
A4 (8.3 × 11.7 inches) |
S041106 |
10 |
|
adhesive Sheets |
|
|
|
|
|
|
|
|
|
Epson Iron-on Cool Peel Transfer |
Letter (8.5 × 11 inches) |
S041153 |
10 |
|
|
|
|
|
16 Loading Paper
Placing Originals for Copying, Scanning, or Faxing
Before you copy, scan, or fax, place your documents or photos on the scanner glass (below) or in the Automatic Document Feeder (see page 18).
Using the Scanner Glass
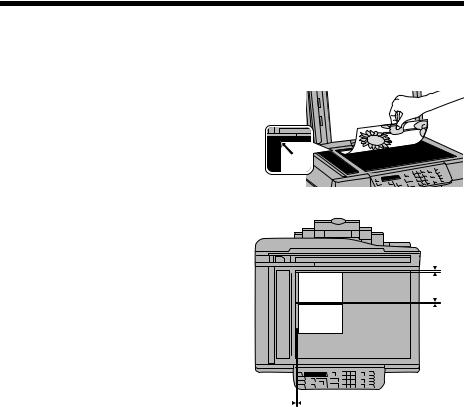
You can place a photo or a document up to letter-size (or A4-size) on the scanner glass to make color or black-and-white copies.
1.Open the document cover and place your original face-down on the scanner glass, with the top against the back left corner.
If you’re scanning 3 × 5- or 4 × 6-inch photos on your computer, you can place up to two at a time on the scanner glass. Place them at least
1/4 inch (5 mm) apart.
2.Close the cover gently so you don’t move the original(s).
1/4 inch (5 mm)
1/4 inch (5 mm)
Placing Originals for Copying, Scanning, or Faxing 17
Using the Automatic Document Feeder
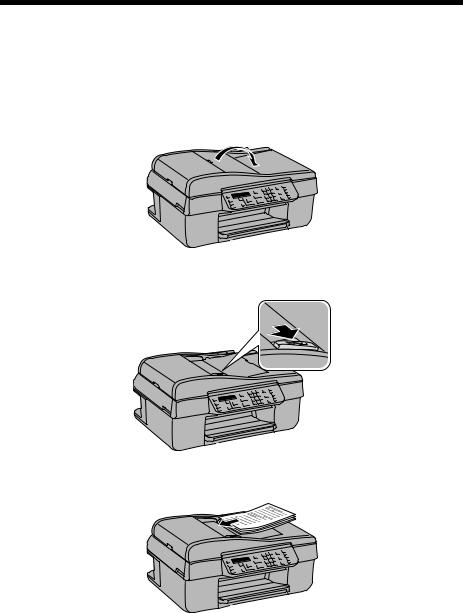
You can place up to 30 letter-size (or A4) sheets or 10 legal-size sheets in the Automatic Document Feeder (ADF).
1.Fan the originals, then tap them on a flat surface to even the edges.
2.Open the ADF paper support.
3. Slide the edge guide outward.
4. Insert the originals face-up.
18 Placing Originals for Copying, Scanning, or Faxing
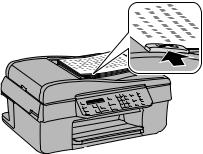
5. Slide the edge guide against the originals, but not too tightly.
Note:
When you use the Copy function, letter-size paper is automatically selected for your printed copies. If you copy a legal-size document, the image will be cut off. To copy a legal-size document on letter-size paper, press x Menu, select Reduce/Enlarge, then press OK. Press u or d to select Legal->Letter, then press OK.
Using the Automatic Document Feeder 19
Copying a Document or Photo
Follow the instructions in this section to make color or black-and-white copies.
Note:
To turn off the “beep” heard when you press a button, press r Copy, press x Menu, press u or d to select Maintenance, then press OK. Press u or d to select Sound, then press OK. Press u or d to select Off, then press OK.
Copying a Document
You can copy documents onto letter-size (or A4) plain paper or Epson special paper just like you would on a copy machine. If you use the Automatic Document Feeder, you can copy up to 30 sheets at a time onto letter-size (or A4) plain paper.
1.Load letteror A4-size plain paper, Epson Bright White Paper, or Epson Presentation Paper Matte in the sheet feeder (see page 14).
2.Place your original document(s) on the scanner glass or in the Automatic Document Feeder (see page 17 or 18).
3.Press the r Copy button.
4.Press u or d or use the numeric keypad to select the number of copies you want (up to 99).
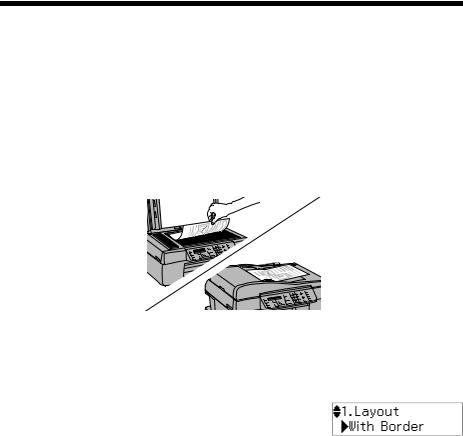
5.To change the layout, press x Menu, then press OK. Press u or d to select a layout setting, then press OK.
Note:
You cannot print borderless on plain paper.
20 Copying a Document or Photo
 Loading...