


Daikin UATYQ20ABAY1, UATYQ25ABAY1, UATYQ30ABAY1, UATYQ45ABAY1, UATYQ50ABAY1 Operation manuals
...Models:
UATYQ20ABAY1
UATYQ25ABAY1
UATYQ30ABAY1
UATYQ45ABAY1
UATYQ50ABAY1
UATYQ55ABAY1
UATYQ65ABAY1
UATYQ75ABAY1
UATYQ90ABAY1
UATYQ110ABAY1
UATYQ115ABAY1
UATYQ20AFC2Y1
UATYQ25AFC2Y1
UATYQ30AFC2Y1
UATYQ45AFC2Y1
UATYQ50AFC2Y1
UATYQ55AFC2Y1
UATYQ65AFC2Y1
UATYQ75AFC2Y1
UATYQ90AFC2Y1
UATYQ110AFC2Y1
UATYQ115AFC2Y1
UATYQ20AFC3Y1
UATYQ25AFC3Y1
UATYQ30AFC3Y1
UATYQ45AFC3Y1
UATYQ50AFC3Y1
UATYQ55AFC3Y1
UATYQ65AFC3Y1
UATYQ75AFC3Y1
UATYQ90AFC3Y1
UATYQ110AFC3Y1
UATYQ115AFC3Y1
Operation manual
Rooftop Packaged Unit
Operation manual |
English |
|
Rooftop Packaged Unit |
||
|
||
|
|


Contents
1 |
User Interface |
4 |
|
2 |
Operating guide |
5 |
|
|
2.1 |
Software menu |
5 |
|
2.2 |
Main mask and menu |
6 |
|
2.3 |
Switching ON/OFF he unit from keyboard |
7 |
|
2.4 |
Temperature and air flow setpoint adjust |
7 |
|
2.5 |
Clock menu and time slots setting |
8 |
|
2.5.1 Time slots programming examples |
9 |
|
|
2.6 |
Stop washing function (forced freecooling at unit start-up) |
10 |
|
2.7 |
Summer/winter changeover from keyboard |
11 |
|
2.8 |
Input/output visualization |
12 |
|
2.9 |
Change language and unit and software data visualization |
14 |
|
2.10 |
Alarms |
15 |
We reserve the right to make changes without any prior notice. |
Original instructions |
|
|
||
UATYQ*Y1 |
Installation manual |
|
Packaged Rooftop |
3 |
|
4P522681-1A |
|

This operation manual is dedicated to the end user of the unit and it contains a brief description of all free access functions of the unit control.
1 USER INTERFACE
The user interface is a LCD display with 4 rows, 20 columns and automatic backlight; the display has 6 function keys, that are used to navigate the software menu and to set the parameters.
The key functions are described in the following.
This key, called “up arrow”  , allows to scroll up the masks and to modify the value of each mask field, increasing it.
This key, called “down arrow”  , allows to scroll up the masks and to modify the value of each mask field, decreasing it.
This key, called “Enter”  , confirms the selection done to access the menu branches and stores a parameter that has been modified.
This key, called “alarm”, allows to display active alarms and, in case, to reset them.
This key, called "prg"  , allows to enter the software menu.
This key, called "esc"  , allows to exit the displayed mask and to go back to the previous menu level.
Original instructions |
We reserve the right to make changes without any prior notice. |
Installation manual |
UATYQ*Y1 |
4 |
Packaged Rooftop |
4P522681-1A |
2 OPERATING GUIDE
The operating guide describes the main control functions.
2.1Software menu
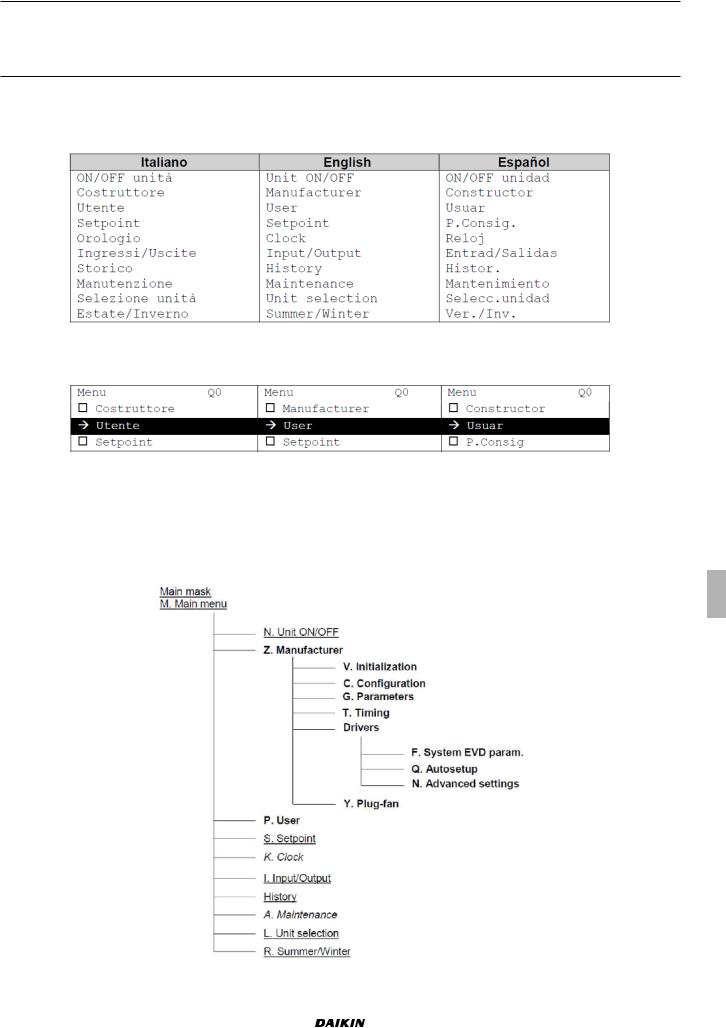
The software is organized with a menu that allows to access to different branches, each one containing one or more masks or screens, with different access levels: free, partially password-protected or completely password-protected.
Pressing the  key from any mask, the following menu loop is displayed:
With arrow keys 
 it is possible to scroll the menu; the selected one is highlighted and marked by an arrow on the left:
To enter the selected menu, press the "enter" key  .
.
This is the masks tree with all sub-menus:
•The ones reported in underlined letters are free access menu;
•the ones reported in "italic letters" are partially password-protected menu;
•the ones reported in bold letters are completely password-protected menu. The access to the password-protected menu is reserved to Service technicians.
We reserve the right to make changes without any prior notice. |
Original instructions |
UATYQ*Y1 |
Installation manual |
Packaged Rooftop |
5 |
4P522681-1A |

2.2Main mask and menu
Whentheunitispowered,themainmaskisdisplayedontheunitdisplay,showinginitsfirstrowtheindoortemperature setpoint on the left and the local address of the unit on the right, in bigger fonts the read indoor temperature and on the last row the unit status on the left and the current time on the right.
 to display the unit working mode, the time slots activation, the dehumidification activation (not available), the setpoint compensation activation (where enabled).
 to display if the unit is in defrost, in freecooling or in freeheating mode.
 to display the unit active compressors.
 to display if high pressure alarm prevention function in summer mode is active, if the supply temperature limit is active and if the antifreeze function is enabled and active.
 to display the delivery and return (if present) air fans working mode (manual or automatic).
 to display if the condensate tray electrical heater is active.
 to display if the washing function (forced freecooling at unit start-up) is active.
Original instructions |
We reserve the right to make changes without any prior notice. |
Installation manual |
UATYQ*Y1 |
6 |
Packaged Rooftop |
4P522681-1A |

 to display if the low pressure alarm prevention function in winter mode is active for circuits 1 and 2.
2.3Switching ON/OFF he unit from keyboard

 select "On/OFF unit" menu
  "Enter"
  "Enter"to switch ON/OFF the unit.
If time slots are active, the unit will start running only if it is programmed to be ON in that time slot.
If the unit ON/OFF switching from a supervisor system is enabled, the serial consent is necessary for the effective unit starting-up.
If the unit ON/OFF switching from digital input is enabled, the ON/OFF digital input must be closed for the effective unit starting-up.
If even only one of the previous starting-up systems does not give its consent, the unit will not start running.
2.4Temperature and air flow setpoint adjust

 select "Setpoint" menu
  "Enter" .
From S0 mask, the indoor temperature setpoint in summer mode (cooling) can be adjusted: press "enter" key  , adjust the setpoint value with arrow keys and press
  again to confirm the new value.
If time slots are active, the setpoint cannot be modified from this mask, but only from the specific mask of the Clock menu.
 from S1 mask, the indoor temperature setpoint in winter mode (heating) can be adjusted: press the key
  , adjust the setpoint value with arrow keys and press
  again to confirm the new value.
If time slots are active, the setpoint cannot be modified from this mask, but only from the specific mask of the Clock menu.
 from S5 mask, the delivery air flow can be adjusted: press the key
  , adjust the setpoint value with arrow keys and press
  again to confirm the new value.
The real air flow can be read from next mask S6.
We reserve the right to make changes without any prior notice. |
Original instructions |
UATYQ*Y1 |
Installation manual |
Packaged Rooftop |
7 |
4P522681-1A |

 from S7 mask, displayed only for unit with return fans, the return air flow can be adjusted: press
  key, adjust the setpoint value with arrow keys and press
  again to confirm the new value.
The real air flow can be read from next mask S8.
2.5Clock menu and time slots setting

 select "Clock" menu
  .
.
Current time and date can be set from this mask, while the day is automatically updated.
 to enable and set time slots, input the Clock menu password and press the key
  ; the factory Clock menu password is 0001.
 from this mask, the daily time slots can be enabled (second line) and switch off the unit outside the time slots
(fourth line).
 set start and end time of the daily time slot.
 set the summer (cooling) indoor temperature setpoint inside the time slot (internal set, third line) and outside the time slot (external set, fourth line).
 set the winter (heating) indoor temperature setpoint inside the time slot (internal set, third line) and outside the time slot (external set, fourth line).
Original instructions |
We reserve the right to make changes without any prior notice. |
Installation manual |
UATYQ*Y1 |
8 |
Packaged Rooftop |
4P522681-1A |
 Loading...