Clatronic DB 3512 User manual [ml]

|
|
|
|
|
|
Bedienungsanleitung/Garantie |
Gebruiksaanwijzing • Mode d’emploi |
|
Instrucciones de servicio • Istruzioni per l’uso |
|
Instruction Manual • Instrukcja obsługi/Gwarancja |
|
Használati utasítás • Інструкція з експлуатації |
|
Руководство по эксплуатации • |
Dampfbügelautomat
Stoomstrijkijzer • Fer à repasser à vapeur •Autómata de vapor
stiro a vapore •Automatic Steam Iron •Automatyczne żelazko parowe DB 3512 vasaló• Автоматична парова праска• Паровой утюг•

|
ENGLISH |
|
Contents |
|
|
Overview of the Components....................................... |
Page |
3 |
Instruction Manual......................................................... |
Page |
26 |
Technical Data............................................................... |
Page |
29 |
Disposal......................................................................... |
Page |
29 |
|
JĘZYK POLSKI |
|
Spis treści |
|
|
Przegląd elementów obłsugi...................................... |
Strona |
3 |
Instrukcja obsługi........................................................ |
Strona |
30 |
Dane techniczne......................................................... |
Strona |
33 |
Ogólne warunki gwarancji.......................................... |
Strona |
34 |
Usuwanie..................................................................... |
Strona |
34 |
|
MAGYARUL |
|
Tartalom |
|
|
Akezelőelemek áttekintése........................................... |
Oldal |
3 |
Használati utasítás......................................................... |
Oldal |
35 |
Műszaki adatok.............................................................. |
Oldal |
38 |
Hulladékkezelés............................................................. |
Oldal |
35 |
|
YKPAÏHCBKA |
|
Зміст |
|
|
Огляд елементів управління................................ |
сторінка |
3 |
Інструкція з експлуатації........................................ |
сторінка |
39 |
Технічні параметри................................................ |
сторінка |
43 |
|
РУССКИЙ |
|
Содержание |
|
|
Обзор деталей прибора................................................ |
стр. |
3 |
Руководство по эксплуатации...................................... |
стр. |
44 |
Технические данные..................................................... |
стр. |
48 |
تايوتحملا |
|
|
3 .................................................. |
تانوكلماىلعةماعةرظن |
|
52 ............................................................... |
تاميلعتلاليلد |
|
49 ................................................................ |
ةينفلاتانايبلا |
|
2

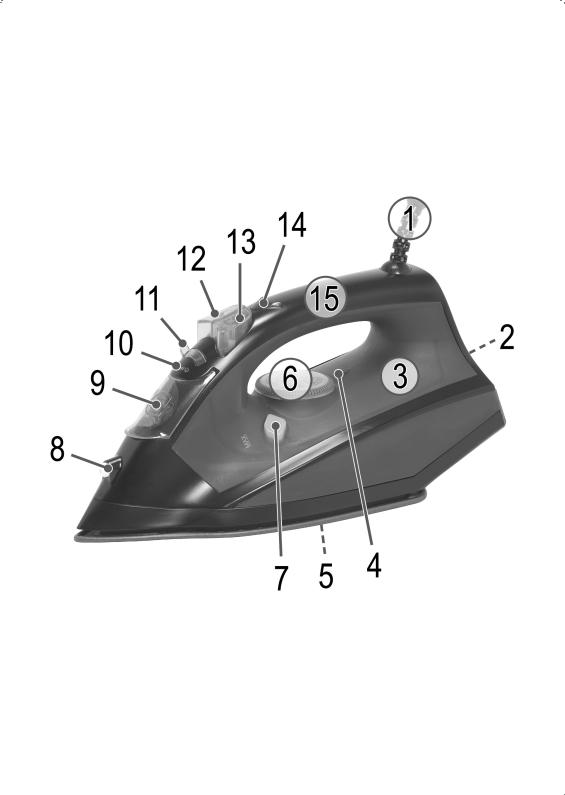
Übersicht der Bedienelemente
Overzicht van de bedieningselementen • Liste des différents éléments de commande Indicación de los elementos de manejo • Elementi di comando • Overview of the Components Przegląd elementów obsługi •Akezelőelemek áttekintése • Огляд елементів управління
Обзор деталей прибора •
3

Instruction Manual
Thank you for choosing our product. We hope you enjoy using the appliance.
Symbols in these Instructions for Use
Important information for your safety is specially marked. It is essential to comply with these instructions in order to avoid accidents and prevent damage to the machine:
 WARNING:
This warns you of dangers to your health and indicates possible injury risks.
CAUTION:
This refers to possible hazards to the machine or other objects.
 NOTE: This highlights tips and information.
General Notes
Read the operating instructions carefully before putting the appliance into operation and keep the instructions including the warranty, the receipt and, if possible, the box with the internal packing. If you give this device to other people, please also pass on the operating instructions.
•The appliance is designed exclusively for private use and for the envisaged purpose. This appliance is not fit for commercial use.
•Do not use the appliance outdoors. Keep it away from sources of heat, direct sunlight, humidity (never dip it into any liquid) and sharp edges. Do not use the appliance with wet hands. If the appliance is humid or wet, unplug it immediately.
•When cleaning or putting it away, switch off the appliance and always pull out the plug from the socket (pull the plug itself, not the lead) if the appliance is not being used and remove the attached accessories.
•Do not operate the machine without supervision. If you leave the room you should always turn the device off. Remove the plug from the socket.
•The device and the mains lead have to be checked regularly for signs of damage. If damage is found the device must not be used.
•Use only original spare parts.
•In order to ensure your children’s safety, please keep all packaging (plastic bags, boxes, polystyrene etc.) out of their reach.
 WARNING!
Caution! Do not allow small children to play with the foil as there is a danger of suffocation!
Special Safety Instructions for this Machine
 WARNING:
•The sole plate becomes hot quickly and requires a long time to cool down. Do not touch.
•When not in use, place the iron vertically on the stand.
•Choose a safe resting surface! The surface must be stable and level. Check the resting surface again for stability.
•The iron must be used and rested on a stable, heat-resistant surface. The surface should be level.
•Before filling the water tank, disconnect from the mains.
•The iron must not be left unsupervised while it is connected to the mains.
•The iron may not be used if it has been dropped, if there is visible damage or if it leaks.
26

 WARNING:
•Do not try to repair the appliance on your own.Always contact an authorized technician. To avoid the exposure to danger, always have a faulty cable be replaced only by the manufacturer, by our customer service or by a qualified person and with a cable of the same type.
•When turning on or cooling down, the iron and its cord must be out of reach of children who are younger than 8 years.
•This appliance can be used by children aged from 8 years and above and persons with reduced physical, sensory or mental capabilities or lack of experience and knowledge if they have been given supervision or instruction concerning use of the appliance in a safe way and understand the hazards involved.
•Children shall not play with the appliance.
•Cleaning and user maintenance shall not be made by children without supervision.
•The tank should only be filled up to the maximum mark. Do not overfill! Maximum water filling quantity: approx. 280 ml.
•Please use only distilled water.
Intended Use |
11 |
Steam volume regulator |
|
This device is used for ironing clothes and textiles. |
12 |
Steam jet button |
|
13 |
Spray button |
||
It is intended for household use. |
|||
14 |
Control lamp |
||
Any other use is regarded as not intended and may even result |
15 |
Handle |
|
in damage to property or personal injury. |
16 |
Measuring cup (not shown) |
|
Overview of the Components |
Instructions |
1 |
Flexible line cord entry |
Unpacking |
2 |
Stand |
• Remove any protective foils and stickers from the soleplate. |
3 |
Transparent water container |
• Please unwind the lead completely. |
4 |
Temperature control markings |
Electrical connection |
5 |
Stainless steel soleplate |
|
6 |
Continuously adjustable temperature regulator |
• Make sure that the iron voltage (see name plate) and the |
7 |
SELF-CLEAN button |
line voltage match. |
8 |
Spray nozzle |
• The mains plug should only be inserted into a correctly |
9 |
Filler opening for the water tank |
installed socket with earthing contact. |
10 |
Steam control markings |
|
27

Connected Wattage
The maximum power consumption of the appliance is 2500 W. With this connected load a separate supply line protected by a 16Ahousehold circuit breaker is recommended.
CAUTION: OVERLOAD!
•If you use extension leads, these should have a cable cross-section of at least 1.5 mm².
•Do not use any multiple sockets, as this device is too powerful.
Temperature Control on the Iron
The symbols on the control correspond to the following settings:
OFF |
off |
Nylon, rayon |
low temperature |
Wool, silk |
medium temperature |
Cotton, linen |
high temperature |
MAX |
maximum temperature |
Water Tank
1.Place the iron with the sole plate in an upright position on a heat resistant surface.
2.Fill the water reservoir at the refill opening. Use the supplied measuring cup.
3.The tank volume is ca. 280 ml. Fill the water tank to the max marking only.
4.Close the lid of the tank.
Water
Please use only distilled water.
Do not fill battery water, water from the clothes dryer and water containing additives (such as starch, perfume, softener or other chemicals) into the water reservoir.
This could damage the iron due to residues forming in the steam chamber. These residues may cause impurities to the fabric when dropping out of the holes in the soleplate.
Operation
Before Initial Use
•Clean the ironing base with a slightly damp cloth.
•In order to remove all residues before initial use, please pass the iron a few times over an old clean cloth.
Ironing without steam
NOTE:
1.Sort out the garments according to their ironing temperatures.
2.Always set the temperature control to “OFF” before connecting the appliance to a power point, or before disconnecting it. Please follow the temperature control markings.
NOTE:
3.Set the steam control to the “0” position, following the steam control markings.
4.Place the iron on its stand.
5.Only connect the machine to a properly installed safety socket.
6.Set the temperature on the temperature control. If you have sensitive items to iron, please begin with the lowest temperature.
NOTE:
The control lamp on the iron shows that it is heating up.As soon as the control lamp goes off the operating temperature has been reached. Now you can start ironing.
7.Always turn the temperature control to “OFF” after use and remove the mains plug (The control lamp goes off).
Steam Ironing
 WARNING:
The steam is hot. Danger of scalding!
NOTE:
•For this a high temperature is needed. Turn the temperature control at least to the “
 ” symbol.
•If the temperature is too low water may leak from the soleplate.
•Use the steam control to adjust the amount of steam. Follow the markings on the steam volume regulator.
•Steam escapes as soon as the iron is in a horizontal position.
•Extra steam can be added with the steam jet function .
.
•Press the steam jet button intermittently.
Spray Function ( )
)
In order to moisten a section of a garment to be ironed, press the spray button intermittently.
Vertical Steam function
This can be used to produce a jet of steam in a vertical direction.
 WARNING:
Never direct the steam jet at people. Risk of burning!
1.Hang your laundry on a clothes hanger and move the iron to approximately 3-5 cm away.
2.Set the temperature control to “MAX” position.
3.Press the steam jet button intermittently.
NOTE:
If the amount of steam emitted is too little, wait until the appliance heats up again.
28

Refilling the water tank
1.Always disconnect the mains plug before refilling water.
2.Set the steam control to the “0” position.
3.Place the iron with the sole plate in an upright position on a heat resistant surface.
4.Open the lid of the refill inlet and carefully pour in the water.
5.Do not exceed the maximum line as marked on the water reservoir.
6.Close the lid of the tank.
Self-Cleaning
1.Half fill the water tank with water.
2.Heat the machine up to its maximum temperature.After the control lamp goes off remove the machine from the mains supply.
3.Now hold the iron horizontally over a sink. Press and hold the SELF-CLEAN button. Now rock the device backwards and forwards until the tank is empty.
4.Place the machine back on its stand and heat it up again. To clean the base now iron over a clean cotton cloth.
When you have finished
•Always turn the temperature control to “OFF” after use and remove the mains plug (The control lamp goes off).
•Empty the water tank in order to prevent the contents of the tank leaking.
•Allow the device to cool down before you put it away.
Cleaning
 WARNING:
•Always remove the mains lead before cleaning!
•Wait until the machine has cooled down completely!
•Under no circumstances should you immerse the device in water for cleaning purposes. Otherwise this might result in an electric shock or fire.
CAUTION:
•Do not use a wire brush or any abrasive items.
•Do not use any acidic or abrasive detergents.
•Clean the casing with a slightly damp cloth.
•Clean the sole plate and the rest with a slightly damp cloth.
|
Technical Data |
Model:............................................................................... |
DB 3512 |
Power supply:............................................ |
220 -240 V~, 50/60 Hz |
Power consumption: |
2500 W |
Protection class: |
I |
Net weight:........................................................... |
approx. 1.04 kg |
The right to make technical and design modifications in the course of continuous product development remains reserved.
This device has been tested according to all relevant current CE guidelines, such as electromagnetic compatibility and low voltage directives, and has been constructed in accordance with the latest safety regulations.
Disposal
Meaning of the “Dustbin” Symbol
Protect our environment: do not dispose of electrical equipment in the domestic waste.
Please return any electrical equipment that you will no longer use to the collection points provided for their disposal.
This helps avoid the potential effects of incorrect disposal on the environment and human health.
This will contribute to the recycling and other forms of reutilisation of electrical and electronic equipment.
Information concerning where the equipment can be disposed of can be obtained from your local authority.
29

Instrukcje obsługi
Dziękujemy za wybór naszego produktu. Mamy nadzieję, że użytkowanie urządzenia przyniesie Państwu satysfakcje.
Symbole użyte w tej instrukcji obsługi
Ważne informacje dotyczące bezpieczeństwa użytkownika są specjalnie wyróżnione. Koniecznie stosuj się do tych wskazówek, aby uniknąć wypadków i uszkodzenia urządzenia.
 OSTRZEŻENIE:
Ostrzega przed zagrożeniami dla zdrowia i wskazuje na potencjalne ryzyka obrażeń.
UWAGA:
Wskazuje na potencjalne zagrożenia dla urządzenia lub innych przedmiotów.
WSKAZÓWKA:
Wyróżnia porady i informacje ważne dla użytkownika.
Uwagi ogólne
Przed uruchomieniem urządzenia proszę bardzo dokładnie przeczytać instrukcję obsługi. Proszę zachować ją wraz z kartą gwarancyjną, paragonem i w miarę możliwości również kartonem z opakowaniem wewnętrznym. Przekazując urządzenie innej osobie, oddaj jej także instrukcję obsługi.
•Proszę wykorzystywać urządzenie jedynie dla prywatnego celu, jaki został przewidziany dla urządzenia. Urządzenie to nie zostało przewidziane do użytku w ramach działalności gospodarczej.
•Nie korzystać z urządzenia na zewnątrz. Proszę trzymać urządzenie z daleka od ciepła, bezpośredniego promieniowania słonecznego, wilgoci (w żadnym wypadku nie zanurzać w substancjach płynnych) oraz ostrych krawędzi. Proszę nie obsługiwać urządzenia wilgotnymi dłońmi. Jeżeli urządzenie jest wilgotne lub mokre, proszę natychmiast wyciągnąć wtyczkę (należy ciągnąć za wtyczkę, nie za przewód).
•Jeżeli nie korzystacie Państwo z urządzenia, jeżeli chcecie Państwo zamontować jakieś akcesoria, w celu wyczyszczenia lub w przypadku jakichkolwiek zakłóceń, proszę zawsze wyłączyć urządzenie i wyjąć wtyczkę z gniazdka.
•Pracującego urządzenia nie należy pozostawiać bez nadzoru. Przed opuszczeniem pomieszczenia urządzenie należy zawsze wyłączać i wyciągać wtyczkę sieciową z gniazda.
•Należy regularnie sprawdzać, czy urządzenie i kabel sieciowy nie są uszkodzone. W razie uszkodzenia należy przestać korzystać z urządzenia.
•Proszę stosować tylko oryginalne akcesoria.
•Dla bezpieczeństwa dzieci proszę nie zostawiać swobodnie dostępnych części opakowania (torby plastikowe, kartony, styropian itp.).
 OSTRZEŻENIE!
Nie pozwalaj dzieciom bawić się folią. Niebezpieczeństwo uduszenia!
Specjalne wskazówki związane z bezpieczną obsługą tego urządzenia
 OSTRZEŻENIE:
•Stopa żelazka szybko się nagrzewa i wymaga wiele czasu, aby ostygnąć. Nie dotykać.
•Kiedy nie korzystamy z żelazka należy ustawić je pionowo na podstawie.
•Wybrać bezpieczną powierzchnię do spoczynku! Powierzchnia musi być pozioma i stabilna. Sprawdzić powierzchnie do spoczynku ponownie pod kątem stabilności.
30

 OSTRZEŻENIE:
•Żelazko musi być używane oraz odstawione na stabilnej powierzchni. Powierzchnia powinna być równa.
•Przed napełnieniem zbiornika z wodą, odłączyć od sieci.
•Żelazka nie wolno pozostawiać bez nadzoru, kiedy jest podłączone do sieci.
•Nie wolno korzystać z żelazka, kiedy spadło, kiedy są widoczne uszkodzenia lub jeśli przecieka.
•W razie awarii proszę nie naprawiać urządzenia samemu lecz skorzystać z pomocy autoryzowanego specjalisty. Jeżeli przewód zasilający nieodłączalny ulegnie uszkodzeniu, to powinien on być wymieniony u producenta lub w specjalnym zakładzie naprawczym albo przez wykwalifikowaną osobę w celu uniknięcia zagrożenia.
•Kiedy żelazko jest włączone lub kiedy stygnie, należy trzymać przewód poza zasięgiem dzieci poniżej 8 roku życia.
•Urządzenie może być użytkowane przez dzieci od 8 roku życia i
osoby z ograniczonymi zdolnościami fizycznymi, czuciowymi lub  mentalnymi oraz bez doświadczenia i wiedzy w zakresie użytkowa-
  nia, pod warunkiem, że znajdują się one pod nadzorem lub zosta-
  ły poinstruowane odnośnie użytkowania urządzenia w bezpieczny sposób i rozumieją związane z tym ryzyko.
•Dzieciom nie wolno bawić się urządzeniem.
•Dzieci nie mogą czyścić ani dokonywać konserwacji dopuszczalnej dla użytkownika bez nadzoru.
•Napełnij zbiornik tylko do kreski maksimum. Nie wlewaj za dużo! Maksymalna ilość wlewanej wody: ok. 280 ml.
•Używaj tylko destylowanej wody.
31

Przeznaczenie
Urządzenie przeznaczone jest do prasowania ubrań i tekstyliów.
Przeznaczone jest wyłącznie do użytku domowego.
Inne użycie jest uważane za niezgodne z przeznaczeniem i może prowadzić do uszkodzeń mienia lub nawet obrażeń ciała.
Przegląd elementów obłsugi
1Elastyczne doprowadzenie kabla sieciowego
2Podstawa
3 |
Przezroczysty zbiorniczek na wodę |
4 |
Oznaczenia kontrolki temperatury |
5 |
Stopa ze stali nierdzewnej |
6 |
Bezstopniowy regulator temperatury |
7 |
Przycisk SELF-CLEAN |
8 |
Rozpylacz |
9 |
Otwór wlewczy do zbiornika wody |
10Oznaczenia kontrolki pary
11Regulator ilości pary
12Przycisk wyrzutu pary
13Przycisk rozpylacza
14Lampka kontrolna
15Uchwyt
16Kubek z miarką (brak rysunku)
Instrukcja użycia
Rozpakowywanie
•Zdejmij ze stopy żelazka folie zabezpieczające i naklejki (jeżeli są).
•Odwiń całą długość kabla.
Połączenie elektryczne
•Proszę upewnić się, że napięcie urządzenia (patrz tabliczka identyfikacyjna) zgadza się z napięciem w sieci.
•Wtyczkę sieciową podłączaj tylko do prawidłowo zainstalowanego gniazda z zestykiem ochronnym.
Moc przyłączeniowa
Maksymalne zużycie mocy urządzenia wynosi 2500 W. W związku z tym wskazane jest podłączenie osobnym przewodem i zabez-pieczenie obwodu bezpiecznikiem domowym 16A.
UWAGA: PRZECIĄŻENIE!
•Używane przedłużacze powinny mieć przewody o przekroju nie mniejszym niż 1,5 mm².
•Nie używaj rozgałęziaczy ze względu na dużą moc urządzenia.
Regulator temperatury na żelazku
Symbole na regulatorze odpowiadają następującym ustawieniom:
OFF |
wył. |
Nylon, Rayon |
niska temperatura |
wełna, jedwab |
średnia temperatura |
bawełna, len |
wysoka temperatura |
MAX |
najwyższa temperatura |
Zbiornik wody
1.Umieścić żelazko na podstawie w pozycji stojącej na powierzchni żaroodpornej.
2.Wlać przez otwór wodę do zbiornika. Użyć dostarczonego kubka z miarką.
3.Zbiornik mieści ok. 280 ml wody. Napełnić zbiornik wody tylko do poziomu MAX.
4.Zamknij pokrywkę zbiornika.
Woda
Używaj tylko destylowanej wody.
Do zbiornika wody nie wolno wlewać wody z baterii, z suszarki do bielizny lub wody z dodatkami (takimi jak krochmal, perfumy, płyny do zmiękczania bielizny lub inne środki chemiczne).
Można przez to doprowadzić do uszkodzenia żelazka z powodu tworzenia się osadów w pojemnikach pary. Resztkowe osady mogą podczas wypływu pary przez dyszę parową doprowadzić do zanieczyszczenia prasowanej bielizny.
Obsługa
Przed pierwszym użyciem
•Stopę prasującą proszę czyścić lekko wilgotną ściereczką.
•W celu usunięcia wszelkich pozostałości przed pierwszym użyciem proszę przeprasować kilka razy starą czystą ściereczkę.
Prasowanie bez pary
WSKAZÓWKA:
1.Proszę posegregować elementy odzieży według temperatury prasowania.
2.Przed podłączeniem urządzenia do gniazdka lub wyłączeniem go z sieci regulator temperatury proszę zawsze ustawiać na „OFF“. Prosimy uwzględniać oznaczenia kontrolki temperatury.
3.Ustawić kontrolkę pary w pozycji „0”, korzystając z oznaczeń kontrolki pary.
4.Proszę ustawić żelazko na podstawie.
5.Urządzenie wolno podłączyć tylko do przepisowo zainstalowanego sprawnego, gniazda wtyczkowego posiadającego kołek ochronny.
6.Ustaw temperaturę regulatorem. Jeżeli będzie prasowana delikatna bielizna, zacznij od najniższej temperatury.
32
 Loading...