


BOSCH PKT345EGB, PCD685, PCD655FDE, NHT645S, PHG106FEU User Manual
...EN Operating instructions
FR Mode d’emploi
ES Instrucciones de funcionamiento
Robert Bosch Hausgeraete GmbH
5551 McFadden Avenue, Huntington Beach, CA 92649
800/944-2904 • BSH Home Appliance Corp.
2002 Litho in U.S.A.
Cod9000057398. A
Internet:: http://www.bosch-hausgeraete.de
Downloaded from www.Manualslib.com manuals search engine
Downloaded from www.Manualslib.com manuals search engine
Dear Customer,
We thank and congratulate you on your choice.
This practical, modern and functional appliance has been built with top quality materials. These materials have been subjected to thorough quality control in the manufacturing process, and meticulously tested in order for this appliance to meet your every need, achieving perfect cooking.
Therefore, we ask you to read and follow these simple instructions in order to guarantee unbeatable results from the first use. This manual contains important information, not only for use of the appliance, but safety and maintenance as well.
During transport, our products are protected by efficient packaging materials. However, we have reduced our packaging to the bare essentials. The materials are all completely recyclable. Just like us, you can help protect the environment. To do so, we recommend you dispose of these materials in the recycling facility nearest you. Waste oil should not be poured down the sink drain, as this has a negative impact on the environment. Place it in a closed container and dispose of it at a collection point. If this is not possible, dispose of it with standard domestic waste (as it will be taken to a controlled landfill, and though this is not the best solution, at least water pollution will be avoided). Present and future generations will appreciate it.
Before you get rid of an old appliance, make sure you render it inoperable. Next, deliver it to a recyclable material collection facility. Your local government can provide you with the necessary information on the nearest collection facility.
1
Downloaded from www.Manualslib.com manuals search engine

FOR YOUR SAFETY |
3 |
|
|
Important information for installation and usage |
4 |
|
|
Important instructions |
6 |
For your safety |
6 |
Before set-up |
9 |
For appliance usage |
9 |
|
|
This is what your new cooktop looks like |
10 |
|
|
Gas burners |
11 |
Cooking tips |
12 |
Appropriate cooking utensils |
12 |
|
|
Cooktop usage warnings |
13 |
|
|
Steel: cleaning and care |
14 |
|
|
Home troubleshooting |
15 |
|
|
Installation instructions |
16 |
Installing the cooktop on the kitchen unit: |
|
Fitting measurements |
16 |
Electrical connection |
18 |
Change of gas type: from natural gas to propane |
19 |
Convert the pressure regulator: from 6” W.C. to 10” W.C. |
20 |
Warranty conditions |
21 |
|
|
2
Downloaded from www.Manualslib.com manuals search engine

 For your safety
WARNING: If the information in this manual is not followed exactly, a fire or explosion may result causing property damage, personal injury or death.
Do not store or use gasoline or other
flammable vapors and liquids in the vicinity of this or any other appliance.
WHAT TO DO IF YOU SMELL GAS
 Do not try to light any appliance.
 Do not touch any electrical switch.
 Do not use any phone in your building.
 Immediately call your gas supplier from a neighbor's phone. Follow the gas supplier's instructions.
 If you cannot reach your gas supplier, call the fire department.
Installation and service must be performed by a qualified installer, service agency or the gas supplier.
PLEASE READ THE INSTRUCTIONS BEFORE CONTINUING
IMPORTANT: Keep these instructions for the local electrical inspector to use. INSTALLER: Leave these instructions next to the unit for the owner. OWNER: Keep these instructions for future use.
3
Downloaded from www.Manualslib.com manuals search engine

 Important information for installation and usage
1 - For safety reasons, do not allow the flames to extend beyond the edge of the cooking appliance.
2 - Remember that the appliance heats up when in use. Remember to use common sense.The absence of a flame does not mean that the appliance parts are no longer hot.
3 - For safety reasons, this appliance should not be used for room heating purposes.
4 - Make sure the power supply is disconnected before dismantling the appliance.
5 - Do not storecombustible materials, such as gasoline, other vapors and inflammable liquids near the appliance.
6 - Do not block the combustion or ventilation air flow.
•If a burner goes out and gas escapes, open windows and doors. Wait until gas dissipates before using the appliance.
•If you smell gas, your installer has not done a proper job of checking for leaks. If the connections are not perfectly light, you can
have a small leak and, therefore, a faint smell. Finding a gas leak is not a "do-it-yourself" procedure. Some leaks can only be found with the burner control in the ON position and this must be done by a qualified service technician. See Warning, page. 3.
7 - Maintain a minimum distance of 762 mm (30") between the gas cooktop and cabinets installed in the upper part.
8 - The gas pressure regulator supplied with the appliance must be installed in the gas piping line.
9 - The appliance and its individual shutoff valve must be disconnected from the gas supply piping system during any pressure testing of the system at test pressures in excess of 3.5 kPa (1/2 psig).The appliance must be isolated from the gas supply piping system by closing its individual manual shutoff valve during any pressure testing of the gas supply piping system at test pressures equal to or less than 3.5 kPa (1/2 psig).
10 - Important:When using an especially large pan, leave a minimum space of 50 mm (2") to prevent damage to countertops of
wooden, plastic or other non-heat resistant materials. Never leave hot oil or grease unattended.
11 - Make the caution about leaving oil or grease unattended.
•Always turn hood ON when cooking at high heat or when flambeing food (i.e. Crepes Suzette, Cherries Jubilee, Peppercorn Beef Flambe').
•Use high heat settings on the cooktop only when necessary. To avoid bubbling and splattering, heat oil slowly on no more than a low-medium setting. Hot oil is capable of causing extreme burns and injury.
•Never move a pan of hot oil, especially a deep fat fryer. Wait until it is cool.
4
Downloaded from www.Manualslib.com manuals search engine

12- Do not clean the appliance while it is still hot. Some cleaners produce noxious fumes when applied to a hot surface. Wet clothes or sponges can cause burns from steam.
After a spill or boilover, turn off the burner and allow the cooktop to cool. Clean around the burner and burner ports. After cleaning, check for proper operation.
Use Proper Pan Size. The use of undersized cookware will expose a portion of the heating element or burner to direct contact and may result in ignition of clothing. Select cookware having flat bottoms large enough to cover the surface unit. This appliance is equipped with one or more surface units of different size. Proper relationship or cookware to heating element or burner will also improve efficiency.
13-To avoid compromising the electrical safety of the appliance, use of high-pressure steam jet cleaning apparatus is forbidden.
The name plate is affixed to the underside of the appliance.
WARNING: NEVER use this appliance as a space heater to heat or warm the
room. Doing so may result in carbon monoxide poisoning and overheating of the oven.
This appliance has been tested in accordance with ANSI/CSA Z21.1 Standard for household Cooking Appliances (USA) and CAN 1.1-M81 (Canada)
For US installations only:
This installation must comply with local codes, or if none exists, the National Fuel Gas Code,ANSI Z 223.1/NFPA 54, current edition.
If an external electrical source is used, the appliance must be electrically grounded in
compliance with local codes, or if none exists, the National Electrical Code
ANSI/NFPA 70, current edition.
For Massachusetts installations:
1.Installation must be performed by a qualified or licensed by the state, province or region where this appliance is being installed.
2.Shut-off valve must be a "T" handle gas cock.
3. Flexible gas connector must not be longer than 36 inches.
For Canada installations only:
The installation must comply with CAN 1- B149.1 and .2- Installation Codes for Gas Burning Appliances and or local codes.
When installed, the appliance must be electrically grounded in compliance with local legislation, or if none exists, in compliance with CSA Standard C22.1-Canadian Electrical Code, Part I (current).
5
Downloaded from www.Manualslib.com manuals search engine

 Important instructions
For your safety |
|
• It is prohibited to leave children alone or |
||||
|
without adult supervision in an area where |
|||||
Carefully read this Operation and Maintenance |
||||||
appliances are in use |
. It is prohibited for anyone |
|||||
Manual before using your new cooktop. |
to sit or stand on any part of the appliance. |
|||||
As its user, you are responsible for the proper |
||||||
When children become old enough to operate |
||||||
maintenance and use of this appliance in your |
the appliance, it is the legal responsibility of the |
|||||
home. |
|
parents or legal guardians to ensure that they |
||||
|
|
|
are instructed in safe practices by qualified |
|||
|
WARNING: These precau- |
|||||
|
persons. |
|
|
|||
|
tions will reduce the risk |
• Do not allow children to use this appliance |
||||
|
of burns, electrocution, |
unless closely supervised by an adult. Children |
||||
|
and pets should not be left alone or unattended |
|||||
|
fire and personal injury. |
in the area where the appliance is in use. They |
||||
|
Proceed with maximum |
should never be allowed to play in its vicinity, |
||||
|
whether or not the appliance is in use. |
|||||
|
care when using this |
• Do not place objects that may attract |
||||
|
cooktop, as this |
|
children's interest on or behind the cooktop. |
|||
|
|
If children climb up the appliance to retrieve |
||||
|
appliance generates |
|||||
|
such objects, they could be seriously injured. |
|||||
|
intense heat and can |
• Do not use aluminium foil or protective liners |
||||
|
increase the risk of |
to line any part of an appliance, especially sur- |
||||
|
accidents. |
|
face unit drip bowls or oven bottom. Installation |
|||
|
|
of these liners may result in a risk of electric |
||||
When using cooking appliances, the following |
shock or fire. |
|
|
|||
• Do not allow aluminum foil, plastic, paper or |
||||||
basic safety precautions must be observed: |
||||||
cloth to come in contact with a hot burner or |
||||||
|
• Ensure proper installation and service. |
|||||
|
grate. Do not allow pans to boil dry. |
|||||
Follow the installation instructions provided with |
• Do not use any part of the cooktop to |
|||||
this product. Only a qualified technician can perform |
||||||
store objects. |
Inflammable materials can ignite |
|||||
the installation and grounding of the cooktop. |
||||||
and plastic objects can melt or catch fire. |
||||||
Do not use the appliance if damaged. |
||||||
• Extinguish flames with a properly fitted lid, |
||||||
|
• Have the installer show you where the gas |
|||||
|
baking sheet or other metal tray. Next, attempt to |
|||||
shut-off valve is located, |
to know how and wshutereoff the gas burner. |
Use caution and avoid |
||||
to shut off the gas mains to the cooktop. |
burns. If flames are not extinguished immediately, |
|||||
• To prevent carbon monoxide build-up, do not block appliance air vents.
evacuate the premises and notify the fire department.
• When connecting electrical appliances
• Do not repair or replace any part of the the cooktop, make sure that the cables do
appliance unless it is specifically recommended
not touch any cooking surface that remains hot.
in this manual. All remaining service must be performed by a qualified technician.
6
Downloaded from www.Manualslib.com manuals search engine

WARNING-TO REDUCE THE RISK OF A
GREASE FIRE:
a) Never leave surface units unattended at high settings. Boilovers cause smoking and greasy spillovers that may ignite. Heat oils slowly on low or medium settings.
b) Alway turn hood ON when cooking at high heat or when flambeing food (i.e. Crepes Suzette, Cherries Jubilee, Peppercorn Beef Flame).
c)Clean ventilating fans frequently. Grease should not be allowed to accumulate on fan or filter.
d)Use proper pan size. Always use cookware appropriate for the size of the surface element.
Smother flames from food fires other than grease fires with baking soda. Never use water on cooking fires.
Have an appropriate fire extinguisher avai -
lable, nearby, highly visible and easily accessible near oven.
WARNING-TO REDUCE THE RISK OF INJURY TO PERSONS IN THE EVENT OF A GREASE FIRE, OBSERVE THE FOLLOWING:
a) SMOTHER FLAMES with a close-fitting lid, cookie sheet, or metal tray, then turn off the burner.
BE CAREFUL TO PREVENT BURNS. If the flames do not go out immediately.
EVACUATE AND CALL THE FIRE DEPARTMENT. b) NEVER PICK UP A FLAMING PANYou may be burned.
c)DO NOT USE WATER, including wet dishcloths or towels - a violent steam explosion will result.
d)Use an extinguisher ONLY if:
1)You know you have a Class ABC extinguisher, and you already know how to operate it.
2)The fire is small and contained in the area where it started.
3)The fire department is being called.
4)You can fight the fire with your back to an exit. that personal clothing catches fire, drop and roll
•Never allow clothing, baking mitts or other
inflammable materials to come into contact with a burner or the grate of this appliance, or to remain close to these objects , until they have cooled. The fabric can ignite and cause personal injury.
• Use only dry oven mitts. Wet or damp oven mitts can cause steam burns when applied to hot surfaces. Do not use towels or other voluminous linen products as oven mitts. Do not allow oven mitts to touch the hot grates of the burners.
• For your personal safety, wear the proper clothing. Do not wear loose garments, or any with drooping sleeves while using this appliance. Some synthetic fabrics may easily catch fire and should not be worn while cooking. In the event that personal clothing catches fire, drop and roll immediately to smother the flames.
• This appliance has been designed for the cooking of food . For safety reasons, never use the cooktop to heat a room.
• This appliance is intended for normal family household use only. It is not approved for outdoor use. See the Warranty. If you have any questions, contact the manufacturer.
• When using the cooktop: |
DO NOT TOUCH |
THE BURNER GRATES OR THE IMMEDIATE SURROUNDING AREA. They heat up enough to cause burns.
• WARNING: To prevent flare-ups all grates must be properly positioned on the cooktop whenever the cooktop is in use. Each of the feet must be placed into the corresponding dimples in the cooktop. Do not use a grate if damaged.
•Never leave the cooktop unattended.
Spillovers will cause smoke and grease spills that can ignite.
•Do not heat food containers without opening them. An accumulation of pressure can trigger the explosion of the container.
•Do not heat or warm unopened food containers. Build-up of pressure may cause the containers to burst and cause injury.
•While cooking, adjust the burner control so that the hot flame only touches the bottom
of the pot or pan. Do not allow the flame to extend beyond it.
•Use caution so that the currents triggered by
the forced ventilation openings or fans do not blow the inflammable material toward the flames, or push them so that they extend beyond the edges of the pot or pan.
7
Downloaded from www.Manualslib.com manuals search engine

• Always use cooking utensils with flat |
• Only authorized technicians can carry out |
|||
bottoms big enough to cover the burner. If |
the necessary service. |
Technicians must |
||
smaller utensils are used, part of the flame can |
disconnect the electrical power supply before |
|||
remain exposed and set clothing on fire. |
|
carrying out maintenance operations on this unit. |
||
• To reduce the risk of burns, ignition of |
• Never modify or alter the construction of |
|||
inflammable materials and unintentional spills, |
the appliance. For example, do not remove leve- |
|||
point the handles of the utensils inward, so |
||||
ling legs, panels, wire covers or anti-tip |
||||
that they do not hang over adjacent working areas, |
||||
brackets/screws. |
|
|||
cooking areas or the edge of the cooktop. |
• Install a smoke detector |
in or around the |
||
• To eliminate the risk of burns or fire by rea- |
||||
kitchen. |
|
|||
ching over heated surface units, cabinet storage |
• Install a gas shutoff valve near the appliance. |
|||
space located above the surface units should be |
||||
avoided. If cabinet storage is to be provided, the |
It must be easily accessible in an emergency. |
|||
risk can be reduced by installing a hood that pro- |
• The warranty for this appliance does not |
|||
jects horizontally a minimum of 5 inches beyond |
||||
cover damages caused by non-adherence to |
||||
the bottom of the cabinet. |
|
|||
|
these instructions or by any non-authorized |
|||
|
|
|||
• When stirring or turning food, |
hold the modifications. |
|
||
handle of the pot or pan firmly, to prevent it from |
|
|
||
moving. |
|
• California, Proposition 65, Danger: The burning |
||
• GREASE IS INFLAMMABLE. |
Let hot grease |
|
||
cool before handling it. Prevent the formation of |
of gas cooking fuel generates some by-products, |
|||
which are on the list of substances which are |
||||
grease build-up. Clean the cooktop following |
||||
known by the State of California to cause cancer or |
||||
every use. |
|
|||
|
reproductive harm. California law requires busi- |
|||
• In order for the burners to ignite and operate |
||||
nesses to warn customers of potential exposure |
||||
properly, keep the burner ports clean. |
|
|||
|
to such substances. To minimize exposure to the- |
|||
The burner ports must be cleaned follow |
ing a |
|||
se substances, always operate this unit accor- |
||||
a spill or when the burner does not ignite, even |
||||
ding to the instructions contained in this booklet |
||||
if the electrical lighters click. |
|
|||
|
and provide good ventilation to the room when |
|||
Consult the care and maintenance section. |
||||
cooking with gas. |
|
|||
• Never pick up a burning pot, as this could |
|
|||
• During maintenance procedures, remove |
||||
cause burns. |
|
|||
• Clean the cooktop with care.Avoid steam |
power and the plug from the outlet and shut |
|||
off the gas supply. |
|
|||
burn risks: do not use a sponge or damp cloth |
|
|||
In order to guarantee the electrical safety of the |
||||
to clean the cooktop while hot. Some cleaning |
||||
appliance, only authorized technicians can perform |
||||
products produce harmful vapors if applied to a |
||||
the necessary repairs. |
|
|||
hot surface. Follow the instructions provided by |
|
|||
|
|
|||
the cleaning product manufacturer. |
|
|
|
|
• Ensure that all the cooktop control |
The right to make technical modifications is |
|||
knobs are set to off and that the cooktop is |
reserved. |
|
||
cool before using any aerosol cleaning product on or around the cooktop. In the presence of heat, the chemical products that produce the spraying action can ignite or trigger corrosion of the metal pieces.
• Hidden surfaces may have sharp edges. Use caution when reaching behind or under appliance.
8
Downloaded from www.Manualslib.com manuals search engine
Before the first start-up
Remove the packaging from the appliance and dispose of it as per local laws. Remember that there are other accessories in addition to packaging materials. Keep packaging materials and plastic bags out of the reach of children.
Check the condition of the appliance before installing it, to ensure that it has suffered no damage during transport.
Only authorized technical personnel must install and connect the appliance before
its first start-up in compliance with the regulations of the gas supplier companies and local.
Turn the control dials to  before connecting the appliance to the current supply.
The appliance's serial number is indicated on the control slip annexed to this manual. For warranty purposes, keep this note together with the usage and assembly instructions.
Carefully read the assembly and usage instructions before starting up the appliance.
Thoroughly clean the appliance and accessories when using them for the first time. This will eliminate any "new" scents and any remaining dirtiness (see cleaning and care chapter).
For appliance usage
The use of this gas burning appliance produces a formation of heat and humidity in the area of use. Make sure that the area has proper ventilation conditions.
Keep the ventilation channels open. Prolonged use of the appliance with several or all cooking units may require additional ventilation, such as opening a window or a door or more intensive extraction of air with an extraction hood.
To guarantee good combustion, the room in which the appliance is installed must have a minimum volume of 1240 cft (35 m3) and must possess a door that opens outdoors or a window that can opened.
The use of spit-roasters, pans or grilling stones simultaneously by more than one burner is prohibited, as the accumulation of heat could damage the appliance.
If large pots are used, a minimum separation of approximately 50 mm (2") should be kept between the pot and peripheral inflammable materials. A minimum separation of some 50 mm (2") should be kept between the control dial or control panel and the pot or pan. The cooking pot must not touch
the control panel.
If pots or pans are removed temporarily, set the stovetop to the minimum setting. This will reduce the risk of suffering burns while working near open flames; in addition to saving gas, thus favoring the environment.
If there is a fault in the current supply, do not use the appliance.
If the appliance does not work properly, contact the technical service.
BURNER |
Ø MINIMUM PAN SIZE |
|
Ø MAXIMUM PAN SIZE |
|||
Large triple-flame burner (Center) |
9” |
|||||
Rapid burner (Left front) |
|
|
9” |
|
10” |
|
(Right front) |
|
|
|
|
|
|
Semi-rapid (Right rear) |
|
|
6” |
|
|
8” |
Auxiliary (Left front) |
|
|
5” |
|
6” |
|
|
|
|
|
|
|
|
|
|
|
|
|
9 |
|
Downloaded from www.Manualslib.com manuals search engine
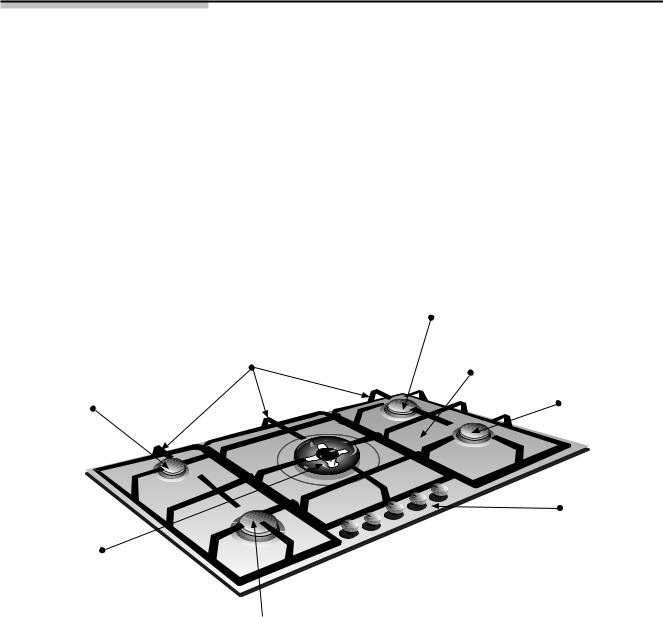
This is what your new Cooktop looks like
|
Burner |
|
7,000 Btu/hr |
|
Grates |
|
Grease splash tray |
Burner |
Burner |
5,500 Btu/hr |
7,000 Btu/hr |
Control knobs
Large triple-flame burner
for up to
15,300 Btu/hr  Burner
10,000 Btu/hr
10
Downloaded from www.Manualslib.com manuals search engine
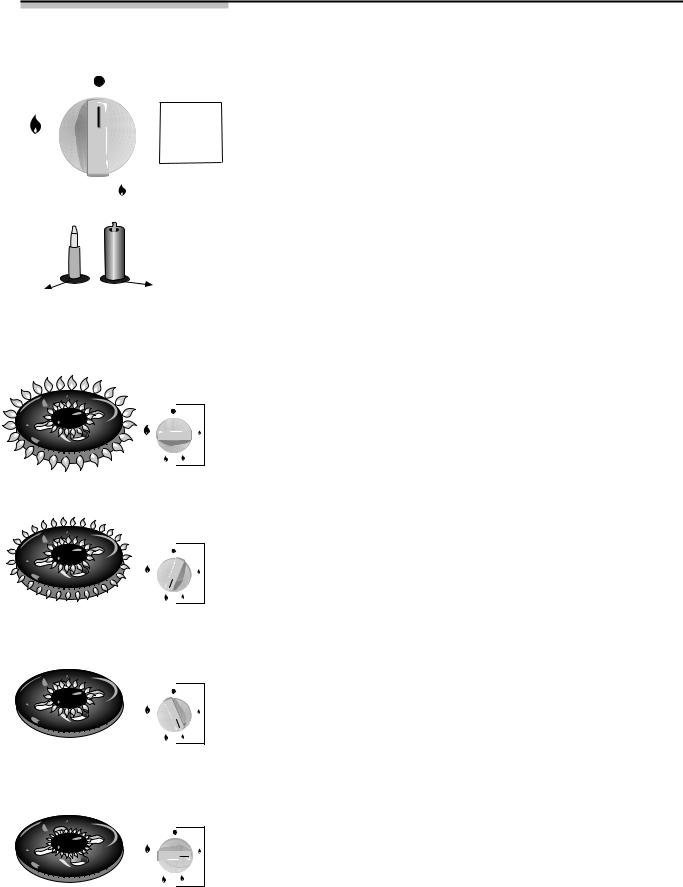
The gas burners
Figure1
 : Off
: Off
 : Hi
: Hi
 : Low
: Low
Figure 2
Thermocouple |
Ignitor |
|
Figure 3
Both rings (inner and outer) burn at full power.
The outer ring burns at
minimum power, the inner ring burns at full power.
The inner ring burns
at full power, the outer ring
is turned off.
The inner ring burns
at minimum power, the outer ring is turned off.
There are indications to show which burner each control knob operates. Fig. 1.
To light a burner, press the chosen control knob and turn it toward the left, holding it in the maximum setting for a few seconds until the burner is lit, then release it, and adjust to the desired setting. If it does not light, repeat the procedure.
CAUTION - All igniters spark when any single burner is turned ON. Do not touch any of the burners when the cooktop is in use.
If the ignitor are dirty, this makes the burner harder
to light. Therefore, keep them as clean as possible. This cleaning should be performed with a small brush, considering
that the ignitor can not withstand any sharp blows. If your cooktop is not fitted with this automatic lighting
feature, use a lighter or a match to light the burner.
Your cooktop may be equipped with safety thermocouples
to prevent gas flow if the burners are accidentally extinguished. Figure 2.
To turn on and activate this innovative system, proceed in the same way, but keeping the control knob pressed down until ignition takes place, the flame appears and does not extinguish.
If ignition does not take place, repeat the procedure, keeping the control knob pressed down 1-5 seconds.
To turn it off, turn the control knob to the right to the correct position  . When carrying out this procedure, the ignition system may activate again. This is completely normal.
Your modern, functional cooktop has progressive gas valves that make it possible to adjust to the necessary setting between the maximum and minimum flames.
Triple flame burners and large triple flame burners are very practical and convenient for cooking with "paella" pans, Chinese Woks (all sorts of Asian dishes), etc.
If your cooktop is equipped with a large triple flame burner, it will have a valve facilitating independent control of the interior and exterior flame. This revolutionary system makes it possible to select from a wide array of power settings. Working description Fig. 3.
The direct impact of the flame on the enamel may cause an orange-coloured flame in the Large, triple-flame burner.
The use of the appliance produces heat and humidity in the site where it is installed. Ensure that the kitchen has good ventilation. Keep ventilation channels open or install a mechanical ventilation system (extraction hood).
Prolonged use of the appliance with several or all cooking units may require additional ventilation, such as opening a window (without causing air currents) or increasing the power of mechanical ventilation if it exists.
11
Downloaded from www.Manualslib.com manuals search engine
Cooking recommendations
|
|
|
Very high High |
Medium |
|
Low |
||
|
Large |
|
Boiling, cooking, roasting, |
Reheating and keeping food warm: |
||||
|
triple-flame |
|
browning, "paellas" and |
ready and pre-cooked meals. |
||||
|
burner |
|
Asian dishes (Wok). |
|
Defrosting. |
|
|
|
Rapid |
|
Steaks, |
Rice, “bechamel” |
|
Steaming: fish |
|||
|
|
|||||||
|
|
|
omelettes and fried dishes. |
(sauce) |
|
and vegetables. |
||
|
|
|
|
|
and stew. |
|
|
|
|
|
|
|
|
|
|
|
|
Semi-rapid |
Steamed potatoes, fresh |
|
vegetables and pasta. |
Auxiliary Cooking: casseroles, rice pudding and caramel.
Reheating and keeping food warm: pre-cooked meals, preparing delicate casseroles.
Defrosting and |
Melting: butter, |
slow cooking: |
chocolate and |
legumes, fruits |
gelatin. |
and frozen |
|
products. |
|
Appropriate cooking utensils
Match Pan Diameter to Flame Size
- The flame should be the same size the bottom of the pan or smaller. Do not use small pans with high flame settings as the flames can lick up the sides of the pan.
Use Balanced Pans
-Pans must sit level on the cooktop grate without rocking.
-Center pan over burner.
Use a lid That Fits Properly
- A well-fitting lid shorten the cooking time.
12
Downloaded from www.Manualslib.com manuals search engine
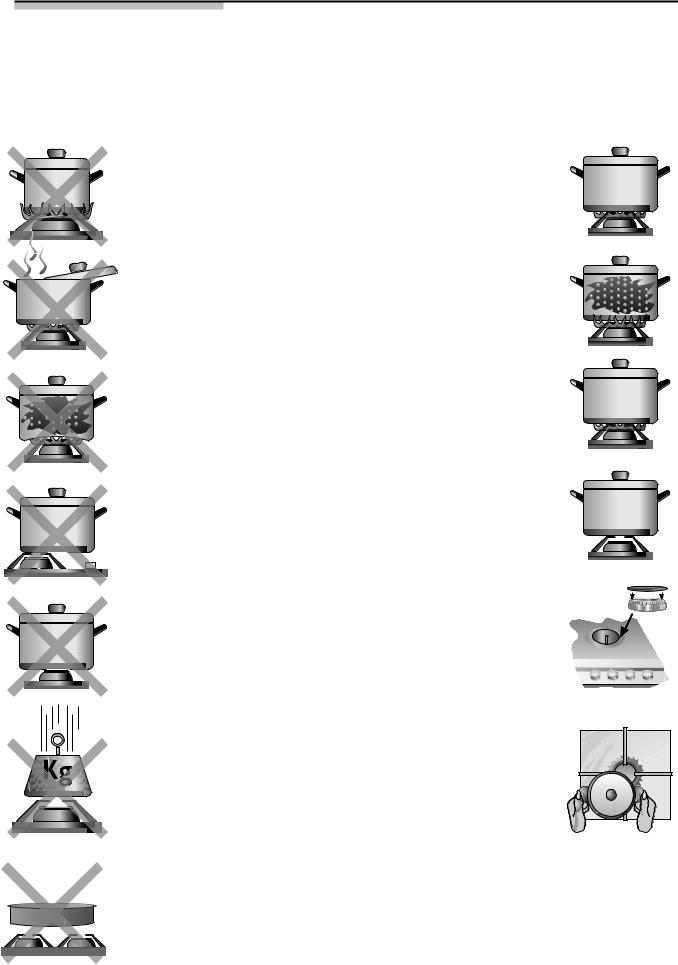
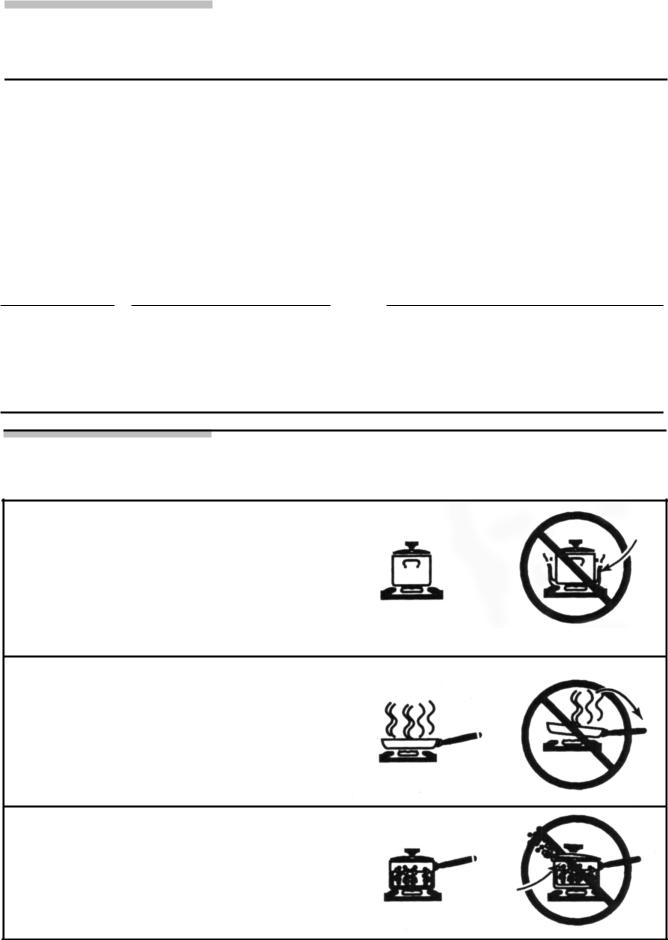
Cooking warnings
NO YES
Do not use small pots on large burners. The flame should not touch the sides of the pot.
Do not cook without a lid, or if the lid moves, as this causes a partial energy loss.
Do not use pots with irregular bottoms as they lengthen cooking time and increase energy consumption.
Do not place the pot off-center over the burner, as tipping could result.
Do not use large-diameter pots on the burners near
the control knobs, which, once centered over the burner, could touch the knobs or be close enough to them that the temperature of that area increases, possibly causing damage.
Never place pots
directly on top of the burners.
Do not use excessive weights or strike the cooktop with heavy objects.
Never use two burners or heat sources to heat a single pot.
Avoid using roasting grilles, earthen pots, etc. for extended periods at maximum power.
Always use appropriate pots for each burner.
This will prevent excessive consumption of gas and staining of the pots.
Always use the lid.
Use only pots, pans and casseroles with flat, thick bottoms.
Center the pot over the burner.
Place the pot over the grate.
Make sure that the grates and burner covers
are in the correct positions before using the appliance.
Handle pots carefully when they are on the cooktop.
13
Downloaded from www.Manualslib.com manuals search engine
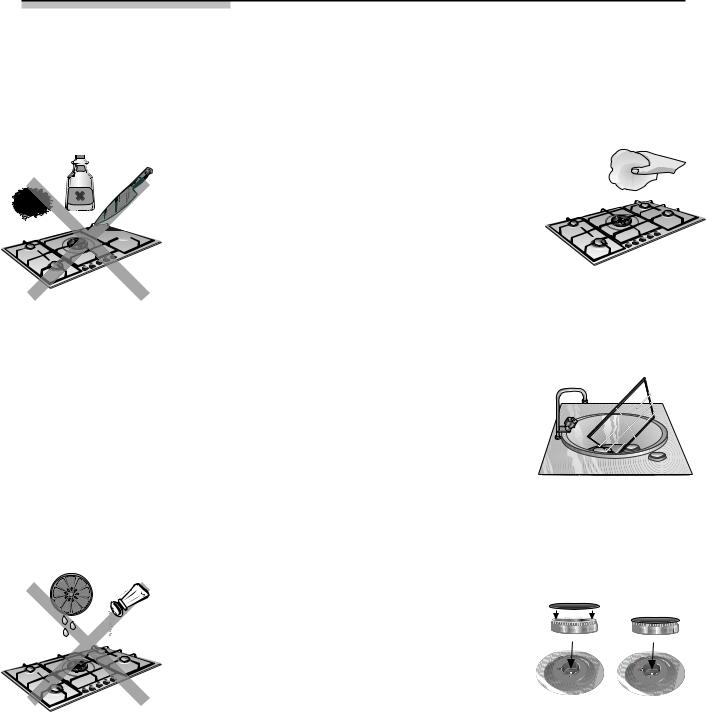
Steel usage rules: cleaning and care
NO YES
DO NOT use abrasive
products, sharp objects,

 steel wool, knives, etc. to
remove hardened
remains of food on the
 cooktop, pan
supports, burners or
electrical cooktops. If your cooktop has a glass panel, DO NOT
use a knife, scraper or any similar device to clean the joint where it meets the metal.
DO NOT use steam cleaning machines on the cooktop, as they
could damage it.
DO NOT leave acidic liquids (lemon juice, vinegar, etc.) on the cooktop.
Once the appliance has cooled, clean it with a sponge, soap and water.
Remove all spilt liquids immediately. This will save unnecessary efforts.
To keep the burners and pan supports clean, they must be regularly cleaned, submerging them in soapy water and scrubbing them with a non-metallic brush so that the holes and slots are perfectly clear to provide proper flame. Always dry the burner covers and the grates if they have become wet.
After cleaning and drying the burners, ensure that the lids are properly placed atop the burner flame diffuser.
If the appliance has Monoblock burners, ensure that they are perfectly dry before their next use.
Due to the high temperatures that the ring lid of your triple flame burner, and stainless steel areas such as the grease splash tray and the outer perimeter of the burners, etc. must withstand, they will become discoloured over time. This is NORMAL. Clean them after every use using products appropriate for stainless steel.
After washing the grates, dry them completely before cooking with them again. The
presence of water droplets or wet areas at the beginning of cooking can cause possible points of enamel deterioration.
If the grates of your cooktop have rubber pads, use precaution when cleaning them, as they could come off, leaving the grate unprotected and leading to scratching of the cooktop.
Stainless steel cleaning products should not be used in the area surrounding the control knobs. The (printed) symbols may be wiped off.
14
Downloaded from www.Manualslib.com manuals search engine

Home troubleshooting
You do not always need to call the technical assistance service. In many cases, you can solve problems on your own. The following table contains useful advice.
Important:
Only authorized personnel from our Technical Service can perform the necessary tasks relative to the gas and electrical systems.
What's wrong? |
Cause Probable |
Solution |
The general electrical |
-Defective fuse. |
- Check the fuse in the |
system is malfunctioning |
|
general fuse box, and replace |
|
-The automatic circuit breaker has |
it if faulty. |
|
- Check the general incoming |
|
|
tripped or a fuse has blown. |
cabinet for a tripped automatic |
|
|
circuit breaker or blown fuse. |
The electric ignitor does |
-There is food or cleaning |
- The space between the |
not work |
product residue between the |
ignitor and the burner must be |
|
ignitor and the burner. |
cleaned carefully. |
|
-The burners are wet. |
-Dry the burner covers carefully. |
|
-The burner caps are not set |
- Ensure that the covers have |
|
correctly. |
been correctly set. |
The flames on the |
-The different parts of the burner |
- Correctly set the various parts. |
burners are not uniform |
have been set incorrectly. |
|
|
- The grooves on the burners' |
- Clean the grooves on the |
|
gas outlets are dirty. |
burners' gas outlets. |
|
-The burners may not be totally |
- Proceed with thorough drying |
|
dry. |
(take special care with |
|
|
monoblock burners). |
|
|
|
The gas flow does not |
-The gas mains are turned off |
- Open possible mid-pipe |
appear to be normal or |
through a mid-pipe valve. |
valves. |
no gas comes out |
- If the gas comes from a gas |
-Replace the gas bottle with a |
|
bottle, it may be empty. |
full one. |
|
|
|
There is a smell of gas |
-A gas valve has been left on. |
-Check to see if any gas valve |
in the kitchen area |
|
is on. |
|
-There may be a leak from the |
- Ensure that the coupling has |
|
coupling to the gas bottle. |
been made correctly. |
The safeties of the |
- The control knob has not been |
- Once the burner is lit, keep |
various burners do not |
held down long enough. |
the control knob pressed for a |
work |
|
few more seconds. |
|
-The grooves on the burners' gas |
- Clean the grooves on the |
|
outlets are dirty. |
burners' gas outlets. |
|
|
|
15
Downloaded from www.Manualslib.com manuals search engine

Installation instructions
IMPORTANT INFORMATION
Read these instructions before installing or using the appliance.
Thoroughly follow the general safety instructions as well as the important information.
Before using the appliance, an authorized technician must install and connect it. Additionally, this technician must ensure that the power supply and gas connections work properly.
The technician performing the installation is responsible for the perfect operation of the appliance in its place of installation.
The technician must show the user how to disconnect the electricity and gas when necessary.
PRECAUTION: Before connecting the appliance, ensure that the local connection conditions as well as the gas type and pressure and the current supply voltage match the appliance's settings.
It is necessary for all tasks related with installation, adjustment and adaptation to LP gas to
be performed by authorized personnel, and that the codes in force, as well as the requisites of the gas companies, be respected.
Before you begin, turn off the gas and electricity supply to the appliance.
Before installing, turn power OFF at the service panel. Lock service panel to prevent power from being turned ON accidentally.
Before connecting up the appliance to the installation, first check that it has been adjusted for the type of gas that is to be supplied. Our cooktops are delivered from factory fit to work with the gas type indicated on the name plate.
It is obligatory for the place where the appliance is to be installed to have standard ventilation.
Thus, it is necessary for the combustion gases to be vented outside.
Check the dimensions of the cooktop as well as the dimensions of the hole to be cut in the kitchen unit.
The panels located above the work surface, next to the cooktop, must be made of noninflammable material. The stratified coatings and the adhesive that fixes them must be heat-resistant to prevent possible deterioration.
Electrical cables must not come into contact with heat zones.
The power cable must be fastened to the kitchen unit to keep it from touching the hot parts of the oven or cooktop.
It is mandatory for appliances with any electrical component to be grounded.
Installer-show the owner the location of the circuit breaker or fuse. Mark it for easy reference.
The installation of this appliance must be performed in accordance with the codes in force and only in a well-ventilated site.
If required by the National Electrical Code (or Canada Electrical Code), this appliance must be installed on a separate branch circuit.
Handle the appliance with care during the entire installation process. Avoid any blows to the appliance.
In the event that these recommendations are not observed, the installation technician will be responsible for any damage caused, and the manufacturer will be exempt from all responsability.
Installing the cooktop on the kitchen unit: Fitting measurements
1 - Minimum distances (mm). Cut a gap of the required size in the work surface. Fig. 1 a-b Follow the installation instructions for hoods.
2 - The wood fibres that have been used to make the cabinets tend to swell quickly
when they come into contact with moisture. Therefore, we recommend to coat the cut surfaces, to protect them from steam or condensed water that could be deposited under the kitchen unit work surface.
16
Downloaded from www.Manualslib.com manuals search engine

IMPORTANT INFORMATION
Requirements for the cabinet
Figure 1a |
|
|
|
E |
|
|
C |
F |
D |
|
B |
|
|
|
A |
|
|
A- Minimum 6” (152 mm) |
D- Minimum 2” (51 mm) |
|
B- Minimum 6” (152 mm) |
E- Minimum 36” (915 mm) |
|
C- Minimum 30” (762 mm) |
F- Minimum 18” (458 mm) |
|
Maximum depth of cabinets installed above cooktop: 13" (330 mm.)
Appliance installation
min. 71/4”
min. 213/16”
191/4” |
331/2” |
min. 6”
Figure 1b
331/2”
|
13/4” |
11/16” |
191/4” |
11/16” |
3 - Depending on the model, the clips and the watertight seal (lower edge of the cooktop) may already be fitted; if this is the case, do not remove them under any circumstance.
The seal ensures that the entire work surface will be watertight, and prevents water seepage.
If this item has not been fitted in the factory, remove the pan supports and the gas burner
covers and diffusers from your cooking hob, and turn it upside down.Now fit the adhesive seal supplied with the appliance onto the lower edge of the cooking hob,Fig. 2a,remove the clips from the attached accessories bag and screw them into the lower points designed for this purpose, Fig. 2 b. Place the cooktop in the middle of the
opening where it is to be inserted into the kitchen unit.
Once the hob is fitted you should turn the clip and tighten the screw as shown in Fig. 2b. For
disassembly, unscrew the clip and proceed in the reverse manner.
If the oven is not installed under the cooktop, place a separator of non-flammable material to
prevent access to the lower part of the cooktop.
To install the cooktop over an oven, check the dimensions given in the installation manual.
Figure. 2a
Figure. 2b
Figure. 2c
17
Downloaded from www.Manualslib.com manuals search engine
All operations relative to installation, adjustment and adaptation to another gas type must be carried out by authorized personnel from our Technical Service, and the codes in force, as well as the requisites of the gas companies must be complied with.
4 - Before connecting the appliance, ensure that the local connection conditions, as well as the gas type and pressure match the settings of the appliance.
Ensure that the gas supply is cut off through the manual shut-off valve before connecting the
appliance.
The gas connection must be in a place that permits access to the manual shut-off valve and that, if necessary, is visible upon opening the kitchen
cabinet door.
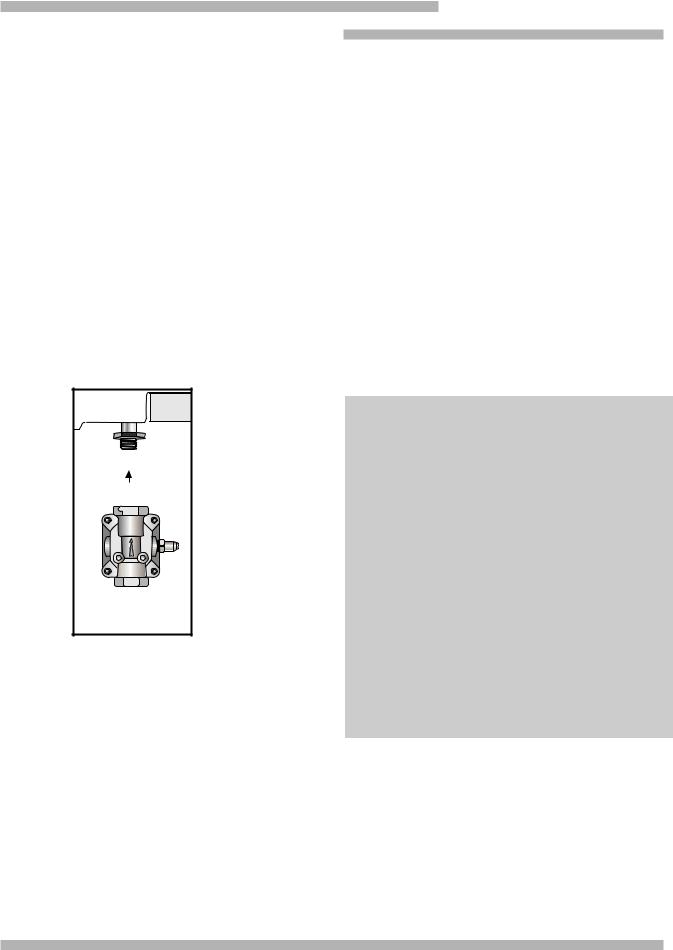
Connect the regulator Figure 3 (2) to the manifold, Figure 3 (1) as shown by the arrow on the regulator applying teflon to the threads.
Connect the pressure regulator to the gas grid using a flexible gas line fitting between the shutoff valve and the pressure regulator. Figure 3.
IMPORTANT INFORMATION
Electrical connection
Before connecting the power cable to the wall outlet, make sure the gas shut-off valve and all the control knobs of the burners are set to "off".
The voltage and total power must be checked on the specifications plate. This appliance must be grounded.
Always ensure that all connections have been made in accordance with code requirements. Thoroughly follow the requisites of the local electric power company.
The electrical connection (CA 110-127 V) is established by a connection cable with a grounding contact plug connected to a grounded outlet to which there must be access after installation of the gas cooktop.
All gas connections must be tested for leaks using an appropriate liquid solution. Never use a flame to test for gas leaks.
Figure 3
1
2
Ensure that a bag containing component 2 is supplied with the appliance. If this component is missing, call our Technical Service. Use the parts we supply to complete the gas connection.
Tighten the appliance regulador to 15 to 22 ft-lbs of torque. Never tighten to more than 26 ft-lbs of torque. Always use an approved pipe joint compound
resistant to the action of LP gas.
Connection using a metal pipe. In this case, contact between this tube and the moving parts of the kitchen unit (for example, a drawer) and its passage through areas that could be blocked, must be avoided.
The manufacturer accepts no responsibility for leaks or connections carried out by the installation technician.
Leak testing of the appliance shall be conducted according to manufacturer,s instructions.
 WARNING: this appliance is equipped with
a three prong grounding plug for your protection against shock hazard and should be plugged directly into a properly grounded receptacle. Do not cut or remove the grounding prong from this plug.
The current supply connection cable must be at least of the JT 3x18 AWG/UL/CSA variety, or should be heat-resistant (at least 105 ºC / 221 ºF).
The mains connecting cable must only be purchased through and connected by an authorised specialist.
Do not tamper with the inside of the appliance. If this is necessary, call our technical assistance service.
18
Downloaded from www.Manualslib.com manuals search engine
 Loading...