


Bosch PKN715T01E, PKF646T02E, PKF675T01E, PKN677T01, PKF677T01E Manual
...! ! 46
! !
6 C 6 6 6
64 6 6
4 4 6
|
PKQ |
67..C |
PKN |
67.. PKN |
60.. |
|
||||||||||||
7 |
|
|
|
7 |
|
|||||||||||||
|
|
|
|
|
|
|
|
|
|
|
||||||||
|
|
|
|
|
|
|
|
|
|
|
|
|
|
|
|
|
|
|
|
|
|
|
|
|
|
|
|
|
|
|
|
|
|
|
|
|
|
|
|
|
|
|
|
|
|
|
|
|
|
|
|
|
|
|
|
|
|
|
|
|
|
|
|
|
|
|
|
|
|
|
|
|
|
|
|
|
|
|
|
|
|
|
|
|
|
|
|
|
|
|
|
|
|
|
|
|
|
|
|
|
|
|
|
|
|
|
|
|
|
|
|
|
|
|
|
|
|
|
|
|
|
|
|
|
|
|
|
|
|
|
|
|
|
|
|
|
|
|
|
|
|
|
|
|
|
|
|
|
|
|
|
|
|
|
|
|
|
|
|
|
|
|
|
|
|
|
|
|
|
|
|
|
|
|
|
|
|
|
|
|
|
|
|
|
|
|
|
|
|
|
|
|
|
|
|
|
|
|
|
|
|
|||||||||||||||||
|
|
|
|
|
|
|
|
PKR |
67.. |
PKF |
64.. |
PKF |
67.. |
|
||||||||||||||
|
8 |
|
|
|
|
|
8 |
|
|
|
|
|
|
|||||||||||||||
|
|
|
|
|
|
|
|
|
|
|
|
|
|
|
|
|
|
|
|
|
|
|
|
|
|
|
|
|
|
|
|
|
|
|
|
|
|
|
|
|
|
|
|
|
|
|
|
|
|
|
|
|
|
|
|
|
|
|
|
|
|
|
|
|
|
|
|
|
|
|
|
|
|
|
|
|
|
|
|
|
|
|
|
|
|
|
|
|
|
|
|
|
|
|
|
|
|
|
|
|
|
|
|
|
|
|
|
|
|
|
|
|
|
|
|
|
|
|
|
|
|
|
|
|
|
|
|
|
|
|
|
|
|
|
|
|
|
|
|
|
|
|
|
|
|
|
|
|
|
|
|
|
|
|
|
|
|
|
|
|
|
|
|
|
|
|
|
|
|
|
|
|
|
|
|
|
|
|
|
|
|
|
|
|
|
|
|
|
|
|
|
|
|
|
|
|
|
|
|
|
|
|
|
|
|
|
|
|
|
|
|
|
|
|
|
|
|
|
|
|
|
|
|
|
|
|
|
|
|
|
|
|
|
|
|
|
|
|
|
|
|
|
|
|
|
|
|
|
|
|
|
|
|
|
|
|
|
|
|
|
|
|
|
|
|
|
|
|
|
|
|
|
|
|
|
|
|
|
|
|
|
|
|
|
|
|
|
|
|
|
|
|
|
|
|
Ø = cm
2

|
|
|
|
PKQ |
67..E |
PKG |
77..E |
|||||||||||||||
ø 17 26 5 ø |
|
14 5 |
ø |
|
18 12 ø 14 5 |
|||||||||||||||||
|
|
|
|
|
|
|
|
|
|
|
|
|
|
|
|
|
|
|
|
|
|
|
|
|
|
|
|
|
|
|
|
|
|
|
|
|
|
|
|
|
|
|
|
|
|
|
|
|
|
|
|
|
|
|
|
|
|
|
|
|
|
|
|
|
|
|
|
|
|
|
|
|
|
|
|
|
|
|
|
|
|
|
|
|
|
|
|
|
|
|
|
|
|
|
|
|
|
|
|
|
|
|
|
|
|
|
|
|
|
|
|
|
|
|
|
|
|
|
|
|
|
|
|
|
|
|
|
|
|
|
|
|
|
|
|
|
|
|
|
|
|
|
|
|
|
|
|
|
|
|
|
|
|
|
|
|
|
|
|
|
|
|
|
|
|
|
|
|
|
|
|
|
|
|
|
|
|
|
|
|
|
|
|
ø |
14 5 |
ø 21 |
|
ø |
14 5 |
ø |
21 12 |
||||||||||
|
|
|
|
|
|
|
|
|
|
|
|
||||||
|
|
|
|
|
PKG 97.. |
PKN |
71.. |
|
|
|
|
|
|
|
|||
|
|
|
|
|
|
|
ø |
17 26 5 |
|
|
|
ø 14 5 |
|||||
ø |
14 5 ø |
|
18 12 |
|
|
|
|
|
|
|
|
|
|
|
|||
|
|
|
|
|
|
|
|
|
|
|
|
||||||
|
|
|
|
|
|
|
|
|
|
|
|
|
|
|
|
|
|
|
|
|
|
|
|
|
|
|
|
|
|
|
|
|
|
|
|
|
|
|
|
|
|
|
|
|
|
|
|
|
|
|
|
|
|
|
|
|
|
|
|
|
|
|
|
|
|
|
|
|
|
|
|
|
|
|
|
|
|
|
|
|
|
|
|
|
|
|
|
|
|
ø 230 180 |
ø 14 5 |
ø 18 |
ø 21 12 |
|
|
Ø = cm
3

Table |
of contents |
|
|
|
|
|
|
Important |
nformat on. . . . . . . . . . . . |
. |
.6 . . . . . . . . |
|
|
|
|
Before installation. . . . . . . . . . . . . . . |
. |
6. . . . . . . . . |
|
|
|
|
|
Safety precautions. . . . . . . . . . . . . . . .6 . . . . . . . .
Reasons for damage. . . . . . . . . . . . . . . 7. . . . . . . .
Gett ng to |
know the appl ance. . . . . . . . . . . 9. . . . |
|
|
|
|
The control |
panel. . . . . . . . . . . . . . . . .9 . . . . . . . . |
|
|
|
|
The hotplates . . . . . . . . . . . . . . . . . .0 . . . . . . . .
Residual heat indicator. . . . . . . . . . . . . . . . . . . . . . .
Ma n sw tch w th ch ldproof lock. . . . . . . . . .12. . .
Main switch. . . . . . . . . . . . . . . . . . . . . . . . . . .
Childproof lock. . . . . . . . . . . . . . . . . . . . . . . . . .
Cook ng . . . . . . . . . . . . . . . . . . |
13. . . . . . . . . . |
|
|
|
|
Settings . . . . . . . . . . . . . . . . . . . |
.4 . . . . . . . . . |
|
|
|
|
Table . . . . . . . . . . . . . . . . . . . . |
.5 . . . . . . . . . |
|
|
|
|
Tips on saving energy. . . . . . . . . . . . . . . .7. . . . . . .
Cook ng w th the electron c bo l start control. . |
18 |
|
|
Setting procedure. . . . . . . . . . . . . . . . 8. . . . . . . . .
Tables . . . . . . . . . . . . . . . . . . . . 9. . . . . . . . .
Tips on electronic boil |
start |
control. . . |
. . |
. . |
. |
. . . 0. . . |
|
|
|
|
|
|
|
|
|
T mer funct on. . . . . |
. . |
. . . |
. . . |
. . |
. |
21. . . . . . . . . |
|
|
|
|
|
|
|
|
|
A hotplate is to switch off automatically. . . . . . . . . .
Cooking timer. . . . . . . . . . . . . . . . . .3 . . . . . . . .
Memory funct on . . . . . . . . . . . . . . . 24. . . . . . . . .
Storing the setting. . . . . . . . . . . . . . . . .4 . . . . . . . .
Calling up the memory. . . . . . . . . . . . . . . 5. . . . . . . .
Automat c t me l m ter. . . . . . . . . . . . . .27. . . . . . . .
4

Table of contents
Switching off input confirmation. . . . . . . . . .27. . . .
Care and cleaning. . . . . . . . . . . . . . . 28. . . . . . . . .
Care . . . . . . . . . . . . . . . . . . . . . 28. . . . . . . . . .
Cleaning glass ceramic. . . . . . . . . . . . . . 28. . . . . . . . .
Cleaning the hob surround. . . . . . . . . . . . . 29. . . . . . .
Troubleshooting . . . . . . . . . . . . . . . 30. . . . . . . . . .
Notes: . . . . . . . . . . . . . . . . . . . . 31. . . . . . . . . .
Packaging and old appliances. . . . . . . . . . 32. . . . .
After$sales service. . . . . . . . . . . . . . .32. . . . . . . . .
Acrylamide in food. . . . . . . . . . . . . . . 33. . . . . . . . .
What can you do?. . . . . . . . . . . . . . . . .3 . . . . . . . .
5

Important information
Read |
this instruction manual |
carefully. Only then wil |
you |
be able to operate your |
hob safely and correc |
Keep the instruction and installation manual and the appliance pass in good condition. Please pass on these documents to the new owner if you sell the appliance.
Before installation
Transport damage Check the hob after unpacking it. Do not connect appliance if it has been damaged in transport.
Electrical connection The hob may only be connected by a licensed specialist. Damage due to the appliance being connected incorrectly will invalidate the guarantee.
Safety precautions
|
This |
appliance |
is intended only for domestic use. |
|||||||
|
Only use the hob for food preparation. |
|
|
|||||||
Overheated oil and fat |
Overheated |
oil |
or fat |
can ignite very |
quickly. |
|
||||
|
Risk |
of fire! |
|
|
|
|
|
|
||
|
Never leave heating oil or fat unsupervised. |
|
||||||||
|
Should |
the oil |
ignite, do not |
try to |
put it |
out |
by |
|||
|
water |
on |
it. |
|
|
|
|
|
|
|
|
Cover the pan with a lid or plate immediately. |
|
||||||||
|
Switch |
off |
the |
hotplate. |
|
|
|
|
||
|
Leave the ovenware on the hotplate |
to cool down. |
||||||||
Hot hotplates |
Do |
not touch |
hot hotplates. There is a risk of bur |
|||||||
|
Children must be kept at a safe distance from the |
|||||||||
|
appliance. |
The |
residual |
heat |
indicator |
warns |
you |
tha |
||
|
the |
hotplates are hot. |
|
|
|
|
|
|||
|
Never place combustible items on the hob. |
|
||||||||
|
Risk |
of fire! |
|
|
|
|
|
|
||
|
You |
must |
not |
keep any combustible items or aeros |
||||||
|
cans in a |
drawer located under the |
hob. |
Risk |
of |
|||||
6

The service cables from electrical appliances must n
touch the hot |
hotplates. |
This could cause damage t |
the hob and |
the cable |
insulation. |
Wet saucepan bases and Steam pressure can be generated from the liquid
hotplates |
between the base of the saucepan and |
the |
hotplate |
|
|
The steam pressure could cause the pan to jump |
|||
|
suddenly. There is a risk of injury. |
|
|
|
|
Always keep the hotplate and the bases |
of |
saucepa |
|
|
dry. |
|
|
|
Cracks in the glass ceramicIf there are fractures, flaws or cracks in |
the |
glass |
||
|
ceramic, there is a risk of electric shock. |
|
||
|
Switch off the appliance immediately. |
|
|
|
|
Isolate the appliance from the power supply |
at the |
||
|
fuse |
box. |
|
|
|
Call |
after&sales service. |
|
|
The hotplate heats up theSwitch off the hotplate if the hotplate heats up but indicator does not work indicator is not working. There is a risk of burning.
Call after&sales service.
The hob switches off automatically
Incorrect repairs
If the hob switches itself off and can then no long used, disconnect it from the electricity supply immediately. The hob can be switched on again lat
Risk |
of |
fire! |
|
Switch |
off the |
circuit breaker in the fuse box and |
|
the |
after&sales |
service. |
|
Incorrect repairs are dangerous. There is a risk of electrocution.
Repairs may only be carried out by one of our experienced after&sales engineers.
Reasons for damage
Saucepan and pan bases Rough pan bases scratch the glass ceramic. Check your ovenware.
Avoid cooking on the hob with an empty pan, especially with enamel and aluminium pans. This could cause damage to the saucepan bases and glass ceramic.
Observe the manufacturer's instructions when using special ovenware.
7
Hot |
pans |
and |
saucepans |
Never place hot pans or saucepans on the control |
|
|
|
|
|
panel, display area or the frame. |
|
|
|
|
|
This could cause damage. |
|
Salt |
sugar |
and |
sand |
Salt, sugar and sand cause scratches on the glass |
|
|
|
|
|
ceramic. Do not use the hob as a work surface o |
|
|
|
|
|
storage |
space. |
Hard |
and |
pointed objects |
Damage |
can occur if hard or pointed objects fall o |
|
|
|
|
|
the hob. |
|
|
|
|
|
Do not store such objects above the hob. |
|
Food |
spills |
|
Sugar and food with a high sugar content damage |
||
|
|
|
|
hob. Remove food spills immediately with a glass |
|
|
|
|
|
scraper. |
|
|
|
|
|
Caution |
The glass scraper has a sharp blade. |
Foil and plastic
Examples of possible damage
Aluminium foil or plastic containers |
melt |
on |
hot hob |
Oven protective foil is not suitable |
for |
your |
hob. |
The following types of damage affect neither the cooker's function nor the stability of the glass ceramic.
Blisters
caused by melted sugar or food with a high sugar content.
Scratches
caused by salt, sugar or sand particles or from ro pan bases.
Shimmering metallic discoloration
caused by pan abrasion or the use of unsuitable cleaning agents.
8

Scuffed surface caused by using unsuitable cleaning agents.
Getting to know the appliance
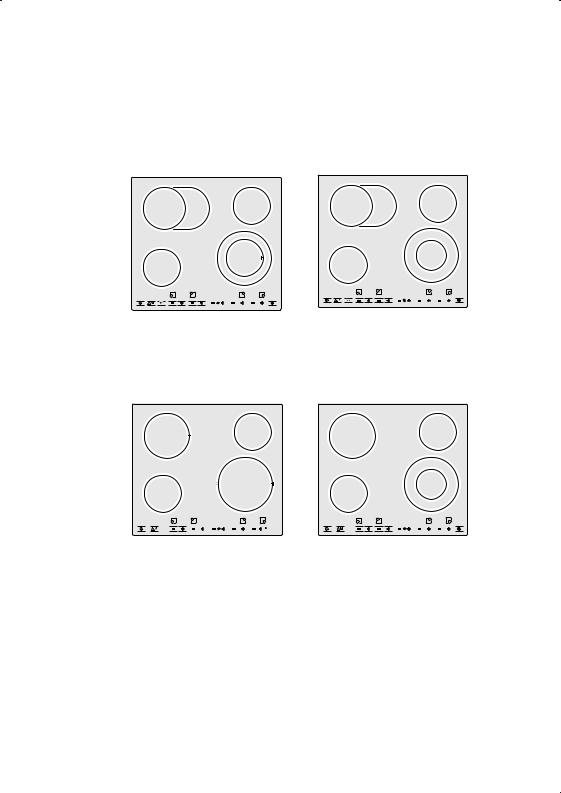
The instruction manual applies to various hobs. An overview of models with dimensions is given on pa 2 and 3.
The control panels hotplates and indicators are described in this section. They are shown by appliance model.
The control panel
i
heat setting
operational readiness - residual heat /
|
|
|
|
|
|
|
|
|
|
|
|
|
|
|
|
|
|
|
|
|
|
|
|
|
|
|
|
|
|
|
|
|
|
|
|
|
|
|
|
|
|
|
|
|
|
|
|
|
|
|
|
|
|
|
|
|
|
|
|
|
|
|
|
|
|
|
|
|
|
|
|
|
|
|
|
|
|
|
|
|
|
|
|
|
|
|
|
|
|
|
|
|
|
|
|
|
|
|
|
|
|
|
|
|
|
|
|
|
|
|
|
|
|
|
|
|
|
|
|
|
|
|
|
|
|
|
|
|
|
|
|
|
|
|
|
|
|
|
|
|
|
|
|
|
|
|
|
|
|
|
|
|
|
|
|
|
|
|
|
|
|
|
|
|
|
|
|
|
|
|
|
|
|
|
|
|
|
|
|
|
|
|
|
|
|
|
|
|
|
|
|
|
|
|
|
|
|
|
|
|
|
|
|
|
|
|
|
|
|
|
|
|
|
|
|
|
|
|
|
|
|
|
|
|
|
|
|
|
|
|
|
|
|
|
|
|
|
|
|
|
l |
p l |
|
|
l |
p l |
|
|
|
|
|
|
|
|
|
l p l |
|||||||||||||||||||||||
|
|
|
|
|
|
timer |
function |
|
|
|
|
|
|
dual circuit |
hotplate |
||||||||||||||||||||||||
|
main |
switch |
|
|
|
|
|
|
|
|
|
|
|
||||||||||||||||||||||||||
|
|
|
|
|
|
|
|
|
|
|
|
|
|
|
|
|
|
|
|
|
|
tri circuit |
hotplate |
||||||||||||||||
|
extended |
|
|
|
|
|
|
|
|
|
|
|
|
|
|
|
|
|
|
|
|
|
|||||||||||||||||
|
l p l |
|
|
|
|
|
|
|
|
|
|
|
|
|
|
|
|
|
|
|
|
|
|||||||||||||||||
|
cooking |
zone |
|
|
|
|
|
|
|
|
|
|
|
|
|
|
|
|
|
|
|
|
|||||||||||||||||
|
heat setting |
regulation |
|
|
|
|
|
|
|
|
|
|
|
|
|
|
|
|
|
|
|
||||||||||||||||||
|
|
|
|
|
|
|
|
|
|
|
|
|
|
|
|
|
|
|
|
|
|
|
|
|
|
||||||||||||||
|
memory function |
|
|
|
|
|
|
|
|
|
|
|
|
|
|
|
|
|
|
|
|
|
|
|
|
|
|
|
|
|
|
|
|
|
|||||
9

Control panels |
When you touch a symbol the respective |
function |
|
|
activated. |
|
|
|
Example: Touch thel symbol. |
|
|
|
The outer filament circuit in the dual$circuit hotplate |
||
|
switched |
on. |
|
Note |
The settings remain unchanged if several |
symbols a |
|
|
touched |
briefly. You can therefore easily mop up s |
|
|
on the |
control panel. |
|
|
Always keep the control panels clean and dry. |
||
|
Moisture |
and dirt may impair function. |
|
The hotplates
Single circuit hotplate The cooking surface size of these hotplates cannot altered.
Select the correct hotplate.
The saucepan and hotplate sizes should match.
Dual circuit hotplate The size of these hotplates can be altered. The hotplate must be switched on.
|
Switching on the outer filament circuit: |
|
|||
|
Touch thel symbol. The indicator light lights up. |
||||
|
Switching off: |
|
|
|
|
|
Touch thel symbol again. |
The indicator light goes |
|||
|
out. |
|
|
|
|
|
The size last set will |
be |
selected automatically |
whe |
|
|
you switch on the hotplate again. |
|
|||
Extended cooking zone |
The |
extended cooking |
zone can be switched on w |
||
|
using |
these hotplates. |
The |
hotplate must be switche |
|
|
on. |
|
|
|
|
|
Switching on the extended cooking zone: |
|
|||
|
Touch them symbol. The indicator light lights up. |
||||
|
Switching off: |
|
|
|
|
|
Touch them symbol |
again. The indicator light |
goes |
||
|
out. |
|
|
|
|
|
The size last set will |
be |
selected automatically |
whe |
|
|
you |
switch on the hotplate again. |
|
||
10
Halogen hotplate
Halogen hotplate with power setting
Residual heat indicator
Caution
With these hotplates the heating system reaches ful
power after just a few seconds. |
|
|
|||
The |
halogen |
heating |
ring lights up very |
brightly. |
Ple |
do |
not look |
at the |
halogen light since |
it could |
blin |
you. |
|
|
|
|
|
With these hotplates you can also increase the pow using the power setting e.g. for heating water.
To activate the power setting:
touch the+ symbol until 9 appears in the hotplate
indicator. Touch the+ symbol againP. appears |
in the |
|
hotplate indicator. |
The power setting is activated. |
|
To deactivate the power setting: |
|
|
touch the symbol |
until the desired ongoing |
cooking |
level appears. |
|
|
The hob has a residual heat indicator for each hotplate. It shows which hotplates are still hot. The
residual |
heat indicator |
has two |
levels. |
If anH |
appears in the |
display |
the hotplate is still h |
You can for example keep a small meal warm or chocolate using this heat.
As the hotplate cools down further the display changes toh. The display remains lit until the
hotplatehas |
cooled |
sufficiently. |
|
The |
residual |
heat |
indicator will no longer come on |
after |
a power cut. |
The hotplates could still be hot. |
|
11
 Loading...