


 Loading...
Ú Installation instructions
Gas hob
01
140998

Ú Installation instructions |
|
Safety precautions ..................................................................... |
4 |
Before installing ......................................................................... |
4 |
Preparing the units..................................................................... |
4 |
Installation of appliance ............................................................ |
5 |
Setting up the appliance ................................................................... |
5 |
Removal of hob .......................................................................... |
6 |
Set-up, gas and electricity connection..................................... |
6 |
Gas connection ................................................................................... |
6 |
Faults in the gas installation/smell of gas ..................................... |
6 |
Electrical connection .......................................................................... |
6 |
Types of connection .................................................................. |
7 |
Connection for natural gas (NG) ..................................................... |
7 |
Liquid gas connection (LPG)............................................................ |
8 |
Conversion to a different gas type ........................................... |
8 |
Measures to note ................................................................................ |
8 |
Converting to a different gas type ................................................... |
8 |
Parts for the gas conversion............................................................. |
9 |
Converting the appliance from natural gas to liquefied gas |
|
(LPG) ..................................................................................................... |
9 |
Converting the appliance from liquid gas to natural gas............ |
9 |
Replacing the burner nozzles........................................................ |
10 |
Adjusting or replacing the bypass nozzles................................. |
10 |
Removing the hob plate ................................................................. |
11 |
Replacing the bypass nozzles....................................................... |
11 |
Installing the hob.............................................................................. |
12 |
Leak test and function test...................................................... |
12 |
Check the gas connection ............................................................. |
12 |
Checking the burner nozzles......................................................... |
12 |
Checking the bypass valves.......................................................... |
12 |
Correct flame formation........................................................... |
12 |
Burner ................................................................................................ |
12 |
Technical data – Gas................................................................ |
13 |
3
Safety precautions
Read the appliance instructions before installing and using.
The graphics in these Assembly instructions are given as a guide only.
The manufacturer is exempt from all liability if this manual's requirements are not complied with.
All operations relating to installation, regulation and conversion to other gas types must be carried out by an authorised installation engineer, respecting all applicable regulations, standards and the specifications of the local gas and electricity providers.
You are recommended to contact the Technical Assistance Service to convert to another gas type.
Before you begin, turn off the appliance's electricity and gas supply.
This appliance has been designed for home use only, not for commercial or professional use. This appliance cannot be installed on yachts or in caravans. The warranty will only be valid if the appliance is used for the purpose for which it was designed.
After connecting the appliance, check that the local conditions (type of gas and pressure) are compatible with the appliance settings. The permissible appliance settings can be found on the label or rating plate.
These instructions are only valid if the appropriate country symbol appears on the appliance. If the symbol does not appear on the appliance, it is necessary to refer to the technical instructions which will provide the necessary instructions concerning modification of the appliance to the conditions of use of the country.
This appliance can only be installed in a well-ventilated place in accordance with existing regulations and ventilation specifications. The appliance must not be connected to a combustion product removal device.
The supply cable must be attached to the unit to prevent it from touching hot parts of the oven or hob.
Appliances with electrical supply must be earthed.
Do not tamper with the appliance's interior. If necessary, call our Technical Assistance Service.
Before installing
This appliance is class 3 type, according to the EN 30-1-1 regulation for gas appliances: built-in appliance.
The units next to the appliance must be made of non-flammable materials. The laminated covering and glue for adhering it must be heat resistant.
This appliance cannot be installed above fridges, washing machines, dishwashers or similar.
If the hob is installed above an oven, it must have forced ventilation. Check the dimensions of the oven in your installation instructions.
If an extractor hood is fitted, this must be done according to the installation instructions and always allowing for a vertical minimum clearance of 650 mm to the hob.
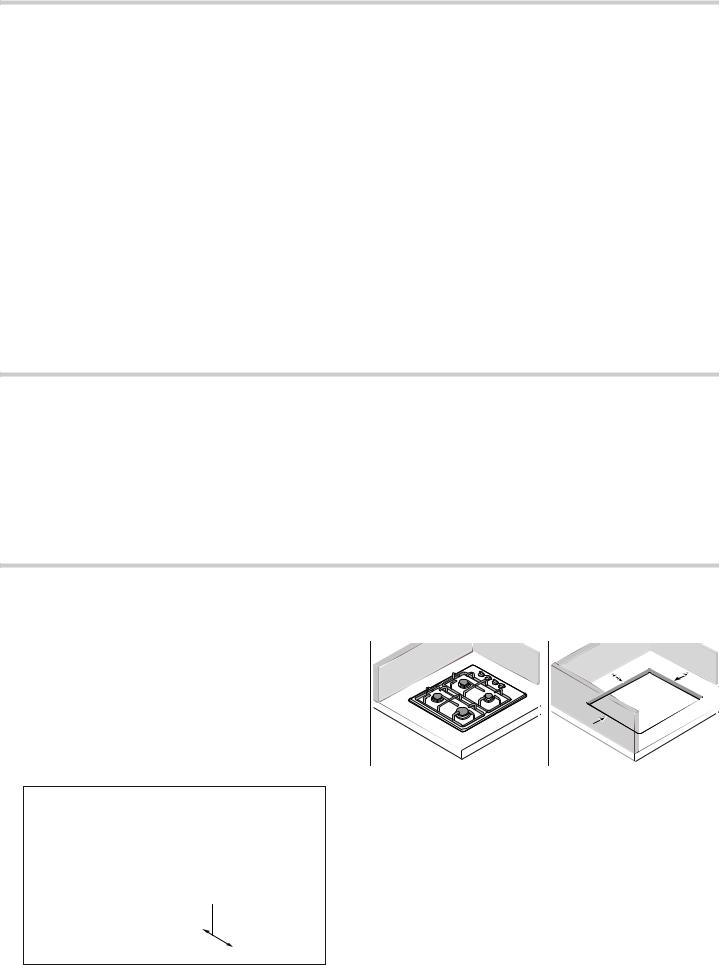
Preparing the units
Make an appropriate size cut in the work surface.
The appliance must be set up and inserted in accordance with the specified dimensions. The appliance must not be set up on any other object.
If the hob is electric or mixed (gas and electricity) and there is no oven below, place a non-flammable separator (e.g. metal or plywood) 10 mm from the bottom of the hob. This will prevent access to the base of the hob.If the hob is gas, it is recommendable to place the separator at the same distance.
Seal all work surfaces made of wood with special sealer/glue to protect it against moisture damage.
PLQ |
PLQ |
PD[ |
|
¸ |
|
|
)
'
&
 $
$
(
 %
%
Distance |
Designation |
|
|
A |
Distance between the appliance and the right |
|
vertical surface |
|
|
B |
Distance between the appliance and the left ver- |
|
tical surface |
|
|
C |
Distance between the appliance and the rear |
|
vertical surface |
|
|
4

Caution!
■You can install the appliance between two vertical surfaces that are next to each other, e.g. D and F or E and F.
■You cannot install the appliance between two vertical surfaces that are opposite each other, e.g. D and E.
When you install the built-in cooker, comply with the dimensions given in the table below.
Note: Use the data in the table below that corresponds to your appliance.
Caution!
Appliance type |
Minimum |
Minimum |
Minimum dis- |
|
distance A |
distance B |
tance C (mm) |
|
(mm) |
(mm) |
|
Products with hob |
100 |
60 |
50 |
plate made of |
|
|
|
glass |
|
|
|
|
|
|
|
Products with hob |
100 |
80 |
50 |
plate made from |
|
|
|
steel/enamel |
|
|
|
|
|
|
|
Installation of appliance
Note: Wear protective gloves to fit the hob.
Remove the pan support, handles, burner cap and burner heads.
Turn the appliance over carefully and place it on a soft cloth. Make sure that the ignition parts are not damaged.
The insulating tape supplied with the appliance prevents leaks. Apply this insulating tape so that it covers the glass surface on the underside of the built-in hob.
Fitting the appliance onto the kitchen unit:
1.Remove the clips from the accessory bag and screw them into the position indicated so that they can turn freely.
2.Insert and centre the hob.
Press the sides of the hob until it is supported around its entire perimeter.
3.Turn the clips and tighten them fully.
The position of the clips depends on how thick the work surface is.
Do not stick the hob onto the worktop with silicone.
Setting up the appliance
■The distance between the top edge of the cooker and the bottom edge of the extractor hood must meet the requirements of the extractor hood manufacturer.
■Ensure that the appliance is not moved again after set up.
■The underside of the appliance heats up during operation. We therefore recommend that you install a guard plate on the underside of the appliance.
|
|
|
PD[ |
PLQ |
|
|
|
5
Loading...