


 Loading...
en |
Operating instructions |
es |
Instrucciones de funcionamiento |
pl |
Instrukcja obstugi |
pt |
Manual de utilização |
tr |
Kullanma KIlavuzu |
Robert Bosch Hausgeräte GmbH
Carl-Wery-Straße 34
81739 München
Cod. 9000480165 C
www.bosch-home.com
Table of contents
Safety precautions. . . . . . . . . . . . . . . . . . . 5
Your new appliance . . . . . . . . . . . . . . . . . 7 Burners . . . . . . . . . . . . . . . . . . . . . . . . . . . 8
Switching on manually . . . . . . . . . . . . . . . . . . . . 8 Switching on automatically . . . . . . . . . . . . . . . . . 8 Safety system . . . . . . . . . . . . . . . . . . . . . . . . . . 9 Switching off a burner . . . . . . . . . . . . . . . . . 9
Power levels . . . . . . . . . . . . . . . . . . . . . . . . . . . 9
Warnings . . . . . . . . . . . . . . . . . . . . . . . . . . 9 Suitable pans . . . . . . . . . . . . . . . . . . . . . . 10
Accessories . . . . . . . . . . . . . . . . . . . . . . . . . . . 10 Additional wok pan support. Wok pan . . . . . 10
Additional coffee maker support . . . . . . . . . . 11 Simmer plate . . . . . . . . . . . . . . . . . . . . . . . . . 11 Simmer cap . . . . . . . . . . . . . . . . . . . . . . . . . . 11
Cooking recommendations. . . . . . . . . . . . . . . . 11
Griddle . . . . . . . . . . . . . . . . . . . . . . . . . . 12
Advice for use . . . . . . . . . . . . . . . . . . . . . 12 Cleaning . . . . . . . . . . . . . . . . . . . . . . . . . 12 Maintenance . . . . . . . . . . . . . . . . . . . . . . 12
Precautions for use. . . . . . . . . . . . . . . . . 13
Cleaning and maintenance . . . . . . . . . . 14
Cleaning . . . . . . . . . . . . . . . . . . . . . . . . . . . . . . 14 Unsuitable products . . . . . . . . . . . . . . . . . . . . . 14 Maintenance . . . . . . . . . . . . . . . . . . . . . . . . . . . 14
Faults . . . . . . . . . . . . . . . . . . . . . . . . . . |
15 |
Technical Assistance Service . . . . . . . . . 16 Warranty conditions . . . . . . . . . . . . . . . . . . 16 Used appliances and packaging. . . . . . . 16
Environmentally-friendly waste management . . 16
3
Dear customer,
Congratulations on your choice and thank you for purchasing one of our appliances. This practical, modern and functional appliance is manufactured using materials of the highest quality which are subject to strict quality control checks throughout the entire manufacturing process. The appliance is meticulously tested to ensure that it meets your demands and produces perfect cooking results.
Do not remove the appliance from its protective packaging until it is installed in the unit.
Please read these instructions carefully before proceeding to install and use the appliance. The information contained in these instructions is essential for the correct operation of the appliance and, more importantly, for your safety.
The packaging of your appliance has been manufactured using only the materials which are strictly necessary to guarantee efficient protection during transport.
These materials are 100% recyclable, thus reducing the environmental impact. You can also contribute to caring for the environment, by following the advice below:
-dispose of the packaging in the appropriate recycling bin
-before you get rid of an old appliance, make sure you disable it. Contact your local authority to find out the address of your nearest recycling centre to dispose of your appliance
-do not pour used oil down the sink. Collect it in a sealed container and take it to an appropriate collection point or, failing that, place it in the rubbish bin (it will end up in a controlled dump; this is probably not the best option, but it will avoid contaminating ground water)
IMPORTANT:
In the unlikely event that the appliance should be damaged or not meet your expectations in terms of quality, please inform us as soon as possible. For the warranty to be valid, the appliance must not have been tampered with, or used inappropriately
4

Safety precautions
Read these instructions carefully. Reading these instructions will enable you to use your appliance safely and effectively.
All operations relating to installation, regulation and conversion to other types of gas must be carried out by an authorised installation engineer, respecting applicable regulations, standards and the specifications of the local gas and electricity providers.
You are recommended to contact the Technical Assistance Service to convert to another type of gas.
Before installing your new hob, ensure that it is being installed according to the assembly instructions.
This appliance can only be installed in a well-ventilated place in accordance with existing regulations and ventilation specifications. The appliance must not be connected to a combustion product removal device.
This appliance has been designed for home use only, not for commercial or professional use. This appliance cannot be installed on yachts or in caravans. The warranty will only be valid if the appliance is used for the purpose for which it was designed.
The place in which the appliance is installed must have fully-functioning ventilation, in accordance with the regulations.
Do not subject the appliance to draughts. These might blow out the burners.
This appliance leaves the factory set to the type of gas that is indicated on the specifications plate. If this must be changed, read the Assembly instructions.
Do not tamper with the appliance's interior. If necessary, call our Technical Assistance Service.
These operating and installation instructions should be retained, and passed onto the buyer if the appliance is sold.
Do not switch on the appliance if it is damaged in any way. Contact our Technical Assistance Service.
The surfaces of cooking appliances heat up during use. Care must be taken when using these appliances. Keep children well away from this appliance.
This appliance is only intended for cooking purposes, not as a heating system.
5
Fat or oil which is overheated can catch fire easily. Do not leave oil or fats to heat up unattended. If oil or fats do catch fire, never use water to put the fire out. Risk of burns! Put the fire out by covering the pan with a lid and switch off the hotplate.
In the event of a malfunction, turn off the appliance’s gas and electricity supply. For repairs, call our Technical Assistance Service.
If one of the control knobs will not turn, do not force it. Call the Technical Assistance Service immediately, so that they can repair or replace it.
Never place unstable pans on the hob or the burners, as they may accidentally tip over.
Do not clean the hob using a steam cleaner. Risk of electrocution!
This appliance is class 3 type, according to the EN 30-1- 1 standard for gas appliances: built-in appliance.
Do not store or use corrosive chemicals, steamers, flammable materials or non-food products below or near this domestic appliance.
This appliance is not intended for use by persons (including children) with reduced physical, sensory or mental capabilities, or lack of experience and knowledge, unless they have been given supervision or instruction concerning use of the appliance by a person responsible for their safety.
Never leave the appliance unattended during operation.
The graphics in this instruction manual are given as a guide only.
The manufacturer is exempt from all responsibility if the requirements of this manual are not complied with.
6
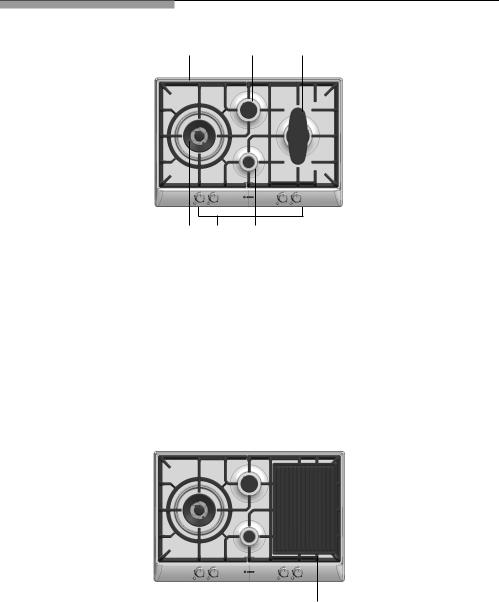
Your new appliance
1 |
4 |
6 |
5 2 3
1 Pan supports
2 Control knobs
3 Auxiliary burner (up to 1 kW)
4 Semi-rapid burner (up to 1,75 kW)
5 Triple-flame burner (up to 4 kW)
6 Long burner (up to 2.7 kW)
Your hob includes as accessory a griddle to be used only over the long burner.
Griddle
7

Gas burners
Operation
Fig. 1
Fig. 2
Fig. 3
Switching on manually
Switching on automatically
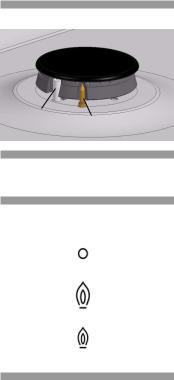
There are indications to show which burner each control knob operates. Fig. 1.
It is essential to ensure that all the burner parts and pan supports are correctly installed for the appliance to work correctly. Fig. 2-3.
1.Press the chosen burner control knob and turn it anticlockwise to the required setting.
2.Use any type of lighter or flame (cigarette lighter, matches, etc.) and bring it close to the burner.
If your hob can be switched on automatically (ignition sparkers):
1. Press the chosen burner control knob and turn it anticlockwise to the maximum power setting.
While the control knob is still pressed down, sparks are produced on all burners. The flame ignites (it is no longer necessary to press down the control knob).
2. Turn the control knob to the required setting.
If it does not come on, turn the control knob to the off setting and repeat the steps above. This time, press and hold the control knob for longer (up to 10 seconds).
Warning! If after 15 seconds the flame does not ignite, switch off the burner and open a nearby window or door. Wait at least one minute before trying to switch the burner on.
8

Safety system
Ignition sparker
Depending on the model, your hob may have a safety system (thermocouple) that prevents the flow of gas if the burners accidentally switch off. To ensure that this device is active, switch on the burner as usual and, without releasing the control knob, press and hold it down firmly for 4 seconds after lighting the flame.
Thermocouple
Switching off a burner
Power levels
Setting |
Control knob |
|
off |
||
|
||
|
Maximum |
|
High flame |
capacity or |
|
aperture and |
||
|
||
|
electricity on |
|
|
Minimum |
|
Low flame |
capacity or |
|
|
aperture |
Turn the corresponding control knob clockwise to the 0 setting.
The progressive control knobs can be used to control the power needed, from minimum to maximum power.
Warnings
It is normal to hear a slight whistling noise while the burner is operating.
When it is first used, it is normal for the burner to give off odours; this does not pose any risk and does not indicate a malfunction; they will disappear in time.
A few seconds after the burner is switched off, a sound (thud) will be produced. This is not a fault - this means that the safety device is no longer operating.
Keep the burner as clean as possible. If the ignition sparkers are dirty they will not light properly. Clean them periodically using a small non-wire brush. Bear in mind that the ignition sparkers must not suffer any serious impacts.
An orange-coloured flame is normal. This is caused by the presence of dust in the atmosphere, spilt liquids, etc.
The kitchen will become hot and humid when this gas appliance is used.
You must therefore ensure that the kitchen is well ventilated: either keep the natural ventilation apertures open, or install a ventilation system (extractor hood).
If using the appliance intensively for prolonged periods, you may require additional ventilation (e.g. by opening a
9

Suitable pans
Wok pan
Accessories
Additional wok pan support
Wok pan
window) or more effective ventilation (e.g. by increasing the hob's ventilation, if possible).
If the burner flames are accidentally blown out, switch off the burner operating control knob and do not try to relight it for at least one minute.
Burner |
Minimum pan size |
Maximum pan size |
|
|
|
Triple-flame |
Ø 22 cm |
|
burner |
|
|
|
|
|
Semi-rapid |
Ø 14 cm |
Ø 20 cm |
burner |
|
|
|
|
|
Auxiliary burner |
Ø 12 cm |
Ø 16 cm |
|
|
|
Long burner* |
28 cm x 12 cm |
36 cm x 20 cm |
|
|
|
*long pans |
|
|
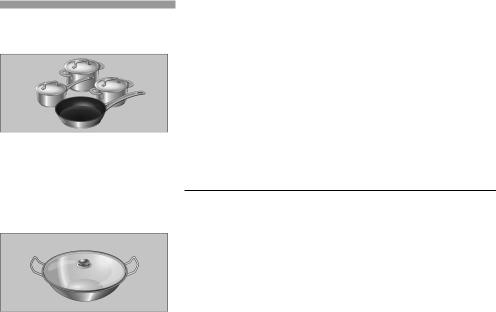
A wok is a cooking vessel originating in China; it is a kind of deep, round, lightweight pan with handles and a flat or concave base.
Food can be prepared in various ways in a wok: it can be stewed, stir fried, cooked on a low heat, pan-fried or steamed. It could be said that woks serve as both as a saucepan and a frying pan and, owing to their shape and size, they can be used to cook quite large ingredients.
When cooking with a wok, heat is diffused more uniformly and gently; the intense heat which accumulates means that food takes less time to cook and also requires less oil, making it one of the quickest and healthiest ways of cooking.
Always follow the manufacturer's instructions when cooking with a wok pan.
Depending on the model, the hob may include the following accessories. These are also available from the Technical Assistance Service.
Additional wok pan support: to be used exclusively on double and triple-flame burners with concave-based pans.
Using these pans may cause some temporary deformation of the grease splash tray. This is normal and does not affect the operation of the appliance.
Pan support: code HEZ298107. Wok pan: code HEZ298103.
10

Additional coffee maker support
Only for use on the auxiliary burner with pans which are no more than 12 cm in diameter.
Code HEZ298115.
Simmer Plate
This accessory has been designed to reduce the level of heat at the lowest power setting.
Place the accessory directly on the pan support with the cones facing upwards, never directly over the burner. Centre the pan over the accessory.
Code HEZ298105.
Simmer Cap
This is a burner which is exclusively suited for cooking over a low heat. In order to use it, it is necessary to remove the auxiliary burner and replace it with the Simmer Cap burner.
Code HEZ298104.
The manufacturer accepts no liability if these acessories are not used or are used incorrectly.
Cooking recommendations
Burner |
Very high High |
Medium |
Slow |
|
|
|
|
|
|
|
|
Triple-flame burner |
Boiling, steaming, |
Reheating and keeping things hot: |
|
|
griddling, toasting, |
cooked and pre-cooked dishes. |
|
|
paellas, Asian food |
|
|
|
(wok). |
|
|
|
|
|
|
Semi-rapid burner |
Steamed potatoes, |
Reheating and keeping things hot: |
|
|
fresh vegetables, |
cooked dishes and making delicate |
|
|
vegetable stews, |
stews. |
|
|
pasta. |
|
|
|
|
|
|
Auxiliary burner |
Cooking: |
Defrosting and |
Melting: |
|
casseroles, rice |
slow cooking: |
butter, chocolate, |
|
pudding and |
vegetables, fruit |
gelatine. |
|
caramels. |
and frozen |
|
|
|
products. |
|
|
|
|
|
Long burner |
Cooking fish. |
Defrosting fish. |
Keeping hot. |
|
Escalope, steak and |
Cooking rice, white |
Steaming: fish, |
|
fried food. |
sauce and ragout. |
vegetables. |
|
|
|
|
11
Griddle
Advice for use
Cleaning
Maintenance
The griddle with non-stick surface allows for cooking dishes that are generally cooked in a frying pan using a low amount of oil.
To use the griddle, place it only on the pan support over the long burner.
M Warning! Place and remove the griddle only when all pan supports and the griddle have cooled down and all burners are off.
To cook most foods on the griddle, the surface must be pre-heated. The burner power may require adjustment if the griddle is used for a long time.
When you first start using it, slight smoke and odour may come off.
It is recommended to use only plastic, nylon or wooden utensils to prevent damaging the griddle surface. Avoid using sharp or cutting-edge metal utensils. Never cut food or leave utensils on the griddle.
Do not use oil on the griddle for long a time and avoid grease spilling.
After each use, wash the griddle with hot water and a soap containing non-toxic ingredients, using a soft sponge or cloth.
Do not use metal scourers or detergents with a sandy texture. Do not wash the griddle in the dishwasher.
Dry the griddle with a soft cloth or kitchen paper.
M Clean the grease built up on the griddle underside as soon as possible, as it could ignite.
To protect the non-stick surface:
ØBefore using it for the first time, and then regularly, wipe the griddle cooking surface with oil and remove excess with kitchen paper.
ØStore the griddle carefully to avoid bangs or scratches.
ØDo not overheat the griddle without food.
12
Precautions for use
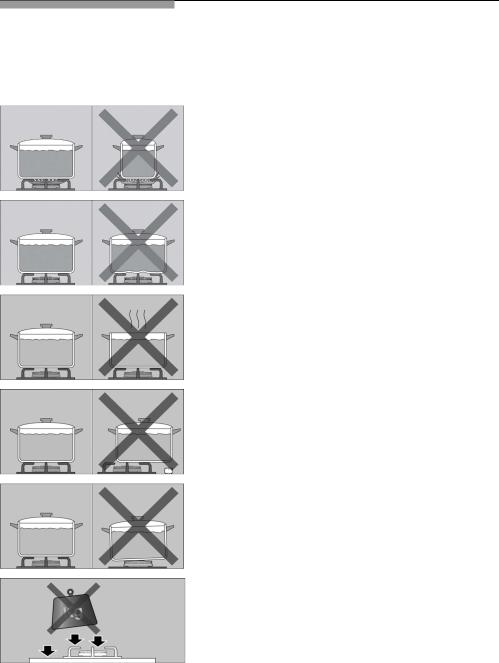
The following advice is intended to help you save energy and prevent pan damage:
Use pans which are the right size for each burner.
Do not use small pans on large burners. The flame should not touch the sides of the pan.
Do not use damaged pans, which do not sit evenly on the hob. Pans may tip over.
Only use pans with a thick, flat base.
Do not cook without using a lid and make sure the lid is properly fitted to avoid wasting energy.
Always place the pan right over the burner, not to one side. Otherwise it could tip over.
Do not place large pans on the burners near the control knobs. These may be damaged by the very high temperatures.
Place the pans on the pan supports, never directly on the burner.
Pans should be placed on the hob carefully.
Do not strike the hob and do not place excessive weight on it.
Make sure that the pan supports and burner covers are correctly positioned before using the appliance.
13
Cleaning and maintenance
Cleaning
Unsuitable products
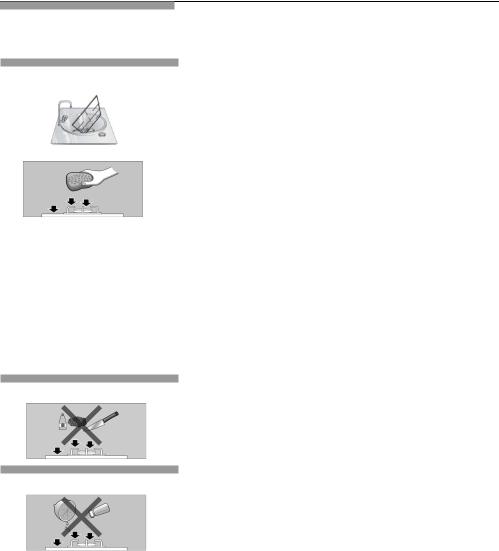
Once the appliance is cool, use a sponge to clean it with soap and water.
After each use, clean the surface of the respective burner parts once they have cooled down. If any residue is left (baked-on food, drops of grease etc.), however little, it will become stuck to the surface and more difficult to remove later. The holes and grooves must be clean for the flame to ignite properly.
The movement of some pans may leave metal residue on the pan supports.
Clean the burners and pan supports using soapy water and scrub with a non-wire brush.
If the pan supports are fitted with rubber rests, ensure that these are also cleaned. The rests may come loose and the pan support may scratch the hob.
Always dry the burners and pan supports completely. Water droplets or damp patches on the hob at the start of cooking may damage the enamel.
After cleaning and drying the burners, make sure the burner covers are correctly placed on the diffuser.
Do not use steam cleaners. This could damage the hob.
If your hob is fitted with a glass or aluminium panel, never use a knife, scraper or similar to clean the point where it joins the metal.
Maintenance
Always clean off any liquid as soon as it is spilt: you will save yourself any unnecessary effort.
Do not leave acidic liquids (e.g. lemon juice, vinegar, etc.) on the hob.
Due to the high temperatures endured, the triple-flame burner ring cap and the stainless steel areas (grease drip tray, burner outline, etc.) can become discoloured. This is normal. After each use, clean these areas, with a product that is suitable for stainless steel.
The stainless steel cleaner must not be used in the area around the controls. The (printed) symbols may be wiped off.
14

Faults
Sometimes certain faults detected can be easily resolved. Before calling the Technical Assistance Service, bear in mind the following advice:
Fault |
Possible cause |
Solution |
|
|
|
The general electrical |
Defective fuse. |
Check the fuse in the main fuse |
system is |
|
box and change it if it is |
malfunctioning. |
The automatic safety switch |
damaged. |
|
or circuit breaker has |
Check the main control panel |
|
tripped. |
to see if the automatic safety |
|
|
switch or circuit breaker has |
|
|
tripped. |
|
|
|
The automatic on |
There may be food or |
The space between the ignition |
function does not |
cleaning products stuck |
sparker and the burner must be |
work. |
between the ignition |
clean. |
|
sparkers and the burners. |
|
|
The burners are wet. |
Dry the burner covers carefully. |
|
|
Check that the covers are |
|
The burner covers are not |
correctly positioned. |
|
correctly positioned. |
|
|
The appliance is not |
Contact the electrical installer. |
|
earthed, is not correctly |
|
|
connected or the earth wire |
|
|
is faulty. |
|
|
|
|
The burner flame is |
The burner components are |
Ensure the components are |
not uniform. |
not correctly positioned. |
correctly positioned. |
|
The grooves on the burner |
|
|
are dirty. |
Clean the grooves on the |
|
|
diffuser. |
|
|
|
The flow of gas does |
The gas supply is blocked |
Open all intermediary valves. |
not appear normal or |
via intermediary valves. |
Change the gas cylinder. |
no gas comes out. |
If the gas is supplied from a |
|
|
gas cylinder, check that this |
|
|
is not empty. |
|
|
|
|
The kitchen smells of |
A gas tap has been left on. |
Turn off the gas taps. |
gas. |
There may be a leak in the |
Check that the coupling is |
|
gas cylinder coupling. |
sound. |
|
|
|
The safety valves on |
The control knob was not |
Once the burner is lit, hold the |
one of the burners are |
held down for long enough. |
control knob down a few |
not working. |
|
seconds longer. |
|
The grooves on the diffuser |
Clean the grooves on the |
|
are dirty. |
diffuser. |
|
|
|
15
Technical Assistance Service
|
|
When contacting our Technical Assistance Service, |
|
|
please provide the product number (E-No.) and |
|
|
production number (FD) of the appliance. This |
|
|
information is given on the specifications plate located on |
|
|
the lower section of the hob and on the label in the user |
|
|
manual. |
|
|
|
|
|
|
Warranty conditions |
The applicable warranty conditions are those set out by |
|
|
|
the company's representative office in the country of |
|
|
purchase. Detailed information is available from retail |
|
|
outlets. Proof of purchase must be presented to obtain |
|
|
the benefits of the warranty. |
|
|
We reserve the right to introduce changes. |
Used appliances and packaging
Environmentally-friendly waste management
If the ) symbol is shown on the specifications plate, bear in mind the following instructions.
Unpack the appliance and dispose of the packaging by environmentally-friendly means.
This appliance complies with European directive 2002/ 96/CE on electrical and electronic equipment identified as WEEE (waste electrical and electronic equipment).
16
Contenido
Indicaciones de seguridad . . . . . . . . . . . 19 Su nuevo aparato . . . . . . . . . . . . . . . . . . 21
Quemadores. . . . . . . . . . . . . . . . . . . . . . . . 22
Encendido manual . . . . . . . . . . . . . . . . . . . . . . 22 Encendido automático . . . . . . . . . . . . . . . . . . . 22 Sistema de seguridad . . . . . . . . . . . . . . . . . . . 23
Apagar un quemador . . . . . . . . . . . . . . . . . . 23
Niveles de potencia . . . . . . . . . . . . . . . . . . . . 23
Advertencias . . . . . . . . . . . . . . . . . . . . . . . . 23
Recipientes apropiados. . . . . . . . . . . . . . . . . 24 Accesorios . . . . . . . . . . . . . . . . . . . . . . . . . . . 25 Parrilla supletoria wok. Recipiente wok . . . . . 25 Parrilla supletoria cafetera . . . . . . . . . . . . . . . 25 Simmer plate. . . . . . . . . . . . . . . . . . . . . . . . . 25 Simmer cap . . . . . . . . . . . . . . . . . . . . . . . . . 25 Consejos de cocinado . . . . . . . . . . . . . . . . . . . 26
Plancha de asado . . . . . . . . . . . . . . . . . . . 27 Consejos de uso . . . . . . . . . . . . . . . . . . . . . 27 Limpieza . . . . . . . . . . . . . . . . . . . . . . . . . . . 29 Mantenimiento . . . . . . . . . . . . . . . . . . . . . . . 27
Advertencias de uso. .. . . . . . . . . . . . . . . . |
28 |
Limpieza y mantenimiento . . . . . . . . . . . |
29 |
Limpieza . . . . . . . . . . . . . . . . . . . . . . . . . . . . . . 29 Productos inadecuados . . . . . . . . . . . . . . . . . . 29 Mantenimiento . . . . . . . . . . . . . . . . . . . . . . . . . 29
Anomalías . . . . . . . . . . . . . . . . . . . . . . . . . 30
Servicio de asistencia técnica . . . . . . . . . 31
Condiciones de garantía . . . . . . . . . . . . . . . . 31
Embalaje y aparatos usados . . . . . . . . . . 31
Eliminación de residuos respetuosa con el medio ambiente . . . . . . . . . . . . . . . . . . . . . . . 31
17
Estimado cliente:
Le felicitamos por su elección y le agradecemos la confianza depositada en nosotros. Este práctico aparato, moderno y funcional está fabricado con materiales de primera calidad, los cuales han sido sometidos a unos estrictos controles de calidad durante todo el proceso de fabricación, y meticulosamente ensayados para que pueda satisfacer todas sus exigencias de una perfecta cocción.
No saque el aparato del embalaje protector, hasta el momento del encastre.
Le rogamos lea las instrucciones antes de proceder a la instalación o al uso del aparato. La información que contienen es fundamental para un correcto funcionamiento y, lo que es más importante, para su seguridad.
El embalaje de su aparato se ha fabricado con los materiales estrictamente necesarios para garantizar una protección eficaz durante el transporte.
Estos materiales son totalmente reciclables, reduciendo así el impacto medioambiental. Le invitamos a contribuir también en la conservación del medio ambiente, siguiendo los siguientes consejos:
-deposite el embalaje en el contenedor de reciclaje adecuado,
-antes de deshacerse de un aparato desechado, inutilícelo. Consulte en su administración local la dirección del centro recolector de materiales reciclables más próximo y entregue allí su aparato,
-no tire el aceite usado por el fregadero. Guárdelo en un recipiente cerrado y entréguelo en un punto de recogida o, en su defecto, en un contenedor de basura (acabará en un vertedero controlado; probablemente, no es la mejor solución, pero evitamos la contaminación del agua).
IMPORTANTE:
Si contrariamente a nuestras expectativas, el aparato presentara algún daño o no cumpliera con sus exigencias de calidad previstas, le rogamos nos lo haga saber lo antes posible. Para que la garantía tenga validez, el aparato no deberá haber sido manipulado, ni sometido a un mal uso.
18

Indicaciones de seguridad
Lea atentamente estas instrucciones. Sólo entonces podrá manejar su aparato de manera efectiva y segura.
Todos los trabajos de instalación, regulación y adaptación a otro tipo de gas deben ser realizados por un técnico autorizado, respetando la normativa y legislación aplicable, y las prescripciones de las compañías locales eléctricas y de gas.
Se recomienda llamar al Servicio Técnico para la adaptación a otro tipo de gas.
Antes de instalar su nueva placa de cocción asegúrese de que la instalación se realiza siguiendo las instrucciones de montaje.
Este aparato sólo puede ser instalado en un lugar bien ventilado, respetando los reglamentos en vigor y las disposiciones relativas a la ventilación. No debe conectarse el aparato a un dispositivo de evacuación de los productos de combustión.
Este aparato ha sido diseñado sólo para uso doméstico, no estando permitido su uso comercial o profesional. Este aparato no puede ser instalado en yates o caravanas. La garantía únicamente tendrá validez en caso de que se respete el uso para el que fue diseñado.
El lugar en el que se instale el aparato debe disponer de la ventilación reglamentaria en perfecto estado.
No someta el aparato a corrientes de aire. Los quemadores podrían apagarse.
Este aparato sale de fábrica adaptado al tipo de gas que indica la placa de características. Si fuera necesario cambiarlo, consulte las instrucciones de montaje.
No manipule el interior del aparato. Si fuera necesario, llame a nuestro Servicio Técnico.
Conserve las instrucciones de uso e instalación, y entréguelas con el aparato si éste cambia de dueño.
Si observa algún daño en el aparato, no lo conecte. Póngase en contacto con nuestro Servicio Técnico.
Las superficies de aparatos de cocción se calientan durante el funcionamiento. Actúe con precaución. Mantenga alejados a los niños.
Utilice el aparato únicamente para cocinar, nunca como calefacción.
Las grasas o aceites sobrecalentados se inflaman fácilmente. No se ausente mientras calienta grasas o
19
aceites. Si se inflaman, no apague el fuego con agua. ¡Peligro de quemaduras! Cubra el recipiente con una tapa para sofocar el fuego y desconecte la zona de cocción.
En caso de avería, corte la alimentación eléctrica y de gas del aparato. Para la reparación, llame a nuestro Servicio Técnico.
Si alguno de los mandos no se puede girar, no lo fuerce. Llame inmediatamente al Servicio Técnico, para que proceda a su reparación o sustitución.
No coloque recipientes deformados que se muestren inestables sobre placas y quemadores, para evitar que se puedan volcar accidentalmente.
No utilice máquinas de limpieza a vapor en la placa de cocción. ¡Peligro de electrocución!
Este aparato corresponde a la clase 3, según la norma EN 30-1-1 para aparatos a gas: aparato encastrado en un mueble.
No almacene ni utilice productos químicos corrosivos, vapores, materiales inflamables ni productos no alimenticios debajo de este electrodoméstico ni cerca de él.
Este aparato no está destinado para ser usado por personas (incluidos niños) cuyas capacidades físicas, sensoriales o mentales estén reducidas, o
carezcan de experiencia o conocimiento, salvo si han tenido supervisión o instrucciones relativas al uso del aparato por una persona responsable de su seguridad.
Durante el funcionamiento, el aparato no debe dejarse sin vigilancia.
Los gráficos representados en este manual de instrucciones son orientativos.
El fabricante queda exento de toda responsabilidad si no se cumplen las disposiciones de este manual.
20

Su nuevo aparato
1 4 6
5 2 3
1 Parrillas
2 Mandos
3 Quemador auxiliar de hasta 1 kW
4 Quemador semi-rápido de hasta 1,75 kW
5 Quemador de triple llama de hasta 4 kW
6 Quemador alargado de hasta 2,7 kW
Su placa de cocción incluye como accesorio una plancha de asado para utilizar exclusivamente sobre el quemador alargado.
Plancha de asado
21
Quemadores de gas Funcionamiento
Fig. 1
Fig. 2
Fig. 3
Encendido manual
Encendido automático
Cada mando de accionamiento tiene señalado el quemador que controla. Fig. 1.
Para un correcto funcionamiento del aparato es imprescindible asegurarse de que las parrillas y todas las piezas de los quemadores estén bien colocadas. Fig. 2-3.
1.Presione el mando del quemador elegido y gírelo hacia la izquierda hasta la posición deseada.
2.Acerque algún tipo de encendedor o llama (mecheros, cerillas, etc.) al quemador.
Si su placa de cocción dispone de encendido automático (bujías):
1. Presione el mando del quemador elegido y gírelo hacia la izquierda hasta la posición de máxima potencia.
Mientras el mando está presionado, se producen chispas en todos los quemadores. La llama se enciende (ya no es necesario mantener el mando presionado).
2. Gire el mando a la posición deseada.
Si no se produce el encendido, gire el mando a la posición de apagado y repita los pasos. Esta vez, mantenga el mando presionado durante más tiempo (hasta 10 segundos).
22
Sistema de seguridad
Bujía Termopar
Apagar un quemador
Niveles de potencia
Posición |
Mando |
|
cerrado |
||
|
||
|
Apertura o |
|
|
capacidad |
|
Llama grande |
máximas y |
|
|
encendido |
|
|
eléctrico |
|
Llama |
Apertura o |
|
capacidad |
||
pequeña |
||
mínima |
||
|
¡Atención! Si transcurridos 15 segundos la llama no se enciende, apague el quemador y abra la puerta o ventana del recinto. Espere al menos un minuto antes de intentar encender el quemador.
Según modelo, su placa de cocción puede disponer de un sistema de seguridad (termopar), que impide el paso de gas si los quemadores se apagan accidentalmente. Para garantizar que este dispositivo esté activo, encienda el quemador con normalidad y, sin soltar el mando, manténgalo presionado firmemente durante 4 segundos tras haberse encendido la llama.
Gire el mando correspondiente hacia la derecha hasta la posición 0.
Los mandos progresivos le permiten regular la potencia que necesite entre los niveles máximo y mínimo.
Advertencias
Durante el funcionamiento del quemador, es normal que se escuche un leve silbido.
En los primeros usos es normal que se desprendan olores, esto no supone ningún riesgo, ni mal funcionamiento, irán desapareciendo.
Unos segundos después del apagado del quemador se producirá un sonido (golpe seco). No es ninguna anomalía, eso significa que la seguridad se ha desactivado.
Mantenga la máxima limpieza. Si las bujías están sucias el encendido será defectuoso. Límpielas periódicamente con un cepillo no metálico pequeño. Tenga en cuenta que las bujías no deben sufrir impactos violentos.
23
Recipientes apropiados
Recipiente wok
Una llama de color naranja es normal. Se debe a la presencia de polvo en el ambiente, líquidos derramados, etc.
El uso de un aparato de cocción a gas produce calor y humedad en el local donde está instalado.
Debe asegurarse una buena ventilación de la cocina: mantenga abiertos los orificios de ventilación natural, o instale un dispositivo de ventilación mecánica (campana extractora).
La utilización intensa y prolongada del aparato puede necesitar una ventilación complementaria, por ejemplo, abriendo una ventana, o una ventilación más eficaz, por ejemplo, aumentando la potencia de la ventilación mecánica, si existe.
En el caso de una extinción accidental de las llamas del quemador, cierre el mando de accionamiento del quemador y no intente reencenderlo durante por lo menos 1 minuto.
Quemador |
Tamaño mínimo del |
Tamaño máximo |
|
recipiente |
del recipiente |
|
|
|
Quemador de |
Ø 22 cm |
|
triple llama |
|
|
|
|
|
Quemador semi- |
Ø 14 cm |
Ø 20 cm |
rápido |
|
|
|
|
|
Quemador |
Ø 12 cm |
Ø 16 cm |
auxiliar |
|
|
|
|
|
Quemador |
28 cm x 12 cm |
36 cm x 20 cm |
alargado* |
|
|
*recipientes alargados
El wok es un utensilio de cocina originario de China, es una especie de sartén ligera, redonda, profunda, con asas y con base plana o cóncava.
En el wok, los alimentos se pueden preparar de variadas formas: estofados, fritos, a fuego lento, al grill, además de al vapor. Se puede decir que el wok hace las veces de sartén y de olla, y gracias a su forma y tamaño, permite cocinar ingredientes de bastante tamaño.
En el wok, el calor se distribuye de manera más uniforme y suave, el calor intenso que acumula permite que los alimentos se cocinen en menos tiempo, y además requiere menos aceite, por lo que es uno de los métodos de cocción más rápidos y saludables.
Cuando utilice un recipiente wok, siga las instrucciones del fabricante.
24
Loading...