


 Loading...
Bosch PCQ715B80E, PCP616B80E, PCP615M90E, PCP615B80E, PCI815M91E Operating Instructions
...
en Operating instructions
fr Mode d’emploi
it Avvertenze per l’uso
es Instrucciones de funcionamiento
pt Manual de utilizaçao
Robert Bosch Hausgeräte GmbH
Carl-Wery-Straße 34
81739 München
Cod. 9000388207 I
www.bosch-home.com
Table of contents
Safety precautions. . . . . . . . . . . . . . . . . . . 5
Your new appliance . . . . . . . . . . . . . . . . . 7 Burners . . . . . . . . . . . . . . . . . . . . . . . . . . . 8
Switching on manually . . . . . . . . . . . . . . . . . . . . 8 Switching on automatically . . . . . . . . . . . . . . . . . 8 Safety system . . . . . . . . . . . . . . . . . . . . . . . . . . 9 Switching off a burner . . . . . . . . . . . . . . . . . 9
Power levels . . . . . . . . . . . . . . . . . . . . . . . . . . . 9 Main Switch / Hob lock. . . . . . . . . . . . . . . . 10
Warnings . . . . . . . . . . . . . . . . . . . . . . . . . 10 Suitable pans . . . . . . . . . . . . . . . . . . . . . . 11
Accessories . . . . . . . . . . . . . . . . . . . . . . . . . . . 12 Additional wok pan support. Wok pan . . . . . 12
Additional coffee maker support . . . . . . . . . . 12 Simmer plate . . . . . . . . . . . . . . . . . . . . . . . . . 12 Simmer cap . . . . . . . . . . . . . . . . . . . . . . . . . . 12
Cooking recommendations. . . . . . . . . . . . . . . . 13
Electric hobs. . . . . . . . . . . . . . . . . . . . . . 14
Electric hobs with continuous energy
regulator . . . . . . . . . . . . . . . . . . . . . . . . . . . . . 14 Suggestions . . . . . . . . . . . . . . . . . . . . . . . . . . . 15
Precautions for use. . . . . . . . . . . . . . . . . 16
Cleaning and maintenance . . . . . . . . . . 17
Cleaning . . . . . . . . . . . . . . . . . . . . . . . . . . . . . . 17 Unsuitable products . . . . . . . . . . . . . . . . . . . . . 17 Maintenance . . . . . . . . . . . . . . . . . . . . . . . . . . . 17
Faults . . . . . . . . . . . . . . . . . . . . . . . . . . |
18 |
Technical Assistance Service . . . . . . . . . 19 Warranty conditions . . . . . . . . . . . . . . . . . . 19 Used appliances and packaging. . . . . . . 19
Environmentally-friendly waste management . . 19
3
Dear customer,
Congratulations on your choice and thank you for purchasing one of our appliances. This practical, modern and functional appliance is manufactured using materials of the highest quality which are subject to strict quality control checks throughout the entire manufacturing process. The appliance is meticulously tested to ensure that it meets your demands and produces perfect cooking results.
Do not remove the appliance from its protective packaging until it is installed in the unit.
Please read these instructions carefully before proceeding to install and use the appliance. The information contained in these instructions is essential for the correct operation of the appliance and, more importantly, for your safety.
The packaging of your appliance has been manufactured using only the materials which are strictly necessary to guarantee efficient protection during transport.
These materials are 100% recyclable, thus reducing the environmental impact. You can also contribute to caring for the environment, by following the advice below:
-dispose of the packaging in the appropriate recycling bin
-before you get rid of an old appliance, make sure you disable it. Contact your local authority to find out the address of your nearest recycling centre to dispose of your appliance
-do not pour used oil down the sink. Collect it in a sealed container and take it to an appropriate collection point or, failing that, place it in the rubbish bin (it will end up in a controlled dump; this is probably not the best option, but it will avoid contaminating ground water).
IMPORTANT:
In the unlikely event that the appliance should be damaged or not meet your expectations in terms of quality, please inform us as soon as possible. For the warranty to be valid, the appliance must not have been tampered with, or used inappropriately
4

Safety precautions
Read these instructions carefully. Reading these instructions will enable you to use your appliance safely and effectively.
All operations relating to installation, regulation and conversion to other types of gas must be carried out by an authorised installation engineer, respecting applicable regulations, standards and the specifications of the local gas and electricity providers. You are recommended to contact the Technical Assistance Service to convert to another type of gas.
Before installing your new hob, ensure that it is being installed according to the assembly instructions.
This appliance can only be installed in a well-ventilated place in accordance with existing regulations and ventilation specifications. The appliance must not be connected to a combustion product removal device.
This appliance has been designed for home use only, not for commercial or professional use. This appliance cannot be installed on yachts or in caravans. The warranty will only be valid if the appliance is used for the purpose for which it was designed.
The place in which the appliance is installed must have fully-functioning ventilation, in accordance with the regulations.
Do not subject the appliance to draughts. These might blow out the burners.
This appliance leaves the factory set to the type of gas that is indicated on the specifications plate. If this must be changed, read the Assembly instructions.
Do not tamper with the appliance's interior. If necessary, call our Technical Assistance Service.
These operating and installation instructions should be retained, and passed onto the buyer if the appliance is sold.
Do not switch on the appliance if it is damaged in any way. Contact our Technical Assistance Service.
The surfaces of cooking appliances heat up during use. Care must be taken when using these appliances. Keep children well away from this appliance.
This appliance is only intended for cooking purposes, not as a heating system.
Fat or oil which is overheated can catch fire easily. Do not leave oil or fats to heat up unattended. If oil or fats do
5
catch fire, never use water to put the fire out. Risk of burns! Put the fire out by covering the pan with a lid and switch off the hotplate.
In the event of a malfunction, turn off the appliance’s gas and electricity supply. For repairs, call our Technical
Assistance Service.
If one of the control knobs will not turn, do not force it.
Call the Technical Assistance Service immediately, so that they can repair or replace it.
Never place unstable pans on the hob or the burners, as they may accidentally tip over.
Do not clean the hob using a steam cleaner. Risk of electrocution!
This appliance is class 3 type, according to the EN 30-1-
1 standard for gas appliances: built-in appliance.
Do not store or use corrosive chemicals, steamers, flammable materials or non-food products below or near this domestic appliance.
This appliance is not intended for use by persons
(including children) with reduced physical, sensory or mental capabilities, or lack of experience and knowledge, unless they have been given supervision or instruction concerning use of the appliance by a person responsible for their safety.
Never leave the appliance unattended during operation.
The graphics in this instruction manual are given as a guide only.
The manufacturer is exempt from all responsibility if the requirements of this manual are not complied with.
6

Your new appliance
7 |
1 |
5 |
4 |
1 |
5 |
9 |
1 |
5 |
4 |
5 |
|||||||
|
|
|
|
|
|
|
|
|
|
|
|
|
|
|
|
|
|
|
|
|
|
|
|
|
|
|
|
|
|
|
|
|
|
|
|
|
|
|
|
|
|
|
|
|
|
|
|
|
|
|
|
|
|
|
|
|
|
|
|
|
|
|
|
|
|
|
|
|
|
|
|
|
|
|
|
|
|
|
|
|
|
|
|
|
|
|
|
|
|
|
|
|
|
|
|
|
|
|
|
10 |
|
|
3 |
|
|
|
|
|
|
|
|
|
|
|
|
|
|
|
|
|
|
|
|
|
|
|
|
|
|
|
|
|
|
||
|
|
|
|
|
6 |
10 |
|
|
|
|
|
|
|
|
|
|
|
3 |
|
|
|
|
|
|
|||||||
|
|
|
3 |
2 3 |
|
|
|
4 |
2 |
4 |
|
|
|||||||||||||||||||
2 |
|
|
|
2 |
|||||||||||||||||||||||||||
4 |
|
1 |
|
5 |
|
|
|
|
|
|
4 |
1 |
5 |
|
|
|
|
|
7 |
|
1 |
|
|
|
|
||||||
|
|
|
|
|
|
|
|
|
|
|
|
|
|
|
|
|
|
|
|
|
|
|
|
|
|
|
|
|
|
|
|
|
|
|
|
|
|
|
|
|
|
|
|
|
|
|
|
|
|
|
|
|
|
|
|
|
|
|
|
|
|
|
|
|
|
|
|
|
|
|
|
|
|
|
|
|
|
|
|
|
|
|
|
|
|
|
|
|
|
|
|
|
|
|
|
|
|
|
|
|
|
|
|
|
|
|
|
|
|
|
|
|
|
|
|
|
|
|
|
|
|
|
|
|
|
|
|
|
|
|
|
|
|
|
|
|
|
|
|
|
|
|
|
|
|
|
|
|
|
|
|
|
|
|
|
|
|
|
|
|
|
|
|
|
|
|
|
|
|
|
|
|
|
|
|
|
|
|
|
|
|
|
|
|
|
|
|
|
|
|
|
|
|
|
|
|
|
|
10 4 |
|
|
2 |
3 4 |
5 |
|
||||||
3 |
2 |
7 |
10 4 |
3 |
2 |
8 |
|
|
||||||||||||||||||||
|
|
|
|
1 |
5 |
|
3 |
|
|
1 |
|
4 |
|
3 |
1 |
|
|
4 |
||||||||||
|
|
|
|
|
|
|
|
|
|
|
|
|
|
|
|
|
|
|
|
|
|
|
|
|
|
|
|
|
|
|
|
|
|
|
|
|
|
|
|
|
|
|
|
|
|
|
|
|
|
|
|
|
|
|
|
|
|
|
|
|
|
|
|
|
|
|
|
|
|
|
|
|
|
|
|
|
|
|
|
|
|
|
|
|
|
|
|
|
|
|
|
|
|
|
|
|
|
|
|
|
|
|
|
|
|
|
|
|
|
|
|
|
|
|
|
8 |
2 |
3 4 |
10 4 |
5 |
2 |
8 |
10 |
4 |
6 |
2 |
3 4 |
6 |
|
|
|
|
1 Pan supports
2 Control knobs
3 Auxiliary burner (up to 1 kW)
4 Semi-rapid burner (up to 1,75 kW)
5 Rapid burner (up to 3 kW)
6 Double-flame burner (up to 3,3 kW)
7 Triple-flame burner (up to 4 kW)
8 Dual double-flame burner (up to 5 kW)
9 Electric hob 1500 W
10 Main Switch (optional)
7

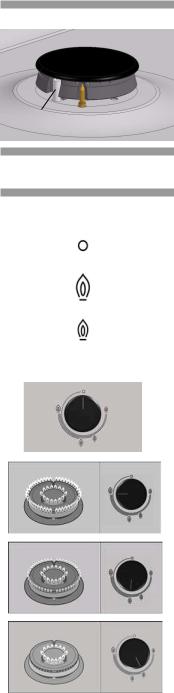
Gas burners
Operation
Fig. 1
Fig. 2
Fig. 3
Switching on manually
Switching on automatically
There are indications to show which burner each control knob operates. Fig. 1.
It is essential to ensure that all the burner parts and pan supports are correctly installed for the appliance to work correctly. Fig. 2-3.
1.Press the chosen burner control knob and turn it anticlockwise to the required setting.
2.Use any type of lighter or flame (cigarette lighter, matches, etc.) and bring it close to the burner.
If your hob can be switched on automatically (ignition sparkers):
1.Press the chosen burner control knob and turn it anticlockwise to the maximum power setting.
While the control knob is still pressed down, sparks are produced on all burners. The flame ignites (it is no longer necessary to press down the control knob).
2.Turn the control knob to the required setting.
If it does not come on, turn the control knob to the off setting and repeat the steps above. This time, press and hold the control knob for longer (up to 10 seconds).
Warning! If after 15 seconds the flame does not ignite, switch off the burner and open a nearby window or door. Wait at least one minute before trying to switch the burner on.
8
Safety system
Ignition
sparker Thermocouple
Depending on the model, your hob may have a safety system (thermocouple) that prevents the flow of gas if the burners accidentally switch off. To ensure that this device is active, switch on the burner as usual and, without releasing the control knob, press and hold it down firmly for 4 seconds after lighting the flame.
Switching off a burner
Power levels
Setting |
Control knob |
|
off |
|
Maximum |
|
capacity or |
High |
aperture and |
flame |
electricity |
|
on |
Low |
Minimum |
flame |
capacity or |
|
aperture |
Turn the corresponding control knob clockwise to the 0 setting.
The progressive control knobs can be used to control the power needed, from minimum to maximum power.
For dual double-flame burners, the inner and outer flames can be controlled separately.
The available power levels are as follows:
Inner and outer flame on full power.
Outer flame on minimum, inner flame on full power.
Inner flame on full power.
9

Inner flame on minimum power.
Main switch/Hob lock
Warnings
The hob may have a main switch to cut off the main gas supply and switch off all the burners at the same time. This switch is very practical if there are children in the house, or, if for any reason, all the burners must be switched off quickly.
To lock the hob:
1. Press the main switch.
This switches off all the burners which are on. The hob is locked.
To unlock the hob:
1.Turn all the control knobs to the "off" position.
2.Press the main switch and turn it fully clockwise. The mains gas supply is turned on.
You can now use your hob normally.
It is normal to hear a slight whistling noise while the burner is operating.
When it is first used, it is normal for the burner to give off odours; this does not pose any risk and does not indicate a malfunction; they will disappear in time.
A few seconds after the burner is switched off, a sound
(thud) will be produced. This is not a fault - this means that the safety device is no longer operating.
Keep the burner as clean as possible. If the ignition sparkers are dirty they will not light properly. Clean them periodically using a small non-wire brush. Bear in mind that the ignition sparkers must not suffer any serious impacts.
An orange-coloured flame is normal. This is caused by the presence of dust in the atmosphere, spilt liquids, etc.
The kitchen will become hot and humid when this gas appliance is used.
10

You must therefore ensure that the kitchen is well ventilated:
either keep the natural ventilation apertures open, or install a ventilation system (extractor hood).
If using the appliance intensively for prolonged periods, you may require additional ventilation (e.g. by opening a window) or more effective ventilation (e.g. by increasing the hob's ventilation, if possible).
If the burner flames are accidentally blown out, switch off the burner operating control knob and do not try to relight it for at least one minute.
Suitable pans
|
Burner |
Minimum pan |
Maximum pan |
|
|
diameter |
diameter |
|
|
|
|
|
Double or triple |
22 cm |
|
|
flame burner |
|
|
|
|
|
|
|
|
|
|
|
Rapid burner |
22 cm |
26 cm |
|
|
|
|
|
Semi-rapid |
14 cm |
20 cm |
|
burner |
||
|
|
|
|
|
|
|
|
|
Auxiliary burner |
12 cm |
16 cm |
|
|
|
|
|
Electric hob |
18 cm |
|
|
|
||
Wok pan |
A wok is a cooking vessel originating in China; it is a kind |
||
|
of deep, round, lightweight pan with handles and a flat or |
||
|
concave base. |
|
|
|
Food can be prepared in various ways in a wok: it can be |
||
stewed, stir fried, cooked on a low heat, pan-fried or steamed. It could be said that woks serve as both as a saucepan and a frying pan and, owing to their shape and size, they can be used to cook quite large ingredients. When cooking with a wok, heat is diffused more uniformly and gently; the intense heat which accumulates means that food takes less time to cook and also requires less oil, making it one of the quickest and healthiest ways of cooking.
Always follow the manufacturer's instructions when cooking with a wok pan.
11
Accessories
Additional wok pan support
Wok pan
Additional coffee maker support
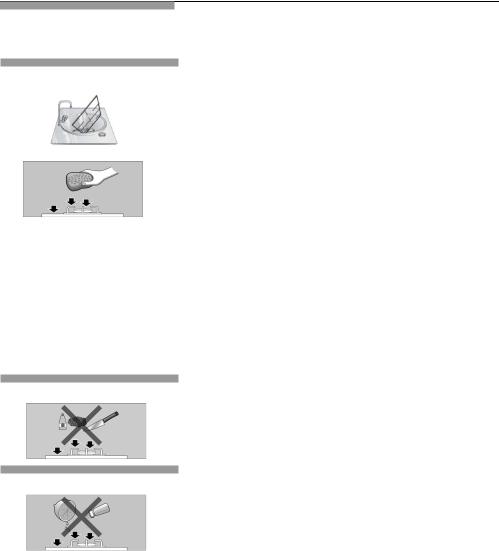
Simmer Plate
Depending on the model, the hob may include the following accessories. These are also available from the Technical Assistance Service.
Additional wok pan support: to be used exclusively on double and triple-flame burners with concave-based pans.
Using these pans may cause some temporary deformation of the grease splash tray. This is normal and does not affect the operation of the appliance.
Cast iron pan support (4/5 kW): code HEZ298107. Cast iron pan support (3.3 kW): code HEZ298108. Enamelled iron pan support: code HEZ298110.
Wok pan: code HEZ298103.
Only for use on the auxiliary burner with pans which are no more than 12 cm in diameter.
Cast iron pan support: Code HEZ298115.
Enamelled iron pan support: Code HEZ298114.
This accessory has been designed to reduce the level of heat at the lowest power setting.
Place the accessory directly on the pan support with the cones facing upwards, never directly over the burner. Centre the pan over the accessory.
Code HEZ298105.
Simmer Cap
Burner specially designed to cook at minimum power. In order to use it, remove the auxiliary burner and replace it with the Simmer Cap burner.
Code HEZ298104.
The manufacturer accepts no liability if these accessories are not used or are used incorrectly.
12

Cooking recommendations
Burner |
Very high, high |
Medium |
Low |
|
|
|
|
|
|
|
|
Double or triple |
Boiling, steaming, |
Reheating and keeping things hot: |
|
flame burner |
griddling, toasting, |
cooked and pre-cooked dishes. |
|
|
paellas, Asian food |
|
|
|
(wok). |
|
|
|
|
|
|
Rapid burner |
Escalopes, steaks, |
Rice, white sauce |
Steaming: |
|
omelettes, frying. |
and ragout. |
fish, vegetables. |
|
|
|
|
Semi-rapid |
Steamed potatoes, |
Reheating and keeping things hot: |
|
burner |
fresh vegetables, |
pre-cooked dishes and delicate |
|
|
stews, pasta. |
casseroles. |
|
|
|
|
|
Auxiliary burner |
Cooking: |
Defrosting and |
Melting: |
|
casseroles, rice |
slow cooking: |
butter, chocolate, |
|
pudding and |
vegetables, fruits |
gelatine. |
|
caramels. |
and frozen |
|
|
|
products. |
|
|
|
|
|
13
Electric hobs
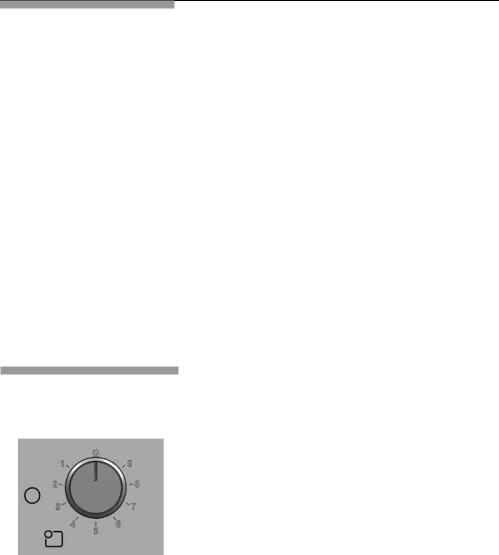
Electric hobs with continuous energy regulator
Fig. 4.
Before using the hob for the first time, heat it up for 5 minutes, set to full power, with no pans placed on it. At this point it is normal to notice smoke and odours, but these will disappear over time. Do not operate the hobs without placing pans on top, except during this initial heating phase.
It is recommended to start cooking on full power and, depending on the quantity and quality of food, later switch to an intermediate setting for the remaining cooking time.
Taking advantage of the hob's thermal inertia, you can switch the hob off shortly before you finish cooking. This will save energy, as you can continue cooking using the residual heat.
Use pans with bottoms which are thick and perfectly flat. Make sure that the size of the pan used is similar to that of the heating element, never smaller.
Do not allow liquids to be spilt on the surface of the hob and do not use wet pans on the hob.
If prolongued use has worn away the surface of the electrical hot plates, sprinkle them with a few drops of oil or other manteinance products that are widely available.
These hobs are operated using an energy control regulator which you can use to select the appropriate power level for the food you are cooking. Fig. 4.
Bearing in mind the type of cooking and the quantity of food, using the table below as a guide, turn the control knob to the left, selecting the setting for the dish you want to cook. The operating indicator light will come on. To switch off the hob, turn the control knob to the 0 setting. The indicator light will go out.
14

Suggestions
|
Hob with 9 |
|
settings |
|
|
Melting: chocolate, butter, gelatine |
1-2 |
|
|
Cooking: rice, white sauce and ragout |
2-3 |
|
|
Cooking: potatoes, pasta, vegetables |
4-5 |
|
|
Searing: stews, roast joints |
4-5 |
|
|
Steaming: fish |
5 |
|
|
Heating, warming: ready meals |
2-3-4-5 |
|
|
Grilling: escalopes, steaks, omelettes |
6-7-8 |
|
|
Cooking and browning |
9 |
|
|
These suggested settings are intended as a guide only.
The power must be increased for:
-large quantities of liquid
-large quantities of food
-cooking using pans without lids
15

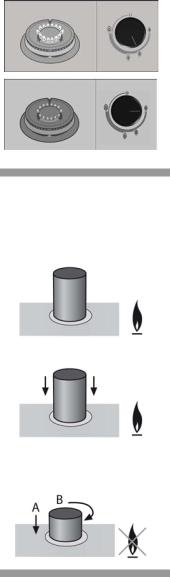
Precautions for use
The following advice is intended to help you save energy and prevent pan damage:
Use pans which are the right size for each burner.
Do not use small pans on large burners. The flame should not touch the sides of the pan.
Do not use damaged pans, which do not sit evenly on the hob. Pans may tip over.
Only use pans with a thick, flat base.
Do not cook without using a lid and make sure the lid is properly fitted to avoid wasting energy.
Always place the pan right over the burner, not to one side. Otherwise it could tip over.
Do not place large pans on the burners near the control knobs. These may be damaged by the very high temperatures.
Place the pans on the pan supports, never directly on the burner.
Pans should be placed on the hob carefully.
Do not strike the hob and do not place excessive weight on it.
Make sure that the pan supports and burner covers are correctly positioned before using the appliance
16
Cleaning and maintenance
Cleaning
Unsuitable products
Once the appliance is cool, use a sponge to clean it with soap and water.
After each use, clean the surface of the respective burner parts once they have cooled down. If any residue is left
(baked-on food, drops of grease etc.), however little, it will become stuck to the surface and more difficult to remove later. The holes and grooves must be clean for the flame to ignite properly.
The movement of some pans may leave metal residue on the pan supports.
Clean the burners and pan supports using soapy water and scrub with a non-wire brush.
If the pan supports are fitted with rubber rests, ensure that these are also cleaned. The rests may come loose and the pan support may scratch the hob.
Always dry the burners and pan supports completely. Water droplets or damp patches on the hob at the start of cooking may damage the enamel.
After cleaning and drying the burners, make sure the burner covers are correctly placed on the diffuser.
Do not use steam cleaners. This could damage the hob.
If your hob is fitted with a glass or aluminium panel, never use a knife, scraper or similar to clean the point where it joins the metal.
Maintenance
Always clean off any liquid as soon as it is spilt: you will save yourself any unnecessary effort.
Do not leave acidic liquids (e.g. lemon juice, vinegar, etc.) on the hob.
Where possible, do not allow salt to come into contact with the surface of the electric hob.
The ring cover of the double or triple flame burner and stainless steel parts such as hotplate rings, top sheet and the area around the burners may become discoloured over time. This is normal because of the high temperatures. Each time the appliance is used these parts should be cleaned with a product that is suitable for stainless steel.
The stainless steel cleaner must not be used in the area around the controls. The (printed) symbols may be wiped off.
17

Faults
Sometimes certain faults detected can be easily resolved. Before calling the Technical Assistance Service, bear in mind the following advice:
Fault |
Possible cause |
Solution |
|
|
|
The general electrical |
Defective fuse. |
Check the fuse in the main |
system is |
|
fuse box and change it if it is |
malfunctioning. |
The automatic safety switch |
damaged. |
|
or circuit breaker has |
Check the main control panel |
|
tripped. |
to see if the automatic safety |
|
|
switch or circuit breaker has |
|
|
tripped. |
|
|
|
The automatic on |
There may be food or |
The space between the ignition |
function does not |
cleaning products stuck |
sparker and the burner must |
work. |
between the ignition |
be clean. |
|
sparkers and the burners. |
Dry the burner covers carefully. |
|
The burners are wet. |
|
|
The burner covers are not |
Check that the covers are |
|
correctly positioned. |
correctly positioned. |
|
The appliance is not |
Contact the electrical installer. |
|
earthed, is not correctly |
|
|
connected or the earth wire |
|
|
is faulty. |
|
|
|
|
The burner flame is |
The burner components are |
Ensure the components are |
not uniform. |
not correctly positioned. |
correctly positioned. |
|
The grooves on the burner |
Clean the grooves on the |
|
are dirty. |
diffuser. |
|
|
|
The flow of gas does |
The gas supply is blocked |
Open all intermediary valves. |
not appear normal or |
via intermediary valves. |
Change the gas cylinder. |
no gas comes out. |
If the gas is supplied from a |
|
|
gas cylinder, check that this |
|
|
is not empty. |
|
|
|
|
The kitchen smells of |
A gas tap has been left on. |
Turn off the gas taps. |
gas. |
There may be a leak in the |
Check that the coupling is |
|
gas cylinder coupling. |
sound. |
|
|
|
The safety valves on |
The control knob was not |
Once the burner is lit, hold the |
one of the burners are |
held down for long enough. |
control knob down a few |
not working. |
|
seconds longer. |
|
The grooves on the diffuser |
Clean the grooves on the |
|
are dirty. |
diffuser. |
|
|
|
18

Technical Assistance Service
When contacting our Technical Assistance Service, please provide the product number (E-No.) and production number (FD) of the appliance. This information is given on the specifications plate located on the lower section of the hob and on the label in the user manual.
|
|
|
Warranty conditions |
The applicable warranty conditions are those set out by |
|
|
|
the company's representative office in the country of |
|
|
purchase. Detailed information is available from retail |
|
|
outlets. Proof of purchase must be presented to obtain |
|
|
the benefits of the warranty. |
|
|
We reserve the right to introduce changes. |
Used appliances and packaging
Environmentally-friendly waste management
If the ) symbol is shown on the specifications plate, bear in mind the following instructions.
Unpack the appliance and dispose of the packaging by environmentally-friendly means.
This appliance complies with European directive 2002/ 96/CE on electrical and electronic equipment identified as WEEE (waste electrical and electronic equipment).
19
Table des matières
Consignes de sécurité . . . . . . . . . . . . . . 22 Votre nouvel appareil . . . . . . . . . . . . . . . 24
Brûleurs . . . . . . . . . . . . . . . . . . . . . . . . . . . . 25
Allumage manuel . . . . . . . . . . . . . . . . . . . . . . . 25 Allumage automatique . . . . . . . . . . . . . . . . . . . 25 Système de sécurité . . . . . . . . . . . . . . . . . . . . 26
Éteindre un brûleur . . . . . . . . . . . . . . . . . . . . 26
Niveaux de chauffe . . . . . . . . . . . . . . . . . . . . . 26 Interrupteur principal / Blocage de la
plaque de cuisson (Main Switch) . . . . . . . . . . 27
Avertissements. . . . . . . . . . . . . . . . . . . . . . . 27
Récipients appropriés . . . . . . . . . . . . . . . . . . 28 Accessoires . . . . . . . . . . . . . . . . . . . . . . . . . . 29 Grille supplémentaire wok. Récipient wok . . . 29 Grille supplémentaire cafetière . . . . . . . . . . . 29 Simmer plate. . . . . . . . . . . . . . . . . . . . . . . . . 29 Simmer cap . . . . . . . . . . . . . . . . . . . . . . . . . 29 Conseils pour cuisiner . . . . . . . . . . . . . . . . . . . 30
Plaques électriques. . . . . . . . . . . . . . . . . . 31
Plaques électriques avec variateur . . . . . . . . . . 31 Suggestions . . . . . . . . . . . . . . . . . . . . . . . . . . . 32
Conseils d’utilisation. . . . . . . . . . . . . . . . . . 33 Nettoyage et entretien . . . . . . . . . . . . . . . 34
Nettoyage . . . . . . . . . . . . . . . . . . . . . . . . . . . . . 34 Produits inappropriés . . . . . . . . . . . . . . . . . . . . 34 Maintenance . . . . . . . . . . . . . . . . . . . . . . . . . . . 34
Anomalies . . . . . . . . . . . . . . . . . . . . . . . . 35
Service Technique . . . . . . . . . . . . . . . . . . . 36
Conditions de garantie . . . . . . . . . . . . . . . . . 36
Emballage et appareils usagés . . . . . . . . 36
Élimination des résidus de manière
écologique . . . . . . . . . . . . . . . . . . . . . . . . . . . . 36
20
Cher client,
Nous vous félicitons de votre choix et vous remercions de la confiance que vous nous témoignez. Cet appareil pratique, moderne et fonctionnel est fabriqué avec des matériaux de première qualité, qui ont été soumis à de stricts contrôles de qualité pendant tout le processus de fabrication, et méticuleusement testés pour répondre à toutes vos exigences en termes de cuisson.
Ne retirez l'appareil de son emballage protecteur qu'au moment de son encastrement.
Veuillez lire attentivement ces instructions avant de procéder à l'installation ou à l'utilisation de l'appareil. Elles sont indispensables pour faire fonctionner l'appareil correctement et ainsi garantir votre sécurité.
L'emballage de votre appareil a été fabriqué avec les matériaux indispensables pour garantir une protection efficace pendant le transport.
Ces matériaux sont entièrement recyclables, ce qui réduit l'impact sur l'environnement. Nous vous encourageons à contribuer également à la préservation de l'environnement, en suivant les conseils ci-dessous :
-mettez l'emballage au rebut dans le bac de recyclage approprié,
-avant de vous débarrasser d'un appareil usagé, mettez-le hors service. Consultez votre administration locale pour connaître l'adresse du centre de collecte de matériels recyclables le plus près de chez vous, et apportez-le à ce site,
-ne jetez pas l'huile usagée dans l'évier. Conservez-la dans un récipient fermé et remettezle à un point de collecte ou, le cas échéant, dans un bac approprié (qui sera remis à un dépotoir contrôlé ; il ne s'agit sans doute pas de la meilleure solution, mais nous évitons ainsi la contamination de l'eau)
IMPORTANT :
Si, contrairement à nos attentes, l'appareil présente un dommage ou ne respecte pas les exigences de qualité prévues, veuillez nous l'indiquer dans les plus brefs délais. Pour que la garantie soit valide, l'appareil ne devra pas avoir été manipulé, ni soumis à une mauvaise utilisation.
21
Consignes de sécurité
Lisez attentivement ces instructions. Ce n'est qu'à cette condition que vous pourrez utiliser votre appareil efficacement et en toute sécurité.
Tous les travaux d'installation, de réglage et d'adaptation à un autre type de gaz doivent être réalisés par un technicien habilité qui doit respecter les normes et la législation applicable, ainsi que les prescriptions des fournisseurs locaux d'électricité et de gaz. Il est recommandé d'appeler le Service Technique pour l'adaptation à un autre type de gaz.
Assurez-vous que l'installation de votre plaque de cuisson est réalisée dans le respect des instructions de montage.
Cet appareil ne peut être installé que dans un endroit bien ventilé, dans le respect de la réglementation en vigueur et des dispositions relatives à la ventilation.
L'appareil ne doit pas être raccordé à un dispositif d'évacuation des produits de combustion.
Cet appareil n'a été conçu que pour un usage domestique ; son usage commercial ou professionnel n'est en aucun cas permis. Cet appareil ne peut pas être installé dans des yachts ou des caravanes. La garantie ne sera valable que si l'usage pour lequel il a été conçu a été respecté.
Le lieu où est installé l'appareil doit disposer d'une ventilation conforme à la réglementation, en parfait état de marche.
Ne placez pas l'appareil dans des courants d'air. Les brûleurs pourraient s'éteindre.
En sortie d'usine, cet appareil est adapté au type de gaz indiqué sur la plaque signalétique. S'il était nécessaire de le changer, veuillez consulter les instructions de montage.
Ne manipulez pas l'intérieur de l'appareil. Si nécessaire, contactez notre Service Technique.
Conservez la notice d'utilisation et d'installation, et remettez-la avec l'appareil si celui-ci change de propriétaire.
Si vous observez que l'appareil est endommagé, ne le branchez pas. Contactez notre Service Technique.
Les surfaces des appareils de cuisson chauffent lors du fonctionnement. Agissez avec précaution. Maintenez les enfants à distance.
22
N'utilisez l'appareil que pour cuisiner, jamais comme chauffage.
Les graisses et les huiles surchauffées s'enflamment facilement. Restez toujours à proximité si vous chauffez des graisses ou des huiles. Si elles s'enflamment, n'éteignez pas le feu avec de l'eau. Risque de brûlures ! Couvrez le récipient avec un couvercle hermétique pour
étouffer le feu puis éteignez la zone de cuisson.
En cas d'incident, débranchez l'alimentation électrique et de gaz de l'appareil. Pour la réparation, contactez notre Service Technique.
Si l'un des boutons de commande est bloqué, ne forcez pas. Contactez immédiatement le Service Technique pour qu’il procède à sa réparation ou à son remplacement.
Ne placez pas de récipients déformés ou instables sur les plaques et les brûleurs, pour éviter tout renversement accidentel.
N'utilisez pas de machines de nettoyage à vapeur sur la plaque de cuisson. Risque d'électrocution !
Cet appareil correspond à la classe 3, selon la norme EN
30-1-1 pour les appareils à gaz : appareil encastré dans un meuble.
Ne stockez pas et n'utilisez pas de produits chimiques corrosifs, de vapeurs, de matériels inflammables, ni de produits non alimentaires sous cet appareil, ni à proximité.
Cet appareil n'est pas destiné aux personnes (enfants y compris) dont les capacités physiques, sensorielles ou mentales sont réduites, aux personnes manquant d'expérience ou de connaissances, sauf s'ils ont bénéficié de la supervision ou des instructions relatives à l'utilisation de l'appareil de la part d'une personne chargée de leur sécurité.
Ne laissez pas l'appareil sans surveillance pendant son fonctionnement.
Les images de cette notice sont proposées à titre indicatif.
Le fabricant est exempt de toute responsabilité si les instructions de cette notice ne sont pas respectées.
23

Votre nouvel appareil
7 |
1 |
5 |
4 |
1 |
5 |
9 |
1 |
5 |
4 |
5 |
|||||||
|
|
|
|
|
|
|
|
|
|
|
|
|
|
|
|
|
|
|
|
|
|
|
|
|
|
|
|
|
|
|
|
|
|
|
|
|
|
|
|
|
|
|
|
|
|
|
|
|
|
|
|
|
|
|
|
|
|
|
|
|
|
|
|
|
|
|
|
|
|
|
|
|
|
|
|
|
|
|
|
|
|
|
|
|
|
|
|
|
|
|
|
|
|
|
|
|
|
|
|
10 |
|
|
3 |
|
|
|
|
|
|
|
|
|
|
|
|
|
|
|
|
|
|
|
|
|
|
|
|
|
|
|
|
|
|
||
|
|
|
|
|
6 |
10 |
|
|
|
|
|
|
|
|
|
|
|
3 |
|
|
|
|
|
|
|||||||
|
|
|
3 |
2 3 |
|
|
|
4 |
2 |
4 |
|
|
|||||||||||||||||||
2 |
|
|
|
2 |
|||||||||||||||||||||||||||
4 |
|
1 |
|
5 |
|
|
|
|
|
|
4 |
1 |
5 |
|
|
|
|
|
7 |
|
1 |
|
|
|
|
||||||
|
|
|
|
|
|
|
|
|
|
|
|
|
|
|
|
|
|
|
|
|
|
|
|
|
|
|
|
|
|
|
|
|
|
|
|
|
|
|
|
|
|
|
|
|
|
|
|
|
|
|
|
|
|
|
|
|
|
|
|
|
|
|
|
|
|
|
|
|
|
|
|
|
|
|
|
|
|
|
|
|
|
|
|
|
|
|
|
|
|
|
|
|
|
|
|
|
|
|
|
|
|
|
|
|
|
|
|
|
|
|
|
|
|
|
|
|
|
|
|
|
|
|
|
|
|
|
|
|
|
|
|
|
|
|
|
|
|
|
|
|
|
|
|
|
|
|
|
|
|
|
|
|
|
|
|
|
|
|
|
|
|
|
|
|
|
|
|
|
|
|
|
|
|
|
|
|
|
|
|
|
|
|
3 |
|
|
7 |
10 4 |
3 |
2 |
8 |
10 4 |
|
|
2 |
3 4 |
5 |
|
||||||||||||||
2 |
|
|
||||||||||||||||||||||||||
|
|
|
|
1 |
5 |
|
3 |
|
|
1 |
|
4 |
|
3 |
1 |
|
|
4 |
||||||||||
|
|
|
|
|
|
|
|
|
|
|
|
|
|
|
|
|
|
|
|
|
|
|
|
|
|
|
|
|
|
|
|
|
|
|
|
|
|
|
|
|
|
|
|
|
|
|
|
|
|
|
|
|
|
|
|
|
|
|
|
|
|
|
|
|
|
|
|
|
|
|
|
|
|
|
|
|
|
|
|
|
|
|
|
|
|
|
|
|
|
|
|
|
|
|
|
|
|
|
|
|
|
|
|
|
|
|
|
|
|
|
|
|
|
|
|
8 |
2 |
3 4 |
10 4 |
5 |
2 |
8 |
10 |
4 |
6 |
2 |
3 4 |
6 |
|
|
|
|
1 Grilles
2 Boutons de commande
3 Brûleur auxiliaire jusqu’à 1 kW
4 Brûleur semirapide jusqu’à 1,75 kW
5 Brûleur rapide jusqu’à 3 kW
6 Brûleur à double flamme jusqu’à 3,3 kW
7 Brûleur à triple flamme jusqu’à 4,0 kW
8 Brûleur à double flamme double jusqu’à 5,0 kW
9 Plaque électrique 1500 W
10 Main Switch (en option)
24

Brûleurs à gaz Fonctionnement
Fig. 1
Fig. 2
Fig. 3
Allumage manuel
Allumage automatique
Chaque bouton de commande de mise en marche indique le brûleur qu'il contrôle. Fig. 1.
Pour un fonctionnement correct de l'appareil, il est indispensable de s'assurer que les grilles et toutes les pièces des brûleurs sont correctement mises en place. Fig. 2-3.
1.Appuyez sur le bouton de commande du brûleur choisi et tournez-le vers la gauche jusqu'à la position souhaitée.
2.Approchez un allume-gaz ou une flamme (briquets, allumettes, etc.) du brûleur.
Si votre plaque de cuisson dispose d'un allumage automatique (bougies).
1.Appuyez sur le bouton de commande du brûleur choisi puis tournez-le vers la gauche jusqu'à la position de puissance maximum.
Quand le bouton de commande est enfoncé, des étincelles se produisent sur tous les brûleurs. La flamme s'allume (vous pouvez relâcher le bouton de commande).
2.Tournez le bouton de commande sur la position souhaitée.
Si l'allumage ne se produit pas, tournez le bouton de commande sur la position d'extinction puis répétez les étapes. Cette fois-ci, maintenez le bouton de commande enfoncé plus longtemps (jusqu'à 10 secondes).
25

Système de sécurité
Bougie Thermocouple
Éteindre un brûleur
Niveaux de chauffe
Position |
Eteint |
|
Ouverture ou |
|
capacité |
Flamme |
maximums et |
forte |
allumage |
|
électrique |
Flamme |
Ouverture ou |
faible |
capacité |
|
minimum |
Attention ! Si au bout de 15 secondes la flamme ne s'est pas allumée, éteignez le brûleur et aérez la pièce. Attendez au moins une minute avant d'essayer de rallumer le brûleur.
Selon le modèle, votre plaque de cuisson peut disposer d'un système de sécurité (thermocouple) qui bloque l'arrivée du gaz si les brûleurs s'éteignent accidentellement. Pour activer ce dispositif, allumez le brûleur normalement, puis maintenez le bouton de commande enfoncé fermement pendant 4 secondes après l'allumage de la flamme.
Tournez le bouton de commande correspondant vers la droite jusqu'à la position 0.
Les variateurs vous permettent de régler la puissance dont vous avez besoin entre les niveaux maximum et minimum.
Dans le cas des brûleurs à double flamme doubles, les flammes intérieure et extérieure peuvent être réglées de manière indépendante.
Les niveaux de chauffe possibles sont :
Flammes extérieure et intérieure à la puissance maximum.
Flamme extérieure à puissance minimum, flamme intérieure à puissance maximum.
26
Flamme intérieure à puissance maximum.
Flamme intérieure à puissance minimum.
Interrupteur principal / Blocage de la plaque de cuisson (Main Switch)
Avertissements
La plaque de cuisson peut disposer d'un interrupteur principal qui coupe le passage du gaz général et qui
éteint tous les brûleurs en même temps. Cet interrupteur est très pratique si vous avez des enfants à la maison ou si, pour une raison, vous devez éteindre rapidement tous les brûleurs.
Pour bloquer la plaque de cuisson :
1. Appuyez sur l'interrupteur principal.
Tous les brûleurs qui sont allumés s'éteignent. La plaque de cuisson se bloque.
Pour débloquer la plaque de cuisson :
1.Placez tous les Boutons de commande sur la position d'arrêt.
2.Enfoncez et tournez l'interrupteur principal dans le sens des aiguilles d'une montre jusqu'à la butée. Le passage de gaz général est ouvert.
Vous pouvez alors utiliser normalement votre plaque de cuisson.
Pendant le fonctionnement du brûleur, il est normal d'entendre un léger sifflement.
Lors des premières utilisations, le dégagement d'odeurs est normal et ne présente aucun risque, ni un mauvais fonctionnement : elles disparaîtront peu à peu.
27
Loading...