


 Loading...
BeoSound 5
Guide
Dear Customer
This Guide contains additional information about your product and describes certain features and functions from the Getting Started in more detail.
Among other things you can find information about settings, how to operate your product with a Bang & Olufsen remote control, and how to make your digital music available.
This Guide will be updated on a regular basis to make it reflect, for example, new features and functions introduced with software updates.
Using the optional CD Ripping Device as described in this guide of course requires that the BeoSound 5 is equipped with the optional CD Ripping Device and that the system is updated to software version 7.02 or higher. The new settings included in the software update and influencing the use of the CD Ripping Device is written in blue in this guide.
You can also find additional information about your product in the Frequently Asked Questions section on www.bang-olufsen.com/faq.
Technical specifications, features and the use thereof are subject to change without notice.
Version 5.0 |
1310 |
2
Contents
Menu overview, 4
Find an overview of display menus.
Close-up operation, 7
How to use the physical controls of your music system.
How to use Beo5 or Beo6, 8
How to operate your music system with a Beo5 or Beo6.
Two-way communication, 9
How to use Beo6 for two-way communication
How to use Beo4, 10
How to operate your music system with a Beo4.
Adjust sound settings, 11
How to make adjustments for balance, bass, treble, etc.
Change language and time zone, 12
How to change the display language.
The maintenance menu, 13
How to use the clean-up function. Settings for automatic software update and information on the latest software. How to make a manual software update.
Service settings, 15
Change the netradio buffer time or disable the MOTS function. Make settings for the optional CD Ripping Device and set it up to be used mainly as a ripping device or as a CD player.
Network setup, 19
Your music system in a Network Link setup. Host name, IP address and password.
How to make music available, 21
How to make music sources available for playback.
Create coloured lists and numbered favourites, 27
How to make personal playlists.
MOTS, 28
Find information about MOTS.
The Roles menu, 29
Use your music system for Play Timers and more. How to change audio master settings and source names.
Change start-up time, 32
How to adjust the default start-up time.
3

Menu overview
N.MUSIC/A.MEM/CD |
COVERS |
|
|
ARTISTS |
|
|
ALBUMS |
|
|
TITLES |
|
|
FAVOURITES |
|
|
QUEUE |
|
N.RADIO/RADIO |
GENRES |
|
|
LANGUAGES |
|
|
COUNTRIES |
|
|
NAMES |
|
|
FAVOURITES |
|
CD/A.MEM/N.MUSIC*4 *5 |
TITLES |
|
A.AUX |
|
|
SETTINGS |
SOUND*1 |
VOLUME |
|
|
BALANCE |
|
|
BASS |
|
|
TREBLE |
|
|
LOUDNESS |
|
|
SPEAKER TYPE |
|
SYSTEM INFO |
AVAILABLE STORAGE |
|
SYSTEM SETTINGS |
LANGUAGE |
|
|
TIME ZONE |
|
|
TIME |
MAINTENANCE
MUSIC SERVICES
SERVICE SETTINGS
1* Only available in Option 1 – 6.
2* Only available when N.MUSIC is selected and internal hard disk is used.
3* Only available when an external server is used.
4* Only available if optional CD Ripping Device is connected.
5* Only available when AUDIO MASTER is YES.
CLEAN-UP*2 UPDATE SOFTWARE
AUTOMATIC SOFTWARE UPDATE RESCAN MUSIC STORAGE*3 EJECT DISC*4
LATEST RELEASE INFORMATION ABOUT
N.RADIO BUFFER
DISABLE MOTS
CD RANDOM*4
CD REPEAT*4
AUTO-RIP*4
RIP THEN PLAY*4
RIP FORMAT*4
CD RIPPING DEVICE*4
4

NETWORK INFO |
HOST NAME |
|
LOCATION |
|
IP ADDRESS |
|
MAC ADDRESS |
|
CLIENTS CONNECTED |
|
NETWORK CONNECTION |
|
BONJOUR STATUS |
|
MUSIC SERVER STATUS |
|
SHARED FOLDER NAME |
|
USER NAME |
ROLES |
PLAY TIMER*1 |
|
AUDIO MASTER |
|
AM OPTION |
|
N.MUSIC*5 |
|
N.RADIO*5 |
|
MUSIC SERVICES*5 |
|
CD*4 *5 |
1* Only available in Option 1 – 6.
4* Only available if optional CD Ripping Device is connected.
5* Only available when AUDIO MASTER is YES.
MUSIC SERVICES is only available if a supported music service account is registered.
5

Menu overview – advanced
Menus you use in the daily operation of your BeoSound are available when you use the pointer and the wheel.
Additional menus used for advanced settings are “hidden”, because you do not need them very often, because they are just ‘status displays’, or because changing the settings in these menus may affect the performance of your BeoSound.
To bring up these ‘advanced’ menus:
>Use the pointer to highlight MODE.
>Turn the wheel to select SETTINGS.
>Press  twice and press GO.
Only the additional menus are shown here.
5* Only available when AUDIO MASTER is YES.
6* Only available when MUSIC SERVER is YES.
7* Indicates whether a CD Ripping Device is connected or not. Use this menu to check if CD Ripping Device is connected properly.
Options are: ‘DETECTED’ and ‘NOT DETECTED’. If the menu states ‘NOT DETECTED’ check the cable connections between BeoSound 5 and the CD Ripping Device.
8* Only available when AM OPTION is 0.
SYSTEM INFO
SYSTEM SETTINGS
MAINTENANCE
SERVICE SETTINGS
PRODUCT INFO
NETWORK SETTINGS
ROLES
BS5 CASE TEMP
BM5 CASE TEMP
BM5 HDD TEMP
BM5 UPTIME
IR TIMEOUT*5
POWER SAVING
DEBUG LOGGING
SUBMIT LOGS TO BANG & OLUFSEN REBOOT
MUSIC STORAGE
MUSIC SERVER
REBUILD MUSIC SERVER*6
CD DRIVE*7
CLIENT PASSWORD
HOST NAME
LOCATION
DELAY*8
6
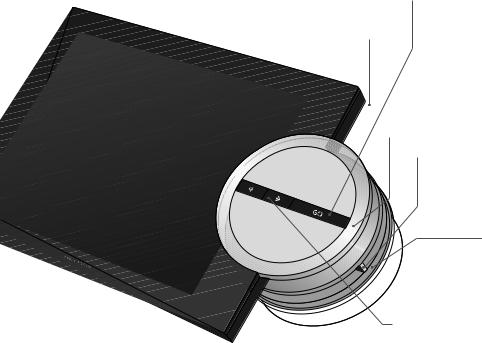
Close-up operation
The music system is designed for close-up operation. You can browse in music and stations and make selections.
GO button – used to confirm selections
Press and hold GO to see the options you have when an item is selected
Standby button
Wheel – used for browsing
Pointer – used for view selection
Volume wheel – used for volume adjustment
Step left – enter sub-menus or sub-views
Step right – move one level back in menus or views. Leave menus without storing
Depending on which source you are using and which view you are in, you get different options when you press and hold GO while an item is highlighted.
N.MUSIC
REMOVE … Remove album, artist or track from views and lists.
ADD TO … Add item to favourites. If you do not want a specific track to be included in the playlist generated by MOTS, you must add it to the EXCLUDE LIST.
N.RADIO
ADD TO … Add station to favourites.
Coloured lists and numbered favourites
REMOVE … Remove the album, artist, track or station from a list.
CLEAR LIST … Remove everything from the list in question.
PLAY QUEUE
REMOVE … Remove the track from the play queue.
CLEAR QUEUE … Remove everything from the play queue.
ADD TO … Add item to favourites. If you do not want a specific track to be included in the playlist generated by MOTS, you must add it to the EXCLUDE LIST.
EXCLUDE LIST
REMOVE … Remove item from the exclude list to include it in MOTS again.
CLEAR LIST … Remove everything from the exclude list.
RIPPING
While ripping a CD, the tracks appears individually in the ripping list. The ripped tracks can be selected for playback.
RECENTLY ADDED
This list contains all tracks recently added to the internal hard disk. The list is sorted in the order the albums have been added to the hard disk. Tracks added by means of the CD Ripping Device as well as tracks transferred from a connected computer are included in the list.
If your music system is equipped with the optional CD Ripping Device, the option EJECT DISC is shown for all sources.
7
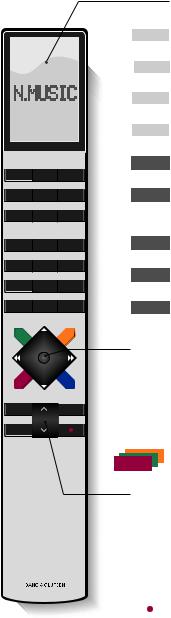
How to use Beo5 or Beo6
If you use Beo5 or Beo6, it must be configured for use with the music system. Contact your retailer.
|
Living Room |
|
TV |
N.MUSIC |
RADIO |
DTV |
A.MEM |
CD |
|
STOP |
PLAY |
|
|
BACK
N. MUSIC Soft button
Touch screen to select available sources
 Seed playing item for MOTS
 Back up through Beo5/Beo6 displays
 Bring up scene buttons
Press again to return
+Bring up digits to select track or station Press again to return
|
|
|
STOP |
Press to stop playback |
|||
|
|
|
|
Start playback |
|||
|
|
|
PLAY |
||||
|
|
|
|
|
|
|
Select coloured list. Press volume wheel next to the colour. |
|
|
|
|
|
|
|
|
|
|
|
|
|
|
|
Press and hold to add currently playing track to the coloured list (does not |
|
|
|
|
|
|
|
apply to CD) |
1 – 99 Select numbered favourite
Turn to adjust volume
To mute, turn quickly counter-clockwise
Centre button used for selections in menus
 Navigation button used for menu operation
 Step through tracks or stations
 Step in albums
 Switch to standby
8

Two-way communication with Beo6
When your Beo6 remote control is configured for two-way communication and connected to your wireless network, you can browse the music on your music system with the remote control. You can see what is currently playing and change tracks or add to your play queue.
Your music system must also be connected to your network.
For further information about connecting Beo6 to a wireless network, refer to its own Guide.
When you want to operate BeoSound 5 wirelessly with Beo6, you must wait for Beo6 to connect to the wireless network.
If you place Beo6 in the charger, the playing screen remains on. You can still operate BeoSound 5.
Browse N.MUSIC on Beo6
The cover of the track currently playing is shown on Beo6 and you can browse through your music collection to add tracks to the play queue or to make a new MOTS seed. When you make a new MOTS seed, playback of the track is interrupted as soon as the new MOTS queue is generated.
To browse music …
>Touch the button activating your music source (e.g. N.MUSIC).
To switch on the product, you must be within IR range.
>Choose the button for the sorting you wish to use; ALBUM or ARTIST.
>Choose a letter to bring up a list of Albums or Artist starting with this letter. Albums and Artists are sorted alphabetically.
>Slide your finger across the screen (from top to bottom or vice versa) to move from one screen to the next.
>Press shortly to select.
>Press and hold to bring up options for the chosen item.
>Press the + sign to bring up the ‘Playing screen’.
To add to the play queue …
>Press and hold the item to bring up the option QUEUE.
>Press the QUEUE button to add the track to the play queue.
To use a track as MOTS seed …
>Press and hold the item to bring up the option MOTS.
>Press the MOTS symbol 
 to use the track as a MOTS seed.
In all lists you can press and hold an item to bring up the screen with options for that item.
N.MUSIC |
Artist |
Album |
The cover from the most recently played track is shown to the left. The middle cover is recently added and the right cover serves as inspiration for new music.
A |
B |
C |
D |
E |
F |
G |
H |
I |
J |
K |
L |
M |
N |
O |
P |
Q |
R |
S |
T |
U |
V W |
X |
Y |
Z |
+ |
|
|
Press a letter to see the list of Albums or Artists.
|
Albums |
A |
Abbey Road |
B |
Black Sabbath |
|
Blind Faith |
|
Blue Oyster Cult |
C |
City Reading |
To return to the “letter keyboard”, press a letter to the left on the screen.
Playing |
Acoustic LadyLand |
Skinny Grin |
New Me |
Press the cover on the “Playing” screen to bring up the Play Queue.
9
How to use Beo4
The music system can also be operated with the Beo4 remote control.
TV LIGHT RADIO
DTV |
DVD |
CD |
V.MEM TEXT A.MEM
7 |
8 |
9 |
4 |
5 |
6 |
1 |
2 |
3 |
LIST |
0 |
MENU |
The Beo4 display shows you the activated source or function
N.MUSIC Switch on N.MUSIC. Press LIST to bring up N.MUSIC in the display*1
N. RADIO Switch on N.RADIO. Press LIST to bring up N.RADIO in the display
A.AUX Switch on A.AUX source. Press LIST to bring up A.AUX in the display
MOTS Seed playing item for MOTS. Press LIST to bring up MOTS in the display
RADIO Switch on N.RADIO, if the N.Radio source is configured to this button
CD Switch on CD player, if the optional CD Ripping Device is connected and configured to this button
A.MEM Switch on N.MUSIC, if the N.Music source is configured to this button
1 – 9 Select a numbered favourite to play. If a CD is playing, use number buttons to select track.
LIST Display extra “buttons” for functions or sources in the Beo4 display. Use or
or to step in the list and press the centre button to accept
 Centre and navigation button; Accept selections or navigate in the LIST menu
 Step through tracks or stations
STOP |
PLAY |
BACK |
|
 Step in albums
 Select coloured music or radio list. Press and hold to add currently playing track to the coloured list (does not apply to CD)
|
|
Adjust volume |
|
||
|
|
To mute, press the middle of the button |
|
|
|
|
|
Press to stop playback |
STOP |
|
|
|
|
Press to start playback. Press and hold to seed playing item for MOTS |
PLAY |
|
|
|
|
Switch to standby |
|
|
|
|
|
1*If AUDIO MASTER is set to NO, for more information, see Audio Master, you must |
|
|
activate Spotify – provided that you have an account – by pressing LIST until N.MUSIC is |
|
|
shown in the Beo4 display, and then pressing 1. To activate A.AUX, press LIST until N. |
|
|
MUSIC is shown in the Beo4 and then press 2. |
10
Loading...