


 Loading...
BeoSystem 4
Dear Customer
This guide contains additional information about the daily use of your Bang & Olufsen product and connected equipment, and describes the features and functions of your product in more detail. Among other things you can find information about settings, how to operate your product with a Bang & Olufsen remote control, and how to set up a wired connection. We expect your retailer to deliver, install and set up your product.
This guide will be updated on a regular basis to make it reflect, for example, new features and functions introduced with software updates. When your television receives new features and functions, you can also read about them in the NICE TO KNOW menu under SETUP.
You can find additional information about your product in the Frequently Asked Questions (FAQ) section on www.bang-olufsen.com/faq.
Your Bang & Olufsen retailer is your first stop for all your service queries.
To find your nearest retailer, visit our website … www.bang-olufsen.com
2
Contents – Click a headline to move to that section
How to use your remote control, 6
See how to use the remote control. You can also use BeoRemote App to operate your television.
Understanding the guide, 9
See how to use the illustrated menu and remote control operations.
Basic operation, 10
See how to navigate in menus and how to set up your television to be used with another remote control than BeoRemote One.
Set up your system, 12
How to place and handle your system in a correct way.
Maintenance, 13
See how to clean and maintain your product.
Connections, 14
Connect your television and expand your setup by connecting additional equipment, such as a set-top box, a PC or a camera to widen your source selection. If needed, you can reset to default settings.
Set positions for the television to turn to,
23
Preset positions for a motorised floor stand to turn to in order to optimise the experience for several viewing and listening positions.
Set up a display, 24
How to register a television screen or projector in the DISPLAY SETUP menu.
Set up additional equipment, 25
Register connected equipment via the SOURCE LIST menu and download PUC tables to operate non-Bang & Olufsen equipment with your Bang & Olufsen remote control. You can remove PUC tables you no longer wish to use.
Watch television, 27
Watch television and bring up programme information. You can turn the TV to different viewing and listening positions and change subtitles and audio options to customise the viewing experience to your preferences.
Use channels, groups and lists, 31
Create, edit and use groups and lists, for example, to customise the range of channels to the preferences of the individual member of a family. Thus, no one has to go through all the available channels when searching for a specific channel. You can edit and add channels and watch Pay Per View channels, if available.
Re-tune channels, 34
Channels are updated automatically but you can also update channels manually if needed or reinstall all channels, for example, if you have switched to another service provider.
Loudspeaker setup – surround sound, 36
Make your television part of a surround sound system to enjoy a fantastic sound experience. You are encouraged to create different speaker groups to optimise the sound experience for different listening positions, and you can set up sound modes to suit different types of programmes or sources.
Daily use of sound modes and speaker groups, 39
Switch between different sound modes, such as GAME mode, to optimise sound from your surround sound system for different types of programmes and sources. Switch between speaker groups to optimise the sound experience for different listening positions. Each speaker group is customised for a specific listening position.
Adjust sound and picture settings, 40
Make sound and picture settings, such as adjusting bass level or brightness, to suit your preferences, and use picture modes and formats to adapt to different types of programmes and sources.
Calibrate colour accuracy of the screen, 43
How to optimise the colour performance of the screen.
Continues …
Version 1.0 |
1404 |
3
>> Contents – Click a headline to move to that section
Personalise the TV experience, 44
Save and restore a snapshot of the current source, sound, and picture experience if you would like to easily bring up the same combination at another time. For internal sources also the playing item may be stored.
Home cinema, 45
Your system in Home cinema mode with a projector.
Set up 3D television, 46
Make settings for how 3D television should be activated for you to enjoy the experience of watching 3D television when it suits you.
Watch 3D television, 47
Activate 3D television to obtain an extraordinary immersive viewing experience. Choose between modes to match the signal from the programme provider.
See two sources at the same time, 49
See two sources at the same time, for example, to watch another source during the commercial break of a movie and at the same time keep track of when the movie starts again.
Teletext, 50
Store favourite teletext pages as MEMO pages to be able to bring them up quickly at any time.
Operate additional equipment, 52
Operate connected equipment, such as settop boxes, DVD players or the like with your Bang & Olufsen remote control, which thereby offers you the opportunity to use only one remote control for all sources in your setup.
WebMedia, 53
Navigate in web pages and add apps using WebMedia. WebMedia enables you to use Internet features on your television allowing you to easily share web-related content, for example, in the living room with your family.
Spotify, Deezer and YouTube, 55
Access Spotify, Deezer and YouTube through apps to enjoy a world of music and television at your own choice.
HomeMedia, 56
Browse your photos and play back your music and video files on your television. Enjoy the contents of a storage device in comfortable surroundings in the living room with your friends. You can also stream content from a computer or a smart phone.
Sleep Timers, 59
Make your television switch off automatically, for example, if you wish to go to sleep to the sound of music from a source in your setup or if you want the television to switch off at the end of a programme.
Power settings, 60
Make settings for power consumption and auto standby and reduce the start-up time of the television.
Access control, 61
Make an access code to prevent others from editing channel settings and watching channels. For example, it is possible to limit children’s access to channels with much violence and crime.
The pin code system, 62
Use the pin code system to make the television useless for people who do not know the pin code, for example, if it has been stolen and thereby been disconnected from the mains for a period of time.
Software and service update, 63
Update software and see software information for your television or your entire Bang & Olufsen system to continuously be equipped with the newest features and functions.
Continues …
4
>> Contents – Click a headline to move to that section
Digital Text and HbbTV, 64
Enable or disable Digital Text for MHEG operation. This feature is useful for some countries or CA modules and activates available applications for channels. You can also activate HbbTV, an online service offering additional features, such as competitions and social networking, sent out by the broadcaster.
Network settings, 65
Set up a network and bring up network information. A network connection allows you to access different sources such as WebMedia and take advantage of software updates, HbbTV and other features.
Distribute sound with Network Link, 67
Make Link connections and integrate your television with another product in order to distribute sound to other rooms in the house and thereby expand the possibilities of your Bang & Olufsen system.
Connect and operate a music system, 69
Connect a music system to your television and operate an integrated system to play music from your music system on your television or to send the sound from your television to your music system.
Two televisions – Network Link connection,
71
Connect another television to your television and be able to share sound between the two televisions and, for example, listen to a music or television source from a television placed in another room.
Operate two televisions with one remote control, 73
Switch between two televisions and operate both televisions with the same Bang & Olufsen remote control.
HDMI Matrix, 74
Enter settings in the HDMI MATRIX menu if you have connected an HDMI Matrix, allowing you to connect a multitude of external sources to a variety of televisions, and operate these sources individually on each television or simultaneously in several rooms.
5
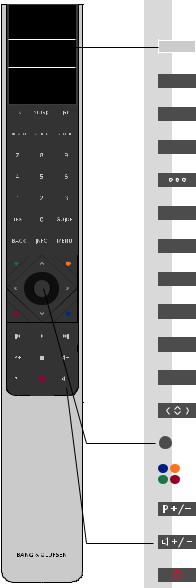
How to use your remote control
Operation in this guide is described with BeoRemote One. To use another Bang & Olufsen remote control, see pages 8 and 11.
TV |
TV |
|
|
HOMEMEDIA |
TV |
|
MUSIC |
|
LIST |
|
0 – 9 |
|
TEXT |
|
GUIDE |
|
BACK |
|
INFO |
|
MENU |
The display shows you a list of sources or functions when it is switched on
Display available television sources in the display for you to switch on. Use  or
or  to step in the list*1
Display available music sources in the display for you to switch on. Use  or
or  to step in the list*1
Display extra functions in the display. Use  or
or  to step in the list
MyButtons. Long press to store the current setup, such as source, sound and picture settings, short press to select it
Select channels and enter information in on-screen menus
Switch on teletext
Bring up the television Programme Guide
Move backwards through television menus and the BeoRemote One lists. Long press exits menus completely
Bring up help texts and information on a menu or function
Bring up the main menu of the active source
Arrow buttons left, right, up and down  ,
,  ,
,  and
and  . Move in menus and in the BeoRemote One display
Centre button used for selecting and activating, such as source selection and settings
Select colour specific functions
Step through channels and stations
Adjust volume. To mute, press the middle of the button
Standby
1*Some sources in the display can be reconfigured during the setup process. For more information, see page 25.
For general information about remote control operation, see the guide for your remote control.
Some countries and CA modules require activation of Digital Text/MHEG. Consequently, some differences apply for BeoRemote One. When no menu is shown on the screen, you may have to press MENU before a coloured button. For more information, see page 64.
6

>> How to use your remote control
BeoRemote App
iOS and Android
Your device and your television must be on the same network to use the BeoRemote App.
BeoRemote App allows you to operate your television with a smartphone or iOS tablet and is especially useful for navigating in web pages or applications using WebMedia.*1 Both your television and device must be on the same network and WAKE ON LAN must be set to ON, see the television POWER SAVING menu. This allows you to switch on your television from standby mode. Note that the standby power consumption will increase slightly.
BeoRemote App integrates with your television. However, it does not support all BeoRemote One functions.
Note that first-time setup must be performed using BeoRemote One. BeoRemote App requires that your television is set up in a network.
1*BeoRemote App supports smartphones with most recent iOS version or Android (version 4.0 or higher) and tablets with iOS (most recent iOS version).
7
>> How to use your remote control
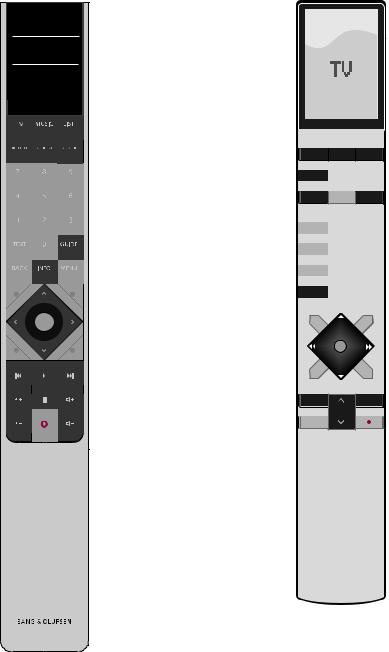
BeoRemote One and Beo4 conversion
If you wish to operate your product with Beo4, below conversion helps you to find out which buttons to use on your Beo4 instead of BeoRemote One.
BeoRemote One buttons are written with |
Note that MyButtons are not available on |
blue text. The buttons which have exactly |
Beo4. |
the same function or name on Beo4 and |
|
BeoRemote One are light grey on the |
|
illustrations. |
|
TV |
HOMEMEDIA |
TV: Press TV, DTV, DVD or V.MEM. on Beo4. Press LIST and find other TV sources, such as
V.AUX. and HOMEMEDIA.
MUSIC: Press RADIO, CD or A.MEM. on Beo4. Press LIST and find other music sources, such as SPOTIFY and A.AUX.
LIST: Press LIST on Beo4 to find additional television/music sources, such as HOMEMEDIA.
GUIDE: Press the green button on Beo4.
INFO: Press the blue button on Beo4.
Arrow buttons ,
, ,
, and
and : Use the navigation button on Beo4.
 and
and : Press
  or
or  to search backwards or forwards on Beo4.
 /
/ : Press
  and
and  on Beo4.
 : Press PLAY on Beo4.
 /
/ : Press
  or
or  on Beo4.
TV LIGHT RADIO
DTV |
DVD |
CD |
|
|
|
|
V.MEM TEXT A.MEM
|
7 |
8 |
9 |
|
4 |
|
|
|
5 |
6 |
|
|
|
|
|
|
1 |
2 |
3 |
|
|
|
|
|
LIST |
0 |
MENU |
|
|
|
|
STOP |
PLAY |
BACK |
|
8

Understanding the guide
Quick guide and online guide
www |
Together with your television you have received a printed Quick guide introducing you to the television.
The present online guide provides you with a deeper knowledge about the television and its many features and functions.
Menu operation
MENU
SETUP
 SOUND
SOUND

… 

This menu hierarchy illustrates the path into a menu where you can make different settings. Press MENU on your remote control and use the arrow button  and the centre button to select and open the menu.
When available, you can also press the INFO button on your remote control to bring up help texts.
Example of menu operation.
Remote control operation
To activate picture modes |
|
|
|
directly … |
|
|
|
Press to bring up PICTURE in |
|
LIST |
|
|
|
|
|
the BeoRemote One display |
|
|
|
|
|
|
|
|
|
|
|
|
PICTURE |
||
|
|
|
|
Press to select a picture mode |
|
1 – 4 |
|
|
|
|
|
Step between modes |
|
|
|
|
|
|
|
|
|
|
|
|
|
|
|
Press to remove PICTURE |
|
BACK |
|
|
|
|
|
from the display |
|
|
|
|
|
|
|
Example of BeoRemote One operation.
Where relevant, the remote control operation will be shown.
–A dark grey button indicates a physical button you must press.
–A light grey display text indicates a BeoRemote One display text. Press LIST, TV or MUSIC on BeoRemote One to bring it up. The text appears in the BeoRemote One display. The texts in LIST, TV and MUSIC can be renamed and you can hide texts you have no need for and show texts you need. For more information, see your BeoRemote One guides.
–The centre button is symbolised by  which is used in the operation sequences when you must press the centre button.
9

Basic operation
How to navigate in menus
Navigate in menus and select settings using your remote control. Pressing MENU brings up the main menu, including a menu overlay for the active source.
This guide is described with
BeoRemote One operation.
Display and menus …
Select source and settings.
Bring up television sources in |
|
TV |
|
the BeoRemote One display |
|
|
|
|
|
|
|
and select the television source |
|
|
|
|
TV |
||
to be switched on |
|
|
|
|
|
|
|
Bring up the main menu |
|
MENU |
|
Navigate in menus …
When a menu is on the screen, you can move between menu options, reveal settings or enter data.
Highlight a menu or change a setting
Enter data |
0–9 |
Bring up a submenu or store a |
|
setting |
|
Select an option |
|
|
|
Press to back up through |
BACK |
previous menus or press and |
|
hold to leave the menu |
|
CHANNEL LIST
CNN |
1 |
TV 2 NEWS |
2 |
DISCOVER |
3 |
CWNBC |
4 |
BBCWORLD |
5 |
… |
6 |
… |
7 |
SUPER CH |
8 |
… |
9 |
CRIME TV |
10 |
CINEMA |
11 |
Example of channel list. Selection must be made using the centre button.
Step between menu pages …
Some menus take up more space than available on the television screen. This is indicated by half a menu item at the bottom or top of the screen. To easily step from the top of a list to the bottom, press .
.
Step in pages
Scroll through menu items
Continues …
10
>> Basic operation
Select source …
You can bring up a source by pressing the TV or MUSIC button and select a source in the remote control display, or you can select a source via the television menu.
Bring up the main menu |
MENU |
Select SOURCE LIST
Select a source
Bring up help texts …
You can bring up help texts with explanations of features and functions when available in menus and submenus.*1 General features and functions are also explained in the NICE TO KNOW menu.*2
Bring up the main menu |
MENU |
Bring up the SETUP menu
Highlight an option
Show or hide help texts |
INFO |
1*For some languages, help texts are only available in English.
2*Access the NICE TO KNOW menu from the SETUP menu. You can read about basic features and functions. When your television receives software updates (requires Internet connection), new features and functions will be explained here.
Use another remote control
You can set up your television to be operated with a Beo4, Beo5 or Beo6 in the REMOTE CONTROL menu. However, note that some features and functions described in the guide, such as MyButtons, can only be used with BeoRemote One.
If the television is set up to be used with another remote control than
BeoRemote One, operation may differ from otherwise described in this guide.
MENU
SETUP

PRODUCT INTEGRATION
 REMOTE CONTROL

11
Set up your system
Follow the guidelines for placement and connection described on this and the following pages. When the system is switched on for the first time, follow the on-screen instructions to perform a firsttime setup.
To ensure proper ventilation, allow enough space around the screen and system. At overheating (flashing standby indicator and an on-screen warning), switch the TV to standby, not off, in order for the TV to cool down. You cannot operate the TV during this time.
If you have connected a projector, you must switch off the system after firsttime setup and then switch it on again for your settings to take effect.
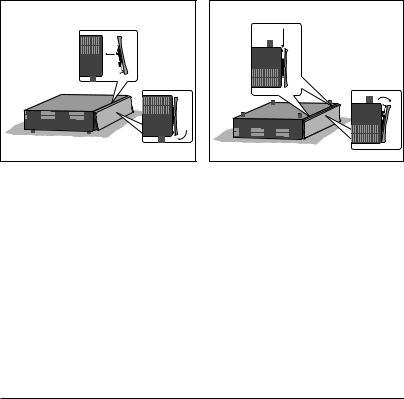
Mount the profile cover
A |
B |
A |
B |
Mount the enclosed profile cover on the |
– To release the cover again, turn the |
front of the system. |
system upside down, press down the two |
|
snap locks as illustrated and take off the |
– Insert the hooks on the profile cover in |
cover by pulling the side closest to the |
the two holes on the system as illustrated |
snap locks. |
and press the bottom of the cover |
|
towards the system until you hear a click. |
|
Wall bracket and racks
Your system can stand alone or you can mount it on the enclosed wall brackets, see the enclosed guide for the wall brackets.
It is also possible to mount the system on the enclosed 19" rack mounts in different positions. See the enclosed rack guide.
12
Maintenance
Regular maintenance, such as cleaning, is the responsibility of the user.
Cabinet and controls
Wipe dust off the surfaces using a dry, soft cloth. To remove stains or dirt, use a soft, damp cloth and a solution of water and mild detergent, such as washing-up liquid.
Never use alcohol or other solvents to clean any parts of the system.
13

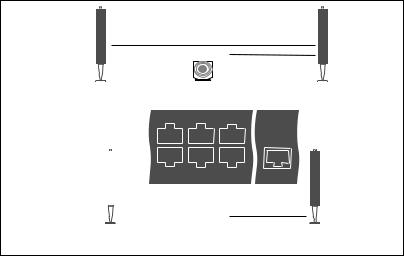
Connections
The connection panel on your system allows you to connect signal input cables as well as a variety of extra equipment, such as a television screen, a projector, a video player, or a Bang & Olufsen music system.
Equipment you connect to these sockets can be registered in the SOURCE LIST menu when you press the red button. If the equipment is not in the SOURCE LIST, you must press the green button to add it to the SOURCE LIST first. For more information, see page 25.
Before you connect any equipment to your system, remember to disconnect the system from the mains. Except when connecting a source to the HDMI IN or USB socket.
Depending on the type of equipment you connect to the system, different cables and maybe also adaptors are needed. Cables and adaptors are available from your Bang & Olufsen retailer.
|
MONITOR |
SATELLITE |
PL 1–6 |
|
BEOSYSTEM 4 |
AERIAL |
PL 1–6 |
Loudspeakers
Use Bang & Olufsen BeoLab speakers. Cables are available from your Bang & Olufsen retailer.
Equipment with HDMI™ output
Equipment with HDMI output such as a settop box can be connected to any available HDMI IN socket in the system. For more information on how to set up connected equipment, see page 25.
A configured source can be selected on the BeoRemote One or in the SOURCE LIST. If the television detects an unconfigured source, you are asked to choose between doing nothing, showing the source or configuring it.
Connected equipment can be operated with its own remote control or you may download a Peripheral Unit Controller (PUC) table, if available, to use the Bang & Olufsen remote control, see page 52.
If you need to reset your television to default settings, then bring up the REGIONAL SETTINGS menu and select another country. You will be asked to confirm the reset. All settings will be deleted and you must go through first-time setup, follow the onscreen instructions.
14

>> Connections
Connection panels
|
|
|
|
|
|
1 |
2 |
3 |
4 |
5 |
|
|
CHIPSIDE |
|
|
|
|
|
|
|
|
|
|
CHIPSIDE |
|
|
|
|
|
|
|
|
14/18V=0.4A |
5V=50mA |
COMMON INTERFACE |
12V=1.0A |
5V |
S/P-DIF |
AV |
|
|
|
|
SATELLITE |
AERIAL |
STAND |
0,5A |
IN |
IN |
|
HDMI IN |
|
|
|
|
|
|
|
|
|
|
|
|
|
HDMI |
MONITOR IR/AUTO |
PL 6 |
OUT |
CONTROL CONTRAST |
|
CTRL 1 |
CTRL 2 |
CTRL 3 |
PL 1 |
PL 2 |
PL 3 |
|
|
|
|
PUC 3 A+B |
|||
EXT IR |
PUC 1 |
PUC 2 |
NOT |
PL 4 |
PL 5 |
|
|
|
A+B |
A+B |
USED |
|
|
|
|
CTRL 4 |
CTRL 5 |
|
|
|
|
|
|
|
|
|
|
|
|
|
|
|
|
|
Equipment you connect permanently to the connection panel must be registered in the SOURCE LIST menu by pressing the green button and then for each source the red button. If a source is already configured, you can simply highlight it in the SOURCE LIST and press the red button to change settings. For more information, see page 25.
We recommend that you connect the system to the Internet to be able to receive software updates and to download Peripheral Unit Controller (PUC) tables. PUC tables enable you to operate connected non-Bang & Olufsen products with your Bang & Olufsen remote control.
Connect the ~ socket on the connection panel of your system to the wall outlet. The system is in standby mode and ready to be used.
The supplied plug and mains cord are specially designed for the product. Do not change the plug, and if the mains cord is damaged, you must buy a new one from your Bang & Olufsen retailer.
~ Mains supply
Connection to the mains supply.
PL 1–6 (Power Link)
For connection of external speakers in a surround sound setup. Depending on the television screen, a PL socket, for example PL 6, can also be used for connection of a television screen’s built-in centre speaker.
MONITOR CONTROL
For connection of a Bang & Olufsen television screen.
PUC 1–3 A+B
For IR control signals to external equipment connected to an HDMI IN, HDMI OUT or AV IN socket. Allows you to control non-Bang & Olufsen equipment with your Bang & Olufsen remote control.
CTRL (1)
For future use.
CTRL (2)
For control of external HDMI switch for dual screen setup.
EXT. IR
For connection of a secondary external IRreceiver.
HDMI IN (1–5)
The High Definition Multimedia Interface allows you to connect many different television sources, such as set-top boxes, multimedia players, Blu-ray players, or a PC.
AV IN
For connection of analogue video equipment.
S/P-DIF IN
Digital audio input socket, for example, a PC.
USB (

 )
)
For connection of a USB device to browse digital photos, video or music files.


 Ethernet
For connection to the Internet. For software updates, access to WebMedia and PUC downloads.
Make sure the cable connection between the product and the router does not exit the building to avoid contact with high voltage.
Continues …
15

>> Connections
STAND
For connection of a motorised stand.
AERIAL (5V= 50mA)
Aerial input socket for an external aerial/ cable TV network or for an analogue signal.
SATELLITE
Aerial input socket for a digital satellite signal. Depending on your tuner options, you may have a satellite socket.
2 x PCMCIA (CA Module)
For insertion of a module and card for access to coded digital channels. For more information about compatible card and module combinations, contact your Bang & Olufsen retailer.
HDMI OUT
For connection of a television screen, projector, or HDMI switch box.
IR / AUTO CONTRAST |
|
For connection of a primary external IR- |
To protect the mains cable, fasten it with the |
receiver enabling remote control operation |
enclosed cable bracket and screw. |
of a television screen or projector. Auto |
|
contrast is only available for Bang & Olufsen |
|
television screens. |
|
NOT USED |
|
Not used. |
|
16

>> Connections
Home cinema setup and a home automation system
With a home automation system you can control different external elements, such as room lights, curtains and movement of a projector screen or television screen. The setup can be controlled via BeoRemote One if you have downloaded the available PUC table. For more information about home automation system and PUC downloading, see pages 45 and 25 or contact your retailer.
When you have connected a projector or television screen, it may be necessary to adjust the sound delay setting to make sure that picture and sound are in sync. For more information about the SOUND ADJUSTMENT menu and sound delay, see page 40.
You can integrate your system in a home automation system to be able to handle a basic setup with room lights and curtains by means of the sockets CTRL 4–5.
For a more advanced setup or for use of BeoLink App, you must use a Bang & Olufsen Master Link Gateway. For more information about Master Link Gateway, contact your retailer.
Press CINEMA ON and CINEMA OFF on BeoRemote One to toggle between TV mode and Cinema mode. You must first add them to the LIST. See the guide for
BeoRemote One for information on how to add functions.
|
|
IR/AUTO CONTRAST |
|
Home |
|
|
|
Automation |
|
|
|
|
system |
|
PUC |
HDMI OUT |
|
CTRL |
|
|
|
|
BEOSYSTEM 4 |
|
|
|
|
|
Home cinema setup with a projector.
MONITOR CONTROL |
PL 6 |
IR/AUTO CONTRAST |
HDMI OUT |
BEOSYSTEM 4
Home cinema setup with a Bang & Olufsen television screen. Auto contrast is only available for Bang & Olufsen television screen.
|
|
IR/AUTO CONTRAST |
|
MONITOR CONTROL |
|
Home |
|
|
|
|
Automation |
||
|
|
|
|
system |
||
HDMI |
PUC |
HDMI |
PL 6 |
|
||
|
|
|
|
|
BEOSYSTEM 4 |
CTRL |
|
|
|
ATLONA |
|
|
|
|
|
|
|
|
|
Example of dual screen setup. An Atlona switch is required.
17
>> Connections
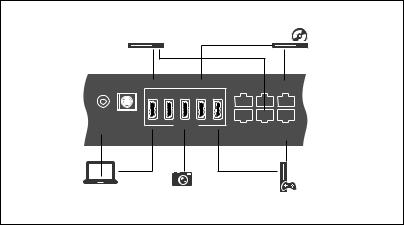
Connect digital sources
Connect external HDMI sources, such as a set-top box, computer or game console. All equipment connected to the television can be configured, see page 25.
Depending on the equipment you connect to the system, different cables and maybe also adaptors are needed. If you have more than two types of equipment that need a PUC socket, you must buy an extra PUC cable. Cables and adaptors are available from your Bang & Olufsen retailer.
DVD/Blu-ray player
|
Set-top box |
|
|
|
|
|
|
|
|
|
|
|
CTRL 1 |
CTRL 2 |
CTRL 3 |
|
1 |
2 |
3 |
4 |
5 |
|
PUC 3 A+B |
|
|
|
|||||
S/P-DIF |
AV |
|
|
|
|
|
|
IN |
IN |
|
HDMI IN |
|
EXT IR |
PUC 1 |
PUC 2 |
|
|
|
|
||||
|
|
|
|
|
|
A+B |
A+B |
|
|
|
|
|
|
CTRL 4 |
CTRL 5 |
Computer |
Camera |
Game console |
|
|
Example of connected digital sources.
Connect a set-top box
>Connect the cable to the appropriate socket on the set-top box.
>Run the cable to an HDMI IN socket on the system.
>To enable operation of the set-top box with your Bang & Olufsen remote control, connect an IR-transmitter to one of the PUC sockets and attach it to the IRreceiver of the set-top box. See page 20 for more information on IR-transmitters.
>Follow on-screen instructions to configure the source.
Connect a DVD/Blu-ray player
>Connect the cable to the appropriate socket on the DVD/Blu-ray player.
>Run the cable to an HDMI IN socket on the system.
>To enable operation of the DVD/Blu-ray player with your Bang & Olufsen remote control, connect an IR-transmitter to one of the PUC sockets and attach it to the IRreceiver of the DVD/Blu-ray player. See page 20 for more information on IRtransmitters.
>Follow on-screen instructions to configure the source.
Connect a game console
>Connect the cable to the appropriate socket on the game console.
>Run the cable to an HDMI IN socket on the system.
>To enable operation of the game console with your Bang & Olufsen remote control, connect an IR-transmitter to one of the PUC sockets and attach it to the IRreceiver of the game console. See page 20 for more information on IR-transmitters.
>Follow on-screen instructions to configure the source.*1
Connect a camera
>Connect the cable to the appropriate socket on the camera.
>Run the cable to an HDMI IN socket on the system.
>Follow on-screen instructions to configure the source.
1*When selecting GAME CONSOLE as source, the picture mode GAME is activated as default setting. You can change this setting temporarily in the PICTURE menu, see
page 41.
18

>> Connections
Connect a computer
Before you connect a computer, you must disconnect the system, the computer and all connected equipment from the mains supply.
Connect a computer
>Using the appropriate type of cable, connect one end to the DVI or HDMI output socket on your computer, and the other end to an HDMI IN socket on the system.
>If you use the DVI output socket on the computer, use the appropriate cable and connect the digital sound output on the computer to the S/P-DIF IN socket on the television to hear sound from the computer in the speakers connected to the system.
>Reconnect the system, the computer, and all connected equipment to the mains. Remember, the computer must be connected to a grounded wall outlet as specified in its setting-up instructions.
See page 20 for more information on IRtransmitters.
Connect an analogue source
You can connect one analogue source, such as a game console. To configure equipment connected to the system, see page 25.
Disconnect all systems from the mains before you connect additional equipment.
Connect an analogue source
>Connect the cable to the appropriate socket on the equipment you wish to connect.
>Run the cable to the AV IN socket on the system.
>Reconnect the system and the connected equipment to the mains.
>To enable remote control operation of the analogue source, connect an IRtransmitter to one of the PUC sockets and attach it to the IR-receiver of the analogue source. See page 20 for more information on IR-transmitters.
>Follow on-screen instructions to configure the source.
Different adaptors and possibly also cables are needed. Cables and adaptors are available from your Bang & Olufsen retailer.
19

>> Connections
IR-transmitters
To operate non-Bang & Olufsen products with BeoRemote One or the BeoRemote App, attach a Bang & Olufsen IR-transmitter on your non-Bang & Olufsen product and then connect it to one of the sockets marked PUC on the connection panel. Attach the transmitter near the IR-receiver on the connected equipment to ensure remote control operation. Before attaching the transmitter permanently, check that you can operate the equipment menus on the television screen using BeoRemote One or BeoRemote App.
When you set up the transmitter to a selected PUC socket in the SOURCE LIST menu, settings for the IR-transmitter are made automatically. However, it is possible to perform a manual setup of the socket if alternative settings are required.
For an extra PUC cable, contact your Bang & Olufsen retailer.
For information about download of Peripheral Unit Controller (PUC) tables for set-top boxes, see page 25.
Smart Card for digital channels
If you want to watch coded channels, contact your service provider. The service provider will register you as an authorised viewer, usually requiring payment. You will then be provided with a Smart Card and a CA Module. Note that these will only be valid for one service provider and therefore only work with certain channels.
The CA module is a ‘card reader’ for your Smart Card which decodes the coded signals sent out by the service provider. Only uncoded digital channels, also known as ‘free-to-air’ channels, are available without Smart Cards and CA Modules.
CHIPSIDE 
 CHIPSIDE

COMMON INTERFACE
Contact your Bang & Olufsen retailer for information about compatible CA Modules.
The Smart Cards must remain in the CA Modules, unless your service provider asks you to remove it. This is important in case your service provider wishes to send new information to your Smart Card.
Insert a Smart Card carefully into a CA Module. The CA Module has one protruding edge on one side and two protruding edges on the other side. If the system does not receive any signal, check that the Smart Card and CA Modules are inserted correctly.
Smart Cards and CA Modules may also give access to special menus which are not described here. If this is the case, follow the instructions from your service provider.
Continues …
20
>> Connections
Activate the CA modules
In the CA MODULES menu, you can activate or deactivate the CA modules for terrestrial, cable or satellite. In some countries, it may be useful to disable the CA module for satellite to get an optimal performance from the terrestrial CA module.
|
|
|
You can also access the CA modules from the |
|
|
|
|
|
MENU |
|
|
|
|
main menu when the TV tuner is the current |
|
|
SETUP |
||
|
source. |
||
|
CA MODULES |
|
|
|
… |
|
|
|
|
|
|
21
>> Connections
Connect speakers to the system
You can connect up to twelve speakers and subwoofers to the television using Power Link cables.
Disconnect all systems from the mains |
|
|
|
Subwoofer |
|
|
|
|
before you connect additional equipment. |
|
|
|
|
|
|
|
|
|
|
|
|
|
|
|
|
|
|
Surround |
|
|
|
|
|||
Depending on the type of speakers you |
|
|
|
|
|
|
|
|
connect to the television, different cables |
|
|
|
PL 1 |
PL 2 |
PL 3 |
||
|
|
|
|
|
|
|
|
|
and maybe also adaptors are needed. Cables |
|
|
|
|
|
|
|
|
and adaptors are available from your Bang & |
|
|
|
|
|
|
|
|
|
|
|
|
|
|
|
|
|
Olufsen retailer. |
|
|
|
NOT |
PL 4 |
PL 5 |
||
|
|
|
|
|||||
|
|
|
|
USED |
|
|
|
|
|
|
|
|
|
|
|
|
|
|
|
|
|
|
|
|
|
|
|
|
|
|
|
|
|
||
|
Front speaker |
|
|
|
|
|||
Example of a speaker setup.
Surround
PL 6
Front speaker
Connect speakers
>Connect a Power Link cable to the appropriate socket on the speakers you wish to connect to the system.*1
>Run the cables to available sockets marked PL 1–6 on the system.
>Connect a Power Link cable to the appropriate sockets on a subwoofer.
>Run the cable to an available socket marked PL 1–6 on the system.
>Reconnect the television and the connected speakers to the mains.
1*Remember to set the switch for left and right position on the speakers depending on whether your speaker is positioned to the left or right of your listening position.
If you want to connect two speakers to one PL socket on the system and it is not possible to loop the cable between the speakers, an extra splitter is needed, contact your Bang & Olufsen retailer for more information.
22
Set positions for the television to turn to
If your Bang & Olufsen television is equipped with the optional motorised floor stand, you can turn it using the remote control.
Furthermore, you can set the television to turn automatically to face your favourite viewing position when you switch on the television. It can turn to a different position when you listen to, for example, a connected radio, and turn away to a standby position when you switch it off. You can also set up other stand positions for other listening or viewing positions.
Preset stand positions
If your Bang & Olufsen television is equipped with a motorised floor stand, choose one position for video mode, one for audio mode, and one for standby. You can also preset stand positions of your own choice, for example, when you sit in an armchair reading or when you sit at the dining table.
MENU
SETUP

STAND

STAND POSITIONS

…
Bring up the STAND POSITIONS menu to store, name or delete a stand position.
If you wish to store the current stand position in an empty stand position field, you just press the centre button when you have selected the field. Then you can name the stand position.
You cannot rename or delete the STANDBY, VIDEO and AUDIO stand positions. Also you cannot name fields where no stand positions are set. Empty fields are shown by <…>. In some languages, you must choose between predefined names.
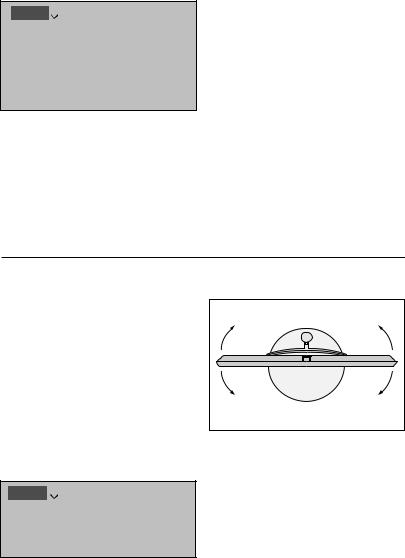
Calibrate the motorised movement
If your setup includes a motorised floor stand, you will during first-time setup be prompted to calibrate the outer positions of the motorised movement. For the floor stand this is done by entering the distance from the stand to the wall, follow on-screen instructions. The motorised movement of the television will not work until the calibration process has been completed. If the television is placed differently later on, for example, in a corner, it is necessary to calibrate the motorised movement again.
MENU
SETUP

STAND

STAND ADJUSTMENT
The calibration process allows you to set the maximum angle the television will turn – left and right.
Depending on your setup, you can bring up a menu for stand positions.
23
Loading...