


 Loading...
BeoVision 10
Guide
Contents
Menu overview, 3 |
Re-tune or add channels, 19 |
Teletext, 36 |
See an overview of on-screen menus. |
How to add new channels or how to make a |
How to store favourite teletext pages as |
|
new automatic tuning. |
MEMO pages. |
Navigate in menus, 4 |
|
|
See how to use the different remote controls |
Loudspeaker setup |
Operate other equipment with Beo4 or |
for menu operation. |
– BeoVision 10-32, 20 |
Beo6, 37 |
|
How to connect loudspeakers. |
How to operate connected equipment, such |
First-time setup, 5 |
|
as set-top boxes, DVD players or the like, |
Which menus appear when you switch on |
Loudspeaker setup |
with the Bang & Olufsen remote control. |
the television for the very first time. |
– BeoVision 10-40/46, 21 |
|
|
How to make your television part of a |
Connect and operate an audio system, 39 |
Choose menu language, 6 |
surround sound system, including how to |
How to connect an audio system to your |
How to select menu language. |
connect loudspeakers and adjust speaker |
television and operate an integrated audio/ |
|
balance. |
video system. |
Set positions for the television to turn |
|
|
to, 7 |
Adjust picture and sound settings, 25 |
Distribute sound and picture with |
How to preset positions for a motorised |
How to make settings for picture and how |
BeoLink, 42 |
stand to turn to. |
to adjust bass, treble, etc. How to use game |
How to make link connections, operate a |
|
mode. |
link system. |
Tuner setup, 8 |
|
|
How to disable the internal TV tuner or |
Daily use of speaker combinations |
Your television in a link room, 44 |
built-in DVD-HD module. |
– BeoVision 10-32, 28 |
How to set up and operate your television in |
|
How to switch between different speaker |
a link room. |
Connections, 9 |
combinations. |
|
Examples of where to connect additional |
|
Two televisions in the same room, 46 |
equipment and how to connect a PC or |
Daily use of speaker combinations |
Option programming and operation of two |
camera. |
– BeoVision 10-40/46, 29 |
televisions in the same room. |
|
How to switch between different speaker |
|
Register additional video equipment, 12 |
combinations. |
|
How to register connected equipment in the |
|
|
CONNECTIONS menu. |
Set the television to switch itself on or |
|
|
off, 30 |
|
Camera and headphone sockets, 15 |
How to make your television switch off |
|
How to watch digital pictures on your |
automatically or make it part of a PLAY |
|
television and how to connect headphones. |
TIMER. How to make auto standby settings |
|
|
and save power. |
|
Edit tuned TV channels, 16 |
|
|
How to rearrange the order in which channels |
Set up your Beo4 remote control, 32 |
|
appear in the channel list and how to name |
Tell the television if your remote control has |
|
or delete them. |
a navigation button or not. |
|
|
Feature activation, 33 |
|
|
How enter an activation key and get access |
|
|
to additional features. |
|
|
HDMI Matrix, 34 |
|
|
How to enter settings in the HDMI MATRIX |
|
|
menu. |
|
Version 1.0 |
1106 |
2

Menu overview
1. |
2. |
3. |
|
|||
|
|
|
|
|
|
|
|
|
|
|
|
|
|
TUNING |
|
EDIT CHANNELS |
|
|
|
|
|
|
|
|
|
|
|
|
|
|
ADD CHANNELS |
|
|
|
|
|
|
|
|
|
|
|
|
|
AUTO TUNING |
|
|
|
|
|
|
|
|
|
|
|
|
|
MANUAL TUNING |
|
FREQUENCY |
|
|
|
|
|
|
|
|
|
|
|
|
|
CHANNEL NO |
|
|
|
|
|
|
|
|
|
|
|
|
|
NAME |
|
|
|
|
|
|
|
|
|
|
|
|
|
FINE TUNE |
|
|
|
|
|
|
|
|
|
|
|
|
|
DECODER |
|
|
|
|
|
|
|
|
|
|
|
|
|
TV SYSTEM |
|
|
|
|
|
|
|
|
|
|
|
|
|
SOUND |
|
|
|
|
|
|
|
|
|
SLEEP TIMER |
|
|
|
|
|
|
|
|
|
|
|
|
|
PLAY TIMER |
|
TIMER |
|
|
|
|
|
|
|
|
|
|
|
OPTIONS |
|
CONNECTIONS |
|
AV1–AV6 |
|
|
|
|
|
|
|
|
|
|
|
|
|
HDMI EXPANDER |
|
|
|
|
|
|
|
|
|
|
|
|
|
LINK TUNING |
|
TUNER SETUP
SOUND
PICTURE
TV TUNER
DVB HD
ADJUSTMENT
SPEAKER TYPE SPEAKER DISTANCE* SPEAKER LEVEL* SOUND SYSTEM*
BRIGHTNESS
CONTRAST COLOUR TINT
HOR. SIZE
VERT. SIZE HOR. POSITION VERT. POSITION GAME MODE
|
STAND POSITIONS |
|
VIDEO |
|
|
|
|
|
|
|
AUDIO |
|
|
|
|
|
|
|
STANDBY |
|
|
|
|
|
|
|
STAND ADJUSTMENT |
|
|
|
|
|
DTV PLAY TIMER |
|
MODE |
|
|
|
|
|
|
|
GROUP |
|
|
|
|
|
STANDBY SETTINGS |
|
AUTO STANDBY |
|
|
|
|
|
|
|
POWER SAVING |
|
|
|
|
|
BEO4 SETTING |
|
NAVIGATION BUTTON |
|
|
|
|
|
|
|
NO NAVIGATION BUTTON |
|
|
|
|
|
FEATURE ACTIVATION |
|
|
|
|
|
|
*Only available on BeoVision 10-40/46. |
MENU LANGUAGE |
|
|
|
|
|
3

Navigate in menus
Beo4 with navigation button
If you have a Beo4 with navigation button and your television is set up for use with it, see page 32, you use the centre button with up, down, left and right movement to navigate in menus. Press in the middle of the centre button to confirm selections and settings in menus.
Bring up the TV SETUP menu by pressing MENU while the TV is on.
To back up through menus, press BACK. To exit menus, press and hold BACK.
If your television is set up for use without navigation button, you must use the ‘star’ to navigate up, down, left and right in menus and press the centre button to confirm selections and settings in menus.
Beo4 without navigation button
If you have a Beo4 remote control without navigation button, you must use the ‘star’ to navigate up, down, left and right in menus and press the centre
GO |
button to confirm choices and settings |
|
|
|
in menus. Also your television must be |
|
set up for use with a Beo4 without |
|
navigation button. |
Bring up the TV SETUP menu by pressing MENU while the TV is on.
To back up through menus, press STOP. To exit menus, press EXIT.
STOP
BACK
PLA Y
Beo6
If you operate your television with the Beo6 remote control, you use the centre button with up, down, left and right movement to navigate in menus. Press in the middle of the centre button to confirm selections and settings in menus.
Bring up the TV SETUP menu by pressing Menu while the TV is on.
To back up through menus, press BACK. To exit menus, press and hold BACK.
If your Beo6 is set up to be used without navigation button, press STOP to back up through menus and BACK to exit menus.
Note that a Beo6 should be reconfigured when you add new products to your setup.
You can also operate your television with Beo5 which is operated similarly to Beo6.
4
First-time setup
The setup procedure is activated when the television is connected to the mains and switched on for the first time. You are led through an automatic series of on-screen menus in which you must register the extra equipment you have connected, such as loudspeakers.
If you change your setup at a later date, you can access the same menus and update your settings. Remember that you need to set the speaker types and the distances in the SOUND menu.
The sequence of menus in first-time setup
MENU LANGUAGE … You can select the language for on-screen menus. The text on the screen changes as you move from language to language.
STAND ADJUSTMENT … Set the maximum angle for turn for the television. Use  and
and  to turn the television and limit the movement of the stand.
STAND POSITIONS … Set your preferred preset positions for the television. For further information about the STAND POSITIONS menu, see page 7.
TUNER SETUP … Disable the television tuner or DVB tuner, if you like, see page 8.
STANDBY SETTINGS … The television can be set to switch itself to standby after some time with no operation. You can also switch power saving on or off, see page 31.
CONNECTIONS … Select the type of equipment you have connected to each socket, the sockets used, the product name, and the source name. For further information about the CONNECTIONS menu, see page 9.
CHECK AERIAL CONNECTION … This prompt only appears, if the television tuner is enabled.
AUTO TUNING … When you have registered your connected equipment, a menu for channel tuning automatically appears on the screen. Press the centre button to start auto tuning. The television finds all available channels. For further information about tuning TV channels, see page 19.
SPEAKER TYPE … In this menu, you select which speakers are connected to the television, if any. See page 20 for further information.
SPEAKER DISTANCE … In this menu, you select the distance in metres to each of the speakers in your setup (only
BeoVision 10–40/46).
SPEAKER LEVEL … In this menu, you can adjust the volume level of each speaker in your setup (only BeoVision 10–40/46).
ADJUSTMENT … In this menu, you can adjust bass, volume, treble, etc.
DVB SETUP … If the DVB-HD tuner is enabled, the DVB SETUP menu appears, see the separate DVB-HD guide for further information.
For information about where to connect extra equipment, see the chapter about connection panels in Getting Started.
5

Choose menu language
The menu language you choose during the first-time setup of your television can be changed at any time.
Once a menu language is chosen, all menus and display messages are shown in this language.
You can select the language for onscreen menus via the TV SETUP menu. The text on the screen changes as you move from language to language.
>Bring up the TV SETUP menu and highlight OPTIONS.
>Press the centre button to bring up the OPTIONS menu and highlight MENU LANGUAGE.
>Press the centre button to bring up the MENU LANGUAGE menu.
>Use the navigation button up or down to move to your language choice.
>Press the centre button to make your choice.
>Press BACK to back up through previous menus or press and hold BACK to leave the menus.
MENU LANGUAGE DANSK
DEUTSCH
ENGLISH
ESPAÑOL
FRANÇAIS
ITALIANO NEDERLANDS SVENSKA
6
Set positions for the television to turn to
If your television is equipped with the optional motorised stand, you can turn it using the remote control.
Furthermore, you can program the television to turn automatically to face your favourite viewing position when you switch on the television. It can turn to a different position when you listen to, for example, a connected radio, and turn away to a standby position when you switch it off.
You can also turn your television by hand.
NOTE! For information about firsttime installation of the motorised stand, see Getting Started.
Choose one position for when you switch the television on, one for audio mode, and one for when you switch it off.
>Bring up the TV SETUP menu and highlight OPTIONS.
>Press the centre button to bring up the OPTIONS menu and highlight STAND POSITIONS.
>Press the centre button to bring up the STAND POSITIONS menu.
>Press the centre button to determine the VIDEO position.
>Use  and
and  to turn the television and place it according to your viewing position.
>Press the centre button to store the position.
To store a stand position for when an audio source is switched on from the television …
>Highlight AUDIO.
>Press the centre button to determine the AUDIO position.
>Use  and
and  to turn the television and place it as you wish.
>Press the centre button to store the position.
STAND POSITIONS |
VIDEO |
AUDIO |
STANDBY |
To store a stand position for when the television is switched off and in standby …
>Highlight STANDBY.
>Press the centre button to determine the STANDBY position.
>Use  and
and  to turn the television and place it as you wish.
>Press the centre button to store the position.
>During first-time setup, press the green button to continue first time-setup, otherwise …
>…press and hold BACK to leave all menus.
7

If you disable the TV tuner, you can activate the DVB tuner with the TV button. If you disable the DVB tuner, you can activate a connected peripheral unit with the DTV button.
Tuner setup
To disable the internal tuner …
>Bring up the TV SETUP menu and highlight OPTIONS.
>Press the centre button to bring up the OPTIONS menu, and highlight TUNER SETUP.
>Press the centre button to bring up the TUNER SETUP menu and highlight TV TUNER.
>Use the navigation button left or right to switch between the setting ON or OFF.
>Highlight DVB HD.
>Use the navigation button left or right to switch between the setting ON or OFF.
>Press the centre button to store the settings, or …
>… press and hold BACK to leave the menus without storing.
TUNER SETUP |
|
TV TUNER |
ON |
DVB HD |
ON |
|
|
8

Connections
The connection panel on your television allows you to connect signal input cables as well as a variety of extra equipment, such as a video recorder or a linked Bang & Olufsen music system.
Any equipment you connect to these sockets must be registered in the CONNECTIONS menu. For further information, see page 12.
Before you connect any equipment to your television, remember to disconnect the television from the mains.
|
POWER LINK |
|
SUB |
DVB |
|
|
POWER LINK |
|
FRONT |
AERIAL |
POWER LINK |
|
|
|
REAR |
|
BeoVision 10-40/46 setup |
Decoder |
AV 2 |
|
|
||
DVD |
AV 1–6 |
|
PUC 1–4 |
||
|
||
Satellite (STB) |
AV 1–6 |
|
PUC 1–4 |
||
|
||
Recorder (HDR) |
AV 4 |
|
|
There are some restrictions as to the types of |
In a BeoVision 10-32 setup with Power Link |
equipment that can be connected to the |
speakers and a subwoofer, the subwoofer |
sockets. |
must be connected to the television and the |
|
speakers must be connected to the subwoofer. |
Equipment with VGA output can only be |
Only front speakers can be connected. |
connected and registered to the AV3 socket. |
See page 20 for further information. |
The illustrations above are only examples.
9
>> Connections
IR type
In the AV menus you can select how a PUC controlled product is connected. You can choose between ‘PLUG’ (cable) and ‘IR’ (IR Blaster).
PLUG
STB
IR
STB
IR-transmitters: To operate non-Bang & Olufsen products with a Bang & Olufsen remote control, attach a Bang & Olufsen IRtransmitter to each of the products. Connect each transmitter to the corresponding socket marked PUC on the main connection panel.
DVB module
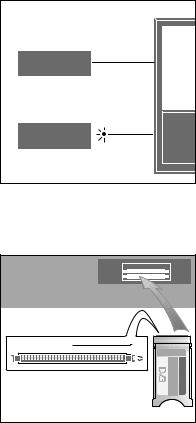
The CA module is a ‘card reader’ for your Smart Card which decodes the coded signals sent out by the programme provider.
PCMCIA |
SMARTCARD |
The CA module has one protruding edge on one side and two protruding edges on the other side. The side with two edges should face upwards.
When inserting a card, the gold chip should face away from the screen.
10
>> Connections
Connect and use a PC
IMPORTANT! Before connecting a PC to the television, disconnect the television, the computer, and all equipment connected to the computer from the mains.
To connect a computer to the television …
>Using the appropriate type of cable, connect one end to the DVI, VGA or HDMI output socket on your computer, and the other end to the VGA or HDMI socket on the television.
>To hear sound from the computer in the speakers connected to the television, use the appropriate cable and connect the sound output on the computer to the R–L or SPDIF sockets on the television.
>Reconnect the television, the computer, and all equipment connected to the computer to the mains. Remember, the computer must be connected to a grounded wall outlet as specified in its setting-up instructions.
If you have connected your PC to the VGA socket on the television, you must register the PC to the AV3 socket in the CONNECTIONS menu. A PC connected to the HDMI socket can be registered to any of the AV sockets or socket groups.
Bring up the computer image on the screen
To see the computer picture on the screen, you must bring it up with your remote control.
To bring up the computer picture …
>Press LIST and use the navigation button up or down to bring up PC in the Beo4 display and press the centre button to bring up the picture. You can then operate the computer as you normally would.
(Beo6: Press PC).
To connect a camera to the television, see page 15.
11

Register additional video equipment
If you connect additional video equipment to your television, you must register the equipment in the CONNECTIONS menu.
When the television is first set up, some of the equipment connected at that particular moment is detected by the television. The CONNECTIONS menu appears automatically on the screen during first-time setup for you to register connected equipment, if it is not detected automatically by the television. If you connect equipment at a later date, you must register this equipment in the CONNECTIONS menu.
What is connected?
Registering the equipment connected to the television enables you to operate it with your remote control.
>Bring up the TV SETUP menu and highlight OPTIONS.
>Press the centre button to bring up the OPTIONS menu. CONNECTIONS is highlighted already.
>Press the centre button to bring up the CONNECTIONS menu.
>Use the navigation button up or down to step between the different socket groups: AV1, AV2, AV3, AV5, AV6, HDMI
EXPANDER and HDMI MATRIX, when available.
>Press the centre button to be able to register a connected product type to the highlighted socket group.
>Use the navigation button up and down to move between the sockets in the group.
>Use the navigation button left or right to register what you have connected to the highlighted socket.
>Press the centre button to be able to select the product from an on-screen list. .
>Use the navigation button left or right to see lists for other types of products.
>Use the navigation button up or down or a number button to highlight the name of the product and press the centre button to register it.
>Press the green button to be able to name the source. The naming menu is now activated.
>Use the navigation button up and down to find the individual characters in the name.
>Press the centre button to accept the name.
CONNECTIONS |
|
AV1 |
NONE |
AV2 |
NONE |
AV3 |
NONE |
AV4 |
NONE |
AV5 |
NONE |
AV6 |
NONE |
HDMI EXPANDER |
NO |
HDMI MATRIX |
NO |
LINK TUNING |
|
|
|
>Names are shown in the television onscreen display when the source is selected.
>Press the centre button to bring up the AUTO STANDBY menu.
>Use the navigation button left or right to see the list of standby options for when the connected equipment should switch to standby.
>Press the centre button to select a standby option.
>When you have completed your settings for a single socket group, press the centre button to return to the CONNECTIONS menu.
>Repeat the procedure for each socket group.
At first-time setup only, when you have registered all connected equipment, press the green button to store the setup.
12

>> Register additional video equipment
What’s on the AV1 – AV6 menus …
SOURCE … Select the source you have connected. The option you select indicates which remote control button switches on the source. For example, a source registered as V. MEM is selected on when you press the V MEM button. A source registered as DTV2 is switched on by pressing LIST and then the navigation button up or down to display DTV2 and press the centre button. (Beo6: Press DTV2). Options are:
NONE … if nothing is connected. V.MEM … for a connected video recorder or hard disk recorder. Only AV2–4. DVD/DVD2 … for a connected DVD player or recorder.
DTV2… for other equipment, such as a set-top box.
DTV … for other equipment, such as a settop box.
V.AUX2 … for other equipment, such as a video game console.
TV … occupied by the TV tuner, unless you disable both tuners in the TUNER SETUP menu.
PC … for a connected PC.
DECODER … for a connected decoder.
The source lists are divided into 4 groups; ‘stb’ are set-top boxes, ‘dvd’ are DVD players and recorders, ‘vmem’ are video recorders including hard disk recorders, ‘other’ are, for example, PCs and media centres.
NAME … Allows you to name the source you are registering, the name you enter appears in the on-screen display when you activate the source.
(AUTO SELECTION) … Allows a source connected to AV5 to be selected automatically as soon as the television detects a signal, provided the television is on at the time. Options are ON and OFF.
IR SOCKET … Select which IR socket is used for the source, options are PUC1, PUC2, PUC3, PUC4 and NONE.
IR TYPE … Select the type of IR connection used. Options are PLUG (for a cable connection) and IR (for an IR blaster connection).
HDMI … Indicates whether or not the equipment is connected to the television via one of the HDMI sockets. Select the appropriate socket: A, B, or C.
(YPbPr) … Indicates whether or not the equipment is connected to the television via the YPbPr sockets. Options are YES and NO. Can only be registered in one of the AV menus (AV2-AV4 or AV6) at any time.
(VGA) … Indicates whether or not the equipment is connected to the television via the VGA socket. Options are YES and NO.
S/P-DIF … Select the S/P-DIF connection used. Options are 1, 2 and NONE.
An HDMI Expander must always be connected to HDMI C, when present, otherwise to HDMI B. When connecting an
HDMI Expander, additional HDMI sockets become available; C1, C2, C3 and C4.
While it is possible to register equipment under any of the available source types, the type you select affects how you can use your source.
|
AV2 |
SOURCE |
NONE |
NAME |
. . . . . |
IR SOCKET |
NONE |
IR TYPE |
NONE |
HDMI |
NONE |
Y/Pb/Pr |
NO |
S/P-DIF |
NONE |
|
|
Regarding High Definition (HD) sources …
SD signals can be recorded, as well as distributed to a link room television, but HD signals cannot.
Connect both the HD and the SD signals to the television. The best signal is always used. If no HD signal is available, the SD signal is shown.
NOTE! If you have other equipment connected to your television, set POWER SAVING to OFF. See page 31 for further information.
13
>> Register additional video equipment
Standby options …
When you register a non-Bang & Olufsen product in the CONNECTIONS menu, you can also select different STANDBY OPTIONS for your product. This means that you can select if the connected product should switch to standby automatically.
The options are:
OFF AT SOURCE CHANGE … The product switches to standby immediately when you select another source.
OFF AT TV STANDBY … The product switches to standby when you switch the television to standby.
ALWAYS ON … The television does not switch the product to standby, but the product may switch to standby due to its own settings.
MANUAL CONTROL …The product can only be switched on and off by means of the remote control. For further information, see page 39.
14
Loading...