


 Loading...
BeoSound 2
Guide

CAUTION: To reduce the risk of electric shock, do not remove cover (or back).
No User-serviceable parts inside. Refer servicing to qualified service personnel.
WARNING: To prevent fire or electric shock, do not expose this appliance to rain or moisture. Do not expose this equipment to dripping or splashing and ensure that no objects filled with liquids, such as vases, are placed on the equipment.
To completely disconnect this equipment from the AC Mains, disconnect the power supply cord plug from the AC receptacle.
This symbol indicates that a dangerous voltage constituting a risk of electric shock is present within this unit.
This symbol indicates that there are important operating and maintenance instructions in the literature accompanying this unit.
This class B digital apparatus meets all requirements of the Canadian Interference-Causing Equipment Regulations.
NOTE: This device complies with part 15 of the FCC Rules. Operation is subject to the following two conditions: (1) This device may not cause harmful interference, and (2) this device must accept any interference received, including interference that may cause undesired operation.
This equipment generates, uses and can radiate radio frequency energy and, if not installed and used in accordance with the instructions, may cause harmful interference to radio communications. However, there is no guarantee that interference will not occur in a particular installation. If this equipment does cause harmful interference to radio or television reception, which can be determined by turning the equipment off and on, the user is encouraged to try to correct the interference by one or more of the following measures:
–Reorient or relocate the receiving antenna
–Increase the separation between the equipment and receiver
–Connect the equipment into an outlet on a circuit different from that to which the receiver is connected
–Consult the retailer or an experienced radio/TV technician for help
This product fulfills the conditions stated in the EEU directives 89/336 and 73/23.
For your safety: Keep the BeoSound 2 player and base away from water and do not place items on top of them. BeoSound 2 is developed for use in dry environments only, and for use within a temperature range of 5– 45°C (41–113°F).
Technical specifications, features and the use thereof are subject to change without notice!
Acknowledgements and liability
Product names mentioned in this guide may be trademarks or registered trademarks of other companies.
Portions utilize Microsoft Windows Media Technologies. Copyright © 1999-2002 Microsoft Corporation. All rights reserved. Microsoft, Windows Media and the Windows Logo are registered trademarks of Microsoft Corporation in the United States and/or other countries.
MicroOS Operating System
(U.S. Patent #5,787,445)
Please note that Bang & Olufsen will, in no event, be liable for any consequential, incidental or indirect damages arising out of the use or inability to use the software.
Mac, the Mac logo and iTunes are trademarks of Apple Computer, Inc., registered in the U.S. and other countries.
3
System requirements – PC
•One free USB port
If you connect the BeoSound 2 docking station to this port via an external HUB, make sure that your HUB supports Full Speed Devices.
•10 MB of available disk space
•Windows 2000/XP
You must have administrator privileges to install the BeoSound 2 firmware.
System requirements – Macintosh
•One free USB port – 1.1
If you connect the BeoSound 2 docking station to this port via an external HUB, make sure that your HUB supports Full Speed Devices.
•MAC OS 9.x and OS X compatible
•iTunes 2 (and newer) compatible
Supported file formats
•MP3
Sampling frequencies: 8, 11.025, 12, 16, 22.05, 24, 32, 44.1, and 48 kHz
Constant or variable bit rates: 8, 16, 24, 32, 40, 48, 56, 64, 80, 96, 112, 128, 160, 192, 256 and 320 Kbps
•WMA
Sampling frequencies: 8, 11.025, 16, 22.050, 32, 44.1 and 48 kHz
Bit rates: 64, 80, 96, 128, 160 and 192 Kbps
•Note that the WMA format is not supported by iTunes.
Check www.bang-olufsen.com to see whether new file formats are supported by BeoSound 2. Updated BeoSound 2 firmware will also be available on this website.
4
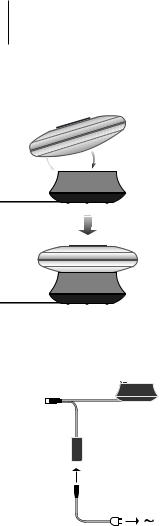
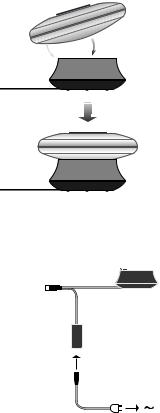
A


Place BeoSound 2 on its docking station as shown above.
USB 
Connect the USB cable – if your computer is a PC, wait until you are prompted.
English
Setting up BeoSound 2
Follow the sequence below corresponding to your setup, PC or Macintosh. If your computer is a PC, do not connect the USB cable until you are specifically prompted to do so on the screen! If you have a Macintosh computer, it is essential that you change mode, in the exact fashion and sequence as described below.
Installation and connection (PC use)
1Insert a memory card (MultiMedia or Secure Digital) into BeoSound 2.
2Insert the CD-rom in your computer’s CD drive. If the Setup program starts automatically, proceed to 5. Otherwise, go to 3.
3Select your CD drive.
4Double-click the ‘Setup’ file.
5Follow the on-screen instructions...
6When prompted on the screen, connect the USB cable to your computer.
Installation and connection (Macintosh use)
1Insert a memory card (MultiMedia or Secure Digital) into BeoSound 2.
2As BeoSound 2 is in BeoPlayer mode per default, you must change this setting. Make sure that BeoSound 2 is paused and that the Earphones are connected. Press and hold and ss. Then press GO twice, without letting go of the first two buttons. You will receive audible feedback. Your BeoSound 2 is now in iTunes mode.
3Connect the USB cable to your computer.
4Insert the CD-rom in your computer’s CD drive.
5Select the appropriate folder for your operating system, OS 9 or OS X.
6Select the install file, and follow the on-screen instructions…
Configuration and formatting (BeoPlayer use only)
Before you copy music to your BeoSound 2 from BeoPlayer, you may want to set the copying quality or make other adjustments to the default settings. This is all done by clicking SETUP on the BeoPlayer on-screen control bar, then CONFIG – and a configuration menu appears where you can make your changes. The configuration menu is also where you format a memory card. Explore the configuration menu for yourself, or access the On-screen Guide for an in-depth explanation.

5
Get started
Once you have connected and installed BeoSound 2 to your computer, you can begin using it. To find out how BeoSound 2 works with your computer and music player, simply proceed to the section on the following pages, describing the setup you have. Available options are listed below.
BeoPlayer or BeoLink PC 2 (PC use only)
We recommend using BeoSound 2 with Bang & Olufsen’s own music players: BeoPlayer or BeoLink PC 2. This Guide describes the basic use on the following pages. To learn more about advanced use of BeoSound 2 with BeoPlayer or BeoLink PC 2, refer to the On-screen Guide located at the bottom of the on-screen control bar in both of these players. Find out for example how to:
–Move or rename tracks and playlists in BeoSound 2.
–View and edit track INFO.
–Find out more about CDDB music information.
–Alter Configuration settings for a personalised touch.
–Format a memory card.
Open the small compartment on a back of BeoSound 2 to insert a memory card.
All future reference to BeoPlayer includes BeoLink PC 2 use, as these two players work similarly regarding Beosound 2.
iTunes (Macintosh use only)
To learn more about using iTunes, refer to ‘BeoSound 2 with iTunes’ in this Guide. For further information on iTunes, refer to the iTunes help function.
GO |
Other players
It is possible to use other players than the above mentioned with BeoSound 2. Examples can be found in ‘other players and options’ on the last page of this Guide.
Use a needle to pull out the key ring tag. You may, for example, use the tag to attach a neck strap.
6 |
>> English |
|
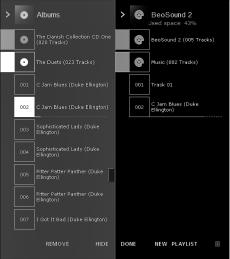
BeoSound 2 with BeoPlayer
The BeoSound 2 Playlist is open and a track is being copied from an Album list to BeoSound 2. Wait for the progress indicator under the track to be filled out completely, before your copy is finished.
About BeoPlayer |
Copy music files to BeoSound 2 |
A music organiser – N.MUSIC, and a |
The N.MUSIC organiser in BeoPlayer automatically sorts your music tracks by |
CD player – PC CD, are some of the |
Genre, Album, Title, Artists and Playlists. If you already have music stored in |
most important features of the |
N.MUSIC, you can start copying tracks to BeoSound 2. |
BeoPlayer. On these pages you can |
> Place BeoSound 2 on the docking station. |
read about basic use of these |
The docking station must be in USB mode (indicated by red light from the |
features with the BeoSound 2 |
docking station). If the docking station light is not red, press and hold GO |
portable player. To know more about |
for 2 seconds to change it, then; |
your options, we recommend that |
> Access BeoPlayer. |
you access the BeoPlayer On-screen |
> Click N.MUSIC twice to access your playlists and tracks. |
Guide. |
> Click COPY to access the music content on BeoSound 2. A BeoSound 2 |
|
Playlist opens containing an overview of music already stored on |
|
BeoSound 2. |
|
> To copy tracks from your lists to BeoSound 2, simply drag and drop a track |
|
from a list to the BeoSound 2 Playlist. An progress indicator below the track |
|
name shows the status of the copying progress. |
|
> To cancel a copy, select the track and delete it, either by dragging it to the |
|
waste basket – or by pressing the DELETE button on your keyboard. A copy |
|
will also be cancelled if you exit BeoPlayer completely, or if you unplug |
|
BeoSound 2. |

7
Copy from an audio CD to BeoSound 2
You can copy music directly from an audio CD to BeoSound 2. This is useful if, for example, you haven’t got any music stored in your BeoPlayer, and you want to get started playing music on BeoSound 2.
>Insert an audio CD into your PC CD-rom drive.
>Click PC CD to access the PC CD list.
BeoPlayer uses your Internet connection to connect to CDDB in order to receive information about the CD tracks*.
>Click COPY to gain access to the destination lists, and select the option ‘BeoSound 2’. A BeoSound 2 Playlist opens.
>You can now drag and drop the track or tracks you wish to copy from the PC CD list into the BeoSound 2 list.
You can use the control bar while copying, but your copying will be disrupted if you exit the player completely.
*In order to be able to receive CDDB information, you must be registered to BeoPlayer, the function must be enabled in the Configuration menu (it is as per default) and your computer must be on-line. If there is no information available after approximately 10 seconds, your tracks will simply be registered as ‘unknown’. Refer to the BeoPlayer On-screen Guide for further information about CDDB.
About audio CD copying
Once a track is copied from a CD directly to your portable player, it is stored on your memory card, but not on your PC. Therefore, if you subsequently format your card, it will erase your copy of the track.
Firmware update
Bang & Olufsen firmware updates can be downloaded from www.bang-olufsen.com. Select ‘BeoSound 2 download’ and follow the on-screen instructions.

8 |
>> English |
|
BeoSound 2 with iTunes |
||
|
If you have a Macintosh computer, you can use BeoSound 2 with the iTunes program.
Organising tracks and playlists iTunes allows you to sort your tracks by different sorting criteria: Size, Title, Rating etc. To display the playback order of BeoSound 2, press the small arrow on the top-left side of the list. For further assistance in the use of iTunes, refer to the help function.
Get started
Once you have set BeoSound 2 to iTunes mode, as described in the setup section, you can begin using iTunes:
>Place BeoSound 2 on the docking station.
The docking station must be in USB mode (indicated by red light from the docking station). If the docking station light is not red, press and hold GO for 2 seconds to change it, then;
>Access iTunes.
After a few seconds, iTunes detects BeoSound 2. This is shown in the playlist view and a disc icon appears on your desktop.
>You can now drag and drop tracks from your playlists on to the BeoSound 2 icon.
It is not possible to place tracks directly into playlists. iTunes creates a playlist: ‘music’ containing all the tracks you copy. To place a track in another playlist, you must create a new playlist and move the track after you have finished copying.
Note that the disc icon must be ejected from the desktop before you either press GO to playback the music, or remove BeoSound 2 from the docking station.

Other functions
Once you have connected BeoSound 2, iTunes adds on features that were not previously available. These new features can be found behind buttons located at the bottom of the playlist, as illustrated to the right.
Create playlists
To create a playlist in BeoSound 2, select the BeoSound 2 icon and click the button marked [+] shown to the right. For daily BeoSound 2 use, having multiple playlists is practical. It allows you to easily locate your sorted tracks, using the next/previous playlist feature, as described on the following page.
Firmware update
Bang & Olufsen firmware updates can be downloaded from www.bang-olufsen.com.
–Click the update button shown to the right.
The button appears in the lower right corner of iTunes – only when BeoSound 2 is on its docking station.
–Click the ‘update firmware’ button, locate the firmware file and select it. Await on-screen instructions. When you have followed the instructions on-screen, an audible feedback from your BeoSound 2 will inform you that the firmware update is completed.
IMPORTANT: BeoSound 2 returns to BeoPlayer mode, after a firmware update. You must change the mode back, if you want to continue in iTunes mode. Read more about changing mode on the following pages.
9
This button gives you access to erase your memory card.
Create a new playlist by clicking this button.
This button has a three-fold purpose: See which firmware version you currently have, update your firmware, and personalise BeoSound 2 by changing the name at will. The button differs in OS 9 and OS X.
The upper button is the OS X version, the lower the OS 9 version.

10
GO |
>> English
Daily use
Keypad functions
Play: Press GO to start playback.
Pause: To pause playback, press GO a second time.
Volume: and adjusts volume.
Next track: Press ▲ to step to the next track in a playlist.
Previous track: Press ▼ to go to the previous track in a playlist.
Random on/off: To play tracks in random order, press and hold ▲ and ▼ simultaneously for two seconds. Repeat to restore sequential playback.
Next playlist: Press tt to step to the next playlist.
Previous playlist: Press ss to step to the previous playlist.
Cue: To cue through your tracks, press and hold ss or tt. Cueing is not possible for tracks in the WMA format.
Lock/unlock: To lock or unlock the keypad, press and hold ss and tt simultaneously for two seconds.
Standby: To switch BeoSound 2 to standby, press and hold GO for two seconds.
BeoSound 2 switches to standby after 30 seconds in pause mode.
Format card: BeoSound 2 must be paused and the Earphones connected. Press and hold and tt. Then press GO twice. You will get audible feedback. When the audible feedback stops press and hold and tt. Then press GO twice again. You will get audible feedback again.
11
Switch between playback and download: BeoSound 2 must be placed on the docking station. Press GO to start playback, or press and hold GO for 2 seconds to connect to the computer – enabling you to download to BeoSound 2. The docking station light changes colour accordingly.
Change mode: Switch between BeoPlayer and iTunes mode. BeoSound 2 is in BeoPlayer mode per default. To change this setting, make sure that BeoSound 2 is paused, and that the Earphones are connected.
Go to iTunes mode: |
Go to BeoPlayer mode: |
Press and hold and ss. |
Press and hold and ss. |
Then press GO twice, without |
Then press GO twice, without |
letting go of the first two |
letting go of the first two |
buttons. Audible feedback |
buttons. Audible feedback |
informs you that BeoSound 2 has |
informs you that BeoSound 2 has |
changed to iTunes mode. |
changed to BeoPlayer mode. |
|
|
BeoSound 2 feedback
Audible feedback: BeoSound 2 gives you audible feedback for example when:
–Battery power is low (beep repeated every 30 seconds)
–Error occurs (beep repeated every 5 seconds)
–Firmware update is completed
–A memory card is formatted
Docking station light feedback: When BeoSound 2 is placed on the docking station, the docking station lights up to indicate its current status: Green… Track playback or pause, not connected to the computer.
Red… Download mode, connected to the computer.
Orange… Resetting – continuous orange light feedback indicates error.
Flashing light (red or green)… Battery charging.
Flashing red and green, followed by orange, then red… Updating Firmware.
12 |
>> English |
|
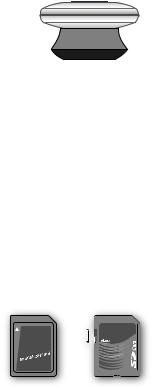
MultiMedia (MMC) and Secure Digital (SD) cards are available from a number of suppliers. Memory cards from SanDisk has been tested and approved for use in BeoSound 2. You can write-protect an SD-card by moving the slider down.
Maintenance, etc.
Recharge battery
When the built-in battery requires recharging, a beep, repeated every 30 seconds, sounds from BeoSound 2. You can silence this signal by pressing GO on the keypad once.
Place BeoSound 2 on the docking station. Recharging begins. You can leave BeoSound 2 on the docking station without risk of overcharging the battery.
An 80% battery charge is reached after approximately one and a half hours, and a full charge is reached after approximately two and a half hours. Starting from a fully-charged state, the battery in BeoSound 2 will provide approximately 8 hours of use.
Reset BeoSound 2
If BeoSound 2 doesn’t respond, you can reset it. Press and hold and . Then press GO for two seconds. This resets BeoSound 2. No data is lost.
Update BeoSound 2 Firmware
Updates for BeoSound 2 will be available for download via www.bang-olufsen.com. Go to the previous pages for instructions.
Cleaning BeoSound 2
Wipe dust off the surfaces using a dry, soft cloth. Remove grease stains or dirt with a lint-free, firmly wrung cloth, dipped in a solution of water containing only a few drops of mild detergent, such as washing-up liquid.
Memory card
To ensure a long lifetime, memory cards must be handled with care. Always keep the card inside the BeoSound 2, or in the cartridge supplied with the card. Please note that formatting will not be possible if you have write-protected the card (formatting will erase all content on the card).

Earphones
For maximum sound quality, assemble, place and adjust the Earphones as illustrated to the right. BeoSound 2 switches to standby if you disconnect the Earphones.
WARNING! Prolonged use at high volume may cause hearing damage!
Other players and options
Windows Media Player 7.0 or newer can also be used with BeoSound 2. Refer to the Windows Media Player help function for further details on device use.
Mass Storage device mode
When BeoSound 2 is in iTunes mode, it will actually work and act as a Mass Storage device. The Mass Storage device mode will make your BeoSound 2 act as an extra drive on your computer. This allows you to use, for example, your file explorer to organise your music.
Note that you can only place music in folders when using file explorer. You cannot use the root or subfolders. Furthermore, to be able to change between folders as if they were playlists, you must create new folders yourself.
If you use BeoSound 2 in Mass Storage mode, or if you load the SD card in a PC card reader, the SD card must be scanned in order to create or update the playlist file. This scan is done automatically if no playlist file is found on the SD card when you switch on BeoSound 2.
If there is a playlist file on the SD card, but you have not updated it, you can start the scan manually by pressing and holding the and ▼ buttons for two seconds. During the scan, BeoSound 2 beeps at three-second intervals. When scanning is complete, playback starts automatically.
You can interrupt the scanning by switching off BeoSound 2. However, this produces an incomplete playlist file, so only part of the content is played when you switch on BeoSound 2.
Optional accessories
A number of optional accessories are available. The accessories enable the continued use of the BeoSound 2, for example, when travelling or during leisure activities. For further information, contact your Bang & Olufsen retailer
– or visit www.bang-olufsen.com.
13 |
14 |
|
Français |
|
||
|
|
Installation du BeoSound 2 |
A


Placez le BeoSound 2 sur sa station d’accueil comme le montre l’illustration ci-dessus.
USB 
Connectez le câble USB – si vous avez un PC, il faut attendre d’y être invité.
Suivez la séquence ci-dessous qui correspond à votre installation, PC ou Macintosh. Si vous avez un PC, il ne faut pas connecter le câble USB avant d’avoir été spécifiquement invité à le faire à l’écran ! Si vous avez un Macintosh, il est indispensable que vous changiez de mode en suivant exactement la description ci-dessous.
Installation et connexion (utilisation avec PC)
1Introduire une carte mémoire (MultiMedia ou Secure Digital) dans le BeoSound 2.
2Mettez le CD-ROM dans le lecteur CD de votre ordinateur. Si le programme d’installation démarre automatiquement, allez au point 5. Sinon, allez à 3.
3Sélectionnez votre lecteur CD.
4Double-cliquez sur le fichier « Setup ».
5Suivez les instructions qui s’affichent à l’écran…
6Lorsque vous y êtes invité à l’écran, connectez le câble USB à votre ordinateur.
Installation et connexion (utilisation avec Macintosh)
1Introduire une carte mémoire (MultiMedia ou Secure Digital) dans le BeoSound 2.
2Le BeoSound 2 étant en mode BeoPlayer par défaut, vous devez modifier ce réglage. Assurez-vous que le BeoSound 2 est mis sur pause et que les écouteurs sont connectés. Appuyez et maintenez enfoncées les touches
et ss. Appuyez ensuite deux fois sur GO sans relâcher les deux premières touches. Vous entendrez une réaction sonore. Votre BeoSound 2 est désormais en mode iTunes.
3Connectez le câble USB à votre ordinateur.
4Mettez le CD-ROM dans le lecteur CD de votre ordinateur.
5Sélectionnez le dossier correspondant à votre système d’exploitation, OS 9 ou OS X.
6Sélectionnez le fichier d’installation et suivez les instructions qui s’affichent à l’écran…
Configuration et formatage (utilisation du BeoPlayer uniquement)
Avant de copier vers votre BeoSound 2 à partir du BeoPlayer, peut-être souhaitez-vous régler la qualité de copie ou effectuer d’autres réglages par rapport aux réglages par défaut. Pour cela, il suffit de cliquer sur SETUP sur la barre de commande à l’écran du BeoPlayer, puis sur CONFIG – après quoi apparaît un menu de configuration qui vous permet d’effectuer vos modifications. Dans le menu de configuration, vous pouvez également formater une carte mémoire. Explorez vous-même le menu de configuration ou accédez au Manuel en ligne pour des explications approfondies.

15
Commencer
Après avoir connecté et installé votre BeoSound 2 en fonction de votre ordinateur, vous pouvez commencer à l’utiliser. Afin de savoir comment le BeoSound 2 fonctionne avec votre ordinateur et lecteur de musique, il vous suffit d’aller au chapitre dans les pages suivantes qui décrivent votre installation. Les options disponibles figurent ci-dessous.
BeoPlayer ou BeoLink PC 2 (utilisation avec PC uniquement)
Nous recommandons l’utilisation du BeoSound 2 avec les lecteurs de musique de Bang & Olufsen : le BeoPlayer ou le BeoLink PC 2. Ce Manuel décrit les bases de leur utilisation dans les pages suivantes. Afin de découvrir une méthode avancée quant à l’utilisation du BeoSound 2 avec le BeoPlayer ou le BeoLink PC 2, prière de vous reporter au Manuel en ligne situé en bas de la barre de commande à l’écran dans ces deux lecteurs. Savoir par exemple comment :
–Déplacer ou renommer des pistes et des listes de diffusion dans le BeoSound 2.
–Visualiser et modifier INFO sur les pistes.
–En savoir plus sur l’information musicale CDDB.
–Modifier des paramétrages afin d’apporter une touche personnelle.
–Formater une carte mémoire.
Toutes les références faites au BeoPlayer correspondent également à l’utilisation du BeoLink PC 2, étant donné que ces deux lecteurs fonctionnent de façon similaire en ce qui concerne le Beosound 2.
iTunes (utilisation avec Macintosh uniquement)
Afin d’en savoir plus sur l’utilisation d’iTunes, prière de vous reporter au chapitre « BeoSound 2 avec iTunes » dans ce Manuel. Pour plus d’informations sur iTunes, prière de vous reporter à la fonction aide d’iTunes.
Autres lecteurs
Il est possible d’utiliser d’autres lecteurs que ceux mentionnés ci-dessus avec le BeoSound 2. Vous trouverez des exemples dans « Autres lecteurs et fonctions » à la dernière page de ce Manuel.
Ouvrez le petit compartiment à l’arrière du BeoSound 2 afin d’installer une carte mémoire.
GO |
Extraire à l'aide d'une aiguille la patte de fixation de l'anneau, dans lequel on peut passer une sangle à des fins de port autour du cou, etc.
Loading...