


 Loading...
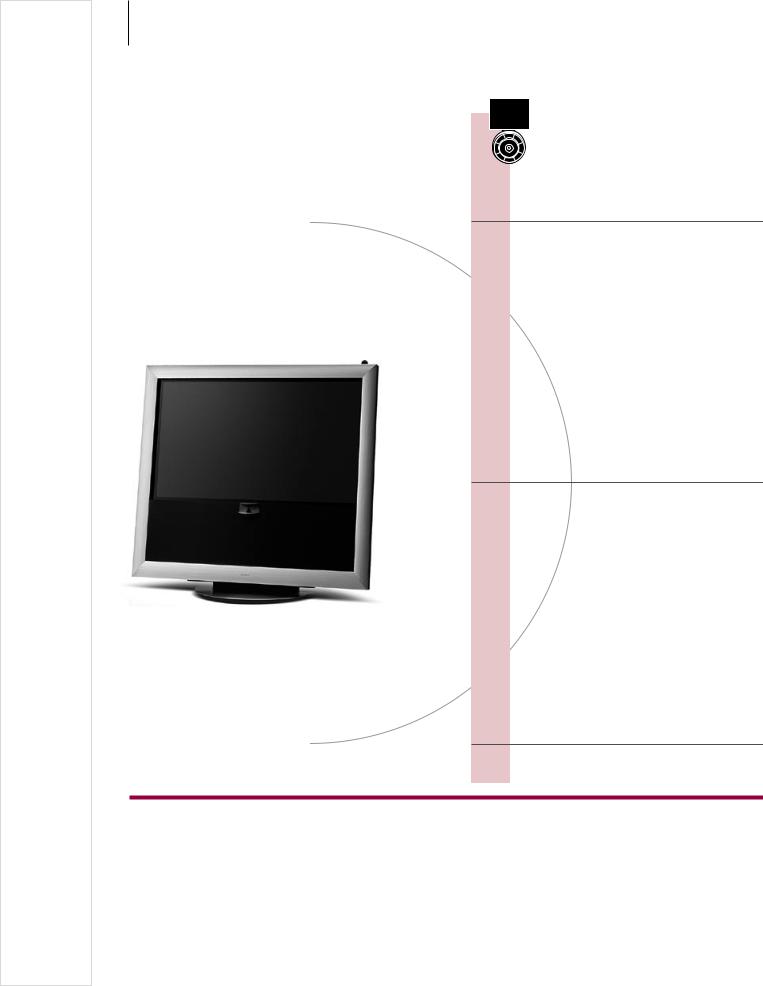
BeoVision 9
Guide
Cautions
–Make sure that the product is set up, placed and connected in accordance with the instructions in this Guide.
–Place your product on a firm and stable surface. To prevent injury, use Bang & Olufsen approved stands and wall brackets only!
–Do not place any items on top of your product.
–Do not subject the product to high humidity, rain or sources of heat.
–The product is developed for indoor use in dry, domestic environments only. Use within a temperature range of 10–35°C (50–95°F), and at an altitude of no more than 1500 m (5000 ft).
–Do not place the TV in direct sunlight, as this may reduce the sensitivity of the remote control receiver.
–Leave enough space around the product for adequate ventilation.
–Do not connect any of the products in your system to the mains, until you have connected all the cables.
–Do not attempt to open the product. Leave such operations to qualified service personnel.
–The product can only be switched off completely by disconnecting it from the wall socket.

Dear Customer
This Guide contains information about the daily use of your Bang & Olufsen product and about connecting and operating
external equipment. We expect your retailer to deliver, install and set up your product.
On the Bang & Olufsen website, www.bang-olufsen.com, you can find further information and relevant FAQs about your product.
The needs of the user are considered carefully when designing and developing Bang & Olufsen products. Therefore, please take the time to tell us about your experience with your product.
To contact us, visit our website on …
www.bang-olufsen.com
or write to: |
Bang & Olufsen a/s |
|
BeoCare |
|
Peter Bangs Vej 15 |
|
DK–7600 Struer |
or fax: |
Bang & Olufsen |
|
BeoCare |
|
+45 9785 3911 (fax) |
Technical specifications, features and the use thereof are subject to change without notice.
|
Contents |
4 |
Watch television |
6 |
Teletext |
8 |
HDR – Pause and replay |
10 |
HDR – Recordings |
12 |
Access to BeoMaster 5 |
15 |
BeoLink |
25 |
Advanced use |
43 |
Installation – setup |
3510348 0903

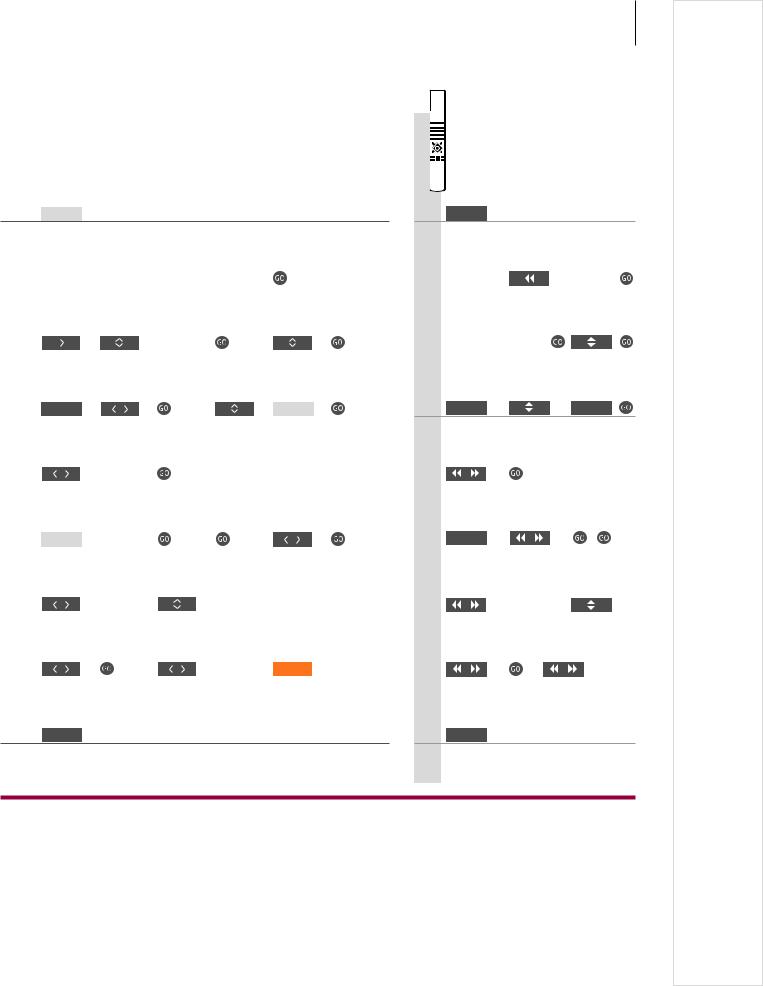
How to use your remote control
You can operate your television with |
Beo5 operation |
Beo5 or Beo4. The instructions in this
Guide are mainly based on Beo5.
TV |
Soft button, touch screen to select*1 |
|
Switch on a source or select a function |
|
Back up through Beo5 displays |
|
|
|
|
Bring up SCENE buttons, such as Zones or Speaker |
|
|
|
|
Press again to return |
|
Living Room |
|
|
|
|
|
|
+ |
Bring up digits to select channel or recording |
|
|
|
|
Press again to return |
TV |
V.MEM |
RADIO |
|
|
DTV |
N.MUSIC |
N.RADIO |
STOP |
Back up through menus or press once to pause |
|
|
|
|
playback and twice to stop |
PC |
DVD |
CD |
|
|
|
|
|
PLAY |
Start playback |
|
|
|
BACK |
Exit menus completely |
|
STOP |
PLA |
|
2 |
|
Y |
|
||
|
|
|
|
Select colour specific functions* |
|
|
|
|
Press volume wheel next to the colour |
|
Turn to adjust volume |
|
To mute, turn quickly counter-clockwise |
BACK |
Press centre button to accept and store settings |
GO |
|
|
Step through screen menus |
|
Search backwards or forwards |
|
Recordings |
|
Step through channels or recordings |
|
Hold for continuous step |
|
Standby |
Useful hints
1*About buttons Light grey buttons indicate that you have to press a text in the display. Dark grey buttons indicate that you have to press a hard button.
2*Coloured buttons Press the wheel next to the colour to activate a coloured button. Actual zone Indicates the actual zone as it was named during the setup process.
Soft buttons Depending on the activated source, different soft buttons appear on the screen. Touch the screen to activate the function.
Beo4 operation
TV |
LIGHT |
RADIO |
DTV |
DVD |
CD |
V MEM |
RECORD |
A MEM |
7 |
8 |
9 |
4 |
5 |
6 |
1 |
2 |
3 |
TEXT 0 MENU
|
GO |
LIST |
EXIT |
STOP |
|
TV |
The Beo4 display shows you the activated source or function |
TV |
Switch on the TV*3 |
V MEM |
Switch on the hard disc recorder |
|
Press twice to start a recording |
RECORD |
|
0 – 9 |
Select channels and enter information in on-screen menus |
|
Bring up the main menu of the active source |
MENU |
|
|
Switch on teletext |
TEXT |
|
|
Search backwards or forwards or move in menus |
GO |
Accept and store settings and start playback |
|
Step through channels or move in menus |
|
Hold for continuous step |
|
Select colour specific functions |
|
Adjust volume |
|
|
|
To mute, press the middle of the button |
|
|
LIST |
Display extra ‘buttons’ on the Beo4 |
|
Press repeatedly to change ‘buttons’ |
STOP |
Back up through menus or press once to pause playback and |
|
twice to stop |
|
Exit menus |
EXIT |
|
|
Standby |
*3 Marked buttons can be reconfigured during the setup process. See p. 47. |
NOTE! For general information about |
||
|
|
|
remote control operation, see the Guide |
My reconfiguration: |
enclosed with your remote control. |
||
|
|
|
|
|
TV |
|
|
|
|
|
|
DTV
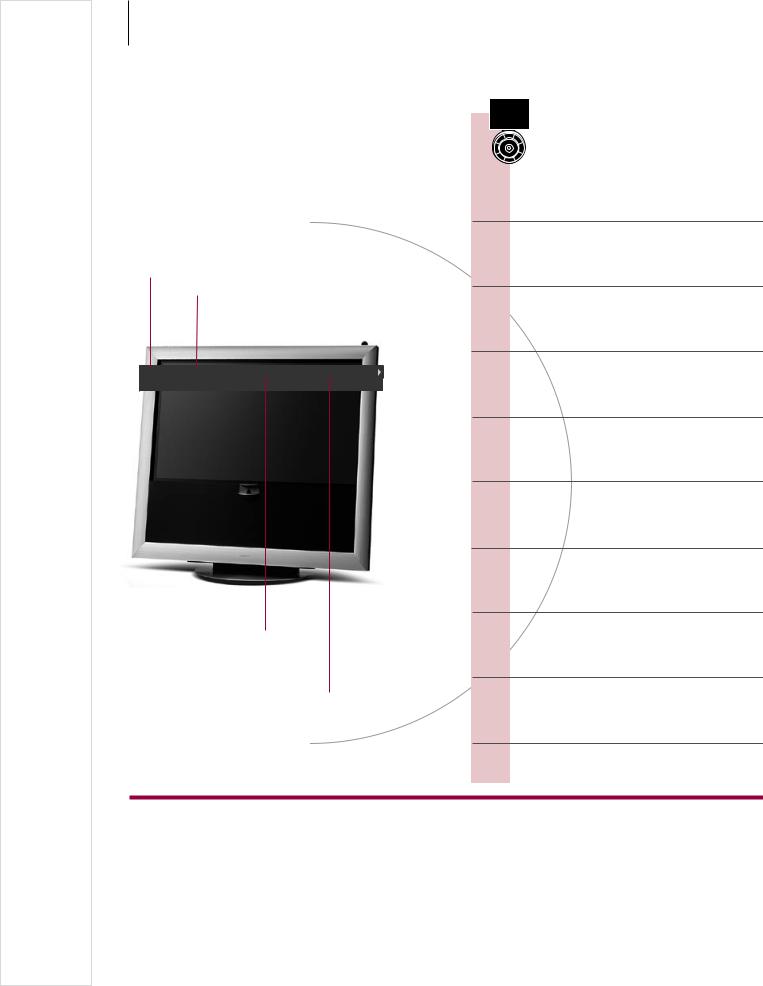
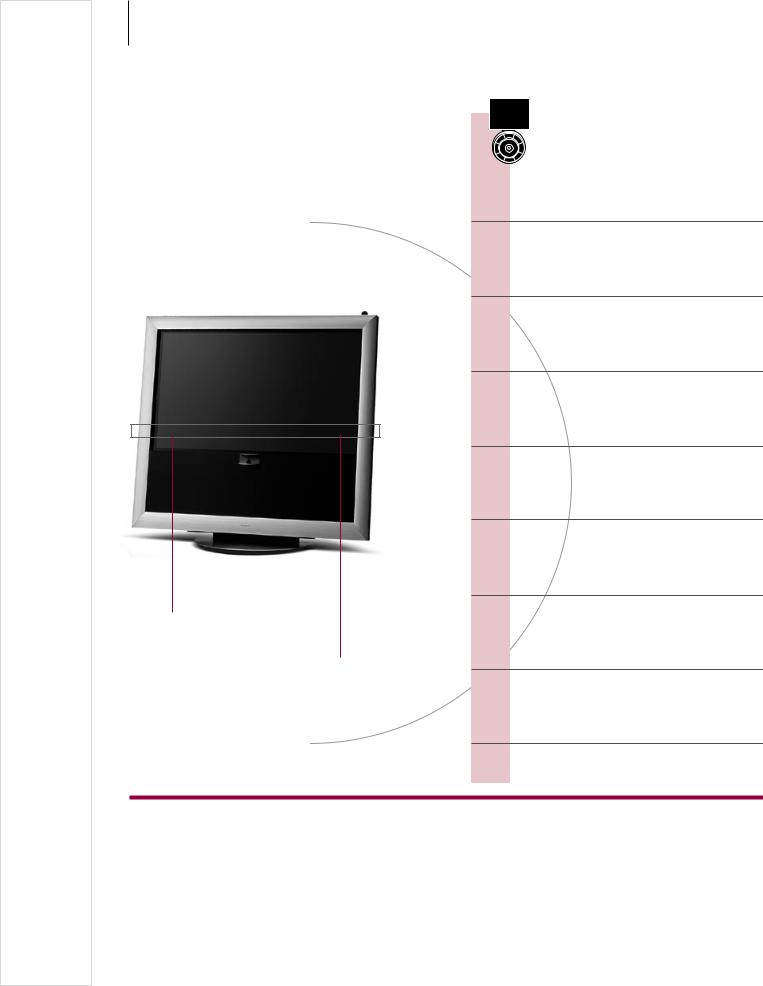
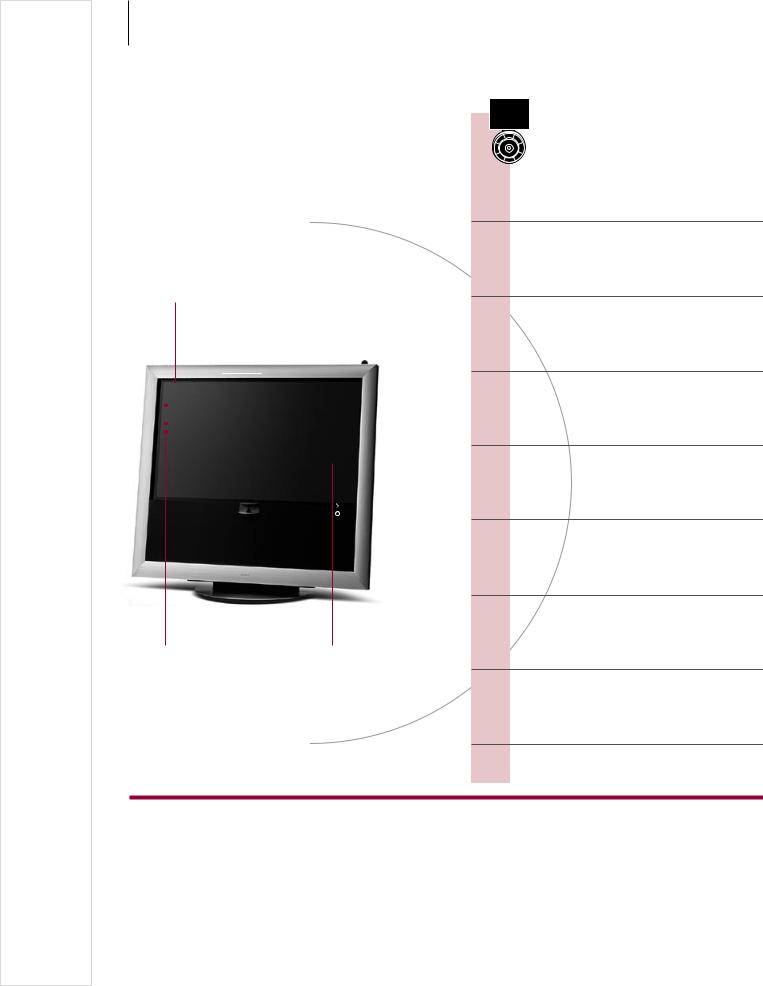
Introduction |
3 |
Watch, record or store movies and listen to different sources, such as the optional hard disc recorder, a connected set-top box or a music centre.
Display and menus |
… |
TV |
or |
V.MEM |
Menu |
Information about the selected source is |
Select TV’s |
Switch on TV |
|
Switch on hard |
Show menu |
shown at the top of the screen. On-screen |
zone |
|
|
disc recorder |
|
|
|
|
|
|
menus allow you to adjust settings.
Easy use
Menu name |
|
|
|
TV SETUP |
|
|
|
|
|||
|
|
|
|
TUNING |
|
Menu options |
|
PLAY TIMER |
|||
|
OPTIONS |
||||
|
|
|
|
||
|
|
|
|
STAND POSITIONS |
|
Information field |
|
|
|
select |
|
|
|
|
|||
|
|
|
|
|
|
Navigate in menus |
|
|
|
|
|
|
|
|
|
|
|
|
|
|
|
|
|
|
|
+ |
|
|
0–9 |
GO |
|
|
|
|
|
|
|
BACK |
|
||
|
|
|
|
|
|
|
|
|
|
|
|||||||
|
|
|
|
|
|
|
|
|
|
|
|
|
|
|
|
|
|
When a menu is on the screen, you can |
Select option/ |
Enter data |
|
Bring up subSelect option |
Exit menus*4 |
||||||||||||
move between menu options, reveal |
setting |
|
|
|
|
menu/store |
|
|
|||||||||
|
|
|
|
|
|
setting |
|
|
|||||||||
settings or enter data. |
|
|
|
|
|
|
|
|
|||||||||
|
|
|
|
|
|
|
|
|
|
|
|
|
|
|
|
|
|
Watch television • Teletext • HDR – Pause and replay • HDR – Recordings • Access to BeoMaster 5
Important – for more information: www.bang-olufsen.com
Remote control The instructions in this Guide are mainly based on the Beo5 remote control, but you can also operate the TV with Beo4. On the fold-out page in this Guide, you will find an overview of the buttons on Beo5 and Beo4. For general information about remote control operation, see the Guide enclosed with your remote control.
4*NOTE! Press STOP to back up through menus.
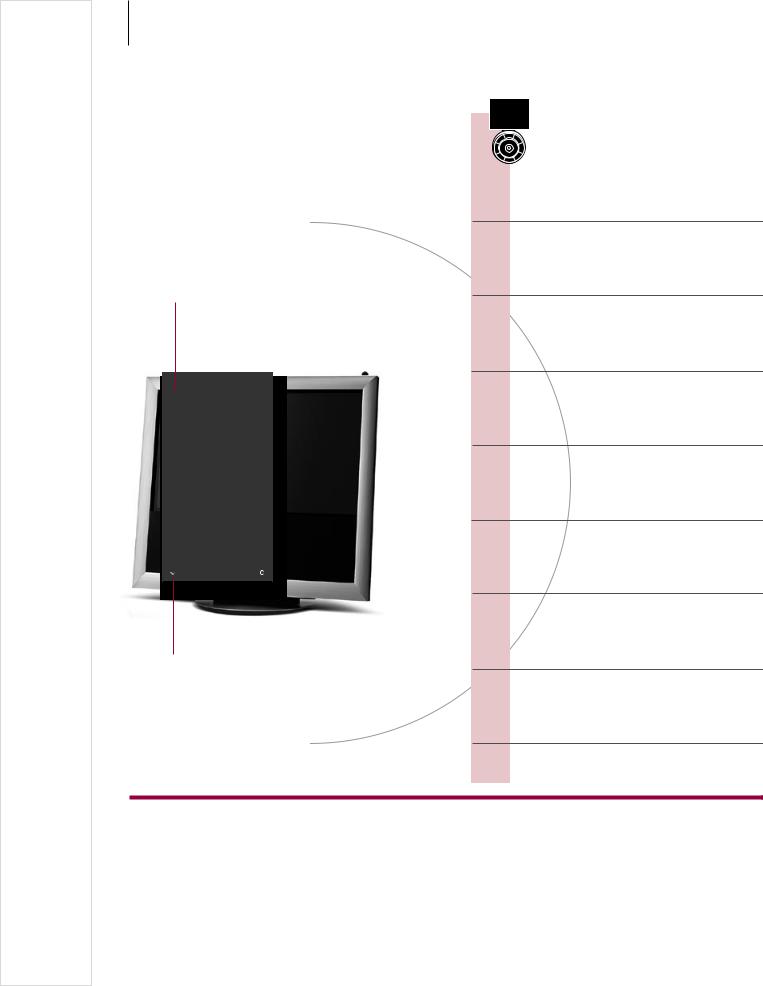
4 |
Watch television |
|
Choose a TV channel by its number or switch to another channel or source. Adjust the sound volume, change the sound type or language and turn the TV.
Activate the TV source to use these functions
|
Channel name |
|
Channel number |
|
|
|
|
||
|
|
|
||
|
|
|
|
|
TV |
CHANNEL LIST |
|
|
|
|
|
|
|
|
CNN |
1 |
|
||
… |
2 |
|
||
DISCOVER |
3 |
|
||
CWNBC |
4 |
|
||
BBCWORLD |
5 |
|
||
… |
6 |
|
||
… |
7 |
|
||
… |
8 |
|
||
SUPER CH |
9 |
|
||
…10
CRIME TV |
11 |
CINEMA |
12 |
…13
MOVIE NW |
14 |
…15
…16
…17
…18
more |
select |
Indicates more channels
Beo5 operation
Switch on the TV
Select a TV channel
Bring up a channel list
Adjust the volume
Record here and now
While recording you can also watch another recording, source, or TV channel.*1
Turn the TV
See second source
Divide the screen to watch two sources at the same time.
Switch off the TV
Automatic colour calibration may start automatically.
Useful hints
1*Record here and now You cannot start a new recording if a recording is already in progress, or if the optional hard disc recorder is full of protected recordings. Also, you cannot watch one set-top box programme while recording another.
Automatic Colour Management Automatic Colour Management automatically compensates for colour changes on the screen for every 100 hours of use approximately. Do not switch off the system or disconnect it from the mains during the calibration.
TV
Press
|
|
|
|
|
|
|
|
|
|
|
|
|
|
or |
+ |
0–9 |
|
Previous |
|
||
|
|
|
|
|
|
|
|
|
|
|
Select |
|
|
Activate |
Select |
Select previous channel |
|||||
|
|
|
|
|
numbers |
channel |
|
|
|
|
|
|
|
|
|
|
|
|
|
|
|
|
|
|
|
|
|
or |
+ |
|
0–9 |
|
|
|
|
|
|
|
|
|
|
|
|
Hold for |
Select page |
Select channel |
|
|
Accept |
|||||
channel list |
|
|
|
|
|
|
|
|
||
Adjust volume. To mute, turn quickly |
Bring back the sound by turning the |
||||||||||
|
counter-clockwise |
|
|
|
|
wheel either way. |
|||||
|
|
|
|
|
|
|
|
|
|
|
|
|
Record |
|
Record |
|
|
|
|
STOP |
|
STOP |
|
|
|
|
|
|
|
|
|
|
|
|
|
Start recording |
|
|
|
|
Stop recording |
||||||
|
|
|
|
|
|
|
|
|
|
|
|
|
|
|
|
|
|
|
|
|
|
Position |
|
|
|
|
Stand |
|
Turn |
or |
Turn |
or |
1…9 |
|
|
|
|
|
|
|
|
|
|
|
|
|
|
|
Press |
Press |
Turn TV |
|
Select position*2 |
||||||
|
|
|
|
|
|
|
|
|
|
|
|
|
P-and-P |
|
DVD |
|
Swap |
|
|
|
|
|
|
|
|
|
|
|
|
|
|
|
|
|
|
|
Press |
Select |
Swap pictures |
|
|
|
|||||
|
|
source |
|
|
|
|
|
|
|
|
|
|
|
|
|
|
|
|
|
|
|
|
|
|
|
|
|
|
|
|
|
|
|
|
|
Press
5
 Beo4 operation
TV
Press
|
|
or |
0–9 |
|
0 |
|
|
|
|
|
|
|
|
Select |
Select |
Previous |
||||
|
|
|
channel |
channel |
||
|
|
|
|
|
|
|
|
|
|
|
or |
|
|
|
|
|
|
|
|
|
Hold to |
Select page or channel and |
|||||
activate |
accept |
|
|
|
||
|
|
|
|
|
|
|
|
|
|
|
|
|
|
Adjust |
To mute, press in the middle |
|||||||
volume |
of the button |
|
|
|||||
|
|
|
|
|
|
|
||
|
RECORD |
|
|
|
|
STOP |
|
|
|
|
|
|
|
|
|
|
|
|
Press twice to start |
Press twice to |
||||||
|
|
|
|
|
|
|
stop |
|
|
|
|
|
or |
|
|||
|
LIST |
|
|
|
1–9 |
|
||
|
|
|
|
|
|
|
|
|
Select |
Turn TV |
Select |
||||||
STAND |
|
|
|
position*2 |
||||
|
|
|
|
|
|
|||
|
LIST |
|
|
DVD |
|
0 |
|
|
|
|
|
|
|
|
|
|
|
Select |
Select source |
Swap pictures |
||||||
P-AND-P |
|
|
|
|
|
|||
|
|
|
|
|
|
|
|
|
|
|
|
|
|
|
|
|
|
Press
Second source You can bring up two video sources. With Swap you can make the left and right pictures switch places. With BACK you leave the function and go to the source on the left. You can also just select the source you wish to go to. See also p. 50 for information about HDMI sources.
2*TV positions Position 1 is the far left position and Position 9 is the far right.
NOTE! To use the stand function, you have to calibrate the stand first, see p. 53. To preset positions for the TV to turn to, see p. 56.
6 Teletext
Operate teletext through the menu bar at the top of the teletext page or the arrow buttons on your Beo5.
Activate teletext to use these functions
Actual page
Change broadcaster
|
PAGE |
CHANNEL |
LARGE |
HALT REC |
SETUP |
|
|
P100 |
BBC |
S100 |
Wed 13 Oct |
12:39:34 |
|
|
|
|
|
|
|
|
Stop subpage turning
The arrow indicates that more options are available. Reveal hidden text on ‘REVEAL’ and make settings on ‘SETUP’
Beo5 operation
Start teletext
Access the start page of teletext.
Move to pages
Access teletext pages you wish to see.
Change teletext service*1
Access teletext pages of other broadcasters.
Stop subpages from turning
Reveal hidden messages
… and the like.
Create MEMO pages
Nine MEMO pages are available for each channel’s teletext service.*2
View a MEMO page
‘MEMO’ is only available if you have stored MEMO pages.
Delete a MEMO page
Exit teletext
Leave the teletext function.
Glossary
Beo5 teletext point With the inner arrow buttons on Beo5 you can navigate in page references in a teletext page. Go to a page referred to by pressing the centre button and back again by pressing BACK.
1*Teletext service Each channel provides its own teletext service. Change easily between teletext pages of different channels. MEMO pages Store a teletext page as a MEMO page to be able to access it quickly.
Large teletext To enlarge the size of the teletext page, bring up teletext, move to ‘LARGE’ in the menu bar and press the centre button repeatedly to switch between the upper and lower half of the page and normal page size.
7
Text
Press repeatedly to change screen mode
|
0–9 |
|
|
or |
|
|
|
|
|
|
|
|
|
|
|
|
|
|
|
|
|
|
|
||||
Select page |
|
|
|
|
Move to |
Select page |
Go to index pages (100, |
||||||
|
|
|
|
|
|
‘PAGE’ |
|
|
200, 300 …) |
|
|
||
|
|
|
|
|
|
|
|
||||||
|
Move to ‘CHANNEL’ or ‘MEMO’ then |
Bring up |
Select |
Accept |
|||||||||
‘CHANNEL’ |
|
|
|
|
|
|
channel list |
channel |
|
|
|||
|
STOP or |
|
|
|
|
|
|
|
or |
0–9 |
|
|
|
Stop turning Move to |
|
Press |
Select subpage |
Restart |
|||||||||
|
|
|
‘HALT’ |
|
|
|
|
|
|
turning |
|||
|
|
|
|
|
|
|
|
|
|
||||
|
Move to ‘REVEAL’ |
Accept |
|
|
|
|
|
||||||
|
0–9 |
|
|
|
|
|
|
|
|
|
|
|
|
|
|
|
|
|
|
|
|
|
|
|
|
||
|
|
|
|
|
|
|
|
|
|
|
|
|
|
Select page |
Move to |
Accept |
Store |
Move to |
Accept |
||||||||
|
|
|
‘SETUP’ |
|
|
|
current |
‘BACK’ |
|
|
|||
|
|
|
|
|
|
|
|
|
page |
|
|
|
|
|
|
|
|
|
|
|
|
||||||
|
Move to ‘CHANNEL’ or |
Select MEMO page |
|
|
|
||||||||
‘MEMO’ |
|
|
|
|
|
|
|
|
|
|
|
||
|
|
|
|
|
|
|
|
|
|||||
|
|
|
|
|
|
|
|
|
|
|
|
|
|
|
Move to |
Accept |
Select MEMO page |
Press |
Delete |
||||||||
‘SETUP’ |
|
|
|
|
|
|
|
|
|
|
|
||
BACK
Press
 Beo4 operation
TEXT
Press
|
0–9 |
|
or |
|
|
|
|
|
|||||
Select page Move to ‘PAGE’ |
Index |
|||||
|
|
|
and select |
pages |
||
|
|
|
|
|
|
|
|
|
|
|
|
|
|
Move to ‘CHANNEL’ or Press, select
‘MEMO’ then channel and accept
‘CHANNEL’
STOP |
or |
0–9 |
Stop turning Select subpage and restart turning
Move to |
Accept |
|
|
|
‘REVEAL’ |
|
|
|
|
0–9 |
|
|
|
|
|
|
|
|
|
Select page |
Move to |
Accept then |
||
|
‘SETUP’ |
store |
||
|
|
|
|
|
Move to ‘CHANNEL’ or |
Select MEMO |
|||
‘MEMO’ |
|
page |
||
|
|
|
|
|
|
|
|
|
|
Move to |
Press Select |
Press |
||
‘SETUP’ |
page |
twice |
||
EXIT
Press
2*Teletext subtitles |
If you would like available teletext subtitles to appear |
NOTE! If your TV is linked via a Master Link |
|
automatically for a particular channel, store the teletext subtitles |
cable to another TV, stored MEMO pages |
|
page as MEMO page 9. |
are not shared among these TVs. MEMO |
Dual screen |
When teletext is activated, pressing Text swaps between dual |
pages must be stored manually on each |
|
screen and full screen mode. |
linked TV. |
8 |
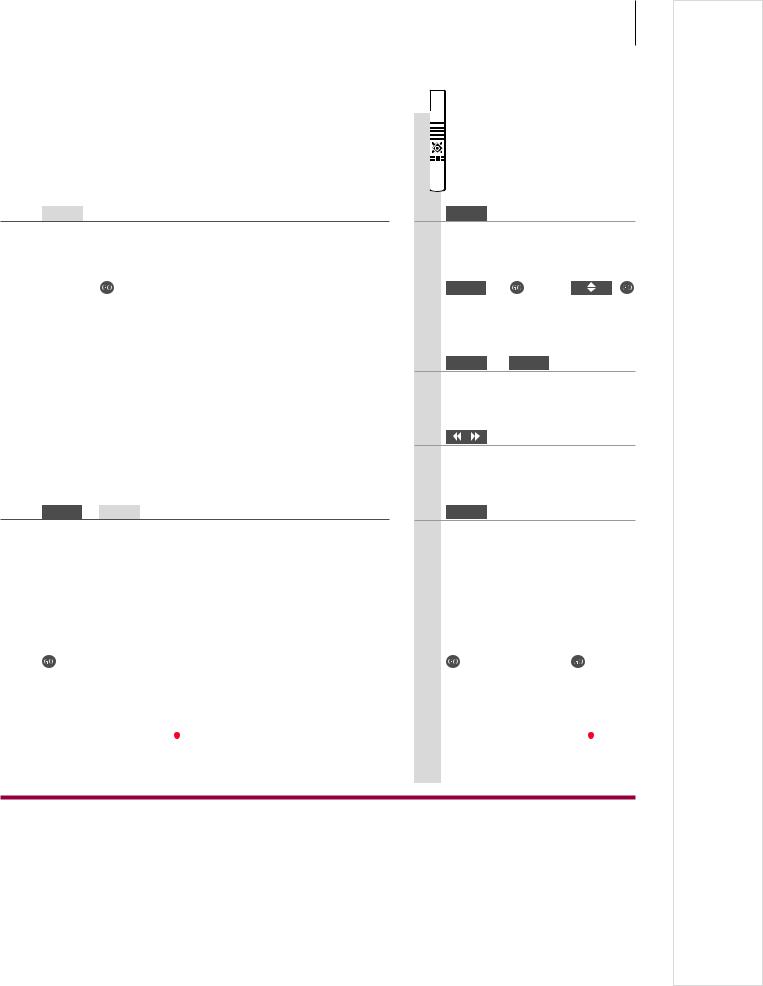
HDR – Pause and replay |
|
With the optional hard disc recorder, pause, repeat and resume the current programme. The TV continues saving during replay, so you are sure to see the entire programme.
The current channel is saved in a three-hour replay buffer
- 0:19 |
REPLAY |
-0:05 |
|
|
|
|
|
19 minutes are saved in the replay buffer
The current picture is 5 minutes behind the live signal
Beo5 operation
Pause
Pause the programme on the current channel.
Replay
Replay a programme that you have paused.
Go to a specific point
Enter a specific time to go to in the buffer content.
Step backwards or forwards
Step backwards or forwards minute by minute.
Cue backwards or forwards
Press button again to change speed.
Pause replay
Pause replay of the buffer content.
Save the replay buffer
Save the buffer contents to the hard disc recorder.
Go to live signal or replay mode
Switch between the live signal and replay mode.
Glossary
Replay You cannot pause or replay a programme while the TV is recording another programme or copying a recording, nor can you pause or replay programmes copy-protected by Macrovision. If you pause a programme for three hours, the TV automatically starts replay from the point at which you paused the programme.
Slow replay Slow replay backwards is not possible.
Save the replay Copy the content of the replay buffer to the ‘HARD DISC CONTENT’ list. The content before the recording buffer start time will be deleted when the TV is switched off.
Replay
|
Press |
|
|
|
To return to live signal, select source |
||||
|
|
|
|
|
|
again, such as TV |
|||
|
|
|
|
|
|
|
|
|
|
|
PLAY |
|
or |
|
|
|
|
|
|
|
|
|
|
|
|
|
|
|
|
|
Replay |
|
Slow replay, press again to change |
||||||
|
|
|
|
speed |
|
|
|
|
|
|
|
|
|
|
|
|
|
|
|
+ |
|
|
0–9 |
|
|
|
|
|
|
|
|
|
|
|
|
|
|
|
|
Activate numbers |
Select point |
|
|
|
|
||||
|
|
|
|
|
|
|
|
|
|
|
|
|
|
|
|
|
|
|
|
Step |
|
|
|
|
|
|
|
||
|
|
|
or |
|
|
|
|
|
|
|
|
|
|
|
|
|
|
|
|
|
|
|
|
|
|
|
|
|
|
|
Backwards |
|
Forwards |
|
|
|
|
||
|
|
|
|
|
|
|
|
|
|
|
STOP |
|
|
|
|
|
|
|
|
|
|
|
|
|
|
|
|
|
|
|
Press |
|
You can step frame by frame |
||||||
|
|
|
|
|
|
|
|
|
|
|
|
|
|
STOP |
|
Record |
|
Record |
|
|
|
|
|
|
|
|
|
|
|
Search for start point |
Stop |
Activate |
Accept saving |
||||||
|
|
|
|
searching |
saving |
|
|
|
|
|
|
|
|
|
|
|
|
|
|
|
|
|
|
|
|
|
|
|
|
Go to live signal |
|
Return to replay mode |
|
|
|
||||
9
 Beo4 operation
STOP
Press |
To return to the live signal |
|
select the source again |
or
Replay Slow replay, press again to change speed
0–9
Select point
Step
or
Backwards Forwards
STOP
Press |
You can step frame by frame |
|||||
|
|
|
|
|
|
|
|
|
|
STOP |
|
RECORD |
|
|
|
|
|
|
|
|
Search for |
Stop |
Press twice to |
||||
start point |
searching |
accept |
||||
|
|
|
|
|
|
|
|
|
|
|
|
|
|
Go to live |
Return to replay mode |
|||||
signal |
|
|
|
|
||
Switching source You can switch from one live source, such as TV.TUNER, to another, such as STB, at any time, but the source you leave is no longer saved to the buffer after the switch. Instead the new source is saved.
Switching to a non-live source, such as DVD, causes the TV to stop saving to the buffer and ends replay.
NOTE! The content of the replay buffer is not protected. If the buffer is full and you continue to save programmes to it, the oldest content is deleted. If you switch off the TV, the content of the buffer is deleted after 60 sec.
10 |
HDR – Recordings |
|
Use the optional hard disc recorder to play recordings stored on its hard disc. Playback of recordings begins automatically after a few seconds.
Activate the source of the hard disc recorder to use these functions
|
|
Name of the |
|
Recording time and date |
|||||||
|
|
|
|||||||||
|
|
recording |
|
|
|
|
|
|
|||
|
|
|
|
|
|
|
|
|
|
||
HARD DISC CONTENT |
|
|
|
|
|
|
|||||
|
|
|
|
|
|
|
|
|
|
|
|
THE SOPRANOS |
12:14 |
17 JUN |
01:34 |
|
|
||||||
CROCODILE |
HUNTER |
9:12 |
17 |
JUN |
1:00 |
|
|
||||
WRC RALLY |
|
|
12:00 |
14 |
JUN |
1:12 |
|
|
|||
AUSTRALIAN |
OPEN |
9:00 |
13 |
JUN |
3:25 |
|
|
||||
SAT |
117 |
|
|
23:00 |
29 |
MAY |
2:55 |
|
|
||
TV |
24 |
|
|
18:00 |
24 |
MAY |
1:05 |
|
|
||
V.AUX 4 |
|
|
23:10 |
22 |
MAY |
12:30 |
|
|
|||
DAYS OF THUNDER |
22:00 |
20 MAY |
1:55 |
|
|
||||||
CASABLANCA |
21:00 |
13 |
APR |
2:15 |
|
|
|||||
|
|
|
|
|
|
|
|
|
delete |
|
|
|
|
|
protection on |
|
|
|
play |
|
|
||
|
|
|
|
|
|
|
|
|
|
|
|
|
|
|
|
|
|
|
|
|
|
|
|
|
Duration of |
Protected recording |
the recording |
Beo5 operation
Switch on the hard disc recorder
It takes up to 40 seconds to start the recorder.
Select and play a recording
Pause or stop playback
Pause or stop playback of a recording.
Switch to previous or next
Switch to the previous or next recording within a group.
Go to a specific point
Enter a specific time to go to in a recording.
Step or cue backwards or forwards
Step backwards or forwards minute by minute. Press button again to cue faster.
Browse through recordings
During playback, you can see a short list of recordings from the chosen group.
Switch off the recorder
Glossary
Playback information To bring up playback information during playback, press the centre button. To remove the information, press BACK or wait three seconds.
Pause and stop playback When the picture remains unchanged for eight minutes, the TV screen dims automatically. Browse through recordings Show up to five recordings at a time during playback. You can browse through recordings
in Groups if you have set ‘FEATURE LEVEL’ to ‘ADVANCED’ and placed recordings in the predefined Groups. See pp. 28 and 57 for more information.
V.MEM
Select source of recorder. Playback begins automatically of the last viewed recording, the newest recording or a recording in progress.
|
Menu |
|
|
|
|
|
PLAY |
|
or |
|
|
|
|
|
|
|
|
|
|
|
|
|
|
Open ‘HARD DISC |
Select |
Play |
Slow replay |
||||||||
CONTENT’ menu |
recording |
recording |
|
|
|
||||||
|
|
|
|
|
|
|
|
|
|
|
|
|
STOP |
|
STOP |
|
|
|
|
|
|
|
|
|
|
|
|
|
|
|
|
|
|
|
|
|
Pause |
Stop |
|
|
From pause mode, step frame by |
||||||
|
|
|
|
|
|
|
frame |
|
|
|
|
|
|
|
|
|
|
|
|
|
|
|
|
|
|
|
|
|
|
|
|
|
|
|
|
Previous/next
+0–9
Activate |
Select point |
|
|
|
|
|
|
numbers |
|
|
|
|
|
|
|
|
|
|
|
|
|
|
|
|
|
|
|
Step backwards/forwards Cue backwards/forwards
|
|
|
|
|
|
|
|
PLAY |
|
Press twice Select recording |
|
Play recording |
|||||||
|
|
|
|
|
|
|
|
|
|
|
TV |
|
or |
|
|
|
|
||
|
|
|
|
|
|
|
|
||
Switch source |
|
Switch off TV |
|||||||
11
 Beo4 operation
V MEM
Select source of recorder
MENU
Open ‘HARD DISC |
Select and |
CONTENT’ menu |
play |
STOP STOP
Pause Stop
Previous/next
0–9
Select point
|
|
|
|
|
|
|
|
|
|
|
|
|
|
|
Step |
Cue backwards/forwards |
||||
|
backwards/ |
|
|
|
|
|
|
forwards |
|
|
|
|
|
|
|
|
|
|
|
|
|
|
|
|
|
|
|
|
Press twice |
Select |
Play recording |
|||
|
|
|
recording |
|
|
|
|
|
|
or |
|
|
|
|
TV |
|
|
|
||
|
|
|
|
|
|
|
Switch source |
|
|
Switch off TV |
|||
Playback When you select a recording to play, the TV resumes playback from where you left off the last time the same recording was played. If you have viewed the recording to its end, playback starts from the beginning. Unless otherwise instructed, the TV plays the selected recording through to the end. The recording is then paused.
Slow playback Slow playback backwards is not possible.
NOTE! You can bring up the ‘HARD DISC CONTENT’ menu if you press and hold the centre button. The bar at the top indicates how full the hard disc is. A red dot indicates if a recording is protected. For information about protection, see p. 27.
12 |
Access to BeoMaster 5 |
|
If your TV is equipped with the optional BeoMaster, you can bring up BeoMaster sources on the TV screen to get access to N.Music, N.Radio, photos, and web.
Activate the BeoMaster in order to use these functions
|
GO |
Source selection |
|
|
EXIT |
Leave mode |
|
|
GO |
Add to playlist |
|
|
1 |
Home/Return |
|
|
2 |
. |
|
|
3 |
Random on/off |
|
|
4 |
Show info/Hide info |
|
|
5 |
List root |
|
|
6 |
Play all/Play group |
|
|
7 |
Full Size cover/Track info view |
|
|
8 |
Delete |
|
|
9 |
Configuration |
|
|
0 |
Rename |
|
|
|
|
|
Beo5 operation
Select a BeoMaster source
When you have brought up the source selection menu, choose from different media sources.
Select function*1
The menu overlay gives you quick access to selected functions.
Switch off the BeoMaster
Useful hints
1*Menu overlay The menu overlay shows the options you have with a selected source.
13
Beo4 operation
|
PC |
|
|
|
|
|
LIST |
|
|
|
|
|
|
|
|
|
|
|
|
|
|
Press |
Select source |
|
Select PC |
|
Select source |
|||||
|
|
|
|
|
|
|
|
|
|
|
|
|
|
or |
|
|
|
Menu |
|
+ |
|
0–9 |
or |
or |
BACK |
|
|
|
MENU |
|
0–9 |
or EXIT |
|
|
|
|
|
|
|
|
|
|
|
|
|
|
|
|
|
|
Show menu overlay |
Select function |
|
|
|
|
|
Show menu overlay and select function |
|||||||||
|
TV |
|
or |
|
|
|
|
TV |
|
or |
|
|
|
|
|
|
|
|
|
|
|
||||
Switch source |
Switch off TV |
|
Switch source |
Switch off TV |
||||||||
|
|
|
|
|
|
|
|
|
|
|
|
|
Remote control Use your remote control to switch sources on and off, search for specific stations or tracks, access additional functions, and adjust volume.
NOTE! For further information about the BeoMaster, refer to the Guide enclosed with your BeoMaster.

14
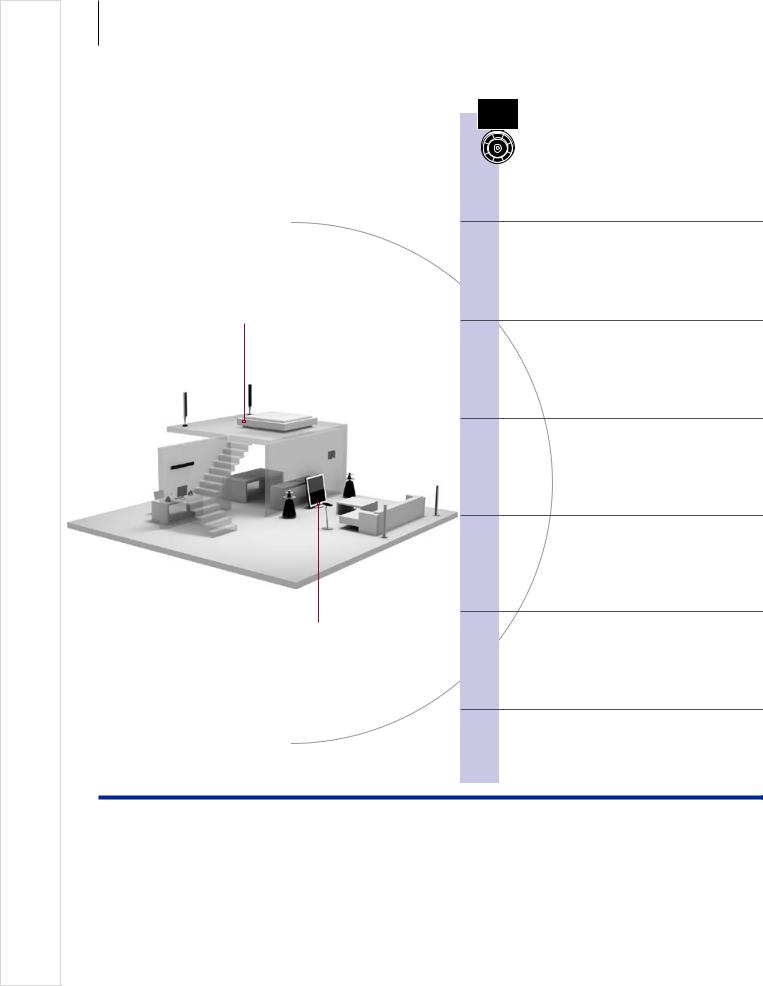
Contents – BeoLink
16 BeoLink system
18 Connect and set up an audio system
20Connect and set up a BeoLink system
21Your television in a link room
22Two televisions in the same room
15
BeoLink
BeoLink system • Connect and set up an audio system • Connect and set up a BeoLink system …
16 |
BeoLink system |
|
If you have a BeoLink system, you can operate all connected sources from both the main room and link rooms.
Activate main or link room sources
Link room
Main room
Beo5 operation
TV sound on the audio speakers
Listen to sound from a TV source on your audio system speakers.
Audio sound on the TV speakers
Listen to audio sound on the speakers connected to the TV.
Use a source present in one room
Activate a main or link room source from a link room. The source type is only present in one room.
Use a link room source
Activate a link room source in a link room. The source type is present in both rooms.
Use a main room source
Activate a main room source from a link room. The source type is present in both rooms.
Stereo sound in a link room
If stereo sound is selected in the link room, you cannot distribute other main room sources to the link room system.*1
Useful hints
Options To use all functions properly, the products must be set to the correct options. See p. 18. Main room source This is the central source from which you can distribute sound and pictures to link room
sources.
Link room source This source is placed in the link room and through the source you can receive sound and pictures from connected main room sources.
Audio system Only Bang & Olufsen audio systems with Master Link support integration with the TV.

17
…TV
Select audio |
Select video source |
speaker zone |
|
…CD
Select TV speaker |
Select audio source |
|
|
|||
zone |
|
|
|
|
||
|
|
|
|
|
|
|
|
RADIO |
|
|
|
|
|
|
|
|
|
|
|
|
|
Select source |
Operate source as usual |
||||
|
|
|
|
|
|
|
|
TV |
|
|
|
|
|
|
|
|
|
|
|
|
|
Select source |
Operate source as usual |
||||
|
|
|
|
|
|
|
|
Link |
|
TV |
|
|
|
|
|
|
|
|
|
|
|
Press |
Select source |
Operate source as usual |
|||
|
|
|
|
|
||
|
TV |
|
AV |
|
DTV |
|
|
|
|
|
|
|
|
Switch on TV |
Press |
Select main room source |
||||
Beo4 operation
|
LIST |
|
TV |
|
|
|
|
|
|
Select AV*2 |
Select video source |
|||
|
LIST |
|
CD |
|
|
|
|
||
Select AV*2 |
Select audio source |
|||
RADIO
Select source Operate source as usual
TV
Select source Operate source as usual
|
LIST |
|
TV |
|
|
|
|
|
|
Select LINK*2 |
Select source Operate source |
|||
|
|
|
|
as usual |
|
TV |
|
LIST |
|
DTV |
|
|
|
|
|
|
|
|
|
Switch on TV |
Select AV*2 |
Select main |
|||
|
|
|
|
|
room source |
|
1*Sound Usually sound distributed from a main room video source, such as a set-top box, to the link room is transmitted in mono. However, you can select stereo sound.
Changes in link If you move your link room products to other rooms, remember to get room setup your Beo5 remote control reconfigured by your Bang & Olufsen retailer.
2*NOTE! In order to display AV and LINK on Beo4, you must first add it to the Beo4 list of functions. See the Guide enclosed with your
Beo4.
18 |
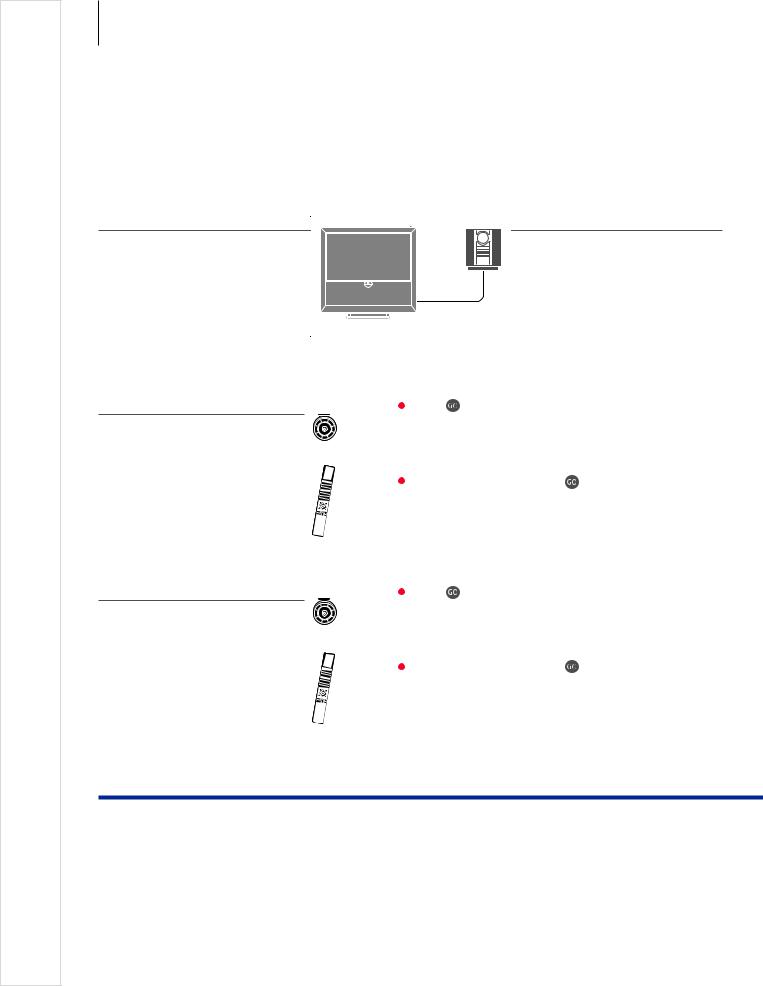
Connect and set up an audio system |
To obtain the benefits of an integrated audio/video system, connect a compatible Bang & Olufsen audio system to the TV using a Master Link cable.
1. Connect the audio system
Connect the available sockets marked MASTER LINK on the TV and the audio system using a Master Link cable.
MASTER LINK
2. Set option for TV
If your TV has been set up in an audio/video system, set it to the correct option. Switch the entire system to standby first and place yourself in front of the TV.
3. Set option for audio system
Set the audio system to the correct option. Switch the entire system to standby first and place yourself in front of the audio system.
|
|
|
|
|
|
|
|
|
|
|
|
|
|
|
|
|
|
|
|
|
|
|
|
|
|
Option |
|
|
|
|
|
|
|
|
|
|
|
|
|
|
|
|
|
|
|
|
|
|
||
|
|
|
|
|
|
and |
|
|
pgm |
|
… |
|
|
|
||
|
|
|
|
|
|
|
|
|
|
|
|
|
|
|
|
|
|
|
|
|
|
Hold |
Press |
|
Press |
Select zone in which TV |
|||||||
|
|
|
|
|
|
|
|
|
|
|
|
is placed |
|
|
|
|
|
|
|
|
|
|
and |
|
|
|
|
|
|
|
|
|
|
|
|
|
|
|
|
|
|
|
|
|
|
|
|
|
|
|
|
|
|
|
|
|
|
|
|
|
|
|
|
|
|
|
|
|
|
|
|
|
|
LIST |
|
LIST |
|
|
LIST |
|
|
0–9 |
|
|
|
|
|
|
|
|
|
|
|
|
|
|
|
|
|
|
|
|
|
|
|
|
Hold |
Press |
|
Select OPTION? and |
Select V.OPT Select |
|||||||
|
|
|
|
|
|
|
|
|
accept |
|
|
Option |
||||
|
|
|
|
|
|
|
|
|
|
|
|
|
|
|
|
|
|
|
|
|
|
|
|
|
|
|
|
|
|
|
|
|
|
|
|
|
|
|
|
|
|
|
Option |
|
|
|
|
|
|
|
|
|
|
|
|
|
|
|
|
|
|
|
|
|
|
||
|
|
|
|
|
|
and |
|
|
pgm |
|
… |
|
|
|
||
|
|
|
|
|
|
|
|
|
|
|
|
|
|
|
|
|
|
|
|
|
|
Hold |
Press |
|
Press |
Select zone in which |
|||||||
|
|
|
|
|
|
|
|
|
|
|
|
audio system is placed |
||||
|
|
|
|
|
|
and |
|
|
|
|
|
|
|
|
|
|
|
|
|
|
|
|
|
|
|
|
|
|
|
|
|
|
|
|
|
|
|
|
|
|
|
|
|
|
|
|
|
|
|
|
|
|
|
|
|
|
LIST |
|
LIST |
|
|
LIST |
|
|
0–9 |
|
|
|
|
|
|
|
|
|
|
|
|
|
|
|
|
|
|
|
|
|
|
|
|
Hold |
Press |
|
Select OPTION? and |
Select |
Select |
||||||
|
|
|
|
|
|
|
|
|
accept |
A.OPT |
Option |
|||||
|
|
|
|
|
|
|
|
|
|
|
|
|
|
|
|
|
Useful hints
TV and audio speakers Play a CD on your audio system using speakers connected to the TV, or switch on a TV programme and send the sound to your audio system speakers.
Choice of options If you have a Beo4 remote control, options for the TV can be 1, 2, or 4 in a main room and 5 or 6 in a link room. Options for the audio system can be 0, 1, 2, 5, 6. See also p. 21.
19
Your audio/video system can be placed together in one room, or in two rooms with the TV in one and the audio system with a set of speakers in another.
Select options
To set the correct options with the Beo5 remote control, you must select the zone in which your product is placed, see p. 18. To set the correct options with the Beo4 remote control, you can get an overview of options on this page.
Option 2 |
Option 0 |
Option 1 |
Option 1 |
Option 2 |
Option 2 |
The TV and audio system are set up in one room with all speakers connected to the TV. Set the TV to Option 2 and the audio system to Option 0.
The TV with or without additional speakers and an audio system with a connected set of speakers are set up in one room.
Set the TV to Option 1 and the audio system to Option 1.
The audio system is set up in one room and the TV with or without additional speakers in another.
Set the TV to Option 2 and the audio system to Option 2.
Options For information about Option 4, 5 and 6, see pp. 21–22.
NOTE! Not all Bang & Olufsen audio systems support integration with the TV.
Loading...