


 Loading...
BeoVision 5
Guide

Guide
Should you loose or damage the BeoVision 5 CD-rom, the information can also be found on the Bang & Olufsen web-site; www.bang-olufsen.com
or you can contact your retailer.
An explanation of symbols in the guides
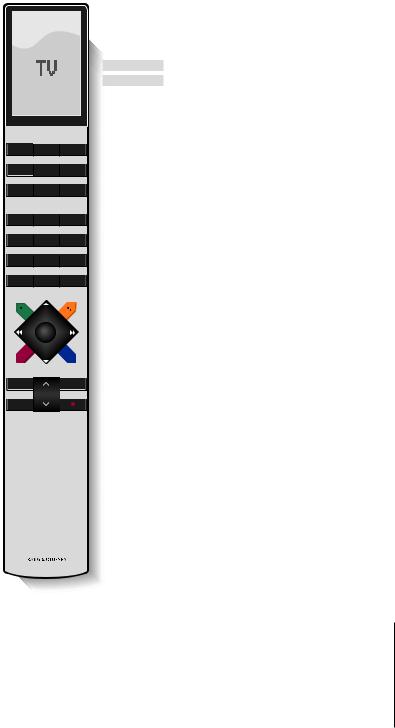
The illustration below shows what a button, source or status display looks like in the instruction sequences used in the guides.
TV |
Buttons on the Beo4 |
LIST |
remote control |
▲ |
|
▼ |
|
|
Displays on the Beo4 |
STORE |
|
|
remote control |
P-IN-P |
|
|
Displays on the |
TV 12 |
|
|
BeoVision 5 |
UPDATE |
The User’s guides
This Guide contains information about daily use, more advanced operations as well as basic setup and maintenance of your product.
The CD-rom Reference book contains information about connecting loudspeakers, adjusting loudspeaker setup, connecting external equipment, connecting an audio system and setting up and operating a BeoLink system. It also contains an overview of on-screen menus.
Both guides contain an index which can help you find the specific subject, you want to know more about.
We expect that your Bang & Olufsen retailer delivers the product to your home, installs it and makes all necessary connections as well as the initial setting-up. However, the information required to install and set up the product is included in the guides in case you need it at a later date if e.g. you move your products or expand your system.
The Reference book is a file in PDF-format on the enclosed CD-rom. To read this PDF-file, the Acrobat Reader program must be installed on your computer. If you do not have the program, it can be installed from the CD-rom. Then select the file with the language you want, and the Reference book opens.
Contents |
|
3 |
|
Daily use, 4
Find out how to use BeoVision 5 and the Beo4 remote control, watch and select channels, adjust sound, look up Teletext information, and finally how to turn your BeoVision 5 into a Home theatre for watching movies.
Advanced operations, 12
All you need to know about using BeoVision 5 beyond daily use; advanced Teletext functions, timed play and timed standby, specific sound operations and presets, view two sources at the same time, operate connected video equipment with Beo4, and play and copy Camcorder recordings.
Setting up and socket overview, 22
Find out how to handle and place BeoVision 5, what can be connected to BeoVision 5, where to connect it, and how to register additional video equipment.
Tuning and preference settings, 30
Find out how to tune in, name or delete channels and decide the order in which they appear. This chapter also contains information about setting the time, date, picture and sound.
Maintenance, 40
Find out how to take care of your BeoVision 5 and how to use the built-in PIN-code system.
Index, 44
Find the specific subject you want to know more about.
4 |
|
Introducing BeoVision 5 and Beo4 |
|
Using the Beo4 remote control
Look through the basic principles of the Beo4 remote control and try them out. Each button on Beo4 is explained below.
Switch on the television |
TV |
Switch on e.g. a set-top box* |
SAT |
Switch on a DVD player* |
DVD |
Switch on a video tape recorder* |
V TAPE |
TV LIGHT RADIO
SAT |
DVD |
CD |
TV The Beo4 display shows the source you have FORMAT selected, or extra functions available when
you press the LIST button, e.g. FORMAT
RADIO Switch on radio, CD or audio tape recorder*
CD
A TAPE
Press twice to start recording here and now* |
RECORD |
||||
Select channels or tracks* |
|
0 – 9 |
|||
Switch on Teletext |
|
TEXT |
|||
The coloured buttons give you access to |
|
|
|
|
|
|
|
|
|
|
|
|
|
|
|
|
|
different functions, depending on the source |
|
|
|
|
|
|
|
|
|
|
|
|
|
|
|
|
|
you have selected |
|
|
|
|
|
|
|
LIGHT |
Adjust the room lights* |
V TAPE |
RECORD |
A TAPE |
|
|
|
MENU |
Call up the main menu for access to channel |
7 |
8 |
9 |
list, timer play and timer standby menus, as |
|
|
|
|
4 |
5 |
6 |
well as setup options |
1 |
2 |
3 |
|
|
|
▲ |
Step between channels, chapters on a DVD or |
TEXT |
0 |
MENU |
CD tracks* |
|
|
▼ |
Reveal additional functions in the Beo4 |
LIST |
display** |
|
ss tt |
Rewind or fast forward a videotape* |
GO
GO Accept and store instructions or settings
Press to stop playback of a videotape or disc; |
STOP |
|
press to stop recording* |
LIST |
EXIT |
|
|
|
|
STOP |
|
Adjust sound volume; press the middle to |
|
|
mute the sound |
|
|
EXIT Exit all on-screen menus
•Switch BeoVision 5 to standby
*To use these functions, the appropriate products and features must be available in your system. **Refer to Beo4’s own Guide for information about how to add extra functions to those shown in the Beo4 display window.

Displayed information and menus
Information about selected sources is displayed at the top of the screen. In addition, on-screen menus allow you to set or adjust additional functions.
TV 12
VOL 30
The selected source and channel are shown briefly when you select e.g. TV or change channels. Volume level is shown while you adjust it, and disappears after a few seconds.
|
Menu |
|
|
|
|
|
1 |
Timer play |
|
|
|
|
|
2 |
TV list |
|
|
|
|
|
3 |
Setup |
|
|
|
|
|
|
Source |
Pr |
Start |
Stop |
Date |
|
|
TV |
1 |
13:30 - 14:30 |
27 Oct |
OK |
|
|
Press MENU for Timer index |
|
|
|||
On-screen menus will give you either a vertical list of options to choose from or a horizontal list of settings to fill in.
Source |
Pr |
Start |
Stop |
Date |
TV |
1 |
13:30 - 14:30 |
27 Oct OK |
|
Press MENU for Timer index
You can choose if you want the navigation cues in the menus to be shown. Factory setting of the function is On, but you can choose to deactivate it. Call up ‘Menu’ from the ‘Setup’ menu and choose ‘On’ to activate navigation cues or ‘Off’ to deactivate them.
5
Option menu
Menu
1Timer play
2TV list
3Setup
Source |
Pr |
Start |
Stop |
Date |
TV |
1 |
13:30 - 14:30 |
27 Oct OK |
|
Press MENU for Timer index
Fill-in menu
To call up the menu system…
MENU Press MENU while the television is switched on
How to use option menus…
▲ ▼ Press to move through the option menu, or…
1 – 9 …press the number keys on Beo4 to select a numbered option on a list
GO Press to enter your choice
How to use fill-in menus…
▲ ▼ Press ▲ or ▼ to view your choices for a single setting in a
sstt fill-in menu, or ss and tt to move from setting to setting
0 – 9 Press the number keys on Beo4 to enter settings
GO Press to enter your choice
In both option and fill-in menus, you can press STOP to go back to a previous menu, or EXIT to leave all menus.

6
The functions shown on this page are often used on a daily basis:
–Choose a TV channel by its number;
–Switch to another channel or source;
–Call a channel list up on the screen;
–Adjust the sound volume;
–Turn BeoVision 5 so that it faces your viewing position. This requires that your BeoVision 5 is equipped with a motorised stand.
All of these functions can be performed with the Beo4 remote control.
Watch television
Select a TV channel |
See the channel list |
To watch TV, press the appropriate button on Beo4. BeoVision 5 switches on the last channel you watched.
TV |
Press to switch on the television. |
|
The last channel viewed appears |
TV 2 |
|
|
on the screen |
0 – 9 |
Press a channel number to go |
|
directly to that channel |
▲ |
Press to step through channels |
▼one by one
DVD Press another source button at any time to switch to that source, e.g. DVD
•Press to switch BeoVision 5 to standby
All your TV channels appear on a list, which you can call up on the screen. The list contains channel numbers and names, and can contain 99 TV channels.
TV Press to switch on the television
GO Press and hold to call up the channel list on the screen
sstt Press to view the previous or following page of the channel list
0 – 9 To select a channel to watch,
▲press the channel number on
▼Beo4 or press the arrow keys until the cursor highlights the desired channel
GO To switch on the chosen channel, EXIT press GO, or press EXIT to leave
the menu
You can also call up the channel list by pressing MENU to call up the main menu, and then pressing 2 to select the TV list.

7
Adjust or mute the sound volume |
Turn the television |
You can adjust or mute television sound at any time while you are using a source.
If your BeoVision 5 is equipped with the motorised stand, you can turn the television to the left or right with the Beo4 remote control.
|
Press either end of the button to |
LIST |
Press repeatedly until STAND is |
|
adjust the volume up or down |
|
shown in the Beo4 display |
STAND |
|||
|
Press the middle of the button to |
ss tt |
Press to turn BeoVision 5 to the |
|
mute the sound |
|
left or right, or… |
|
Press either end of the button to |
0 |
…press 0, 1 or 2 if you have |
|
bring the sound back |
1 |
preset viewing positions for your |
|
|
2 |
television |
Refer to Set positions for viewing and standby on page 39 for further information about how to preset positions for TV viewing.
1BBC 1
2BBC 2
3ITV
4Super Ch
5SKÝ
6ZDF
7Children
8CNN
9. . . . . . . .
10 . . . . . . . .
11 . . . . . . . .
12 Eurosprt
13 . . . . . . . .
14 . . . . . . . .
15 MTV
16
17
18
19
The TV channel list. Dotted lines indicate that a channel has been stored, but not named. An empty slot in the list indicates that no channel has been stored.

8
You can extend your system into a fully equipped Home theatre system by connecting four Bang & Olufsen loudspeakers and a BeoLab 2 subwoofer*.
When you switch on BeoVision 5 or one of the sources connected to it, the speakers which you may have in a surround sound system can be cut in or out, depending on what kind of sound suits the source you are using.
BeoVision 5 may switch on a speaker combination automatically. This happens if e.g. a broadcasted programme or DVD contains information about the number of speakers to be switched on. You are still free to choose the speaker combination you prefer.
You can also adjust the picture dimensions to fill out the screen and complete the Home theatre experience.
*NOTE! Refer to the BeoVision 5 CD-rom and the chapter Loudspeaker setup – surround sound for further information.
Home theatre viewing with BeoVision 5
Select speakers for movie sound
While you are watching a movie or programme, you can choose the speaker combination you wish to switch on, provided that the various sound modes are available in your system.
LIST Press repeatedly until SPEAKER is SPEAKER shown in the Beo4 display
1 – 5 Press the number of the speaker option you want. The speakers selected will cut in automatically
▲ |
If you want to adjust the sound |
▼balance for the programme you ss tt are watching, press ▲ or ▼ to
adjust the balance between the external front and rear speakers, and press ss or tt to adjust the balance between the left and right speakers
EXIT Press EXIT to remove SPEAKER from the Beo4 display and to return to the source you were using
Speaker combinations
SPEAKER 1
Sound in the television speakers only. For programmes with dialogue, e.g. TV news.
SPEAKER 2
Stereo sound in the two external front speakers. The BeoLab 2 subwoofer is active. For music CDs.
SPEAKER 3
The television speakers, external front speakers and the BeoLab 2 subwoofer are active. For TV programmes in stereo.
SPEAKER 4
Enhanced stereo sound in the external front and rear speakers. The BeoLab 2 subwoofer is active. For music CDs or tapes.
SPEAKER 5
Surround sound from all speakers including the BeoLab 2 subwoofer. For programmes encoded in Surround Sound.
If you have connected only two external front speakers to the television, you will only be able to choose SPEAKER 1–3.

9
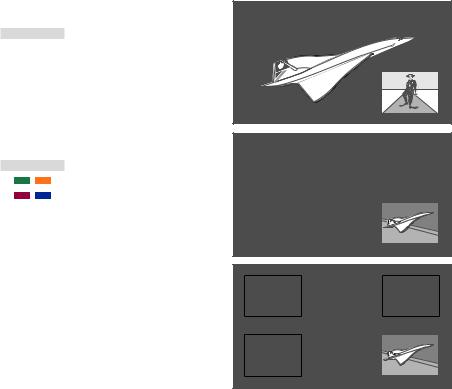
Make the picture fill out the screen
BeoVision 5 always ensures you the best possible picture. It automatically adapts the picture so that it fills out as much of the screen as possible. However, you can still choose a preferred format for Home theatre viewing.
LIST |
Press repeatedly until FORMAT is |
Picture formats to choose from |
|
|
|||
|
shown in the Beo4 display |
FORMAT 1 |
|
FORMAT |
|
||
|
|
For standard TV pictures, as shown to the right. |
|
GO |
Press if you want BeoVision 5 to |
Two variations are available: Panoramic view (for |
|
|
optimise the picture, otherwise… |
the largest picture) and 4:3 (for standard picture |
|
|
|
format). |
|
1 – 3 |
…press the number of the |
FORMAT 2 |
|
|
desired picture format |
For letter-box pictures. |
|
|
If you have chosen Format 1, |
FORMAT 3 |
|
|
|
||
▲ |
For genuine 16:9 wide-screen pictures. FORMAT |
In format 1 BeoVision 5 automatically chooses the |
|
▼ |
press ▲ or ▼ to select variations |
3 will usually be selected automatically. If this is |
largest picture (panoramic view). |
|
of this format |
not the case, you can select it yourself. |
|
▲ |
If you have chosen Format 2, |
|
|
▼press ▲ or ▼ to move the picture up and down
EXIT Press to leave the FORMAT function

10
If you select a channel and the broadcaster offers a Teletext service, BeoVision 5 gives you access to Teletext pages, any subpages linked to that page, and also four memory pages for storage of your most frequently viewed Teletext pages.
Stored memory pages are the first to appear when you call up Teletext on the screen, and Beo4 makes it easy to move quickly from page to page.
If you save the Teletext subtitles page as memory page number four, you can activate subtitles for that particular channel automatically.
Teletext
Main Teletext functions |
Store frequently read pages |
You can find information on Teletext pages in three steps: switch on the Teletext service, read the index page to find the desired page number, and call up the desired page.
TEXT Press to call up the Teletext index page
0 – 9 Press the number of a Teletext page you want to see
▲Press to move to the previous or
▼following page
STOP If the current page contains subpages, you can press STOP to pause subpage turning
0 – 9 To view a particular subpage,
▲enter the four-digit number of
▼the desired page, or press ▲ or ▼ to step to the page
STOP Press STOP again to resume subpage turning
EXIT Press to leave Teletext and return to the source you were using
Store your favourite Teletext pages as memory pages so when you call up Teletext on the screen, these pages appear first.
TEXT Press to call up Teletext
0 – 9 Press the number keys or ▲ ▼
▲on Beo4 to go to a page you
▼refer to often
LIST Press repeatedly until STORE is STORE shown in the Beo4 display
GO Press to select the current page for storing
1 – 4 Enter the number of the memory page to be used
GO Press to store the page as a memory page, or…
EXIT …press to exit the STORE function and return to Teletext without storing
Please note that set-top box Teletext pages can be viewed, but not stored as memory pages!
NOTE! If your BeoVision 5 is linked via a BeoLink cable to another television, stored memory pages will not be shared among linked televisions.
Memory pages must be stored manually on all linked televisions.
11
Daily use of memory pages |
Activate subtitles from Teletext |
You may need to refer to your Teletext memory pages quickly, e.g. if you are leaving for work and wish to check traffic information on a Teletext service.
If a channel offers Teletext subtitles, you can activate subtitles for that channel. The Teletext subtitles page number can often be found in an index on Teletext page 100.
TV Press to turn on a TV channel which offers a Teletext service
TEXT Press to switch on Teletext. The page stored as memory page 1 appears automatically
sstt Press to view the other memory pages
To view stored memory pages from another channel’s Teletext service, press EXIT on Beo4 to return to channel viewing, press ▲ ▼ or the channel number to change channels, and press TEXT to switch on Teletext.
0 – 9 From Teletext, press the number
▲keys or ▲ ▼ on Beo4 to locate
▼the Teletext subtitles page. Subtitles appear on the screen
EXIT Press to cancel subtitles
To store subtitles permanently from the Teletext subtitles page…
LIST Press repeatedly until STORE is STORE shown in the Beo4 display
GO Press to select the memory page
4 |
Press 4 to for memory page 4 |
GO Press to store subtitles
To cancel stored subtitles, simply store another Teletext page as memory page number 4
TV Press to return to TV viewing
A typical Teletext page. The current page number, channel name, date and time appear at the top of the screen, as well as a three-digit number showing the progress of the page search function.

12
If you select a channel that offers a Teletext service, BeoVision 5 gives you access to Teletext pages.
In addition BeoVision 5 supports three extra Teletext functions: text enlargement for easy reading, placement of a Teletext page over a TV picture, and display of hidden text e.g. the answer to a quiz or joke.
If your Teletext broadcaster offers a Fastext service, you can use the coloured buttons on Beo4 to step to one of four linked Teletext pages.
BeoVision 5 can also notify you when a desired page has been found or updated.
Advanced Teletext functions
Teletext extra functions |
See updated Teletext pages |
While using teletext, you can enlarge the text, place the Teletext page over the TV picture or reveal hidden text.
BeoVision 5 supports the page update function, provided by some Teletext broadcasters to announce that a Teletext page has been updated. This is useful e.g. if you want to see the latest news headlines while watching TV.
To enlarge the screen text size…
LIST Press repeatedly until LARGE is LARGE shown in the Beo4 display
GO Press to activate – the upper half of the page is shown
GO Press to view the lower half
GO Press to restore the normal text size
To keep the TV picture in Teletext…
LIST Press repeatedly until MIX is MIX shown in the Beo4 display
GO Press to superimpose Teletext information on the TV picture
GO Press to remove the TV picture
To reveal hidden text…
LIST Press repeatedly until REVEAL is REVEAL shown in the Beo4 display
GO Press to activate – if there is concealed text on that page, it will become visible
GO Press to remove the revealed text
Call up the relevant Teletext page…
LIST Press repeatedly until UPDATE is UPDATE shown in the Beo4 display
GO Press to activate
FOUND When the page is found, FOUND appears on the screen
UPDATE When the page has been updated, UPDATE appears on the screen
GO Press to see the located or updated page
EXIT Press to leave Teletext
The function is cancelled when you change channels.

13
Recording from Teletext TV listings
If you have connected a BeoCord V 8000 to your BeoVision 5, you can preset a recording of a programme from a Teletext TV listings page.
TEXT |
Press to call up Teletext |
Note about PDC/VPS and recording |
|
|
When PDC (Program Delivery Control) or VPS |
0 – 9 |
Find the Teletext TV listings page, |
(Video Programming System) is used, it means that |
|
e.g. 301 |
the broadcaster attaches a coded signal to every |
|
|
programme they broadcast, ensuring that a |
RECORD |
Press to record – a cursor will |
recording will be recorded in full, even though the |
|
highlight the first programme |
broadcasting of the programme in question was |
|
name or start time on the list |
delayed, causing start and stop times to change. |
▲Press ss tt ▲ or ▼ to move the ss tt cursor to the programme you
▼wish to record
GO Press to select that programme – the cursor highlighting the programme will change to show the date, the channel number and channel name, followed by
‘OK?’
If this information is incorrect, press ss or tt to move through the information and ▲ or ▼ to change the settings
GO Press to store your Timer recording – RECORD is shown
If you want to record additional programmes, you can continue to highlight listed programmes with the cursor.
If PDC or VPS signals follow the broadcast programmes you record, and the PDC/VPS facility is set to On in the video tape recorder’s setup menu, then the title of the programme you want to record will be highlighted instead of the start time. There is no need to consider start and stop times, just accept the status line which appears instead of the programme title. If necessary, you can, of course, change the information displayed.
If PDC/VPS signals are not broadcast by the current channel, your recordings are preset by start and stop times, and will not adapt to broadcast delays or extensions. You will see the times at the top of the screen when you store a programme to be recorded.
Refer to the video tape recorder’s own user’s guide for further information.

14 |
>> Advanced Teletext functions |
|
Go directly to a page via Fastext
Some Teletext broadcasters offer immediate access facilities, called Fastext, that enable you to step directly to one of four linked Teletext pages. Fastext is supported by BeoVision 5.
TEXT Press to switch on Teletext
▲ ▼ Press ▲ or ▼ to find a Fastext 0 – 9 page. Alternatively, enter the
page number using the number keys
Press one of the coloured buttons to gain access to the Fastext function. The titles of the four linked pages appear at the top of the screen
Press the coloured button which corresponds to the linked page you wish to see
TEXT Press to leave Fastext and return to normal Teletext viewing, or…
EXIT …press to leave Teletext completely
A Teletext page with the colour bar at the top right indicating that it is a Fastext page.
The titles of the four linked pages appear at the top of the activated Fastext page, each with their own colour.
The Picture-in-Picture function enables you to see two video sources on-screen simultaneously. While you are watching a programme or recording, you can prompt your BeoVision 5 to insert a small picture on the screen showing the source and channel number of your choice. For example, you can view a TV and a set-top box programme or a videotape playback and a TV programme at the same time, provided that these sources are available in your system.
See two sources at the same time |
|
15 |
|
Picture within a picture
When the Picture-in-Picture function is activated, operation with the Beo4 remote control is directed at the small picture, but the sound always follows the source shown on the whole television screen.
While watching e.g. TV…
Press repeatedly until P-IN-P* is shown in the Beo4 display
Press e.g. SAT to select a source to view in the window
Press 0 to swap the large and small picture
Press repeatedly until P-IN-P is shown in the Beo4 display – then press the coloured button corresponding to a corner of the screen to place the window on the screen
Press a source button, such as TV, to cancel Picture-in-Picture and return to normal viewing
If P-IN-P is not available on the Beo4 display, you must add it to the Beo4 list of functions. Refer to Beo4’s own Guide for further information.
*Note: To view a source registered in the ‘Connections’ menu as V.AUX, such as a set-top box, press LIST repeatedly until P-V.AUX is shown in the Beo4 display instead.
Loading...