


 Loading...
BeoSound 3200
Guide

CAUTION: To reduce the risk of electric shock, do not remove cover (or back).
No User-serviceable parts inside. Refer servicing to qualified service personnel.
WARNING: To prevent fire or electric shock, do not expose this appliance to rain or moisture.
This symbol indicates that a dangerous voltage constituting a risk of electric shock is present within this unit.
This symbol indicates that there are important operating and maintenance instructions in the literature accompanying this unit.
Contents |
|
3 |
|
Introducing your Bang & Olufsen music system, 4
Get to know your music system, see how the buttons are organised on the operation panel, understand and change information in the display.
Daily use, 9
Find out how to use your music system, play music from the CD memory, use the CD player and the radio, and find out how to use the Beo4 remote control.
Advanced operation, 15
Find out more about the advanced operations; how to play favourite CD tracks only, use the random and repeat functions, copy and store a CD in the CD memory, name your CD memory groups, your CDs and radio stations. Furthermore, learn how to edit the CD memory; copy, move and delete, and how to make the music system start or stop at a specific time as well as how to operate an Audio/Video system.
Placement, connections, and maintenance, 25
Find out how to place, connect and assemble your music system. How to connect your music system to your video system, how to clean your music system and your CDs, and how to change Beo4 batteries. Including instructions regarding the CD memory.
Tuning and preference settings, 31
Find out how to tune in radio stations, adjust sound and set the clock, activate the PIN code system and enter a PIN code, configure Beo4 to work with your products, and add extra ‘buttons’ to your Beo4.
Index, 40
Find the specific subject you want to know more about.

4 |
|
Introducing your music system |
|
Reach out as if to touch the glass doors and your BeoSound opens automatically, revealing the music system behind the doors.
Use your music system to listen to radio, to play a single CD and to play from the CD memory.
|
|
|
|
|
|
|
|
|
|
RANDOM |
|
TRACK |
1 |
2 |
3 |
4 |
5 |
6 |
7 |
8 |
9 |
10 |
|
|
|
|
|
|
|
|
|
|
|
|
GO |
|
|
|
|
|
|
|
|
|
|
STOP |
DISPLAY |
|
|
|
|
|
|
|
|
|
|
MUTE |
|
Socket for headphones. When the head-phones are plugged in, the speakers, connected to your music system, are muted.
1. Nomeooo jxisks skjs kskd skd oo jxisks |
2. Skjs kskd skd oo |
3. Jxisks skjs kskd skd Nomeooo |
4. Jxisks skjs kskd skd oo jxisks skjs kskd |
5. Skd oo jxisks skjs kskd skd |
Press the LOAD button to raise the clamp which holds the CD in place.
You can now remove a CD or load one you want to play. Always load a CD with the label facing you.
Press LOAD again to lower the clamp. If you press CD, the clamp lowers automatically and playback begins.

5
The CD memory offers you the possibility to store the contents of your CDs inside the music system. It has four available groups and each group can hold up to 99 CDs. Forget about finding and loading CDs one by one, you have instant access to your CD collection, all stored in the same player.
When your CDs are copied into the memory, you can store them out of sight.
To help you organise your CD memory groups, use the booklet enclosed with this Guide; each group is represented by the colour of the button activating it, and there is room for you to enter the group names, CD names as well as track names.
1. Nomeooo jxisks skjs kskd skd oo jxisks |
1. Nomeooo jxisks skjs kskd skd oo jxisks |
||
2. Skjs kskd skd oo |
|
2. Skjs kskd skd oo |
|
3. Jxisks skjs kskd skd Nomeooo |
3. Jxisks skjs kskd skd Nomeooo |
|
|
4. Jxisks skjs kskd skd oo jxisks skjs |
kskd |
4. Jxisks skjs kskd skd oo jxisks skjs |
kskd |
5. Skd oo jxisks skjs kskd skd |
|
5. Skd oo jxisks skjs kskd skd |
|
1. Nomeooo jxisks skjs kskd skd oo jxisks |
1. Nomeooo jxisks skjs kskd skd oo jxisks |
||
2. Skjs kskd skd oo |
|
2. Skjs kskd skd oo |
|
3. Jxisks skjs kskd skd Nomeooo |
|
3. Jxisks skjs kskd skd Nomeooo |
|
4. Jxisks skjs kskd skd oo jxisks skjs |
kskd |
4. Jxisks skjs kskd skd oo jxisks skjs |
kskd |
5. Skd oo jxisks skjs kskd skd |
|
5. Skd oo jxisks skjs kskd skd |
|
1. Nomeooo jxisks skjs kskd skd oo jxisks |
1. Nomeooo jxisks skjs kskd skd oo jxisks |
||
2. Skjs kskd skd oo |
|
2. Skjs kskd skd oo |
|
3. Jxisks skjs kskd skd Nomeooo |
3. Jxisks skjs kskd skd Nomeooo |
|
|
4. Jxisks skjs kskd skd oo jxisks skjs |
kskd |
4. Jxisks skjs kskd skd oo jxisks skjs |
kskd |
5. Skd oo jxisks skjs kskd skd |
|
5. Skd oo jxisks skjs kskd skd |
|
|
|
1. Nomeooo jxisks skjs kskd skd oo jxisks |
|
|
|
2. Skjs kskd skd oo |
|
|
|
3. Jxisks skjs kskd skd Nomeooo |
|
|
|
4. Jxisks skjs kskd skd oo jxisks skjs |
kskd |
|
|
5. Skd oo jxisks skjs kskd skd |
|
Each of the four coloured buttons represents a CD memory group.
Memory groups
When you copy your CDs, you must store the contents in one or more of the four groups already created in the CD memory. The four groups are associated with the four coloured buttons on the operation panel; green, yellow, red and blue, which are also the names that will appear in the display, unless you name the groups as described on page 19.
Naming and organising
You can provide each of the four groups with a new name and create your own structure. You can choose to store all your CDs in one group or store them in different groups organised for example by genre, and name the groups accordingly: POP, BLUES, etc. Another way of organising the CDs is according to the different users of the music system, such as: MY MUSIC, MUM or PETER. It is all up to you.
6 |
|
Close-up operation panel and displays |
|
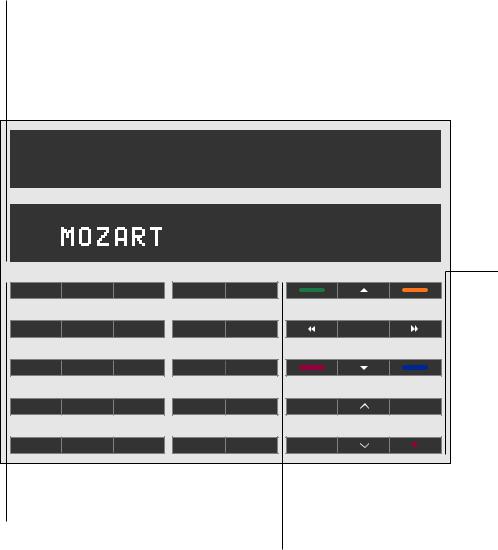
All the buttons are conveniently grouped according to type of function, so you can easily find your way around the panel while operating the system.
The displays on the music system give you various types of information. You choose which type of information is displayed.
Displays |
The lower display shows, for example, the name |
The displays tell you what the system is doing. |
of the current radio station or CD memory group. |
The cues in the upper display relate to |
It also guides you through setting up and |
functions in the CD player, e.g. track number. |
programming sequences. |
|
|
|
|
|
|
|
|
|
|
|
RANDOM |
|
|
|
TRACK |
1 |
2 |
3 |
4 |
5 |
6 |
7 |
8 |
9 |
10 |
|
|
LOAD |
CD |
|
|
CD MEM |
|
|
1 |
|
2 |
|
|
||
RADIO |
CD ALL |
|
AUX |
|
|
|
3 |
|
4 |
|
GO |
||
RANDOM |
REPEAT |
|
NAME |
|
|
|
5 |
|
6 |
|
|
||
COPY |
MOVE |
|
|
EDIT |
|
|
|
7 |
|
8 |
STOP |
DISPLAY |
|
SETUP |
DELETE |
|
TIMER |
|
|
|
9 |
|
0 |
MUTE |
|
||
Source buttons and CD memory functions |
Number buttons |
This group of buttons gives access to sources as |
The number buttons enable you to |
well as setup, playback and Timer functions. |
select other station numbers, select |
|
tracks on a CD, or select CDs and |
|
tracks in the CD memory. |
Primary functions
The buttons on the right-hand side of the panel give you access to all primary functions: switching the system on and off, adjusting volume, muting sound, and operating the radio, CD player, and CD memory.
7
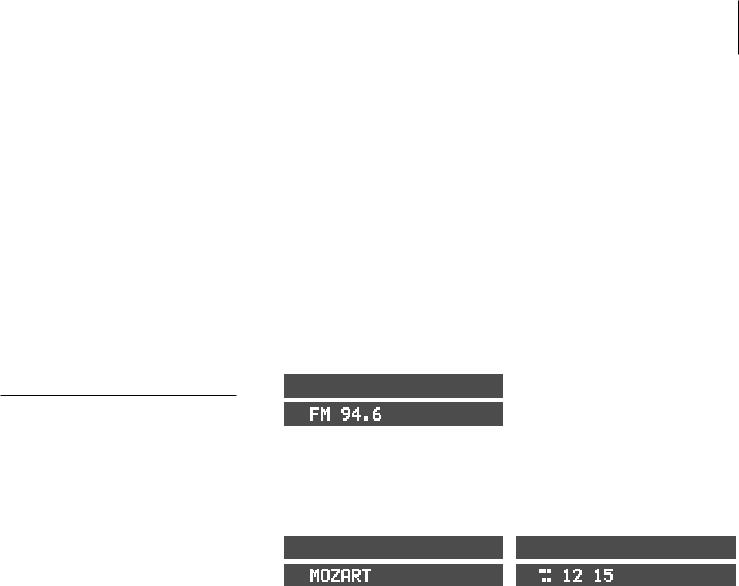
Change the information in the display
You can switch between different types of information by pressing DISPLAY repeatedly when the radio, CD player or CD memory is switched on.
|
|
|
|
|
|
|
|
|
SCAN |
|
|
|
|
|
TRACK |
1 |
2 |
3 |
4 |
5 |
6 |
7 |
8 |
9 |
10 |
|
|
|
|
|
|
|
|
|
|
|
|
|
|
|
|
|
|
|
|
|
|
|
|
|
|
|
|
|
|
|
|
|
|
|
|
|
|
|
The radio station named ‘CLASSIC’ is playing. |
The CD is being scanned meaning that the first 15 |
|
seconds of each track is played. The current track |
|
number is 5. |
The current radio station is transmitting on FM frequency 94.6.
RANDOM
TRACK 1 2 3 4 5 6 7 8 9 10
CD ED |
|
|
|
|
|
REPEAT |
TRACK |
1 |
4 |
5 |
6 |
8 |
10 |
|
|
|
|
|
|
|
|
|
|
|
|
|
|
|
|
|
|
|
|
|
This CD is edited, meaning that some tracks will not be played, also the tracks will be repeated. The current track has been playing for 2 minutes and 15 seconds.
The ten tracks on the CD named ‘MOZART’ will be played in random order.
Three different display settings are available for the radio:
1Station name
2Station number
3Radio frequency
Three display settings are available for the CD player:
1Name of CD
2Track number
3Elapsed time of current track
Track number 15 on CD number 12 in the green CD memory group is playing.
Two display settings are available for the CD memory:
1Name of the group, then the CD name appears
2Group, CD number and track number

8

This chapter informs you of the basic functions of your music system. How to play back music from the CD memory or a CD, how to use the radio and finally how to use the Beo4 remote control, if you have one.
For information about more advanced operation, such as copying the contents of a CD into the CD memory, refer to the next chapter
Advanced operation on page 15.
Daily use |
|
9 |
|
Play from the CD memory, 10
•CD memory playback
•Play a specific group, CD or track
Use the CD player, 11
• Play a CD
Use the radio, 12
• Switch on the radio
Use the Beo4 remote control, 13

10
Once you have copied your CDs into the CD memory, they are stored until you delete them. You can now easily play all your music CDs.
When you switch on the CD memory, the group and the CD you last played start playing. You can then select other CDs or tracks within the group, select another group or perhaps a specific CD in another group. To activate a group, press the corresponding button on the close-up operation panel. The groups are distinguished by the colours: green, yellow, red and blue when you start out, but you can choose to give the groups a name. Refer to page 19 for further information.
Unless you choose differently, playing continues from the CD memory for 12 hours.
Play from the CD memory
CD memory playback |
|
|
|
Play a specific group, CD or track |
|||||
Press to play the CDs in the |
CD MEM |
Press to play the CDs in the |
CD MEM |
||||||
group you last listened to |
|
|
|
group you last listened to |
|
|
|
|
|
Press to play the CDs stored in |
|
|
|
Press to select the group you |
|
|
|
|
|
|
|
|
|
|
|
|
|
||
|
|
|
|
|
|
|
|
||
the green group |
|
|
|
wish to play from |
|
|
|
|
|
|
|
|
|
|
|
|
|
||
|
|
|
1 – 9 |
||||||
Press to play the CDs stored in |
|
|
|
Key in the number of a specific |
|||||
|
|
|
|||||||
|
|
|
|||||||
the yellow group |
|
|
|
CD in this group, or… |
|
|
|
|
|
Press to play the CDs stored in |
|
|
|
Press to step between CDs |
ss tt |
||||
|
|
|
|||||||
|
|
|
|||||||
the red group |
|
|
|
|
|
|
|
|
|
|
|
|
|
Press GO then key in the number |
GO |
||||
Press to play the CDs stored in |
|
|
|
of a specific track, or… |
1 – 9 |
||||
|
|
|
|||||||
|
|
|
|||||||
the blue group |
|
|
|
|
|
|
|
|
|
|
|
|
|
Press to step to the next track |
▲ |
||||
If no CDs are stored in the group |
|
|
|
Press to step to the previous |
|
|
|
|
|
|
EMPTY |
▼ |
|||||||
you wish to play from, the |
|
|
|
track |
|
|
|
|
|
display will read EMPTY |
|
|
|
|
|
|
|
|
|
Press to step to the next CD in |
tt |
|
|
|
|
|
|
||
the group, or… |
|
|
|
|
|
|
|
|
|
Press to step to the previous CD |
ss |
|
|
|
|
|
|
||
in the group |
|
|
|
|
|
|
|
|
|
Press to play the next track, or… |
▲ |
|
|
|
|
|
|
||
Press to play the previous track |
▼ |
|
|
|
|
|
|
||
Press to pause playing |
STOP |
|
|
|
|
|
|
||
Press to resume playing |
GO |
|
|
|
|
|
|
||
Adjust volume… |
|
|
|
|
|
|
|
|
|
Press to adjust the volume up or |
|
|
|
|
|
|
|
||
down |
|
|
|
|
|
|
|
||
Press to silence the speakers |
MUTE |
|
|
|
|
|
|
||
completely, press again to restore |
|
|
|
|
|
|
|
|
|
sound |
|
|
|
|
|
|
|
|
|
Press to switch to standby |
• |
|
|
|
|
|
|
||
Use the CD player |
|
11 |
|
Before playing a loaded CD, all information on the CD is registered, such as the number of tracks. Then the CD starts playing from the beginning. Playback continues until the whole CD has been played, unless you choose differently.
You can always keep track of what the CD player is doing by watching the displays. The displays show either track number or track time, depending on which display mode it has been set to. If you have named the CD, the name will also be shown in the display*
Play a CD
Press to play a loaded CD |
CD |
Press to play specific track |
0 – 9 |
numbers |
|
Press to play the next track |
▲ |
Press to play the previous track |
▼ |
Press to pause playing |
STOP |
Press to resume playing |
GO |
Press to search forward toward |
tt |
the end of the CD |
|
Press to search backward toward |
ss |
the beginning of the CD – Keep |
|
the button pressed down until |
|
you have reached the point you |
|
want |
|
Adjust volume… |
|
Press to adjust the volume up or |
|
down |
|
Press to silence the speakers |
MUTE |
completely, press again to restore |
|
sound |
|
1. Nomeooo jxisks skjs kskd skd oo jxisks |
2. Skjs kskd skd oo |
3. Jxisks skjs kskd skd Nomeooo |
4. Jxisks skjs kskd skd oo jxisks skjs kskd |
5. Skd oo jxisks skjs kskd skd |
|
|
|
|
|
5 |
|
|
|
RANDOM |
|
TRACK |
1 |
2 |
3 |
4 |
6 |
7 |
8 |
9 |
10 |
|
|
|
|
|
|
|
|
|
|
|
|
|
|
|
|
|
|
|
|
|
|
|
|
|
|
|
|
|
|
|
|
|
|
The CD playing has been named ‘MOZART’. The tracks are being played in random order.
NOTE! BeoSound 3200 automatically switches to standby if idle for 30 minutes. *If the display has been set to show the name of the CD, only the name will appear in the display and you cannot follow the elapsed time process. See page 7 for details of the various display modes.

12
To listen to the radio, you must first find and store the frequencies of the radio stations.
You can store up to 60 different radio stations in your music system. Refer to the chapter Tune in radio stations on page 32 for further information.
Use the radio
Switch on the radio
Press to switch on the radio |
RADIO |
|
Use the number keys to select a |
0 – 9 |
|
Radio program 3 is playing. |
||
stored station |
|
|
Step through all stored stations |
▲ |
|
|
▼ |
|
Switch to standby |
• |
|
Pressing 0 switches between the present and |
|
|
previous radio station. |
|
|
Adjust volume… |
|
|
Press to adjust the volume up or |
|
|
down |
|
|
Press to silence the speakers |
MUTE |
|
completely. Press again to restore |
|
|
sound |
|
|
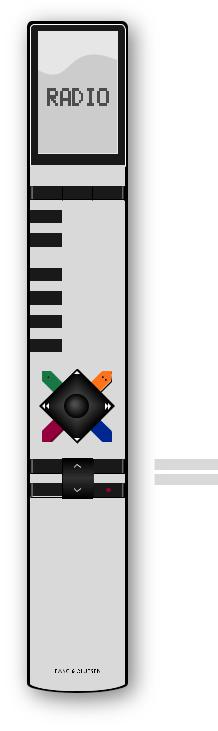
Although designed primarily for close-up operation, the music system can also be operated from a distance. The Beo4 remote control operates all the primary functions in your Bang & Olufsen product.
With Beo4, you can switch on or off, select radio stations or CD tracks. It is also possible to switch on the special random and repeated playback functions in the CD player, as well as adjust the sound.
If your music system is used together with other Bang & Olufsen products, refer to the Guides delivered with these products for further explanation.
Use the Beo4 remote control |
|
13 |
|
RADIO Switches on the radio
CD Switches on the CD player
A TAPE Switches on the CD memory
0 – 9 Use the number buttons to key in the exact radio program number, CD or CD track number
MENU Press to make a Timer programming
TV LIGHT RADIO
▲Steps through your radio programs, or tracks
SAT |
DVD |
CD |
|
|
▼ |
on a CD. Press ▲ when RANDOM or REPEAT is |
|
|
|
||||||
|
|
|
|
|
|
|
shown in the display, to activate the function, |
V TAPE |
RECORD |
A TAPE |
|
|
|
|
and press ▼ to switch it off when the function |
|
|
|
|
|
|
|
is displayed |
|
|
|
|
|
|
|
|
7 |
8 |
9 |
|
|
|
|
|
|
|
|
|
ss |
|
tt |
Searches through a CD |
4 |
5 |
6 |
|
|
|
|
|
|
|
|
|
|
|
|
Selects a CD memory group |
1 |
2 |
3 |
|
|
|
|
|
|
|
|
|
||||
|
|
|
|
|
|||
|
|
|
|
|
|
|
|
|
|
|
|
|
|
|
|
TEXT |
0 |
MENU |
|
|
|
|
|
|
|
|
|
GO |
Resumes playback – accepts settings, etc. |
||
|
|
|
|
|
|
|
Activates the source or function in the Beo4 |
|
|
|
|
|
|
|
display |
GO
STOP Pauses playback any time
|
|
LIST |
Displays extra ‘buttons’*, e.g. RANDOM or |
LIST |
EXIT |
RANDOM |
REPEAT |
|
|
REPEAT |
|
STOP |
|
|
|
Turns the volume up or down, press in the
middle to mute speakers, press again to recall sound
•Switches the BeoSound 3200 to standby
*NOTE! In order to display the relevant extra buttons on the Beo4, you must add them to the Beo4 list of functions: Add RANDOM and REPEAT to Beo4 to use these functions. Add A.AUX to be able to switch on any other source connected to the AUX-socket. Refer to the chapter Customise Beo4 on page 38 for further information.

14
Loading...