


 Loading...
BeoVision 8
Guide

CAUTION
RISK OF ELECTRIC SHOCK
DO NOT OPEN
CAUTION: To reduce the risk of electric shock, do not remove cover (or back).
No User-serviceable parts inside. Refer servicing to qualified service personnel.
WARNING: To reduce the risk of fire or electric shock, do not expose this appliance to rain or moisture. Do not expose this equip ment to dripping or splashing and ensure that no objects filled with liquids, such as vases, are placed on the equipment.
To completely disconnect this equipment from the AC Mains, disconnect the mains plug from the wall socket. The disconnect device shall remain readily operable.
The lightning flash with arrowhead symbol within an equilateral triangle, is intended to alert the user to the presence of un insulated “dangerous voltage” within the product’s enclosure that may be of sufficient magnitude to constitute a risk of electric shock to persons.
The exclamation point within an equilateral triangle is intended to alert the user to the presence of important operating and main tenance (servicing) instructions in the literature accompanying the product.

We expect your Bang & Olufsen retailer to deliver, install and set up your products. However, the information required to install and set them up is included in the Guide. This is useful if you move your products or expand your system at a later date.
Contents |
3 |
Daily operation, 4
•Introducing your television and Beo4, 4
•Watch TV, 6
•Adjust sound and picture format, 8
•Teletext, 10
•Menu overview, 12
Advanced operation, 13
Find out how to operate a connected source, bring up a computer image on the screen and operate your television in Option 4. In addition find out how to operate an audio system, how to operate your television in a BeoLink system, and how to disable the internal TV tuner.
Tuning and preference settings, 25
Find out how to set up your television for the first time, tune in and edit channels. How to register additional sources and make a surround sound setup. This chapter also contains information about settings for picture and sound.
Placement, sockets and connections, 45
Find out how to handle and place your television and where the sockets are placed. Find out how to connect sources.
Maintenance, 53
How to clean your television and change batteries in the Beo4 remote control.
Index, 54
4 |
|
Introducing your television and Beo4 |
|
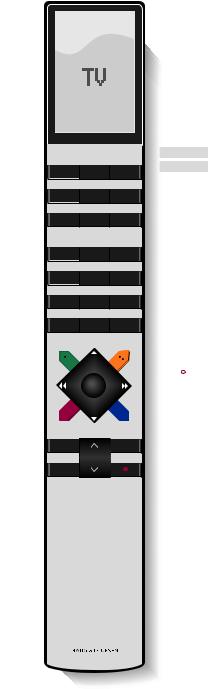
The Beo4 remote control gives you access to all functions. When a function is in use, you are informed via displays on Beo4 or on the television.
Switch on the television |
TV |
|
|
|
TV |
LIGHT |
RADIO |
Switch on the television and activate the DVB HD |
DTV |
|
|
module as source*. Operation of the DVB HD |
DTV |
DVD |
CD |
source is described in a separate Guide |
|
|
|
|
V MEM |
RECORD |
A MEM |
Select channels or teletext pages. Enter data in on- |
0 – 9 |
|
|
screen menus |
7 |
8 |
9 |
Enter information in on-screen menus |
4 |
5 |
6 |
|
|
|
|
|
1 |
2 |
3 |
Accept and store instructions or settings. Press |
GO |
|
|
and hold to bring up a TV channel list |
TEXT |
0 |
MENU |
|
|
|
|
Step up or down through channels or menu items |
|
|
|
|
|
GO |
|
Reveal additional functions in the Beo4 display, |
LIST |
|
|
such as FORMAT |
|
|
|
LIST |
EXIT |
STOP |
|
For information about how to operate connected equipment, refer to the Guide enclosed with it. For information on how to add extra functions to those shown in the Beo4 display, refer to the Guide enclosed with Beo4.
TV The Beo4 display shows the source you have FORMAT selected, or extra functions available when you
press the LIST button
MENU Bring up the main menu
TEXT Switch on teletext
Adjust sound volume: press in the middle to mute the sound
STOP Step back through previous menus
EXIT Exit all on-screen menus
•Switch the television to standby
*NOTE: Which button activates the DVB HD module depends on your settings in the TUNER SETUP menu, refer to page 24 for further information.
5
Displayed information and menus
Information about the selected source is shown in the display. On-screen menus allow you to adjust settings.
How to use on-screen |
|
menus … |
|
Press to switch on the television |
TV |
Press to bring up the TV SETUP |
MENU |
menu |
|
Press to move between the |
|
different menu options |
|
Menu name |
|
|
TV SETUP |
|
||
|
|
|
|
|
|
|
|
|
|
|
|
|
|
|
|
TUNING |
|
|||
|
|
CONNECTIONS |
|
|||
Menu options |
|
SOUND |
|
|||
|
|
PICTURE |
|
|||
|
|
MENU LANGUAGE |
|
|||
|
|
|
|
|
|
|
Information field |
|
|
select |
GO |
|
|
|
|
|
|
|
|
|
|
|
|
|
|
|
|
|
|
|
|
Example of on-screen menu. |
|
Press to reveal different settings |
|
|
|
|
|
|
|
|
|
|
|
|
|
|
|
|
|
|
|
|
|
|
|
An explanation of symbols in |
|
Press to bring up a menu or store |
GO |
|
|
|
|
TV |
|
|
|
|
the Guide |
|
|
|
|
|
|
|
|
|
TV |
||||
a setting you have made |
|
|
|
|
|
|
|
|
|
|
Buttons on the Beo4 remote |
|
|
|
|
|
|
|
|
|
|
|
|
control |
LIST |
Press to step back through |
STOP |
|
|
|
|
|
|
|
|
|
|
|
previous menus |
|
|
|
|
|
|
|
|
|
|
|
|
Press to exit all menus |
EXIT |
|
|
|
|
|
|
|
|
|
Display on the Beo4 remote |
|
|
|
|
|
|
|
|
|
|
|
|||
|
|
|
|
|
|
|
|
|
|
|||
|
|
|
|
|
|
|
|
|
FORMAT |
|||
|
|
|
|
|
|
|
|
|
|
|
control |
|
|
|
|
|
|
|
|
|
|
|
|
Display on the television |
|
|
|
|
|
|
|
|
|
|
|
|
VOL 26 |

6
This chapter describes daily use of your television: how to switch the television on, choose a channel and switch the television off.
The channel list gives you an overview of all your TV channels.
Watch TV
Select a TV channel
When you switch the television on, the last channel viewed appears on the screen.
Press to switch on the television |
TV |
Press a channel number to go |
0 – 9 |
directly to that channel |
|
Press to change channels one by |
|
one |
|
Press to switch the television to |
• |
standby |
|
Pressing 0 swaps between the current TV channel and previous TV channel.
Bring up a channel list
All your TV channels appear on a list, which you can bring up on the screen. The list contains channel numbers and names, and can contain up to 99 TV channels.
Press to switch on the television |
TV |
Press and hold to bring up a |
GO |
channel list on the screen |
|
Press or to step between |
|
‘pages’ in the channel list |
|
To select a channel, enter the |
0 – 9 |
channel number, or … |
|
… press until the desired channel |
|
is highlighted |
|
Press to switch on the chosen |
GO |
channel, or … |
|
… press to leave the menu |
EXIT |
NOTE! If the screen is overheated, black spots may appear in the picture. These spots disappear again, once the television cools down to normal temperature.

7
CHANNEL LIST
1SAT 1
2INFOKANAL
3RTL
4MTV
5DISCOVERY
6EUROSPORT
7ARD
8TV4
9DR1
10. . . . . . . .
11ZDF
12SVT 1
13. . . . . . . .
14TV3
15TVDK1
16TVDK2
17CNN
18BBCWORLD
|
|
more |
select |
GO |
|
|
|
|
|
|
|
The channel list provides you with an overview of all your available TV channels.

8 |
|
Adjust sound and picture format |
|
Several sound adjustment possibilities are available in your television.
You can adjust the volume or mute the sound completely at any time.
If channels are broadcasted with different sound types or languages, you can choose between the sound types or languages.
If speakers are connected to your television, you can select a speaker combination.
While watching TV, you can adjust the picture format.
Adjust volume or mute the sound
You can adjust volume or mute the sound at any time.
Press either end of the button to adjust the volume up or down
Press in the middle of the button to mute the sound
Press either end of the button to bring the sound back
Prolonged listening at high volume levels can cause hearing damage!
Sound type or language
While you are watching TV, you can switch between the types of sound that are available.
Press repeatedly to display |
LIST |
SOUND* on Beo4 |
|
SOUND |
|
Press to bring up the current |
GO |
sound type in the display |
|
Press GO repeatedly to switch to |
GO |
another sound type or language |
|
in a multi-language programme |
|
Press to leave the SOUND |
EXIT |
function |
|
You can store your favourite sound type when tuning in your TV channels. For further information, refer to the chapter ‘Edit tuned channels’ on page 36.
*NOTE! In order to display SOUND on Beo4, you must first add it to the Beo4 list of functions. Refer to the Guide enclosed with Beo4.

9
Speaker combination |
Picture format |
If you connect loudspeakers to your television, you can change the speaker combination at any time.
Press repeatedly to display |
LIST |
SPEAKER on Beo4 |
|
SPEAKER |
|
Press to select a speaker |
1 – 5 |
combination |
|
Press to adjust the balance |
|
between the front and rear |
|
speakers |
|
Press to adjust the balance |
|
between the left and right |
|
speakers |
|
Press to remove SPEAKER from |
EXIT |
the Beo4 display and return to |
|
the source you were using |
|
Speaker combinations
SPEAKER 1 … Sound in the centre speaker only. SPEAKER 2 … Stereo sound in the front speakers.
Subwoofers are active.
SPEAKER 3 … The centre speaker, front speakers and subwoofers are active.
SPEAKER 4 … The front speakers, surround speakers, and subwoofers are active.
SPEAKER 5 … Surround sound from all speakers and subwoofers.
Available speaker combinations depend on the number of connected speakers.
Select a picture format to optimise the picture.
Press repeatedly to display |
LIST |
||
FORMAT on Beo4 |
|
||
FORMAT |
|||
Press if you want to optimise the |
GO |
||
picture, or … |
|
||
… press the number of the |
1 – 4 |
||
desired picture format |
|
||
If you have chosen Format 1 |
|
||
or Format 4 … |
|
||
Press |
or |
to select variations |
|
of this format |
|
||
If you have chosen Format 1* |
|
||
or Format 2 … |
|
||
Press |
or |
to move the |
|
picture up and down |
|
||
Press to leave the FORMAT |
EXIT |
||
function |
|
|
|
*Pictures in 4:3 format cannot be moved up and down.
Picture formats to choose from …
FORMAT 1 … For standard TV pictures. Three variations are available: 4:3, 15:9 and Panoramic view (for the largest picture).
FORMAT 2 … For letter-box pictures. If necessary move the picture up or down to ensure that channel names or subtitles – if these appear in the broadcasted picture – can be seen. In some cases FORMAT 2 is selected automatically.
FORMAT 3 … For genuine 16:9 wide-screen pictures. FORMAT 3 is usually selected automatically. If this is not the case, you can select it yourself.
FORMAT 4 … A video signal in Format 4 uses the 16:9 format and removes any bars at the sides. A graphics signal, for example from a PC, in Format 4 displays the centre part of the picture. When displaying a graphics signal in Format 4, you can select the left or right part of the picture with  and
and  , respectively.
To temporarily remove the picture from the screen, press LIST repeatedly to display P.MUTE on Beo4, then press GO. To restore the picture again, press any source button, such as TV.
NOTE! For further information about how to connect speakers to the television, refer to the chapter ‘Connection panels’ on page 51.

10
If you select a channel and the broadcaster offers a teletext service, the television gives you access to teletext pages and any subpages linked to the pages.
Teletext can be shown in dual-screen or normal viewing mode, this means that the teletext page either fills the entire television screen or only half.
The arrow buttons on Beo4 and the menu bar at the top of the screen, help you move to the page you want. When you get there, you can pause the turning of subpages to read them at your own pace.
The television can remember your favourite pages or reveal hidden messages. To make your favourite teletext pages appear first when you bring up teletext, store them as MEMO pages.
Teletext
Basic teletext functions
Navigate through teletext pages by using the menu bar at the top of the teletext page.
>Press TEXT to gain access to teletext and EXIT to leave teletext.
To move to a new page …
>Enter the number of the page you wish to see, or …
>… press  to move the highlighted cursor to PAGE.
>Press  or
or  to step between pages, and hold to step faster.
>Pressing GO steps to index pages (100, 200, 300 …).
To enlarge the teletext page …
>Press  to move the highlighted cursor to LARGE.
>Press GO to show the upper half of the page in double height. Press GO again to see the lower half of the page.
>Press GO to return the teletext page to normal size.
PAGE |
MEMO |
HALT LARGE REVEAL |
SETUP |
|
|
|
P100 |
BBC |
S100 |
Wed 13 Oct |
12:39:34 |
|
|
|
PAGE MEMO |
HALT |
LARGE REVEAL |
SETUP |
||
|
P100 |
BBC |
S100 |
Wed 13 Oct |
12:39:34 |
|
|
|
|
|
|
|
|
To stop subpages from turning …
>Press STOP to stop subpages from turning, or…
>… move the cursor to HALT and press GO. HALT is replaced by a set of four digits.
>Use  and
and  to step to the subpage you wish to see, or …
>… enter its number using the number buttons on Beo4.
>Press GO to restart page turning.
To reveal hidden messages and the like …
>Press  to move the highlighted cursor to REVEAL.
>Press GO to reveal hidden text on the current page.
NOTE! If your television is linked via a BeoLink cable to another television, stored MEMO pages are not shared among these televisions. MEMO pages must be stored manually on each linked television.
11
Store favourite teletext pages |
Day-to-day use of MEMO pages |
First time use of teletext |
PAGE |
MEMO1 |
HALT |
LARGE |
REVEAL |
SETUP |
|
|
P100 |
BBC |
S100 |
Wed 13 Oct |
12:39:34 |
|
|
|
|
PAGE MEMO2 |
HALT |
LARGE REVEAL |
SETUP |
|||
|
P100 |
BBC |
S100 |
Wed 13 Oct |
12:39:34 |
||
|
|
|
|
|
|
|
|
Nine MEMO pages are available for each television channel’s teletext service.
To create a MEMO page …
>Bring up a page you view often.
>Press  or
or  to move the cursor along the menu bar to SETUP and press GO. The 9 available MEMO slots are shown by number. The first is highlighted.
>Press GO to store the current page. The cursor moves to the next available MEMO slot.
>Use the number buttons on Beo4 to select the next teletext page you wish to store.
>Repeat the procedure for each page you wish to store.
>To leave the MEMO setup, press  or
or  to move the cursor to BACK and press GO.
>Press EXIT to leave teletext.
You may wish to refer to your teletext MEMO pages quickly, for example, if you are leaving for work and wish to check traffic information on a teletext service.
To view MEMO pages …
>Press TEXT to bring up teletext.
>Press  or
or  to move between MEMO pages.
>Press EXIT to leave teletext.
To delete a MEMO page …
>Press  or
or  to move the cursor to SETUP and press GO.
>Move the cursor to the MEMO page you wish to delete and press the yellow button.
>Press the yellow button again to confirm.
To view teletext subtitles for a program …
If you would like available teletext subtitles to appear automatically for a particular program, store the teletext subtitles page as MEMO page 9.
|
|
|
|
|
|
|
|
PAGE |
MEMO1 |
HALT |
REC SETUP REVEAL |
|
|
P100 |
BBC |
S100 |
Wed 18 SEP 12:39:32 |
|
|
|
|
|
|
|
|
|
|
|
|
|
|
|
|
|
|
|
|
|
|
|
|
PAGE |
MEMO1 |
HALT |
REC SETUP |
REVEAL |
P100 |
BBC |
S100 |
Wed 13 Oct |
12:39:34 |
The very first time teletext is activated, it starts in dual-screen mode. You can then choose full-screen instead. The teletext mode is remembered the next time you switch on teletext.
To change viewing mode …
>Press TEXT to bring up teletext.
>Press TEXT again to switch between full-screen and dual-screen.
>Press EXIT to leave teletext.
MEMO pages are not available in DVB teletext.

12
The illustration on this page shows the content of the menu system, and also indicates where in this Guide you can find further information about the menus.
The extended on-screen menu system for the television. The greyed menu items indicate optional extras which may or may not be present in your system.
Available menus also depend on the TV tuner settings, Option setting and connected speakers. For example, the tuning menus are not available if the television tuner is disabled.
Press MENU on Beo4 to access the main menu.
Menu overview
TV SETUP |
|
TUNING |
|
EDIT CHANNELS |
p. 36 |
ADD CHANNELS |
p. 40 |
AUTO TUNING |
p. 40 |
MANUAL TUNING |
p. 38 |
FREQUENCY |
|
CHANNEL NO. |
|
NAME |
|
FINE TUNE |
|
DECODER |
|
TV SYSTEM |
|
SOUND |
|
PLAY TIMER |
p. 20 |
CONNECTIONS |
p. 28 |
AV 1 |
|
SOURCE |
|
IR SOCKET |
|
STB SETUP |
|
STANDBY OPTIONS |
p. 29 |
HDMI |
|
S/P-DIF |
|
AV 2 |
|
SOURCE |
|
IR SOCKET |
|
STB SETUP |
|
STANDBY OPTIONS |
|
HDMI |
|
YPBPR |
|
S/P-DIF |
|
AV 3 |
|
SOURCE |
|
IR SOCKET |
|
STB SETUP |
|
STANDBY OPTIONS |
|
HDMI |
|
YPBPR |
|
VGA |
|
S/P-DIF |
|
AV4 |
|
SOURCE |
|
IR SOCKET |
|
STB SETUP |
|
STANDBY OPTIONS |
|
HDMI |
|
S/P-DIF |
|
LINK |
|
FREQUENCY |
p. 23 |
TV SYSTEM |
p. 23 |
MODULATOR |
p. 23 |
TUNER SETUP |
p. 24 |
TV TUNER |
|
DVB HD |
|
SOUND |
p. 43 |
ADJUSTMENT |
|
VOLUME |
|
BASS |
|
TREBLE |
|
LOUDNESS |
|
DEFAULT AUDIO |
p. 43 |
DEFAULT VIDEO |
p. 43 |
SPEAKER TYPE |
p. 30 |
FRONT |
|
REAR |
|
SUBWOOFER |
|
SPEAKER DISTANCE |
p. 31 |
CENTRE |
|
LEFT FRONT |
|
RIGHT FRONT |
|
RIGHT REAR |
|
LEFT REAR |
|
SUBWOOFER |
|
SPEAKER LEVEL |
p. 32 |
SEQUENCE |
|
LEFT FRONT |
|
RIGHT FRONT |
|
RIGHT REAR |
|
LEFT REAR |
|
SOUND SYSTEM |
p. 34 |
PICTURE |
p. 42 |
BRIGHTNESS |
|
CONTRAST |
|
COLOUR |
|
TINT |
|
HOR. SIZE |
|
HOR. POSITION |
|
VERT. POSITION |
|
MENU LANGUAGE |
p. 44 |
DANSK |
|
DEUTSCH
ENGLISH
ESPAÑOL
FRANÇAIS
ITALIANO
NEDERLANDS
SVENSKA
Advanced operation |
13 |
This chapter tells you how to operate |
Daily operation, 4 |
a connected source, how to use your |
Find out how to use the Beo4 remote control, bring up the menus on the screen, |
television as a computer monitor, and |
operate the daily functions of your television and how to adjust sound and picture |
how to operate your television with |
format. In addition, find an overview of the on-screen menu system. |
an audio system and in a BeoLink |
|
system. It also tells you how to |
Advanced operation, 13 |
disable the internal TV tuner. |
• Use connected video equipment with Beo4, 14 |
|
• Use your television as a computer monitor, 16 |
|
• Two televisions in the same room, 17 |
|
• Connect and operate an audio system, 18 |
|
• BeoVision in a link room, 20 |
|
• BeoLink – Distribute sound and picture, 22 |
|
• TV tuner, 24 |
|
Tuning and preference settings, 25 |
|
Find out how to set up your television for the first time, tune in and edit channels. |
|
How to register additional sources and make a surround sound setup. This chapter |
|
also contains information about settings for picture and sound. |
|
Placement, sockets and connections, 45 |
|
Find out how to handle and place your television and where the sockets are placed. |
|
Find out how to connect sources. |
|
Maintenance, 53 |
|
How to clean your television and change batteries in the Beo4 remote control. |
|
Index, 54 |
14 |
|
Use connected video equipment with Beo4 |
|
The built-in Peripheral Unit Controller acts as an interpreter between connected video equipment, such as a set-top box, video recorder or DVD player, and the Beo4 remote control.
You can use the Beo4 remote control to gain access to the channels and functions offered by your equipment.
Some functions are available via Beo4 when you switch on the equipment. Additional functions are available through a Peripheral Unit Controller menu that you bring up on the screen.
For instruction in the various functions offered by your equipment, please refer to the product’s own user’s guide.
For further information about supported equipment, contact your Bang & Olufsen retailer.
Peripheral Unit Controller menu
Buttons on the remote controls included with your equipment may not match those on Beo4. To see which Beo4 buttons activate specific services or functions, bring up the Peripheral Unit Controller menu on the screen.
Press a source button* to switch |
TV |
||
on connected equipment |
DTV |
||
Press to bring up the Peripheral |
MENU |
||
Unit Controller menu |
|
|
|
Press the number button that |
1 – 9 |
||
activates the function you want, |
|
|
|
or … |
|
|
|
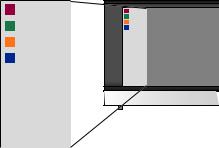
… press one of the coloured |
|
|
|
|
|
|
|
buttons to activate a function |
|
|
|
|
|
|
|
When you have selected a settop box as a source, press MENU twice to bring up the television’s main menu.
1GUIDE
2MENU
3TEXT
4INFO
5 WIDE
1 GUIDE
2 MENU
3 TEXT
4INFO
5WIDE
Example of a Peripheral Unit Controller menu – The Beo4 buttons are shown to the left on the menu, and the functions they control are shown to the right. The menu may also list buttons on the remote control included with your connected equipment.
NOTE: Which source button activates your peripheral unit depends on the tuner setup and settings in the CONNECTIONS menu, refer to page 24 and 28 for further information.

15
Universal Beo4 operation
If you know which Beo4 button activates the function you want, you can activate the function without bringing up the Peripheral Unit Controller menu first.
While your equipment is on … |
|
|
|
Press GO and then the number |
GO |
||
button that activates the |
1 – 9 |
||
function you want |
|
|
|
Press one of the coloured |
|
|
|
|
|
|
|
buttons to activate a function |
|
|
|
|
|
|
|
Press GO and then or to |
GO |
||
step up or down through |
|
|
|
channels directly |
|
|
|
Press and hold GO to bring |
GO |
||
up the Program guide or the |
|
|
|
‘Now/Next’ banner on the screen |
|
|
|
depending on your source |
|
|
|
If you have chosen the standby option ‘MANUAL CONTROL’, see page 29, and your set-top box supports it, you can switch the box on by pressing GO + 0.
Use equipment menus
Once you have activated connected equipment, you can operate its own menus with Beo4.
While equipment menus are shown …
Moves the cursor up or down
Moves the cursor left or right |
|
|
|
Selects and activates a function |
GO |
||
|
GO |
||
Press GO and then or to |
GO |
||
step between menu pages or |
|
|
|
step in channel lists |
|
|
|
Exits menus, or returns to |
STOP |
||
a previous menu* |
|
|
|
Exits menus, enters or exits |
EXIT |
||
different modes, such as radio |
|
|
|
Use the coloured buttons as |
|
|
|
|
|
|
|
indicated in the menus of your |
|
|
|
|
|
|
|
connected equipment |
|
|
|
*Depending on your source, you may have to press EXIT twice instead of STOP to return to a previous menu.
Use equipment in a link room
When you have connected equipment to the television in the main room, you can operate it via the link room television. However, the Peripheral Unit Controller menu cannot be displayed on the television screen in the link room.
Press to switch on equipment in |
V MEM |
||
the main room |
DVD |
||
|
DTV |
||
Press GO and then the number |
GO |
||
button that activates the |
1 – 9 |
||
function you want |
|
|
|
Press one of the coloured |
|
|
|
|
|
|
|
buttons to activate a function |
|
|
|
|
|
|
|

16
If you connect your television to a computer, as described on page 49, you can use it as a monitor.
IMPORTANT! If you wish to connect a computer to the television and use the television as a monitor, make sure that you disconnect the television, the computer, and all equipment connected to the computer from the mains before you connect the computer and the television to each other.
When in use, the computer must be connected to a grounded wall outlet as specified in the computer’s setting-up instructions.
Use your television as a computer monitor
Bring up the computer image on the screen
To see the computer picture on the television |
The television supports the following screen |
|
screen, you must bring it up with Beo4. |
resolutions: 60 Hz; 640 × 480, 800 × 600, |
|
|
|
1024 × 768, 1280 × 720. |
To bring up the computer |
|
|
picture … |
|
|
Press repeatedly until PC* |
LIST |
|
appears in the Beo4 display |
|
|
PC |
|
|
Press to bring up the picture |
GO |
|
You can then operate the computer as you normally would.
*In order to display PC on Beo4, you must first add it to the Beo4 list of functions. For further information, refer to the Guide enclosed with Beo4.
If you have placed your BeoVision 8 in a room where you already have a Bang & Olufsen television, and commands from Beo4 can be received by both televisions, you must change the option setting of BeoVision 8. This prevents simultaneous activation of both televisions.
Two televisions in the same room |
17 |
One remote control for both televisions
For your television to function properly, it is essential that the television is set to the correct Option:
To set your television for Option 4 …
>While holding the • button on Beo4, press LIST.
>Let go of both buttons.
>Press LIST repeatedly to display OPTION? on Beo4 and press GO.
>Press LIST repeatedly to display V.OPT on Beo4 and press 4.
Operate your television in Option 4 …
Normally, you can activate a source, such as TV, simply by pressing the relevant source button on Beo4. However, when you set your television to Option 4, you must do the following:
>Press LIST repeatedly until LINK* is shown in the Beo4 display.
>Press a source button, such as TV.
*In order to display LINK on Beo4, you must add it to the Beo4 list of functions. For further information, refer to the Guide enclosed with Beo4.
BeoVision 8 |
Option 4 |
LIST |
LINK |
TV |
TV |
In order to use teletext on a television you have set to Option 4, you must set up Beo4 to ‘VIDEO 3’, but this limits the Beo4 functions that can be used with televisions set to other Options. For further information, refer to the Guide enclosed with Beo4.
18
If your television is equipped with the optional System Module and you connect a compatible audio system, you obtain the benefits of an integrated audio/video system.
Play a CD on your audio system using the television speakers, or switch on a TV programme and send the sound to your audio system speakers.
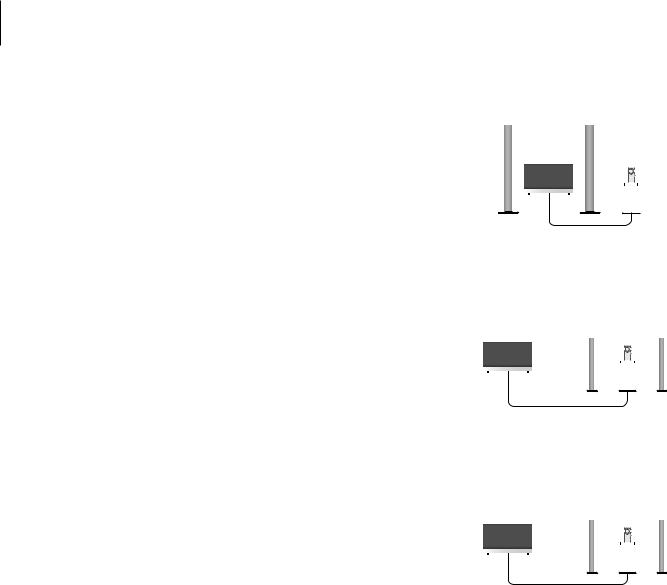
Your AV system can be placed together in one room or in two rooms with the television placed in one room, and the audio system with a set of speakers placed in another.
Not all Bang & Olufsen audio systems support integration with the television.
Connect and operate an audio system
Connect your audio system
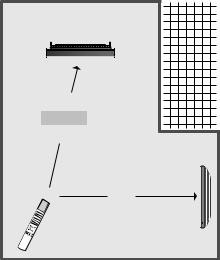
Using a Master Link cable, connect the MASTER LINK sockets on the television and the audio system.
Option setting
If your television has been set up in an AV system, you may need to set it to the correct Option. Switch the entire system to standby.
Option setting for the television
>While holding the • button on Beo4, press LIST.
>Let go of both buttons.
>Press LIST repeatedly to display OPTION? on Beo4 and press GO.
>Press LIST repeatedly to display V.OPT on Beo4 and then key in the appropriate number (1 or 2).
Option setting for the audio system
>Repeat the procedure as described above.
>Press LIST repeatedly to display A.OPT on Beo4 and then key in the appropriate number (0, 1, 2, 5 or 6).
|
|
|
|
|
|
Option 2 |
|
|
Option 0 |
|||||
|
|
|
|
|
|
|
|
|||||||
|
|
|
|
|
|
|
|
|
|
|
|
|
|
|
|
|
|
|
|
|
|
|
|
|
|
|
|
|
|
|
|
|
|
|
|
|
|
|
|
|
|
|
|
|
|
|
|
|
|
|
|
|
|
|
|
|
|
|
|
|
|
|
|
|
|
|
|
|
|
|
|
|
|
|
|
|
|
|
|
|
|
|
|
|
|
|
|
|
|
|
|
|
|
|
|
|
|
|
|
|
|
|
|
|
|
|
|
|
|
|
|
|
|
|
|
|
|
|
|
|
|
|
|
|
|
|
|
|
|
|
|
|
|
|
In one room – all speakers are connected to the television.
|
|
Option 1 |
|
Option 1 |
||||||
|
|
|
|
|
|
|
|
|
|
|
|
|
|
|
|
|
|
|
|
|
|
|
|
|
|
|
|
|
|
|
|
|
|
|
|
|
|
|
|
|
|
|
|
|
|
|
|
|
|
|
|
|
|
|
|
|
|
|
|
|
|
|
|
|
|
|
|
|
|
|
|
|
|
|
|
|
|
|
|
|
|
|
|
|
|
|
|
The television and audio system in the same room.
|
|
Option 2 |
|
|
Option 2 |
||||||
|
|
|
|
|
|
|
|
|
|
|
|
|
|
|
|
|
|
|
|
|
|
|
|
|
|
|
|
|
|
|
|
|
|
|
|
|
|
|
|
|
|
|
|
|
|
|
|
|
|
|
|
|
|
|
|
|
|
|
|
|
|
|
|
|
|
|
|
|
|
|
|
|
|
|
|
|
|
|
|
|
|
|
|
|
|
|
|
|
|
|
|
|
|
|
|
Audio system in one room, and the television in another.
Loading...