


 Loading...
BeoSound 3000
Reference book

Legal Notice:
CAUTION: To reduce the risk of electric shock, do not remove cover (or back).
No User-serviceable parts inside. Refer servicing to qualified service personnel.
WARNING: To prevent fire or electric shock, do not expose this appliance to rain or moisture.
This symbol indicates that a dangerous voltage constituting a risk of electric shock is present within this unit.
This symbol indicates that there are important operating and maintenance instructions in the literature accompanying this unit.
For the Canadian market only!
CAUTION: To prevent electric shock do not use the polarized plug, attached to this apparatus, with an extension cord, receptacle or other outlet unless the blades can be fully inserted to prevent blade exposure.
BeoSound 3000 – the fully integrated music system
Whenever you reach out to operate the BeoSound 3000, the glass doors slide open as if by magic, inviting you in to the music.
The BeoSound 3000 is a fully integrated music system with both radio and CD player. Its compactness facilitates placement next to your favourite listening position.
All the operating buttons are located in one place. They are conveniently grouped according to type of function, so you can easily find your way around the close-up operation panel and operate the system.

Contents of the Reference Book
To get to know your Bang & Olufsen product |
How to set up BeoSound 3000 |
|||||||
two guides are at your disposal. |
|
|
|
|||||
|
|
|
|
|
|
|
6 |
Placing your BeoSound 3000 |
The |
|
|
|
|
|
The |
|
|
|
|
|
|
|
|
|
||
Guide |
|
Guide |
|
|
Reference book |
Reference |
|
|
|
|
|
|
|
|
book |
Connect the cables |
|
|
|
|
|
|
|
|
7 |
Aerial |
|
|
|
|
|
|
|
||
The Guide provides information on daily use. |
7 |
Loudspeakers |
||||||
The Reference book gives a thorough overview |
7 |
Auxiliary equipment |
||||||
of all aspects, installation and in-depth |
7 |
BeoLink |
||||||
explanation. |
|
|
|
|
|
7 |
To the mains |
|
To the right, you find the contents of the
Reference book, all the chapters of the Guide How to assemble BeoSound 3000 are listed below:
|
|
8 |
Mount the glass doors |
• |
Your key to BeoSound 3000, 5 |
8 |
Mount the cables |
• |
Operation panel, 5 |
8 |
Mount the cable cover |
•Displays, 5
•CD player, 6
• |
Different ways of playing a CD, 6 |
BeoSound 3000 in an audio/video |
||
• |
Favourite CD tracks only, 7 |
setup |
||
• |
Make series of CD tracks, 7 |
|||
|
|
|||
• |
Delete series of CD tracks, 7 |
9 |
BeoSound 3000 – without speakers – with |
|
• |
Radio, 8 |
|
a video system |
|
• |
Volume, 8 |
9 |
BeoSound 3000 – with speakers – with a |
|
|
|
|
video system |
|
|
|
9 |
BeoSound 3000 in another room |
|
Adjust and set Sound
10 Sound adjustments
10 Survey of sound displays
Set the right time
11 Set the built-in clock
Tune in radio stations
12 Tune in stations
13 Move radio stations
13 Delete radio stations
13 Name radio stations
Make BeoSound 3000 start or stop at a specific time
14 Make a Timer to start or stop automatically
15 Check the Timers
15 Delete a Timer
Daily use of radio and CD player
16 Switch on the radio
16 Adjust volume
16 Switch on the CD player
16 Find tracks on a CD
BeoSound 3000 display indications
17 Understand and change the displays
Play CDs in different ways
18Play tracks in random order
18Repeat a CD
19Repeat a track on a CD
19 Repeat a passage on a CD
19 Scan a CD
Play favourite CD tracks only
20 Select and store a series of tracks
20 Delete a series of tracks
Name your CDs
21 Name your individual CDs
21 See list of CD names
21 Delete CD names and series of tracks
Looking after BeoSound 3000
22 Cleaning BeoSound 3000
22 Handling your CDs
Beo4 remote control operation
23 Use the Beo4 remote control
Use with a video system – transfer sound from system to system
24 A fully integrated Audio/Video setup
24 An Audio/Video integrated setup
Set and enter a PIN code |
|
Key to using this guide |
||
26 |
Enter a PIN code |
|
Use this Key to identify what a button, |
|
26 |
Switch on the PIN code |
|
source or status display looks like in an |
|
27 |
Change the PIN code |
|
instruction sequence. |
|
27 |
Switch off the PIN code |
|
|
|
27 |
Using a Master code |
|
RADIO |
Buttons on the |
|
|
|
||
|
|
|
CD |
BeoSound 3000 |
|
|
|
PLAY |
close-up operation |
|
|
|
A >>> B |
panel or on the |
|
|
|
|
Beo4 remote |
|
|
|
|
control |
|
|
|
|
Lower display on |
|
|
|
CD |
|
|
|
|
EDIT? |
BeoSound 3000 |
|
|
|
|
Displays on Beo4 |
|
|
|
RANDOM |
|
|
|
|
REPEAT |
|
|
|
|
|
|
6
We recommend that you follow this procedure when you set up your BeoSound 3000:
1Place the BeoSound 3000 where you want to use it.
2Set up your speakers and any auxiliary equipment.
3Connect all cables to their sockets on the rear panel of the BeoSound 3000 – remember not to connect it to the mains yet!
4Arrange the cables in the cable cover grooves and attach the cover to the rear of the BeoSound.
5Mount the glass doors.
6Connect the products to the mains.
How to set up BeoSound 3000
Placing your BeoSound 3000…
•Make sure that the BeoSound 3000 is set up, placed and connected, in accordance with the instructions in this guide.
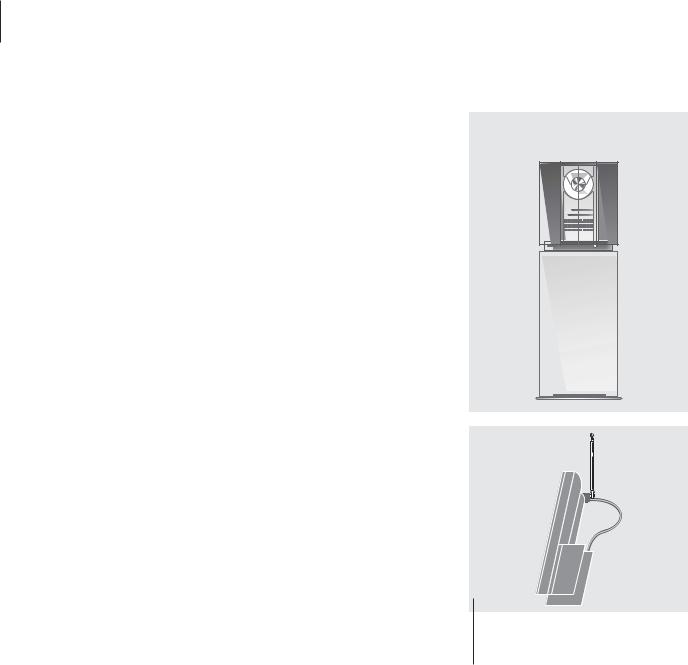
•Place your BeoSound 3000 on a firm surface, preferably on the table, sideboard or stand where you want it placed permanently.
•The BeoSound 3000 is designed for indoor use in dry, domestic environments only, and for use within a temperature range of 10–40º C (50–105º F).
•Avoid placing the system in direct sunlight, near radiators or other sources of heat.
•Allow a space of at least 5cm above and to each side of the BeoSound 3000 for adequate ventilation. Remember to leave enough space at the sides for the glass doors to open.
•If you want to hang the BeoSound 3000 on a wall, make sure that you use the correct size and type of screws and wall plugs for mounting the wall bracket (optional accessory) and the BeoSound. The type of screws and wall plugs will depend on the material and construction of the wall.
•Do not switch on the mains for any products in your system, until after you have connected all the cables (see opposite page, p. 7).
The program list for TV is now called up. It provides you with an overview of all your available TV programs.
If no permanent FM aerial connection is available, an indoor aerial may be hooked onto the clamp on the back of the BeoSound 3000.
You can use your BeoSound 3000 in a stand-alone setup or connected to a Bang & Olufsen video system using the Master Link cable. The Master Link socket on the back of BeoSound 3000 can also be used for BeoLink distribution. The BeoLink system allows you to listen to the BeoSound 3000 in any room you like, via extra speakers*.
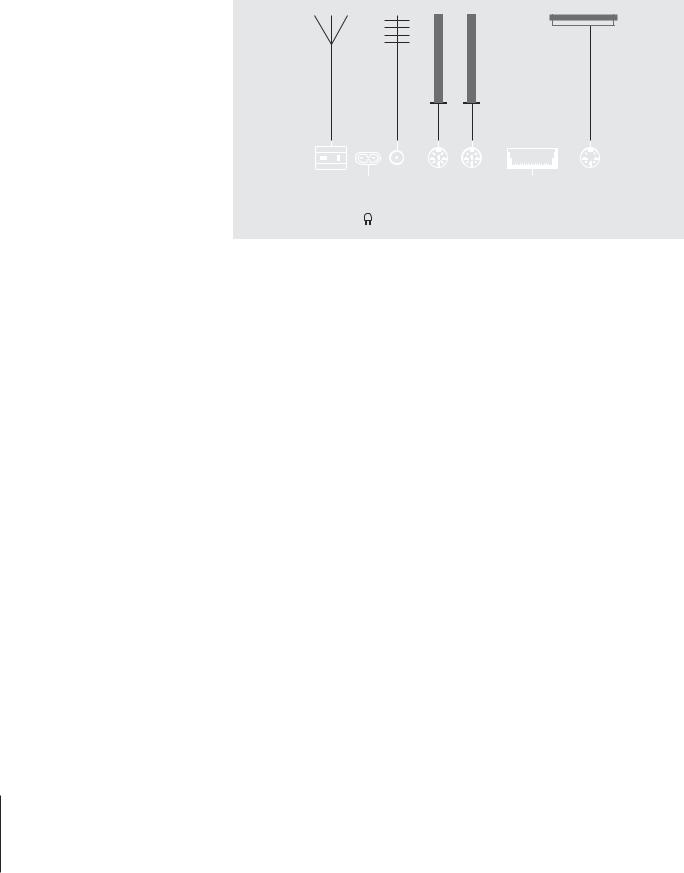
Use the diagram and the graphics imprinted on the socket panel for reference, when locating the sockets.
Please do not connect the BeoSound to the mains until you have finished the setting-up procedure.
Connect the cables |
|
7 |
||
|
||||
|
|
|
|
|
|
|
|
|
|
Auxiliary equipment
AM aerial |
FM aerial |
Loudspeakers
|
|
|
|
|
|
|
|
|
|
|
|
|
|
|
|
|
|
|
|
Mains supply |
BeoLink Connection |
||
|
|
||||
Aerial Auxiliary equipment
Connect your FM aerial to the socket marked FM and your AM aerial, if any, to the socket marked AM.
When using an AM loop aerial, tune in to the radio station you want, then turn the aerial horisontally until you receive the best possible signal.
Loudspeakers
Connect your active speakers to the sockets marked POWER LINK.
You may choose to loop the signals through from speaker to speaker, please refer to the User’s guide for your BeoLab loudspeakers, or you may connect one speaker to each of the two sockets.
Remember to set the L • R • LINE switch on the BeoLab speakers to L and R (left and right), respectively.
Note: If you wish to connect the BeoLab 2500 loudspeakers, please refer to the guide supplied with the speakers
Connect your auxiliary equipment to the socket marked AUX. This socket enables you to use compatible Bang & Olufsen equipment, e.g. an audio tape recorder or a record player. The socket may also accommodate equipment of other makes.
BeoLink connection
The socket marked MASTER LINK should be used when you connect your BeoSound 3000 and a compatible Bang & Olufsen video system.
Mains supply
Plug the mains lead into the socket marked ~, but do not switch on at the mains yet.
*NOTE! Please contact a Bang & Olufsen retailer for further information on the BeoLink system and information on auxiliary equipment.

8
When you have finished the setting up procedure, described on the previous page, you must mount the glass doors and the cable cover.
How to assemble BeoSound 3000
Mount the glass doors
The labels on the back of the glass doors indicate which end should be pointing upwards, and which side of the glass door should point towards the middle of the BeoSound 3000.
•Fasten the two glass doors, one at a time, to the front of the BeoSound 3000 by pressing their fastening points into the corresponding fastening sockets on the BeoSound.
•Press gently on each of the fastening points until you hear a click. The click indicates that the glass doors are mounted properly.
Arrange the cables
Arrange the connector cables in the cable cover as shown to the right. You can fasten the cables with tape to keep them in place before you mount the cable cover to the rear of BeoSound 3000.
Mount the cable cover
Fasten the cover – with the cables attached – to the grill on the BeoSound rear panel:
a Insert the bottom row of pegs into the grill. b Push the top row of pegs into the grill.
c Pull the cable cover upwards until the pegs fit properly with the grill.
Note: Do not plug in the cables before the cable cover is mounted
NOTE! Treat the glass doors with great care. If they are cracked or chipped, or damaged in any other way, they should be replaced immediately as they could otherwise cause bodily harm.
You can order replacement doors through a Bang & Olufsen retailer.
b
c
a
When you have connected your BeoSound 3000 to the mains, you must make sure that it is set up to function with the other products you have connected, if any. This means that you must programme the BeoSound 3000 option. If you have only connected speakers to the BeoSound, you do not have to make this programming.
Audio/video setup |
|
9 |
|
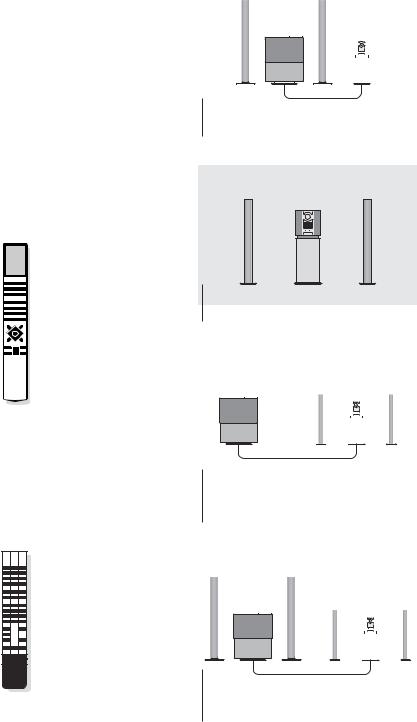
The BeoSound 3000 has three different option settings:
Option 0. Used in a fully integrated Audio/Video system with no speakers connected to the BeoSound 3000. The sound is reproduced through the speakers in the TV, or through speakers connected to the TV.
Option 1. Used when the BeoSound is used on its own or in an Audio/Video integrated setup, with active speakers connected to the BeoSound 3000 (factory setting).
Option 2. Used in a two-room Audio/Video integrated setup.
|
|
|
|
|
Option 2 |
|
|
|
|
Option 0 |
|||||
|
|
|
|
|
|
|
|
|
|||||||
|
|
|
|
|
|
|
|
|
|
|
|
|
|
|
|
|
|
|
|
|
|
|
|
|
|
|
|
|
|
|
|
|
|
|
|
|
|
|
|
|
|
|
|
|
|
|
|
|
|
|
|
|
|
|
|
|
|
|
|
|
|
|
|
|
|
|
|
|
|
|
|
|
|
|
|
|
|
|
|
|
|
|
|
|
|
|
|
|
|
|
|
|
|
|
|
|
|
|
|
|
|
|
|
|
|
|
|
|
|
|
|
A fully integrated Audio/Video system.
The programming is done with a Bang & Olufsen remote control…
Using a Beo4…
Hold the • button down while pressing LIST
Now let go of both buttons
Press LIST until OPTION? is displayed
Press GO
Press LIST once to display A.OPT
When A.OPT is blinking in the Beo4 display… Key in the appropriate number (0, 1 or 2)
Using a Beolink 1000…
Press SOUND
Key in the appropriate number (0, 1 or 2)
Press STORE
Option 1
The BeoSound 3000 as a stand-alone system.
|
Option 1 |
|
Option 1 |
||||||
|
|
|
|
|
|
|
|
|
|
|
|
|
|
|
|
|
|
|
|
|
|
|
|
|
|
|
|
|
|
|
|
|
|
|
|
|
|
|
|
|
|
|
|
|
|
|
|
|
|
|
|
|
|
|
|
|
|
|
|
An Audio/Video integrated system set up in one room.
|
|
|
|
|
Option 2 |
|
|
|
Option 2 |
||||||||
|
|
|
|
|
|
|
|
||||||||||
|
|
|
|
|
|
|
|
|
|
|
|
|
|
|
|
|
|
|
|
|
|
|
|
|
|
|
|
|
|
|
|
|
|
|
|
|
|
|
|
|
|
|
|
|
|
|
|
|
|
|
|
|
|
|
|
|
|
|
|
|
|
|
|
|
|
|
|
|
|
|
|
|
|
|
|
|
|
|
|
|
|
|
|
|
|
|
|
|
|
|
|
|
|
|
|
|
|
|
|
|
|
|
|
|
|
|
|
|
|
|
|
|
|
|
|
|
|
|
|
|
|
|
|
|
|
An Audio/Video integrated system set up in two rooms.

10
All sound levels are set to neutral values from the factory, but you can make your own sound adjustments and store them.
If you store a volume level, BeoSound 3000 will start playing at this level each time you switch it on.
The BeoSound 3000 also features a loudness function which you can activate or deactivate as you like. The loudness function makes the music more dynamic. It compensates for the human ear’s lack of sensitivity to high and low frequencies when listening to low music.
If you do not store the sound adjustments you make, BeoSound 3000 will return to the preset sound levels once you switch it off.
If you only want to adjust volume, simply press the buttons or directly to turn the volume up or down.
Adjust and store sound
Sound adjustments
You can adjust the volume, bass and treble levels or alter the balance between the left and right speakers of the BeoSound. This function enables you to direct the sound emerging from the speakers towards your favourite listening position.
SOUND |
Press SOUND to access |
Displays shown during sound adjustment… |
|
|
the sound adjustment |
|
Volume level |
VOL 28 |
VOL 34 |
||
|
function. VOL and the |
|
Volume can be |
|
current volume level |
|
adjusted in steps of |
|
appears |
|
two within a range of |
|
|
|
00 to 72 |
▲Use to raise or lower
▼the sound levels
PLAY |
Press PLAY repeatedly |
|
to display the different |
BAL >< |
|
|
sound displays, e.g. |
|
BAL >< |
ss tt |
Use to adjust balance |
PLAY |
Press PLAY repeatedly |
|
until STORE ? appears |
STORE ? |
|
STORE |
Press STORE to store |
|
the current sound |
STORED |
|
|
levels. STORED appears |
Note: The buttons STORE and PLAY can be used interchangeably to accept what is shown in the display. However, STORE acts as a short cut, skipping intermediate levels and stores your settings directly.
BAL ><
BASS 0
TREB 0
LOUD ON
Balance setting
Balance can be adjusted within a range of 7 to either side
Bass level
Bass can be adjusted within a range of -5 to +5
Treble level
Treble can be adjusted within a range of -5 to +5
Loudness setting
Indicates if loudness is switched on or off
NOTE! When BeoSound 3000 is used in a fully integrated Bang & Olufsen Audio/Video system, sound must be adjusted as described in the guide for the video system. When you press the SOUND button, the display will read USE TV.
Loading...