


 Loading...
Service Source
MacBook (13-inch Late 2007)
MacBook (13-inch Late 2007), MacBook (13-inch Early 2008), MacBook (13-inch Late 2008)
Updated 2010-07-12
© 2007, 2008 Apple Inc. All rights reserved.

Apple Inc.
© 2007, 2008 Apple Inc. All rights reserved.
Under the copyright laws, this document may not be copied, in whole or in part, without the written consent of Apple.
Every effort has been made to ensure that the information in this document is accurate. Apple is not responsible for printing or clerical errors.
Apple
1 Infinite Loop Cupertino, CA 95014-2084 USA
+ 1 408 996 1010 www.apple.com
Apple, the Apple logo, Mac, and MacBook are trademarks of Apple Inc., registered in the U.S. and other countries.
ii

MacBook (13-inch Late 2007)
Contents
Take Apart
Manual Updates 9 |
|
|
Version 8 updated 12 July 2010 |
9 |
|
Version 7 updated 14 May 2010 |
9 |
|
Version 6 updated 28 April 2010 |
9 |
|
Version 5 updated 2 September 2009 |
9 |
|
Version 4 updated 24 July 2009 |
10 |
|
Version 3 updated 25 April 2008 |
10 |
|
Version 2 updated 26 February 2008 |
10 |
|
Version 1 updated 14 November 2007 |
10 |
|
General Information |
12 |
|
What’s New 12 |
|
|
Product Configurations 13 |
|
|
Identifying Feature |
14 |
|
Cable Connector Names on Logic Board 15 |
||
JST Connectors 16 |
|
|
New Keyboard and Function Keys |
17 |
|
Keycap Replacement 17 |
|
|
Foam Sponges on the Logic Board |
18 |
|
Logic Board Spring |
18 |
|
Tools 19 |
|
|
Temperature Concerns 19 |
|
|
Note About Images in This Manual |
19 |
|
Serial Number Location 19 |
|
|
Transferring the Serial Number 19 |
|
|
Simplified Flowchart for Removing Modules 20
Battery 21
RAM Door (L-Bracket) 24
Memory (DIMMs) 28
Removal Procedure 29
Replacement Procedure 30
Removing a Stuck Memory Card 32
iii

Hard Drive |
33 |
|
|
|
|
|
Top Case (with Keyboard) 37 |
|
|
||||
Top Case/Display Bezel Kit: White Only |
47 |
|||||
New Kit Available in July 2010 |
47 |
|
|
|||
Before Ordering Parts 47 |
|
|
|
|||
Note About International Parts |
47 |
|
|
|||
Trackpad Cable 48 |
|
|
|
|
||
Hard Drive Snubbers, Front and Rear |
53 |
|
||||
AirPort Extreme Card |
56 |
|
|
|
||
MagSafe DC-In Board |
59 |
|
|
|
||
Left Speaker |
63 |
|
|
|
|
|
I/O Frame (with upper EMI shield) 66 |
|
|||||
Battery Connector with Sleep Switch |
69 |
|
||||
Hard Drive Connector |
73 |
|
|
|
||
Fan 79 |
|
|
|
|
|
|
Heatsink |
82 |
|
|
|
|
|
Checking the Thermal Grease |
85 |
|
|
|||
Bluetooth Holder 88 |
|
|
|
|
||
Optical Drive |
92 |
|
|
|
|
|
Handling Slot-Load Optical Drives 99 |
|
|
||||
Removing a Stuck Disc from an Optical Drive |
103 |
|||||
Optical Drive Cable 105 |
|
|
|
|||
Backup Battery 109 |
|
|
|
|
||
Bluetooth Antenna Board and Cable |
113 |
|
||||
Bluetooth Board 117 |
|
|
|
|
||
Bluetooth-to-Logic-Board Cable 120 |
|
|||||
Subwoofer with Right Speaker Cable |
124 |
|||||
Midframe |
126 |
|
|
|
|
|
Logic Board |
129 |
|
|
|
|
|
Display Bezel |
137 |
|
|
|
|
|
iv

Removal Procedure 138
Replacement Procedure 141
Bezel Mounting Clips |
144 |
|
|
|||||
Removal Procedure |
145 |
|
|
|
||||
Replacement Procedure |
146 |
|
|
|||||
Spacers at Bezel Scoops |
148 |
|
|
|||||
Shims at Display Bezel Scoops |
150 |
|||||||
Clutch Block, Left |
153 |
|
|
|
||||
Clutch Block, Right |
157 |
|
|
|||||
Clutch Caps |
161 |
|
|
|
|
|
|
|
(Refer to“Clutch Block, Left”and“Clutch Block, Right”) 161 |
||||||||
Display Module |
162 |
|
|
|
|
|||
Bottom Case |
|
168 |
|
|
|
|
|
|
Clutch Cover |
171 |
|
|
|
|
|
||
Bezel Scoops, Left and Right |
177 |
|||||||
LCD Panel |
180 |
|
|
|
|
|
|
|
Antenna Receptors and Cables, Top and Left 186 |
||||||||
LCD Panel Assembly |
191 |
|
|
|||||
Removal Procedure |
193 |
|
|
|
||||
Reinstallation Procedure |
197 |
|
|
|||||
Spacers at Camera Bracket 205 |
|
|||||||
Camera Assembly |
207 |
|
|
|
||||
LVDS Cable with USB Line |
213 |
|||||||
Microphone Cable |
220 |
|
|
|
||||
Inverter Board |
227 |
|
|
|
|
|||
Inverter Cable |
230 |
|
|
|
|
|
||
Display Hinges, Left and Right |
233 |
|||||||
Bezel Brace, Left |
236 |
|
|
|
|
|||
Bezel Brace, Right |
238 |
|
|
|
||||
Sleep Magnet |
242 |
|
|
|
|
|
||
v

Display Magnet Pairs 245
Display Rear Housing 249
Additional Procedures
General Information 253
Notes on Replacing Keycaps 253
Keycap Replacement 253
Replacing Darfon Keycaps 254
Preliminary Steps 254
Part Location 254
Procedure 255
Replacing Sunrex Keycaps 270
Preliminary Steps 270
Part Location 270
Procedure 272
Troubleshooting
General Information |
275 |
|
||
Troubleshooting Aids and Tips |
276 |
|||
MacBook Firmware Updates 277 |
||||
Software Troubleshooting Tips and Tools 278 |
||||
Application compatibility 279 |
|
|||
Universal binary |
279 |
|
|
|
Rosetta 280 |
|
|
|
|
Troubleshooting Steps |
281 |
|
||
Symptom Charts |
284 |
|
|
|
How to Use the Symptom Charts 284 |
||||
AirPort 284 |
|
|
|
|
Temperature Issue |
285 |
|
|
|
Memory 286 |
|
|
|
|
Power, Battery, or Startup Issue |
287 |
|||
Power-On Self Test (POST) Error Codes 294 |
||||
Optical Drive 294 |
|
|
|
|
Keyboard and Trackpad |
296 |
|
||
USB / FireWire Ports |
297 |
|
||
Video 298 |
|
|
|
|
Sound Output |
300 |
|
|
|
Applications 301
vi

Block Diagram 303
Views
External and Internal Views |
306 |
|
||
Front:Keyboard and IR Window 306 |
|
|||
Back:Air Vents and Display Clutch |
307 |
|
||
Left Side:Ports |
307 |
|
|
|
Right Side:Slot Drive 307 |
|
|
|
|
Battery Bay:Memory Card Levers and Hard Drive Pull Tab 308 |
||||
Top Case Removed:Main Modules and Cable Routing |
308 |
|||
Screw Charts 313 |
|
|
|
|
Top Case Screw Locations 313 |
|
|
||
Display Module Screw Locations |
314 |
|
||
Logic Board Screw Locations |
315 |
|
|
|
LCD Panel Screw Locations 316 |
|
|
||
Screw Reference Chart, Part 1 of 3 |
317 |
|
||
Screw Reference Chart, Part 2 of 3 |
318 |
|
||
Screw Reference Chart, Part 3 of 3 |
319 |
|
||
Exploded Views |
320 |
|
|
|
MacBook (13-inch Late 2007)—Display Exploded View |
320 |
|||
MacBook (13-inch Late 2007)—Main Exploded View 321 |
|
MacBook (13-inch Early 2008) and MacBook (13-inch Late 2008) |
—Display Exploded |
View 322 |
|
MacBook (13-inch Early 2008) and MacBook (13-inch Late 2008) |
—Main Exploded View 323 |
vii

Service Source
Take Apart
MacBook (13-inch Late 2007)
© 2007 Apple Inc. All rights reserved.

 Manual Updates
Version 8 updated 12 July 2010
Take Apart:
•Top Case/Display Bezel Kit:White Only:Added new topic describing how to order a kit containing a white top case and a white display bezel
Views:
•Exploded Views:Updated top case and display bezel part numbers
Version 7 updated 14 May 2010
Take Apart:
General Information:Keycap Replacement:Added section about new keycap kit
Additional Procedures:
General Information:Keycap Replacement:Added section about new keycap kit
Troubleshooting:
•Symptom Charts:Keyboard and Trackpad:Keycap damaged or sticking:Added steps for keycap kit reference and top case troubleshooting
•Symptom Charts:Keyboard and Trackpad:Added new symptom“Built-in keyboard does not work properly”
Version 6 updated 28 April 2010
Take Apart:
Hard Drive:Added note about placement of shoulder screws
Version 5 updated 2 September 2009
Take Apart:
General Information:Added MacBook (13-inch Late 2008) model to What’s New, Product Configurations, and Identifying Feature sections
MacBook (13-inch Late 2007) Take Apart — Manual Updates 9

Views
Added MacBook (13-inch Late 2008) model to exploded view for MacBook (13-inch Early 2008)
Version 4 updated 24 July 2009
Take Apart:
•Top Case:Added Replacement Warning and image to show placement of shims near hard drive to prevent top case cracks
Version 3 updated 25 April 2008
Troubleshooting:
•Revised battery symptoms
•Added display symptom
Version 2 updated 26 February 2008
To add a new model, the manual was updated with the following changes:
Take Apart:
•Revised“Manual Updates”section
•General Information:Added Product Configurations table and revised Identifying Feature section to add the MacBook (13-inch Early 2008) model; added section“Transferring the Serial Number”
Views
Added exploded views for MacBook (13-inch Early 2008)
Version 1 updated 14 November 2007
The MacBook (13-inch Late 2007) manual was updated with the following changes:
Take Apart:
•Added new“Manual Updates”section
•General Information:Added Simplified Flowchart for Removing Modules
•General Information:JST Connectors:Added reminder about using Acrobat to open the manual and view the movie
•Top Case:Revised step 8 with new screw lengths in battery bay
•Hard Drive Snubbers:Added new images and steps
•Optical Drive:Revised steps 4 and 5 for easier access to the optical drive mounting bracket and screw
•Bluetooth Antenna Board and Cable:Revised step 1 with solder joint caution
•Shims at Display Bezel Scoops:Added new images and steps
•Display Module:Replaced images for steps 1 and 5
MacBook (13-inch Late 2007) Take Apart — Manual Updates 10
Troubleshooting
•Troubleshooting Steps:Removed icons from left column
•Symptom Charts:How to Use the Symptom Charts:Updated wording for clarity
•Block Diagram:Replaced existing diagram with all-new version
Manual introduced 1 November 2007
MacBook (13-inch Late 2007) Take Apart — Manual Updates 11
 General Information
What’s New
The MacBook (13-inch Late 2007), MacBook (13-inch Early 2008), and MacBook (13-inch Late 2008) portable computers have an 800 MHz frontside bus, up to 4 GB of memory, and faster processors. The main features and service differences from the previous MacBook model include:
•Mac OS X version 10.5 Leopard
•Keyboard layout includes function keys for Exposé, Dashboard, and media playback
•Reduced weight to 5.0 pounds
•Redesigned rear vents for improved thermal management and ease of identification
•Cable connector names are printed on the logic board
•Vertical-connect JST connectors on the logic board
•Backup battery located on bottom case rather than underside of logic board
•High-power USB port
•Captive bezel clips at slot-load optical drive
•Shims at display bezel scoops
MacBook (13-inch Late 2007) Take Apart — General Information 12

Product Configurations
Although the MacBook models included in this manual offer different configurations, the models are functionally and physically the same except where noted.
The following table shows the MacBook (13-inch Late 2007) model configurations at introduction:
Feature |
Good (Z62) |
Better (Z63) |
Best (Z64) |
|
Intel Core 2 Duo |
2.0 GHz |
2.2 GHz |
2.2 GHz |
|
processor |
|
|
|
|
Memory |
1 GB (2 x 512 MB) |
1 GB (2 x 512 MB); |
1 |
GB (2 x 512 MB); |
|
|
2 GB (2 x 1 GB) |
2 |
GB (2 x 1 GB); |
|
|
|
4 |
GB (2 x 2 GB) |
Hard Drive, Serial ATA |
80 GB |
120 GB |
160 GB |
|
100 5400 rpm |
|
|
|
|
Optical Drive |
Combo, 9.5 mm |
Super, 9.5 mm |
Super, 9.5 mm |
|
Housing |
White |
White |
Black |
|
Display |
13.3-inch, 1280x800, 114 dpi, Low Reflection Glossy Polarizer |
|||
|
(LRGP) |
|
|
|
Battery |
55-Whr Lithium Polymer |
|
|
|
Power Adapter |
60 W MagSafe MPM |
|
|
|
The following table shows the MacBook (13-inch Early 2008) model configurations at introduction:
Feature |
Good (Z0FJ) |
Better (Z0FK) |
Best (Z0FL) |
Intel Core 2 Duo |
2.1 GHz |
2.4 GHz |
2.4 GHz |
processor |
|
|
|
Memory |
1 GB (2 x 512 MB) |
2 GB (2 x 1 GB) |
2 GB (2 x 1 GB)) |
Hard Drive, Serial ATA |
120 GB |
160 GB |
250 GB |
100 5400 rpm |
|
|
|
Optical Drive |
Combo, 9.5 mm |
Super, 9.5 mm |
Super, 9.5 mm |
Housing |
White |
White |
Black |
|
|
|
|
Display |
13.3-inch, 1280x800, 114 dpi, Low Reflection Glossy Polarizer |
||
|
(LRGP) |
|
|
Battery |
55-Whr Lithium Polymer |
|
|
|
|
|
|
Power Adapter |
60 W MagSafe MPM |
|
|
|
|
|
|
MacBook (13-inch Late 2007) Take Apart — General Information 13

This table shows the MacBook (13-inch Late 2008) model configuration at introduction:
Feature |
|
Intel Core 2 Duo |
2.1 GHz |
processor |
|
Memory |
1 GB (2 x 512 MB) |
Hard Drive, Serial ATA |
120 GB |
100 5400 rpm |
|
Optical Drive |
Super, 9.5 mm |
Housing |
White |
|
|
Display |
13.3-inch, 1280x800, 114 dpi, Low Reflection Glossy |
|
Polarizer (LRGP) |
Battery |
55-Whr Lithium Polymer |
|
|
Power Adapter |
60 W MagSafe MPM |
Identifying Feature
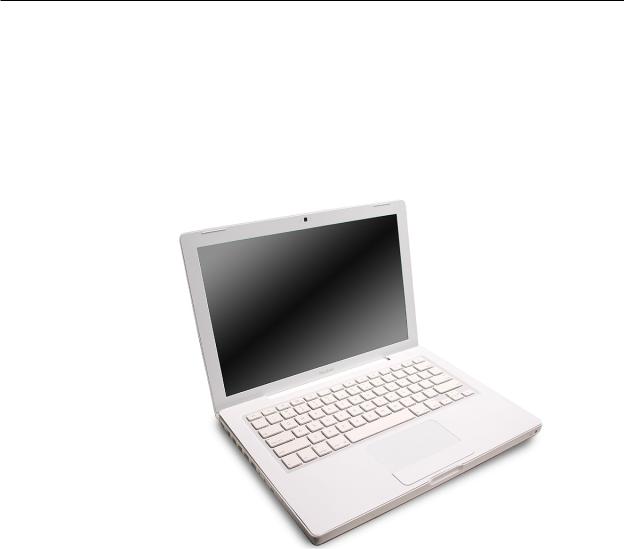
There are no recognizable visual differences between the MacBook (13-inch Late 2007), MacBook (13-inch Early 2008), and MacBook (13-inch Late 2008) models.
To distinguish these models from the previous MacBook model, refer to the shape of the vents on the back of the computer.The newer models have five long horizontal vents on the bottom case under the display clutch cover.
MacBook (13-inch Late 2007), MacBook (13-inch Early 2008), and MacBook (13-inch Late 2008):
Conversely, the previous MacBook model had multiple short vertical vents on the bottom case under the display clutch cover.
Previous Model, MacBook (13-inch Mid 2007):
MacBook (13-inch Late 2007) Take Apart — General Information 14
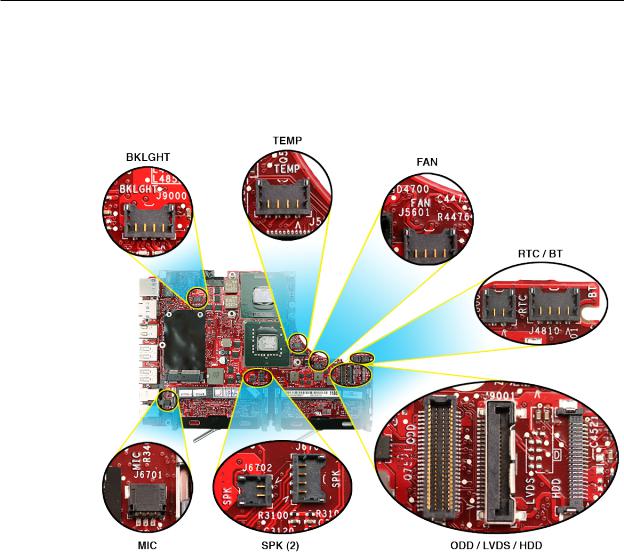
Cable Connector Names on Logic Board
To aid servicing the computer, the logic board now includes abbreviated names for the main connectors. Refer to the image and explanation below:
BKLGHT = Inverter cable for backlight
TEMP = Heatsink thermistor cable
FAN = Fan cable
RTC = Backup battery cable
BT = Bluetooth cable
ODD = Optical drive flex cable
LVDS = LVDS display cable
HDD = Hard drive cable
SPK = Left speaker cable
SPK = Right speaker cable and subwoofer
MIC = Microphone cable
MacBook (13-inch Late 2007) Take Apart — General Information 15

JST Connectors
Most of the cable connectors on the logic board use a JST design that requires special vertical insertion and extraction. Refer to the brief movie in the sidebar for a visual demonstration. Note: To view the movie, make sure the manual is opened in Acrobat.
Caution: To prevent damage to the connectors, remove and install them from a completely level position.
•To disconnect them, use a black stick and your finger to help support the cables and keep the connectors level.
•To connect the cables and avoid damage to the sensitive contacts in the JST connectors, make sure the mated parts are completely aligned, level, and flush to each other before applying pressure.Then use your finger or a black stick to press them straight down into place.
MacBook (13-inch Late 2007) Take Apart — General Information 16

New Keyboard and Function Keys
New images on the function keys include Exposé and Dashboard. Refer to the following table for function key explanations:
Function Key |
Feature |
F1, F2 |
Decrease or increase the display brightness |
F3 |
Exposé allows quick access to all open windows |
F4 |
Dashboard allows access to widgets |
F5, F6 |
Programmable keys |
F7–F9 |
Media controls for rewind, play, or fast forward |
F10 |
Mute the sound coming from the speakers or headphone port |
F11, F12 |
Decrease or increase volume from speakers or headphone port |
Keycap Replacement
Service packages of 78 replacement keycaps are now available in the U.S. and Canada (U.S. version keyboard only) for designated MacBook and MacBook Pro computers.The packages allow you to replace individual keycaps rather than the entire top case.
There are four different keycap packages, based on the color of the key and the type of keyboard (version D and S).
Part number |
Key color |
Keyboard |
922-9277 |
Black |
Version D |
922-9279 |
Black |
Version S |
922-9278 |
White |
Version D |
922-9280 |
White |
Version S |
|
|
|
For step-by-step instructions, refer to the relevant support article:“MacBook/MacBook Pro: Black Keycap Replacement”(HT4002) or “MacBook:White Keycap Replacement”(HT4003).
For an overview of the differences among keycap procedures, refer to “MacBook/MacBook Pro: Keycap Replacement Matrix”(HT4001).
MacBook (13-inch Late 2007) Take Apart — General Information 17

Foam Sponges on the Logic Board
The logic board has two foam sponges:one covering the inverter connector above the AirPort Extreme Card, and one covering the thermistor connector next to the heatsink.The foam sponges have a light adhesive on one side that keep them in place.While they can be removed for service, they must be reinstalled.
Caution: When servicing the computer and before replacing the top case, make sure these two foam sponges are undamaged and in place.
Logic Board Spring
Caution: When servicing the computer, be especially careful when working near the spring on the logic board, located just above the AirPort Extreme Card. Although the spring is flexible, it can be inadvertently torn, bent, or broken if a cable gets caught on it. A logic board might be considered unusable with a damaged spring. Check the structural integrity of the spring before installing the top case and completing a repair.
MacBook (13-inch Late 2007) Take Apart — General Information 18

Tools
Caution: To prevent scratches or other cosmetic damage to the computer housing, use a soft cloth as a protective layer when removing and installing the external screws.
The tools required to service this computer include:
•Clean, soft, lint-free cloth
•Coin
•ESD wrist strap and mat
•Magnetic Phillips #0 screwdriver
•Magnetic Phillips #00 screwdriver (preferably with a long handle)
•Black stick (Apple probe tool, part number 922-5065) or other nonconductive nylon or plastic flatblade tool
•Access card (Apple part number 922-7172) to open the top case
•Jeweler’s flatblade screwdriver
•Needlenose pliers
•Stack of books, weighted boxes, or other means of support for display while removing screws from hinge
•Thermal grease (Apple thermal compound syringe, part number 922-7144)
•Alcohol wipes
•Permanent marking, felt-tip pen
•Standard size CD or DVD disc
•Flashlight or bright lamp
Temperature Concerns
The normal operating temperature of this computer is well within national and international safety standards. Nevertheless, customers may be concerned about the generated heat.To prevent an unneeded repair, you can compare a customer’s computer to a running model, if available, at your repair site. For more information on temperature concerns and customer perception, refer to Knowledge Base article 30612“Apple Portables:Operating Temperature.”
http://docs.info.apple.com/article.html?artnum=30612
Note About Images in This Manual
Because a pre-production model was used for most of the images shown in this manual, you may notice small differences in appearance between the image pictured and the computer you are servicing. However, although the appearance may differ, the steps and sequence are the same unless noted.
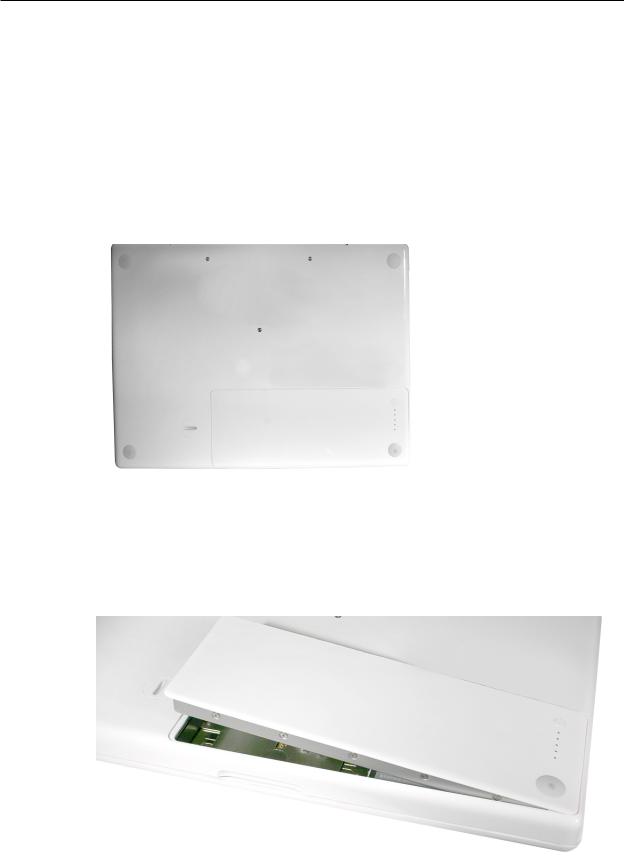
Serial Number Location
The computer serial number is located in the battery bay, as shown below.You can also find the serial number by opening the Applications folder and selecting Utilities/System Profiler/
MacBook (13-inch Late 2007) Take Apart — General Information 19

Hardware. Or from the Apple menu, select About This Mac, and click the version number below the words“Mac OS X”to cycle among the version number, build number, and serial number.
Transferring the Serial Number
When replacing a top case, retain the customer’s top case until the repair is complete. Before installing the replacement top case, transfer the serial number from the original top case to the replacement.
Caution: It is imperative that you copy the correct alphanumeric characters. Keep in mind that Apple serial numbers use the numbers 1 and 0 instead of the Roman letters“I”and“O.”
1.Locate the blank space for the serial number on the battery-bay area of the replacement top case.
2.On the inside surface of the replacement top case, use a fine-tip permanent marker to write the original serial number clearly and legibly in uppercase box letters.
MacBook (13-inch Late 2007) Take Apart — General Information 19
Simplified Flowchart for Removing Modules
Although this flowchart does not include every serviceable part, you can use it as a reference after becoming familiar with the detailed removal procedures.
|
|
|
|
Remove |
|
|
|
|
|
|
|
|
|
|
|
|
|
|
|
|
|
|
|
|
||||||
|
|
|
|
Battery |
|
|
|
|
|
|
|
|
|
|
|
|
|
|
|
|
|
|
|
|
||||||
|
|
|
|
|
|
|
|
|
|
|
|
|
|
|
|
|
|
|
|
|
|
|
|
|
|
|
|
|
|
|
|
|
|
|
Remove RAM |
|
|
|
|
|
|
|
|
|
|
|
|
|
|
|
|
|
|
|
|
|
|||||
|
|
|
|
|
Door |
|
|
|
|
|
|
|
|
|
|
|
|
|
|
|
|
|
|
|
|
|
||||
|
|
|
|
|
|
|
|
|
|
|
|
|
|
|
|
|
|
|
|
|
|
|
|
|
|
|
|
|
|
|
|
|
|
|
|
|
|
|
|
|
|
|
|
|
|
|
|
|
|
|
|
|
|
|
|
|
|
|
|
|
|
|
|
|
|
|
|
|
|
|
|
|
|
|
|
|
|
|
|
|
|
|
|
|
|
|
|
|
|
|
|
|
|
|
Remove 2 |
|
|
|
Remove Hard |
|
|
|
|
|
|
|
|
|
|
|
|
|
|
||||||||||
|
|
RAM Cards |
|
|
|
|
Drive |
|
|
|
|
|
|
|
|
|
|
|
|
|
|
|||||||||
|
|
|
|
|
|
|
|
|
|
|
|
|
|
|
|
|
|
|
|
|
|
|
|
|
|
|
|
|
||
|
|
|
|
|
|
|
|
|
|
|
|
|
|
|
|
|
|
|
|
|
|
|
|
|
|
|
|
|||
|
|
|
|
Remove |
|
|
|
|
|
|
|
|
|
|
|
|
|
|
|
|
|
|
|
|
|
|||||
|
|
|
|
Top Case |
|
|
|
|
|
|
|
|
|
|
|
|
|
|
|
|
|
|
|
|
|
|||||
|
|
|
|
|
|
|
|
|
|
|
|
|
|
|
|
|
|
|
|
|
|
|
|
|
|
|
|
|
||
|
|
|
|
|
|
|
|
|
|
|
|
|
|
|
|
|
|
|
|
|
|
|
|
|
|
|
|
|
||
Remove |
|
|
|
|
|
|
|
|
|
|
|
|
|
|
|
|
Remove |
|
|
Remove Optical |
||||||||||
Trackpad Cable |
|
|
|
|
|
|
|
|
|
|
|
|
|
|
|
Optical Drive |
|
|
Drive Cable |
|||||||||||
|
|
|
|
|
|
|
|
|
|
|
|
|
|
|
|
|
|
|
|
|
|
|
|
|
|
|
|
|
|
|
|
|
|
|
|
|
|
|
|
|
|
|
|
|
|
|
|
|
|
|
|
|
|
|
|
|
|
|
|
|
|
|
|
|
|
|
|
|
|
|
|
|
|
|
|
|
|
|
|
|
|
|
|
|
|
|
|
|
Remove |
|
||
|
|
|
|
Remove AirPort |
|
|
|
Remove |
|
|
|
|
|
Backup Battery |
|
|||||||||||||||
|
|
|
|
Extreme Card |
|
|
|
Clutch |
|
|
|
|
|
|
|
|
|
|
|
|
|
|||||||||
|
|
|
|
|
|
|
|
|
|
|
|
|
|
|
|
|
|
|
||||||||||||
|
|
|
|
|
|
|
|
|
|
|
|
|
|
Blocks |
|
|
|
|
|
|
|
|
|
|
|
|
|
|||
|
|
|
|
|
|
|
|
|
|
|
|
|
|
|
|
|
|
|
|
|
|
|
|
|
|
|
Remove |
|
|
|
|
|
|
|
|
|
|
|
|
|
|
|
|
|
|
|
|
|
|
|
|
|
|
|
|
|
|
Bluetooth |
|
||
|
|
|
|
Remove MagSafe |
|
|
|
|
|
|
|
|
|
|
|
|
|
|
||||||||||||
|
|
|
|
|
|
|
|
|
|
|
|
|
|
|
|
|
|
|
|
|
|
|
|
|||||||
|
|
|
|
DC-In Board |
|
|
|
Remove |
|
|
|
|
|
|
|
|
|
|
|
|
|
|||||||||
|
|
|
|
|
|
|
|
|
|
|
|
|
|
Display |
|
|
|
|
|
|
|
Remove |
|
|||||||
|
|
|
|
|
|
|
|
|
|
|
|
|
|
|
|
|
|
|
|
|||||||||||
|
|
|
|
|
|
|
|
|
|
|
|
|
|
Bezel |
|
|
|
|
|
|
Subwoofer with |
|
||||||||
|
|
|
|
Remove |
|
|
|
|
|
|
|
|
|
|
|
|
|
|
|
Right Speaker |
|
|
|
|||||||
|
|
|
|
Left Speaker |
|
|
|
|
|
|
A |
|
|
|
|
|
|
|
|
|
|
|
|
|
||||||
|
|
|
|
|
|
|
|
|
|
|
|
|
|
|
|
|
|
|
|
|
|
|
|
|
|
|
|
|||
|
|
|
|
|
|
|
|
|
|
|
|
|
|
|
|
|
|
|
|
|
|
|
|
|
|
|||||
Remove Battery |
|
|
|
|
|
|
|
|
|
|
|
|
|
|
|
|
|
|
|
|
|
|
|
|
|
|
|
|
||
Remove |
|
|
|
|
|
|
|
|
|
|
|
|
|
|
|
|
|
|
|
|
|
|
|
|||||||
Connector with |
|
|
|
|
|
|
|
|
|
|
|
|
|
|
|
|
|
|
|
|
|
|
|
|||||||
|
I/O Frame |
|
|
|
|
|
|
|
|
|
|
|
|
|
|
|
|
|
|
|
|
|
|
|
||||||
Sleep Switch |
|
|
|
|
|
|
|
|
|
|
|
|
Remove |
|
|
|
|
|
|
|||||||||||
|
|
|
|
|
|
|
|
|
|
|
|
|
|
|
|
|
|
|
|
|
||||||||||
|
|
|
|
|
|
|
|
|
|
|
|
|
|
|
|
|
|
Midframe |
|
|
|
|
|
|
||||||
|
|
|
|
|
|
|
|
|
|
|
|
|
|
|
|
|
|
|
|
|
|
|
|
|||||||
|
|
|
|
Remove |
Fan |
|
|
|
|
|
|
|
|
|
|
|
|
|
|
|
|
|
|
|
|
|
|
|||
|
|
|
|
|
|
|
|
|
|
|
|
|
|
|
|
|
|
|
|
|
|
|
|
|
|
|
|
|
|
|
|
|
|
|
|
|
|
|
|
|
|
|
|
|
|
|
|
|
|
|
|
|
|
|
|
|
|
|
|
|
|
A
Remove Display Module
Remove Clutch Cover
Remove Spacers
at Bezel Scoops
Remove Bezel
Scoops
Remove
Inverter Board
Remove LCD
Panel Assembly
Remove
Heatsink
Remove
Logic Board
MacBook (13-inch Late 2007) Take Apart — General Information 20

 Battery
Tools
•Clean, soft, lint-free cloth
•Coin
Part Location
Preliminary Steps
Warning: Always shut down the computer before opening it to avoid damaging the internal components or causing injury. After you shut down the computer, the internal components can be very hot. Let the computer cool down for 30 minutes before continuing.
MacBook (13-inch Late 2007) Take Apart — Battery 21
Procedure
1.Shut down the computer.
2.Wait 30 minutes to allow the computer’s internal components to cool.
3.Unplug all external cables from the computer except the power cord.
4.Unplug the power cord.
5.Put on an ESD wrist strap.
6.Turn over the computer and place it on a soft cloth.
7.Use a coin to release the battery latch.Turn the coin a quarter turn clockwise to unlock the battery.
Caution: To prevent scratches or other cosmetic damage to the bottom case, use only a coin to unlock and lock the battery.
8.Lift out the battery from the battery bay.
MacBook (13-inch Late 2007) Take Apart — Battery 22

9.To install the replacement battery, tilt the foot end of the battery into the battery bay first. Then press and hold down the other end of the battery as you turn the coin to lock it into place.
10. Reassemble and test the computer.
MacBook (13-inch Late 2007) Take Apart — Battery 23

 RAM Door (L-Bracket)
Tools
•Soft cloth
•ESD wrist strap and mat
•Magnetic Phillips #0 screwdriver
•Black stick (Apple part no. 922-5065) or other nonconductive nylon or plastic flatblade tool
Preliminary Steps
Before you begin, remove the battery.
Part Location
MacBook (13-inch Late 2007) Take Apart — RAM Door 24

Procedure
1.With the computer closed and upside down on a soft cloth, touch a metal surface inside the battery bay to discharge any static electricity.
2.Loosen—but do not try to remove—the three captive screws along the RAM door.
MacBook (13-inch Late 2007) Take Apart — RAM Door 25

3.Holding the long end of the L-shaped RAM door, pivot it out from the battery bay. (If necessary, use a black stick to tilt it up and out of the battery bay.) Be careful not to bend it.
Replacement Note: Before replacing the RAM door, make sure that
•Hard drive pull tab is not exposed
•Cards are fully inserted
•Memory card levers are fully down before replacing the RAM door
Replacement Note: Check that the replacement RAM door has a rubber cushion to protect the hard drive opening and two EMI gaskets to protect the memory card openings.
MacBook (13-inch Late 2007) Take Apart — RAM Door 26

4.Replacement Note: Install the replacement RAM door by first aligning the short end at the notch near the hard drive opening.
Replacement Note: Use a black stick, if necessary, to tuck in the EMI gaskets so they do not protrude from the edge of the battery bay. Make sure the three screws align with the holes in the bottom case before tightening them.
5.Reassemble and test the computer.
MacBook (13-inch Late 2007) Take Apart — RAM Door 27

 Memory (DIMMs)
This computer comes with a minimum of 1 GB of 667 GHz Double Data Rate 2 (DDR2) Synchronous Dynamic Random-Access Memory (SDRAM) installed. It has two slots that can accept SDRAM Small Outline Dual Inline Memory Modules (SO-DIMMs).The slots are side-by-side on the logic board behind the RAM door. For best performance, memory should be installed
as pairs with an equal memory card in each slot.The maximum amount of memory for this computer is 4 GB, with 2 GB DIMM installed in each slot.
Memory cards must meet these requirements:
•1.25 inch or smaller
•512 MB, 1 GB, or 2 GB
•200-pin
•PC-5300 DDR2 667 MHz Type RAM
Tools
•ESD wrist strap and mat
Preliminary Steps
Before you begin, remove
•Battery
•RAM door
Part Location
MacBook (13-inch Late 2007) Take Apart — Memory 28

Removal Procedure
1.Touch a metal surface inside the battery bay to discharge any static electricity.
2.Put on an ESD wrist strap.
3.In one swift motion, use one finger to move the lever to the left and release it.This swift motion ejects the memory card.
Caution: The memory card eject levers are on a spring hinge that operates on a side-to- side horizontal plane.The mechanism can be damaged if the lever is forced outside of that horizontal movement.To prevent damage to a lever, move it swiftly—in one sideways direction only.
Note: Unlike previous MacBook models that allowed you to replace damaged or malfunctioning DIMM levers with a part kit, you may need to replace the logic board.
If the lever is stuck in a completely closed position (recessed underneath the bottom case), use a wooden pencil or black stick to gently pry it out, as shown below.
MacBook (13-inch Late 2007) Take Apart — Memory 29
Loading...