


 Loading...
Xerox ApeosPort-II 3000, ApeosPort-II 4000, ApeosPort-II 5010, DocuCentre-II 4000, DocuCentre-II 5101 Network Administrator Guide
ApeosPort-II 5010/4000/3000
DocuCentre-II 5010/4000
Network Administrator Guide

Microsoft, Windows, Windows NT, Windows Server, Windows Vista, and Microsoft Network are trademarks or registered trademarks of Microsoft Corporation in the U.S. and other countries.
Novell, NetWare, and NDS are registered trademarks of Novell, Inc. in the United States. and other countries.
Adobe, PostScript, and Adobe PostScript 3 are trademarks of Adobe Systems Incorporated. EtherTalk, Macintosh, and Mac OS are registered trademarks of Apple Computer, Inc.
Intel is a trademark or registered trademark of Intel Corporation.
UNIX is a registered trademark in the United States and other countries, licensed exclusively through X/Open Company Ltd.
NIS (Network Information Services) is a trademark or registered trademark of Sun Microsystems Inc. in the United States.
PCL and HP-GL/2 are registered trademarks of Hewlett-Packard Corporation.
All product/brand names are trademarks or registered trademarks of the respective holders. Permission has been obtained from Microsoft Corporation for use of software screen shots.
The data saved in the hard disk of the machine may be lost if there is any problem in the hard disk. Fuji Xerox is not responsible for any direct and indirect damages arising from or caused by such data loss.
Fuji Xerox is not responsible for any breakdown of machines due to infection of computer virus or computer hacking.
Important
1.This manual is copyrighted with all rights reserved. Under the copyright laws, this manual may not be copied or modified in whole or part, without the written consent of the publisher.
2.Parts of this manual are subject to change without prior notice.
3.We welcome any comments on ambiguities, errors, omissions, or missing pages.
4.Never attempt any procedure on the machine that is not specifically described in this manual. Unauthorized operation can cause faults or accidents. Fuji Xerox is not liable for any problems resulting from unauthorized operation of the equipment.
An export of this product is strictly controlled in accordance with Laws concerning Foreign Exchange and Foreign Trade of Japan and/or the export control regulations of the United States.
XEROX, THE DOCUMENT COMPANY, Ethernet, CentreWare, and the stylized X are registered trademarks of Xerox Corporation. DocuWorks is a trademark of Xerox Corporation or Fuji Xerox Co., Ltd. All Xerox and Fuji Xerox product names are either registered trademarks or trademarks of Xerox Corporation or Fuji Xerox Co., Ltd.

|
Table of Contents |
Table of Contents |
|
Table of Contents.............................................................................................. |
1 |
1 Before Using the Machine .............................................................................. |
7 |
Preface.............................................................................................................. |
8 |
Using This Guide............................................................................................... |
9 |
Related Information Sources ........................................................................ |
9 |
Organization of This Guide......................................................................... |
10 |
Conventions................................................................................................ |
11 |
2 Product Overview.......................................................................................... |
13 |
Machine Components ..................................................................................... |
14 |
Overview of Features ...................................................................................... |
18 |
Print ............................................................................................................ |
18 |
CentreWare Internet Services .................................................................... |
19 |
Scan ........................................................................................................... |
20 |
E-mail.......................................................................................................... |
21 |
iFax............................................................................................................. |
21 |
Tools................................................................................................................ |
22 |
Power On / Off................................................................................................. |
24 |
Powering On............................................................................................... |
24 |
Powering Off............................................................................................... |
25 |
Interface Cables .............................................................................................. |
26 |
Using the Parallel Interface......................................................................... |
26 |
Using the USB Interface ............................................................................. |
26 |
Using the Ethernet Interface....................................................................... |
27 |
Control Panel................................................................................................... |
28 |
Internal Fonts .................................................................................................. |
31 |
3 Installation When Using Parallel Port.......................................................... |
33 |
Preparations.................................................................................................... |
34 |
Installation Procedure...................................................................................... |
34 |
Installation Overview................................................................................... |
34 |
Configuration on the Machine..................................................................... |
34 |
Configuration on the Computer................................................................... |
35 |
4 Installation When Using USB Port............................................................... |
37 |
Preparations.................................................................................................... |
38 |
Installation Procedure...................................................................................... |
38 |
Installation Overview................................................................................... |
38 |
Configuration on the Machine..................................................................... |
38 |
Configuration on the Computer................................................................... |
39 |
1

5 Installation When Using TCP/IP (LPD/Port 9100) ....................................... |
41 |
Preparations.................................................................................................... |
42 |
Installation Procedure ..................................................................................... |
42 |
Installation Overview .................................................................................. |
42 |
Configuration on the Machine..................................................................... |
42 |
Configuration on the Computer .................................................................. |
44 |
6 Installation When Using NetWare................................................................ |
45 |
Preparations.................................................................................................... |
46 |
Installation Procedure ..................................................................................... |
46 |
Installation Overview .................................................................................. |
46 |
Configuration on the Machine..................................................................... |
47 |
Configuration on the Computer .................................................................. |
49 |
7 Installation When Using Microsoft Network (SMB).................................... |
51 |
Preparations.................................................................................................... |
52 |
Installation Procedure ..................................................................................... |
52 |
Installation Overview .................................................................................. |
52 |
Configuration on the Machine..................................................................... |
52 |
Configuration on the Computer .................................................................. |
53 |
8 Installation When Using Internet Printing Protocol (IPP).......................... |
55 |
Preparations.................................................................................................... |
56 |
Installation Procedure ..................................................................................... |
56 |
Installation Overview .................................................................................. |
56 |
Configuration on the Machine..................................................................... |
56 |
Configuration on the Computer .................................................................. |
57 |
9 Installation When Using EtherTalk .............................................................. |
59 |
Preparations.................................................................................................... |
60 |
Installation Procedure ..................................................................................... |
60 |
Installation Overview .................................................................................. |
60 |
Configuration on the Machine..................................................................... |
60 |
Configuration on the Computer .................................................................. |
61 |
10 Using CentreWare Internet Services ........................................................... |
63 |
Preparations.................................................................................................... |
64 |
Installation Procedure ..................................................................................... |
64 |
Installation Overview .................................................................................. |
64 |
Configuration on the Machine..................................................................... |
64 |
Confirmation of the Configuration............................................................... |
66 |
Network Setting Items (Port/Protocol) for CentreWare Internet Services ....... |
67 |
Ethernet ...................................................................................................... |
68 |
Parallel........................................................................................................ |
69 |
USB ............................................................................................................ |
70 |
2

|
Table of Contents |
EtherTalk .................................................................................................... |
71 |
SMB............................................................................................................ |
72 |
NetWare...................................................................................................... |
73 |
TCP/IP ........................................................................................................ |
74 |
LPD............................................................................................................. |
76 |
SNMP ......................................................................................................... |
77 |
IPP.............................................................................................................. |
79 |
Port 9100 .................................................................................................... |
80 |
E-mail.......................................................................................................... |
81 |
SMTP.......................................................................................................... |
86 |
POP3 .......................................................................................................... |
87 |
HTTP .......................................................................................................... |
88 |
WebDAV..................................................................................................... |
89 |
Bonjour ....................................................................................................... |
90 |
11 E-mail.............................................................................................................. |
93 |
E-mail Overview .............................................................................................. |
94 |
Preparations.................................................................................................... |
95 |
Installation Procedure...................................................................................... |
97 |
Installation Overview................................................................................... |
97 |
Enabling Port and Setting TCP/IP .............................................................. |
97 |
Configuring E-mail Environment ................................................................. |
98 |
12 Using the Scan Service............................................................................... |
103 |
Scan Service Overview ................................................................................. |
104 |
Configuration of E-mail.................................................................................. |
105 |
Preparations ............................................................................................. |
105 |
Installation Overview................................................................................. |
105 |
Enabling Port and Setting TCP/IP ............................................................ |
105 |
Configuring E-mail Environment ............................................................... |
106 |
Configuration of Scan to Mailbox .................................................................. |
111 |
Installation Overview................................................................................. |
111 |
Enabling Port and Setting TCP/IP ............................................................ |
111 |
Registering a Mailbox ............................................................................... |
113 |
Configuration of Network Scanning (Job Template Scanning)...................... |
116 |
Preparations ............................................................................................. |
116 |
Installation Overview................................................................................. |
116 |
Enabling Port and Setting TCP/IP ............................................................ |
116 |
Configuring the SNMP Port ...................................................................... |
117 |
Configuration on a Computer.................................................................... |
118 |
Configuration of Scan to PC.......................................................................... |
119 |
Preparations ............................................................................................. |
119 |
Installation Overview................................................................................. |
119 |
Enabling Port and Setting TCP/IP ............................................................ |
120 |
Configuration on the Computer................................................................. |
121 |
3

|
Configuration of the Job Flow ....................................................................... |
122 |
|
Installation Overview ................................................................................ |
122 |
|
Enabling Port and Setting TCP/IP ............................................................ |
122 |
|
Configuring the SNMP Port ...................................................................... |
123 |
|
Configuration on the Computer ................................................................ |
124 |
13 Using the iFax Service................................................................................ |
125 |
|
|
iFax Overview ............................................................................................... |
126 |
|
Preparations.................................................................................................. |
126 |
|
System Requirements for the Machine .................................................... |
126 |
|
Installation Procedure ................................................................................... |
127 |
|
Installation Overview ................................................................................ |
127 |
|
Enabling the Port and Setting TCP/IP ...................................................... |
127 |
|
Configuring the E-mail Environment......................................................... |
128 |
|
Testing iFax .............................................................................................. |
132 |
14 Using the Server Fax Service..................................................................... |
133 |
|
|
Server Fax Overview..................................................................................... |
134 |
|
Preparations.................................................................................................. |
134 |
|
System Requirements for the Machine .................................................... |
134 |
|
Installation Procedure ................................................................................... |
135 |
|
Installation Overview ................................................................................ |
135 |
|
Fax Settings.............................................................................................. |
135 |
|
Setting the Server Fax Feature ................................................................ |
136 |
15 |
Security........................................................................................................ |
139 |
|
Security Service Overview ............................................................................ |
140 |
|
Communication Security Service.............................................................. |
140 |
|
Scan File Security Services...................................................................... |
140 |
|
Configuration of HTTP Communication Encryption ...................................... |
141 |
|
Installation Overview ................................................................................ |
141 |
|
Configuration on the Machine................................................................... |
141 |
|
Configuration on a Computer ................................................................... |
142 |
|
Configuration of E-mail Encryption/Digital Signature .................................... |
144 |
|
Installation Overview ................................................................................ |
144 |
|
Configuration on the Machine................................................................... |
144 |
|
Configuration on a Computer ................................................................... |
146 |
|
Configuration of Scan File Signature |
|
|
(PDF/DocuWorks Signature)......................................................................... |
147 |
|
Installation Overview ................................................................................ |
147 |
|
Configuration on the Machine................................................................... |
147 |
|
Configuration on a Computer ................................................................... |
148 |
16 |
Problem Solving.......................................................................................... |
149 |
|
SMB .............................................................................................................. |
150 |
4

|
Table of Contents |
Troubleshooting........................................................................................ |
150 |
Notes and Restrictions.............................................................................. |
151 |
NetWare ........................................................................................................ |
154 |
Troubleshooting........................................................................................ |
154 |
TCP/IP........................................................................................................... |
158 |
Troubleshooting........................................................................................ |
158 |
Notes and Restrictions.............................................................................. |
159 |
EtherTalk....................................................................................................... |
161 |
Troubleshooting........................................................................................ |
161 |
Notes and Restrictions.............................................................................. |
161 |
Bonjour.......................................................................................................... |
163 |
Notes and Restrictions.............................................................................. |
163 |
CentreWare Internet Services ....................................................................... |
164 |
Troubleshooting........................................................................................ |
164 |
Scanner Features.......................................................................................... |
166 |
Troubleshooting........................................................................................ |
166 |
Notes and Restrictions.............................................................................. |
166 |
E-Mail Features ............................................................................................. |
168 |
Troubleshooting........................................................................................ |
168 |
Internet/Intranet Connection.......................................................................... |
169 |
Troubleshooting........................................................................................ |
169 |
Notes and Restrictions.............................................................................. |
171 |
Index ................................................................................................................... |
173 |
5
1 Before Using the Machine
This chapter describes how to use this guide.
z |
Preface ......................................................................................................... |
8 |
z |
Using This Guide .......................................................................................... |
9 |

Machine the Using Before
1
1 Before Using the Machine
Preface
Thank you for selecting the Fuji Xerox ApeosPort-II 5010/4000/3000, DocuCentre-II 5010/4000 (hereafter referred to as "the machine").
This guide describes a number of configuration procedures for using this machine on a network.
This guide assumes that the operator has a basic knowledge of the operating environment of the personal computer in use, networking environments, and how to operate a personal computer. Please read this guide thoroughly to obtain the best performance on the machine. After reading this guide, be sure to keep it handy for quick reference. It will be useful in case you forget how to perform operations or if a problem occurs with the machine.
Refer to the User Guide for the machine operation, clearing paper jams, daily maintenance, setting various items and safety information. For details about optional accessories, also refer to the guide provided with each optional accessory.
8
Using This Guide
Using This Guide
This section describes the organization of this guide.
Related Information Sources
We provide the following guides for optimum usage of the machine.
Accompanying Manuals
The machine comes with the following documentation, which is referred to as accompanying manuals.
The accompanying manuals include the descriptions of how to configure and use the machine.
User Guide
Describes all the necessary steps for copy/print/scan/fax, clearing paper jams, daily care, setting the various items and safety information.
Network Administrator Guide (this guide)
Aimed toward network administrators, as a guide to setting up the network environment.
ApeosPort Function Guide
Describes the features unique to the ApeosPort series.
Manual (HTML)
A guide to installing print drivers, configuring the printer environment, etc. This manual is included in the CD-ROM of the Driver CD Kit.
Guides for Optional Accessories
Optional accessories are available for this machine. Some of them come with user guides. The user guides, provided as printed or online documentation, are referred to as guides for optional accessories.
The guides for optional accessories describe all the necessary steps for using the optional accessories and installing the software.
Machine the Using Before
1
9

Machine the Using Before
1
1 Before Using the Machine
Organization of This Guide
This guide consists of the following chapters.
1 Before Using the Machine
Describes the organization of this guide.
2 Product Overview
Describes basic information such as identifying the major components, how to switch the machine on and off, and how to use the touch screen.
3 Installation When Using Parallel Port
Describes how to install the machine using a parallel interface.
4 Installation When Using USB Port
Describes how to install the machine using a USB interface.
5 Installation When Using TCP/IP (LPD/Port 9100)
Describes how to install the machine using the TCP/IP (LPD/Port 9100) protocol.
6 Installation When Using NetWare
Describes how to install the machine to a NetWare network.
7 Installation When Using Microsoft Network (SMB)
Describes how to install the machine to a Microsoft Networks (SMB).
8 Installation When Using Internet Printing Protocol (IPP)
Describes how to install the machine to enable Internet printing.
9 Installation When Using EtherTalk
Describes how to install the machine to an EtherTalk network.
10 Using CentreWare Internet Services
Describes how to use the CentreWare Internet Services.
11 E-mail
Describes how to use the E-mail feature on this machine.
12 Using the Scan Service
Describes how to use the scan service on this machine.
13 Using the iFax Service
Describes how to use the iFax service on this machine.
14 Using the Server Fax Service
Describes how to use the Server Fax service on this machine.
15 Security
Describes how to use services using the communication security function on this machine.
16 Problem Solving
Describes how to solve the problems you may encounter.
10

Using This Guide
Conventions
zIn this document, “Computer” refers to a personal computer or a workstation.
zThe following terms are used in this guide:
Important |
:Indicates important information that you should read. |
Note |
:Indicates additional information on operations or features. |
z The following symbols are used in this guide:
"" : Cross-references in this guide, messages displayed on the
|
|
touch screen, and input strings |
[ |
] |
: • The names of screens, tabs, buttons, features, and options |
|
|
displayed on the touch screen |
•The names of menus, windows, dialog boxes, buttons, and other items displayed on computer monitors
<> button : Hardware buttons on the machine’s control panel
< |
> key : |
Keys on computer keyboards |
> |
: |
• Indicates a path to a certain item within a procedure on the |
|
|
control panel. |
|
|
Example: When you see the procedure "select [System |
|
|
Settings] > [Setup Menu] > [Mailbox]", this means that you |
|
|
need to select [System Settings], select [Setup Menu], and |
|
|
then select [Mailbox]. |
•Indicates a path to a certain item within a procedure on a computer.
Example: When you see the procedure "to search for files and folders, click [Start] > [Search] > [For Files or Folders]", this means that you need to click [Start], click [Search], and then click [For Files or Folders] in order to search for files and folders.
•The reference is indicated in the following manner:
"Refer to "6 System Settings" > "Common Settings" > "Audio Tone" in the Administrator Guide."
The sentence above means that you need to refer to the section "Audio Tone", which can be found under "Common Settings" in chapter 6 System Settings of the Administrator Guide.
zIn this guide, the orientations of originals and paper loaded in trays are described as follows:
 ,
, , Long Edge Feed (LEF) : The long edge of the paper is positioned to enter the machine first.
 ,
, , Short Edge Feed (SEF): The short edge of the paper is positioned to enter the machine first.
LEF Orientation |
SEF Orientation |
Paper feed direction |
Paper feed direction |
Machine the Using Before
1
11
2 Product Overview
This chapter describes machine’s basic information such as component names, available features and tools, how to switch on and off, cable connections, and how to use the touch screen.
z |
Machine Components................................................................................. |
14 |
z |
Overview of Features.................................................................................. |
18 |
z |
Tools ........................................................................................................... |
22 |
z |
Power On / Off ............................................................................................ |
24 |
z |
Interface Cables.......................................................................................... |
26 |
z |
Control Panel .............................................................................................. |
28 |
z |
Internal Fonts.............................................................................................. |
31 |
Overview Product
2
2 Product Overview
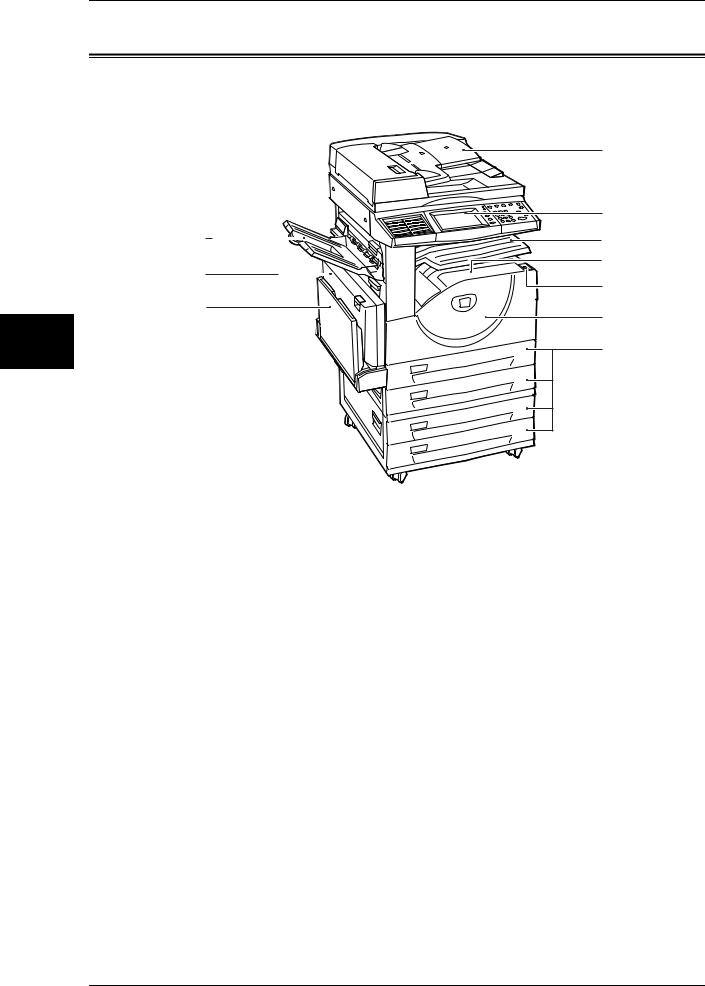
Machine Components
This section describes the main components and functions of the machine.
|
1 |
|
|
2 |
|
8 |
3 |
|
9 |
4 |
|
5 |
||
|
||
10 |
6 |
|
|
||
|
7 |
No. |
Component |
Function |
|
|
|
|
|
|
1 |
Duplex automatic |
Automatically feeds 2 sided originals from a stack. |
|
document feeder |
Note • In this manual, the duplex automatic document feeder is abbreviated as |
|
|
|
|
|
“document feeder”. |
|
|
|
2 |
Control panel |
Consists of operation buttons, LED indicators and a touch screen. |
|
|
Refer to "Control Panel" (P.28). |
|
|
|
3 |
Exit 2 Tray (optional) |
Printed or copied documents are delivered with the printed side facing |
|
|
down. |
|
|
|
4 |
Center output tray |
Printed or copied documents are delivered with the printed side facing |
|
|
down. |
|
|
Note • When the Exit 2 Tray is installed on the machine, the center output tray |
|
|
is referred to as "center tray - lower". |
|
|
|
5 |
Power switch |
Switches the power of the machine on/off. |
|
|
|
6 |
Front cover |
Opened to replace consumables. |
|
|
|
7 |
Tray 1 - 2 |
Accommodates paper. |
|
Tray 3 - 4 (optional) |
|
|
|
|
8 |
Side Tray (optional) |
Printed or copied documents are delivered with the printed side facing up. |
|
|
|
9 |
Duplex module |
Automatically prints or copies on the both sides of paper. |
|
|
|
10 |
Tray 5 (Bypass) |
Used for loading non-standard paper (thick-stock paper, and other |
|
|
special media) that cannot be loaded in the Trays 1 to 4. |
|
|
|
14

Machine Components
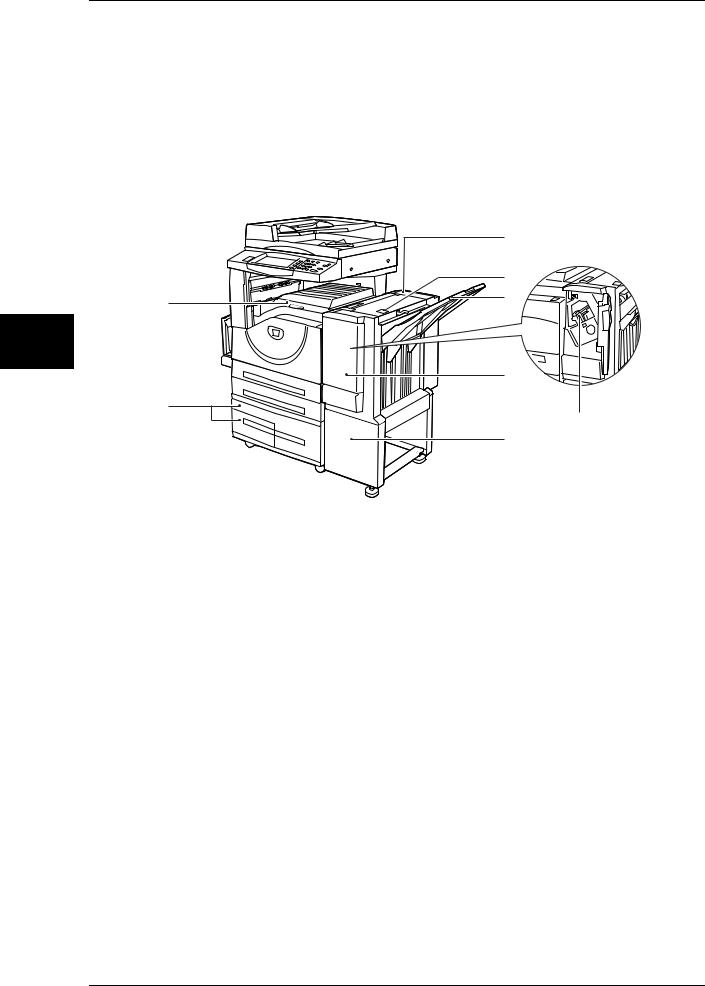
C-Finisher / C-Finisher with Booklet Maker


|
|
|
|
|
|
|
|
|
|
|
|
|
|
Overview Product
2
No. |
Component |
Function |
|
|
|
|
|
|
11 |
Document glass |
Holds original documents. |
|
|
|
12 |
C-Finisher (Optional) / C- |
Staples or punches output sheets. |
|
Finisher with Booklet Maker |
C-Finisher with Booklet Maker also folds output sheets and staple them. |
|
(Optional) |
|
|
|
|
13 |
Output tray |
Receives output sheets. |
|
|
|
14 |
Finisher tray |
Receives stapled sheets. |
|
|
|
15 |
Hole punch container |
Holds punch scraps. |
|
|
|
16 |
Staple cartridge |
Contains staples. Pull out the cartridge when clearing staple jams, or |
|
|
when replacing the cartridge. |
|
|
|
17 |
Booklet tray |
Receives documents when [Folding] is selected in the booklet creation |
|
(For C Finisher with Booklet |
function. |
|
Maker Only) |
|
|
|
|
18 |
Front cover |
Open this cover to access the insides of the machine to clear paper or |
|
|
staple jams, replace staples, or throw punch dust away. |
|
|
|
19 |
Staple cartridges for |
Two staple cartridges for Booklet Maker. |
|
Booklet Maker |
|
|
(For C Finisher with Booklet |
|
|
Maker Only) |
|
|
|
|
20 |
Booklet unit |
Folds sheets in half and staples the folded sheets. |
|
(For C Finisher with Booklet |
|
|
Maker Only) |
|
|
|
|
15
Overview Product
2
2 Product Overview
No. |
Component |
Function |
|
|
|
|
|
|
21 |
Document feeder glass |
Scans documents loaded in the Document Feeder. |
|
|
|
22 |
Toner cartridge |
Contains toner (image forming powder). |
|
|
|
23 |
Drum cartridge |
Contains a photo conductor to transfer toner. |
|
|
|
The C Finisher and C Finisher with Booklet Maker are optional. In this manual, C Finisher and C Finisher with Booklet Maker is referred to as "finisher".
Tandem Tray Module + B-Finisher
|
24 |
|
25 |
30 |
26 |
|
27
31
28 29
No. |
Component |
Function |
|
|
|
|
|
|
24 |
B-Finisher (optional) |
Allows you to staple printed or copied documents. |
|
|
Note • In this manual, the B-Finisher is abbreviated as “finisher”. |
|
|
|
25 |
Finisher top cover button |
Pressed to open the upper cover of the finisher when clearing paper |
|
|
jams. |
|
|
|
26 |
Finisher tray |
Stapled documents are delivered. |
|
|
|
27 |
Front cover |
Opened to clear staple jams, or replace staples. |
|
|
|
28 |
Staple cartridge |
Contains staples. |
|
|
|
29 |
Stand |
Connects the machine and the finisher. |
|
|
|
30 |
Finisher transport cover |
Opened to clear paper jams. |
|
|
|
31 |
Tray 3 - 4 (optional) |
Accommodates paper. |
|
|
|
16

Machine Components
LINE4
39
LINE2
38
TEL LINE1
LINE1
37
36
32
33
34
35
Overview Product
2
No. |
Component |
|
Function |
||
|
|
|
|
|
|
|
|
|
|
|
|
32 |
USB 2.0 interface |
|
|
Connected to a USB cable. |
|
|
connector (optional) |
|
|
||
|
|
|
|
|
|
33 |
Parallel interface connector |
Connected to a computer using a Centronics standard interface cable. |
|||
|
|
|
|
|
|
34 |
10BASE-T / 100BASE-TX |
Connected to a network cable. |
|||
|
connector |
|
|
|
|
|
|
|
|
|
|
35 |
<RESET> button |
|
|
Automatically turns the power off if detecting current leakage. |
|
|
|
|
|
|
|
|
Telephone Line Connectors |
||||
|
|
|
|
|
|
No. |
Name on the |
|
Name on the |
Function |
|
machine cover |
|
touch screen |
|||
|
|
|
|
|
|
|
|
|
|
|
|
36 |
TEL |
|
- |
|
Used to connect an external telephone. |
|
|
|
|
|
Note • Do not connect other fax machines. |
|
|
|
|
|
|
37 |
LINE 1 |
|
Line 1 |
|
Connected to a public telephone network. |
|
|
|
|
|
|
38 |
LINE 2 |
|
Line 2 |
|
Connected to a public telephone network. |
|
(optional) |
|
|
|
|
|
|
|
|
|
|
39 |
LINE 4 |
|
Line 4 |
|
Connected to a public telephone network. |
|
(optional) |
|
|
|
|
|
|
|
|
|
|
|
Note |
• Some models require an optional kit to use Fax features. For details, contact our Customer |
|||
|
|
|
Support Center. |
|
|
17
Overview Product
2
2 Product Overview
Overview of Features
The following features are provided in a network environment.
zPrint
zCentreWare Internet Services
zScan
zE-mail
ziFax
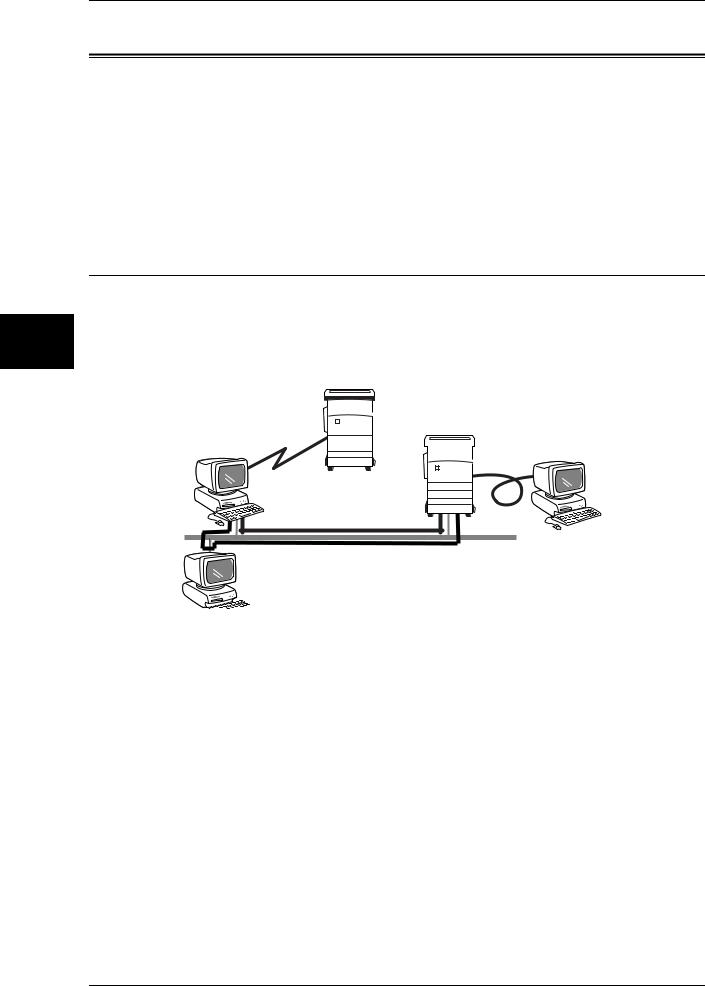
This section describes the environment where the machine is able to provide print services.
This machine can be used as a local printer by directly connecting to a computer, or as a network printer when connecting to a network.
Enable the necessary port using the control panel.


|
|


 !
!
Using as a Local Printer
When using as a local printer, the machine can be connected by the following methods.
z |
Parallel |
: Used to connect the machine with a computer using a parallel interface |
|
|
cable. |
z |
USB |
: Used to connect the machine with a computer using a USB interface |
|
|
cable. |
Using as a Network Printer
When using as a network printer, the machine can be connected by the following methods.
z |
LPD |
: Used when communicating with the machine using the TCP/IP protocol. |
z |
NetWare : Used when sharing the machine using a NetWare server. |
|
|
|
The NetWare Kit (optional) or Adobe PostScript 3 Kit (optional) is |
|
|
required. |
z |
SMB |
: Used when printing through Microsoft Networks. |
18
Overview of Features
z IPP |
: Used when printing through the Internet. |
zPort 9100:Used when using the port 9100 port.
zEtherTalk:Used when printing from Macintosh machines. Adobe PostScript 3 Kit
(optional) is required.
Supported Operating Systems
Connection |
|
|
Local |
|
|
|
Network connection |
|
|
|||||
|
method |
|
connection |
|
|
|
|
|
||||||
|
|
|
|
|
|
|
|
|
|
|
||||
|
|
|
|
|
|
|
|
|
|
|
|
|
|
|
|
Port |
|
Parallel |
USB |
|
LPD |
NetWare*6 |
SMB |
IPP |
Port |
Ether |
|||
|
|
2.0 |
|
9100 |
Talk |
|||||||||
|
|
|
|
|
|
|
|
|
|
|
|
|||
|
|
|
|
|
|
|
|
|
|
|
|
|
|
|
|
Protocol |
|
- |
|
- |
|
TCP/ |
TCP/ |
IPX/ |
Net |
TCP/ |
TCP/ |
TCP/ |
Apple |
|
|
|
|
IP |
IP |
SPX |
BEUI |
IP |
IP |
IP |
Talk |
|||
|
|
|
|
|
|
|
||||||||
|
|
|
|
|
|
|
|
|
|
|
|
|
|
|
|
|
|
|
|
|
|
|
|
|
|
|
|
|
|
|
Windows |
|
O |
|
O*1 |
|
O |
O |
O |
O |
O |
O |
O |
|
|
2000 |
|
|
|
|
|||||||||
|
|
|
|
|
|
|
|
|
|
|
|
|
|
|
|
|
|
|
|
|
|
|
|
|
|
|
|
|
|
|
Windows XP |
|
O |
|
O*1 |
|
O |
O |
O |
|
O |
O |
O |
|
OS |
Windows |
|
O |
|
O*1 |
|
O |
O |
O |
|
O |
O |
O |
|
|
Server 2003 |
|
|
|
|
|
|
|
|
|
|
|
|
|
|
Windows |
|
O |
|
O*1 |
|
O |
|
|
|
O |
O |
O |
|
|
Vista |
|
|
|
|
|
|
|
||||||
|
|
|
|
|
|
|
|
|
|
|
|
|
|
|
|
|
|
|
|
|
|
|
|
|
|
|
|
|
|
|
UNIX |
|
|
|
|
|
O*3 |
|
|
|
|
|
|
|
|
Macintosh |
|
|
|
O*1,2,5 |
|
O*2,4 |
|
|
|
|
|
|
O*2 |
*1: The computer must be equipped with a USB 2.0 port. *2: Adobe PostScript 3 Kit (optional) is required.
*3: Adobe PostScript 3 Kit (optional) and a Unix filter are required to print PostScript data.
*4: Supports Mac OS X 10.3.9 to 10.4.9 only.
*5: Supports Mac OS 8.6 to 9.2.2, and Mac OS X 10.3.9 to 10.4.9 only. *6: NetWare Kit (optional) or Adobe PostScript 3 Kit (optional) is required.
For detail information on network environments, refer to the manual in the CD-ROM of the Driver CD Kit.
CentreWare Internet Services
CentreWare Internet Services provides services such as displaying the status of the machine and jobs, and altering configurations using a web browser in a TCP/IP environment.
For setting as a printer, the properties screen of the services allows users to configure the system settings and port settings for each network that are otherwise operated on the touch screen on the machine.
The following are functions offered under each tab within CentreWare Internet Services when the machine is enabled with the Internet Services (HTTP) port.
Overview Product
2
19

Overview Product
2
2 Product Overview
Tab name |
|
Main function |
|
|
|
|
|
|
Status |
z |
Displaying the machine status |
|
|
Displaying the status of the paper trays, output trays and consumables |
|
|
such as toner cartridges. |
|
z |
Linking to the copyright screen. |
|
|
|
Jobs |
z |
Displaying a list of jobs and job history, and deleting jobs. |
|
|
|
Print/Scan |
z |
Job Submission |
|
|
Allows you to specify and print a file stored on your computer. |
|
z |
Mailbox |
|
|
Allows you to register and set mailboxes. |
|
z |
Job Flow Sheets |
|
|
Allows you to register and set job flow sheets. |
|
z |
Job Template |
|
|
Allows you to create, edit, and delete job templates. |
|
|
|
Properties |
z |
Displaying and setting the following items: |
|
|
Machine information and configuration such as memory and a print |
|
|
language, usage counters, paper trays, paper, power saver mode, |
|
|
Address Book, PKI (Public Key), mail notice, authentication/auditron |
|
|
administration, user details, Xerox Standard Accounting, remote |
|
|
authentication server/directory service, Internet Services, proxy server, |
|
|
and port status. |
|
z |
Port settings |
|
z |
Protocol settings |
|
z |
Emulation settings |
|
z |
Memory settings |
|
z |
Report settings |
|
|
|
Support |
z |
Displaying support information |
|
z |
Displaying error history information |
|
z |
System administrator settings |
|
z |
Pool server settings |
|
z |
Audit log |
|
|
|
Scan
The following scan services are available:
Note |
• This feature does not appear for some models. An optional package is necessary. For |
|
details, contact our Customer Support Center. |
Scanned documents can be converted into an electronic format and transmitted via e- mail.
Scan to Mailbox
Scanned documents are saved into a mailbox.
When the machine is connected to a TCP/IP network, scanned documents in a mailbox can be retrieved from a computer connected to the network.
Network Scanning (Job Template Scanning)
A job template is a configuration file for defining scanning conditions. You can apply a template to a scanned document on the machine. The scanned document will be saved as files on the machine and then sent automatically to computers (servers) such as SMB servers connected to the network.
20

Overview of Features
Note |
• This feature is available on the ApeosPort models only. |
Scan to PC
When the machine is connected to a network which can use either the FTP or SMB protocol, the scanned documents can be saved on a network computer.
Job Flow Sheet
Scanning is performed according to a job flow.
Note |
• This feature is available on the ApeosPort models only |
The following E-mail services are available:
Note |
• This feature does not appear for some models. An optional package is necessary. For |
|
details, contact our Customer Support Center. |
Scanned documents can be converted into an electronic format and transmitted via e- mail.
E-mail Printing
E-mail with attachments in either TIFF, JPEG, or PDF format can be sent to the machine from computers. Received e-mail will be automatically printed.
Consumables Status Notice
E-mail containing contents (status of consumables, paper, and replaceable parts, etc.) set in [Mail Notice Settings] of CentreWare Internet Services is sent to a specified recipient. You can properly determine when to replace toner and drum cartridges by receiving their status periodically.
Job Completion Notice
When a computer has submitted a job to the machine, its completion can be notified by e-mail.
iFax
Unlike general fax communications using public phone lines, Internet Fax uses corporate intranets and the Internet to send or receive scan documents as e-mail attachments.
Note |
• This feature does not appear for some models. An optional package is necessary. For |
|
details, contact our Customer Support Center. |
Overview Product
2
21

Overview Product
2
2 Product Overview
Tools
The following tools are provided with this machine. Available settings vary depending on the tool.
Control Panel
The control panel is located at the center on top of the machine. It consists of operation buttons, LED indicators and a touch screen.
The touch screen is located at the center of the control panel. Messages required for operation and feature buttons are displayed on this display. You can directly touch the buttons and tabs displayed in the touch screen to set features or to instruct operations in screens.
CentreWare Internet Services
CentreWare Internet Services provides services such as displaying the status of this machine as a printer and its print data, altering configurations, and operating on mailboxes using a web browser in a TCP/IP environment.
For setting as a printer, the properties screen of the services allow users to configure the system settings and port settings for each network that are otherwise operated on the touch screen on the machine.
Tools in the Driver CD Kit
The Driver CD Kit CD-ROM contains various tools such as print drivers, and software that helps you install and set up a print driver easily.
EasyOperator allows you to print or fax documents with drag-and-drop mouse operation. This tool also allows you to remotely register mailboxes and make scanning setup for the machine.
Document Monitor allows you to see the machine status (such as paper status, toner status, and paper jams) when you submit a print job. It also allows you to see the status of print jobs, as well as to suspend, resume, and cancel print jobs.
ApeosWare EasyAdmin
ApeosWare EasyAdmin is a tool to reduce the management tasks for printers, faxes, and scanners. It allows users to centrally configure multiple items on multiple devices from a computer.
Note |
• ApeosWare EasyAdmin is an optional. |
22

Tools
The relation of the tools and their configurable items are as follows:
Note that the description in this manual is focused on the configuration from the control panel.
|
|
CentreWare |
|
Tools in the |
|
ApeosWare |
|
Item |
Control Panel |
Internet |
|
|
|
||
|
Driver CD Kit |
|
EasyAdmin |
|
|||
|
|
Services |
|
|
|
||
|
|
|
|
|
|
|
|
|
|
|
|
|
|
|
|
|
|
|
|
|
|
|
|
Enabling a port |
|
|
|
U (IP Address |
|
|
|
|
O |
O |
|
Setting Tool/ |
|
U |
|
|
|
|
|
LPD only) |
|
|
|
|
|
|
|
|
|
|
|
Setting an IP |
O |
O |
|
O (IP Address |
|
O |
|
address |
(change only) |
|
Setting Tool) |
|
(change only) |
|
|
|
|
|
|
||||
|
|
|
|
|
|
|
|
Configuring the e- |
U |
O |
|
X |
|
U |
|
mail environment |
|
|
|
||||
|
|
|
|
|
|
|
|
|
|
|
|
|
|
|
|
Registering a |
O |
O |
|
O |
|
O |
|
mailbox |
|
(EasyOperator) |
|
|
|||
|
|
|
|
|
|
||
|
|
|
|
|
|
|
|
Address book |
O |
U |
|
X |
|
O |
|
|
|
|
|
|
|
|
|
Confirming printer |
U |
O |
|
O (Document |
|
X |
|
status |
|
Monitor) |
|
|
|||
|
|
|
|
|
|
||
|
|
|
|
|
|
|
|
Confirming print |
X |
O |
|
O |
|
X |
|
data (job) status |
|
|
|
||||
|
|
|
|
|
|
|
|
|
|
|
|
|
|
|
|
Setting |
O |
U |
|
X |
|
O |
|
authentication |
|
|
|
||||
|
|
|
|
|
|
|
|
|
|
|
|
|
|
|
|
Setting personal |
|
|
|
|
|
|
|
authentication |
O |
O |
|
X |
|
O |
|
information |
|
|
|
|
|
|
|
|
|
|
|
|
|
|
|
|
|
O : Configurable |
U : Partly configurable |
X : Not configurable |
|||
Overview Product
2
23
Overview Product
2
2 Product Overview
Power On / Off
Turn on the power before operating the machine.
The machine is ready for operation within 24 seconds after the power is turned on. The time may vary depending on the machine configuration.
Turn the machine off at the end of the day or when it is not in use for a long period of time. If you want to reduce power consumption, use the power saving feature.
Important • Switching off the power of the machine may cause loss of data being processed.
For information on the power saving feature, refer to "Power Saver Mode" in Chapter 2 of the User Guide.
Note |
• When the power is turned off, all functions of the machine will stop. Do not turn the |
|
machine off if it is used all day for receiving faxes. |
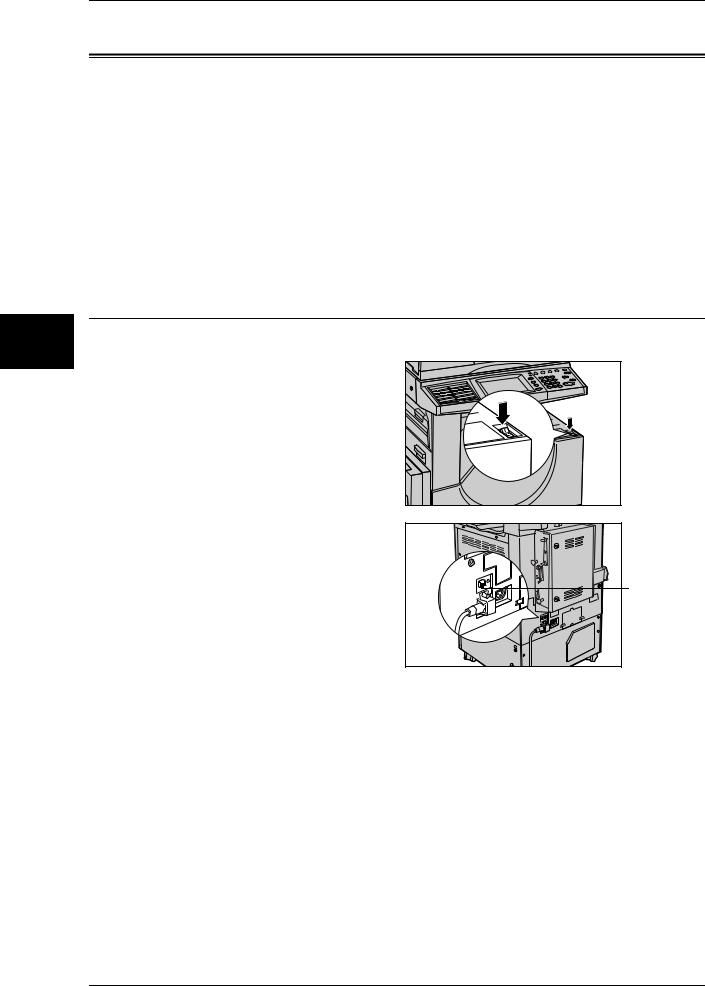
Powering On
The procedure for turning on the power is as follows.
1 Press the power switch to the [ | ] |
|
position to turn the power on. |
|
Note |
• The “Please wait...” |
|
message indicates that the |
|
machine is warming up. |
|
The machine cannot be |
|
used during warming up. |
Note |
• When the power does not |
|
|
come on, check if the |
|
|
power cord is plugged into |
|
|
the power outlet and the |
|
|
<RESET> button is in a |
<RESET> button |
|
reset state (button is |
|
|
|
|
|
pressed in). |
|
24

Power On / Off
Powering Off
The procedure for turning the power off is as follows.
Important • Turning off the power of the machine may cause loss of data being processed.
1Before turning the power off, make sure that all copy or print jobs have completely finished. Also, make sure that the <Online> indicator is not lit.
Important • Never turn the power off in the following instances:
-While data is being received
-While jobs are being printed
-While jobs are being copied
-While jobs are being scanned
2 Press the power switch to the [ ] position.
Important • Power off processing is performed internally on the machine for a while after the power switch is turned off. Therefore, do not unplug the power cord from the power outlet immediately after turning the power switch off.
Note |
• Before you turn the power back on after turning it off, wait 20 seconds. |
Overview Product
2
25
Overview Product
2
2 Product Overview
Interface Cables
When connecting the machine directly to a computer, use either the parallel interface or USB interface. When connecting to a network, use the Ethernet interface.
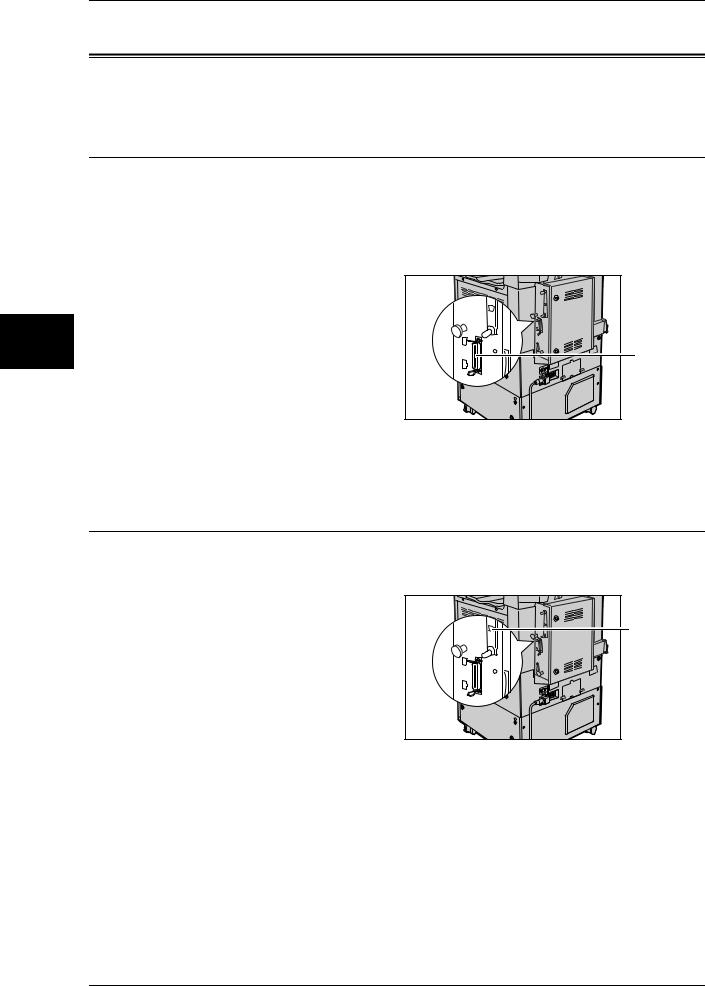
Using the Parallel Interface
This section describes the installation procedure for the parallel interface.
Note |
• When connecting with a computer using parallel interface, our parallel interface cable |
|
(optional) is required. For information on accessories, refer to "Optional Components" in |
|
"Chapter 16 Appendix" in the User Guide. |
1 |
Ensure that the machine is off. |
|
2 |
Insert the connector of the interface |
|
|
cable into the machine’s parallel |
|
|
interface connector and fasten it |
|
|
with the clips on either side of the |
|
|
connector. |
Parallel |
3 |
Connect the other end of the |
|
|
interface cable to a computer. |
|
4 |
Switch on the machine. |
|
5Restart the computer.
For details of setting items, refer to "Installation When Using Parallel Port" (P.33).
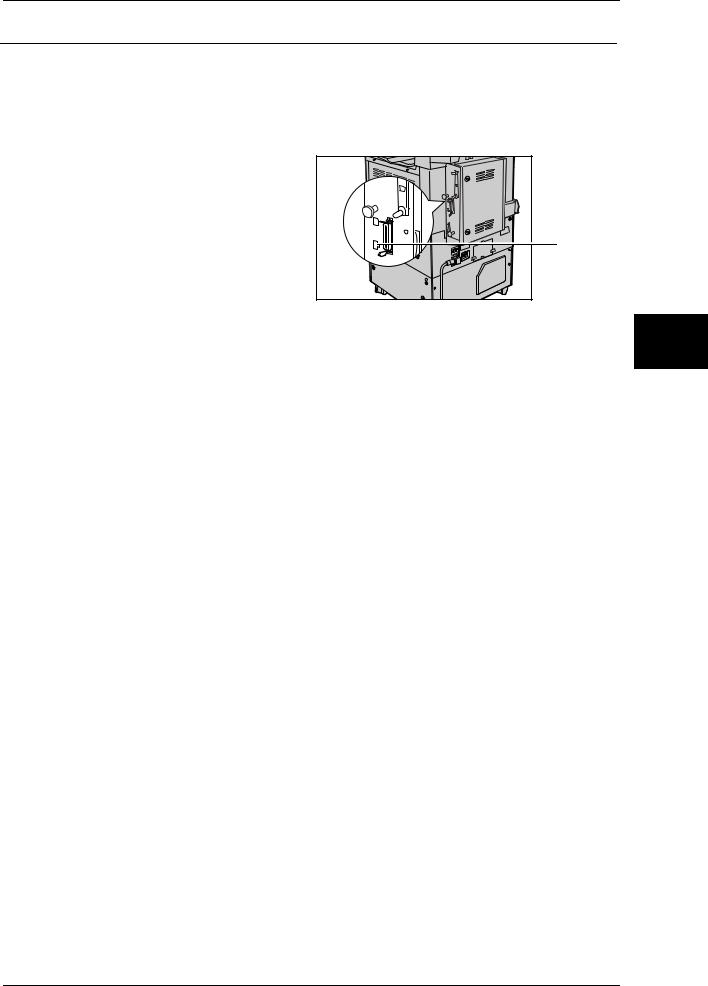
Using the USB Interface
The USB interface supports USB 2.0.
This section describes the installation procedure for the USB interface.
1Ensure that the machine is off.
2Connect the USB interface cable to the USB 2.0 interface connector on the side of the machine.
3Connect the other end of the USB interface cable to a computer.
4Switch on the machine.
5Restart the computer.
USB 2.0 |
For details of setting items, refer to "Installation When Using USB Port" (P.37).
26
Interface Cables
Using the Ethernet Interface
The Ethernet interface supports the following 2 types.
z100BASE-TX
z10BASE-T
This section describes the installation procedure for the Ethernet interface.
1 |
Ensure that the machine is off. |
|
|
|
2 |
Connect the network cable to the |
|
Product |
|
|
Ethernet interface connector. |
|
||
|
|
|
||
|
Note |
• Prepare a network cable |
|
|
|
|
suitable for your network |
Ethernet |
Overview |
|
|
connection. When changing |
|
|
|
|
|
|
|
|
|
the network cable, consult our |
|
|
|
|
customer engineers. |
|
2 |
3 |
Switch on the machine. |
|
||
|
|
|||
27

Overview Product
2
2 Product Overview
Control Panel
The following describes the names and functions of components on the control panel.
DocuCentre Series
|
|
|
|
|
1 |
2 |
34 |
5 |
6 |
7 |
8 |
9 |
001 |
002 |
003 |
016 |
017 |
018 |
|
|
|
|
|
|
|
004 |
005 |
006 |
019 |
020 |
021 |
|
|
1 |
2 |
3 |
|
10 |
007 |
008 |
009 |
022 |
023 |
024 |
|
|
4 |
5 |
6 |
|
11 |
010 |
011 |
012 |
025 |
026 |
027 |
|
|
7 |
8 |
9 |
|
12 |
013 |
014 |
015 |
028 |
029 |
030 |
|
|
|
0 |
# |
|
13 |
|
|
|
|
|
|
|
|
|
|
|
|
C |
21 |
20 |
19 |
18 |
17 |
16 |
15 14 |
ApeosPort Series
001 |
002 |
003 |
016 |
017 |
018 |
004 |
005 |
006 |
019 |
020 |
021 |
007 |
008 |
009 |
022 |
023 |
024 |
010 |
011 |
012 |
025 |
026 |
027 |
013 |
014 |
015 |
028 |
029 |
030 |
1 2 3
4 5 6
7 8 9
0
C |
No. |
Component |
Function |
|
|
|
|
|
|
1 |
Contrast dial |
Adjusts the contrast of the touch screen. Use this dial to enhance or |
|
|
decrease the contrast. |
|
|
|
2 |
Touch screen |
Displays messages required for operation and buttons for various |
|
|
features. You can directly touch the touch screen to instruct operations |
|
|
and set features. |
|
|
|
3 |
<Online> indicator |
Lights when the machine is sending or receiving data to or from a client. |
|
|
|
4 |
<Job in Memory> indicator |
Lights when data is stored in the machine's memory. |
|
|
You can check stored documents in [Stored Documents List]. For |
|
|
information on [Stored Documents List], refer to "Stored Documents |
|
|
List" under "Chapter 12 Machine Status" in the User Guide. |
|
|
|
5 |
<Job Status> button |
Press this button to check or cancel the current job, to check or print |
|
|
saved documents, or to check completed jobs. |
|
|
In this manual, this button is indicated as the <Job Status> button. |
|
|
|
28
Loading...