


 Loading...
System Administrator Guide
WorkCentre
7232/7242
Copyright protection claimed includes all forms and matters of copyrighted material and information now allowed by statutory or judicial law or hereinafter granted.
XEROX COPYRIGHT STATEMENT
XEROX ®, and all Xerox product names mentioned in this document are trademarks of XEROX CORPORATION. Other trademarks belong to their respective owners.
Copyright © XEROX CORPORATION 2008. All Rights Reserved.
Changes are periodically made to this document. Changes, technical inaccuracies, and typographical errors will be corrected in subsequent editions.

Table of Contents
1 Before Using the Machine ..................................................................... |
1 |
|
|
Xerox Welcome Center ............................................................................ |
1 |
|
Serial Number...................................................................................... |
1 |
|
Languages Displayed on the Touch Screen ............................................ |
2 |
|
Conventions ............................................................................................. |
2 |
2 |
Product Overview................................................................................... |
7 |
|
Machine Components .............................................................................. |
7 |
|
Services and Features ........................................................................... |
10 |
|
Power On/Off.......................................................................................... |
11 |
|
Powering On...................................................................................... |
11 |
|
Powering Off...................................................................................... |
12 |
|
Cabling ................................................................................................... |
12 |
|
Interface Ports ................................................................................... |
12 |
|
Modes..................................................................................................... |
13 |
|
All Services........................................................................................ |
13 |
|
Features............................................................................................. |
13 |
|
Job Status.......................................................................................... |
13 |
|
Machine Status.................................................................................. |
20 |
|
System Controls ..................................................................................... |
26 |
|
Settings in the Key Operator Mode ........................................................ |
28 |
|
Printing a Configuration Report ......................................................... |
29 |
|
Changing the Settings ....................................................................... |
29 |
|
Ethernet Port...................................................................................... |
30 |
|
Resident Fonts ....................................................................................... |
31 |
|
PCL Resident Fonts........................................................................... |
31 |
|
Symbol Set ........................................................................................ |
32 |
3 |
TCP/IP Environment............................................................................. |
35 |
|
Quick Network Setup (DHCP) ................................................................ |
35 |
|
Prerequisites for Quick Network Setup Using TCP/IP ....................... |
35 |
|
Configuring an IP Address via DHCP ................................................ |
35 |
|
Quick Network Setup (Static IP)............................................................. |
36 |
|
Prerequisites for Manual Setup of Network Using Static IP Address 36 |
|
Xerox WorkCentre 7232/7242 System Administrator Guide |
i |
|

|
Procedure for Manual Setup of Network Using Static IP Address..... |
36 |
4 |
CentreWare Internet Services ............................................................. |
39 |
|
Information Checklist.............................................................................. |
39 |
|
CentreWare Internet Services Environments......................................... |
39 |
|
CentreWare Internet Services Installation.............................................. |
40 |
|
Installation Procedure........................................................................ |
40 |
|
Network Communication Setup ......................................................... |
41 |
|
Test Access....................................................................................... |
43 |
|
Selecting Transport Protocols ................................................................ |
43 |
|
Using CWIS to Configure Settings on the Machine ............................... |
45 |
|
Ethernet............................................................................................. |
45 |
|
USB ................................................................................................... |
46 |
|
EtherTalk ........................................................................................... |
46 |
|
NetWare ............................................................................................ |
47 |
|
TCP/IP............................................................................................... |
49 |
|
SNMP Configuration.......................................................................... |
51 |
|
SSDP................................................................................................. |
53 |
|
Microsoft Networking......................................................................... |
54 |
|
LPD.................................................................................................... |
55 |
|
Port 9100........................................................................................... |
56 |
|
SMTP Server ..................................................................................... |
57 |
|
LDAP ................................................................................................. |
59 |
|
POP3 Setup....................................................................................... |
61 |
|
HTTP ................................................................................................. |
62 |
|
Proxy Server...................................................................................... |
63 |
|
IPP..................................................................................................... |
64 |
|
UPnP Discovery ................................................................................ |
65 |
|
WebDAV............................................................................................ |
65 |
|
Bonjour .............................................................................................. |
66 |
|
WSD .................................................................................................. |
66 |
|
Machine Software Upgrades.................................................................. |
68 |
5 |
NetWare................................................................................................. |
69 |
|
Information Checklist.............................................................................. |
69 |
|
NetWare Environments .......................................................................... |
70 |
|
NetWare Installation............................................................................... |
71 |
|
Installation Procedure........................................................................ |
71 |
|
Network Communication Setup ......................................................... |
71 |
ii |
Xerox WorkCentre 7232/7242 System Administrator Guide |

|
NetWare IPX Printing Setup .............................................................. |
73 |
|
Workstation Setup ............................................................................. |
73 |
|
Test Print ........................................................................................... |
73 |
6 |
UNIX TCP/IP .......................................................................................... |
75 |
|
Information Checklist.............................................................................. |
75 |
|
UNIX TCP/IP Environments ................................................................... |
76 |
|
UNIX TCP/IP Installation ........................................................................ |
76 |
|
Installation Procedure........................................................................ |
76 |
|
Network Communication Setup ......................................................... |
77 |
|
Workstation Setup ............................................................................. |
78 |
|
Test Print ........................................................................................... |
84 |
|
Printing ................................................................................................... |
84 |
|
Solaris/HP-UX.................................................................................... |
84 |
|
SunOS ............................................................................................... |
86 |
|
Printer Status.......................................................................................... |
88 |
|
Solaris/HP-UX.................................................................................... |
88 |
|
SunOS ............................................................................................... |
89 |
|
-C Option ................................................................................................ |
90 |
7 |
EtherTalk............................................................................................... |
95 |
|
Information Checklist.............................................................................. |
95 |
|
EtherTalk Environments ......................................................................... |
96 |
|
EtherTalk Installation.............................................................................. |
96 |
|
Installation Procedure........................................................................ |
96 |
|
Network Communication Setup ......................................................... |
96 |
|
Workstation Setup ............................................................................. |
97 |
|
Test Print ........................................................................................... |
97 |
8 |
Microsoft Networking........................................................................... |
99 |
|
Information Checklist.............................................................................. |
99 |
|
SMB Environments............................................................................... |
100 |
|
SMB Installation ................................................................................... |
101 |
|
Installation Procedure...................................................................... |
101 |
|
Network Communication Setup ....................................................... |
101 |
|
Workstation Setup ........................................................................... |
103 |
|
Test Print ......................................................................................... |
103 |
Xerox WorkCentre 7232/7242 System Administrator Guide |
iii |

9 |
TCP/IP (LPD or Port9100) .................................................................. |
105 |
|
Information Checklist............................................................................ |
105 |
|
TCP/IP (LPD or Port9100) Environments ............................................ |
106 |
|
TCP/IP (LPD or Port9100) Installation ................................................. |
106 |
|
Installation Procedure...................................................................... |
106 |
|
Network Communication Setup ....................................................... |
107 |
|
IP Filtering (IP Address Restriction) ................................................ |
110 |
10 |
USB Port ............................................................................................. |
111 |
|
Information Checklist............................................................................ |
111 |
|
USB Port Environment ......................................................................... |
112 |
|
USB Port Installation ............................................................................ |
112 |
|
Installation Procedure...................................................................... |
112 |
|
USB Port Communication Setup ..................................................... |
113 |
|
Workstation Setup ........................................................................... |
113 |
|
Test Print ......................................................................................... |
114 |
11 |
IPP (Internet Printing Protocol)......................................................... |
115 |
|
Information Checklist............................................................................ |
115 |
|
IPP Environment .................................................................................. |
116 |
|
IPP Installation ..................................................................................... |
116 |
|
Installation Procedure...................................................................... |
116 |
|
Network Communication Setup ....................................................... |
117 |
|
Workstation Setup ........................................................................... |
119 |
|
Test Print ......................................................................................... |
119 |
12 |
E-mail .................................................................................................. |
121 |
|
E-mail Overview ................................................................................... |
121 |
|
Information Checklist............................................................................ |
122 |
|
E-mail Environments ............................................................................ |
123 |
|
E-mail Installation................................................................................. |
123 |
|
Installation Procedure...................................................................... |
123 |
|
Test Mail.......................................................................................... |
126 |
13 |
Scanning Services ............................................................................. |
129 |
|
Scanning Overview .............................................................................. |
129 |
|
Scanning with the machine.............................................................. |
129 |
|
Scanning Process............................................................................ |
130 |
|
Scan to E-mail Setup ........................................................................... |
130 |
iv |
Xerox WorkCentre 7232/7242 System Administrator Guide |

|
Prerequisites for Scan to E-mail Setup............................................ |
130 |
|
Procedure for Scan to E-mail Setup ................................................ |
131 |
|
Scan to E-mail Troubleshooting....................................................... |
132 |
|
Scan to Mailbox Setup ......................................................................... |
133 |
|
Prerequisites for Scan to Mailbox Setup.......................................... |
133 |
|
Procedure for Scan to Mailbox Setup through CWIS ...................... |
133 |
|
Procedure for Scan to Mailbox Setup through the Control Panel.... |
134 |
|
Workstation Setup ........................................................................... |
134 |
|
Network Scanning Setup...................................................................... |
135 |
|
Prerequisites for Network Scanning Setup...................................... |
135 |
|
Configuring a Scanned File Destination .......................................... |
135 |
|
Configuring the Default Template with Internet Services................. |
137 |
|
Setting up a Remote Template Pool Repository.............................. |
139 |
|
Procedure for Network Scanning Setup .......................................... |
140 |
|
Scan to PC Setup (FTP)....................................................................... |
140 |
|
Prerequisites for Scan to PC (FTP) ................................................. |
140 |
|
Procedure for Scan to PC (FTP)...................................................... |
141 |
|
Scan to PC Setup (SMB)...................................................................... |
141 |
|
Prerequisites for Scan to PC Setup (SMB)...................................... |
141 |
|
Procedure for Scan to PC (SMB)..................................................... |
142 |
|
Scan to HTTP....................................................................................... |
142 |
|
Setting up a Remote Template Pool Repository for HTTP or HTTPS144 |
|
14 |
Internet Fax ......................................................................................... |
147 |
|
Internet Fax Overview .......................................................................... |
147 |
|
Information Checklist ....................................................................... |
147 |
|
Internet Fax Environments ................................................................... |
148 |
|
Internet Fax Installation ........................................................................ |
148 |
|
Installation Procedure...................................................................... |
148 |
|
Network Communication Setup ....................................................... |
149 |
|
Test Internet Fax.............................................................................. |
152 |
15 |
Server Fax........................................................................................... |
153 |
|
Server Fax Overview............................................................................ |
153 |
|
Information Checklist ....................................................................... |
153 |
|
Server Fax Environments..................................................................... |
154 |
|
Server Fax Installation.......................................................................... |
154 |
|
Installation Procedure...................................................................... |
154 |
|
Network Communication Setup ....................................................... |
154 |
Xerox WorkCentre 7232/7242 System Administrator Guide |
v |

|
Server Fax Configuration................................................................. |
156 |
|
Test Server Fax transmission.......................................................... |
158 |
16 |
Security ............................................................................................... |
159 |
|
Security Features Overview ................................................................. |
159 |
|
Network Communication Security ................................................... |
159 |
|
Scan File Security............................................................................ |
160 |
|
Securing HTTP Communication with Encryption ................................. |
160 |
|
Installation Overview ....................................................................... |
160 |
|
Configuration of the Machine........................................................... |
161 |
|
Setting E-mail Encryption/Digital Signature ......................................... |
162 |
|
Installation Overview ....................................................................... |
162 |
|
Configuration of the Machine........................................................... |
162 |
|
Configuration of a Computer ........................................................... |
164 |
|
Setting PDF/XPS Signature ................................................................. |
165 |
|
Installation Overview ....................................................................... |
165 |
|
Configuration of the Machine........................................................... |
165 |
|
Remote Authentication Setup (If Required) ......................................... |
166 |
|
Configuring Xerox Secure Access (Authentication) ............................. |
169 |
|
Secure Access and Accounting....................................................... |
169 |
|
Configure Color Copy Access for LDAP Group............................... |
174 |
|
Scheduled Image Overwrite................................................................. |
177 |
17 |
Problem Solving................................................................................. |
179 |
|
Problem Solving Procedure ................................................................. |
179 |
|
SMB ..................................................................................................... |
180 |
|
Troubleshooting............................................................................... |
180 |
|
Restrictions...................................................................................... |
182 |
|
NetWare ............................................................................................... |
185 |
|
UNIX..................................................................................................... |
189 |
|
Troubleshooting............................................................................... |
189 |
|
TCP/IP.................................................................................................. |
191 |
|
Troubleshooting............................................................................... |
191 |
|
Restrictions...................................................................................... |
193 |
|
EtherTalk.............................................................................................. |
195 |
|
Troubleshooting............................................................................... |
195 |
|
Restrictions...................................................................................... |
196 |
|
Bonjour................................................................................................. |
196 |
vi |
Xerox WorkCentre 7232/7242 System Administrator Guide |

|
Restrictions...................................................................................... |
196 |
|
CentreWare Internet Services .............................................................. |
198 |
|
Troubleshooting............................................................................... |
198 |
|
Scanning Services................................................................................ |
199 |
|
Troubleshooting............................................................................... |
199 |
|
Restrictions...................................................................................... |
200 |
|
E-mail Services .................................................................................... |
202 |
|
Troubleshooting............................................................................... |
202 |
|
Internet/Intranet Connection................................................................. |
203 |
|
Troubleshooting............................................................................... |
203 |
|
Restrictions...................................................................................... |
205 |
18 |
Appendix............................................................................................. |
207 |
|
Configuring Network Authentication (by a remote Accounting server).207 |
|
|
Xerox Standard Accounting.................................................................. |
208 |
|
Overview.......................................................................................... |
208 |
|
Installation Checklist........................................................................ |
208 |
|
Enable Xerox Standard Accounting (from Internet Services) .......... |
209 |
|
Create a Group Account.................................................................. |
209 |
|
Create a User Account and Set Usage Limits ................................. |
209 |
|
Maximum Usage Limits and Resetting Individual Usage Limits ...... |
210 |
|
Using XSA at the machine............................................................... |
210 |
|
Resetting Usage Data...................................................................... |
211 |
|
Print a Usage Report ....................................................................... |
211 |
|
Enable XSA in your Print Drivers..................................................... |
211 |
|
Backing Up XSA data and settings and Cloning to another device .212 |
|
|
Add or Remove All Services Screen Buttons ....................................... |
213 |
|
Xerox Extensible Interface Program (XEIP) ......................................... |
214 |
|
Banner Sheet Printing .......................................................................... |
216 |
19 |
Glossary .............................................................................................. |
219 |
|
Terms Defined...................................................................................... |
219 |
Xerox WorkCentre 7232/7242 System Administrator Guide |
vii |

viii |
Xerox WorkCentre 7232/7242 System Administrator Guide |
1 Before Using the Machine
Welcome to the Xerox family of WorkCentre products.
This System Administration Guide provides detailed information, technical specifications and procedures for using the integral features of the machine.
Xerox Welcome Center
If you need assistance during or after product installation, visit the Xerox website for on-line solutions and support.
http://www.xerox.com/support
If you require further assistance, contact our experts at the Xerox Welcome Center. A local representative telephone number may have been provided when the product was installed. For convenience and future reference, please record the telephone number in the space below.
Welcome Center or local representative telephone number:
#
Xerox US Welcome Center:1-800-821-2797
Xerox Canada Welcome Center:1-800-93-XEROX (1-800-939-3769)
Serial Number
When you call the Welcome Center you will need the serial number which is located on the left side of the machine behind Cover A, as shown in the diagram.
For your convenience, record the serial number in the space below.
Serial Number:
Keep a record of any error messages. This information helps us solve problems faster.
Xerox WorkCentre 7232/7242 System Administrator Guide |
1 |

1 Before Using the Machine
Languages Displayed on the Touch Screen
You can change the languages in the following two ways.
To change the language for temporary use, press the <Language> button on the control panel, and then select the required language.
NOTE: The language returns to the default language after rebooting the machine.
You can also change the default language. The default language will display whenever the machine is started.
To change the default language:
1.Press the [Log In / Out] button to enter System Administration mode.
2.Type the correct user ID using the numeric keypad on the control panel or the screen keyboard.
NOTE: The default System Administration ID is “11111”. If the Authentication feature is enabled, you may also be required to enter a passcode. The default passcode is “x- admin”.
3.Touch [Enter]
4.Press the [Machine Status] button on the Control Panel.
5.Touch the [Tools] tab.
6.Touch [System Settings].
7.In the Group column, touch [Common Service Settings].
8.Touch [Screen / Button Settings].
9.On the Screen / Button Settings screen, select the required language as [Default Language].
Conventions
This section describes the conventions used throughout this System Administration Guide. In this guide, you will find that some terms are used interchangeably:
•Paper is synonymous with media.
•Document is synonymous with original.
•Xerox WorkCentre 7242/7232 is synonymous with the machine.
Key Operator/System Administrator
Key Operator is the designated user who sets Machine, Copy, and Fax defaults and maintains the machine.
2 |
Xerox WorkCentre 7232/7242 System Administrator Guide |
Conventions
System Administrator is the designated user who sets and maintains the network settings on the machine.
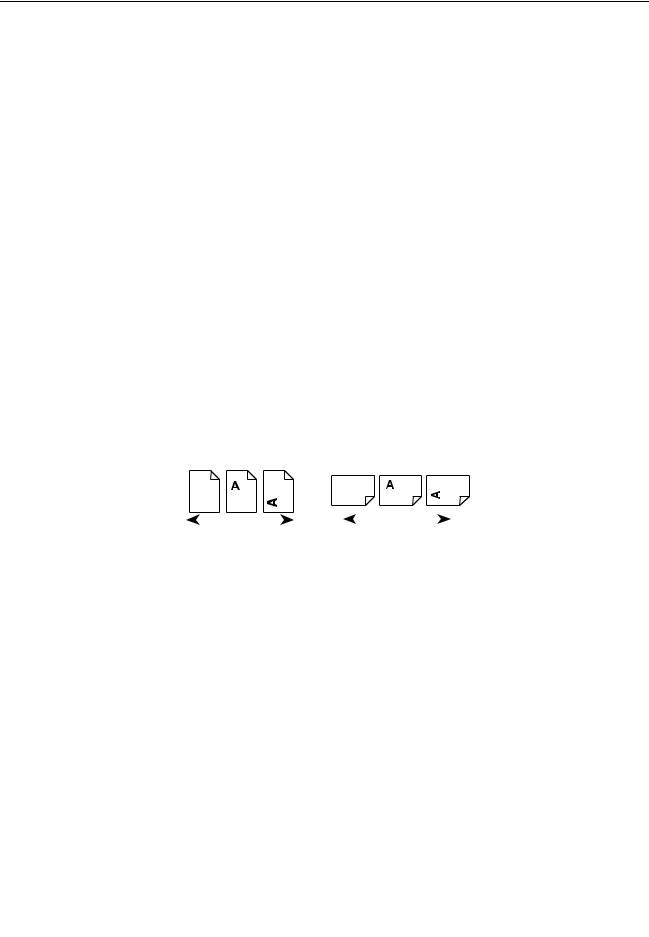
Orientation
Orientation is used to mean the direction of images on the page. When the image is upright, the paper (or other media) can be either long edge feed or short edge feed.
Long Edge Feed (LEF)
When loading documents long edge feed into the document feeder, load with one of the long edges facing into the document feeder. The short edges appear at the top and bottom of the paper, facing the front and back of the document feeder. When loading paper long edge feed into a paper tray, place the paper with one of the long edges on the left-hand side and one of the short edges toward the front of the tray.
Short Edge Feed (SEF)
When loading documents short edge feed into the document feeder, load with one of the short edges facing into the document feeder. The long edges appear on the top and bottom of the paper, facing the front and back of the document feeder. When loading paper short edge feed into a paper tray, place the paper with one of the short edges on the left-hand side and one of the long edges toward the front of the tray.
LEF Orientation |
|
SEF Orientation |
||||
|
|
|
|
|
|
|
|
|
|
|
|
|
|
|
|
|
|
|
|
|
Paper feed direction |
Paper feed direction |
Text in [Square Brackets]
Indicate that these are names of the screens, tabs, buttons, features and option categories on the screen. They are also used when referring to file and folder names on a PC.
For example:
•Select [System Settings] on the [System Administrator Menu] screen.
•Close [config.txt] and then open the [drivers] folder.
Text in <Angle Brackets>
Indicate that these are names of the hard buttons, numeric or symbol buttons, lights on the control panel or symbols on the power switch label.
For example:
•Press the switch to the <I> position to switch the machine on.
•Press the <Log In/Out> button on the control panel.
Xerox WorkCentre 7232/7242 System Administrator Guide |
3 |

1 Before Using the Machine
Italic Typeface
The Italic typeface is used to indicate references to other sections and chapters. For example:
Machine Status – page 20.
Warnings
Warnings are statements that alert you to the possibility of personal harm. For example:
WARNING: This product must be connected to a protective earth circuit.
4 |
Xerox WorkCentre 7232/7242 System Administrator Guide |

Conventions
Cautions
Cautions are statements that suggest the possibility of mechanical damage as a result of an action.
For example:
CAUTION: Do not connect the network cable to the machine until instructed to do so.
Notes
Notes are statements that provide additional information. For example:
NOTE: It is recommended that you change the password from the default one. For further assistance, contact your Xerox Welcome Center.
NOTE: Please note that the screens shown in this System Administration Guide apply to a fully configured machine and therefore may not exactly represent the configuration being used.
Xerox WorkCentre 7232/7242 System Administrator Guide |
5 |

1 Before Using the Machine
6 |
Xerox WorkCentre 7232/7242 System Administrator Guide |
2 Product Overview
This chapter gives an overview of the features and functions of the machine and enables familiarity with the device network installation.
Detailed information is provided in the following sections.
Machine Components – page 7 Services and Features – page 10 Cabling – page 12
Modes – page 13
System Controls – page 26
Settings in the Key Operator Mode – page 28 Resident Fonts – page 31
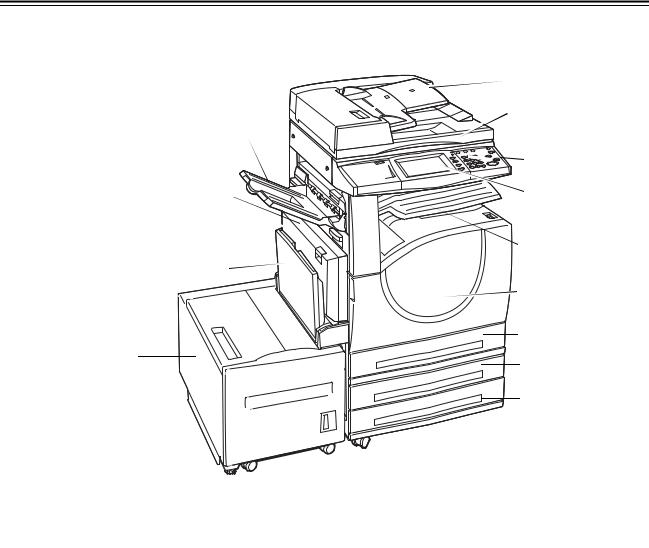
Machine Components
The following diagrams show the standard and optional components of the machine. Configuration may vary depending on the model.
Side Tray
Duplex Module
Tray 5 (Bypass)
High Capacity Feeder (Optional)
Document Feeder (Optional)
Document Glass
(under the Document Feeder
Control Panel
Touch Screen

 On / Off Switch
Center Tray
(Exit 2 Tray)
Front Cover
Tray 1
Two Tray Module Tray 2 (optional)
Two Tray Module Tray 3  (optional)
Xerox WorkCentre 7232/7242 System Administrator Guide |
7 |

2 Product Overview
NOTE: Depending on the configuration, the Document Glass Cover is attached instead of the Document Feeder. Two optional paper trays can be attached.
Ethernet
USB2.0
Office Finisher
Tray
Office Finisher (Optional)
Tray 3 
Tray 2
High Capacity Tandem Tray (Optional)
Telephone socket
Located at the back of the machine. The telephone socket is used to connect to the fax kit.
USB 1.1 (Host) Port
Located at the back of the machine. This port connects to the fax kit.
USB 1.1 (Device) Port
Located at the back of the machine. This port is used to connect to a PC for software update downloads.
USB 2.0 (Device) Port
Located at the back of the machine. This port is used to connect to a local client computer and is used as an input port for printing data.
100 Mbps/10 Mbps Port
Located at the back of the machine. This port is used to connect to a network cable.
Office Finisher
Allows you to staple or sort copies automatically. The Office Finisher Tray can hold 1,000 sheets of 20 lb bond or 80 g/m2 paper in Letter/A4 size or smaller.
8 |
Xerox WorkCentre 7232/7242 System Administrator Guide |

Machine Components
Integrated Office |
Integrated Office |
Finisher (Optional) |
|
|
Finisher Center Tray |
Staple Cartridge
Integrated Office Finisher
Allows you to staple or sort copies automatically. The Integrated Office Finisher Center Tray can hold 500 sheets of 20 lb bond or 80 g/m2 paper in Letter/A4 size or smaller.
Duplex Module
Allows you to make double-sided copies. The Duplex Module can be used when paper is supplied from Tray 1, 2, or 3.
Trays 2 & 3
At the base of the machine, the following optional trays will be available, depending on the configuration.
•Two Tray Module – Can be added to the standard 1-tray configuration. Each tray can hold 520 sheets of 20 lb bond or 80 g/m2 paper.
•High Capacity Tandem Tray – Can be added to the standard 1-tray configuration to
provide high volume paper sources. Tray 2 can hold a maximum of 900 sheets of 20 lb bond or 80 g/m2 paper in Letter or A4 size, long edge feed. Tray 3 can hold 1,200 sheets of 20 lb bond or 80 g/m2 paper in Letter or A4 size. The High Capacity Tandem Tray is referred to as “HCTT” in this manual.
Tray 5 (Bypass)
Allows you to bypass the standard paper trays to print on different sized paper. The Bypass Tray can hold 100 sheets of 20 lb bond or 80 g/m2 paper in sizes ranging from B6 (SEF) or Envelope Monarch (LEF) to A3 (SEF) or 11 × 17 inch (SEF).
NOTE: Do not place paper with a length less than 140mm in the Bypass Tray, as this may cause paper jams and potentially damage the inside of the machine.
Xerox WorkCentre 7232/7242 System Administrator Guide |
9 |

2 Product Overview
Tray 6 (High Capacity Feeder)
Allows you to load up to 2,000 sheets of 20 lb bond or 80 g/m2 paper in B5, Executive, Letter, or A4 size, long edge feed. The High Capacity Feeder is referred to as “HCF” in this manual.
Services and Features
The machine has various features and provides valuable services. The following description outlines the features and explains the options on the <All Services> screen.
NOTE: The arrangement of icons for the services and features displayed on the screen can be changed by the Key Operator.
1.Press the <All Services> button on the control panel.
2.Select the required service.
Copy
Allows you to copy documents in various ways. For example, you can produce output which has been reduced or enlarged to a different size, or copy two or four independent documents onto one sheet of paper.
Allows you to send scanned documents by e-mail in various ways. For example, you can set the density for scanning, or specify the file format for saving the documents.
Internet Fax
Allows you to send and receive faxes over the Internet or intranet. Internet Fax provides reduced cost of transmissions compared to the use of a conventional phone line. After scanning documents, you can send scanned data by e-mail, and can also receive scanned data in an e-mail attachment sent from an Internet Fax compatible machine.
Fax
Allows you to send regular fax documents. You can send documents in a reduced or enlarged format, or specify destinations using the Address Book or speed dialing features.
Server Fax
Allows you to send and receive image data by using the Fax feature of a Server Fax server. The Server Fax feature cannot be used concurrently with the Fax or Internet Fax feature.
10 |
Xerox WorkCentre 7232/7242 System Administrator Guide |
Power On/Off
Network Scanning
Allows you to scan documents and store them as electronic documents on a file server on the network by selecting a job template which has various assigned parameters. You can retrieve the stored electronic documents by accessing the file server from a PC.
Scan to PC
Allows you to scan and store documents to specified destinations using the FTP or SMB protocol.
Scan to Mailbox
Enables the confidential mailbox or polling feature by storing the scanned documents in private mailboxes.
Send from Mailbox
Allows you to confirm, print, or delete the documents in a mailbox. It also allows you to change or release linkage with a job flow sheet and execute the linked job flow sheets.
Power On/Off
Powering On
Make sure that the machine is connected to a suitable power supply and that the power plug is firmly connected to the electrical outlet.
The machine is ready to make copies a maximum of 42 seconds after powering on (varies with machine configuration.)
1. Press the power switch to the |
<I> position. |
NOTE: If the machine does not start up, check that the RESET button on the back of the machine is in the reset position (depressed).
Xerox WorkCentre 7232/7242 System Administrator Guide |
11 |

2 Product Overview
Powering Off
Before turning the power off, wait at least 5 seconds after all copy or print jobs have completely finished.
When you switch off the machine, it remains on for approximately 10 seconds while it stores files and prepares for shutdown. The machine then shuts down completely.
CAUTION: Wait at least 20 seconds between powering the system on and off. Failure to do this could cause damage to the hard disk and the machine.
Cabling
Interface Ports
The machine has multiple interface ports as shown in the following diagram.

 USB 1.1 Port

 Ethernet Port


 USB 2.0 Port
Telephone socket
Located at the back of the machine. The telephone socket is used to connect to the fax kit.
USB 1.1 (Host) Port
Located at the back of the machine. This port is used to connect to the fax kit.
USB 1.1 (Device) Port
Located at the back of the machine. This port is used to connect to a PC for software update downloads.
USB 2.0 (Device)
USB 2.0 is provided for connection to a PC and is used as an input port for printing data. This is compatible with Full Speed (12 Mbps), and High Speed (480 Mbps), but is not compatible with Low Speed (1.5 Mbps).
Ethernet 10 Mbps/100 Mbps Port
This is the Ethernet Network Interface Connector that is used to connect the Device to the Network.
12 |
Xerox WorkCentre 7232/7242 System Administrator Guide |

Modes
There are five Ethernet interface options available on the touch screen: Auto, 100 Mbps Full-Duplex, 100 Mbps Half-Duplex, 10 Mbps Full-Duplex, and 10 Mbps Half-Duplex. When [Auto] is selected, the machine detects the communication speed automatically when powered on and adjusts its settings accordingly.
EtherTalk, NetWare, and TCP/IP protocols that use Ethernet can be switched automatically according to the applied transmission protocol.
NOTE: EtherTalk will function when the optional PostScript Kit is installed.
Modes
Use the mode buttons to access the screens which allow you to select features, monitor the status of jobs and obtain general information on the machine.
There are four buttons on the machine.
•All Services
•Features
•Job Status
•Machine Status
NOTE: These buttons do not respond when the machine is in the System Settings mode.
All Services
Use this button to access all the services available on the machine.
NOTE: The arrangement of service icons displayed on the screen can be changed by the Key Operator.
1. Press the <All Services> button on the control panel.
Features
Use this button to go back one previous screen. If you are using the [Job Status] screen or [Machine Status] screen, press the <Features> button to return to the previous copy, fax, or scan feature screen. The copy, fax, or scan feature screen does not change if you press this button if you are currently viewing one of these screens. In this case, use the <All Services> button to select the copy, fax, or scan feature.
Job Status
Use this button to check the progress of a job, or display the log and detailed information of completed jobs. The latest job is displayed at the top of the list. You can also check, delete, or print documents stored in the public mailbox of the machine. Use the scroll buttons to switch between screens.
For more information on each feature, refer to the following.
Xerox WorkCentre 7232/7242 System Administrator Guide |
13 |

2 Product Overview
Active Jobs – page 14
Completed Jobs – page 15
Secure Print Jobs & More – page 16
1.Press the <Job Status> button on the control panel.
Press the <Features> or <All Services> button at any time to exit.
2.Select the required option.
Active Jobs
This screen allows you to view incomplete jobs that are waiting, in progress, or suspended. It also lists Secure Print, Sample Set, and Delayed Print documents that are currently stored in the machine. You can see job attributes, or promote/delete the job.
1.Press the <Job Status> button on the control panel.
2.Select the [Active Jobs] tab. Use the scroll buttons to switch between screens.
3.Select a job to cancel or promote as required.
Owner
Displays the owner of each job.
Name
Identifies each job by job number and type.
Status
Displays the status of each job, such as copying, printing, and scanning.
Print Waiting Jobs
Prints the jobs waiting in the incomplete jobs queue.
View by Job Type
Allows you to display only the selected type of jobs.
Pop-up Menus
Selecting an active job or stored document in the [Active Jobs] screen displays a popup menu that allows you to delete the job, release the stored document, or view the details of the job or stored document.
Pop-up Menu for Active Jobs
•Delete - Deletes the job, or displays a page that asks whether or not to delete the job depending on the job type.
•Job Details - Displays a job screen where you can view the details of the job.
•Close Menu - Closes the pop-up menu.
14 |
Xerox WorkCentre 7232/7242 System Administrator Guide |

Modes
Pop-up Menu for Stored Documents
•Delete - Deletes the stored document.
•Release - Prints the stored document.
•Details - Displays a job screen where you can view the details of the stored document.
•Close Menu - Closes the pop-up menu.
Job Screen
A job screen allows you to view the details of a job/stored document and select the following buttons. The content of the screen and the buttons displayed will vary depending on the service type and status of the job/stored document.
•Delete – Cancels jobs that are being processed or on hold, or deletes a stored document from the machine’s memory.
•Promote Job – Promotes a job in the list to be processed immediately after the one being processed. The promoted job will be marked with an arrow in the job list on the [Current and Pending Jobs] screen.
•Last Original – Indicates the current scan batch is the last in a job to be scanned.
•Next Original – Sequentially scans more sections in the same scan job.
•Start – Starts scanning the next document or prints a job being held on the machine.
•Release – Prints a stored document.
Completed Jobs
This feature allows you to view the finished jobs in the machine. You can select a job in the list to display detailed attributes for that job. The contents of each screen may differ depending on the type or status of the job.
1.Press the <Job Status> button on the control panel.
2.Select the [Completed Jobs] tab. Use the scroll buttons to switch between screens.
Document/Job Type
Identifies each job by job number and type.
Remote Terminal/Contents
Displays the name of the recipient for a fax job, the paper size for a copy job, or the box number for a scan job.
Status
Displays the status of the job, such as completed, cancelled, shutdown.
Xerox WorkCentre 7232/7242 System Administrator Guide |
15 |

2 Product Overview
Result
Displays the number of printed, scanned, sent, or received pages. For cancelled jobs, the status will be blank.
Group Parent Jobs
Select this check box to group all parent jobs together in the job list.
View by Job Type
Allows you to display only the selected type of jobs.
Job Attributes
Select a job on the [Completed Jobs] screen to display the job attributes. The attributes displayed vary depending on the type of job.
•Show Children Jobs – Select this button to show all child jobs for the selected job. The button is displayed only when there are child jobs available.
•Job History Report – Select this button to print a job history report for both parent and child jobs.
NOTE: The Job History Report feature is enabled by setting the [Print Reports Button] setting to Enabled in the [Common Settings] > [Reports] feature.
Secure Print Jobs & More
This feature allows you to check locally stored documents, print stored documents, and delete stored documents.
NOTE: The jobs displayed are sent from a PC using the print driver. For more information, refer to PCL Driver Online Help.
NOTE: Some features on this screen may not display depending on the system settings and machine configuration.
For more information, refer to the following.
Secure Print – page 17
Sample Set – page 18
Delayed Print – page 19
Public Mailbox – page 19
1.Press the <Job Status> button on the control panel.
2.Select the [Secure Print Jobs & More] tab.
3.Select the required option.
Charge Print
When the Charge Print feature is enabled under [Authentication/Security Settings] > [Authentication] > [Charge/Private Print Settings], this feature allows you to print or delete documents stored for each billing user ID.
16 |
Xerox WorkCentre 7232/7242 System Administrator Guide |

Modes
1.Select [Charge Print] on the [Secure Print Jobs & More] screen.
2.Select a billing user ID. Use the scroll buttons to switch between screens.
3.Select [Document List].
4.Enter the passcode and select [Confirm].
5.Select a document to print or delete.
6.Select the required option.
•Refresh - Refreshes the displayed information.
•Go to - Specifies the Charge Print number to be displayed on the screen. Enter a number within the range of 001 to 200 using the scroll buttons or the numeric keypad.
•Document List - Displays the list of stored documents for the selected billing user ID in the list. The following options are available:
–Select All - Selects all documents in the list.
–Delete - Deletes a document selected in the list.
–Print - Prints a document selected in the list. After printing, the document is deleted.
Private Charge Print
When the Private Charge Print feature is enabled under [Authentication/Security Settings] > [Authentication] > [Charge/Private Print Settings], this feature allows you to print or delete documents stored for each authentication user ID.
1.Press the <Log In/Out> button.
2.Enter your user ID using the screen keypad or numeric keypad on the control panel, and select [Confirm].
3.Select [Private Charge Print] on the [Secure Print Jobs & More] screen.
NOTE: If you entered the screen with the Key Operator’s ID, a list of authentication user IDs will be displayed. Select the desired user ID from the list or enter it in [Go to], and select [Document List]. The documents stored for the selected user ID will appear.
4.Select a document to print or delete.
5.Select the required option.
•Refresh - Refreshes the displayed information.
•Select All - Selects all documents in the list.
•Delete - Deletes a document selected in the list.
•Print - Prints a document selected in the list. After printing, the document is deleted.
Secure Print
This feature allows you to print or delete passcode-protected stored documents. A secure print job requires a User ID and a passcode registered in the machine.
Xerox WorkCentre 7232/7242 System Administrator Guide |
17 |

2Product Overview
1.Select [Secure Print] on the [Secure Print Jobs & More] screen.
2.Select a User ID. Use the scroll buttons to switch between screens.
3.Select [Document List].
4.Enter the passcode and select [Confirm].
5.Select a document to print or delete.
6.Select the required option.
•Refresh – Refreshes the displayed information.
•Go to – Specifies the Secure Print number to be displayed on the screen. Enter a number within the range of 001 to 200 using the scroll buttons or the numeric keypad.
•Document List – Displays the passcode input screen for the selected user ID in the list. Enter the passcode to display the list of stored documents. The following options are available:
–Select All – Selects all documents in the list.
–Delete – Deletes a document.
–Print – Prints a document selected in the list. Select whether or not to delete the stored documents after printing.
NOTE: If you have forgotten the passcode, contact the Key Operator. The Key Operator can access the stored documents without entering the passcode.
Sample Set
This feature allows you to print a sample set of a document prior to printing the whole quantity. You can choose whether or not to print more sets after checking the print result.
1.Select [Sample Set] on the [Secure Print Jobs & More] screen.
2.Select a User ID. Use the scroll buttons to switch between screens.
3.Select [Document List].
4.Select a document to print or delete.
5.Select the required option.
•Refresh – Refreshes the displayed information.
•Go to – Specifies the Sample Set number to be displayed on the screen. Enter a number within the range of 001 to 200 using the scroll buttons or the numeric keypad.
•Document List – Displays the list of stored documents for the selected user ID in the list. The following options are available:
–Select All – Selects all documents in the list.
–Print – Prints a document selected in the list. After printing, the document is deleted.
–Delete – Deletes a document selected in the list.
18 |
Xerox WorkCentre 7232/7242 System Administrator Guide |

Modes
Delayed Print
This feature allows you to store documents on the machine for printing at a later time. You can check, print or delete the stored documents before the specified print time.
1.Select [Delayed Print] on the [Secure Print Jobs & More] screen.
2.Select a document to print or delete. Use the scroll buttons to switch between screens.
3.Select the required option.
•Document Name – Identifies each document by name.
•Print Time – Displays the time the document will be printed.
•Pages – Displays the number of pages.
•Refresh – Refreshes the displayed information.
•Print – Prints a document selected in the list.
•Delete – Deletes a document selected in the list.
Public Mailbox
This feature allows you to check, print, and delete documents stored in a public mailbox on the machine for polling.
1.Select [Public Mailbox] on the [Secure Print Jobs & More] screen.
2.Select a document to print or delete. Use the scroll buttons to switch between screens.
3.Select the required option.
•Document/Type – Identifies each document by number and type.
•Stored Date – Displays the date the document was stored.
•Pages – Displays the number of printed, scanned, sent, or received pages.
•Refresh – Refreshes the displayed information.
•Select All – Selects all the documents in the [Public Mailbox].
•Delete – Deletes a document selected in the list.
•Print – Prints a document selected in the list.
Undelivered Faxes
This feature allows you to delete or resend undelivered faxes. You can resend faxes to their original recipient or change the recipient.
1.Select [Undelivered Faxes] on the [Secure Print Jobs & More] screen.
2.Select a document to delete or resend. Use the scroll buttons to switch between screens.
Xerox WorkCentre 7232/7242 System Administrator Guide |
19 |

2Product Overview
3.Press the <Start> button on the control panel to resend the fax to the original recipient. Alternatively, select to delete the document or send the document to a different recipient.
•Delete This Document - Deletes the selected document. A confirmation screen is displayed before the document is deleted.
•Change Recipients - Displays the [Resend Fax] screen where you can specify a new fax recipient.
[Resend Fax] Screen
1.Select the [Change Recipients] button on the [Undelivered Fax] screen.
2.Specify a new recipient using the [New Recipients] or [Address Book] button.
•New Recipients - Displays a keyboard which allows you to directly enter a recipient.
•Address Book - Displays a page which allows you to select a recipient from the Address Book.
•Starting Rate - Displays the [Starting Rate] screen where you can select the [G3 Auto] or [Forced 4800 bps] communication mode for fax transmissions.
Machine Status
Use this button to check the machine information, the billing information, the status of the toner cartridges and print various reports. Use this button also when accessing the Key Operator mode.
For more information on each feature, refer to the following.
Machine Information – page 20 Billing Information – page 22 Supplies – page 26
Faults – page 26
1.Press the <Machine Status> button on the control panel.
Press the <Features> or <All Services> button at any time to exit.
2.Select the required option.
Machine Information
This section describes how to view general information about the machine, the status of paper trays and the hard disk, and how to change the print mode or fax receiving mode.
For more information on the features available, refer to the following.
Machine Information – page 21 Paper Tray Status – page 21 Overwrite Hard Disk – page 21 Print Mode – page 22
Fax Receiving Mode – page 22
20 |
Xerox WorkCentre 7232/7242 System Administrator Guide |
Loading...