


 Loading...
Digital Still Camera
Cyber-shot Handbook
DSC-S650/S700
Before operating the unit, please read this Handbook and “Instruction Manual” thoroughly, and retain it for future reference.
VCLICK!
 Table of contents
Basic Operations
 Using the menu
Using the Setup screen |
Viewing images on a TV screen
Using your computer
 Printing still images
Troubleshooting
Others
 Index
Index
© 2007 Sony Corporation |
2-897-945-11(1) |
GB |
Notes on using your camera
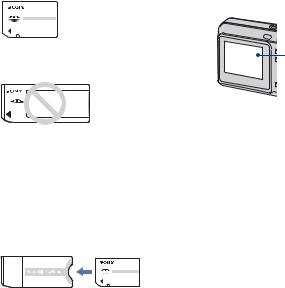
Types of “Memory Stick” that can be used (not supplied)
The IC recording medium used by this camera is a “Memory Stick Duo”. There are two types of “Memory Stick”.
“Memory Stick Duo”: you can use a “Memory Stick Duo” with your camera.
“Memory Stick”: you cannot use a
“Memory Stick” with your camera.
Other memory cards cannot be used.
•For details on “Memory Stick Duo”, see page 96.
When using a “Memory Stick Duo” with
“Memory Stick” compatible equipment
You can use the “Memory Stick Duo” by inserting it into the Memory Stick Duo Adaptor (not supplied).
Memory Stick Duo Adaptor
Notes on the LCD screen and lens
•The LCD screen is manufactured using extremely high-precision technology so over 99.99% of the pixels are operational for effective use. However, there may be some tiny black points and/or bright points (white, red, blue or green in color) that constantly appear on the LCD screen. These points are normal in the manufacturing process and do not affect the recording in any way.
Black, white, red, blue or green points
•Exposing the LCD screen or the lens to direct sunlight for long periods may cause malfunctions. Be careful when placing the camera near a window or outdoors.
•Do not press against the LCD screen. The screen may be discolored and that may cause a malfunction.
•Images may trail across on the LCD screen in a cold location. This is not a malfunction.
•This camera is equipped with a power zoom lens. Be careful not to bump the lens, and be careful not to apply force to it.
The pictures used in this Handbook
The photographs used as examples of pictures in this Handbook are reproduced images, and are not actual images shot using this camera.
On illustrations
Illustrations used in this Handbook are of the DSC-S650 unless noted otherwise.
2

Table of contents |
|
Notes on using your camera ..................................................................... |
2 |
Basic techniques for better images ........................................................... |
6 |
Focus – Focusing on a subject successfully..................................................... |
6 |
Exposure – Adjusting the light intensity ............................................................ |
7 |
Color – On the effects of lighting....................................................................... |
8 |
Quality – On “image quality” and “image size” ................................................. |
9 |
Identifying parts....................................................................................... |
10 |
Indicators on the screen .......................................................................... |
12 |
Changing the screen display ................................................................... |
16 |
Using the internal memory ...................................................................... |
17 |
Basic Operations |
|
Using the mode dial................................................................................. |
18 |
Shooting images easily (Auto adjustment mode) .................................... |
19 |
Shooting still images (Scene selection)................................................... |
25 |
Viewing/deleting images.......................................................................... |
28 |
Using the menu |
|
Using menu items .............................................................................. |
30 |
Menu items .......................................................................................... |
31 |
Shooting menu ........................................................................................ |
32 |
COLOR (Color Mode): Changing the vividness of the image or adding special effects |
|
(Metering Mode): Selecting the metering mode |
|
WB (White Bal): Adjusting the color tones |
|
ISO: Selecting a luminous sensitivity |
|
(P.Quality): Selecting the still image quality |
|
Mode (REC Mode): Selecting the continuous shooting method |
|
(Flash Level): Adjusting the amount of flash light |
|
(Sharpness): Adjusting the sharpness of the image |
|
(Setup): Changing Setup items |
|
3

Table of contents
Viewing menu ......................................................................................... |
39 |
 (Folder): Selecting the folder for viewing images - (Protect): Preventing accidental erasure
DPOF: Adding a Print order mark
 (Print): Printing images using a printer
 (Slide): Playing back a series of images
 (Resize): Changing the image size of a recorded image
 (Rotate): Rotating a still image
  (Setup): Changing Setup items
Using the Setup screen |
|
Using Setup items.............................................................................. |
45 |
Camera.............................................................................................. |
46 |
Digital Zoom |
Red Eye Reduction |
Function Guide |
Auto Review |
Internal Memory Tool......................................................................... |
48 |
Format |
|
Memory Stick Tool............................................................................. |
49 |
Format |
Change REC. Folder |
Create REC. Folder |
Copy |
1
2
Setup 1............................................................................................... |
52 |
LCD Backlight |
Language |
Beep |
Initialize |
Setup 2............................................................................................... |
53 |
File Number |
Video Out |
USB Connect |
Clock Set |
Viewing images on a TV screen
Viewing images on a TV screen ............................................................. |
55 |
4

Table of contents |
|
Using your computer |
|
Enjoying your Windows computer ........................................................... |
57 |
Installing the software (supplied)............................................................. |
59 |
Copying images to your computer........................................................... |
60 |
Viewing image files stored on a computer with your camera (using a |
|
“Memory Stick Duo”) ............................................................................... |
67 |
Using the “Picture Motion Browser” (supplied)........................................ |
68 |
Using your Macintosh computer.............................................................. |
74 |
Printing still images |
|
How to print still images .......................................................................... |
76 |
Printing images directly using a PictBridge compliant printer ................. |
77 |
Printing at a shop .................................................................................... |
81 |
Troubleshooting |
|
Troubleshooting ....................................................................................... |
83 |
Warning messages.................................................................................. |
93 |
Others |
|
To use your camera abroad — Power sources........................................ |
95 |
On the “Memory Stick” ............................................................................ |
96 |
On the batteries....................................................................................... |
98 |
Index |
|
Index........................................................................................................ |
99 |
5
Basic techniques for better images
Focus |
Exposure |
Color |
Quality |
This section describes the basics so you can enjoy your camera. It tells you how to use various camera functions such as the mode dial (page 18), the menus (page 30), and so on.
Focus |
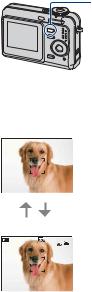
Focusing on a subject successfully |
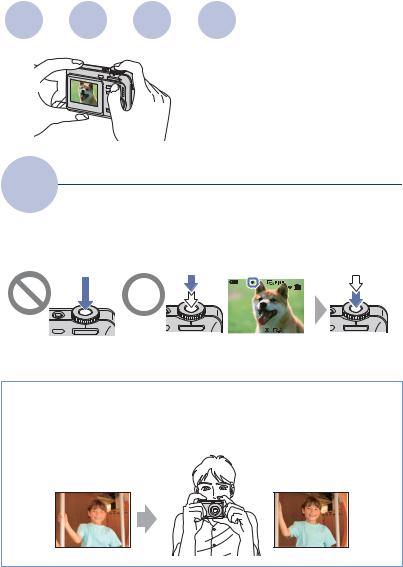
When you press the shutter button halfway down, the camera adjusts the focus automatically (Auto Focus). Remember to press the shutter button only halfway down.
Press the shutter |
Press the shutter |
AE/AF lock indicator |
|
||
button fully down |
button halfway |
|
|||
suddenly. |
down. |
flashing , lit/beeps |
|
||
|
|
|
|
|
|
|
|
|
|
|
|
|
|
|
|
|
|
|
|
|
|
|
|
Then press the shutter button fully down.
If the image looks blurred even after focusing, it may be because of camera shake. t See “Hints for preventing blur” (as follows).
Hints for preventing blur
Hold the camera steady, keeping your arms at your side. It is recommended to lean against a tree or a building nearby to steady yourself. Shooting with a 2-second delay self-timer or using a tripod is also effective. Use the flash when you shoot under a low light condition.
6
Basic techniques for better images
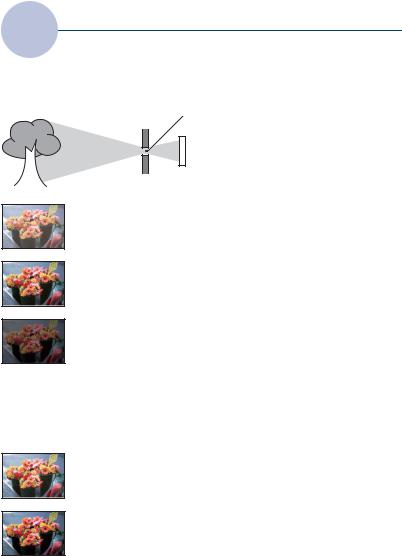
Exposure Adjusting the light intensity
You can create various images by adjusting the exposure and the ISO sensitivity. Exposure is the amount of light that the camera will receive when you release the shutter.
Exposure:
Overexposure
= too much light Whitish image
Correct exposure
Shutter speed = Length of time the camera receives light
Aperture = Size of the opening allowing light to pass through
 ISO sensitivity (Recommended Exposure Index) = Recording sensitivity
The exposure is automatically set to the proper value in the auto adjustment mode. However, you can adjust it manually using the functions below.
Adjusting EV:
Allows you to adjust the exposure determined by the camera (page 23).
Underexposure
= too little light Darker image
Metering Mode:
Allows you to change the part of the subject to be measured to determine the exposure (page 33).
Adjusting the ISO sensitivity (Recommended Exposure Index)
ISO sensitivity is measurement, estimating how much light an image pickup device receives. Even when the exposure is the same, images differ depending on the ISO sensitivity.
To adjust the ISO sensitivity, see page 35.
High ISO sensitivity
Records a bright image even when shooting in a dark location.
However, the image tends to become noisy.
Low ISO sensitivity
Records a smoother image.
However, when the exposure is insufficient, the image may become darker.
7

Basic techniques for better images
Color |
On the effects of lighting |
|
|
|
|
The apparent color of the subject is affected by the lighting conditions.
Example: The color of an image affected by light sources
Weather/lighting |
|
Daylight |
|
Cloudy |
|
Fluorescent |
|
Incandescent |
||||
Characteristics of |
White (standard) |
|
Bluish |
|
Blue-tinged |
|
Reddish |
|||||
light |
|
|
|
|
|
|
|
|
|
|
|
|
|
|
|
|
|
|
|
|
|
|
|
|
|
|
|
|
|
|
|
|
|
|
|
|
|
|
|
|
|
|
|
|
|
|
|
|
|
|
|
The color tones are adjusted automatically in the auto adjustment mode. However, you can adjust color tones manually with [White Bal] (page 34).
8

Basic techniques for better images
Quality |
On “image quality” and “image size” |
|
|
|
|
A digital image is made up of a collection of small dots called pixels.
If it contains a large number of pixels, the picture becomes large, it takes up more memory, and the image is displayed in fine detail. “Image size” is shown by the number of pixels. Although you cannot see the differences on the screen of the camera, the fine detail and data processing time differ when the image is printed or displayed on a computer screen.
Description of the pixels and the image size |
|||
3072 |
|
|
1 Image size: 7M |
|
|
3072 pixels × 2304 pixels = 7,077,888 pixels |
|
|
|
|
|
640 |
|
|
2 Image size: VGA(E-Mail) |
Pixels |
480 |
2304 |
640 pixels × 480 pixels = 307,200 pixels |
|
|||
|
|
|
|
Selecting the image size for use (page 24)
Pixel
Many pixels (Fine image quality and large file size)
Few pixels (Rough image quality but small file size)
Example: Printing in up to A3 size
Example: An attached image to be sent by e- mail
Selecting the image quality (compression ratio) in combination (page 36)
You can select the compression ratio when digital images are saved. When you select a high compression ratio, the image lacks the fineness of detail, but has a smaller file size.
9

Identifying parts
See the pages in parentheses for details of operation.
1 |
5 |
2 |
6 |
3 |
7 |
|
|
|
8 |
|
9 |
4 |
q; |
AShutter button (19)
BMode dial (19)
CSelf-timer lamp (22)
DLens
EPOWER button
FPOWER lamp
GFlash (21)
HBuzzer
IMicrophone
J (USB) · A/V OUT terminal (side)
1
|
4 |
|
5 |
2 |
6 |
|
7 |
|
8 |
3 |
9 |
|
0 |
qs |
|
qa
A (Playback) button (28)
BLCD screen (16)
C


 (Image Size/Delete) button (24, 28)
DFor shooting: Zoom (W/T) button (20)
For viewing:  /
/ (Playback zoom) button/

 (Index) button (28, 29)
EHook for wrist strap
FDISP button (16)
•Press DISP longer to select the brightness of the LCD backlight.
GMENU button (30)
•Press MENU longer to display the (Setup) screen.
HControl button
Menu on: v/V/b/B/z (30) Menu off:  /
/ /
/
 /
/ (21-23)
IAccess lamp
JTripod receptacle (bottom)
• Use a tripod with a screw length of less than 5.5 mm (7/32 inch). You will be unable to firmly secure the camera to tripods having screws longer than 5.5 mm (7/32 inch), and may damage the camera.
KBattery/“Memory Stick Duo” cover
10
Identifying parts
LAC adaptor cord cover
When using an AC-LS5K AC Adaptor (not supplied)
1
2
3
5 4
•Do not pinch the cord when you close the cover.
•You cannot charge the Nickel-Metal Hydride batteries by the AC-LS5K AC Adaptor. Use the battery charger to charge the Nickel-Metal Hydride batteries.
11

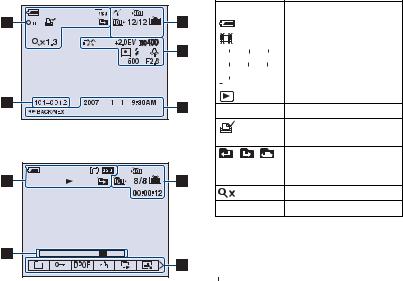
Indicators on the screen
See the pages in parentheses for details of operation.
When shooting still images
When shooting movies
A
Display Indication
Battery remaining
zAE/AF lock (19)
|
|
|
|
|
|
|
|
|
|
|
|
|
|
Recording mode (19, 37) |
|
|
|
|
|
|
|
|
|
|
|
|
|
|
|
|
|
|
|
|
|
|
|
|
|
|
|
|
|
|
|
WB |
|
|
|
|
White balance (34) |
||||||||
|
|
|
|
|
||||||||||
|
|
|
|
|
||||||||||
|
|
|
|
|
|
|
|
|
|
|
|
|
|
|
STBY |
|
Standby/Recording a movie |
||||||||||||
REC |
|
|
||||||||||||
|
|
|
|
|
|
|
|
|
|
|
|
|
|
|
|
|
|
|
|
|
|
|
|
|
|
|
|
|
Mode dial (Scene |
|
|
|
|
|
|
|
|
|
|
|
|
|
|
Selection) (25) |
|
|
|
|
|
|
|
|
|
|
|
|
|
|
|
|
|
|
|
|
|
|
|
|
|
|
|
|
|
Mode dial (Program Auto) |
|
|
|
|
|
|
|
|
|
|
|
|
|
|
(18) |
|
|
|
|
|
|
|
|
|
|
|
|
|
|
|
|
|
|
|
|
|
|
|
|
|
|
|
|
|
Camera mode |
|
|
|
|
|
|
|
|
|
|
|
|
|
|
|
|
|
|
SL |
|
Flash mode (21) |
|||||||||
|
|
|
|
|
|
|
|
|
|
|
|
|
|
|
|
|
|
|
|
|
|
|
|
|
|
|
|
|
Flash charging |
|
|
|
|
|
|
|
|
|
|
|
|
|
|
|
|
|
|
|
|
|
|
|
|
|
|
|
|
|
|
|
|
|
|
|
|
|
|
|
|
|
|
|
|
Zoom scaling (20, 46) |
|
|
|
|
|
|
|
|
|
|
|
|
|
|
|
1.3 |
|
|
|
|
|
|
|
|
|
|
||||
|
|
|
|
|
|
|
|
|
|
|
||||
|
|
|
|
|
|
|
|
|
|
|
|
|
|
|
|
|
|
|
|
|
|
|
|
|
|
|
|
|
Red-eye reduction (47) |
|
|
|
|
|
|
|
|
|
|
|
|
|
|
|
|
|
|
|
|
|
|
|
|
|
|
|
|
|
Sharpness (38) |
|
|
|
|
|
|
|
|
|
|
|
|
|
|
|
|
|
|
|
|
|
|
|
|
|
|
|
|
|
Metering mode (33) |
|
|
|
|
|
|
|
|
|
|
|
|
|
|
|
RICH |
|
Color mode (32) |
||||||||||||
NATURAL |
|
|
||||||||||||
SEPIA B&W |
|
|||||||||||||
|
|
|
|
|
|
|
|
|
|
|
|
|
|
|
B |
|
|
||||||||||||
|
|
|
|
|
|
|
|
|
|
|
|
|
|
|
Display |
|
Indication |
||||||||||||
|
|
|
|
|
|
|
|
|
|
|
|
|
|
Macro (21) |
|
|
|
|
|
|
|
|
|
|
|
|
|
|
|
|
Image Brightness(EV) |
EV |
Exposure value scale bar |
|||||||||||
|
|
|
|
|
|
|
|
|
|
|
|
|
|
(23) |
|
|
|
|
|
|
|
|
|
|
|
|
|
|
• The display is changed, |
|
|
|
|
|
|
|
|
|
|
|
|
|
|
depending on the position |
|
|
|
|
|
|
|
|
|
|
|
|
|
|
of the mode dial (shown |
|
|
|
|
|
|
|
|
|
|
|
|
|
|
left). |
V Darker Exposure value guide (23) v Brighter
12
Indicators on the screen
C
Display |
|
|
|
|
Indication |
|||||||
|
|
|
|
|
|
|
|
|
|
|
|
Image size (24) |
|
7M |
3:2 |
|
|
5M |
|||||||
|
|
|||||||||||
|
|
|
|
|
|
|
|
|
|
|
|
|
|
3M |
|
2M |
|
|
VGA |
|
|||||
|
|
|
|
|
||||||||
|
|
|
|
|
|
|
|
|
|
|
|
|
|
16:9 |
|
|
|
|
|
|
|
|
|
|
|
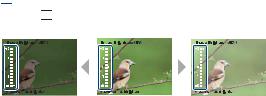
FINE STD Image quality (36)
101Recording folder (49)
•This does not appear when using internal memory.
|
Remaining internal |
|
memory capacity |
|
|
|
Remaining “Memory |
|
Stick” capacity |
|
|
00:00:00 |
Recording time [maximum |
[00:28:25] |
recordable time] |
400Remaining number of recordable images
Self-timer (22)
ISO number (35)
D
Display Indication
Vibration warning
•Indicates vibration may prevent you from shooting clear images due to insufficient lighting. Even if the vibration warning appears, you can still shoot images. However, we recommend that you use the flash for better lighting or using a tripod or other means to stabilize the camera (page 6).
ELow battery warning (93)
+Spot metering cross hair (33)
AF range finder frame
E
|
Display |
Indication |
125 |
Shutter speed |
|
|
|
|
|
F2.8 |
Aperture value |
|
|
|
|
+2.0EV |
Exposure Value (23) |
|
|
|
|
|
Menu (30) |
|
|
|
|
(not displayed |
|
|
|
|
|
on the screen |
|
|
on the previous |
|
|
page) |
|
|
|
|
13
Indicators on the screen
When playing back still images
When playing back movies
A
Display |
|
|
|
|
Indication |
|||||||||
|
|
|
|
|
|
|
|
|
|
|
|
|
|
Battery remaining |
|
|
|
|
|
|
|
|
|
|
|
|
|
|
|
|
|
|
|
|
|
|
|
|
|
|
|
|
|
Recording mode (19) |
|
|
|
|
|
|
|
|
|
|
|
|
|
|
|
|
|
|
|
|
|
|
|
|
|
|
|
|
|
|
|
|
|
|
|
|
|
|
|
|
|
|
|
Image size (24) |
|
|
7M |
|
3:2 |
|
|
5M |
||||||||
|
|
|
||||||||||||
|
|
|
|
|
|
|
|
|
|
|
|
|
||
|
3M |
|
|
2M |
|
|
VGA |
|
||||||
|
|
|
|
|
|
|||||||||
|
|
|
|
|
|
|
|
|
|
|
|
|
|
|
|
16:9 |
|
|
|
|
|
|
|
|
|
|
|
||
|
|
|
|
|
|
|
|
|
|
|
|
|
|
|
|
|
|
|
|
|
|
|
|
|
|
|
|
|
Playback mode |
-Protect (40)
Print order (DPOF) mark (81)
Change folder (39)
•This does not appear when using internal memory.
1.3 |
Zoom scaling (28) |
NPlayback (28)
B
Display |
Indication |
||||
101-0012 |
|
|
Folder-file number (39) |
||
|
|
|
|
|
|
|
|
|
|
|
Playback bar |
|
|
|
|
|
|
14
Indicators on the screen
C
Display Indication
PictBridge connecting (78)
101Recording folder (49)
•This does not appear when using internal memory.
101Playback folder (39)
•This does not appear when using internal memory.
|
Remaining internal |
|
memory capacity |
|
|
|
Remaining “Memory |
|
Stick” capacity |
|
|
8/8 12/12 |
Image number/Number of |
|
images recorded in selected |
|
folder |
|
|
00:00:12 |
Counter |
D
Display |
Indication |
|
PictBridge connecting (79) |
|
• Do not disconnect the |
|
dedicated USB cable while |
|
the icon is displayed. |
+2.0EV |
Exposure Value (23) |
|
ISO number (35) |
|
Metering mode (33) |
|
Flash |
WB |
White balance (34) |
500 |
Shutter speed |
F2.8 |
Aperture value |
E
|
Display |
Indication |
||||||
2007 1 1 |
|
|
Recorded date/time of the |
|||||
|
9:30 AM |
playback image |
||||||
|
|
|
|
|
|
|
|
|
|
|
|
|
|
|
|
|
Menu (30) |
|
|
|
DPOF |
|
|
|
||
|
|
|
|
|
|
|
|
|
|
|
|
|
|
|
|
|
|
|
|
BACK/ |
Select images |
|||||
|
NEXT |
|
||||||
|
|
|
|
|
|
|
|
|
15
Changing the screen display
• By pressing DISP button longer, you can DISP (Screen increase the LCD backlight.
display switch) button
Each time you press the DISP button, the display changes as follows.
Indicators off
Indicators on
16

Using the internal memory
The camera has approximately 24 MB of internal memory. This memory is not removable. Even when there is no “Memory Stick Duo” inserted in the camera, you can record images using this internal memory.
B


BInternal memory
When a “Memory Stick Duo” is inserted
[Recording]: Images are recorded on the “Memory Stick Duo”.
[Playback]: Images on the “Memory Stick Duo” are played back.
[Menu, Setup, etc.]: Various functions can be performed on images on the “Memory Stick Duo”.
When there is no “Memory Stick Duo” inserted
[Recording]: Images are recorded using the internal memory.
[Playback]: Images stored in the internal memory are played back.
[Menu, Setup, etc.]: Various functions can be performed on images in the internal memory.
On image data stored in the internal memory
We recommend that you copy (back up) data without error using one of the following methods.
To copy (back up) data on a “Memory Stick Duo”
Prepare a “Memory Stick Duo” with a capacity of 32 MB or more, then perform the procedure explained in [Copy] (page 51).
To copy (back up) data on a hard disk of your computer
Perform the procedure on pages 60 to 63 without a “Memory Stick Duo” inserted in the camera.
•You cannot copy image data on a “Memory Stick Duo” to the internal memory.
•By connecting the camera and a computer with a dedicated USB cable, you can copy data stored in the internal memory to a computer. However you cannot copy data on a computer to the internal memory.
17

Basic Operations
Using the mode dial
Set the mode dial to the desired function.
Guide Mark
Set to the desired mode.
Mode dial
Control button |
: Shooting movies t page 19 |
|
Still image shooting modes
 : Auto Adjustment mode
Allows easy shooting with the settings adjusted automatically. t page 19
 : Program Auto mode
Allows you to shoot with the exposure adjusted automatically (both the shutter speed and the aperture value). Also you can select various settings using the menu.
(For details on the functions available t page 31)


 : Scene Selection mode
Allows you to shoot with preset settings according to the scene. t page 25
On Function Guide
When you press the control button, the descriptions of functions are temporarily displayed (page 47).
18
Shooting images easily (Auto adjustment mode)
v/V/b/B button |
Shutter button |
|
Mode dial |
z button |
Zoom button |
Control button |
|
(Image |
|
Size) button |
|
1 Select a mode with the mode dial.
Still image (auto adjustment mode): Select  .
.
Movie: Select 


 .
.
2 Hold the camera steady, keeping your arm at your side.
Position the subject in the center of the focus frame.
3 Shoot with the shutter button.
Still image:
1Press and hold the shutter button halfway down to focus.
The z (AE/AF lock) indicator (green) flashes, a beep sounds, the indicator stops flashing and remains lit.
2Press the shutter button fully down.
The shutter sounds.
AE/AF lock indicator
Operations Basic
19

Shooting images easily (Auto adjustment mode)
Movie:
Press the shutter button fully down.
To stop recording, press the shutter button fully down again.
If you shoot a still image of a subject that is difficult to focus on
•The shortest shooting distance is approx. 50 cm (19 3/4 inches). Shoot in the close-up (Macro) mode (page 21) when you shoot a subject closer than the shooting distance.
•When the camera cannot focus on the subject automatically, the AE/AF lock indicator changes to flashing slowly and the beep does not sound. Recompose the shot and focus again.
Subjects difficult to focus on are:
–Distant from the camera and dark
–The contrast between the subject and its background is poor.
–Seen through glass
–Moving fast
–Reflective light or with a lustrous finish
–Flashing
–Backlit

 Using the zoom
Press the zoom button.
•When the zoom scale exceeds 3×, the camera uses the Digital Zoom function. For details on the [Digital Zoom] settings and the image quality, see page 46.
•You cannot change the zoom scale while shooting a movie.
20
Shooting images easily (Auto adjustment mode)
 Flash (Selecting a flash mode for still images)
Press v ( ) on the control button repeatedly until the desired mode is selected.
(No indicator): Flash Auto
Strobes when there is insufficient light (default setting)
 : Flash forced on
 SL : Slow synchro (Flash forced on)
The shutter speed is slow in a dark place to clearly shoot the background that is out of flash light.
 : Flash forced off
•The flash strobes twice. The first time is to adjust the light quantity.
•While charging the flash,  is displayed.
 Macro (Shooting close-up)
Press B ( ) on the control button.
To cancel, press B again.
(No indicator): Macro Off
 : Macro On (W side: Approx. 5 cm or farther (2 inches or farther), T side: Approx. 35 cm or farther (13 7/8 inches or farther))
Macro
•Setting the zoom all the way to the W side is recommended.
•The in-focus range becomes narrow, and the complete subject may not entirely be in focus.
•The Auto Focus speed drops.
Operations Basic
21

Shooting images easily (Auto adjustment mode)
 Using the self-timer
Press V ( ) on the control button repeatedly until the desired mode is selected.
(No indicator): Not using the self-timer
 : Setting the 10-second delay self-timer
  : Setting the 2-second delay self-timer
Press the shutter button, the self-timer lamp flashes, and a beep sounds until the shutter operates.

 Self-timer lamp
To cancel, press V again.
•Use the 2-second delay self-timer to prevent blur of an image made by the shaking of the camera when pressing the shutter button.
22
Shooting images easily (Auto adjustment mode)
 EV (Adjusting the exposure manually)
Press b ( ) on the control button, then press v (Brighter)/V (Darker) to adjust. To turn off the bar displayed, press the b button again.
|
|
|
|
|
|
|
|
|
|
|
|
|
|
|
|
|
|
|
|
|
|
|
|
|
|
|
|
|
|
|
|
|
|
|
|
|
|
|
|
|
|
Toward – |
Toward + |
|
|||||||||||
Basic |
|||||||||||||
• For details on the exposure, see page 7. |
|
|
|
|
|
||||||||
|
|
|
|
|
|
||||||||
• The compensation value can be set in 1/3EV increments. |
Operations |
||||||||||||
• If a subject is being shot in extremely bright or dark conditions, or the flash is used, the exposure |
|||||||||||||
|
|||||||||||||
adjustment may not be effective.
23

Shooting images easily (Auto adjustment mode)


 To change the still image size
Press 


 (Image Size), and then press v/V to select the size.
For details on the image size, see page 9.
The default settings are marked with  .
.
|
Image size |
Guidelines |
No. of images |
Printing |
|||||||||||||
|
7M (3072×2304) |
Up to A3/11×17" print |
|
Less |
|
Fine |
|||||||||||
|
|
|
|
|
|
|
|
|
|
|
|
|
|
|
|
|
|
|
3:21) (3072×2048) |
Match 3:2 Aspect Ratio |
|
|
|
|
|
|
|
|
|
|
|
|
|
|
|
|
5M (2592×1944) |
Up to A4/8×10" print |
|
|
|
|
|
|
|
|
|
|
|
|
|
|
|
|
|
|
|
|
|
|
|
|
|
|
|
|
|
|
|
||
|
|
|
|
|
|
|
|
|
|
|
|
|
|
|
|
|
|
|
3M (2048×1536) |
Up to 13×18cm /5×7" print |
|
|
|
|
|
|
|
|
|
|
|
|
|
|
|
|
|
|
|
|
|
|
|
|
|
|
|
|
|
|
|
||
|
|
|
|
|
|
|
|
|
|
|
|
|
|
|
|
|
|
|
2M (1632×1224) |
Up to 10×15cm /4×6" print |
|
|
|
|
|
|
|
|
|
|
|
|
|
|
|
|
|
|
|
More |
Rough |
||||||||||||
|
VGA (640×480) |
For E-mail |
|
||||||||||||||
|
|
|
|
|
|
|
|
|
|
|
|
|
|
|
|
|
|
|
16:92) (1920×1080) |
Display On 16:9 HDTV3) |
|
|
|
|
|
|
|
|
|
|
|
|
|
|
|
1)Images are recorded in 3:2 aspect ratio, same as photograph printing paper or postcards, etc.
2)Both edges of the image may be cut off when printing (page 90).
3)By using a Memory Stick slot or USB connection, you can enjoy images in higher quality.
24
Shooting still images (Scene selection)
Shutter button
Mode dial
Operations Basic
1 Select the desired mode of Scene Selection (
 ,
,  ,
,  ,
,  ,
,  ,
,  ,
,  ).
).
• For details on modes, see the next page.
2 Shoot with the shutter button.
To cancel the Scene Selection
Set the mode dial to other than the mode of Scene Selection (page 18).
25
Shooting still images (Scene selection)
Scene Selection modes
The following modes are predetermined to match the scene conditions.

 High Sensitivity
Allows you to shoot images without a flash under low light conditions, reducing blur.
 Twilight*
Allows you to shoot night scenes at far distance without losing the dark atmosphere of the surroundings.

 Landscape
Focuses only on a distant subject to shoot landscapes, etc.
 Soft Snap
Allows you to shoot skin colors in brighter and warmer tones for more beautiful pictures. In addition, the soft focus effect creates a gentle atmosphere for portraits of people, flowers, etc.
Twilight Portrait*
Suitable for shooting portraits in dark places. Allows you to shoot sharp images of people in dark places without losing the dark atmosphere of the surroundings.
 Beach
Beach
When shooting seaside or lakeside scenes, the blue of the water is clearly recorded.
 Snow
Snow
When shooting snowy scenes or other places where the whole screen appears white, use this mode to prevent sunken colors and record clear images.
*The shutter speed becomes slower, so using a tripod is recommended.
26

Shooting still images (Scene selection)
Functions that cannot be combined with Scene Selection
For shooting an image appropriately according to the scene condition, a combination of functions is determined by the camera. Some functions are not available, depending on the Scene Selection mode. When you press the button to select functions that cannot be combined with Scene Selection, a beep sounds.
( : you can select the desired setting)
Macro |
Flash |
White Balance |
Burst |
Flash level |
|
|
|
|
— |
|
SL |
Auto/ WB |
— |
|
— |
|
|
— |
— |
— |
/ |
|
|
|
|
/ |
|
|
|
|
/ |
|
|
|
Operations Basic
27
Viewing/deleting images
v/V/b/B button
|
(Index)/ (Playback |
|
zoom) button |
|
(Playback zoom) button |
z button |
(Playback) button |
Control button |
MENU button |
|
|
(Delete) button |
|
1 Press  (Playback) button.
If you press  (Playback) button when the camera is powered off, the camera is turned on in the playback mode. If you press again, switches to recording mode.
2 Select an image with b/B on the control button.
Movie:
Press z to play back a movie. (Press z again to stop playback.)
Press B to fast forward, press b to rewind. (Press z to return to normal playback.)
•You cannot listen to the audio with this camera when a movie is played back. To listen to the audio, connect with external outputs such as a TV, a speaker, etc.

 To delete images
1 Display the image you want to delete and press 


 (Delete).
2 Select [Delete] with v, then press z.
To cancel the deletion
Select [Exit], then press z.

 To view an enlarged image (playback zoom)
Press  while displaying a still image.
To undo the zoom, press  .
.
Adjust the portion: v/V/b/B
Cancel playback zoom: z
28
Viewing/deleting images


 Viewing an index screen
Press 

 (Index) and select an image with v/V/b/B. To display the next (previous) index screen, press b/B.
To return to the single-image screen, press z.
To delete images in index mode
1While an index screen is displayed, press 


 (Delete) and select [Select] with v/V on the control button, then press z.
2Select the image you want to delete with v/V/b/B, then press z to display the  (Delete) indicator on the selected image.
Green selection frame
To cancel a selection
Select an image you have previously selected for deletion, then press z to delete the  indicator from the image.
3 Press 


 (Delete).
4 Select [OK] with B, then press z.
•To delete all the images in the folder, select [All In This Folder] with v/V in step 1 instead of [Select], then press z.
Operations Basic
29
Using the menu
 Using menu items
v/V/b/B button
(Playback) button |
Mode dial |
z button
MENU button
Control button
1 Recording: Turn on the camera, then set the mode dial. Playback: Press  (Playback) button.
Different items are available depending on the position of the mode dial and Recording/Playback mode.
2 Press MENU to display the menu.
3 Select the desired menu item with b/B on the control button.
• If the desired item is invisible, keep pressing b/B until the item appears on the screen.
• Press z after selecting an item in the Playback mode.
4 Select a setting with v/V.
The setting you select is zoomed and set.
5 Press MENU to turn off the menu.
You can also turn off the menu by pressing the shutter button halfway down.
•If there is an item that is not displayed, an v/V mark appears on the edges of the location where menu items usually appear. To display an item that is not displayed, select the mark with the control button.
•You cannot set items that are not available to select.
30
Loading...