


 Loading...
4-537-684-11(2)
Digital Paper System
Quick Start Guide
There are three instruction guides provided for your reference. Please review this Quick Start Guide first. For more information, the Basic Operation Guide and User Guide can be found by pressing the  (Home) button tap [Documents] [Folders] on your Digital Paper device.
DPT-S1
© 2014 Sony Corporation / Printed in Japan

Getting Started
Step 1: Checking the supplied items
When taking out the Digital Paper device from the box, check the supplied items.
ˎˎDigital Paper device × 1 |
ˎˎSleeve case × 1 |
Step 3: Setting up the device
1Perform initial settings on the device.
Set [Time Zone], [Date & Time Settings], [Pen Grip Style], and [User Name] from the options displayed.
ˎˎStylus × 1
ˎˎAC adapter × 1 ˎˎUSB cable × 1
ˎˎReplacement nib × 3
ˎˎNib puller × 1
ˎˎQuick Start Guide (this guide) × 1 ˎˎWarranty card × 1
Step 2: Charging via an AC outlet
1Connect one end of the supplied USB cable to the micro USB connector of your device, and the other end to the AC adapter.
2Connect the AC adapter to an AC outlet.
Charge indicator

 AC outlet
AC adapter
Note
Charge the Digital Paper device within the recommended temperature range of 5 °C (41 °F) to 35 °C (95 °F). If the room is too hot or cold, disconnect the USB cable from the device, adjust room temperature accordingly, then reconnect the USB cable to charge the device.
Tip
ˎˎThe Charge indicator will light up red while charging. It will take approximately 2.5 hours to fully charge via AC Adapter.
ˎˎThe Charge indicator may blink red 3 times if the (Power) button is pressed when the remaining battery is very low. In this case, it may take up to 5 minutes before the Digital Paper device turns on automatically.
Note
You can change the initial settings. Press the  (Home) button tap [Settings]. For details, refer to the User Guide.
2
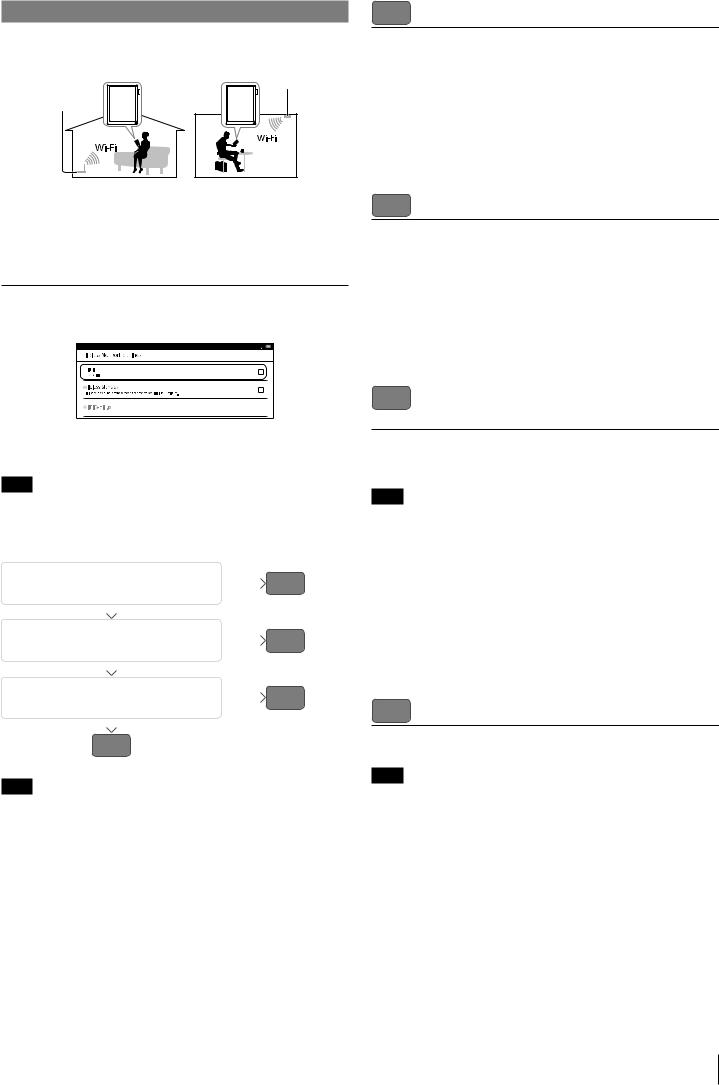
Setting up a Wi-FI® Network
Setting up a Wi-Fi connection
Home |
Hotspot and Office |
|
Internet |
Internet
To connect to the internet wirelessly, set up a wireless (Wi-Fi) internet connection beforehand.
Tip
Supported security methods are WEP, WPA/WPA2 PSK, and 802.1x EAP.
Turning on the Wi-Fi connection
1Press the  (Home) button.
2Tap [Settings] [Wireless Network Settings].
3Tap [Wi-Fi] to check the check box.
Wi-Fi is turned off by default.
Note
Turning on the Wi-Fi connection may differ depending on the solution device. For details, refer to the instruction manual supplied by the solution.
The following questions will determine the most suitable case for setting the Wi-Fi network connection.
1 Are you using a home or office |
No |
D |
||
Wi-Fi connection? |
|
|
||
|
|
|
||
|
Yes |
|
|
|
|
|
|
|
|
2 Is your Wi-Fi router WPS* |
No |
C |
||
compatible? |
|
|
||
|
|
|
||
|
Yes |
|
|
|
|
|
|
|
|
3 Does your Wi-Fi router have a WPS |
No |
B |
||
button? |
|
|
||
|
|
|
||
|
Yes |
|
|
|
|
|
|
|
|
|
* WPS: Wi-Fi Protected Setup |
|
||
A |
|
|
|
|
Note
ˎˎConnection and communication fees apply when using a Wi-Fi router. ˎˎWireless communication exposes risks to wiretapping, manipulation and illegal
invasion into the network.
Unless absolutely necessary, Sony recommends that you use safe security methods (WPA/WPA2-PSK, etc.) and avoid non secure or WEP access.
ˎˎWhen connecting to a Wi-Fi network at home, refer to your Wi-Fi router’s instruction manual for details. When connecting to a Wi-Fi network in an office or group, check with the network administrator for details.
About WPS
WPS (Wi-Fi Protected Setup) lets you easily make a Wi-Fi connection. To use the WPS, your Wi-Fi router must be compatible with WPS. Refer to your Wi-Fi router’s instruction manual for details.
A : Connecting to a Wi-Fi router with a WPS button
By using the “WPS” button on a Wi-Fi router, you can make the connection or security settings automatically.
1Tap [Wi-Fi] [Wi-Fi Settings].
2Tap [WPS Push-Button Configuration] [Start].
3On your Wi-Fi router, press the “WPS” button within 2 minutes.
4After the setup completion screen appears on the device, tap [OK].
B : Connecting to a Wi-Fi router with WPS PIN input
By using the PIN (Personal Identification Number), you can make the connection or security settings easily.
1Tap [Wi-Fi] [Wi-Fi Settings].
2Tap [Add Wi-Fi Network] [WPS PIN Method] [Start].
A PIN code will be shown on the screen of the device.
3Enter the PIN code into your Wi-Fi router.
Refer to your Wi-Fi router’s instruction manual for details.
4Tap [OK] on the screen of the device.
C : Connecting to a Wi-Fi router by selecting a network name
Connect to one of the available Wi-Fi networks listed. Find out the Wi-Fi router’s name and password beforehand and take a note.
Note
Depending on the security method of the Wi-Fi router, a password may be required.
1Tap [Wi-Fi] [Wi-Fi Settings].
2Tap your Wi-Fi router’s SSID in the [Wi-Fi Networks] list.
When the SSID is not listed, tap [Scan].
If prompted for a password, tap the input area and enter the password using the on-screen keyboard.
3Tap [Connect].
Tip
Using TLS under 802.1x EAP requires other settings, certificate installation, etc. Check with the network administrator for details.
D : Connecting to a public Wi-Fi network
You can access a network even when you go out by using the available public Wi-Fi network services.
Note
Connecting to a public Wi-Fi network may differ depending on the service provider. For details, contact the homepage, etc., of the Wi-Fi service provider.
1Follow steps of “C: Connecting to a Wi-Fi router by selecting a network name” to connect to a public Wi-Fi network.
The [Browser] application may start automatically. Otherwise, press the  (Home) button, then tap [Browser].
2Follow the instructions on the homepage of the Wi-Fi service provider to complete the Wi-Fi connection.
3
Manually connecting to an unlisted access point
1Tap [Wi-Fi Settings] to display [Wi-Fi] screen.
2Tap [Add Wi-Fi Network] [Manual Registration].
3Tap the [SSID] input area, then enter the SSID (Service Set Identifier) using the on-screen keyboard.
4Tap [Security Method] ([Open] by default) tap the compatible security method.
5Follow the instructions to complete the Wi-Fi settings for the connected router.
Using TLS under 802.1x EAP may require installation of the user certificate beforehand.
6Tap [Save].
Connecting via the proxy server
Tip
When connecting via proxy server, settings are necessary. Check with the network administrator for details.
1Tap [Wi-Fi Settings] to display [Wi-Fi] screen.
2Press the  (Menu) button, then tap [Advanced].
3Tap [Use a proxy server] in the [Proxy server] menu to check the check box.
4Tap [Address], input a valid address using the on-screen keyboard, then tap [OK].
5Tap [Port], input a valid port using the on-screen keyboard, then tap [OK].
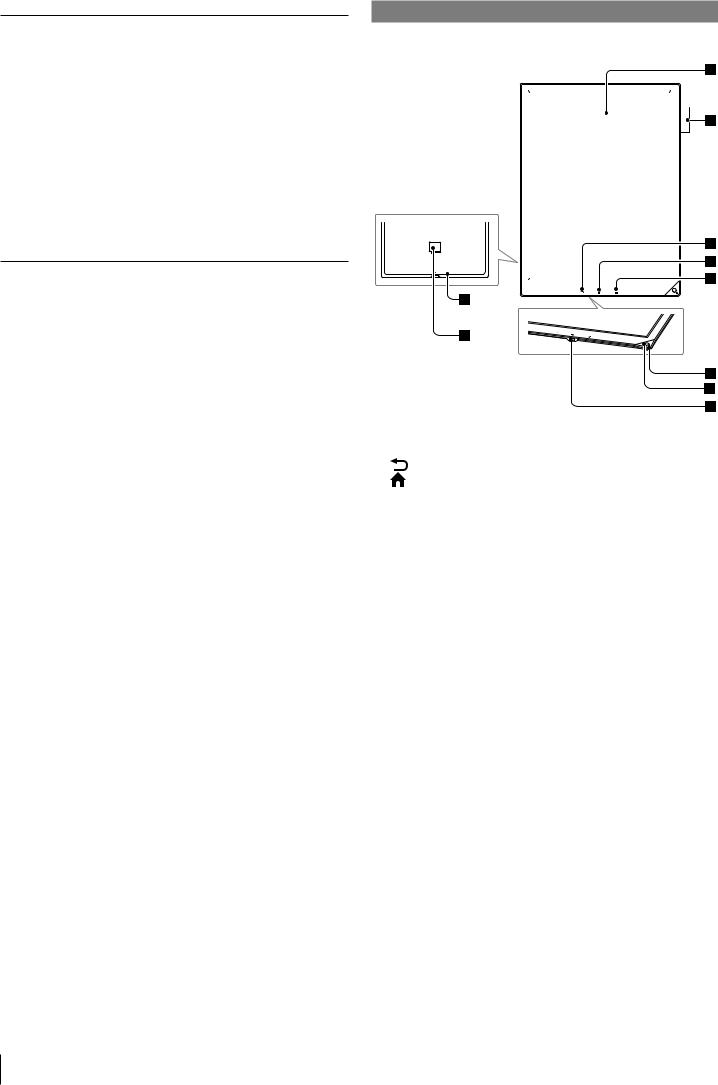
Parts and controls
Overview
|
|
|
|
|
|
|
|
|
|
|
|
|
|
|
|
|
|
|
|
|
|
|
|
|
|
|
|
|
|
|
|
Touchscreen |
Charge indicator |
||||||
Stylus holder |
(Power) button |
||||||
|
|
|
|
(Back) button |
Micro USB connector |
||
|
|
|
|
(Home) button |
RESET button |
||
|
|
|
|
(Menu) button |
microSD card slot |
||
|
|
|
|||||
|
|
|
|||||
|
|
|
|||||
|
|
|
|||||
4
Loading...