


Digital Photo
Printer
DPP-FP67/FP77
Operating Instructions
Before operating this unit, please read “Read This First” and “About the Print Packs” supplied and this manual, “Operating Instructions,” thoroughly and retain them for future reference.
Owner’s Record
The model and serial numbers are located on the bottom. Record the serial number in the space provided below. Refer to these numbers whenever you call upon your Sony dealer regarding this product.
Model No. DPP-FP67/FP77
Serial No. ________________________
These models are not available in every country and region.
4-129-145-12 (1)
Before you begin
Preparations
Direct printing
Printing from a PictBridge camera
Printing from a Bluetoothcompliant device
Printing from a PC
Error messages
Troubleshooting
Additional information
© 2009 Sony Corporation |
Please read the supplied “Read This First” |
and “About the Print Packs.” |
|
|
|

WARNING
To reduce fire or shock hazard, do not expose the unit to rain or moisture.
For the Customers in the U.S.A. who purchased the DPP-FP67
CAUTION
You are cautioned that any changes or modifications not expressly approved in this manual could void your authority to operate this equipment.
If you have any questions about this product, you may call:
Sony Customer Information Services Center 1-800-222-SONY (7669)
The number below is for the FCC related matters only.
Regulatory Information
Declaration of Conformity
Trade Name: |
SONY |
Model No.: |
DPP-FP67 |
Responsible Party: |
Sony Electronics Inc. |
Address: |
16530 Via Esprillo, San Diego, |
|
CA 92127 U.S.A. |
Telephone No.: |
858-942-2230 |
This device complies with part 15 of the FCC Rules. Operation is subject to the following two conditions:
(1) this device may not cause harmful interference, and (2) this device must accept any interference received, including interference that may cause undesired operation.
Note:
This equipment has been tested and found to comply with the limits for a Class B digital device, pursuant to Part 15 of the FCC Rules.
These limits are designed to provide reasonable protection against harmful interference in a residential installation. This equipment generates, uses, and can radiate radio frequency energy and, if not installed and used in accordance with the instructions, may cause harmful interference to radio communications. However, there is no guarantee that interference will not occur in a particular installation. If this equipment does cause harmful interference to radio or television reception, which can be determined by turning the equipment off and on, the
user is encouraged to try to correct the interference by one or more of the following measures:
–Reorient or relocate the receiving antenna.
–Increase the separation between the equipment and receiver.
–Connect the equipment into an outlet on a circuit different from that to which the receiver is connected.
–Consult the dealer or an experienced radio/TV technician for help.
For Customers in Europe
This product has been tested and found compliant with the limits set out in the EMC Directive for using connection cables shorter than 3 meters (9.8 feet).
Attention
The electromagnetic fields at the specific frequencies may influence the picture of this digital photo printer.
Notice
If static electricity or electromagnetism causes data transfer to discontinue midway (fail), restart the application or disconnect and connect the communication cable (USB, etc) again.
Notice for the customers in the countries applying EU Directives
The manufacturer of this product is Sony Corporation, 1-7-1 Konan Minato-ku Tokyo, 1080075 Japan.
Than Authorized Representative for EMC and product safety is Sony Deutschland GmbH, Hedelfinger Strasse 61, 70327 Stuttgart, Germany. For any service or guarantee matters, please refer to the addresses given in separate service or guarantee documents.
2 GB
Disposal of Old Electrical & Electronic Equipment (Applicable in the European Union and other European countries with separate collection systems)
This symbol on the product or on its packaging indicates that this product shall not be treated as household waste. Instead it shall be handed over to the
applicable collection point for the recycling of electrical and electronic equipment. By ensuring this product is disposed of correctly, you will help prevent potential
negative consequences for the environment and human health, which could otherwise be caused by inappropriate waste handling of this product. The recycling of materials will help to conserve natural resources. For more detailed information about recycling of this product, please contact your local Civic Office, your household waste disposal service or the shop where you purchased the product.
NOTICE FOR CUSTOMERS IN THE UNITED KINGDOM
A moulded plug complying with BS 1363 is fitted to this equipment for your safety and convenience. Should the fuse in the plug supplied need to be replaced, a fuse of the same rating as the supplied one and approved by ASTA or BSI to BS 1362, (i.e.marked with or
or mark) must be used.
If the plug supplied with this equipment has a detachable fuse cover, be sure to attach the fuse cover after you change the fuse. Never use the plug without the fuse cover. If you should lose the fuse cover, please contact your nearest Sony service station.
Duplication, edition, or printing of a CD, TV program, copyrighted materials such as pictures or publications, or any other materials except for your own recording or creation is limited to private or domestic use only. Unless you hold copyright or have permission from copyright holders for the materials to be duplicated, use of those materials beyond this limit may infringe the provisions of the copyright law and be subject to the copyright holder’s claim for damages.
When using photo images with this printer, pay special attention not to infringe the provisions of the copyright law. Any unauthorized use or modification of portraits may also infringe their rights.
For some demonstrations, performances, or exhibits, photography may be forbidden.
Backup recommendations
To avoid potential risk of data loss caused by accidental operation or malfunction of the printer, we recommend that you save a backup copy of your data.
Information
IN NO EVENT SHALL SELLER BE LIABLE FOR ANY DIRECT, INCIDENTAL OR CONSEQUENTIAL DAMAGES OF ANY NATURE, OR LOSSES OR EXPENSES RESULTING FROM ANY DEFECTIVE PRODUCT OR THE USE OF ANY PRODUCT.
Sony shall assume no responsibility for any accidental or consequential damages or loss of the recorded content which may be caused by use or malfunction of the printer or memory card.
Notes on LCD screen
•The displayed image on the screen is not identical in picture quality and colors with the printed image because display methods or profiles differ. Please regard the displayed image as just a reference.
•Do not press against the LCD screen. The screen may be discolored and that may cause a malfunction.
•Exposing the LCD screen to direct sunlight for long periods may cause malfunctions.
•The LCD screen is manufactured using extremely high-precision technology, so over 99.99% of the pixels are operational for effective use. However, there may be some tiny black points and/or bright points (white, red, blue or green in color) that constantly appear on the LCD screen. These points are normal in the manufacturing process and do not affect the printing in any way.
•Images may trail across the LCD screen in a cold location. This is not a malfunction.
Continued
3 GB
On trademarks and copyrights
•Cyber-shot, 

 , “Memory Stick,”


 , “Memory Stick Duo,”


 , “MagicGate Memory Stick,” “Memory Stick PRO,”


 , “Memory Stick PRO Duo,”


 , “Memory Stick PRO-HG Duo,”


 , “Memory Stick
Micro,” 


 ,
,  , “Memory Stick-ROM,”


 , “MagicGate,” and


 are trademarks of Sony Corporation.
•Microsoft, Windows, Windows Vista and DirectX are either registered trademarks or trademarks of Microsoft Corporation in the United States and/or other countries.
•Intel and Pentium are the registered trademarks or trademarks of Intel Corporation.
•


 or xD-Picture CardTM is a trademark of FUJIFILM Corporation.
•


 is a trademark of FotoNation Inc. in the U.S.A.
•This product contains fonts from Monotype Imaging Inc.
•All other companies and product names mentioned herein may be the trademarks or registered trademarks of their respective companies. Furthermore, “™” and “®” are not mentioned in each case in this manual.
•The Bluetooth word mark and logos are owned by the Bluetooth SIG, Inc. and any use of such marks by Sony Corporation is under license.
•Other trademarks and trade names are those of their respective owners.
Notice for users
Program © 2009 Sony Corporation
Documentation © 2009 Sony Corporation
All rights reserved. This manual or the software described herein, in whole or in part, may not be reproduced, translated or reduced to any machine readable form without prior written approval from Sony Corporation.
IN NO EVENT SHALL SONY CORPORATION BE LIABLE FOR ANY INCIDENTAL, CONSEQUENTIAL OR SPECIAL DAMAGES, WHETHER BASED ON TORT, CONTACT, OR OTHERWISE, ARISING OUT OF OR IN CONNECTION WITH THIS MANUAL, THE SOFTWARE OR OTHER INFORMATION CONTAINED HEREIN OR THE USE THEREOF.
By breaking the seal of the envelope of the CD-ROM package, you accept all the terms and conditions of this agreement. If you do not accept these terms and conditions, please return this disk envelope unopened, along with the rest of the package, immediately to the dealer where you obtained it.
Sony Corporation reserves the right to make any modification to this manual or the information contained herein at any time without notice.
The software described herein may also be governed by the terms of a separate user license agreement.
Any design data such as sample pictures provided in this software cannot be modified or duplicated except for the purpose of personal use. Any unauthorized duplication of this software is prohibited under copyright law.
Please note that unauthorized duplication or modification of portraits or copyrighted work could infringe the rights reserved by rights holders.
You may be referred to the supplied “Read This First” and “About the Print Packs” when there are detailed explanations in the leaflet.
On the illustrations and screen shots used in this manual
The illustrations and screen shots used in this manual are of the DPP-FP77 unless noted otherwise.
4 GB

Table of Contents |
|
Notice for users ............................. |
4 |
Before you begin |
|
Identifying the parts ........................ |
7 |
Preparations |
|
Checking the contents of the |
|
package .......................................... |
9 |
Setting the ink ribbon ..................... |
9 |
Inserting the print paper ............... |
10 |
Connecting to the AC power |
|
source .......................................... |
12 |
Operations in an initial state ........... |
13 |
Direct printing |
|
LCD screen display ....................... |
14 |
An image preview ........................... |
14 |
Image list ....................................... |
15 |
List of icons ................................... |
16 |
Basic printing ............................... |
17 |
Inserting a memory card ................. |
17 |
Printing selected images ................ |
17 |
Enjoying various printing .............. |
19 |
Exposure and Red-eye |
|
Correction ..................................... |
22 |
Editing an image ........................... |
23 |
Enlarging and reducing an image |
|
size ............................................... |
23 |
Moving an image .......................... |
23 |
Rotating an image ......................... |
23 |
Adjusting an image ........................ |
23 |
Printing an edited image ............... |
24 |
Undoing the operations ................. |
24 |
Exiting the menu ........................... |
25 |
Making a Layout Print .................. |
25 |
Making Batch Print (Index Print/Print |
|
All/DPOF Print) ............................. |
26 |
Making a Calendar ....................... |
27 |
Making an ID Photo ..................... |
28 |
Changing the settings .................. |
29 |
Setting the Date Print ................... |
29 |
Setting the print finish (Borders/ |
|
Borderless Print) ............................ |
30 |
Setting the On-screen Display ....... |
30 |
Changing the Color Setting ........... |
31 |
Hiding or showing the Printer |
|
information display ....................... |
31 |
Resetting to the Default Setting |
..... 32 |
Printing from a USB memory ....... |
32 |
Printing from a PictBridge |
|
camera |
|
Printing from a PictBridge |
|
camera .......................................... |
34 |
Continued
5 GB

Printing from a Bluetoothcompliant device
Printing from a Bluetooth-compliant |
|
device ........................................... |
35 |
Compatible profiles for Bluetooth |
|
communication .............................. |
35 |
Printing procedures ....................... |
35 |
Printing from a PC |
|
Printing from a PC ........................ |
37 |
Installing the software .................. |
37 |
System requirements ..................... |
37 |
Installing the printer driver ............. |
38 |
Installing the PMB (Picture Motion |
|
Browser) ........................................ |
41 |
Printing photos from the PMB |
|
(Picture Motion Browser) ............. |
42 |
Registering a browsing folder ........ |
45 |
Printing from a commercially available |
|
software application ....................... |
46 |
Error messages |
|
If an error display appears ............ |
47 |
Troubleshooting |
|
If trouble occurs ........................... |
50 |
If paper jams ................................ |
60 |
Cleaning ....................................... |
61 |
Additional information |
|
Precautions .................................. |
62 |
On safety ........................................ |
62 |
On installation ................................ |
62 |
On cleaning .................................... |
62 |
On restrictions on duplication ........ |
63 |
About the Memory Cards .............. |
63 |
“Memory Stick” media .................... |
63 |
SD Memory Card ............................ |
64 |
xD-Picture Card .............................. |
64 |
Notes on using a memory card ....... |
65 |
Specifications ............................... |
65 |
Printing range ................................. |
67 |
Glossary ....................................... |
68 |
Index ............................................ |
69 |
6 GB

Before you begin
Identifying the parts
For details, see the pages indicated in the parentheses.
Illustrations are of the DPP-FP77. The button locations and names of the DPP-FP67 are identical, although the LCD screen size is different.
Printer front panel
A1 (on/standby) button/STANDBY indicator
B CANCEL/  (Index View) button
C MENU button
D LCD screen
2.4 type DPP-FP67 3.5 type DPP-FP77
E ENTER button
F Direction (g/G/f/F) buttons
GAUTO TOUCH-UP button (.page 22)
H PRINT button/indicator
IPaper tray compartment (.page 10)
J Paper tray compartment door
K“Memory Stick PRO” media (Standard/Duo) slot (.pages17, 63)
LxD-Picture Card slot (.pages17, 64)
MSD Memory Card slot (.pages17, 64)
N Ink ribbon eject lever (.page 9)
OInk ribbon (sold separately) (.page 9)
PInk ribbon compartment door (.page 9)
begin you Before
Continued
7 GB
Printer left side panel
E  USB connector (.page 39)
When using your computer, connect it via a
USB cable to this connector.
F PictBridge/EXT INTERFACE connector (.pages 32 to 35)
When using a PictBridge-compliant digital camera, a USB memory, a Bluetooth USB adaptor (DPPA-BT1*), or other external USB device, connect it to this connector.
* In some regions, the DPPA-BT1 Bluetooth USB adaptor is not sold.
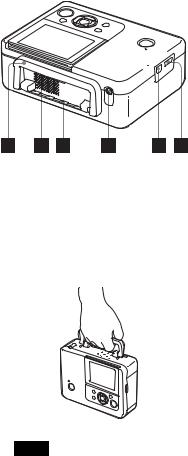
Printer rear panel
AHandle
As illustrated below, raise the handle when you carry the printer.
When you use the printer, close the handle to its original position.
Notes
•When you carry the printer, make sure to remove memory cards, USB memory, the paper tray, AC adaptor, and other cables. Otherwise malfunctions may occur.
•When using the DPP-FP77, set the LCD panel to its original position.
B Ventilation holes
C Paper outlet
DDC IN 24 V jack (.page 12)
Plug the supplied AC adaptor into this connector. Then connect the AC adaptor and AC outlet with the power cord.
8 GB

Preparations
Checking the contents of the package
Make sure that the following accessories are supplied with your printer.
•Paper tray (1)
•AC adaptor (1)
•USB cable (1)
•AC power cord*1 (1)
•Cleaning cartridge (1)/Cleaning sheet (1)
•CD-ROM (Windows Printer Driver Software Ver.1.0 and PMB (Picture Motion Browser) Ver.4.2)
•Operating Instructions (this booklet)
•Read This First (1)
•About the Print Packs (1)
•Warranty (In some regions, the warranty is not supplied.)
•Sony End User Software License Agreement
*1 The plug shape and specifications of the AC power cord differ depending on the region in which you purchased the printer.
About Sony Print Packs (sold separately)
Please use a Sony optional color print pack designed for the printer. For details, refer to the supplied “About the Print Packs.”
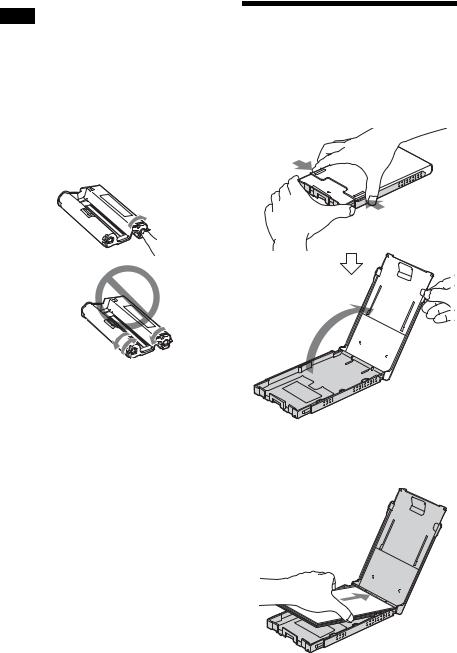
Setting the ink ribbon
1 Pull and open the ink ribbon compartment door.
2 Insert the ink ribbon in the direction of the arrow until it clicks into place.
3 Close the ink ribbon compartment door.
Removing the ink ribbon |
Push up the eject lever, and remove the |
used ink ribbon. |
Preparations
Continued
9 GB
Notes
•Do not touch the ink ribbon or store the ink ribbon in a dusty location. Fingerprints or dust on the ink ribbon may result in imperfect printing.
•Do not rewind the ink ribbon and use the rewound ink ribbon for printing. Otherwise, proper printing results will not be obtained, or a malfunction may occur. If the ink ribbon does not click into place, remove it and then re-insert it. Only when the ink ribbon is too slack to be loaded, keep pressing the core of the ribbon and wind the ink ribbon in the direction of the arrow to remove the slack.
Do not wind the ribbon in the directions shown here
•Do not disassemble the ink ribbon.
•Do not pull out the ribbon from the ink ribbon.
•Do not remove the ink ribbon while printing.
•Avoid placing the ink ribbon in a location subject to high temperatures, high humidity, excessive dust or direct sunlight. Please store it in a cool and dark place and use it within a short period from the date of production. Depending on the storage conditions, the ink ribbon may deteriorate. Use of such an ink ribbon may affect the printed results, for which we cannot guarantee or compensate.
Inserting the print paper
1 Open the paper tray cover.
Hold the parts on both sides of the paper tray cover (shown with arrows) and open the paper tray cover.
2 Set the print paper into the paper tray.
10 GB
3 Close the paper tray cover.
4 Open the slide cover.
5 Insert the paper tray into the printer.
Notes
•You can set up to 20 sheets of print paper. Riffle the print paper thoroughly. Insert the print paper with the protective sheet facing up. Remove the protective sheet from the tray.
•If there is no protective sheet, insert the print paper into the paper tray with its printing surface (the side with no imprint) facing up.
•Do not touch the printing surface. Fingerprints or contamination on the printing surface may result in imperfect printing.
•Do not bend the print paper, or cut the print paper from the perforations before printing.
•To avoid paper jam or malfunctions of the printer, make sure of the following before printing:
–Do not write or type on the print paper.
–Do not attach a sticker or stamps on the print paper.
–When adding print paper to the paper tray, be sure that the total number of print paper sheets does not exceed 20 sheets.
–Do not insert different types of print paper together into the paper tray.
–Do not print on used print paper. Printing an image twice on the same paper will not make the printed image thicker.
–Use the print paper for this printer only.
–Do not use print paper ejected without printing.
Notes on storing the print paper
•To store print paper in the tray, remove the paper tray from the printer and close the slide door of the paper tray.
•Avoid storing the paper with the printed faces touching each other or in contact with rubber or plastic products, including vinyl chloride or plasticizer for an extended period of time; color changes or deterioration of the printed image may occur.
•Avoid placing the print paper in a location subject to high temperatures, high humidity, excessive dust or direct sunlight.
•When you are going to store partially-used print paper, store it in its original bag or a similar container.
Preparations
11 GB
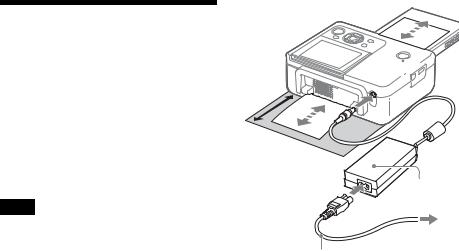
Connecting to the AC power source
1 Insert the plug of the AC adaptor into the DC IN 24 V jack on the back of the printer.
2 Connect one plug of the AC power cord to the connector of the AC adaptor and the other plug to the wall outlet.
Notes
•Do not place the printer in an unstable location such as on a wobbly table.
•Leave enough room around the printer. The print paper emerges from the back a few times during printing. Keep 10 cm (13/32 inch) or more space at the rear of the printer.
•Connect the AC adaptor to an easily accessible wall outlet close by. If trouble occurs while using the adaptor, immediately shut off the power by disconnecting the plug from the wall outlet.
•Do not short the plug of the AC adaptor with a metallic object, as this may cause a malfunction.
•Do not use the AC Adaptor placed in a narrow space, such as between a wall and furniture.
•When you have finished using the AC adaptor, disconnect the AC power cord from the
DC IN 24 V jack of the printer and from the AC power sources.
•The printer is not disconnected from the AC power source (mains) as long as it is connected to the wall outlet, even if the printer itself has been turned off.
•A socket outlet should be as close as possible to the unit and easily accessible.
10 cm (13/32 inches)
AC adaptor
To the wall
outlet
AC power cord
To use your Printer abroad - Power sources
You can use your Printer and the AC Adaptor (supplied) in any country or region where the power supply is within 100 V to 240 V AC, 50/60 Hz.
Do not use an electronics transformer (travel converter), as this may cause a malfunction.
12 GB

Operations in an initial state
When the photo printer is turned on without a memory card inserted or a PC connected, the initial display below appears on the screen.
Preparations
When the printer is not operated for 5 seconds, demo mode is displayed. If any other button than the 1 (on/standby) button is pressed, the screen returns to the initial display. If a memory card is inserted, or a PC is connected, the images from the connected device are displayed.
To print directly from a memory card or an external device, see page 14. To print from a PC, see page 37.
13 GB
Direct printing
LCD screen display
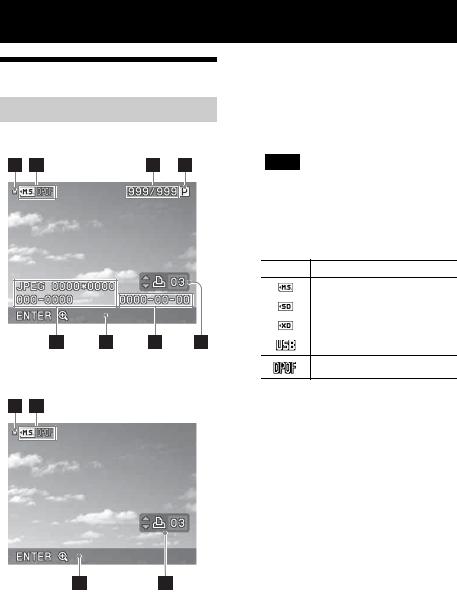
An image preview
On-screen Display: On
On-screen Display: Off
You can change the image preview view by setting the “On-screen Display” from the menu. (page 30)
AAccess indication
Appears while the printer is accessing a memory card or a USB memory.
Note
While the access indication is displayed, do not remove a memory card or a USB memory, or do not turn off the power. Data may be damaged.
BInput/setting indications
Input indications and settings information for an image are displayed.
Icons Meaning
“Memory Stick” media input SD Memory Card input xD-Picture Card input
USB memory input
DPOF print preset indication
CNumber of selected images/Total number of image
DInk ribbon indication
 : P size
 : Cleaning cartridge
EImage file information (file format, file size, image number (folderfile number)*)
*DCF-compatible files only. In case of other file formats, only part of file name will be displayed.
F Operation tips
G Shot or Saved date
H Print quantity setting
14 GB
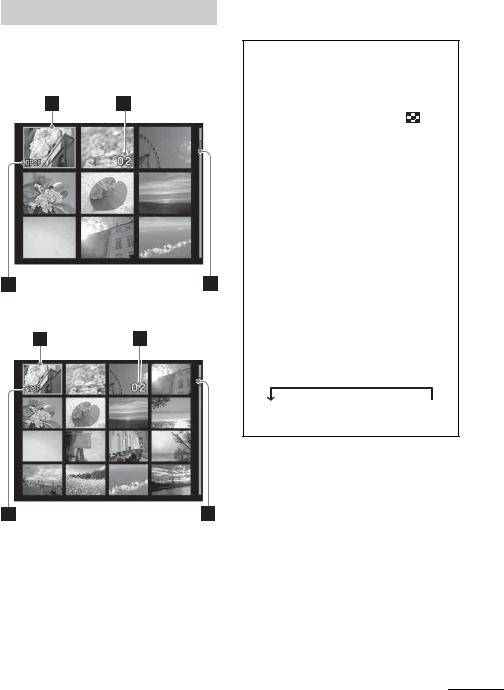
Image list
Displays a list of the images stored in the selected media.
DPP-FP67
DPP-FP77
ACursor (orange frame)
You can move the cursor (selection) by pressing g/G/f/F.
BPrint quantity setting
Appears only when the print quantity is being set.
CScroll bar
Indicates the position of the image among the total number of images.
D  DPOF print preset indication
Switching an image preview and image list
You can switch the display as follows:
• |
To display the image list |
|
|
|
In an image preview, press the |
|
|
|
(Index View) button. |
|
|
|
When there are multiple pages, you can |
|
|
|
switch pages by pressing f/F. |
|
|
• |
To display an image preview |
|
|
|
|||
|
In the image list, press g/G/f/F to move |
|
|
|
the cursor to the desired image and press |
|
|
|
ENTER. |
Direct |
|
|
|
||
|
In an image preview, you can change the |
|
|
|
displayed image by pressing g/G . |
printing |
|
• |
To enlarge an image |
||
|
|||
|
In the image preview window, press |
|
|
|
ENTER. Each time you press the button, |
|
|
|
the image is enlarged up to 5 times the |
|
|
|
original scale: x1.5, x2, x3, x4, and then |
|
|
|
x5. In an enlarged image preview, you |
|
|
|
can change the portion to be displayed by |
|
|
|
pressing g/G/f/F. |
|
|
|
x1 c x1.5 c x2 c x3 c x4 c x5 |
|
Continued
15 GB

List of icons
The following are the icons displayed on the LCD screen.
You can proceed with operations by selecting a desired icon with g/G/f/F, and then pressing ENTER.
For detailed explanations, see the pages in the parentheses.
Icons Meaning
Edit (23)
Layout Print (25)
Batch Print (26)
Calendar (27)
ID Photo (28)
Print setup (29)
Edit/Layout Print/Calendar/ID Photo
Enlarging and reducing an image size (23)
Moving an image (23)
Rotating an image (23) (Rotates 90° clockwise.)
Adjusting the picture quality of an image (23)
Changing a photo into a monochrome one (29)
(This option is available only in ID Photo operations.)
Resetting edits (24)
Printing an edited image (24)
Icons Meaning
Exiting the menu (25)
Batch Print
Index Print (26)
(Prints all the images in split screens.)
Print All (26)
(Prints one copy each for all the images.)
DPOF Print (26)
(Prints the images with the print mark (  ) in an image preview with the preset number of copies in the order they are displayed.)
Print setup
Date Print (29)
Borders/Borderless (30)
On-screen Display (30)
Color Setting (31)
Printer information display (31)
Default Setting (32)
(Resets the settings to the factorypreset default settings.)
16 GB
Basic printing
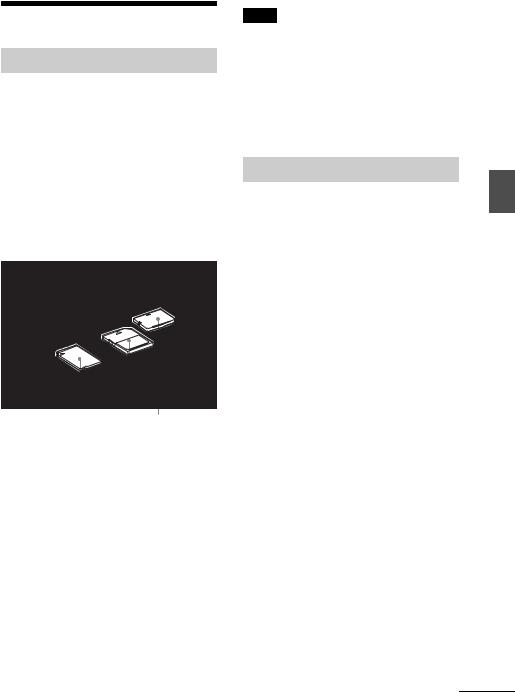
Inserting a memory card
Prepare a memory card that contains images for printing: “Memory Stick” media, “Memory Stick Duo” media, SD Memory Card, or an xDPicture Card.
Insert the desired card with its labelled surface facing up into the proper slot until it clicks firmly into place.
For the types of memory cards you can use with the printer, please see pages 63 to 65.
From the left, with the label side facing up, “Memory Stick” media, (“Memory Stick Duo” media), SD Memory Card, and xD-Picture Card
To eject a memory card
Remove the memory card from the slot slowly in the reverse direction it was inserted.
Notes
•Insert only the memory card that you want to use for printing. When multiple memory cards are inserted, the memory card inserted first will have the first priority.
•The printer supports both standard and small sizes. A “Memory Stick Duo” media adaptor is not necessary.
•To use a memory card, follow the notes described on pages 63 to 65.
Printing selected images
This section explains how to display the images of a memory card or a USB memory on the printer’s LCD screen and print the selected images (direct printing). For how to print from a USB memory, see page 32.
Setting the print quantity
1 Press the 1 (on/standby) button to turn on the printer.
The STANDBY indicator turns off. An image stored on the memory card or USB memory device inserted in the printer is displayed on the LCD screen.
2 Press g/G to display the image that you want to print.
3 Set the print quantity.
To print one copy of the displayed image, skip this procedure and go on to the next step.
Press f to display the print quantity indication. Then specify the print quantity with f/F.
Continued
printing Direct
17 GB

4 Press PRINT.
While the PRINT button is lit in green, the printer is ready for printing. The image being displayed is printed.
To print multiple images
Repeat steps 2 and 3.
To change the print quantity
Display the image whose print quantity you want to change, and change the print quantity with f/F.
If you select “0,” printing is canceled.
Enlarging an image to be printed (Trimming Print)
Press ENTER repeatedly until the image is enlarged to the desired size. You can enlarge an image up to the 5 times the original scale. Press g/G/f/F to move an image.
Press PRINT to display the image preview for printing. Then press PRINT again to print the previewed image.
Even if you have set a print quantity for other images, only the previewed image is printed.
Notes
•Never move or turn off the printer while it is printing; the ink ribbon or print paper may become stuck. If you turn off the power accidentally, keep the paper tray inserted and turn on the printer again. If paper being printed remains in the printer, remove the paper that emerges automatically and resume printing.
•Do not remove the paper tray during printing. Otherwise, a malfunction may occur.
•The print paper emerges a few times during printing. Do not touch nor pull the emerged paper during the printing process.
•If print paper is jammed, see page 60.
On selecting input
The printer is not equipped with an input select switch. When you connect a memory card or a USB memory to the printer, images from the connected media are displayed automatically. If multiple memory cards or a USB memory are connected, the media first connected has the priority.
When you turn on the printer with multiple media inserted or connected, the printer detects the media in the order of “Memory Stick” media, SD Memory Card, xD-Picture Card, and then a USB memory connected to the PictBridge/EXT INTERFACE connector.
18 GB
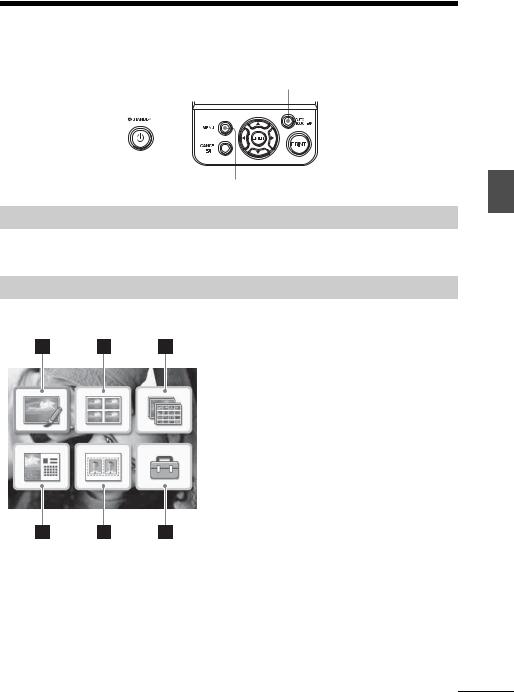
Enjoying various printing
z Operation using the printer buttons
AUTO TOUCH-UP
MENU
Exposure and Red-eye Correction .page 22
Press the AUTO TOUCH-UP button to automatically adjust a photo with problems, such as being backlit, or showing the red-eye phenomenon.
A variety of printing
Press MENU and then select the icon of the desired operation.
•Press g/G/f/F to select the desired icon and press ENTER.
1Edit
2Layout Print
3Batch Print
4Calendar
5ID Photo
6Print setup
• To exit the menu, press CANCEL or press MENU again.
printing Direct
Continued
19 GB
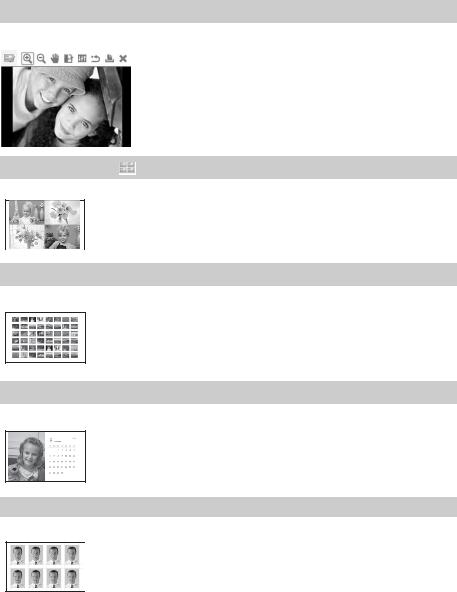
1 Edit  .page 23
You can adjust the size, position, hue or other picture property of the selected image.
For the icons you can use, see page 16.
2 Layout Print
.page 25
You can place multiple photos on split screens to make a print.
You can make a print with 2-split, 4-split, 9-split, 13-split or 16-split images.
3 Batch Print  .page 26
You can print a large number of images of a memory card or USB memory at one time.
You can select from batch print options such as “Index Print,” “Print All,” and “DPOF Print.”
4 Calendar  .page 27
You can create an original calendar by selecting images.
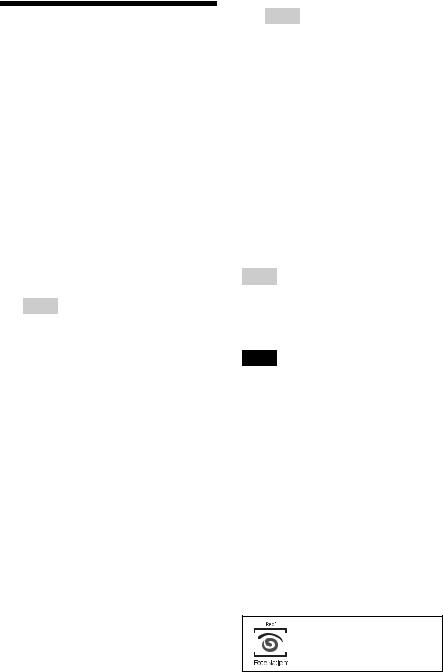
5 ID Photo  .page 28
You can specify the desired width and height of a photo.
You can use a photo for an identification card such as a passport.
20 GB
6 Print setup  .page 29
You can change the settings during printing, the printer settings, and on-screen display settings.
printing Direct
21 GB
Exposure and Red-eye
Correction
1 Display an image that you want to adjust and then press the AUTO TOUCH-UP button.
The correction of the selected image starts. The results of the adjustment will be displayed on the screen.
To display the original image (before correction) again
Press the AUTO TOUCH-UP button. To display the adjusted image, press the AUTO TOUCH-UP button again.
To cancel correction
Press CANCEL.
Tip
Although you can check the exposure and redeye correction status by pressing ENTER and enlarging an image, the image to be printed is not enlarged. To print an enlarged and corrected image, first enlarge an image and then perform the correction.
If you have set print quantity for multiple images
All the images with print quantity settings are adjusted. To display other images, press g/G.
To set the print quantity
Before you press the AUTO TOUCH-UP button, set the print quantity (page 17). You cannot set or change print quantity after you finish the correction. To change the print quantity setting, cancel the correction.
Tips
•If there are no images with print quantity settings, the correction adjusts the image being previewed.
•If there are other images with print quantity setting, and print quantity is not specified for the image being previewed, the image being previewed will not be corrected. The images with print quantity settings will be adjusted.
•If you enlarged an image, only the enlarged image will be adjusted and then printed.
2 Press PRINT.
Printing of the image being adjusted starts. When the print quantity setting is specified, the specified number of copies are printed.
Tips
•Adjustment takes effect only on the image being printed. The original image will not be adjusted.
•You cannot perform editing on an image after the correction.
Notes
•Depending on the image, the exposure phenomenon may not be correctable. In this case, select “Adjust” from the Edit menu to adjust the brightness manually (page 23).
•Depending on the image, the red-eye phenomenon may not be corrected.
•When you cancel the edits by selecting  (Reset) in the Edit menu, the correction will also be
cancelled.
•During the correction process, an animation to show reading and handling of data from a memory card or a USB memory will be displayed. While the animation is displayed, do not remove the memory card or disconnect USB memory.
•You cannot select only Red-eye Correction or only Exposure Correction.
•Depending on the condition of the image, the correction may take some time.
The automatic red-eye correction of this printer uses the technology of FotoNation Inc. in the U.S.A.
22 GB
 Loading...