


3-856-152-52 (1)
Video Camera
Recorder h
Operation Manual
Before operating the unit, please read this manual thoroughly, and retain it for future reference.
Manual de instrucciones
Antes de utilizar la unidad, lea detenidamente este manual y consérvelo para futuras referencias.
CCD-TRV11
CCD-TRV11/TRV21
ã 1996 by Sony Corporation
CCD-TRV11/TRV21 3-856-152-52.E/S

English
Welcome to
Video h
Congratulations on your purchase of this Sony Handycamâ camcorder. With your Handycam, you can capture life’s precious moments with superior picture and sound quality. Your Handycam is loaded with advanced features, but at the same time it is very easy to use. You will soon be producing home video that you can enjoy for years to come.
WARNING
To prevent fire or shock hazard, do not expose the unit to rain or moisture.
To avoid electrical shock, do not open the cabinet. Refer servicing to qualified personnel only.
Español
Bienvenido al vídeo h(8mm de alta fidelidad)
Gracias por su compra de esta videocámara Handycamâ Sony. Con su Handycam, puede captar esos preciosos momentos de la vida con una calidad de imagen y sonido superior. Su Handycam está repleta de características avanzadas, pero a la vez es de fácil manejo. Pronto estará produciendo vídeo familiar que podrá disfrutar años y años.
ADVERTENCIA
Para evitar incendios o el riesgo de electrocución, no exponga la unidad a la lluvia ni a la humedad.
Para evitar descargas eléctricas, no abra la unidad. En caso de avería, solicite sólo los servicios de personal cualificado.
2
CCD-TRV11/TRV21 3-856-152-52.E/S

|
|
|
|
Table of contents |
Índice |
|
|
|
Before you begin |
|
|
Using this manual ................................................... |
|
4 |
Checking supplied accessories ............................. |
|
6 |
Getting started |
|
|
Charging and installing the battery pack ........... |
7 |
|
Inserting a cassette ............................................... |
|
10 |
Basic operations |
|
|
Camera recording ................................................. |
|
11 |
Using the zoom feature ..................................... |
|
15 |
Shooting with the LCD screen ......................... |
|
17 |
Hints for better shooting ..................................... |
|
18 |
Checking the recorded picture ........................... |
|
20 |
Playing back a tape ............................................... |
|
22 |
Searching for the end of the picture ................... |
|
24 |
Advanced operations |
|
|
Using alternative power sources ........................ |
|
25 |
Letting the subject monitor the shot .................. |
|
27 |
Recording with the date or time ......................... |
|
29 |
Shooting with backlighting ................................. |
|
30 |
Using the PROGRAM AE function .................... |
|
31 |
Selecting the START/STOP mode ..................... |
|
33 |
Superimposing a title ........................................... |
|
34 |
Using the wide mode function ........................... |
|
35 |
(CCD-TRV21 only) |
|
|
Using the STEADY SHOT function36 |
|
|
(CCD-TRV21 only) |
|
|
Changing the mode settings ............................... |
|
37 |
Watching on a TV screen ..................................... |
|
38 |
Editing onto another tape .................................... |
|
40 |
Additional information |
|
|
Changing the lithium battery in the |
|
|
camcorder ........................................................... |
|
41 |
Resetting the date and time ................................. |
|
43 |
Playback modes .................................................... |
|
44 |
Tips for using the battery pack ........................... |
|
44 |
Maintenance information and precautions ....... |
48 |
|
Using your camcorder abroad ............................ |
|
53 |
Trouble check ........................................................ |
|
54 |
Specifications ......................................................... |
|
60 |
Identifying the parts ............................................. |
|
62 |
Warning indicators ............................................... |
|
71 |
Index ....................................................... |
back cover |
|
Antes de comenzar |
|
|
Utilización de este manual .................................... |
|
4 |
Comprobación de los accesorios |
|
|
suministrados ....................................................... |
|
6 |
Preparativos |
|
|
Carga y fijación de la batería ................................. |
|
7 |
Inserción de un videocassette ............................. |
|
10 |
Operaciones básicas |
|
|
Videofilmación ...................................................... |
|
11 |
Utilización del zoom ......................................... |
|
15 |
Videofilmación con la pantalla de cristal |
|
|
líquido ............................................................... |
|
17 |
Consejos para videofilmar mejor ....................... |
|
18 |
Verificación de las imágenes grabadas .............. |
20 |
|
Reproducción de cintas ........................................ |
|
22 |
Búsqueda del final de una parte grabada ......... |
24 |
|
Operaciones avanzadas |
|
|
Utilización de fuentes de alimentación |
|
|
alternativas ......................................................... |
|
25 |
Para hacer que el sujeto observe la |
|
|
videofilmación ...................................................... |
|
27 |
Grabación de la fecha o la hora .......................... |
|
29 |
Videofilmación a contraluz ................................. |
|
30 |
Utilización de la función PROGRAM AE ......... |
31 |
|
Selección del modo de inicio/parada ................ |
33 |
|
Superposición de un título .................................. |
|
34 |
Utilización del modo de pantalla amplia (CCD- |
||
TRV21 solamente) .............................................. |
|
35 |
Utilización de la función de videofilmación |
|
|
estable (CCD-TRV21 solamente) |
..................... |
36 |
Cambio de los ajustes de modo .......................... |
|
37 |
Contemplación en la pantalla de un televisor .. |
38 |
|
Edición en otra cinta ............................................. |
|
40 |
Información adicional |
|
|
Reemplazo de la pila de litio de la |
|
|
videocámara ....................................................... |
|
41 |
Reajuste de la fecha y la hora .............................. |
|
43 |
Modos de reproducción ....................................... |
|
44 |
Consejos para utilizar la batería ......................... |
|
44 |
Información sobre el mantenimiento y |
|
|
precauciones ....................................................... |
|
48 |
Utilización de la videocámara en el |
|
|
extranjero ............................................................ |
|
53 |
Solución de problemas ......................................... |
|
57 |
Especificaciones .................................................... |
|
61 |
Identificación de las partes .................................. |
|
62 |
Indicadores de advertencia ................................. |
|
71 |
Índice alfabético .............................. |
Contraportada |
|
comenzar de Antes begin you Before
3
CCD-TRV11/TRV21 3-856-152-52.E/S

|
|
|
|
|
|
|
|
Antes de comenzar |
|
|
|
|
|
|
|
Before you begin |
|
Utilización de este |
|
|
Using this manual |
|||
|
manual |
|||
The instructions in this manual are for the two models listed below. Before you start reading this manual and operating the unit, check your model number by looking at the bottom of your camcorder. The CCD-TRV11 is the model used for illustration purposes. Otherwise, the model name is indicated in the illustrations. Any differences in operation are clearly indicated in the text, for example, “ CCD-TRV21 only”.
As you read through this manual, buttons and settings on the camcorder are shown in capital letters.
e.g. Set the POWER switch to CAMERA.
As indicated with ³in the illustrations, you can hear the beep sound to confirm your operation.
Types of differences
Model |
Zoom |
Wide |
Steady |
|
|
mode |
Shot |
CCD-TRV11 |
12X |
|
|
CCD-TRV21 |
12X ,48X |
r |
r |
Note on TV color systems
TV color systems differ from country to country. To view your recordings on a TV, you need an NTSC system-based TV.
Precaution on copyright
Television programs, films, video tapes, and other materials may be copyrighted. Unauthorized recording of such materials may be contrary to the provision of the copyright laws.
4
Las instrucciones de este manual son para los dos modelos indicados más abajo. Antes de comenzar a leer este manual y de utilizar la unidad, compruebe el número de modelo observando la base de su videocámara. La CCDTRV11 es el modelo utilizado para fines de ilustración. En caso contrario, el nombre del modelo se indicará en las ilustraciones. Cualquier diferencia en la operación se indicará claramente en el texto, por ejemplo, “CCDTRV21” solamente”.
Las teclas y ajustes de la videocámara aparecen en mayúsculas en todo el manual.
Ej. Deslice el selector POWER hasta CAMERA. Como se indica con ³en las ilustraciones, usted podrá oír un pitido para confirmar su operación.
Tipos de diferencias
|
|
Modo de |
Modo de |
Modelo |
Zoom |
pantalla |
videofilmación |
|
|
amplia |
estable |
CCD-TRV11 |
12X |
|
|
CCD-TRV21 |
12X ,48X |
r |
r |
Nota sobre los sistemas de televisión en color
Los sistemas de televisión en color difieren de acuerdo con los países. Si desea ver su videofilmación en un televisor, éste deberá estar basado en el sistema NTSC.
Precaución sobre los derechos de autor
Los programas de televisión, películas, videocintas y demás materiales pueden tener reservado el derecho de reproducción.
La grabación no autorizada de tales materiales puede ir en contra de lo dispuesto por las leyes de derechos de autor.
CCD-TRV11/TRV21 3-856-152-52.E/S

Precautions on camcorder care
•Do not let the camcorder get wet. Keep the camcorder away from rain and sea water. It may cause a malfunction and sometimes the malfunction cannot be repaired. [a]
•Do not let sand get into the camcorder. When you use the camcorder on a sandy beach or in a dusty place, protect it from the sand or dust. Sand or dust may cause the unit to malfunction, and sometimes this malfunction cannot be repaired. [b]
•Never leave the camcorder under temperatures above 60 °C (140° F), such as in a car parked in the sun or under direct sunlight. [c]
Precauciones sobre los cuidados de la videocámara
•No deje que la videocámara se moje. Proteja la videocámara de la lluvia o del agua de mar. Pueden causar malos funcionamientos que a veces no podrán repararse. [a]
•No permita que entre arena en la videocámara. Cuando utilice la videocámara en una playa arenosa o en un lugar polvoriento, protéjala de la arena o del polvo. La arena y el polvo pueden causar malos funcionamientos que a veces no podrán repararse. [b]
•No deje la videocámara a temperaturas superiores a 60°C, como en el interior de un automóvil aparcado al sol o bajo la luz solar directa. [c]
[a] |
[b] |
[c] |
|
|
|
comenzar de Antes begin you Before
5
CCD-TRV11/TRV21 3-856-152-52.E/S
Checking supplied |
Comprobación de los |
accessories |
accesorios suministrados |
|
|
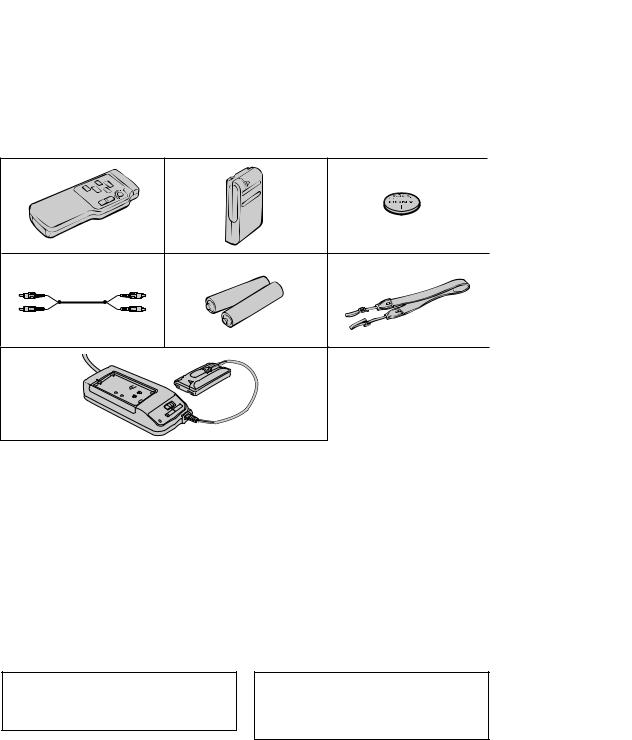
Check that the following accessories are supplied with your camcorder.
Compruebe si los siguientes accesorios están incluidos con su videocámara.
1 |
2 |
3 |
4 |
5 |
6 |
7 |
|
|
1 Wireless Remote Commander (1) (p.23, 66) |
1 Telemando inalámbrico (1) (Pág. 23, 66) |
|
2 NP-55 Battery Pack (1) (p.7) |
|
2 Batería NP-55 (1) (Pág. 7) |
3 CR2025 Lithium Battery (1) (p.41) |
3 Pila de litio CR2025 (1) (Pág. 41) |
|
Already installed in the camcorder.
ya está instalada en la videocára.
4 A/V connecting cable (1) (p.38)
5R6 (size AA) battery for Remote Commander (2) (p.67)
6 Shoulder strap (1) (p.65)
7AC-V15/V16/V16A AC power adaptor (1) (p.7, 26)
Contents of the recording cannot be compensated if recording or playback is not made due to a malfunction of the camcorder, video tape, etc.
4 Cable conector de audio/vídeo (1) (Pág. 38)
5Pilas R6 (tamaño AA) para el telemando (2) (Pág. 67)
6 Bandolera (1) (Pág. 65)
7Adaptador de alimentación de CA AC-V15/V16/V16A (1) (Pág. 7, 26)
El contenido de la grabación no puede ser compensado si la grabación o la reproducción no ha sido posible debido al mal funcionamiento de la videocámara, videocassette, etc.
6
CCD-TRV11/TRV21 3-856-152-52.E/S
Getting started
Charging and installing the battery pack
Before using your camcorder, you first need to charge and install the battery pack. To charge the battery pack, use the supplied AC power adaptor.
Charging the battery pack
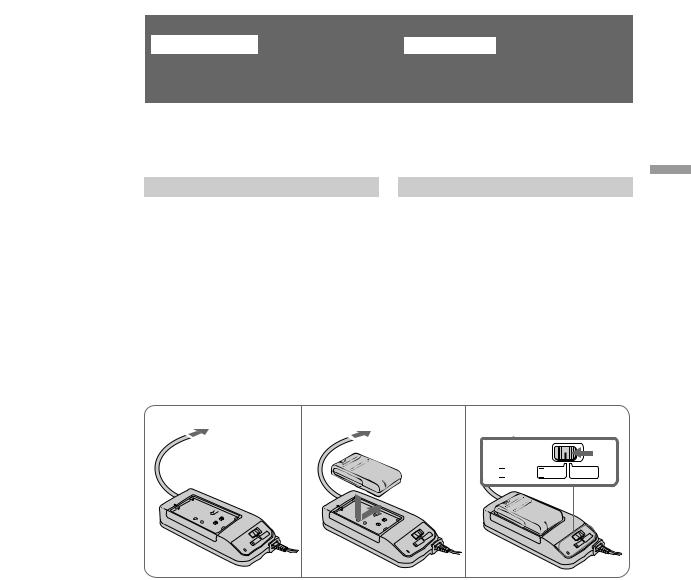
Charge the battery pack on a flat place without vibration.
(1)Connect the AC power adaptor to the wall outlet.
(2)Align the right side of the battery pack with the line on the AC power adaptor, then slide the battery pack in the direction of the arrow.
(3)Set the selector to CHARGE. The CHARGE lamp (orange) lights up. Charging begins.
When charging is completed, the CHARGE lamp goes out. Unplug the unit from the wall outlet, and then remove the battery pack and install it on the camcorder.
Preparativos
Carga y fijación de la batería
Antes de utilizar la videocámara, primero tendrá que cargar y colocar la batería. Para cargar la batería, utilice el adaptador de alimentación de CA suministrado.
Carga de la batería
Cargue la batería en un lugar nivelado y exento de vibraciones.
(1)Conecte el adaptador de alimentación de CA a una toma de la red.
(2)Alinee el lado derecho de la batería con la línea del adaptador de alimentación de CA, y después deslice la batería en el sentido de la flecha.
(3)Ponga el selector en CHARGE. La lámpara CHARGE (anaranjada) se encenderá y se iniciará la carga.
Cuando finalice la carga, la lámpara CHARGE se apagará. Desconecte la unidad de la toma de la red, y después quite la batería y fíjela a la videocámara.
Preparativos started Getting
1 |
2 |
3 |

 POWER
POWER 
 CHARGE
Charging Time
Battery pack |
Charging time* |
NP-55 (supplied) |
70 |
NP-55H |
85 |
NP-C65/67 |
105 |
NP-66 |
95 |
NP-77H/77HD |
170 |
NP-98/98D |
215 |
Approximate minutes to charge an empty battery pack using the supplied AC power adaptor (Lower temperatures require a longer charging time.)
Tiempo de carga
Batería |
Tiempo de carga* |
NP-55 (suministrada) |
70 |
NP-55H |
85 |
NP-C65/67 |
105 |
NP-66 |
95 |
NP-77H/77HD |
170 |
NP-98/98D |
215 |
Minutos aproximados para cargar una batería agotada utilizando el adaptador de alimentación de CA suministrado. (A bajas temperaturas, el tiempo de carga será más
largo.)
7
CCD-TRV11/TRV21 3-856-152-52.E/S

Charging and installing the battery pack
Battery life
CCD-TRV11
|
While recording1) |
While |
||
Battery pack |
|
|
playing |
|
LCD open2) |
LCD close |
back on |
||
|
||||
|
3) |
|||
|
|
|
LCD |
|
NP-55 (supplied) |
75 (40) |
95 (55) |
75 |
|
NP-55H |
85 (45) |
110 (60) |
85 |
|
NP-C65/67 |
120 (65) |
155 (85) |
115 |
|
NP-66 |
110 (60) |
150 (85) |
110 |
|
NP-77H/77HD |
185 (100) |
235 (130) |
180 |
|
NP-98/98D |
225 (120) |
305 (170) |
225 |
|
CCD-TRV21 |
|
|
|
|
|
|
|
|
|
|
While recording1) |
While |
||
Battery pack |
|
|
playing |
|
LCD open2) |
LCD close |
back on |
||
|
||||
|
LCD3) |
|||
NP-55 (supplied) |
70 (35) |
85 (50) |
70 |
|
NP-55H |
80 (40) |
100 (55) |
85 |
|
NP-C65/67 |
105 (55) |
145 (80) |
100 |
|
NP-66 |
100 (50) |
135 (75) |
105 |
|
NP-77H/77HD |
170 (90) |
215 (120) |
180 |
|
NP-98/98D |
210 (110) |
275 (155) |
220 |
|
1)Approximate continuous recording time indoors is indicated outside of parentheses. Approximate minutes when recording while you repeat recording start/stop, zooming and turning the power on/off are indicated in parentheses. The actual battery life may be shorter.
2)Approximate minutes when using the LCD screen. When using both the viewfinder and LCD screen, the battery life is shorter.
3)Approximate continuous playback time indoors.
If the LCD BACK LIGHT switch is set to BRIGHT, the battery life is approximately 10% shorter while the LCD screen is open.
To remove the battery pack
Slide the battery pack in the direction of the arrow.
Carga y fijación de la batería
Duración de la batería
CCD-TRV11
|
Videofilmación1) |
Reproducción |
|
||
Batería |
|
|
|
en la pantalla |
|
Pantalla de cristal |
Pantalla de cristal |
de cristal |
|
||
|
líquido abierta |
2) |
líquido cerrada |
líquido3) |
|
NP-55(suministrado) |
75 (40) |
95 (55) |
75 |
|
|
NP-55H |
85 (45) |
110 (60) |
85 |
|
|
NP-C65/67 |
120 (65) |
155 (85) |
115 |
|
|
NP-66 |
110 (60) |
150 (85) |
110 |
|
|
NP-77H/77HD |
185 (100) |
235 (130) |
180 |
|
|
NP-98/98D |
225 (120) |
305 (170) |
225 |
|
|
CCD-TRV21 |
|
|
|
|
|
|
Videofilmación1) |
Reproducción |
|
||
Batería |
|
|
|
en la pantalla |
|
Pantalla de cristal |
Pantalla de cristal |
de cristal |
|
||
|
líquido abierta |
2) |
líquido cerrada |
líquido3) |
|
NP-55(suministrado) |
70 (35) |
85 (50) |
70 |
|
|
NP-55H |
80 (40) |
100 (55) |
85 |
|
|
NP-C65/67 |
105 (55) |
145 (80) |
100 |
|
|
NP-66 |
100 (50) |
135 (75) |
105 |
|
|
NP-77H/77HD |
170 (90) |
215 (120) |
180 |
|
|
NP-98/98D |
210 (110) |
275 (155) |
220 |
|
|
1)Minutos aproximados de videofilmación continua en interiores, indicados fuera de paréntesis.
Minutos aproximados cuando videofilme repitiendo el inicio/la parada de la grabación, el zoom y la conexión/ desconexión de la alimentación, indicados enfre paréntesis. Es posible que la duración de la batería actual sea más corta.
2)Minutos aproximados cuando utilice la pantalla de cristal líquido. Cuando use el visor y la pantalla de cristal líquido, la duración de la batería será más corta.
3)Tiempo aproximado de reproducción continua en interiores.
Si el selector LCD BACK LIGHT está en BRIGHT, la duración de la batería será aproximadamente un 10% menor mientras la pantalla de cristal líquido esté abierta.
Para quitar la batería
Deslícela en el sentido de la flecha.
8
CCD-TRV11/TRV21 3-856-152-52.E/S

Notes on charging the battery pack
•The POWER lamp will remain lit for a while even if the battery pack is removed and the power cord is unplugged after charging the battery pack. This is normal.
•If the POWER lamp does not light, set the selector to VTR (DC OUT) and disconnect the power cord. After about one minute, reconnect the power cord and set the selector to CHARGE again.
•You cannot operate the camcorder using the AC power adaptor while charging the battery pack.
Installing the battery pack
(1)Insert the top of the battery pack into the top of the battery mounting surface.
(2)Push the battery pack so that it attaches firmly.
Notas sobre la carga de la batería
•Es normal que la lámpara POWER permanezca encendida durante un momento después de que haya quitado la batería y desconectado el cable de alimentación de CA cuando finalice la carga.
•Si la lámpara POWER no se enciende, ponga el selector en VTR (DC OUT) y desconecte el cable de alimentación de CA. Después de aproximadamente un minuto, vuelva a conectar el cable y a poner el selector en CHARGE.
•No podrá operar la videocámara empleando el adaptador de alimentación de CA mientras esté cargando la batería.
Fijación de la batería
(1)Inserte la cabeza de la batería en la parte superior de la superficie de montaje.
(2)Empuje la batería de forma que ésta quede firmemente fijada.
Preparativos started Getting
1
2
To remove the battery pack
Slide BATT, and then pull the lower part of the battery pack.
Para quitar la batería
Deslice BATT, y después tire de la parte inferior de la batería.
2
1
9
CCD-TRV11/TRV21 3-856-152-52.E/S
|
Inserción de un |
Inserting a cassette |
videocassette |
|
|
Make sure that a power source is installed.
(1)While pressing the small blue button, slide EJECT in the direction of the arrow. The cassette compartment automatically opens.
(2)Insert a cassette (not supplied) with the window facing out.
(3)Press the PUSH mark on the cassette compartment to close it. The cassette compartment automatically closes.
Asegúrese de que haya una fuente de alimentación conectada a la videocámara.
(1)Manteniendo presionado el pequeño botón azul, deslice EJECT en el sentido de la flecha. El compartimiento del videocassette se abrirá automáticamente.
(2)Inserte un videocassette (no suministrado) con la ventanilla hacia afuera.
(3)Presione la marca PUSH del compartimiento del videocassette para cerrarlo. El compartimiento se cerrará automáticamente.
PUSH
EJECT
To eject the cassette
While pressing the small blue button, slide EJECT in the direction of the arrow.
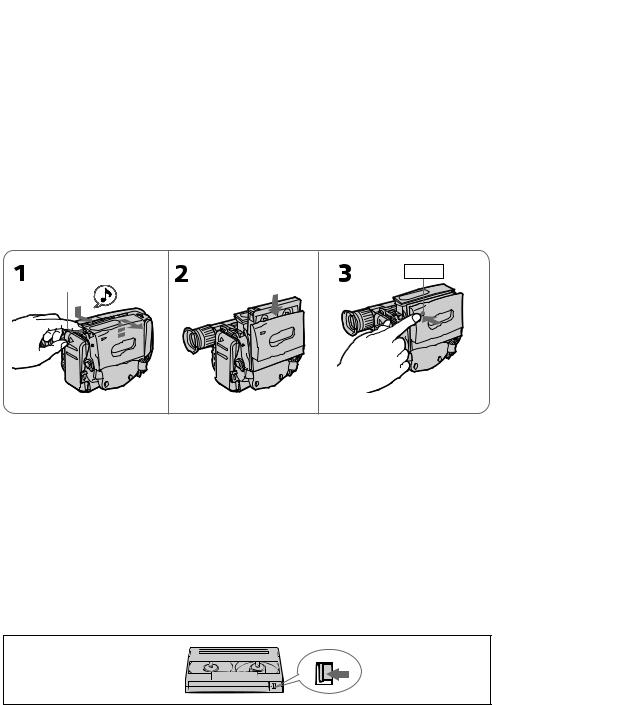
To prevent accidental erasure
Slide the tab on the cassette to expose the red mark.
If you insert the cassette with the red mark exposed and close the cassette compartment, the beeps sound for a while. If you try to record with the red mark exposed, the ÿ and 6indicators flash in the viewfinder, and you cannot record. To re-record on this tape, slide the tab back out covering the red mark.
Para expulsar el videocassette
Manteniendo presionado el pequeño botón azul, deslice EJECT en el sentido de la flecha.
Para prevenir el borrado accidental
Deslice la lengüeta del videocassette de forma que la marca roja quede al descubierto.
Si inserta un videocassette con la marca roja al descubierto y cierra el compartimiento del videocassette, sonará un pitido durante un momento. Si intenta grabar con la marca roja al descubierto, en el visor parpadearán los indicadores ÿ y 6, y no podrá grabar. Para volver a grabar en esta cinta, deslice la lengüeta de forma que se cubra la marca roja.
10
CCD-TRV11/TRV21 3-856-152-52.E/S
|
|
|
|
|
|
|
|
|
|
|
|
|
|
|
|
|
Basic operations |
|
Operaciones básicas |
|
|
|
|
|
|
|
|
|
|
|
Camera recording |
Videofilmación |
||
|
|
|
|
|
|
|
Make sure that a power source and a cassette is inserted and that the START/STOP MODE switch inside the LCD panel is set to  . When you use the camcorder for the first time, power on it and reset the date and time to your time (p. 43) before you start recording. The date is automatically recorded for 10 seconds after you start recording (AUTO DATE feature). This feature works only once a day.
Before you record one-time events, you may want to make a trial recording to make sure that you are using the camcorder correctly.
(1)While pressing the small green button on the POWER switch, set it to CAMERA.
(2)Turn STANDBY up. The “STBY” indicator appears in the viewfinder.
(3)Press START/STOP. The camcorder starts recording and the “STBY” indicator changes to the “REC” indicator.
You can also select Recording mode, SP (standard play) mode or LP (long play) mode. Set REC MODE (P. 37) according to the length of your planned recording before you start.
Asegúrese de que haya una fuente de alimentación conectada, un videocassette insertado, y de que el selector START/STOP MODE del interior de la pantalla de cristal
líquido esté en |
|
. |
Cuando utilice la videocámara por primera vez, conecte la alimentación y reajuste la fecha y la hora actual (pág. 43). Cuando las reajuste, la fecha se grabará automáticamente durante 10 segundos a partir del inicio de la videofilmación [función AUTO DATE (grabación automática de la fecha)]. Esta función sólo trabajará una vez al día.
Antes de realizar videofilmaciones irrepetibles, se recomienda realizar una filmación de prueba a fin de comprobar si la videocámara funciona correctamente.
(1)Manteniendo presionado el pequeño botón verde del selector POWER, deslícelo hasta CAMERA.
(2)Gire STANDBY hacia arriba. En el visor aparecerá el indicador “STBY”.
(3)Presione START/STOP. La videocámara comenzará a grabar y el indicador “STBY” cambiará a “REC”.
Usted también podrá seleccionar el modo de grabación, modo SP (reproducción estándar) o LP (reproducción larga). Ajuste REC MODE (pág. 37) de acuerdo con la duración de la filmación planeada antes de comenzar.
básicas Operaciones operations Basic
CAMERA |
OFF |
PLAYER |
11
CCD-TRV11/TRV21 3-856-152-52.E/S

Camera recording |
Videofilmación |
|
|
To stop recording momentarily [a]
Press START/STOP again. The “REC” indicator in the viewfinder changes to the “STBY” indicator (Standby mode).
To finish recording [b]
Press START/STOP. Turn STANDBY down, and set the POWER switch to OFF.
Then, eject the cassette and remove the battery pack.
Para detener momentáneamente la grabación [a]
Presione otra vez START/STOP. El indicador “REC” cambiará al indicador “STBY” (Modo de espera).
Para finalizar la grabación [b]
Presione START/STOP, gire STANDBY hacia abajo y ponga el selector POWER en OFF. Después extraiga el videocassette y quite la batería.
[a] |
[b] |
Note on standby mode
If you leave the camcorder for 5 minutes or more with a cassette inserted in Standby mode, the camcorder goes off automatically. This prevents wearing down the battery and wearing out the tape. To resume Standby mode, turn STANDBY down once and turn it up again. To start recording, press START/STOP.
Notes on the recording mode
•This camcorder records and plays back in SP (standard play) mode and in LP (long play) mode.
The playback quality in LP mode, however, will not be as good as that in SP mode.
•When a tape recorded on this camcorder in LP mode is played back on other types of 8 mm camcorders or VCRs, the playback quality may not be as good as that on this camcorder.
Nota sobre el modo de espera
Si deja la videocámara en el modo de espera durante 5 minutos o más con el videocassette insertado, la videocámara se apagará automáticamente. Esto evitará que la batería y el videocassette se desgasten. Para restablecer el modo de espera, gire una vez STANDBY hacia abajo y después otra vez hacia arriba. Para comenzar a grabar, presione START/STOP.
Notas sobre el modo de grabación
•Esta videocámara graba y repoduce en los modos SP (reproducción estándar) y LP (reproducción larga). Sin embargo, la calidad de las imágenes reproducidas en el modo LP no será tan buena como en el modo SP.
•Cuando reproduzca una cinta grabada en esta videocámara en el modo LP en una videocámara de 8 mm de otro tipo o una videograbadora, es posible que la calidad de reproducción no sea tan buena como la reproducida en esta videocámara.
12
CCD-TRV11/TRV21 3-856-152-52.E/S

To focus the viewfinder lens
If the viewfinder is not in focus at all or when you use the camcorder after someone else has used it, focus the viewfinder lens. Turn the viewfinder lens adjustment ring so that the indicators in the viewfinder come into sharp focus.
Para enfocar la lente del visor
Cuando el visor no esté enfocado en absoluto, o cuando vaya a utilizar la videocámara después de haberla empleado otra persona, enfoque la lente del visor. Gire el anillo de ajuste de la lente del visor de forma que los indicadores del visor queden nítidamente enfocados.
operations Basic
Recording with the START/STOP button depressed
You can also make recording while pressing down the START/STOP button. To make the START/STOP button work this way, slide START/STOP MODE to 

 . [a]
. [a]
Shooting scenery in several short takes
You can automatically make recording for about 5 seconds with the 5 SEC mode (p. 33). To make the START/STOP button work this way, slide START/STOP MODE to 5 SEC. [b]
Grabación con la tecla START/STOP presionada
Usted también podrá grabar presionando la tecla START/STOP. Para hacer funcionar la tecla START/STOP de esta manera, deslice START/ STOP MODE hasta 

 . [a]
. [a]
Videofilmación de escenas en varias tomas cortas
Utilizando 5 SEC modo (pág. 33), podrá videofilmar automáticamente durante unos 5 segundos. Para que la tecla START/STOP funcione de esta manera, deslice el selector START/STOP MODE hasta 5 SEC. [b]
[a] START/STOP MODE |
[b] START/STOP MODE |
básicas Operaciones
|
|
|
|
5 |
5 |
||
|
SEC |
|
SEC |
Note on recording
When you record from the beginning of the tape, run the tape for about 15 seconds before actual recording. This prevents the camcorder from missing any start-up scenes when you play back the tape.
Nota sobre la grabación
Cuando grabe desde el comienzo de la cinta, haga que ésta avance unos 15 segundos antes de comenzar la videofilmación actual. Esto evitará que se pierdan las escenas iniciales cuando se reproduzca la cinta.
13
CCD-TRV11/TRV21 3-856-152-52.E/S
Camera recording |
Videofilmación |
|
|
Notes on the tape counter
•The tape counter indicates the recording or playback time. Use it as a guide. There will be a time lag of several seconds from the actual time. To set the counter to zero, press COUNTER RESET.
•If the tape is recorded in SP and LP modes mixed, the tape counter shows incorrect recording time. When you intend to edit the tape using the tape counter, record in same (SP or LP) mode.
Note on beep sound
As indicated with ³ in the illustrations, a beep sounds when you turn the power on or when you start recording and two beeps sound when you stop recording, confirming the operation. Several beeps also sound as a warning of any unusual condition of the camcorder. Note that the beep sound is not recorded on the tape. If you do not want to hear the beep sound, change the BEEP setting to OFF.
Note on the AUTO DATE feature
The clock is set at the factory to Tokyo time for the models sold in Japan, and to New York or Panama time for other models. You can reset the clock.
The AUTO DATE feature shows the date automatically once a day. However, the date may automatically appear more than once a day when:
–you reset the date and time.
–you eject and insert the tape again.
–you stop recording within 10 seconds.
When moving from indoors to outdoors (or vice versa)
Turn STANDBY up and point the camcorder at a white object for about 15 seconds so that the white balance is properly adjusted.
Notas sobre el contador de la cinta
•El contador de la cinta indicará el tiempo de grabación o de reproducción. Empléelo como una guía. Es posible que exista una diferencia de varios segundos del tiempo real. Para ajustar el contador a cero, presione COUNTER RESET.
•Si la cinta se ha grabado en los modos SP y LP mezclados, el contador de la cinta indicará un tiempo de videofilmación incorrecto. Cuando intente editar la cinta utilizando el contador de la cinta, grabe en el mismo modo (SP o LP).
Nota sobre el pitido
Como se indica con la marca ³ en las ilustraciones, cuando conecte la alimentación o cuando comience la videofilmación, sonará un pitido, y cuando pare la videofilmación sonarán dos pitidos para confirmar la operación. También sonarán varios pitidos como advertencia de una condición anormal de la videocámara. Tenga en cuenta que los pitidos no se grabarán en la cinta. Si no desea oír los pitidos, cambie el ajuste de BEEP a OFF.
Nota sobre la función AUTO DATE
El reloj está ajustado en fábrica a la hora de Tokio en el modelo para Japón y a la de Nueva York o Panamá en otros modelos. El reloj puede reajustarse.
La función AUTO DATE se activará una vez al día. Sin embargo, la fecha aparecerá automáticamente más de una vez al día cuando:
–reajuste la fecha y la hora.
–extraiga y vuelva a insertar el videocassette.
–pare la grabación antes de 10 segundos.
Cuando se mueva del interior al exterior (o viceversa)
Gire STANDBY hacia arriba y apunte con la videocámara hacia un objeto blanco durante unos 15 segundos de forma que el equilibrio del blanco se ajuste apropiadamente.
14
CCD-TRV11/TRV21 3-856-152-52.E/S

|
|
|
|
|
|
|
|
|
|
|
Using the zoom feature |
|
Utilización del zoom |
|
Zooming is a recording technique that lets you |
El zoom es una técnica de videofilmación que le |
change the size of the subject in the scene. For |
permite cambiar el tamaño del motivo en la |
more professional-looking recordings, use the |
escena. Para filmaciones de aspecto más |
zoom sparingly. |
profesional, utilice el zoom en forma limitada. |
T side: for telephoto (subject appears closer) |
Lado T: para telefoto (el motivo se ve cercano) |
W side: for wide-angle (subject appears farther |
Lado W: para gran angular (el motivo se ve |
away) |
lejano) |
|
operationsBasic |
|
básicas Operaciones |
Zooming speed (Variable speed zooming)
Turn the power zoom lever fully for a high-speed zoom. Turn it lightly for a relatively slow zoom.
When you shoot a subject using a telephoto zoom
If you cannot get a sharp focus while in extreme telephoto zoom, move the power zoom lever to the “W” side until the focus is sharp.
You can shoot a subject that is at least 80 cm (about 2.6 feet) away from the lens surface in the telephoto position, or 1 cm (about 1/ 2 inches) in the wide-angle position.
Velocidad del zoom (zoom de velocidad variable)
Gire completamente la palanca del zoom motorizado para efectuar el zoom a gran velocidad. Gírela un poco para hacerlo a una velocidad relativamente lenta.
Cuando videofilme un motivo empleando el acercamiento con el zoom
Si no puede enfocar nítidamente cuando videofilme con el zoom en el extremo del telefoto, gire la palanca del zoom motorizado hacia el lado “W” hasta enfocar nítidamente. Usted podrá videofilmar un motivo que esté por lo menos a 80 cm de la superficie del objetivo en la posición de telefoto, y a 1 cm en la de gran angular.
15
CCD-TRV11/TRV21 3-856-152-52.E/S

Camera recording |
Videofilmación |
|
|
Notes on digital zoom (CCD-TRV21 only)
•More than 12x zoom is performed digitally, and the picture quality deteriorates as you go toward the “ T ” side. If you do not want to use the digital zoom, set the D ZOOM function to OFF.
•The vertical bar in the power zoom indicator separates the digital zooming zone (right side of the bar [a]) and the optical zooming zone (left side of the bar [b]). If you set the D ZOOM function to OFF, the right side of the bar [a] disappears.
Notas sobre el zoom digital (CCD-TRV21 solamente)
•A más de 12 aumentos, el zoom se realizará digitalmente, y la calidad de la imagen se deteriorará a medida que vaya hacia el lado “T”. Si no desea utilizar el zoom digital, ajuste la función D ZOOM a OFF.
•La barra vertical del indicador del zoom motorizado separa la zona del zoom digital (parte situada a la derecha de la barra [a]) y la zona del zoom óptico (parte situada a la izquierda de la barra [b]). Si ha ajustado la función D ZOOM a OFF, la parte situada a la derecha de la barra [a] desaparecerá.
16
CCD-TRV11/TRV21 3-856-152-52.E/S

Shooting with the LCD screen
You can also record the picture while looking at the LCD screen.
When using the LCD screen, the viewfinder turns off automatically. You cannot monitor the sound from the speaker during recording.
(1)While pressing PUSH OPEN, open the LCD panel.
(2)Adjust the angle of the LCD panel.
The LCD panel moves about 90 degrees to this side and about 210 degrees to the other side.
To adjust the brightness of the LCD screen, turn the BRIGHT dial.
The battery life is longer when the LCD panel is closed. Use the viewfinder instead of the LCD screen to save the battery power.
Videofilmación con la pantalla de cristal líquido
Usted también podrá grabar imágenes observando la pantalla de cristal líquido. Cuando utilice la pantalla de cristal líquido, el visor se desactivará automáticamente. Usted no podrá escuchar el sonido a través del altavoz durante la videofilmación.
(1)Manteniendo pulsada PUSH OPEN, abra la pantalla de cristal líquido.
(2)Ajuste el ángulo de la pantalla de cristal líquido.
La pantalla de cristal líquido podrá moverse unos 90 grados hacia este lado y aproximadamente 210 grados hacia el otro. Para ajustar el brillo de la pantalla de cristal líquido, gire el mando BRIGHT.
La duración de la batería será mayor cuando la pantalla de cristal líquido esté cerrada. Para ahorrar energía de la batería, utilice el visor en vez de la pantalla de cristal líquido.
1
2
Notes on the LCD panel
•When closing the LCD panel, turn it vertically until it clicks [a].
•When turning the LCD panel, turn it always vertically; otherwise, the camcorder body may be damaged or the LCD panel may not close properly [b].
•Close the LCD panel completely when not in use.
210˚
90˚
 BRIGHT 90˚
Notas sobre al pantalla de cristal líquido
•Para cerrar la pantalla de cristal líquido, gírela verticalmente hasta que chasquee [a].
•Cuando gire la pantalla de cristal líquido, hágalo siempre verticalmente, ya que de lo contrario podría dañar el cuerpo de la videocámara o la pantalla no se cerraría adecuadamente [b].
•Cuando no vaya a utilizar la pantalla de cristal líquido, ciérrela completamente.
básicas Operaciones operations Basic
[a] |
1 |
[b] |
2
17
CCD-TRV11/TRV21 3-856-152-52.E/S
Hints for better |
Consejos para |
shooting |
videofilmar mejor |
|
|
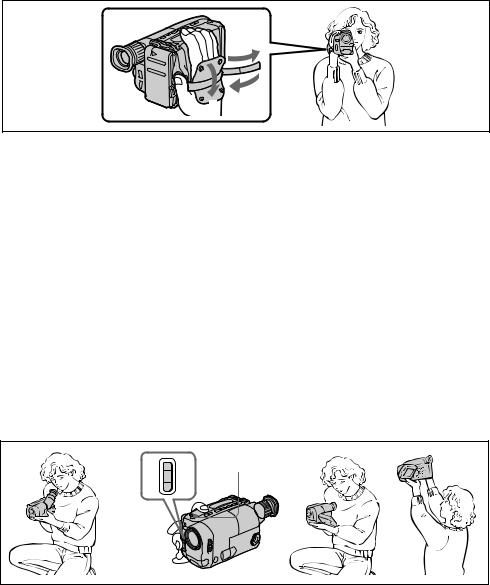
For hand-held shots, you’ll get better results by holding the camcorder according to the following suggestions:
•Hold the camcorder firmly and secure it with the grip strap so that you can easily manipulate the controls with your thumb.
Para videofilmar con la videocámara en las manos, podrá obtener mejores imágenes sujetándola como se indica a continuación:
•Sujete la videocámara firmemente y asegúrela con la correa de la empuñadura de modo que pueda manipular fácilmente los controles con el pulgar.
1
2
3
•Place your right elbow against your side. •Place your left hand under the camcorder to
support it.
•Place your eye firmly against the viewfinder eyecup.
•Use the viewfinder frame as a guide to determine the horizontal plane.
•You can record in a low position to get an interesting recording angle. Lift the viewfinder up for recording from a low position [a].
•While recording in a low position, you can use the START/STOP button on the top of the camcorder or the power zoom button located on the front [b]. Note that you cannot change zooming speed using the front power zoom button.
•You can also record in a low position or even in a high position using the LCD panel [c].
•Coloque su codo derecho firmemente contra su costado.
•Coloque su mano izquierda debajo de la videocámara para sostenerla.
•Apoye el ocular del visor de la videocámara firmemente contra su ojo.
•Para determinar el plano horizontal, utilice el cuadro del visor como referencia.
•Para obtener un ángulo de videofilmación interesante, usted también podrá grabar desde una posición baja. Para grabar desde una posición baja, gire el visor hacia arriba [a].
•Cuando videofilme en posición baja, podrá utilizar la tecla START/STOP de la parte superior de la videocámara o la tecla del zoom motorizado situada en la parte frontal [b]. Tenga en cuenta que usted no podrá cambiar la velocidad del zoom utilizando la tecla del zoom motorizado.
•Usted también podrá videofilmar en posición baja, incluso en posición alta, utilizando la pantalla de cristal líquido [c].
[a] |
[b] |
[c] |
|
W |
START / STOP |
|
T |
|
18
CCD-TRV11/TRV21 3-856-152-52.E/S

Place the camcorder on a flat surface or use a tripod
Try placing the camcorder on a table top or any other flat surface of suitable height. If you have a tripod for a still camera, you can also use it with the camcorder. When attaching a non-Sony tripod, make sure that the length of the tripod screw is less than 6.5 mm (9/32 in). Otherwise, the screw may damage the inner parts of the camcorder.
Cautions on the viewfinder and the LCD
•Do not pick up the camcorder by the viewfinder or by the LCD panel [d].
•Do not place the camcorder so as to point the viewfinder or the LCD screen toward the sun. The inside of the viewfinder or the LCD panel may be damaged. Be careful when placing the camcorder under sunlight or by a window [e].
Coloque la videocámara en una superficie plana o utilice un trípode
Pruebe colocando la videocámara sobre una mesa u otra superficie plana de altura adecuada. Si posee un trípode para cámara fotográfica, podrá emplearlo también con esta videocámara. Cuando utilice un trípode que no sea Sony, asegúrese de que la longitud del tornillo del trípode sea inferior a 6,5 mm. De lo contrario, es posible que el tornillo dañe las partes internas de la videocámara.
Precauciones sobre el visor y la pantalla de cristal líquido
•No sujete la videocámara por el visor ni por la pantalla de cristal líquido [d].
•No deje la videocámara con el visor ni con la pantalla de cristal líquido apuntando hacia el sol. El interior del visor o de la pantalla de cristal líquido podría dañarse. Tenga cuidado cuando deje la videocámara bajo la luz solar directa o cerca de una ventana [e].
[d] |
[e] |
básicas Operaciones operations Basic
Notes on the LCD screen
•The LCD screen is made with high-precision technology. However, black points or bright points of light (red, blue or green) may appear constantly on the LCD screen. These points are not recorded on the tape. This is not a malfunction.
(Effective dots: more than 99.99%)
•When you use the LCD screen outdoors in direct sunlight, the LCD screen may be difficult to see. If this happens, we recommend that you use the viewfinder.
Notas sobre la pantalla de cristal líquido
•La pantalla de cristal líquido ha sido fabricada con tecnología de gran precisión. Sin embargo, es posible que en la misma aparezcan puntos negros o brillantes de luz (rojos, azules, o verdes). Estos puntos no se grabarán en la cinta. Esto no significa mal funcionamiento. (Puntos efectivos: más del 99,99%)
•Si utiliza la pantalla de cristal líquido en exteriores bajo la luz solar directa, es posible que resulte difícil de ver. Cuando suceda esto, recomendamos utilizar el visor.
19
CCD-TRV11/TRV21 3-856-152-52.E/S

Checking the |
Verificación de las |
recorded picture |
imágenes grabadas |
|
|
Using EDITSEARCH, you can review the last recorded scene or check the recorded picture in the viewfinder. You can also review the picture on the LCD screen.
(1) While pressing the small green button on the POWER switch, set it to CAMERA.
(2) Turn STANDBY up.
(3) Press the - (Î) side of EDITSEARCH momentarily; the last few seconds of the recorded portion plays back (Rec Review). You can also monitor the sound from the speaker or by using an earphone (not supplied).
Hold down the – side of EDITSEARCH until the camcorder goes back to the scene you want. The last recorded portion is played back. To go forward, hold down the + side
(Edit Search).
Utilizando EDITSEARCH, usted podrá revisar la última escena grabada o comprobar la imagen grabada en el visor.
(1)Manteniendo presionado el pequeño botón verde del selector POWER, ponga hasta CAMERA.
(2)Gire STANDBY hacia arriba.
(3)Presione EDITSEARCH. Presione momentáneamente el lado – (Î). Se reproducirán los últimos segundos de la parte filmada (Revisión de la grabación).
Mantenga presionado el lado – de EDITSEARCH hasta que la cinta retroceda hasta la escena deseada. La última parte filmada se reproducirá. Para avanzar la cinta, mantenga presionado el lado + (Búsqueda para la edición).
1 |
|
|
|
|
CAMERA |
2 |
|
|
|
OFF |
|
3 |
|
|
|
K |
|
||
|
|
|
||
|
C |
|
||
|
O |
|
|
|
PLAYER |
L |
|
|
|
|
|
EDITSEARCH |
Î |
|
|
S |
|
||
|
T |
Y |
|
|
|
A |
|
|
|
|
|
NDB |
|
|
|
Î |
|
|
|
|
|
|
Î |
|
20
CCD-TRV11/TRV21 3-856-152-52.E/S
To stop playback
Release EDITSEARCH.
To go back to the last recorded point after edit search
Press END SEARCH. The last recorded point is played back for about 5 seconds if the tape was recorded in SP mode, or 10 seconds if the tape was recorded in LP mode, and stops.
Note that this function does not work once you eject the cassette after you recorded in the tape.
To begin re-recording
Press START/STOP. Re-recording begins from the last recorded point or the point you released EDITSEARCH. Provided you do not eject the tape, the transition between the last scene you recorded and the next scene you record will be smooth.
Para parar la reproducción
Suelte EDITSEARCH.
Para volver al último punto grabado después de la búsqueda para edición
Presione END SEARCH. El último punto grabado se reproducirá durante unos 5 segundos si la cinta fue grabada en el modo SP, o 10 segundos si fue grabada en el modo LP, y después se parará.
Tenga en cuenta que esta función no trabajará cuando haya extraído el videocassette después de haber grabado la cinta.
Para reanudar la grabación
Presione START/STOP. La grabación se iniciará desde el punto en el que soltó EDITSEARCH. Mientras no extraiga el videocassette, la transición entre la última escena grabada y la siguiente será uniforme.
básicas Operaciones operations Basic
21
CCD-TRV11/TRV21 3-856-152-52.E/S

Playing back a tape
You can monitor the playback picture on the LCD screen.
(1)While pressing the small green button on the POWER switch, set it to PLAYER.
(2)Insert the recorded tape with the window facing out.
(3)While pressing PUSH OPEN, open the LCD panel. Adjust the angle of the LCD panel or the brightness of the LCD screen if necessary.
(4)Press (to start playback.
(5)Adjust the volume using VOL.
You can also monitor on the TV screen after connecting the camcorder to the VCR/TV.
Reproducción de cintas
Usted podrá contemplar las imágenes de reproducción en la pantalla de cristal líquido.
(1)Manteniendo presionado el pequeño botón verde del selector POWER, deslice éste hasta PLAYER.
(2)Inserte el videocassette grabado con la ventanilla hacia afuera.
(3)Manteniendo presionada PUSH OPEN, abra la pantalla de cristal líquido. Si es necesario, ajuste el ángulo o el brillo de la pantalla de cristal líquido.
(4)Para iniciar la reproducción, presione (.
(5)Ajuste el volumen utilizando VOL.
Usted también podrá contemplar las imágenes en la pantallas de un televisor después de haber conectado la videocámara a una videograbadora/televisor.
CAMERA |
OFF |
PLAYER |
VOLUME |
To stop playback, press p.
To rewind the tape, press 0.
To fast-forward the tape, press ).
Para parar la reproducción, presione p. Para rebobinar la cinta, presione 0.
Para hacer que la cinta avance rápidamente, presione ).
22
CCD-TRV11/TRV21 3-856-152-52.E/S
 Loading...