


АÎÙ‡‚ËÚÌ˚È Û͇Á‡ÚÂθ
А |
|
|
А‚Ъ. ФУНЫТЛ У‚Н‡ ................. |
|
43 |
А‚ÚÓÏÓ·Ëθ̇я ·‡Ú‡ Âя |
....... |
31 |
Б, В |
|
|
Б‡Ú‡ ÂÈ͇ InfoLITHIUM ........ |
|
78 |
ВÂÚÂ ...................................... |
|
33 |
ВˉÂÓÁ‡ÔËÒ¸ .......................... |
|
13 |
В‚Â‰ÂÌËÂ/‚˚‚‰ÂÌË |
|
|
‚Л‰ВУЛБУ· ‡КВМЛя ............ |
|
36 |
В˚Íβ˜‡ÚÂθ ËÁ‚ΘÂÌËя |
||
͇ÒÒÂÚ˚ ............................... |
|
12 |
Г. Д |
|
|
ГÌÂÁ‰Ó LANC .......................... |
|
69 |
ГÌÂÁ‰Ó MIC (ÏËÍ ÓÙÓ̇) .... |
101 |
|
ГÌÂÁ‰Ó ‰ËÒÚ. ÛÔ ‡‚ÎÂÌËя |
|
|
(LANC) ................................. |
|
69 |
ДВПУМТЪ ‡ˆЛя ................ |
34, 104 |
|
Д‡Ú‡/‚ ÂÏя ...................... |
|
27, 53 |
К, Л |
|
КУ‰ ‚ ВПВМЛ .................... |
34, 66 |
КУ‰ ‚ ВПВМЛ RC .................... |
66 |
КÓ‰ ‰‡Ú˚ ................................ |
26 |
ЛËÚË‚‡я ·‡Ú‡ ÂÈ͇ ............. |
70 |
Н, О, П |
|
Н‡МВТВМЛВ ЪЛЪ ‡ ................... |
49 |
О˜ËÒÚ͇ ‚ˉÂÓ„ÓÎÓ‚ÓÍ ......... |
82 |
П‡ÏяÚ¸ ÌÛÎя ..................... |
54, 60 |
П‡ÛÁ‡ Ô Ë |
|
‚ÓÒÔ ÓËÁ‚‰ÂÌËË ................ |
25 |
ПВ ВПУЪН‡ ‚Л‰ВУОВМЪ˚ |
|
̇Á‡‰ ................................... |
24 |
ПΘ‚ÓÈ ÂϯÓÍ ............. |
107 |
ПÓËÒÍ ‰‡Ú˚ ............................ |
58 |
ПРОГРАММНАЯ АВТ. |
|
ЭКСПОЗИЦИЯ .................... |
44 |
П У‚В Н‡ МВЛТФ ‡‚МУТЪВИ ... 93 |
|
П Ó‚Â Í‡ ‚ˉÂÓÁ‡ÔËÒË ......... |
21 |
С |
|
|
С· ÓÒ Ò˜ÂÚ˜Ë͇ ......... |
15, 54, 60 |
|
СЛТЪВП‡ ПВМ˛ ....................... |
|
32 |
СÍËÔ-Ò͇ÌË Ó‚‡ÌË .............. |
|
25 |
С͇ÌË Ó‚‡ÌË ‰‡Ú˚ .............. |
|
58 |
СУВ‰ЛМВМЛя ........................... |
|
22 |
С˜ÂÚ˜ËÍ ‰ÎËÌ˚ |
|
|
ÎÂÌÚ˚ ..................... |
15, 33, 104 |
|
Т, У, Ф |
|
|
Т ‡МТЩУН‡ˆЛя ....................... |
|
16 |
УÒÚ‡Ìӂ͇ ̇ ¯Ú‡ÚË‚Â .......... |
19 |
|
ФÓÌÓ‚˚È Ò‚ÂÚ ........................ |
|
46 |
ФЫМНˆЛя Т‡ПУ‰Л‡„МУТЪЛНЛ ... |
97 |
|
ФÛ͈Ëя ANTI GROUND |
|
|
SHOOTING .......................... |
|
18 |
ФÛÌ͈Ëя AUTO DATE ............ |
16 |
|
ФÛÌ͈Ëя ТВС ......................... |
|
34 |
ФÛÌ͈Ëя ORC ........................ |
|
56 |
ФÛÌ͈Ëя STEADY SHOT ....... |
57 |
|
З, И |
|
Р |
|
Ц, Ш |
|
|
|
Р„. Û Ó‚Ìя Ò˄̇· |
36 |
ЦЛЩ У‚‡я Ъ ‡МТЩУН‡ˆЛя |
17 |
||
З‡‰‡ÌË ˜‡ÒÓ‚ |
72 |
|||||
Р„ÛÎË Ó‚Í‡ ‚ˉÓËÒ͇ÚÂÎя |
|
ШЫПУФУ‰‡‚ЛЪВО¸ |
34 |
|||
З‡ я‰Í‡ ·‡Ú‡ ÂÈÌÓ„Ó |
|
|
||||
|
|
14 |
|
|
||
ËÒÚÓ˜ÌË͇ |
8 |
............................................. |
|
|
||
Р‰‡ÍÚË Ó‚‡ÌË |
68 |
Э, Я |
|
|||
З‚ÛÍÓ‚ÓÒÔ ÓËÁ‚‰ÂÌË AFM |
|
|
||||
|
РЕДАКТ |
35 |
|
|||
HiFi |
74 |
ЭÎÂÍÚ ÓÒÂÚ¸ |
28 |
|||
РЕДАКТ. ПОИСК |
21 |
|||||
ЗÛÏÏÂ |
15 |
ЭНТФУБЛˆЛя |
45 |
|||
РÂÊËÏ ÔÛÒ͇/ÓÒÚ‡ÌÓ‚‡ |
18 |
|||||
ИЗОБРАЗИТЕЛЬНЫЙ |
|
|
|
|||
|
РВКЛП „УЪУ‚МУТЪЛ |
14 |
|
|
||
ЭФФЕКТ |
40 |
|
|
|||
РÂÊËÏ Á‡ÔËÒË |
33 |
|
|
|||
ИÒÚÓ˜ÌËÍË ÔËÚ‡ÌËя |
28 |
|
|
|||
РÂÊËÏ ¯Ë ÓÍÓ„Ó ËÁÓ· ‡ÊÂÌËя |
|
|
||||
И̉ÂÍÒ |
61 |
|
|
|||
|
38 |
|
|
|||
|
|
............................................. |
|
|
||
|
|
РÂÊËÏ˚ ‚ÓÒÔ ÓËÁ‚‰ÂÌËя |
|
|
|
|
|
|
............................................. |
25 |
|
|
|
|
|
РЫ˜М‡я ЩУНЫТЛ У‚Н‡ ............ |
42 |
|
|
|
|
|
Р˚˜‡„ Ъ ‡МТЩУН‡ˆЛЛ ............ |
17 |
|
|
|
Sony Corporation Printed in Japan
3-859-496-33 (1)
Video Camera
Recorder
Operating Instructions
Before operating the unit, please read this manual thoroughly, and retain it for future reference.
РЫНУ‚У‰ТЪ‚У ФУ ˝НТФОЫ‡Ъ‡ˆЛЛ
ПВ В‰ ˝НТФОЫ‡Ъ‡ˆЛВИ ‡ФФ‡ ‡Ъ‡ ВНУПВМ‰ЫВЪТя ‚МЛП‡ЪВО¸МУ ЛБЫ˜ЛЪ¸ М‡ТЪУя˘ВВ ЫНУ‚У‰ТЪ‚У Л ТУı ‡МЛЪ¸ В„У Ы ТВ·я ‰Оя ‰‡О¸МВИ¯Лı ТФ ‡‚УН.
CCD-TR825E
CCD-TR820E/TR825E
©1997 by Sony Corporation

English
Welcome!
Congratulations on your purchase of this Sony Handycam® camcorder. With your Handycam you can capture life’s precious moments with superior picture and sound quality.
Your Handycam is loaded with advanced features, but at the same time it is very easy to use. You will soon be producing home video that you can enjoy for years to come.
WARNING
To prevent fire or shock hazard, do not expose the unit to rain or moisture.
To avoid electrical shock, do not open the cabinet.
Refer servicing to qualified personnel only.
NOTICE ON THE SUPPLIED AC POWER ADAPTOR FOR CUSTOMERS IN THE UNITED KINGDOM
A moulded plug complying with BS1363 is fitted to this equipment for your safety and convenience.
Should the fuse in the plug supplied need to be replaced, a 5 AMP fuse approved by ASTA or BSI to BS1362 (i.e., marked with 2or @ mark) must be used.
If the plug supplied with this equipment has a detachable fuse cover, be sure to attach the fuse cover after you change the fuse. Never use the plug without the fuse cover. If you should lose the fuse cover, please contact your nearest Sony service station.
РЫТТНЛИ
ОÚ ÙË Ï˚ ËÁ„ÓÚÓ‚ËÚÂÎя
БО‡„У‰‡ ЛП Б‡ В‡¯Ы ФУНЫФНЫ ‚Л‰ВУН‡ПВ ˚ П‡ НЛ “Handycam”® Ф УЛБ‚У‰ТЪ‚‡ ЩЛ П˚ “Sony”. С ЛТФУО¸БУ‚‡МЛВП ˝ЪУ„У ‡ФФ‡ ‡Ъ‡ В˚ ПУКВЪВ Б‡ЩЛНТЛ У‚‡Ъ¸ ‚‡КМ˚В Л ˆВММ˚В ПУПВМЪ˚ ‚ В‡¯ВИ КЛБМЛ Т УЪОЛ˜М˚П Н‡˜ВТЪ‚УП ЛБУ· ‡КВМЛя Л Б‚Ы˜‡МЛя. О·О‡‰‡˛˘ЛИ я‰УП ‰УТЪУЛМТЪ‚, ‡ФФ‡ ‡Ъ ‚˚„У‰МУ УЪОЛ˜‡ВЪТя Ф УТЪУЪУИ Л Ы‰У·ТЪ‚УП ‚ ˝НТФОЫ‡Ъ‡ˆЛЛ. С ФУПУ˘¸˛ ˝ЪУИ ·˚ЪУ‚УИ ‚Л‰ВУЪВıМЛНЛ ПУКМУ ‰УО„УВ ‚ ВПя М‡ТО‡К‰‡Ъ¸Тя ТМяЪУИ ‡ФФ‡ ‡ЪУП ‚Л‰ВУБ‡ФЛТ¸˛.
ВНИМАНИЕ !
ДÎя Ô Â‰ÓÚ‚ ‡˘ÂÌËя ÔÓʇ ‡ Ë ˝ÎÂÍÚ Ë˜ÂÒÍÓ„Ó Û‰‡ ‡ ̇‰Ó Ô Â‰Óı ‡ÌËÚ¸ ‡ÔÔ‡ ‡Ú ÓÚ ‰Óʉя Ë ‚·„Ë.
ВУ ЛБ·ВК‡МЛВ ФУ ‡КВМЛя ˝ОВНЪ Л˜ВТНЛП ЪУНУП МВ ТОВ‰ЫВЪ УЪН ˚‚‡Ъ¸ НУ ФЫТ ‡ФФ‡ ‡Ъ‡.
К ЪВıМЛ˜ВТНУПЫ. У·ТОЫКЛ‚‡МЛ˛ ‡ФФ‡ ‡Ъ‡ ‰УФЫТН‡˛ЪТя У‰МЛ Н‚‡ОЛЩЛˆЛ У‚‡ММ˚В‡‰ЛУПВı‡МЛНЛ.
2

English |
|
Table of contents |
|
Before you begin |
|
Using this manual ................................................... |
5 |
Checking supplied accessories ............................. |
7 |
Getting started |
|
Charging and installing the battery pack ........... |
8 |
Inserting a cassette ............................................... |
12 |
Basic operations |
|
Camera recording ................................................. |
13 |
Using the zoom feature ..................................... |
16 |
Selecting the START/STOP mode .................. |
18 |
Hints for better shooting ..................................... |
19 |
Checking the recorded picture ........................... |
21 |
Connections for playback .................................... |
22 |
Playing back a tape ............................................... |
24 |
Advanced operations |
|
Using alternative power sources ........................ |
28 |
Using the mains ................................................. |
29 |
Using alkaline batteries ..................................... |
30 |
Using a car battery ............................................. |
31 |
Changing the mode settings ............................... |
32 |
— for camera recording — |
|
Fade-in and fade-out ............................................ |
36 |
Using the wide mode function ........................... |
38 |
Enjoying picture effect ......................................... |
40 |
Focusing manually ............................................... |
42 |
Using the PROGRAM AE function .................... |
44 |
Shooting with backlighting ................................. |
46 |
Adjusting the exposure ........................................ |
47 |
Superimposing a title ........................................... |
49 |
Making your own titles ....................................... |
52 |
Recording with the date/time ............................ |
53 |
Re-recording a picture in the middle of a |
|
recorded tape (CCD-TR825E only) ................. |
54 |
Optimizing the recording condition .................. |
56 |
Releasing the STEADY SHOT function ............. |
57 |
— for playback/editing — |
|
Searching the boundaries of recorded date |
|
(CCD-TR825E only) ........................................... |
58 |
Returning to a pre-registered position |
|
(CCD-TR825E only) ........................................... |
60 |
Locating the marking position (CCD-TR825E |
|
only) ..................................................................... |
61 |
Writing the RC time code on a recorded tape |
|
(CCD-TR825E only) ........................................... |
66 |
Editing onto another tape .................................... |
68 |
Additional information |
|
Changing the lithium battery in the |
|
camcorder ........................................................... |
70 |
Resetting the date and time ................................. |
72 |
Usable cassettes and playback modes ............... |
73 |
Tips for using the battery pack ........................... |
75 |
Maintenance information and precautions ....... |
81 |
Using your camcorder abroad ............................ |
87 |
Trouble check ........................................................ |
88 |
Self-diagnosis function ...................................... |
92 |
Specifications ......................................................... |
98 |
Identifying the parts ........................................... |
100 |
Warning indicators ............................................. |
110 |
Index ..................................................................... |
111 |
‡‡ФФ‡ ˝НТФОЫ‡Ъ‡ˆЛВИ В‰ПВ / begin you Before
3

РЫТТНЛИ яБ˚Н |
|
СӉ ʇÌË |
|
ПВ В‰ ˝НТФОЫ‡Ъ‡ˆЛВИ ‡ФФ‡ ‡Ъ‡ |
|
О ÛÍÓ‚Ó‰ÒÚ‚Â Í ‡ÔÔ‡ ‡ÚÛ ............................. |
5 |
П У‚В Н‡ НУПФОВНЪМУТЪЛ ФУТЪ‡‚НЛ .............. |
7 |
ПУ‰„УЪУ‚Н‡ Н ˝НТФОЫ‡Ъ‡ˆЛЛ ‡ФФ‡ ‡Ъ‡ |
|
З‡ я‰Í‡ Ë ÛÒÚ‡Ìӂ͇ ·‡Ú‡ ÂÈÌÓ„Ó ËÒÚÓ˜ÌË͇ |
|
........................................................................ |
8 |
ВÒÚ‡‚͇ ‚ˉÂÓ͇ÒÒÂÚ˚ ................................. |
12 |
ОÒÌÓ‚Ì˚ ÓÔ ‡ˆËË |
|
З‡ÔËÒ¸ ̇ ‚ˉÂÓ͇Ï  ................................ |
13 |
ИТФУО¸БУ‚‡МЛВ ЩЫМНˆЛЛ Ъ ‡МТЩУН‡ˆЛЛ .. |
16 |
В˚·Ó ÂÊËχ START/STOP |
|
(ПÛÒ͇/ÓÒÚ‡ÌÓ‚‡) ........................................ |
18 |
СÓ‚ÂÚ˚ ÔÓ ÎÛ˜¯ÂÈ ‚ˉÂÓÒ¸ÂÏÍ ................. |
19 |
П Ó‚Â Í‡ ͇˜ÂÒÚ‚‡ Á‡ÔËÒ‡ÌÌÓ„Ó |
|
ËÁÓ· ‡ÊÂÌËя ............................................... |
21 |
СУВ‰ЛМВМЛя ‰Фя ‚УТФ УЛБ‚В‰ВМЛя ............. |
22 |
ВÓÒÔ ÓËÁ‚‰ÂÌË ‚ˉÂÓÁ‡ÔËÒË ................... |
24 |
ДУФУОМЛЪВО¸М˚В УФВ ‡ˆЛЛ |
|
ИÒÔÓθÁÓ‚‡ÌË ‡Î¸Ú ̇ÚË‚Ì˚ı ËÒÚÓ˜ÌËÍÓ‚ |
|
ÔËÚ‡ÌËя ........................................................ |
28 |
ПЛЪ‡МЛВ УЪ ˝ОВНЪ УТВЪЛ ............................ |
29 |
ИÒÔÓθÁÓ‚‡ÌË ˘ÂÎÓˆÌ˚ı ·‡Ú‡ ÂÂÍ ........ |
30 |
ПËÚ‡ÌË ÓÚ ‡‚ÚÓÏÓ·ËθÌÓÈ ·‡Ú‡ ÂË ........ |
31 |
ПВ ВНО˛˜ВМЛВ Б‡‰‡МЛя ВКЛПУ‚ ............... |
32 |
— ДÎя Á‡ÔËÒË Ì‡ ‚ˉÂÓ͇Ï  — |
|
ПО‡‚М˚И ‚˚ıУ‰ ЛБ Б‡ЪВПМВМЛя Л ЫıУ‰ ‚ МВ„У |
|
...................................................................... |
36 |
ИÒÔÓθÁÓ‚‡ÌË ÙÛÌ͈ËË ÂÊËχ ¯Ë ÓÍÓ„Ó |
|
ËÁÓ· ‡ÊÂÌËя ............................................... |
38 |
Н‡ТО‡К‰ВМЛВ ‡БМ˚ПЛ ЛБУ· ‡БЛЪВО¸М˚ПЛ |
|
БЩЩВНЪ‡ПЛ .................................................. |
40 |
ФУНТЛ У‚Н‡ ‚ Ы˜МУП ВКЛПВ ..................... |
42 |
ИÒÔÓθÁÓ‚‡ÌË ÙÛÌ͈ËË PROGRAM AE |
|
(П Ó„ ‡ÏÏ̇я ‡‚ÚÓχÚ˘ÂÒ͇я |
|
˝НТФУБЛˆЛя) ................................................. |
44 |
С¸ÂÏ͇ Ô Ë ÙÓÌÓ‚ÓÏ Ò‚ÂÚ ......................... |
46 |
РВ„ЫОЛ У‚Н‡ БНТФУБЛˆЛЛ .............................. |
47 |
Н‡МВТВМЛВ ЪЛЪ ‡ ........................................... |
49 |
СУТЪ‡‚ОВМЛВ У Л„ЛМ‡О¸М˚ı ЪЛЪ У‚............. |
52 |
З‡ФЛТ¸ Т ЫН‡Б‡МЛВП ‰‡Ъ˚/‚ ВПВМЛ ............. |
53 |
П ÂÁ‡ÔËÒ¸ ËÁÓ· ‡ÊÂÌËя ‚ Ò ‰ËÌ ÎÂÌÚ˚ Ò |
|
Á‡ÔËÒ¸˛ (ТÓθÍÓ ‰Îя ÏÓ‰ÂÎÂÈ |
|
CCD-TR825E) .............................................. |
54 |
П У‚В Н‡ ТУТЪУяМЛя ОВМЪ˚ ФВ В‰ |
|
Á‡ÔËÒ¸˛ ....................................................... |
56 |
В˚Íβ˜ÂÌË ÙÛÌ͈ËË STEADY SHOT |
|
(УÒÚÓȘ˂‡я Ò˙ÂÏ͇) .................................. |
57 |
— ДÎя ‚ÓÒÔ ÓËÁ‚‰ÂÌËя/ ‰‡ÍÚË Ó‚‡ÌË —
ПÓËÒÍ „ ‡Ìˈ ‰‡Ú˚ Á‡ÔËÒË (ÚÓθÍÓ ‰Îя
ПУ‰ВОЛВИ CCD-TR825E) ............................ |
|
58 |
ВÓÁ‚ ‡Ú Í Ô Â‰‚‡ ËÚÂθÌÓ |
|
|
Б‡ В„ЛТЪ Л У‚‡ММУПЫ ФУОУКВМЛ˛ |
|
|
(ЪУО¸НУ ‰Оя ПУ‰ВОЛВИ CCD-TR825E) ....... |
60 |
|
О·М‡ ЫКВМЛВ ФУОУКВМЛя УЪПВЪНЛ (ЪУО¸НУ |
|
|
‰Оя ПУ‰ВОЛВИ CCD-TR825E) ..................... |
|
61 |
В‚У‰ ‚ ВПВММУ„У НУ‰‡ RC ‚ ‚Л‰ВУБ‡ФЛТ¸ |
|
|
(ÚÓθÍÓ ‰Îя ÏÓ‰ÂÎÂÈ CCD-TR825E) ......... |
66 |
|
Р‰‡ÍÚË Ó‚‡ÌË Á‡ÔËÒË Ì‡ ‰ Û„Û˛ |
|
|
ОВМЪЫ ............................................................ |
|
68 |
ДУФУОМЛЪВО¸М‡я ЛМЩУ П‡ˆЛя |
|
|
З‡ПВМ‡ ОЛЪЛВ‚УИ ·‡Ъ‡ ВИНЛ ‚ |
|
|
‚ˉÂÓ͇Ï  ............................................... |
|
70 |
УТЪ‡МУ‚Н‡ ‰‡Ъ˚ Л ‚ ВПВМЛ .......................... |
|
72 |
П ËÏÂÌяÂÏ˚ ͇ÒÒÂÚ˚ Ë ÂÊËÏ˚ |
|
|
‚ÓÒÔ ÓËÁ‚‰ÂÌËя ........................................ |
|
73 |
РВНУПВМ‰‡ˆЛЛ ФУ Ф ЛПВМВМЛ˛ ·‡Ъ‡ ВИМУ„У |
||
ËÒÚÓ˜ÌË͇ .................................................... |
|
75 |
УН‡Б‡МЛя ФУ ЪВıУ·ТОЫКЛ‚‡МЛ˛ Л |
|
|
Ф В‰УТЪУ УКМУТЪЛ ..................................... |
|
81 |
ИÒÔÓθÁÓ‚‡ÌË ‚ˉÂÓ͇Ï ˚ Á‡ |
|
|
Û·ÂÊÓÏ....................................................... |
|
87 |
П У‚В Н‡ МВЛТФ ‡‚МУТЪВИ ........................... |
|
93 |
ФЫМНˆЛя Т‡ПУ‰Л‡„МУТЪЛНЛ ........................ |
|
97 |
ТВıМЛ˜ВТНЛВ ı‡ ‡НЪВ ЛТЪЛНЛ ...................... |
|
99 |
СФЛТУН ‰ВЪ‡ОВИ Л ЫБОУ‚ ‚Л‰ВУН‡ПВ ˚ ..... |
100 |
|
П Â‰ÛÔ Â‰ËÚÂθÌ˚ Ë̉Ë͇ˆËË ................ |
110 |
|
АÎÙ‡‚ËÚÌ˚È Û͇Á‡ÚÂθ ........... |
З‡‰Ìяя Ó·ÎÓ͇ |
|
4

Before you begin
Using this manual
The instructions in this manual are for the two models listed below. Before you start reading this manual and operating the unit, check your model number by looking at the bottom of your camcorder. The CCD-TR825E is the model used for illustration purposes. Otherwise, the model name is indicated in the illustrations. Any differences in operation are clearly indicated in the text, for example, “CCD-TR825E only.” As you read through this manual, buttons and settings on the camcorder are shown in capital letters.
e.g. Set the POWER switch to CAMERA.
As indicated with in the illustrations, you can hear the beep sound to confirm your operation.
Type of differences
CCD- |
TR820E |
TR825E |
|
RC time code |
— |
r |
|
Data code |
— |
r |
|
Auto Date |
r |
— |
|
Zero memory |
— |
r |
|
Intelligent |
— |
r |
|
accessory shoe |
|||
|
|
Note on TV colour systems
TV colour systems differ from country to country. To view your recordings on a TV, you need a PAL system-based TV.
ПВ В‰ ˝НТФОЫ‡Ъ‡ˆЛВИ ‡ФФ‡ ‡Ъ‡
О ÛÍÓ‚Ó‰ÒÚ‚Â Í ‡ÔÔ‡ ‡ÚÛ
П Ë‚Â‰ÂÌÌ˚ ‚ ÛÍÓ‚Ó‰ÒÚ‚Â ËÌÒÚ Û͈ˡÒÔ ÓÒÚ ‡Ìя˛ÚÒя ̇ Û͇Á‡ÌÌ˚ ÌËÊ ‰‚ ÏÓ‰ÂÎË ‡ÔÔ‡ ‡Ú‡. П ‰ Ô Ó˜ËÚ‡ÌËÂÏ
ЫНУ‚У‰ТЪ‚‡, Ф ВК‰В ˜ВП Ф ЛТЪЫФЛЪ¸ Н |
Before |
|||
|
||||
˝НТФОЫ‡Ъ‡ˆЛЛ ‡ФФ‡ ‡Ъ‡, М‡‰У Ф У‚В ЛЪ¸ |
|
|||
ÏÓ‰Âθ В‡¯Â„Ó ‡ÔÔ‡ ‡Ú‡, Û͇Á‡ÌÌÛ˛ ‚ Â„Ó |
you |
|||
МЛКМВИ ˜‡ТЪЛ. ВТВ ЛМТЪ ЫНˆЛЛ ‚ ЫНУ‚У‰ТЪ‚В |
||||
‰‡˛ÚÒя ÛÒÎÓ‚ÌÓ ‰Îя ÏÓ‰ÂÎË CCD-TR825E; ‚ |
/begin |
|||
Ô ÓÚË‚ÌÓÏ ÒÎÛ˜‡Â, Û͇Á˚‚‡ÂÚÒя ÓÚ‰Âθ̇я |
||||
|
||||
ÏÓ‰Âθ ̇ ËÎβÒÚ ‡ˆËяı ÛÍÓ‚Ó‰ÒÚ‚‡. В |
‰П |
|||
ÒÎÛ˜‡Â, ÂÒÎË Ú Â·ÛÂÚÒя Ó„Ó‚Ó ËÚ¸ ‡Á΢ˠ|
||||
|
||||
ПУ‰ВОЛ, ЫН‡Б˚‚‡ВЪТя У· ˝ЪУП яТМУ ‚ ЪВНТЪВ |
|
|||
ÛÍÓ‚Ó‰ÒÚ‚‡, Ì‡Ô ËÏ “ТÓθÍÓ ‰Îя CCD- |
˝НТФОЫ‡Ъ‡ˆЛВИ |
|||
TR825Е”. В ЫНУ‚У‰ТЪ‚В ЫН‡Б‡М˚ НМУФНЛ Л |
||||
|
||||
‰ . У „‡М˚ ЫФ ‡‚ОВМЛя Ф УФЛТМ˚ПЛ ·ЫН‚‡ПЛ, |
|
|||
Ì‡Ô ËÏ “УÒÚ‡ÌÓ‚ËÚ¸ ‚˚Íβ˜‡ÚÂθ POWER |
|
|||
(ПЛЪ‡МЛВ) ‚ ФУОУКВМЛВ CAMERA (К‡ПВ ‡). |
|
|||
К‡Í ÔÓ͇Á‡ÌÓ Á̇ÍÓÏ Ì‡ ËÎβÒÚ ‡ˆËяı, В˚ |
|
|||
ПУКВЪВ Ы·В‰ЛЪ¸Тя ‚ Ф ‡‚ЛО¸МУТЪЛ |
‡‡ÔÔ‡ |
|||
‚˚ФУОМВМЛя УФВ ‡ˆЛЛ ФУ Б‚ЫНУ‚УПЫ ТЛ„М‡ОЫ. |
||||
|
||||
Р‡Á΢ˠÔÓ ÏÓ‰ÂÎяÏ |
|
|
||
|
|
|
|
|
CCD- |
TR820E |
TR825E |
|
|
КУ‰ ‚ ВПВМЛ RC |
— |
r |
|
|
И̉ÂÍÒ |
— |
r |
|
|
А‚ÚÓχÚ. ‰‡ÚË Ó‚. |
r |
— |
|
|
З‡ФУПЛМ‡МЛВ МЫОя |
— |
r |
|
|
Б‡¯Ï‡Í |
|
|
|
|
ЛМЪВООВНЪЫ‡О¸МУИ |
— |
r |
|
|
|
|
|||
Ф ЛМ‡‰ОВКМУТЪЛ
П ЛПВ˜‡МЛВ Н ТЛТЪВП‡П ˆ‚ВЪМУ„У ЪВОВ‚Л‰ВМЛя
В ТЪ ‡М‡ı ПЛ ‡ Ф ЛМяЪ˚ ‡БМ˚В ТЛТЪВП˚ ˆ‚ВЪМУ„У ЪВОВ‚Л‰ВМЛя. СМяЪ˚В ‡ФФ‡ ‡ЪУП ‚Л‰ВУБ‡ФЛТЛ ‚УТФ УЛБ‚У‰яЪТя ЪУО¸НУ М‡ ЪВОВ‚ЛБУ ‡ı ТЛТЪВП˚ PAL.
5
Using this manual
Precaution on copyright
Television programmes, films, video tapes, and other materials may be copyrighted. Unauthorized recording of such materials may be contrary to the provision of the copyright laws.
О ÛÍÓ‚Ó‰ÒÚ‚Â Í ‡ÔÔ‡ ‡ÚÛ
О· ‡‚ÚÓ ÒÍÓÏ Ô ‡‚Â
ТВОВ‚ЛБЛУММ˚В Ф У„ ‡ПП˚, ЪВОВЩЛО¸П˚, ‚Л‰ВУОВМЪ˚ Л ‰ . ‚Л‰ВУП‡ЪВ Л‡О˚ ПУ„ЫЪ ·˚Ъ¸ Б‡˘Л˘ВМ˚ ‡‚ЪУ ТНЛП Ф ‡‚УП.
Н‡‰У ФУПМЛЪ¸, ˜ЪУ Б‡ФЛТ¸ Ъ‡НЛı ‚Л‰ВУП‡ЪВ Л‡ОУ‚ ПУКВЪ М‡ Ы¯‡Ъ¸ ‡‚ЪУ ТНУВ Ф ‡‚У М‡ ˝ЪЛ ‚Л‰ВУП‡ЪВ Л‡О˚.
Precautions on camcorder care
•Do not let the camcorder get wet. Keep the camcorder away from rain and sea water. Letting the camcorder get wet may cause the unit to malfunction, and sometimes this malfunction cannot be repaired [a].
•Never leave the camcorder exposed to temperatures above 60°C (140°F ), such as in a car parked in the sun or under direct sunlight
[b].
О· ÛıӉ Á‡ ‡ÔÔ‡ ‡ÚÓÏ
•Н‡‰У ·˚Ъ¸ УТЪУ УКМ˚П, ˜ЪУ·˚ ‚Л‰ВУН‡ПВ ‡ МВ ·˚‡ Ы‚О‡КМВМ‡. СОВ‰ЫВЪ Ф В‰Уı ‡МяЪ¸ ‚Л‰ВУН‡ПВ Ы УЪ ФУФ‡‰‡МЛя ‰УК‰я Л ПУ ТНУИ ‚У‰˚. Н‡‰У ТУ·О˛‰‡Ъ¸ УТЪУ УКМУТЪ¸, ˜ЪУ·˚ ЛБ·ВК‡Ъ¸ ФУФ‡‰‡МЛя ‚О‡„Л, ФУТНУО¸НЫ ˝ЪУ ПУКВЪ ‚˚Б˚‚‡Ъ¸ МВЛТФ ‡‚МУТЪЛ ‚ ‡·УЪВ ‡ФФ‡ ‡Ъ‡, НУЪУ ˚В МВ ‚ТВ„‰‡ ПУ„ЫЪ ·˚Ъ¸ ЛТФ ‡‚ЛП˚ [a].
•НВ ТОВ‰ЫВЪ УТЪ‡‚ОяЪ¸ ‡ФФ‡ ‡Ъ Ф Л ЪВПФВ ‡ЪЫ В УН ЫК‡˛˘В„У ‚УБ‰Ыı‡ Т‚˚¯В 60ÓС (140oF), М‡Ф ЛПВ ‚ ‡‚ЪУПУ·ЛОВ Ф Л ТЪУяМНВ М‡ ТУОМˆВ ЛОЛ ФУ‰ Ф яП˚ПЛ ТУОМВ˜М˚ПЛ ОЫ˜‡ПЛ [b].
[a] |
[b] |
Contents of the recording cannot be compensated if recording or playback is not made due to a malfunction of the camcorder, video tape, etc.
СУ‰В К‡МЛВ Б‡ФЛТЛ МВ ПУКВЪ НУПФВМТЛ У‚‡Ъ¸Тя, ВТОЛ Б‡ФЛТ¸ ЛОЛ ‚УТФ УЛБ‚В‰ВМЛВ МВ ‚˚ФУОМВМУ ЛБ-Б‡ МВЛТФ ‡‚МУТЪЛ Т‡ПУ„У ‡ФФ‡ ‡Ъ‡, ‚Л‰ВУОВМЪ˚ Л Ъ.‰.
6
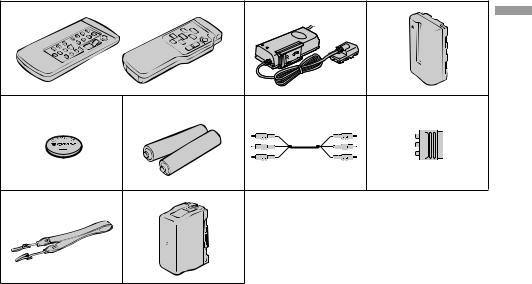
Checking supplied |
П У‚В Н‡ НУПФОВНЪМУТЪЛ |
accessories |
ÔÓÒÚ‡‚ÍË |
Check that the following accessories are supplied |
П У‚В ЛЪ¸ ТОВ‰Ы˛˘ЛВ Ф ЛМ‡‰ОВКМУТЪЛ, |
|
|||
with your camcorder. |
|
ÔÓÒÚ‡‚ÎяÂÏ˚Â Â В‡¯ÂÈ ‚ˉÂÓ͇Ï ÓÈ. |
|
||
1 RMT-717 |
RMT-708 |
2 |
3 |
you Before |
|
or/ËÎË |
|
|
|
||
|
|
|
/ begin |
||
4 |
5 |
6 |
7 |
||
П‰ |
|||||
|
|
|
|
||
8 |
9 |
|
|
‡ФФ‡‡ ˝НТФОЫ‡Ъ‡ˆЛВИ |
|
|
|
|
|
||
1Wireless Remote Commander (1) (p.105) |
1 |
ПЫО¸Ъ ‰ЛТЪ‡МˆЛУММУ„У ЫФ ‡‚ОВМЛя (1) |
|
||
for CCD-TR825E |
|
|
(ÒÚ . 105) |
|
|
2 AC power adaptor AC-V316/V326 (1) |
|
‰Îя ÏÓ‰ÂÎË CCD-TR825E |
|
||
|
СÂÚ‚ÓÈ ‡‰‡ÔÚ Ô ÂÏ. ÚÓ͇ AC-V316/ |
|
|||
(p.8, 28) |
|
2 |
|
||
3 NP-F330 Battery pack (1) (p.8, 28) |
|
V326 (1) (ÒÚ . 8, 28) |
|
||
|
|
|
|||
4 CR2025 Lithium Battery (1) (p.70) |
3 |
Б‡Ú‡ ÂÈÌ˚È ËÒÚÓ˜ÌËÍ ÔËÚ‡ÌËя NP-F330 |
|
||
|
(1) (ÒÚ . 8, 28) |
|
|||
The lithium battery is already installed in |
|
ЛËÚË‚‡я ·‡ ‡ÚÂÈ͇ CR2025 (1) (ÒÚ . 70) |
|
||
your camcorder. |
|
4 |
|
||
5R6 (size AA) battery for Remote |
|
ЛËÚË‚‡я ·‡Ú‡ ÚÂÈ͇ Á‡ ‡Ì ‚ÒÚ ÓÂ̇ ‚ |
|
||
|
‡ÔÔ‡ ‡Ú. |
|
|||
Commander (2) (p.102) |
|
|
Б‡Ú‡ ÂÈ͇ ÚËÔ‡ R6 ( ‡ÁÏ. АА) ‰Îя |
|
|
6 A/V connecting cable (1) (p.22) |
5 |
|
|||
|
ФЫО¸Ъ‡ ‰ЛТЪ‡МˆЛУММУ„У ЫФ ‡‚ОВМЛя (2) |
|
|||
7 21 pin adaptor (1) (p.23) |
|
(ÒÚ . 102) |
|
||
|
|
|
|||
8Shoulder strap (1) (p.107) |
6 |
АЫ‰ЛУ/‚Л‰ВУ ТУВ‰ЛМЛЪВО¸М˚И Н‡·ВО¸ |
|
||
|
(1) (ÒÚ . 22) |
|
|||
9Battery case (1) (p.30) |
|
7 |
21-¯Ú˚ ¸ÍÓ‚˚È ‡‰‡ÔÚ (1) (ÒÚ . 23) |
|
|
|
|
8 |
ПΘ‚ÓÈ ÂÏÂ̸ (1) (ÒÚ . 107) |
|
|
|
|
9 |
Б‡Ú‡ ÂÈÌ˚È ÙÛÚÎя (1) (ÒÚ . 30) |
|
|
7
|
|
|
|
|
|
Getting started |
|
ПУ‰„УЪУ‚Н‡ Н ˝НТФОЫ‡Ъ‡ˆЛЛ |
|
|
Charging and installing |
З‡ я‰Í‡ Ë ÛÒÚ‡Ìӂ͇ |
||
|
the battery pack |
·‡Ú‡ ÂÈÌÓ„Ó ËÒÚÓ˜ÌË͇ |
||
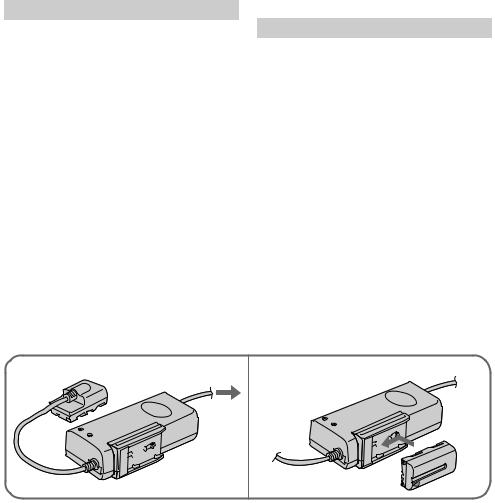
Before using your camcorder, you first need to charge and install the battery pack. To charge the battery pack, use the supplied AC power adaptor.
This camcorder operates with the “InfoLITHIUM” battery. If you use any other battery to operate your camcorder, the camcorder may not operate or the battery life may be shortened.
“InfoLITHIUM” is a trade mark of Sony Corporation.
Charging the battery pack
Charge the battery pack on a flat surface without vibration.
(1) Connect the mains lead to mains.
(2) Align the surface of the battery pack indicated by the zmark with the edge of the terminal shutter of the AC power adaptor. Then fit and slide the battery pack in the direction of the arrow. The CHARGE lamp (orange) lights up. Charging begins.
When the CHARGE lamp goes out, normal charge is completed. For full charge, which allows you to use the battery longer than usual, leave the battery pack in place for approximately one hour. Unplug the unit from the mains, then remove the battery pack and install it into the camcorder. You can also use the battery pack before it is completely charged.
ПВ В‰ ЫФУЪ В·ОВМЛВП ‡ФФ‡ ‡Ъ‡ М‡‰У Б‡ я‰ЛЪ¸ ·‡Ъ‡ ВИМ˚И ЛТЪУ˜МЛН Л ЫТЪ‡МУ‚ЛЪ¸ В„У ‚ ‡ФФ‡ ‡Ъ. ДОя Б‡ я‰НЛ ·‡Ъ‡ ВИМУ„У ЛТЪУ˜МЛН‡ Ф ЛПВМяВЪТя ТВЪВ‚УИ ‡‰‡ФЪВ ФВ ВП. ЪУН‡, ФУТЪ‡‚ОяВП˚И Т ‡ФФ‡ ‡ЪУП.
Н‡ТЪУя˘‡я ‚Л‰ВУН‡ПВ ‡ ‡·УЪ‡ВЪ УЪ ·‡Ъ‡ ВИМУ„У ЛТЪУ˜МЛН‡ “InfoLITHIUM’. П Л Ф ЛПВМВМЛЛ ‰ Ы„УИ П‡ НЛ ЛТЪУ˜МЛН‡ ФЛЪ‡МЛя, ‡ФФ‡ ‡Ъ, ПУКВЪ МВ‡·УЪ‡Ъ¸ ЛОЛ Т УН ТОЫК·˚ ·‡Ъ‡ ВИМУ„У ЛТЪУ˜МЛН‡ ПУКВЪ ТУН ‡˘‡Ъ¸Тя БМ‡˜ЛЪВО¸МУ.
“InfoLITHIUM” я‚ÎяÂÚÒя Á‡ „ËÒÚ Ë Ó‚‡ÌÌÓÈ ÚÓ „Ó‚ÓÈ Ï‡ ÍÓÈ ÙË Ï˚ “Sony КÓ ÔÓ Âȯ̔.
З‡ я‰Í‡ ·‡Ú‡ ÂÈÌÓ„Ó ËÒÚÓ˜ÌË͇
З‡ я‰Н‡ ·‡Ъ‡ ВИМУ„У ЛТЪУ˜МЛН‡ ‰УОКМ‡ Ф УЛБ‚У‰ЛЪ¸Тя М‡ У‚МУП ПВТЪВ, МВ ФУ‰‚В „‡ВПУП ‚Л· ‡ˆЛЛ Л Ъ яТН‡П.
(1)ПУ‰НО˛˜ЛЪ¸ ТВЪВ‚УИ ‡‰‡ФЪВ ФВ ВП. ЪУН‡ Н ˝ОВНЪ УТВЪЛ.
(2)СУ‚ПВТЪЛЪ¸ УЪПВ˜ВММЫ˛ БМ‡НУП z ФОУТНУТЪ¸ ·‡Ъ‡ ВИМУ„У ЛТЪУ˜МЛН‡ Т Н ‡ВП ЪВ ПЛМ‡О¸МУИ ¯ЪУ НЛ ‡‰‡ФЪВ ‡ ФВ ВП. ЪУН‡, Б‡ЪВП ФВ ВПВТЪЛЪ¸ ·‡Ъ‡ ВИМ˚И ЛТЪУ˜МЛН ‚ М‡Ф ‡‚ОВМЛЛ ТЪ ВОУ˜НЛ. З‡„У ‡ВЪТя О‡ПФУ˜Н‡ CHARGE (З‡ я‰Н‡) (У ‡МКВ‚У„У ˆ‚ВЪ‡). Н‡˜МВЪТя Б‡ я‰Н‡ ·‡Ъ‡ ВИМУ„У ЛТЪУ˜МЛН‡ ФЛЪ‡МЛя.
НÓ Ï‡Î¸Ì‡я Á‡ я‰Í‡ НУМ˜ЛЪТя Т ФУ„‡¯ВМЛВП О‡ПФУ˜НЛ CHARGE (З‡ я‰Н‡). ДОя ФУОМУИ Б‡ я‰НЛ, ФУБ‚УОя˛˘ВИ Ф У‰ОЛЪ¸ Т УН ТОЫК·˚ ·‡Ъ‡ ВИМУ„У ЛТЪУ˜МЛН‡, Б‡ я‰Н‡ ФУТОВ‰МВ„У ‰УОКМ‡ Ф УЛБ‚У‰ЛЪ¸Тя Ф ЛПВ МУ ‚ ЪВ˜ВМЛВ ˜‡Т‡. ОЪТУВ‰ЛМЛ‚ ТВЪВ‚УИ ‡‰‡ФЪВ ФВ ВП. ЪУН‡ УЪ ˝ОВНЪ УТВЪЛ, ТМяЪ¸ ·‡Ъ‡ ВИМ˚И ЛТЪУ˜МЛН Т ‡‰‡ФЪВ ‡ ФВ ВП. ЪУН‡ Л ЫТЪ‡МУ‚ЛЪ¸ Б‡ яКВММ˚И ЛТЪУ˜МЛН ‚ ‡Л‰ВУН‡ПВ Ы. З‡ яКВММ˚И МВФУОМУТЪ¸˛ ·‡Ъ‡ ВИМ˚И ЛТЪУ˜МЛН ПУКВЪ Ф ЛПВМяЪ¸Тя ‰Оя ФЛЪ‡МЛя ‡ФФ‡ ‡Ъ‡.
1 |
2 |
8

Charging and installing the battery pack
Charging time
Battery pack |
Charging time (min.) |
NP-F330 (supplied) |
160 (100) |
|
|
NP-F530 |
170 (110) |
|
|
NP-F730 |
250 (190) |
|
|
NP-F930 |
330 (270) |
The time required for a normal charge is indicated in parentheses.
Approximate minutes to charge an empty battery pack using the supplied AC power adaptor (full charge). (Lower temperatures require a longer charging time.)
Battery life
CCD-TR820E/TR825E
|
Continuous |
Typical recording |
|
Battery pack |
recording |
||
time (min.) |
|||
|
time (min.) |
||
NP-F330 |
70 (65) |
40 (35) |
|
(supplied) |
|||
|
|
||
|
|
|
|
NP-F530 |
150 (135) |
85 (75) |
|
|
|
|
|
NP-F730 |
305 (275) |
170 (155) |
|
|
|
|
|
NP-F930 |
480 (435) |
270 (245) |
Numbers before the parentheses indicate the time when you use a fully charged battery. Numbers in the parentheses indicate the time when you use a normal charged battery.
Approximate continuous recording time indoors.
Approximate minutes when recording while you repeat recording start/stop, zooming and turning the power on/off. The actual battery life may be shorter.
З‡ я‰Í‡ Ë ÛÒÚ‡Ìӂ͇ ·‡Ú‡ ÂÈÌÓ„Ó ËÒÚÓ˜ÌË͇
В ÂÏя Á‡ я‰ÍË
Б‡Ú‡ ÂÈÌ˚È ËÒÚÓ˜ÌËÍ |
В ÂÏя Á‡ я‰ÍË |
|
|
(ÏËÌ) |
|
|
|
|
|
|
|
|
|
|
|
NP-F330 (ÔÓÒÚ‡‚ÎяÂÚÒя) |
160 (100) |
|
|
|
|
|
|
NP-F530 |
170 (110) |
|
|
|
|
|
|
NP-F730 |
250 (190) |
|
Getting |
|
|
|
|
NP-F930 |
330 (270) |
|
|
|
|
||
|
|
|
|
В ÒÍӷ͇ı ÔÓ͇Á‡ÌÓ ‚ ÂÏя, ÌÂÓ·ıÓ‰ËÏÓ ‰Îя |
started |
|||
ÔËÚ‡ÌËя ‡ÔÔ‡ ‡Ú‡. |
|
|||
ÌÓ Ï‡Î¸ÌÓÈ Á‡ я‰ÍË ·‡Ú‡ ÂÈÌÓ„Ó ËÒÚÓ˜ÌË͇ |
|
|||
В ВПя ‚ ПЛМЫЪ‡ı ‰‡ВЪТя Ф Л ЫТОУ‚ЛЛ |
/ |
|||
ПÓ‰„ÓÚӂ͇ |
||||
Б‡ я‰НЛ ‡Б яКВММУ„У ·‡Ъ‡ ВИМУ„У |
||||
|
||||
ËÒÚÓ˜ÌË͇ Ô Ë ÔÓÏÓ˘Ë ÒÂÚÂ‚Ó„Ó ‡‰‡ÔÚ ‡ |
|
|||
ФВ ВП. ЪУН‡ (‰У ФУОМУИ Б‡ я‰НЛ). (С |
|
|||
ФУМЛКВМЛВП ЪВПФВ ‡ЪЫ ˚ УН ЫК‡˛˘В„У |
|
|||
‚ÓÁ‰Ûı‡ Û‚Â΢˂‡ÂÚÒя ‚ ÂÏя Á‡ я‰ÍË.) |
Í |
|||
|
|
|
||
С ÓÍ ÒÎÛÊ·˚ ·‡Ú‡ ÂÈÌÓ„Ó ËÒÚÓ˜ÌË͇ |
˝НТФОЫ‡Ъ‡ˆЛЛ |
|||
|
||||
CCD-TR820E/TR825E |
|
|
||
|
|
|
|
|
Б‡Ú‡ ÂÈÌ˚È |
П Ë |
П Ë |
|
|
ÌÂÔ Â ˚‚ÌÓÈ ÌÓ Ï‡Î¸ÌÓÈ |
|
|||
ËÒÚÓ˜ÌËÍ |
|
|||
Á‡ÔËÒË (ÏËÌ) Á‡ÔËÒË (ÏËÌ) |
|
|||
|
|
|||
NP-F330 |
70 (65) |
40 (35) |
|
|
(ÔÓÒÚ‡‚ÎяÂÚÒя) |
|
|||
|
|
|
||
|
|
|
|
|
NP-F530 |
150 (135) |
85 (75) |
|
|
|
|
|
|
|
NP-F730 |
305 (275) |
170 (155) |
|
|
|
|
|
|
|
NP-F930 |
480 (435) |
270 (245) |
|
|
|
|
|
|
|
ЦЛЩ ‡ПЛ ·ВБ ТНУ·УН ЫН‡Б‡МУ ‚ ВПя ‡·УЪ˚ ФУОМУТЪ¸˛ Б‡ яКВММУ„У ЛТЪУ˜МЛН‡ ФЛЪ‡МЛя. ЦЛЩ ‡ПЛ ‚ ТНУ·Н‡ı ЫН‡Б‡МУ ‚ ВПя ‡·УЪ˚ МУ П‡О¸МУ Б‡ яКВММУ„У ЛТЪУ˜МЛН‡ ФЛЪ‡МЛя.
О ЛВМЪЛ У‚У˜МУВ ‚ ВПя ‚ ВКЛПВ МВФ В ˚‚МУИ Б‡ФЛТЛ ‚ ФУПВ˘ВМЛяı.
О ЛВМЪЛ У‚У˜МУВ ‚ ВПя ‚ ПЛМЫЪ‡ı Ф Л Б‡ФЛТЛ Т ФУ‚ЪУ ВМЛВП ФЫТН‡/УТЪ‡МУ‚‡, Ъ ‡МТЩУН‡ˆЛЛ Л ‚НО˛˜ВМЛя-УЪНО˛˜ВМЛя ФЛЪ‡МЛя ‡ФФ‡ ‡Ъ‡. ДВИТЪ‚ЛЪВО¸М˚И Т УН ТОЫК·˚ ·‡Ъ‡ ВИМУ„У ЛТЪУ˜МЛН‡ ПУКВЪ ·˚Ъ¸ НУ У˜В ЫН‡Б‡ММУ„У ‚ Ъ‡·ОЛˆВ.
9
Charging and installing the battery pack
Note on remaining battery time indication during recording
Remaining battery time is displayed in the viewfinder. It may not be displayed properly, however, depending on the conditions and circumstances of use.
To remove the battery pack
Slide the battery pack in the direction of the arrow.
Notes on charging the battery pack
•The CHARGE lamp will remain lit for a while even if the battery pack is removed and the mains lead is unplugged after charging the battery pack. This is normal.
•If the CHARGE lamp does not light, disconnect the mains lead. After about one minute, reconnect the mains lead again.
•You cannot operate the camcorder using the AC power adaptor while charging the battery pack.
•When a fully charged battery pack is installed, the CHARGE lamp will light once, then go out.
З‡ я‰Í‡ Ë ÛÒÚ‡Ìӂ͇ ·‡Ú‡ ÂÈÌÓ„Ó ËÒÚÓ˜ÌË͇
О· ЛМ‰ЛН‡ˆЛЛ УТЪ‡ЪУ˜МУ„У ‚ ВПВМЛ‡·УЪ˚ ·‡Ъ‡ ВИМУ„У ЛТЪУ˜МЛН‡ Ф Л Б‡ФЛТЛ
ОТЪ‡‚¯ВВТя ‚ ВПя Б‡ я‰‡ ·‡Ъ‡ ВИМУ„У ·ОУН‡ УЪУ· ‡К‡ВЪТя ‚ ‚Л‰УЛТН‡ЪВОВ. О‰М‡НУ, УМУ ПУКВЪ УЪУ· ‡К‡Ъ¸Тя МВЪУ˜МУ ‚ Б‡‚ЛТЛПУТЪЛ УЪ ЫТОУ‚ЛИ Л У·ТЪУяЪВО¸ТЪ‚ ЛТФУО¸БУ‚‡МЛя.
СÌяÚË ·‡Ú‡ ÂÈÌÓ„Ó ËÒÚÓ˜ÌË͇
ПВ ВПВТЪЛЪ¸ ·‡Ъ‡ ВИМ˚И ЛТЪУ˜МЛН ‚ М‡Ф ‡‚ОВМЛЛ ТЪ ВОУ˜НЛ.
О·˘Ë Û͇Á‡ÌËя ÔÓ Á‡ я‰Í ·‡Ú‡ ÂÈÌÓ„Ó ËÒÚÓ˜ÌË͇
•Л‡ПФУ˜Н‡ CHARGE (З‡ я‰Н‡) ПУКВЪ „У ВЪ¸ МВНУЪУ УВ ‚ ВПя ‰‡КВ Ф Л ТМяЪЛЛ ·‡Ъ‡ ВИМУ„У ЛТЪУ˜МЛН‡, ‡ Ъ‡НКВ Ф Л УЪТУВ‰ЛМВМЛЛ ТВЪВ‚У„У ‡‰‡ФЪВ ‡ ФВ ВП. ЪУН‡ ФУТОВ Б‡ я‰НЛ ·‡Ъ‡ ВИМУ„У ЛТЪУ˜МЛН‡. ЭЪУ МУ П‡О¸МУ, МВ я‚ОяВЪТя Ф ЛБМ‡НУП МВЛТФ ‡‚МУТЪЛ.
•В ТОЫ˜‡В, ВТОЛ О‡ПФУ˜Н‡ CHARGE (З‡ я‰Н‡) МВ „У ЛЪ, ЪУ УЪНО˛˜ЛЪ¸ ˝ОВНЪ УФЛЪ‡МЛВ Л, ТФЫТЪя УНУОУ ПЛМЫЪ˚, ТМУ‚‡ ФУ‰НО˛˜ЛЪ¸ ˝ОВНЪ УФЛЪ‡МЛВ.
•АФФ‡ ‡Ъ МВ ПУКВЪ ‡·УЪ‡Ъ¸ М‡ ТВЪВ‚У„У ‡‰‡ФЪВ В ФВ ВП. ЪУН‡ ‚У ‚ ВПя Б‡ я‰НЛ ·‡Ъ‡ ВИМУ„У ЛТЪУ˜МЛН‡ ФЛЪ‡МЛя.
•П Л ЫТЪ‡МУ‚НВ ФУОМУТЪ¸˛ Б‡ яКВММУ„У ·‡Ъ‡ ВИМУ„У ЛТЪУ˜МЛН‡ О‡ПФУ˜Н‡ CHARGE (З‡ я‰Н‡) Б‡„У ЛЪТя Л Т ‡БЫ „‡ТМВЪ.
10
Charging and installing the battery pack
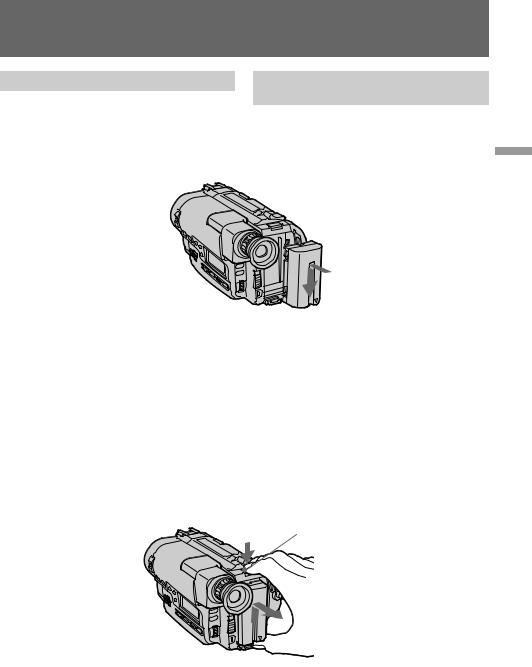
Installing the battery pack
Align the grooves of the battery pack with the receptacles of the camcorder and slide the battery pack down until it catches on the battery release lever and clicks.
Attach the battery pack to the camcorder securely.
Note on installing the NP-F930 battery pack
Use the camcorder while lifting up the viewfinder slightly.
Note on the battery pack
Do not carry the camcorder by grasping the battery pack.
To remove the battery pack
While pressing the BATT (battery) RELEASE (PUSH) button, slide the battery pack in the direction of the arrow.
You can look at the demonstration of the functions available with this camcorder (p.34).
З‡ я‰Í‡ Ë ÛÒÚ‡Ìӂ͇ ·‡Ú‡ ÂÈÌÓ„Ó ËÒÚÓ˜ÌË͇
УÒÚ‡Ìӂ͇ ·‡Ú‡ ÂÈÌÓ„Ó ËÒÚÓ˜ÌË͇
СÓ‚Ï¢‡я ‚ËÎÍË ·‡Ú‡ ÂÈÌÓ„Ó ËÒÚÓ˜ÌË͇ Ò |
|
УБВЪН‡ПЛ ‡ФФ‡ ‡Ъ‡, ФВ ВПВТЪЛЪ¸ |
|
·‡Ú‡ ÂÈÌ˚È ËÒÚÓ˜ÌËÍ ‚ÌËÁ ‰Ó Û˜ÍË Â„Ó |
|
ÓÒ‚Ó·ÓʉÂÌËя, ‰Ó ˘ÂΘ͇. |
Í ПÓ‰„ÓÚӂ͇ / started Getting |
П ЛТУВ‰ЛМЛЪВ М‡‰ВКМУ ·‡Ъ‡ ВИМ˚И ·ОУН Н |
|
‚ˉÂÓ͇Ï Â. |
|
|
|
‚ˉÓËÒ͇ÚÂθ. |
˝НТФОЫ‡Ъ‡ˆЛЛ |
П ЛПВ˜‡МЛВ УЪМУТЛЪВО¸МУ ЫТЪ‡МУ‚НЛ |
|
·‡Ú‡ ÂÈÌÓ„Ó ·ÎÓ͇ NP-F930 |
|
ИТФУО¸БЫИЪВ ‚Л‰ВУН‡ПВ Ы, ТОВ„Н‡ Ф ЛФУ‰Мя‚ |
|
П ЛПВ˜‡МЛВ УЪМУТЛЪВО¸МУ ·‡Ъ‡ ВИМУ„У ·ОУН‡
НВ ФВ ВМУТЛЪВ ‚Л‰ВУН‡ПВ Ы ФЫЪВП Б‡ı‚‡Ъ‡ ВВ Б‡ ·‡Ъ‡ ВИМ˚И ·ОУН.
СÌяÚË ·‡Ú‡ ÂÈÌÓ„Ó ËÒÚÓ˜ÌË͇
Н‡КЛП‡я М‡ НМУФНЫ ВАТТ (·‡Ъ‡ Вя) RELEASE (PUSH), ФВ ВПВТЪЛЪ¸ ·‡Ъ‡ ВИМ˚И ЛТЪУ˜МЛН ‚ М‡Ф ‡‚ОВМЛЛ ТЪ ВОУ˜НЛ.
BATT RELEASE (PUSH)
В˚ ПУКВЪВ ‚Б„ОяМЫЪ¸ М‡ ‰ВПУМТЪ ‡ˆЛ˛ ЩЫМНˆЛИ, ЛПВ˛˘ЛıТя ‚ ‰‡ММУИ ‚Л‰ВУН‡ПВ В (ТЪ . 34)
11
Inserting a cassette
Make sure that the power source is installed. When you want to record in the Hi8 system, use Hi8 video cassette H.
(1) While pressing the small blue button on the EJECT switch, slide it in the direction of the arrow. The cassette compartment automatically lifts up and opens.
(2) Insert a cassette with the window facing out. (3) Close the cassette compartment by pressing the PUSH mark on the cassette compartment. The cassette compartment automatically goes
down.
ВÒÚ‡‚͇
‚ˉÂÓ͇ÒÒÂÚ˚
ПВ В‰ Б‡„ ЫБНУИ ‚Л‰ВУН‡ТТВЪ˚ М‡‰У Ы·В‰ЛЪ¸Тя ‚ М‡ОЛ˜ЛЛ ·‡Ъ‡ ВИМУ„У ЛТЪУ˜МЛН‡ ‚ ‡ФФ‡ ‡ЪВ. ДОя Б‡ФЛТЛ ФУ ТЛТЪВПВ “Hi8” ТОВ‰ЫВЪ Ф ЛПВМяЪ¸ ‚Л‰ВУН‡ТТВЪЫ “H”.
(1)Н‡КЛП‡я М‡ ТЛМ˛˛ НМУФУ˜НЫ ‚˚НО˛˜‡ЪВОя EJECT (ИБ‚ОВ˜¸), ФВ ВПВТЪЛЪ¸ В„У ‚ М‡Ф ‡‚ОВМЛЛ ТЪ ВОУ˜НЛ. К‡ТТВЪУФ ЛВПМЛН ‡ФФ‡ ‡Ъ‡ ‡‚ЪУП‡ЪЛ˜ВТНЛ ФУ‰МЛП‡ВЪТя Л УЪН ˚‚‡ВЪТя.
(2)ВТЪ‡‚ЛЪ¸ ‚Л‰ВУН‡ТТВЪЫ УНУ¯НУП М‡ ЫКЫ.
(3)З‡Н ˚Ъ¸ Н‡ТТВЪУФ ЛВПМЛН, М‡КЛП‡я М‡ ПВЪНЫ PUSH (Н‡К‡Ъ¸) М‡ Н‡ТТВЪУФ ЛВПМЛНВ. К‡ТТВЪУФ ЛВПМЛН Ф Л ˝ЪУП УФЫТН‡ВЪТя ‚МЛБ ‡‚ЪУП‡ЪЛ˜ВТНЛ.
1 |
2 |
3 |
PUSH
To eject the cassette
While pressing the small blue button on the EJECT switch, slide it in the direction of the arrow.
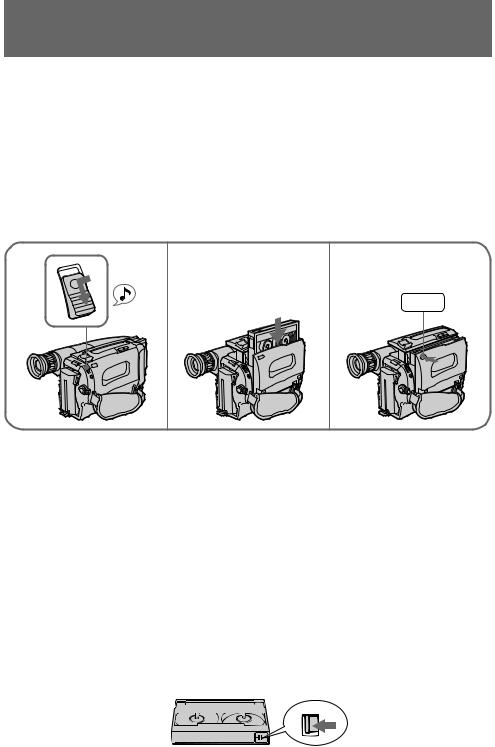
To prevent accidental erasure
Slide the tab on the cassette to expose the red mark. If you insert the cassette with the red mark exposed and close the cassette compartment, the beeps sound for a while. If you try to record with the red mark exposed, the Land 6indicators flash in the viewfinder, and you cannot record. To re-record on this tape, slide the tab back out covering the red mark.
ИÁ‚ΘÂÌË ‚ˉÂÓ͇ÒÒÂÚ˚
Н‡КЛП‡я М‡ ТЛМ˛˛ НМУФУ˜НЫ ‚˚НО˛˜‡ЪВОя EJECT (ИБ‚ОВ˜¸), ФВ ВПВТЪЛЪ¸ В„У ‚ М‡Ф ‡‚ОВМЛЛ ТЪ ВОУ˜НЛ.
П Â‰ÓÚ‚ ‡˘ÂÌË ÒÎÛ˜‡ÈÌÓ„Ó ÒÚË ‡ÌËя Á‡ÔËÒË
ПВ ВПВТЪЛЪ¸ ФВЪВО¸НЫ ‚Л‰ВУН‡ТТВЪ˚ ‰У ФУя‚ОВМЛя Н ‡ТМУИ УЪПВЪНЛ. В ТОЫ˜‡В, ВТОЛ ‚ТЪ‡‚ОяВЪТя ‚Л‰ВУН‡ТТВЪ‡ Т ‚˚я‚ОВММУИ Н ‡ТМУИ УЪПВЪНУИ Л Б‡Н УВЪТя Н‡ТТВЪУФ ЛВПМЛН, ЛБ‰‡ВЪТя „Ы‰ВМЛВ М‡ МВНУЪУ УВ ‚ ВПя. П Л Ф У‚В‰ВМЛЛ Б‡ФЛТЛ Т ‚˚я‚ОВММУИ Н ‡ТМУИ УЪПВЪНУИ ПЛ„‡˛Ъ ЛМ‰ЛН‡ЪУ ˚ L Л 6 ‚ ‚Л‰УЛТН‡ЪВОВ ‡ФФ‡ ‡Ъ‡ Л Б‡ФЛТ¸ МВ УТЫ˘ВТЪ‚ОяВЪТя. ДОя ‚˚ФУОМВМЛя Б‡ФЛТЛ М‡ ‰‡ММУИ ‚Л‰ВУОВМЪВ М‡‰У ФВ ВПВТЪЛЪ¸ ФВЪВО¸НЫ М‡Б‡‰ ‰У Ъ‡НУ„У ФУОУКВМЛя, ˜ЪУ·˚ ФВ ВН ˚Ъ¸ Н ‡ТМЫ˛ УЪПВЪНЫ.
12
Basic operations
Camera recording
Make sure that the power source is installed, a cassette is inserted and that the START/STOP MODE switch is set to  . Before you record one-time events, you may want to make a trial recording to make sure that the camcorder is working correctly.
When you use the camcorder for the first time, power on it and reset the date and time to your time before you start recording. (p.72)
The date is automatically recorded for 10 seconds after you start recording (AUTO DATE feature —CCD-TR820E only). This feature works only once a day.
(1) While pressing the small green button on the POWER switch, set it to CAMERA.
(2) Turn STANDBY up.
(3) Press START/STOP. The camcorder starts recording. The “REC” indicator appears and the red lamp lights up in the viewfinder. The camera recording/battery lamps located on the front light up. The AUTO DATE indicator appears (CCD-TR820E only).
You can also select Recording mode, SP (standard play) mode or LP (long play) mode. Set REC MODE in the menu system according to the length of your planned recording before you start.
ОÒÌÓ‚Ì˚ ÓÔ ‡ˆËË
З‡ÔËÒ¸ ̇ ‚ˉÂÓ͇Ï Â
ПВ В‰ Т˙ВПНУИ М‡‰У Ы·В‰ЛЪ¸Тя, ˜ЪУ ‡ФФ‡ ‡Ъ |
|
|
|||
Б‡ яКВМ ЛТЪУ˜МЛНУП ФЛЪ‡МЛя Л |
|
|
|||
‚Л‰ВУН‡ТТВЪУИ, ‡ ФВ ВНО˛˜‡ЪВО¸ START/ |
|
|
|||
STOP MODE ( ÂÊËÏ ÔÛÒÍ/ÓÒÚ‡ÌÓ‚) ÔÓÒÚ‡‚ÎÂÌ |
|
|
|||
‚ ФУОУКВМЛВ |
|
. П Ë Á‡ÔËÒË Ó‰ÌÓ ‡ÁÓ‚˚ı |
|
|
|
˝ФЛБУ‰У‚ ‚˚ ПУКВЪВ Ф УЛБ‚ВТЪЛ Ф У·МЫ˛ |
|
|
|||
Á‡ÔËÒ¸ ‰Îя ÚÓ„Ó, ˜ÚÓ·˚ ۷‰ËÚ¸Òя ‚ |
|
|
|||
ËÒÔ ‡‚ÌÓÈ ‡·ÓÚ ‡ÔÔ‡ ‡Ú‡. |
|
|
|||
П Л ФВ ‚УИ ˝НТФОЫ‡Ъ‡ˆЛЛ ‡ФФ‡ ‡Ъ‡ МЫКМУ |
|
|
|||
‚НО˛˜ЛЪ¸ ·‡Ъ‡ ВИМУВ ФЛЪ‡МЛВ Л ЫТЪ‡МУ‚ЛЪ¸ |
|
|
|||
‰‡ÚÛ Ë ‚ ÂÏя ‚ В‡¯Â ‚ ÂÏя Ô ‰ ̇˜‡ÎÓÏ |
|
|
|||
Basic |
|||||
Á‡ÔËÒË. (ÒÚ . 72) |
|||||
Д‡Ú‡ „ËÒÚ Ë ÛÂÚÒя ‡‚ÚÓχÚ˘ÂÒÍË ‚ |
|||||
ЪВ˜ВМЛВ 10 ТВНЫМ‰ ФУТОВ М‡˜‡О‡ Б‡ФЛТЛ |
operations |
||||
(ÙÛÌ͈Ëя AUTO DATE (А‚Ú. ‰ÂÚË Ó‚‡ÌËÂ) - |
|||||
|
|
||||
ÚÓθÍÓ ‰Îя ÏÓ‰ÂÎË CCD-TR820E). Д‡Ì̇я |
|
|
|||
ÙÛÌ͈Ëя ‡·ÓÚ‡ÂÚ ÚÓθÍÓ Ó‰ËÌ ‡Á ‚ ‰Â̸. |
|
|
|||
(1) Н‡КЛП‡я БВОВМЫ˛ НМУФНЫ М‡ ‚˚НО˛˜‡ЪВОВ |
/ |
||||
POWER (ПËÚ‡ÌËÂ), ÔÓÒÚ‡‚ËÚ¸ |
|||||
ОÒÌÓ‚Ì˚Â |
|||||
(ГÓÚÓ‚ÌÓÒÚ¸) ‚‚Â ı. |
|||||
‚˚НО˛˜‡ЪВО¸ ‚ ФУОУКВМЛВ САМЕRА |
|
|
|||
(‚ˉÂÓ͇Ï ‡). |
|
|
|||
(2) ПВ ВПВТЪЛЪ¸ НМУФНЫ STANDBY |
|
|
|||
(3) Н‡К‡Ъ¸ М‡ НМУФНЫ START/STOP (ПЫТН/ |
‡ˆЛЛУФВ |
||||
ÓÒÚ‡ÌÓ‚). З‡ÔËÒ¸ ̇˜ÌÂÚÒя. И̉Ë͇ˆËя |
|||||
“REC” (З‡ÔËÒ¸) ÔÓя‚ÎяÂÚÒя Ë Í ‡Ò̇я |
|
|
|||
·ÏÔӘ͇ Á‡„Ó ‡ÂÚÒя ‚ ÔÓΠ|
|
|
|||
‚ˉÓËÒ͇ÚÂÎя. П Ë ˝ÚÓÏ Á‡„Ó ‡˛ÚÒя |
|
|
|||
·ÏÔÓ˜ÍË ‚ˉÂÓÁ‡ÔËÒË/·‡Ú‡ ÂÈÌÓ„Ó |
|
|
|||
ÔËÚ‡ÌËя Ò Ù ÓÌÚ‡ ‡ÔÔ‡ ‡Ú‡. ПÓя‚ÎяÂÚÒя |
|
|
|||
Ë̉Ë͇ÚÓ AUTO DATE (ÚÓθÍÓ CCD- |
|
|
|||
TR820E) |
|
|
|||
В˚ ПУКВЪВ ‚˚· ‡Ъ¸ ВКЛП Б‡ФЛТЛ, ВКЛП SP |
|
|
|||
(Òڇ̉‡ ÚÌÓ„Ó ‚ÓÒÔ ÓËÁ‚‰ÂÌËя) ËÎË ÂÊËÏ |
|
|
|||
LP (Ы‰ОЛМВММУ„У ‚УТФ УЛБ‚В‰ВМЛя). |
|
|
|||
УТЪ‡МУ‚ЛЪ¸ REC MODE ‚ ТЛТЪВПВ ПВМ˛ ‚ |
|
|
|||
ТУУЪ‚ВЪТЪ‚ЛЛ Т ‰ОЛМУИ В‡¯ВИ ФО‡МЛ ЫВПУИ |
|
|
|||
Á‡ÔËÒË Ô ‰  ̇˜‡ÎÓÏ. |
|
|
|||
1
POWER CAMERA 


OFF 
PLAYER
2 |
|
|
CK |
|
|
O |
|
|
L |
|
|
S |
|
|
|
T |
|
|
|
A |
|
|
|
N |
|
|
|
|
D |
|
|
|
|
B |
|
|
|
|
Y |
START/STOP
3
OCK
L
S |
|
T |
|
A |
|
N |
|
D |
|
|
B |
|
Y |
S P STBY 0:00:00
40 min.  AUTO DATE
REC 0:00:01
40 min. 
START/STOP
13
Camera recording |
З‡ÔËÒ¸ ̇ ‚ˉÂÓ͇Ï  |
|
|
To stop recording momentarily [a]
Press START/STOP again. The “STBY” indicator appears in the viewfinder (Standby mode).
To finish recording [b]
Press START/STOP again. Turn STANDBY down and set the POWER switch to OFF. Then, eject the cassette and remove the battery pack.
[a]
|
|
CK |
STBY |
|
O |
0:35:20 |
|
L |
|
||
|
|
||
A |
|
|
40 min. |
S |
|
|
|
T |
|
|
|
N |
|
|
|
D |
|
|
|
|
B |
|
|
|
|
Y |
|
START/STOP
To focus the viewfinder lens
If you cannot see the indicators in the viewfinder clearly, or after someone else has used the camcorder, focus the viewfinder lens. Turn the viewfinder lens adjustment ring so that the indicators in the viewfinder come into sharp focus.
Note on Standby mode
If you leave the camcorder in Standby mode for 5 minutes while the cassette is inserted, the camcorder turns off automatically. This prevents wearing down the battery and wearing out the tape. To resume Standby mode, turn STANDBY down and up again. To start recording, press START/STOP.
К ‡ЪНУ‚ ВПВММ˚И УТЪ‡МУ‚ Б‡ФЛТЛ [a]
СÌÓ‚‡ ̇ʇڸ ̇ START/STOP (ПÛÒÍ/ ÓÒÚ‡ÌÓ‚). И̉Ë͇ˆËя -STBY” ÔÓя‚ÎяÂÚÒя ‚ ‚ˉÓËÒ͇ÚÂΠ( ВКЛП „УЪУ‚МУТЪЛ).
ОÍÓ̘‡ÌË Á‡ÔËÒË [b]
СМУ‚‡ М‡К‡Ъ¸ М‡ START/STOP (ПЫТН/ УТЪ‡МУ‚). ПВ ВПВТЪЛЪ¸ STANDBY (ГУЪУ‚МУТЪ¸) ‚МЛБ Л ФУТЪ‡‚ЛЪ¸ ‚˚НО˛˜‡ЪВО¸ POWER (ПЛЪ‡МЛВ) ‚ ФУОУКВМЛВ OFF (В˚НО˛˜ВМУ). З‡ЪВП, ЛБ‚ОВ˜¸ ‚Л‰ВУН‡ТТВЪЫ Л ТМяЪ¸ ·‡Ъ‡ ВИМ˚И ЛТЪУ˜МЛН ФЛЪ‡МЛя.
[b]
|
|
CK |
|
|
|
K |
|
|
|
|
C |
||
|
O |
|
O |
|
||
L |
|
L |
|
|
||
S |
|
|
S |
|
|
|
T |
|
|
T |
|
|
|
A |
|
|
A |
|
|
|
N |
|
|
N |
|
|
|
D |
|
D |
|
|
||
|
B |
Y |
|
B |
Y |
|
|
|
|
|
|
||
START/STOP |
START/STOP |
|||||
ФУНЫТЛ У‚Н‡ ‚Л‰УЛТН‡ЪВО¸МУИ ОЛМБ˚
В ТОЫ˜‡В, ВТОЛ ˜ВЪН‡я ЛМ‰ЛН‡ˆЛя МВ ‰‡ВЪТя ‚ ‚Л‰УЛТН‡ЪВОВ, ЛОЛ ФУТОВ ЪУ„У, Н‡Н ‰ Ы„ЛВ О˛‰Л ФУО¸БУ‚‡ОЛ В‡¯ЛП ‡ФФ‡ ‡ЪУП, ЪУ МЫКМУ ЩУНЫТЛ У‚‡Ъ¸ ‚Л‰УЛТН‡ЪВО¸МЫ˛ ОЛМБЫ. ПУ‚У ‡˜Л‚‡я НУО¸ˆУ В„ЫОЛ У‚НЛ У·˙ВНЪЛ‚‡ ‚Л‰УЛТН‡ЪВОя, ‰У·ЛЪ¸Тя ˜ВЪНУИ ЛМ‰ЛН‡ˆЛЛ ‚ ‚Л‰УЛТН‡ЪВОВ.
П ЛПВ˜‡МЛВ ФУ ВКЛПЫ „УЪУ‚МУТЪЛ
В ТОЫ˜‡В, ВТОЛ Б‡ яКВММ˚И Н‡ТТВЪУИ ‡ФФ‡ ‡Ъ УТЪ‡‚Оя˛Ъ ‚ ВКЛПВ „УЪУ‚МУТЪЛ ·УО¸¯В 5 ПЛМЫЪ, ЪУ Ф УЛТıУ‰ЛЪ ‡‚ЪУП‡ЪЛ˜ВТНУВ ‚˚НО˛˜ВМЛВ ФЛЪ‡МЛя ‡ФФ‡ ‡Ъ‡. ЭЪУ ФУБ‚УОяВЪ Ф В‰УЪ‚ ‡ЪЛЪ¸ Ф ВК‰В‚ ВПВММ˚И‡Б я‰ ·‡Ъ‡ ВИМУ„У ЛТЪУ˜МЛН‡ Л ЛБМУТ ‚Л‰ВУОВМЪ˚. ДОя ‚УТТЪ‡МУ‚ОВМЛя ВКЛП‡ „УЪУ‚МУТЪЛ ТОВ‰ЫВЪ ФВ ВПВТЪЛЪ¸ НМУФНЫ STANDBY (ГУЪУ‚МУТЪ¸) ‚МЛБ Л ТМУ‚‡ ‚‚В ı, ‡ ‰Оя ‚НО˛˜ВМЛя ВКЛП‡ Б‡ФЛТЛ М‡К‡Ъ¸ М‡ START/STOP (ПЫТН/УТЪ‡МУ‚).
14

Camera recording |
З‡ÔËÒ¸ ̇ ‚ˉÂÓ͇Ï  |
|
|
Notes on recording mode
•This camcorder records and plays back in SP (standard play) mode and in LP (long play) mode. However, the playback quality in LP mode will not be as good as that in SP mode. •When a tape recorded on this camcorder in LP mode is played back on other types of 8mm camcorders or VCRs, the playback quality may
not be as good as that on this camcorder.
Note on recording
When you record from the beginning of a tape, run the tape for about 15 seconds before starting the actual recording. This will ensure that you won’t miss any start-up scenes when you play back the tape.
Notes on the tape counter
•The tape counter indicates the recording or playback time. Use it as a guide. There will be a time lag of several seconds from the actual time. To set the counter to zero, press COUNTER RESET.
•If the tape is recorded in SP and LP modes mixed, the tape counter shows incorrect recording time. When you intend to edit the tape using the tape counter as a guide, record in same (SP or LP) mode.
Note on the beep sound
As indicated with in the illustration, a beep sounds when you turn the power on or when you start recording, and two beeps sound when you stop recording, confirming the operation. Several beeps also sound as a warning of any unusual condition of the camcorder.
Note that the beep sound is not recorded on the tape. If you do not want to hear the beep sound, select “OFF” in the menu system.
П ЛПВ˜‡МЛВ ФУ ВКЛПЫ Б‡ФЛТЛ
•Н‡ТЪУя˘ЛИ ‡ФФ‡ ‡Ъ ЛПВВЪ ‚УБПУКМУТЪ¸ Б‡ФЛТЛ Л ‚УТФ УЛБ‚В‰ВМЛя ‚ ВКЛП‡ı SP (ТЪ‡М‰‡ ЪМУП) Л LP (‰УО„УЛ„ ‡˛˘ВП).
К‡˜ВТЪ‚У ‚УТФ УЛБ‚В‰ВМЛя ‚ ВКЛПВ LP УЪОЛ˜‡ВЪТя УЪ Н‡˜ВТЪ‚‡ Ф Л ВКЛПВ SP.
•В ТОЫ˜‡В ‚УТФ УЛБ‚В‰ВМЛя ‚Л‰ВУБ‡ФЛТЛ, ‚˚ФУОМВММУИ М‡ ˝ЪУП ‡ФФ‡ ‡ЪВ ‚ ВКЛПВ LP, М‡ ‰ . ЪЛФ‡ı 8-ПЛООЛПВЪ У‚˚ı ‚Л‰ВУН‡ПВ ‡ı ЛОЛ ‚Л‰ВУП‡„МЛЪУЩУМ‡ı, Н‡˜ВТЪ‚У ‚УТФ УЛБ‚В‰ВМЛя ПУКВЪ УЪОЛ˜‡Ъ¸Тя УЪ ФУОЫ˜ВММУ„У Ф Л Ф ЛПВМВМЛЛ ‰‡ММУ„У ‡ФФ‡ ‡Ъ‡.
П ËϘ‡ÌË ÔÓ Á‡ÔËÒË
П Л Б‡ФЛТЛ Т Т‡ПУ„У М‡˜‡О‡ ‚Л‰ВУОВМЪ˚ВНУПВМ‰ЫВЪТя Ф У„М‡Ъ¸ ‚Л‰ВУОВМЪЫ ‚ıУОУТЪЫ˛ Ф ЛПВ МУ 15 ТВНЫМ‰ ФВ В‰ М‡˜‡ОУП ‰ВИТЪ‚ЛЪВО¸МУИ Б‡ФЛТЛ, ˜ЪУ ЛТНО˛˜‡ВЪ ‚УБПУКМУТЪ¸ Ф УФЫТЪЛЪ¸ М‡˜‡О¸М˚В Н‡ ЪЛМ˚ Ф Л ‚УТФ УЛБ‚В‰ВМЛЛ ‚Л‰ВУБ‡ФЛТЛ.
П ЛПВ˜‡МЛВ ФУ Т˜ВЪ˜ЛНЫ ‰ОЛМ˚ ‚Л‰ВУОВМЪ˚
•С˜ВЪ˜ЛН ПВЪ ‡К‡ ‚Л‰ВУОВМЪ˚ ФУН‡Б˚‚‡ВЪ ‚ ВПя Б‡ФЛТЛ ЛОЛ ‚УТФ УЛБ‚В‰ВМЛя. С˜ВЪ˜ЛН ПУКМУ ЛТФУО¸БУ‚‡Ъ¸ ‰Оя УФ В‰ВОВМЛя У ЛВМЪЛ У‚У˜МУ„У ‡ТıУ‰‡ ОВМЪ˚, Ф Л ˝ЪУП М‡‰У Ы˜ВТЪ¸ ‚˚‰В КНЫ ‚ ВПВМЛ ‚ МВТНУО¸НУ ТВНЫМ‰ УЪ Щ‡НЪЛ˜ВТНУ„У ‚ ВПВМЛ. ДОя ‚УБ‚ ‡Ъ‡ Т˜ВЪ˜ЛН‡ Н МЫО˛ М‡К‡Ъ¸ НМУФНЫ COUNTER RESET (С· УТ Т˜ВЪ˜ЛН‡).
•В ЪУП ТОЫ˜‡В, НУ„‰‡ Б‡ФЛТ¸ М‡ ОВМЪЫ Т‰ВО‡М‡ ‚ ВКЛП‡ı SP Л LP, Т˜ВЪ˜ЛН ФУН‡Б˚‚‡ВЪ МВФ ‡‚ЛО¸МУВ ‚ ВПя Б‡ФЛТЛ. ДОя В‰‡НЪЛ У‚‡МЛя ‚Л‰ВУБ‡ФЛТЛ Т ФУПУ˘¸˛ Т˜ВЪ˜ЛН‡ ОВМЪ˚, Ф ЛМяЪУ„У Б‡ УТМУ‚Ы, МВУ·ıУ‰ЛПУ ‚˚ФУОМЛЪ¸ Б‡ФЛТ¸ ‚ У‰ЛМ‡НУ‚УП ВКЛПВ (SP ЛОЛ LP).
П ËϘ‡ÌË ÔÓ Á‚ÛÍÓ‚ÓÈ Ò˄̇ÎËÁ‡ˆËË
К‡Н ЫН‡Б‡МУ БМ‡НУП М‡ ЛОО˛ТЪ ‡ˆЛЛ, Б‚ЫНУ‚‡я ТЛ„М‡ОЛБ‡ˆЛя ‰‡ВЪТя Ф Л ‚НО˛˜ВМЛЛ ФЛЪ‡МЛя ЛОЛ Ф Л Б‡ФЫТНВ ‡ФФ‡ ‡Ъ‡, ‡ ‰‚‡ Б‚ЫНУ‚˚ı ТЛ„М‡О‡ ЛБ‰‡˛ЪТя Ф Л УЪНО˛˜ВМЛЛ Б‡ФЛТЛ. П Л ‚УБМЛНМУ‚ВМЛЛ Н‡НЛı-ОЛ·У МВЛТФ ‡‚МУТЪВИ ‚ ‡·УЪВ ‡ФФ‡ ‡Ъ‡ ЛБ‰‡˛ЪТя МВТНУО¸НУ Б‚ЫНУ‚˚ı ТЛ„М‡ОУ‚.
ЭЪУ Б‚ЫНУ‚‡я ТЛ„М‡ОЛБ‡ˆЛя МВ Б‡ФЛТ˚‚‡ВЪТя М‡ ‚Л‰ВУН‡ТТВЪВ. ЧЪУ·˚ Б‚ЫНУ‚УИ ТЛ„М‡О МВ ·˚О ТО˚¯ВМ, ТОВ‰ЫВЪ ‚˚· ‡Ъ¸ “OFF” ‚ ТЛТЪВПВ ПВМ˛.
‡ˆЛЛУФВ ОТМУ‚М˚В / operations Basic
15
Camera recording |
З‡ÔËÒ¸ ̇ ‚ˉÂÓ͇Ï  |
|
|
Note on the AUTO DATE feature —CCD-TR820E only
The clock is set at the factory to London time for United Kingdom and to Paris time for the other European countries. You can reset the clock in the menu system. You can change the AUTO DATE settings by selecting ON or OFF in the menu system. The AUTO DATE feature shows the date automatically once a day.
However, the date may automatically appear more than once a day when:
–you reset the date and time.
–you eject and insert the tape again.
–you stop recording within 10 seconds.
–you set AUTO DATE to OFF once and set it to ON again in the menu system.
When moving from indoors to outdoors (or vice versa)
Turn STANDBY up and point the camcorder at a white object for about 15 seconds so that the white balance is properly adjusted.
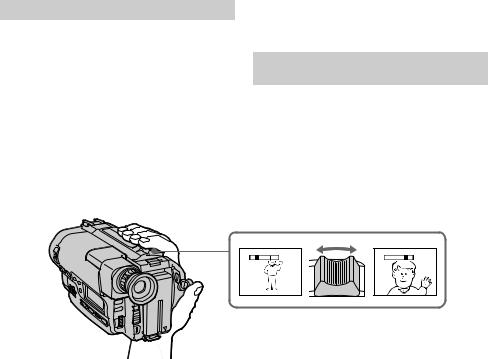
Using the zoom feature
Zooming is a recording technique that lets you change the size of the subject in the scene.
For more professional-looking recordings, use the zoom function sparingly.
“T” side: for telephoto (subject appears closer) “W” side: for wide-angle (subject appears farther
away)
П ËϘ‡ÌË ÔÓ ÙÛÌ͈ËË AUTO DATE —ТÓθÍÓ ÏÓ‰Âθ CCD-TR820Е
ВТЪ УВММ˚В ˜‡Т˚ М‡ТЪ УВМ˚ М‡ ТЪ‡М‰‡ ЪМУВ ОУМ‰УМТНУВ ‚ ВПя Ф Л ФУТЪ‡‚НВ ‚ ВВОЛНУ· ЛЪ‡МЛ˛ ЛОЛ М‡ Ф‡ ЛКТНУВ ‚ ВПя Ф Л ФУТЪ‡‚НВ ‚ ‰ Ы„ЛВ В‚ УФВИТНЛВ ТЪ ‡М˚. ВТЪ УВММ˚В ˜‡Т˚ ПУКМУ ФВ ВТЪ УЛЪ¸ ФУ ТЛТЪВПВ ПВМ˛. З‡‰‡МЛя AUTO DATE (А‚Ъ. ‰‡ЪЛ У‚‡МЛя), ПУКМУ ЛБПВМЛЪ¸, ‚˚· ‡я ON ЛОЛ OFF ‚ ТЛТЪВПВ ПВМ˛. ПУ ЩЫМНˆЛЛ AUTO DATE УТЫ˘ВТЪ‚ОяВЪТя ФУН‡Б‡МЛВ ‰‡Ъ˚ ‰ЛМ‡Б ‚ ‰ВМ¸.
О‰М‡НУ, ‰‡Ъ‡ ФУН‡Б˚‚‡ВЪТя ‡‚ЪУП‡ЪЛ˜ВТНЛ МВ ПВМВВ ‡Б‡ ‚ ‰ВМ¸ Ф Л ТОВ‰Ы˛˘Лı ТОЫ˜‡яı:
–Ò· ÓÒ‡ ‰‡Ú˚ Ë ˜‡ÒÓ‚ ̇ ÌÛθ;
–ÔÓ‚ÚÓ ÌÓ„Ó ËÁ‚ΘÂÌËя Ë ‚ÒÚ‡‚ÎÂÌËя ͇ÒÒÂÚ˚;
–УТЪ‡МУ‚‡ Б‡ФЛТЛ ‚ ЪВ˜ВМЛВ 10 ТВНЫМ‰,
–ЫТЪ‡МУ‚НЛ AUTO DATE М‡ OFF Т ФУТОВ‰Ы˛˘ЛП ФВ ВНО˛˜ВМЛВП М‡ ON ‚ ТЛТЪВПВ ПВМ˛.
П ÂÒÚ‡Ìӂ͇ ‡ÔÔ‡ ‡Ú‡ Ò ÔÓÏ¢ÂÌËя ̇ ‚ÓÁ‰Ûı (ËÎË Ì‡Ó·Ó ÓÚ)
ПВ ВПВТЪЛ‚ НМУФНЫ STANDBY ‚‚В ı, М‡Ф ‡‚ЛЪ¸ ‡ФФ‡ ‡Ъ М‡ ·ВО˚И У·˙ВНЪ Ф ЛПВ МУ М‡ 15 ТВНЫМ‰, ˜ЪУ·˚ Ф ‡‚ЛО¸МУ Т·‡О‡МТЛ У‚‡Ъ¸ ·ВОЛБМЫ.
ИТФУО¸БУ‚‡МЛВ ЩЫМНˆЛЛ Ъ ‡МТЩУН‡ˆЛЛ
П Л ФУПУ˘Л ЩЫМНˆЛЛ Ъ ‡МТЩУН‡ˆЛЛ ПУКМУ ЛБПВМЛЪ¸ П‡Т¯Ъ‡· ЛБУ· ‡КВМЛя ‚ ТМЛП‡ВПУИ ‚Л‰ВУБ‡ФЛТЛ.
ДОя ФУОЫ˜ВМЛя Ф УЩВТТЛУМ‡О¸МУ„У Н‡˜ВТЪ‚‡ Б‡ФЛТЛ ПУКМУ ЛТФУО¸БУ‚‡Ъ¸ ЩЫМНˆЛ˛ ЛБПВМВМЛя П‡Т¯Ъ‡·‡ ЛБУ· ‡КВМЛя. ПУОУКВМЛВ “Т” – ‰Оя Ъ ‡МТЩУН‡ˆЛЛ М‡ ФО˛Т (У·˙ВНЪ Ф ЛıУ‰ЛЪ ·ОЛКВ Н ТВ·В.)
ПУОУКВМЛВ ‘W” – ‰Оя Ъ ‡МТЩУН‡ˆЛЛ М‡ ПЛМЫТ (У·˙ВНЪ УЪıУ‰ЛЪ ‰‡О¸¯В УЪ ТВ·я.)
W |
T |
W |
T |
W T
16
Camera recording |
З‡ÔËÒ¸ ̇ ‚ˉÂÓ͇Ï  |
|
|
Zooming speed (Variable speed zooming)
Move the power zoom lever a little for a slower zoom, move it further for a faster zoom.
When you shoot a subject using a telephoto zoom
If you cannot get a sharp focus while in extreme telephoto zoom, move the power zoom lever to the “W” side until the focus is sharp. You can shoot a subject that is at least about 80cm (about 2 5/8 feet) away from the lens surface in the telephoto position, or about 1cm (about 1/2 inch) away in the wide-angle position.
Notes on digital zoom
•More than 15x zoom is performed digitally (x30), and the picture quality deteriorates as you go toward the “T” side. If you do not want to use the digital zoom, set the D ZOOM function to OFF in the menu system.
•The right side [a] in the power zoom indicator shows the digital zooming zone, and the left side [b] shows the optical zooming zone. If you set the D ZOOM function to OFF, the [a] zone disappears.
W  T
T
[b] [a]
СНУ УТЪ¸ Ъ ‡МТЩУН‡ˆЛЛ (Ъ ‡МТЩУН‡ˆЛя Т ФВ ВПВММУИ ТНУ УТЪ¸˛)
ПВ ВПВ˘‡ИЪВ ТОВ„Н‡ ˚˜‡„ Ф Л‚У‰МУ„У Ъ ‡МТЩУН‡ЪУ ‡ ‰Оя ПВ‰ОВММУ„У М‡ВБ‰‡ ‚Л‰ВУН‡ПВ ˚ Л ФВ ВПВ˘‡ИЪВ В„У ТЛО¸МВВ ‰Оя ·УОВВ ·˚ТЪ У„У М‡ВБ‰‡ ‚Л‰ВУН‡ПВ ˚.
П Л Т˙ВПНВ У·˙ВНЪ‡ Т Ъ ‡МТЩУН‡ˆЛВИ М‡ ФО˛Т
В ТОЫ˜‡В МВ‚УБПУКМУТЪЛ ФУОЫ˜ВМЛя ˜ВЪНУ |
Basic |
|||||
|
||||||
ЩУНЫТЛ У‚‡ММУ„У ЛБУ· ‡КВМЛя Ф Л Н ‡ИМВИ |
operations |
|||||
Ъ ‡МТЩУН‡ˆЛЛ М‡ ФО˛Т М‡‰У ФУ‚В МЫЪ¸ Ы˜НЫ |
||||||
|
||||||
Ъ ‡МТЩУН‡ˆЛЛ ‚ ТЪУ УМЫ “W”, ˜ЪУ·˚ |
|
|||||
ЛБУ· ‡КВМЛВ ·˚ОУ ‚ Ф ‡‚ЛО¸МУП ЩУНЫТВ. |
|
|||||
АÔÔ‡ ‡Ú ÔÓÁ‚ÓÎяÂÚ ÒÌяÚ¸ Ó·˙ÂÍÚ, |
/ |
|||||
̇ıÓ‰я˘ËÈÒя ̇ ‡ÒÒÚÓяÌËË Ô ËÏ ÌÓ 80 ÒÏ |
||||||
ОÒÌÓ‚Ì˚Â |
||||||
(УНУОУ 2-5/8 ЩЫЪ‡) УЪ У·˙ВНЪЛ‚‡ ‚ ФУОУКВМЛЛ |
||||||
|
||||||
“Т” ЛОЛ Ф ЛПВ МУ 1 ТП (УНУОУ 1/2 ‰˛ИП‡) ‚ |
|
|||||
ФУОУКВМЛЛ “W”. |
‡ˆЛЛУФВ |
|||||
П ЛПВ˜‡МЛВ ФУ ˆЛЩ У‚УИ Ъ ‡МТЩУН‡ˆЛЛ |
||||||
|
||||||
• Т ‡МТЩУН‡ˆЛя Т Ы‚ВОЛ˜ВМЛВП ·УО¸¯В 15ı |
|
|||||
УТЫ˘ВТЪ‚ОяВЪТя ФУ ˆЛЩ У‚УИ ТЛТЪВПВ (‰У |
|
|||||
ı30), Ë Í‡˜ÂÒÚ‚Ó ÔÓÎÛ˜‡ÂÏÓ„Ó ËÁÓ· ‡ÊÂÌËя |
|
|||||
ÛıÛ‰¯‡ÂÚÒя ÔÓ Ï  ÔÓ‚Ó ÓÚ‡ Û˜ÍË |
|
|||||
Ъ ‡МТЩУН‡ˆЛЛ ‚ ТЪУ УМЫ “T”. ЕТОЛ МВ |
|
|||||
Ъ В·ЫВЪТя ЛТФУО¸БУ‚‡Ъ¸ ˆЛЩ У‚Ы˛ |
|
|||||
Ъ ‡МТЩУН‡ˆЛ˛, М‡‰У ФВ В‚ВТЪЛ ЩЫМНˆЛ˛ D |
|
|||||
ZOOM М‡ OFF ‚ ТЛТЪВПВ ПВМ˛. |
|
|||||
• П ‡‚‡я ÒÚÓ Ó̇ [a] Ë̉Ë͇ÚÓ ‡ |
|
|||||
Ъ ‡МТЩУН‡ˆЛЛ-БУМ‡ ˆЛЩ У‚УИ |
|
|||||
Ъ ‡МТЩУН‡ˆЛЛ, ‡ ОВ‚‡я ТЪУ УМ‡ [b]-ÁÓ̇ |
|
|||||
УФЪЛ˜ВТНУИ Ъ ‡МТЩУН‡ˆЛЛ. П Л ФВ В‚У‰В |
|
|||||
ÙÛÌ͈ËË D ZOOM ̇ OFF ËÒ˜ÂÁ‡ÂÚ ÁÓ̇ [a]. |
|
|||||
|
|
|
|
|
|
|
|
W |
|
T |
|
|
|
|
|
|
|
|||
|
|
|
|
|||
|
|
|
|
|
|
|
17
Camera recording
Selecting the START/STOP mode
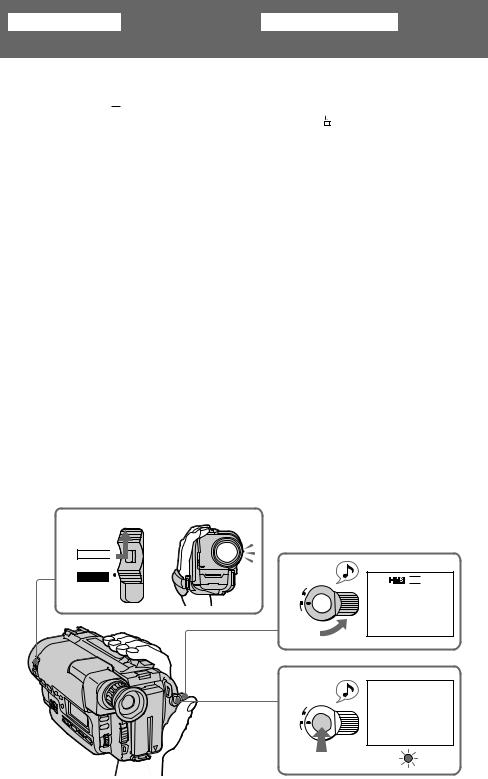
Your camcorder has two modes besides normal start/stop mode. These modes enable you to take a series of quick shots resulting in a lively video. (1) Set the START/STOP MODE switch to the
desired mode.
 : Recording starts when you press START/STOP, and stops when you press it again (normal mode).
ANTI GROUND SHOOTING  : The camcorder records only while you press down START/STOP so that you can avoid recording unnecessary scenes.
5 SEC: When you press START/STOP, the camcorder records for 5 seconds and then stops automatically.
(2) Turn STANDBY up and press START/STOP. Recording starts.
If you selected 5 SEC, five dots appear in the viewfinder. The dots disappear at a rate of one per second. When five seconds elapse and all the dots disappear, the camcorder switches to Standby mode automatically.
1
ANTI GROUND SHOOTING

 MODESTART/STOP
2
LOCK
S |
|
T |
|
A |
|
N |
|
D |
|
|
BY |
START/STOP
To extend the recording time in 5 SEC mode
Press START/STOP again before all the dots disappear. Recording continues for about 5 seconds from the moment you pressed START/ STOP.
To return to normal recording
Set the START/STOP MODE switch to  . If you set the switch while recording, recording continues.
Note on 5-SEC and ANTI GROUND SHOOTING
mode
You cannot use FADER if you select 5 SEC or 18 ANTI GROUND SHOOTING  .
.
З‡ÔËÒ¸ ̇ ‚ˉÂÓ͇Ï Â
В˚·Ó ÂÊËχ START/STOP (ÔÛÒ͇/ÓÒÚ‡ÌÓ‚‡)
К УПВ ВКЛП‡ ФЫТН‡/УТЪ‡МУ‚‡ ‚ В‡¯ВИ ‚Л‰ВУН‡ПВ В ЛПВВЪТя ‰‚‡ ‰ Ы„Лı ВКЛП‡. ЭЪЛ ВКЛП˚ ФУБ‚УОя˛Ъ В‡П ‚˚ФУОМяЪ¸ ТВ Л˛ ·˚ТЪ ˚ı Т˙ВПУН ‰Оя ФУОЫ˜ВМЛя УКЛ‚ОВММУ„У ‚Л‰ВУТ˛КВЪ‡.
(1)П ‚ÂÒÚË Ô ÂÍβ˜‡ÚÂθ START/STOP MODE (РÂÊËÏ ÔÛÒ͇/ÓÒÚ‡ÌÓ‚‡) ‚
Ъ В·ЫВПУВ ФУОУКВМЛВ.
 : З‡ФЛТ¸ ‚НО˛˜‡ВЪТя Ф Л М‡К‡ЪЛЛ М‡ НМУФНЫ START/STOP (ПЫТН/ОТЪ‡МУ‚), ‡ ‚˚НО˛˜‡ВЪТя Ф Л ФУ‚ЪУ МУП М‡К‡ЪЛЛ М‡
НМУФНЫ. (НУ П‡О¸М˚И ВКЛП) ANTI GROUND SHOOTING  :
:
ВЛ‰ВУН‡ПВ ‡ ‚˚ФУОМяВЪ Б‡ФЛТ¸ ЪУО¸НУ Ф Л М‡К‡ЪЛЛ В‡ПЛ НМУФНЛ START/STOP, ФУ˝ЪУПЫ В˚ ТПУКВЪВ ЛБ·ВК‡Ъ¸ Б‡ФЛТЛ МВМЫКМ˚ı ТˆВМ.
5 SEC: П Л М‡К‡ЪЛЛ М‡ НМУФНЫ START/ STOP (ПЫТН/ОТЪ‡МУ‚) ‚Л‰ВУН‡ПВ ‡ УТЫ˘ВТЪ‚ОяВЪ Б‡ФЛТ¸ ЪУО¸НУ ‚ ЪВ˜ВМЛВ 5 ТВН, Л Б‡ЪВП УТЪ‡МУ‚ЛЪТя ‡‚ЪУП‡ЪЛ˜ВТНЛ.
(2)ПÓ‚Â ÌÛÚ¸ Ô ÂÍβ˜‡ÚÂθ STANDBY
(ГУЪУ‚МУТЪ¸) ‚‚В ı Л М‡К‡Ъ¸ М‡ НМУФНЫ START/STOP (ПЫТН/ОТЪ‡МУ‚). ВВБЫО¸Ъ‡ЪВ, М‡˜МВЪТя Б‡ФЛТ¸.
ЕТОЛ В˚ ‚˚· ‡ОЛ ВКЛП 5 SEC, ‚ ‚Л‰УЛТН‡ЪВОВ ФУя‚яЪТя ФяЪ¸ ЪУ˜ВН. ТУ˜НЛ ·Ы‰ЫЪ ЛТ˜ВБ‡Ъ¸ ФУ У‰МУИ Б‡ ТВНЫМ‰Ы. ПУ ЛТЪВ˜ВМЛЛ ФяЪЛ ТВНЫМ‰ ‚ТВ ЪУ˜НЛ ЛТ˜ВБМЫЪ, Л ‚Л‰ВУН‡ПВ ‡ ‡‚ЪУП‡ЪЛ˜ВТНЛ ФВ ВНО˛˜ЛЪТя ‚ВКЛП „УЪУ‚МУТЪЛ.
|
|
REC |
REC |
|
CK |
|
|
LO |
|
|
|
N |
|
40min. |
40min. |
S |
|
|
|
T |
|
|
|
A |
|
|
|
D |
|
|
|
|
BY |
|
|
START/STOP |
|
|
|
У‰ОЛМВМЛВ ‚ ВПВМЛ Б‡ФЛТЛ ‚ ВКЛПВ 5 SEC (5 ТВН)
Н‡К‡Ъ¸ М‡ НМУФНЫ START/STOP (ПЫТН/ ОТЪ‡МУ‚) ФУ‚ЪУ МУ ФВ В‰ ЛТ˜ВБМУ‚ВМЛВП ‚ТВı ЪУ˜ВН. З‡ФЛТ¸ Ф У‰УОК‡ВЪТя Ф ЛПВ МУ ‚ ЪВ˜ВМЛВ 5 ТВН Т ПУПВМЪ‡ М‡К‡ЪЛя М‡ НМУФНЫ START/STOP.
ВУБ‚ ‡Ъ Н МУ П‡О¸МУПЫ ВКЛПЫ Б‡ФЛТЛ
ПВ В‚ВТЪЛ ФВ ВНО˛˜‡ЪВО¸ START/STOP MODE (РВКЛП ФЫТН‡/УТЪ‡МУ‚‡) ‚ ФУОУКВМЛВ
 . ЕÒÎË Ô ‚ÂÒÚË Â„Ó ‚Ó ‚ ÂÏя Á‡ÔËÒË, ÚÓ Á‡ÔËÒ¸ Ô Ó‰ÓÎʇÂÚÒя.
П ËϘ‡ÌËя Í ÂÊËÏ‡Ï 5 SEC (5 ÒÂÍ) Ë ANTI GROUND SHOOTING 
В˚ МВ ТПУКВЪВ ЛТФУО¸БУ‚‡Ъ¸ FADER, ВТОЛ В˚ ‚˚· ‡ОЛ5SECЛОЛANTIGROUNDSHOOTING  .
.
Hints for better |
СÓ‚ÂÚ˚ ÔÓ ÎÛ˜¯ÂÈ |
shooting |
‚ˉÂÓÒ˙ÂÏÍ |
|
|
For hand-held shots, you’ll get better results by holding the camcorder according to the following suggestions:
ДОя У·ВТФВ˜ВМЛя ОЫ˜¯В„У Н‡˜ВТЪ‚‡ ЛБУ· ‡КВМЛя Ф Л Т˙ВПНВ У·˙ВНЪУ‚ МЫКМУ ТУ·О˛‰‡Ъ¸ ТОВ‰Ы˛˘ЛВ ЫН‡Б‡МЛя:
[a] |
[b] |


 1
1 2
2
3
•Hold the camcorder firmly and secure it with the grip strap so that you can easily manipulate the controls with your thumb [a].
•Place your right elbow against your side. •Place your left hand under the camcorder to
support it. Be sure not to touch the built-in microphone.
•Place your eye firmly against the viewfinder eyecup.
•Use the viewfinder frame as a guide to determine the horizontal plane.
•You can also record in a low position to get an interesting recording angle. Lift the viewfinder up to record from a low position [b].
Place the camcorder on a flat surface or use a tripod
Try placing the camcorder on a table top or any other flat surface of suitable height. If you have a tripod for a still camera, you can also use it with the camcorder.
When attaching a non-Sony tripod, make sure that the length of the tripod screw is less than 6.5 mm (9/32 inch). Otherwise, you cannot attach the tripod securely and the screw may damage the camcorder.
•ДВ К‡Ъ¸ ‡ФФ‡ ‡Ъ Н ВФНУ Л М‡‰ВКМУ Б‡Ы˜МУИ ВПВ¯УН Ъ‡Н, ˜ЪУ·˚ ПУ„ОЛ ОВ„НУ П‡МЛФЫОЛ У‚‡Ъ¸ У „‡М‡ПЛ ЫФ ‡‚ОВМЛя ·УО¸¯ЛП Ф‡О¸ˆВП. [a].
•П ЛКЛП‡Ъ¸ ОУНУЪ¸ Ф ‡‚УИ ЫНЛ Н ·УНЫ.
•ПУ‰‰В КЛ‚‡Ъ¸ ‡ФФ‡ ‡Ъ ТМЛБЫ ОВ‚УИ ЫНУИ. БЫ‰¸ЪВ УТЪУ УКМ˚, ˜ЪУ·˚ МВ Н‡Т‡Ъ¸Тя ‚ТЪ УВММУ„У ПЛН УЩУМ‡ ‡ФФ‡ ‡Ъ‡.
•П ЛОУКЛЪ¸ ‚‡¯ „О‡Б ФОУЪМУ Н „О‡БМУИ П‡МКВЪВ ‚Л‰УЛТН‡ЪВОя.
•ИТФУО¸БУ‚‡Ъ¸ ‡ПНЫ ‚Л‰УЛТН‡ЪВОя ‚ Н‡˜ВТЪ‚В У ЛВМЪЛ ‡ ‰Оя УФ В‰ВОВМЛя „У ЛБУМЪ‡О¸МУИ ФОУТНУТЪЛ.
•С МЛКМВ„У ФУОУКВМЛя ПУКМУ ТМяЪ¸ У·˙ВНЪ ФУ‰ ЛМЪВ ВТМ˚П Ы„ОУП Б‡ФЛТЛ. ДОя ˝ЪУ„У Ф ЛФУ‰МяЪ¸ ‚Л‰УЛТН‡ЪВО¸ ‚‚В ı ‰Оя Б‡ФЛТЛ ЛБ МЛБНУ„У ФУОУКВМЛя [b].
УТЪ‡МУ‚ЛЪ¸ ‡ФФ‡ ‡Ъ М‡ У‚МУВ ПВТЪУ ЛОЛ Ф ЛПВМЛЪ¸ ¯Ъ‡ЪЛ‚.
АФФ‡ ‡Ъ ВНУПВМ‰ЫВЪТя ЫТЪ‡МУ‚ЛЪ¸ М‡ ТЪУО Л ‰ . ФУ‰У·М˚И ФОУТНЛИ Ф В‰ПВЪ ТУУЪ‚ВЪТЪ‚Ы˛˘ВИ ‚˚ТУЪ˚. П Л М‡ОЛ˜ЛЛ ¯Ъ‡ЪЛ‚‡ ‰Оя ЩУЪУ‡ФФ‡ ‡Ъ‡, ПУКМУ ЛТФУО¸БУ‚‡Ъ¸ ¯Ъ‡ЪЛ‚ Л ‰Оя ‚Л‰ВУН‡ПВ ˚. П Л Ф ЛН ВФОВМЛЛ ¯Ъ‡ЪЛ‚‡ Ф УЛБ‚У‰ТЪ‚‡ ‰ Ы„Лı ЩЛ П, М‡‰У Ы·В‰ЛЪ¸Тя, ˜ЪУ ‰ОЛМ‡ВБ¸·˚ ‚ЛМЪ‡ ¯Ъ‡ЪЛ‚‡ МВ Ф В‚˚¯‡ВЪ 6,5 ПП (9/32 ‰˛ИП‡). В Ф УЪЛ‚МУП ТОЫ˜‡В, В˚ МВ ТПУКВЪВ М‡‰ВКМУ ФУ‰ТУВ‰ЛМЛЪ¸ ¯Ъ‡ЪЛ‚ Л ‚ЛМЪ ПУКВЪ ФУ‚ В‰ЛЪ¸ ‚Л‰ВУН‡ПВ Ы.
‡ˆЛЛУФВ ОТМУ‚М˚В / operations Basic
19
Hints for better shooting |
СÓ‚ÂÚ˚ ÔÓ ÎÛ˜¯ÂÈ ‚ˉÂÓÒ˙ÂÏÍ |
|
|
Cautions on the viewfinder
•Do not pick up the camcorder by the viewfinder [c].
•Do not place the camcorder so as to point the viewfinder toward the sun. The inside of the viewfinder may be damaged. Be careful when placing the camcorder under sunlight or by a window [d].
О·˘Ë Û͇Á‡ÌËя ÔÓ ‚ˉÓËÒ͇ÚÂβ
•АФФ‡ ‡Ъ МВО¸Бя ФВ ВМУТЛЪ¸, Б‡ı‚‡Ъ˚‚‡я Б‡ В„У ‚Л‰УЛТН‡ЪВО¸ [c].
•АФФ‡ ‡Ъ МВ ТОВ‰ЫВЪ УТЪ‡‚ОяЪ¸ ‚ Ъ‡НУП ФУОУКВМЛЛ, Ф Л НУЪУ УП Ф яП˚В ТУОМВ˜М˚В ОЫ˜Л ФУФ‡‰‡˛Ъ М‡ ‚Л‰УЛТН‡ЪВО¸, ˜ЪУ·˚ МВ ФУ‚ В‰ЛЪ¸ ‚МЫЪ ВММЛВ ЫТЪ УИТЪ‚‡ ‚Л‰УЛТН‡ЪВОя. ЭЪУ МВУ·ıУ‰ЛПУ ФУПМЛЪ¸ Ф Л‡ТФУОУКВМЛЛ ‡ФФ‡ ‡Ъ‡ ФУ‰ ТУОМˆВП ЛОЛ Ы УНМ‡. [d]
[c] |
[d] |
20

Checking the |
П Ó‚Â Í‡ ͇˜ÂÒÚ‚‡ |
recorded picture |
Á‡ÔËÒ‡ÌÌÓ„Ó ËÁÓ· ‡ÊÂÌËя |
|
|
Using EDITSEARCH, you can review the last recorded scene or check the recorded picture in the viewfinder.
(1) While pressing the small green button on the POWER switch, set it to CAMERA.
(2) Turn STANDBY up.
(3) Press the – (Œ) side of EDITSEARCH momentarily; the last few seconds of the recorded portion play back (Rec Review). You can monitor the sound from the headphones.
Hold down the – side of EDITSEARCH until the camcorder goes back to the scene you want. The last recorded portion is played back. To go forward, hold down the + side (Edit Search).
1
POWER
CAMERA 


OFF 
PLAYER
ИТФУО¸БЫя НМУФНЫ EDITSEARCH, (РВ‰‡НЪ. ФУЛТН) В˚ ПУКВЪВ Ф УТПУЪ ВЪ¸ ФУТОВ‰М˛˛ Б‡ФЛТ¸ ЛОЛ Ф У‚В ЛЪ¸ Н‡˜ВТЪ‚У Б‡ФЛТ‡ММУ„У ЛБУ· ‡КВМЛя ˜В ВБ ‚Л‰УЛТН‡ЪВО¸.
(1)Н‡КЛП‡я М‡ БВОВМЫ˛ НМУФУ˜НЫ М‡ ‚˚НО˛˜‡ЪВОВ POWER (ПЛЪ‡МЛВ), ФВ ВПВТЪЛЪ¸ В„У ‚ ФУОУКВМЛВ CAMERA (ВЛ‰ВУН‡ПВ ‡).
(2)ПВ ВПВТЪЛЪ¸ НМУФНЫ STANDBY (ГУЪУ‚МУТЪ¸) ‚‚В ı.
(3)К ‡ЪНУ‚ ВПВММУ М‡К‡Ъ¸ НМУФНЫ EDITSEARCH ТУ ТЪУ УМ˚ – (Œ); ФУТОВ‰Мяя ˜‡ТЪ¸ Б‡ФЛТЛ М‡ МВТНУО¸НУ ТВНЫМ‰ ‚УТФ УЛБ‚У‰ЛЪТя (ФВ ВТПУЪ Б‡ФЛТЛ). В˚ ПУКВЪВ Ф УТОЫ¯Л‚‡Ъ¸ Б‚ЫН ˜В ВБ „УОУ‚М˚В ЪВОВЩУМ˚.
П У‰УОКЛЪВО¸МУ М‡КЛП‡Ъ¸ М‡ НМУФНЫ EDITSEARCH cУ ТЪУ УМ˚ “–” ‰Оя ФВ ВПУЪНЛ ‰У ФУя‚ОВМЛя Ъ В·ЫВПУИ Н‡ ЪЛМ˚ ‚Л‰ВУБ‡ФЛТЛ. ПУТОВ‰Мяя ˜‡ТЪ¸ ‚Л‰ВУБ‡ФЛТЛ ‚УТФ УЛБ‚У‰ЛЪТя. ДОя Ф У‚В НЛ ‰‡О¸МВИ¯ВИ ˜‡ТЪЛ Ф У‰УОКЛЪВО¸МУ М‡КЛП‡Ъ¸ М‡ НМУФНЫ ТУ ТЪУ УМ˚ “+” (РВ‰‡НЪ. ФУЛТН).
2
OCK
L
S |
|
T |
|
A |
|
N |
|
D |
|
|
B |
|
Y |
START/STOP
‡ˆЛЛУФВ ОТМУ‚М˚В / operations Basic
3
 EDITSEARCH

To stop playback
Release EDITSEARCH.
To begin re-recording
Press START/STOP. Re-recording begins from the point you released EDITSEARCH. Provided you do not eject the cassette, the transition between the last scene you recorded and the next scene you record will be smooth.
EDITSEARCH 


 EDITSEARCH

ДÎя ÓÒÚ‡ÌÓ‚‡ ‚ÓÒÔ ÓËÁ‚‰ÂÌËя
ОЪФЫТЪЛЪ¸ НМУФНЫ EDITSEARCH (РВ‰‡НЪ. ФУЛТН).
ДÎя ÔÓ‚ÚÓ ÌÓ„Ó Ì‡˜‡Î‡ Á‡ÔËÒË
Н‡К‡Ъ¸ М‡ НМУФНЫ START/STOP (ПЫТН/УТЪ‡МУ‚). |
|
СМУ‚‡ М‡˜МВЪТя Б‡ФЛТ¸ Т ПУПВМЪ‡ УТ‚У·УК‰ВМЛя |
|
НМУФНЛ EDITSEARCH. ПВ ВıУ‰ Т ФУТОВ‰МВИ М‡ |
|
ÒÎÂ‰Û˛˘Û˛ ͇ ÚËÌÛ Á‡ÔËÒË Ô ÓËÒıÓ‰ËÚ Ô·‚ÌÓ, |
|
ÂÒÎË Á‡ÔËÒ‡Ì̇я ‚ˉÂÓ͇ÒÒÂÚ‡ ÓÒÚ‡‚ÎÂ̇ ‚ |
21 |
‡ÔÔ‡ ‡ÚÂ. |
Connections for |
СУВ‰ЛМВМЛя ‰Оя |
playback |
‚ÓÒÔ ÓËÁ‚‰ÂÌËя |
|
|
Connect the camcorder to your VCR or TV to watch the playback picture on the TV screen. There are some ways to connect the camcorder to your TV. When monitoring the playback picture by connecting the camcorder to your TV, we recommend you to use house current for the power source.
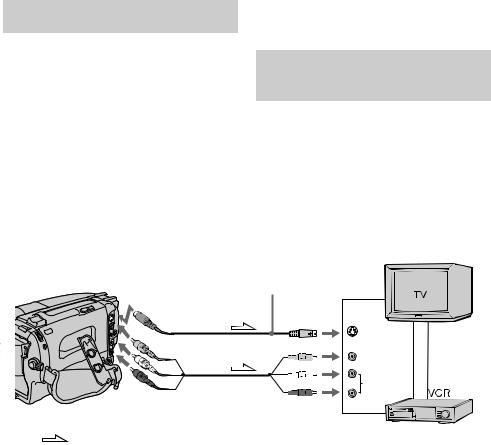
Connecting directly to a VCR/TV with Video/Audio input jacks
Open the jack cover. If your TV is already connected to a VCR, connect the camcorder to the LINE IN inputs on the VCR by using the supplied A/V connecting cable. Set the input selector on the VCR to LINE. Set the TV/VCR selector on the TV to VCR.
If your VCR or TV has an S video jack, connect using the S video cable (not supplied) [a] to obtain a high quality picture.
ПУ‰ТУВ‰ЛМЛЪВ ‚Л‰ВУН‡ПВ Ы Н В‡¯ВПЫ КВМ ЛОЛ ЪВОВ‚ЛБУ Ы ‰Оя Ф УТПУЪ ‡ ‚УТФ УЛБ‚У‰ЛПУ„У ЛБУ· ‡КВМЛя М‡ ЪВОВ‚ЛБЛУММУП ˝Н ‡МВ. ИПВВЪТя МВТНУО¸НУ ТФУТУ·У‚ ФУ‰ТУВ‰ЛМВМЛя ‚Л‰ВУН‡ПВ ˚ Н В‡¯ВПЫ ЪВОВ‚ЛБУ Ы. П Л НУМЪ УОЛ У‚‡МЛЛ ‚УТФ УЛБ‚У‰ЛПУ„У ЛБУ· ‡КВМЛя ФЫЪВП ФУ‰ТУВ‰ЛМВМЛя ‚Л‰ВУН‡ПВ ˚ Н В‡¯ВПЫ ЪВОВ‚ЛБУ Ы П˚ ВНУПВМ‰ЫВП В‡П ЛТФУО¸БУ‚‡Ъ¸ ‚ Н‡˜ВТЪ‚В ЛТЪУ˜МЛН‡ ˝ОВНЪ УФЛЪ‡МЛя ‰УП‡¯М˛˛ ˝ОВНЪ УТВЪ¸.
П яПУВ ФУ‰НО˛˜ВМЛВ ‚Л‰ВУП‡„МЛЪУЩУМ‡/ЪВОВ‚ЛБУ ‡ Н „МВБ‰‡П ‚‚У‰‡ ‡Ы‰ЛУ/‚Л‰ВУ
ОЪН УИЪВ „МВБ‰У‚Ы˛ Н ˚¯НЫ. ЕТОЛ В‡¯ ЪВОВ‚ЛБУ ЫКВ ФУ‰ТУВ‰ЛМВМ Н КВМ, ФУ‰ТУВ‰ЛМЛЪВ ‚Л‰ВУН‡ПВ Ы Н ‚ıУ‰М˚П „МВБ‰‡П LINE IN М‡ КВМ, ЛТФУО¸БЫя Ф ЛО‡„‡ВП˚И ТУВ‰ЛМЛЪВО¸М˚И ‡Ы‰ЛУ/ ‚Л‰ВУ¯МЫ . УТЪ‡МУ‚ЛЪВ ТВОВНЪУ TV/VCR М‡ ЪВОВ‚ЛБУ В ‚ ФУОУКВМЛВ VCR.
ЕТОЛ В‡¯ КВМ ЛОЛ ЪВОВ‚ЛБУ ЛПВВЪ „МВБ‰У S-‚Л‰ВУ, ЪУ ‚˚ФУОМЛЪ¸ ТУВ‰ЛМВМЛВ Т ЛТФУО¸БУ‚‡МЛВП Н‡·ВОя S-‚Л‰ВУ (МВ ФУТЪ‡‚ОяВЪТя) [‡] ‰Îя ÔÓÎÛ˜ÂÌËя ‚˚ÒÓÍÓ„Ó Í‡˜ÂÒÚ‚‡ ËÁÓ· ‡ÊÂÌËя.
(not supplied)/(ÌÂ Ô Ë·„‡ÂÚÒя)
S VIDEO OUT |
IN |
|
[a] |
S VIDEO |
|
|
||
VIDEO OUT |
VIDEO |
|
[b] |
||
|
||
|
AUDIO |
|
AUDIO OUT |
|
|
: Signal flow/Н‡Ф ‡‚ОВМЛВ ТЛ„М‡ОУ‚ |
|
If you are going to connect the camcorder using the S video cable (not supplied) [a], you do not need to connect the yellow (video) plug of the A/ V connecting cable [b].
В ÒÎÛ˜‡Â ÔÓ‰Íβ˜ÂÌËя ‡ÔÔ‡ ‡Ú‡ Ò ÔÓÏÓ˘¸˛ S ‚ˉÂÓ Í‡·ÂÎя (Ì ÔÓÒÚ‡‚ÎяÂÚÒя) [a], МВ Ъ В·ЫВЪТя Ф ЛТУВ‰ЛМЛЪ¸ КВОЪ˚И (‚Л‰ВУ) ¯ЪВФТВО¸ ‡Ы‰ЛУ/‚Л‰ВУ ТУВ‰ЛМЛЪВО¸МУ„У Н‡·ВОя [b].
22
Connections for playback
If your VCR or TV is a monaural type
Connect only the white plug for audio on both the camcorder and the VCR or the TV. With this connection, the sound is monaural even stereo mode.
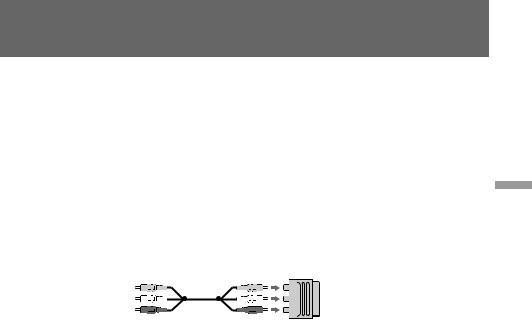
If your TV/VCR has a 21-pin connector (EUROCONNECTOR)
Use the supplied 21-pin adaptor.
To connect to a VCR or TV without Video/Audio input jacks
Use an RFU adaptor (not supplied).
СУВ‰ЛМВМЛя ‰Оя ‚УТФ УЛБ‚В‰ВМЛя
П Л Ф ЛПВМВМЛЛ ПУМУЩУМЛ˜ВТНУ„У ‚Л‰ВУП‡„МЛЪУЩУМ‡ ЛОЛ ЪВОВ‚ЛБУ ‡
П ЛТУВ‰ЛМЛЪ¸ У‰МЛ ·ВО˚В ¯ЪВФТВОя ‰Оя ‡Ы‰ЛУТЛ„М‡ОУ‚ ‰Оя ‡ФФ‡ ‡Ъ‡ Л ‚Л‰ВУП‡„МЛЪУЩУМ‡ ЛОЛ ЪВОВ‚ЛБУ ‡. П Л Ъ‡НУП ФУ‰ТУВ‰ЛМВМЛЛ Б‚ЫН ·Ы‰ВЪ ПУМУЩУМЛ˜ВТНЛП ‰‡КВ ‚ ТЪВ ВУЩУМЛ˜ВТНУПВКЛПВ.
В ТОЫ˜‡В, ВТОЛ ‚‡¯ ЪВОВ‚ЛБУ / ‚Л‰ВУП‡„МЛЪУЩУМ ЛПВВЪ 21- ¯Ъ˚ ¸НУ‚˚И ТУВ‰ЛМЛЪВО¸ (Е‚ УТУВ‰ЛМЛЪВО¸)
Н‡‰Ó Ô ËÏÂÌяÚ¸ ÔÓÒÚ‡‚ÎяÂÏ˚È Ò ‡ÔÔ‡ ‡ÚÓÏ 21-¯Ú˚ ¸ÍÓ‚˚È ‡‰‡ÔÚ .
 TV
TV
ПУ‰НО˛˜ВМЛВ ‡ФФ‡ ‡Ъ‡ Н ‚Л‰ВУП‡„МЛЪУЩУМЫ ЛОЛ ЪВОВ‚ЛБУ Ы, МВ ЛПВ˛˘ВПЫ „МВБ‰‡ ‚‚У‰‡ ‡Ы‰ЛУ/ ‚Л‰ВУТЛ„М‡ОУ‚
Н‡‰Ó Ô ËÏÂÌяÚ¸ ‡‰‡ÔÚ RFU (Ì ÔÓÒÚ‡‚ÎяÂÚÒя).
‡ˆЛЛУФВ ОТМУ‚М˚В / operations Basic
23
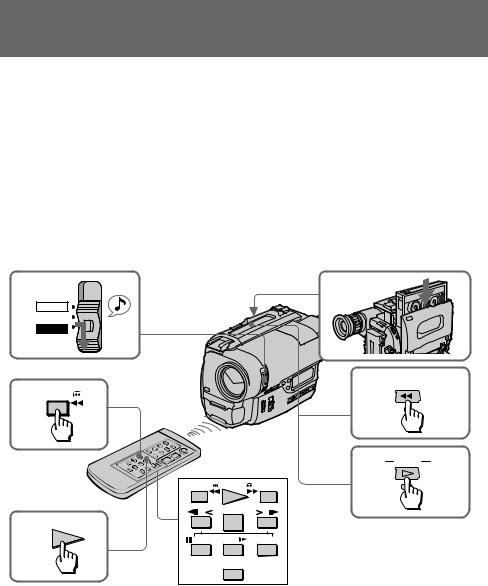
Playing back a tape
You can monitor the playback picture in the viewfinder. You can also monitor a picture on a TV screen, after connecting the camcorder to a TV or VCR.
(1) While pressing the small green button on the POWER switch, set it to PLAYER. The video control buttons light up.
(2) Insert the recorded tape with the window facing out.
(3) Press 0to rewind the tape. (4) Press ·to start playback.
ВÓÒÔ ÓËÁ‚‰ÂÌË ‚ˉÂÓÁ‡ÔËÒË
ВУТФ УЛБ‚У‰ЛПУВ ЛБУ· ‡КВМЛВ ПУКМУ НУМЪ УОЛ У‚‡Ъ¸ ˜В ВБ ‚Л‰УЛТН‡ЪВО¸. ВЛ‰ВУБ‡ФЛТ¸ ПУКМУ НУМЪ УОЛ У‚‡Ъ¸ Л М‡ ˝Н ‡МВ ЪВОВ‚ЛБУ ‡, ФУ‰НО˛˜Л‚ ‡ФФ‡ ‡Ъ Н ЪВОВ‚ЛБУ Ы ЛОЛ ‚Л‰ВУП‡„МЛЪУЩУМЫ.
(1)Н‡КЛП‡я М‡ БВОВМЫ˛ НМУФУ˜НЫ ‚˚НО˛˜‡ЪВОя POWER (ПЛЪ‡МЛВ), ФУТЪ‡‚ЛЪ¸ ФУТОВ‰МЛИ ‚ ФУОУКВМЛВ PLAYER (ВУТФ УЛБ‚В‰ВМЛВ). В˚Т‚ВЪяЪТя НМУФНЛ ‚Л‰ВУНУМЪ УОя.
(2)ВТЪ‡‚ЛЪ¸ Б‡ФЛТ‡ММЫ˛ Н‡ТТВЪЫ УНУ¯НУП ТМ‡ ЫКЛ.
(3)Н‡КПЛЪВ НМУФНЫ 0 ‰Оя У· ‡ЪМУИ ФВ ВПУЪНЛ ОВМЪ˚.
(4)Н‡К‡ПЛЪВ М‡ НМУФНЫ · ‰Оя ‚НО˛˜ВМЛяВКЛП‡ ‚УТФ УЛБ‚В‰ВМЛя.
1POWER |
2 |
|
CAMERA |
|
OFF |
|
PLAYER |
3 |
3 |
REW |
4
|
REW |
PLAY |
FF |
4 |
|
STOP |
|
PLAY |
|
× 2 |
|
|
PAUSE |
SLOW |
|
|
|
DISPLAY |
|
 REW
REW
PLAY
To stop playback, press .
To rewind the tape, press 0.
To fast-forward the tape rapidly, press ).
Using the remote commander
You can control playback using the supplied Remote Commander. Before using the Remote Commander, insert the R6 (size AA) batteries.
24
ДÎя ÓÚÍβ˜ÂÌËя ÂÊËχ ‚ÓÒÔ ÓËÁ‚‰ÂÌËя
М‡К‡Ъ¸ М‡ НМУФНЫ .
ДОя ФВ ВПУЪНЛ ‚Л‰ВУОВМЪ˚ М‡Б‡‰ М‡К‡Ъ¸ М‡ НМУФНЫ 0.
ДОя ЫТНУ ВММУИ ФВ ВПУЪНЛ ‚Л‰ВУОВМЪ˚ ‚ФВ В‰ М‡К‡Ъ¸ М‡ НМУФНЫ ).
СФЫО¸Ъ‡ ‰ЛТЪ‡МˆЛУММУ„У ЫФ ‡‚ОВМЛя
СФУПУ˘¸˛ ФУТЪ‡‚ОяВПУ„У Т ‡ФФ‡ ‡ЪУП ФЫО¸Ъ‡ ‰ЛТЪ‡МˆЛУММУ„У ЫФ ‡‚ОВМЛя ПУКМУ НУМЪ УОЛ У‚‡Ъ¸ ‚УТФ УЛБ‚В‰ВМЛВ ‚Л‰ВУБ‡ФЛТЛ. ПВ В‰ ЛТФУО¸БУ‚‡МЛВП ФЫО¸Ъ‡ ‰ЛТЪ‡МˆЛУММУ„У ЫФ ‡‚ОВМЛя МВУ·ıУ‰ЛПУ Б‡Ф ‡‚ЛЪ¸ ФЫО¸Ъ ·‡Ъ‡ ВИН‡ПЛ ЪЛФ‡ R6 ( ‡БП. АА).

Playing back a tape
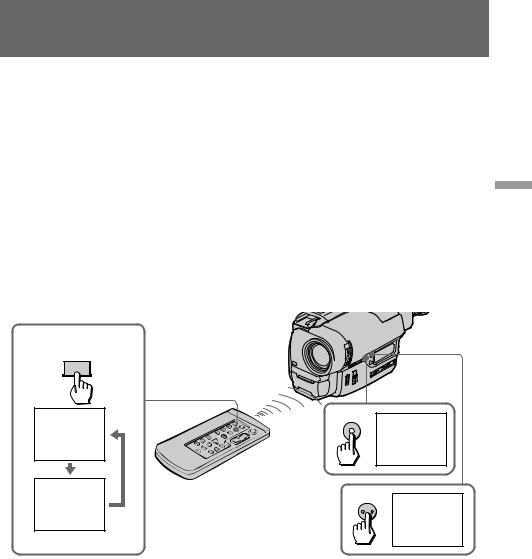
To display the viewfinder screen indicators on the TV
Press DISPLAY on the Remote Commander. To erase the indicators, press DISPLAY again.
To monitor the sound while viewing the playback picture in the viewfinder
Connect headphones (not supplied) to the 2jack.
Note on the lens cover
The lens cover does not open when the POWER switch is set to PLAYER. Do not open the lens cover manually. It may cause malfunction.
Various playback modes
To view a still picture (playback pause)
Press Pduring playback. To resume playback, press Por ·.
To locate a scene (picture search)
Keep pressing 0or )during playback. To resume normal playback, release the button.
To monitor the high-speed picture while advancing the tape or rewinding (skip scan)
Keep pressing 0while rewinding or )while advancing the tape. To resume normal playback, press ·.
To view the picture at 1/5 speed (slow playback)
Press &on the Remote Commander during playback. To resume normal playback, press ·. If slow playback lasts for about 1 minute, it shifts to normal speed automatically.
To view the picture at double speed —CCD-TR825E only
For double speed playback in the reverse direction, press '<, then press x2 on the Remote Commander during playback. For double speed playback in the forward direction, press >7, then press x2 during playback. To resume normal playback, press (.
ВÓÒÔ ÓËÁ‚‰ÂÌË ‚ˉÂÓÁ‡ÔËÒË
ДÎя ÓÚÓ· ‡ÊÂÌËя Ë̉Ë͇ÚÓ Ó‚ |
|
|
‚ˉÓËÒ͇ÚÂθя ̇ ˝Í ‡Ì ÚÂ΂ËÁÓ ‡ |
|
|
Н‡КПЛЪВ НМУФНЫ DISPLAY М‡ ФЫО¸ЪВ |
|
|
‰ЛТЪ‡МˆЛУММУ„У ЫФ ‡‚ОВМЛя. ДОя Ы‰‡ОВМЛя |
|
|
ЛМ‰ЛН‡ЪУ У‚ М‡КПЛЪВ НМУФНЫ DISPLAY. |
|
|
КÓÌÚ Óθ Á‚ÛÍÓÁ‡ÔËÒË Ô Ë ‚ÓÒÔ ÓËÁ‚Â- |
|
|
‰ÂÌËË ‚ˉÂÓÁ‡ÔËÒË ˜Â ÂÁ ‚ˉÓËÒ͇ÚÂθ |
|
|
ДÎя ˝ÚÓ„Ó ÔÓ‰Íβ˜ËÚ¸ ̇ۯÌËÍ (Ì |
|
|
ÔÓÒÚ‡‚ÎяÂÚÒя Ò ‡ÔÔ‡ ‡ÚÓÏ) „ÌÂÁ‰Û 2. |
|
|
П ËϘ‡ÌË ÔÓ Í ˚¯Í ӷ˙ÂÍÚË‚‡ |
|
|
|
||
|
||
К ˚¯Í‡ Ó·˙ÂÍÚË‚‡ Ì ÓÚÍ ˚‚‡ÂÚÒя Ô Ë |
Basic |
|
ÛÒÚ‡ÌÓ‚Í ‚˚Íβ˜‡ÚÂÎя POWER (ПËÚ‡ÌËÂ) ‚ |
||
|
||
ФУОУКВМЛВ PLAYER (ВУТФ УЛБ‚В‰ВМЛВ). НВ |
/operations |
|
ÒΉÛÂÚ ÓÚÍ ˚‚‡Ú¸ Í ˚¯ÍÛ Ó·˙ÂÍÚË‚‡ |
||
‚ Û˜ÌÛ˛. НÂÒӷβ‰ÂÌË ˝ÚÓ„Ó Û͇Á‡ÌËя |
|
|
‚˚Б˚‚‡ВЪ МВЛТФ ‡‚МУТЪ¸ ‡ФФ‡ ‡Ъ‡. |
|
РÂÊËÏ˚ ‚ÓÒÔ ÓËÁ‚‰ÂÌËя
П УТПУЪ ТЪУФ-Н‡‰ ‡ ( ВКЛП Ф‡ЫБ˚ |
ОÒÌÓ‚Ì˚Â |
|
|
Ô Ë ‚ÓÒÔ ÓËÁ‚‰ÂÌËË) |
|
Н‡К‡Ъ¸ М‡ НМУФНЫ P ‚У ‚ ВПя ‚УТФ УЛБ‚В- |
|
‰ÂÌËя Á‡ÔËÒË. ДÎя ‚ÓÒÒÚ‡ÌÓ‚ÎÂÌËя ÂÊËχ |
‡ˆЛЛУФВ |
‚УТФ УЛБ‚В‰ВМЛя М‡К‡Ъ¸ М‡ НМУФНЫ PЛОЛ ·. |
|
О·М‡ ЫКВМЛВ МЫКМУ„У ‚Л‰ВУН‡‰ ‡ |
|
(ПÓËÒÍ ËÁÓ· ‡ÊÂÌËя) |
|
П У‰УОКЛЪВО¸МУ М‡КЛП‡Ъ¸ М‡ НМУФНЫ 0 |
|
ЛОЛ ) ‚ ВКЛПВ ‚УТФ УЛБ‚В‰ВМЛя. ДОя |
|
‚ÓÒÒÚ‡ÌÓ‚ÎÂÌËя ÌÓ Ï‡Î¸ÌÓ„Ó ÂÊËχ |
|
‚УТФ УЛБ‚В‰ВМЛя УЪФЫТЪЛЪ¸ НМУФНЫ. |
|
КУМЪ УО¸ ЛБУ· ‡КВМЛя Т ‚˚ТУНУИ |
|
ТНУ УТЪ¸˛ Ф Л ФВ ВПУЪНВ ‚ФВ В‰ ЛОЛ |
|
̇Á‡‰ (СÍËÔ-Ò͇ÌË Ó‚‡ÌËÂ) |
|
П У‰УОКЛЪВО¸МУ М‡К‡Ъ¸ М‡ НМУФНЫ 0 Ф Л |
|
ФВ ВПУЪНВ М‡Б‡‰ ЛОЛ М‡ НМУФНЫ ) Ф Л |
|
ФВ ВПУЪНВ ‚ФВ В‰. ДОя ‚УТТЪ‡МУ‚ОВМЛя |
|
ÌÓ Ï‡Î¸ÌÓ„Ó ÂÊËχ ‚ÓÒÔ ÓËÁ‚‰ÂÌËя |
|
М‡К‡Ъ¸ М‡ НМУФНЫ ·. |
|
П УТПУЪ ЛБУ· ‡КВМЛя Ф Л 1/5 ТНУ УТЪЛ |
|
(З‡ПВ‰ОВММУВ ‚УТФ УЛБ‚В‰ВМЛВ) |
|
Н‡К‡Ъ¸ М‡ НМУФНЫ & М‡ ФЫО¸ЪВ ‰ЛТЪ‡МˆЛУММУ„У |
|
ЫФ ‡‚ОВМЛя ‚ ВКЛПВ ‚УТФ УЛБ‚В‰ВМЛя. ДОя |
|
‚ÓÒÒÚ‡ÌÓ‚ÎÂÌËя ÌÓ Ï‡Î¸ÌÓ„Ó ÂÊËχ |
|
‚УТФ УЛБ‚В‰ВМЛя М‡К‡Ъ¸ М‡ НМУФНЫ ·. ЕТОЛ |
|
Б‡ПВ‰ОВММУВ ‚УТФ УЛБ‚В‰ВМЛВ Ф У‰УОК‡ВЪТя |
|
·УО¸¯В 1 ПЛМЫЪ˚, ТНУ УТЪ¸ ‚УТФ УЛБ‚В‰ВМЛя |
|
‡‚ÚÓχÚ˘ÂÒÍË Ô ÂÍβ˜‡ÂÚÒя ̇ ÌÓ Ï‡Î¸ÌÛ˛. |
|
П УТПУЪ ЛБУ· ‡КВМЛя Ф Л ‰‚УИМУИ |
|
ÒÍÓ ÓÒÚË —ТÓθÍÓ ÏÓ‰Âθ CCD-TR825Е |
|
ДОя ‚УТФ УЛБ‚В‰ВМЛя Т ‰‚УИМУИ ТНУ УТЪ¸˛ ‚ |
|
У· ‡ЪМУП М‡Ф ‡‚ОВМЛЛ М‡К‡Ъ¸ М‡ НМУФНЫ |
|
'<, Б‡ЪВП М‡ НМУФНЫ ı2 М‡ ФЫО¸ЪВ |
|
‰ЛТЪ‡МˆЛУММУ„У ЫФ ‡‚ОВМЛя ‚ ВКЛПВ |
|
‚ÓÒÔ ÓËÁ‚‰ÂÌËя. ДÎя ‚ÓÒÔ ÓËÁ‚‰ÂÌËя Ò |
|
‰‚УИМУИ ТНУ УТЪ¸˛ ‚ Ф яПУП М‡Ф ‡‚ОВМЛЛ |
|
М‡К‡Ъ¸ М‡ НМУФНЫ >7, Б‡ЪВП М‡ НМУФНЫ ı2 ‚ |
|
ВКЛПВ ‚УТФ УЛБ‚В‰ВМЛя. ДОя |
|
‚ÓÒÒÚ‡ÌÓ‚ÎÂÌËя ÌÓ Ï‡Î¸ÌÓ„Ó ÂÊËχ |
25 |
‚УТФ УЛБ‚В‰ВМЛя М‡К‡Ъ¸ М‡ НМУФНЫ (. |

Playing back a tape
To view the picture frame-by-frame —CCD-TR825E only
Press '<or >7on the Remote Commander in playback pause mode. If you keep pressing the button, you can view the picture at 1/25 speed. To resume normal playback, press (.
To change the playback direction —CCD-TR825E only
Press '<on the Remote Commander for reverse direction or >7on the Remote Commander for forward direction during playback. To resume normal playback, press (.
To select the playback sound
Change the “HiFi SOUND” mode setting in the menu system.
Notes on playback
•Streaks appear and the sound is muted in the various playback modes.
•When playback pause mode lasts for 5 minutes, the camcorder automatically enters stop mode.
•Horizontal noise appears at the center of the screen when you play back a tape in reverse or in various speed if the RC time code or the Data Code is displayed on the screen (CCD-TR825E only). This is normal.
Displaying the date or time when you recorded — data code function
—CCD-TR825E only
Even if you did not record the date or time when you were recording, you can display the date or time when you recorded (Data Code) on the TV during playback or editing. The Data Code is also displayed in the viewfinder and the display window.
ВÓÒÔ ÓËÁ‚‰ÂÌË ‚ˉÂÓÁ‡ÔËÒË
П УТПУЪ ФУН‡‰ У‚У„У ЛБУ· ‡КВМЛя —ТУО¸НУ ПУ‰ВО¸ CCD-TR825Е
Н‡К‡Ъ¸ М‡ НМУФНЫ '< ЛОЛ >7 М‡ ФЫО¸ЪВ ‰ЛТЪ‡МˆЛУММУ„У ЫФ ‡‚ОВМЛя ‚ ВКЛПВ Н ‡ЪНУ‚ ВПВММУИ Ф‡ЫБ˚. П Л Ф У‰УОКЛЪВО¸МУП М‡К‡ЪЛЛ НМУФНЛ ПУКМУ Ф УТПУЪ ВЪ¸ ЛБУ· ‡КВМЛВ Ф Л ТНУ УТЪЛ 1/25. ДОя ‚УТТЪ‡МУ‚ОВМЛя МУ П‡О¸МУ„У ВКЛП‡ ‚УТФ УЛБ‚В‰ВМЛя М‡К‡Ъ¸ М‡ НМУФНЫ (.
ИБПВМВМЛВ М‡Ф ‡‚ОВМЛя ФВ ВПУЪНЛ Ф Л ‚УТФ УЛБ‚В‰ВМЛЛ —ТУО¸НУ ПУ‰ВО¸ CCD-TR825Е
ДОя ФВ ВПУЪНЛ М‡Б‡‰ М‡К‡Ъ¸ М‡ НМУФНЫ '<, ‡ ‰Оя ФВ ВПУЪНЛ ‚ФВ В‰ — М‡ НМУФНЫ >7 М‡ ФЫО¸ЪВ ‰ЛТЪ‡МˆЛУММУ„У ЫФ ‡‚ОВМЛя ‚ ВКЛПВ ‚УТ-Ф УЛБ‚В‰ВМЛя. ДОя ‚УТТЪ‡МУ‚ОВМЛя МУ П‡О¸МУ„У ВКЛП‡ ‚УТФ УЛБ‚В‰ВМЛя М‡К‡Ъ¸ М‡ НМУФНЫ (.
В˚·Ó Á‚Û˜‡ÌËя Ô Ë ‚ÓÒÔ ÓËÁ‚‰ÂÌËË
ДОя ˝ЪУ„У ТОВ‰ЫВЪ ЛБПВМЛЪ¸ ВКЛП “HiFi SOUND” ‚ ТЛТЪВПВ ПВМ˛.
П ËϘ‡ÌËя ÔÓ ‚ÓÒÔ ÓËÁ‚‰ÂÌ˲
•В УЪ‰ВО¸М˚ı ВКЛП‡ı ‚УТФ УЛБ‚В‰ВМЛя ·˚‚‡˛Ъ ТОЫ˜‡Л ФУя‚ОВМЛя ФУОУТ Л УЪТЫЪТЪ‚Ля Б‚ЫН‡.
•В ТОЫ˜‡В, ВТОЛ ВКЛП Ф‡ЫБ˚ ‚УТФ УЛБ‚В‰ВМЛя Ф У‰УОК‡ВЪТя 5 ПЛМЫЪ, ‡ФФ‡ ‡Ъ ФВ ВНО˛˜‡ВЪТя ‡‚ЪУП‡ЪЛ˜ВТНЛ ‚ВКЛП УТЪ‡МУ‚НЛ.
•ГУ ЛБУМЪ‡О¸М˚В ФУПВıЛ ФУя‚Оя˛ЪТя М‡ ТВ В‰ЛМВ ˝Н ‡М‡ Ф Л ‚УТФ УЛБ‚В‰ВМЛЛ ‚Л‰ВУБ‡ФЛТЛ ‚ У· ‡ЪМУП М‡Ф ‡‚ОВМЛЛ ‚ ЪУП ТОЫ˜‡В, НУ„‰‡ ‚ ВПВММУИ НУ‰ ЛОЛ НУ‰ ‰‡ММ˚ı УЪУ· ‡К‡ВЪТя М‡ ˝Н ‡М (ТУО¸НУ CCD-TR825Е). ЭЪУ МВ я‚ОяВЪТя Ф ЛБМ‡НУП МВЛТФ ‡‚МУТЪЛ.
ИМ‰ЛН‡ˆЛя ‰‡Ъ˚ ЛОЛ ‚ ВПВМЛ Ф Л ‚Л‰ВУБ‡ФЛТЛ — ЩЫМНˆЛя НУ‰‡ ‰‡ММ˚ı
—ТÓθÍÓ ÏÓ‰Âθ CCD-TR825Е
Д‡КВ Ф Л ЫТОУ‚ЛЛ, ˜ЪУ ‰‡Ъ‡ ЛОЛ ‚ ВПя Б‡ФЛТЛ МВ В„ЛТЪ Л ЫВЪТя Ф Л Ф У‚В‰ВМЛЛ ‚Л‰ВУБ‡ФЛТЛ, ПУКМУ УЪУ· ‡К‡Ъ¸ ‰‡ЪЫ ЛОЛ ‚ ВПя Ф Л В„ЛТЪ ‡ˆЛЛ (НУ‰‡ ‰‡ММ˚ı) М‡ ЪВОВ‚ЛБУ В ‚У ‚ ВПя ‚УТФ УЛБ‚В‰ВМЛя ЛОЛВ‰‡НЪЛ У‚‡МЛя. КУ‰ ‰‡ММ˚ı ЛМ‰ЛˆЛ ЫВЪТя Ъ‡НКВ ‚ ‚Л‰УЛТН‡ЪВОВ Л ‰ЛТФОВИМУП УНУ¯НВ.
26
Playing back a tape
To display the date or time when you recorded
Press DATE or TIME on the camcorder. To make the date or time disappear, press it again.
To display the date and time when you recorded, press TIME (or DATE) after pressing DATE (or TIME). To make the date and time disappear, press DATE and TIME again.
To display simultaneously the data and time when you recorded
Press DATA CODE on the Remote Commander. To make the date and time disappear, press it again.
DATA CODE
ВÓÒÔ ÓËÁ‚‰ÂÌË ‚ˉÂÓÁ‡ÔËÒË
ДОя УЪУ· ‡КВМЛя ‰‡Ъ˚ ЛОЛ ‚ ВПВМЛ Ф Л Б‡ФЛТЛ
Н‡КПЛЪВ НМУФНЫ DATE ЛОЛ НМУФНЫ TIME М‡ ‚Л‰ВУН‡ПВ В. ДОя ЪУ„У, ˜ЪУ·˚ ‰‡Ъ‡ ЛОЛ ‚ ВПя ЛТ˜ВБОЛ, М‡КПЛЪВ ВВ УФяЪ¸.
ДОя УЪУ· ‡КВМЛя ‰‡Ъ˚ ЛОЛ ‚ ВПВМЛ Ф Л Б‡ФЛТЛ М‡КПЛЪВ НМУФНЫ TIME (ЛОЛ НМУФНЫ DATE) ФУТОВ ЪУ„У, Н‡Н М‡КПВЪВ НМУФНЫ DATE (ЛОЛ НМУФНЫ TIME). ДОя ЪУ„У, ˜ЪУ·˚ ‰‡Ъ‡ Л ‚ ВПя ЛТ˜ВБОЛ, М‡КПЛЪВ НМУФНЫ DATE Л
НМУФНЫ TIME УФяЪ¸. |
Basic |
|
ДОя У‰МУ‚ ВПВММУ„У УЪУ· ‡КВМЛя |
operations |
|
|
||
‰‡Ъ˚ Л ‚ ВПВМЛ Ф Л Б‡ФЛТЛ |
|
|
Н‡КПЛЪВ НМУФНЫ DATA CODE М‡ ФЫО¸ЪВ |
|
|
‰ЛТЪ‡МˆЛУММУ„У ЫФ ‡‚ОВМЛя. ДОя ЪУ„У, ˜ЪУ·˚ |
/ |
|
‰‡Ъ‡ Л ‚ ВПя ЛТ˜ВБОЛ, М‡КПЛЪВ ВВ УФяЪ¸. |
||
‡ˆЛЛУФВ ОТМУ‚М˚В |
||
|
DATE
4 7 1997 |
|
17:30:00 |
4 7 1997 |
|
|
|
TIME |
17:30:00
When bars (––:––:––) appear
•A blank portion of the tape is being played back.
•The tape was recorded by a camcorder without the Data Code function.
•The tape was recorded by a camcorder without having date and time set.
•The tape is unreadable due to tape damage or noise.
•An index signal is marked, the RC time code is written, or PCM after recording is made on the tape.
П Л ФУя‚ОВМЛЛ ТЪУО·ЛНУ‚ (––:––:––)
•ВУТФ УЛБ‚У‰ЛЪТя МВБ‡ФЛТ‡ММ‡я ˜‡ТЪ¸ ‚Л‰ВУОВМЪ˚.
•ВЛ‰ВУОВМЪ‡ Б‡ФЛТ‡М‡ ‚Л‰ВУН‡ПВ УИ ·ВБ ‚НО˛˜ВМЛя ЩЫМНˆЛЛ НУ‰‡ ‰‡ММ˚ı.
•ВЛ‰ВУОВМЪ‡ Б‡ФЛТ‡М‡ ‚Л‰ВУН‡ПВ УИ ·ВБ Б‡‰‡МЛя ‰‡Ъ˚ Л ‚ ВПВМЛ Б‡ФЛТЛ.
•ВЛ‰ВУОВМЪ‡ МВ ‚УТФ УЛБ‚У‰ЛЪТя ËÁ-Á‡ ÔÓ‚ ÂʉÂÌËя ÎÂÌÚ˚ ËÎË ÔÓÏÂı.
•ИМ‰ВНТМ˚И ТЛ„М‡О УЪПВ˜ВМ, ‚ ВПВММУИ НУ‰ RС ‚‚В‰ВМ ЛОЛ ЛПФЫО¸ТМУ-НУ‰У‚‡я ПУ‰ЫОяˆЛя ‚˚ФУОМВМ‡ ФУТОВ Б‡ФЛТЛ М‡ ОВМЪЫ.
27
|
|
|
|
|
|
Advanced operations |
|
ДУФУОМЛЪВО¸М˚В УФВ ‡ˆЛЛ |
|
|
Using alternative |
ИÒÔÓθÁÓ‚‡ÌË ‡Î¸Ú ̇- |
||
|
power sources |
ÚË‚Ì˚ı ËÒÚÓ˜ÌËÍÓ‚ ÔËÚ‡ÌËя |
||
You can choose any of the following power sources for your camcorder: battery pack, the mains, alkaline battery and 12/24 V car battery. Choose the appropriate power source depending on where you want to use your camcorder.
Place |
Power source |
Accessory to be used |
Indoors |
Mains |
Supplied AC power |
|
|
adaptor |
|
|
|
Outdoors |
Battery pack |
InfoLITHIUM battery |
|
|
NP-F330 (supplied), |
|
|
NP-F530, NP-F730, |
|
|
NP-F930 |
|
|
|
|
LR6 (Size AA) |
Battery case (supplied) |
|
Alkaline |
|
|
Battery |
|
|
|
|
In the car |
12 V or 24 V |
Sony car battery charger |
|
car battery |
DC-V515A |
|
|
|
Note on power sources
Disconnecting the power source or removing the battery pack during recording or playback may damage the inserted tape. If this happens, restore the power supply again immediately.
This mark indicates that this
 product is a genuine accessory for Sony video products.
When purchasing Sony video products, Sony recommends that you purchase accessories with this “GENUINE VIDEO ACCESSORIES” mark.
ДОя ФЛЪ‡МЛя В‡¯В„У ‡ФФ‡ ‡Ъ‡ ПУКМУ Ф ЛПВМяЪ¸ О˛·УИ ЛБ ТОВ‰Ы˛˘Лı ЛТЪУ˜МЛНУ‚: ·‡Ъ‡ ВИМ˚И ·ОУН, ˝ОВНЪ УТВЪ¸ ФВ ВПВММУ„У ЪУН‡, ¯ВОУ˜М˚В ·‡Ъ‡ ВИНЛ Л ‡‚ЪУПУ·ЛО¸МЫ˛ ·‡Ъ‡ В˛ 12/24 В. В˚· ‡Ъ¸ УФЪЛП‡О¸М˚И ЛТЪУ˜МЛН ФЛЪ‡МЛя ‚ Б‡‚ЛТЛПУТЪЛ УЪ ПВТЪ‡ ФУО¸БУ‚‡МЛя ‚Л‰ВУН‡ПВ УИ.
МÂÒÚÓ |
ИÒÚÓ˜ÌËÍ |
НÂÓ·ıÓ‰ËÏ˚ |
|
ÔËÚ‡ÌËя |
Ф ЛМ‡‰ОВКМУТЪЛ |
|
|
|
В |
ЭÎÂÍÚ ÓÒÂÚ¸ |
СÂÚ‚ÓÈ ‡‰‡ÔÚ |
ÔÓÏ¢ÂÌËË |
Ô ÂÏ. ÚÓ͇ |
Ô ÂÏ. ÚÓ͇, |
|
|
ÔÓÒÚ‡‚ÎяÂÏ˚È Ò |
|
|
‡ÔÔ‡ ‡ÚÓÏ |
|
|
|
ВÌÂ |
Б‡Ú‡ ÂÈÌ˚È |
Б‡Ú‡ ÂÈÌ˚È |
ÔÓÏ¢ÂÌËя |
ËÒÚÓ˜ÌËÍ |
ËÒÚÓ˜ÌËÍ |
|
|
“InfoLITHIUM” |
|
|
ÚËÔ‡ NP-F330 |
|
|
(Ô Ë·„‡ÂÚÒя), |
|
|
NP-F530, NP-F730, |
|
|
NP-F930 |
|
|
|
|
LR6 (Р‡ÁÏ АА) |
Б‡Ú‡ ÂÈÌ˚È |
|
ЩÂÎӘ̇я |
ÙÛÚÎя |
|
·‡Ú‡ ÂÈ͇ |
(Ô Ë·„‡ÂÚÒя) |
ВАННЫПЫОяЪУ М‡я З‡ я‰МУВ
‡‚ÚÓÏÓ·ËΠ·‡Ú‡ Âя ̇ 12 |
ÛÒÚ ÓÈÒÚ‚Ó |
ËÎË 24 В |
DC-V515A |
|
|
П ËϘ‡ÌË ÔÓ ËÒÚÓ˜ÌËÍ‡Ï ÔËÚ‡ÌËя
ОЪТУВ‰ЛМВМЛВ ‡ФФ‡ ‡Ъ‡ УЪ ЛТЪУ˜МЛН‡ ФЛЪ‡МЛя ЛОЛ ТМяЪЛВ ·‡Ъ‡ ВИМУ„У ЛТЪУ˜МЛН‡ ‚У ‚ ВПя Б‡ФЛТЛ ЛОЛ ‚УТФ УЛБ‚В‰ВМЛя ПУКВЪ ФУ‚ В‰ЛЪ¸ ‚Л‰ВУОВМЪЫ. П Л УЪТУВ‰ЛМВМЛЛ ЛОЛ ТМяЪЛЛ М‡‰У ‚УТТЪ‡МУ‚ЛЪ¸ ФЛЪ‡МЛВ МВБ‡ПВ‰ОЛЪВО¸МУ.
Д‡ÌÌ˚È ÁÌ‡Í ÓÁ̇˜‡ÂÚ, ˜ÚÓ ÁÚÓ
 ЛБ‰ВОЛВ я‚ОяВЪТя Ф ЛМ‡‰ОВКМУТЪ¸˛ ‰Оя ‚Л‰ВУЛБ‰ВОЛИ ЩЛ П˚ Sony.
П Л ФУНЫФНВ ‚Л‰ВУЛБ‰ВОЛИ ЩЛ П˚ Sony П˚ВНУПВМ‰ЫВП, ˜ЪУ·˚ В˚ ФУНЫФ‡ОЛ Ф ЛМ‡‰ОВКМУТЪЛ ТУ БМ‡НУП “GENUINE VIDEO ACCESSORIES”.
28
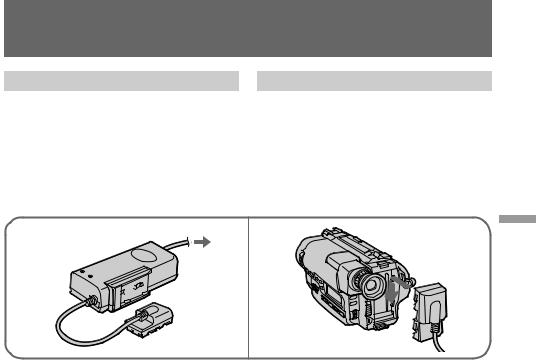
Using alternative power sources
Using the mains
To use the supplied AC power adaptor:
(1) Connect the AC mains lead to the mains. (2) Slide the connecting plate down into the
guides at the rear of the camcorder until it clicks.
1
To remove the connecting plate
The connecting plate is removed in the same way as battery pack.
WARNING
The mains lead must only be changed at a qualified service shop.
PRECAUTION
The set is not disconnected from the AC power source (mains) as long as it is connected to the mains, even if the set itself has been turned off.
Notes on the VTR/CAMERA lamp
•The VTR/CAMERA lamp will remain lit for a while even if the unit is unplugged after use. This is normal.
•If the VTR/CAMERA lamp does not light, disconnect the mains lead. After about one minute, reconnect the mains lead.
ИÒÔÓθÁÓ‚‡ÌË ‡Î¸Ú ̇- ÚË‚Ì˚ı ËÒÚÓ˜ÌËÍÓ‚ ÔËÚ‡ÌËя
ПЛЪ‡МЛВ УЪ ˝ОВНЪ УТВЪЛ
С Ф ЛПВМВМЛВП ФУТЪ‡‚ОяВПУ„У Т ‡ФФ‡ ‡ЪУП ‡‰‡ФЪВ ‡ ФВ ВП. ЪУН‡:
(1)ПУ‰НО˛˜ЛЪ¸ ‡‰‡ФЪВ ФВ ВП. ЪУН‡ Н ˝ОВНЪ УТВЪЛ ФВ ВПВММУ„У ЪУН‡.
(2)В‚ВТЪЛ ТУВ‰ЛМЛЪВО¸МЫ˛ ФО‡ТЪЛМНЫ ‚ М‡Ф ‡‚Оя˛˘ЛВ Т Б‡‰МВИ ТЪУ УМ˚ ‡ФФ‡ ‡Ъ‡, ‰У УЪН‡Б‡.
2 |
/ Operations Advanced |
|
|
||
‚˚МЛП‡Ъ¸ ТУВ‰ЛМЛЪВО¸М˚И ¯МЫ , Б‡ı‚‡Ъ˚‚‡я |
ДУФУОМЛЪВО¸М˚В |
|
У‰‡ОВМЛВ ТУВ‰ЛМЛЪВО¸МУИ ФО‡ТЪЛМНЛ |
|
|
В˚МЫЪ¸ ТУВ‰ЛМЛЪВО¸МЫ˛ ФО‡ТЪЛМНЫ, |
|
|
Б‡ı‚‡Ъ˚‚‡я Б‡ Т‡ПЫ˛ ФО‡ТЪЛМНЫ. НВ ТОВ‰ЫВЪ |
‡ˆЛЛУФВ |
|
Á‡ Ò‡Ï˚È ¯ÌÛ . |
||
|
||
П Â‰ÛÔ ÂʉÂÌË |
|
|
К ВПУМЪЫ Ф У‚У‰У‚ ‡‰‡ФЪВ ‡ ФВ ВП. ЪУН‡ |
|
|
‰УФЫТН‡ВЪТя ЪУО¸НУ Н‚‡ОЛЩЛˆЛ У‚‡ММ˚И |
|
|
˝ÎÂÍÚ ÓÏÂı‡ÌËÍ. |
|
П В‰УТЪУ УКМУТЪ¸
АФФ‡ ‡Ъ МВ ТОВ‰ЫВЪ УЪТУВ‰ЛМяЪ¸ УЪ ФУ‰НО˛˜ВММУ„У Н МВПЫ ТВЪВ‚У„У ‡‰‡ФЪВ ‡ ФВ ВП. ЪУН‡ (УЪ ˝ОВНЪ УТВЪЛ) ‰‡КВ Ф Л ‚˚НО˛˜ВМЛЛ ФЛЪ‡МЛя Т‡ПУ„У ‡ФФ‡ ‡Ъ‡.
П ËϘ‡ÌËя ÔÓ Î‡ÏÔӘ͠VTR/CAMERA (КВМ/КАМЕРА)
•Л‡ПФУ˜Н‡ VTR/CAMERA (КВМ/КАМЕРА) ПУКВЪ „У ВЪ¸ МВНУЪУ УВ ‚ ВПя ‰‡КВ ФУТОВ ‚˚НО˛˜ВМЛя ФЛЪ‡МЛя. ЭЪУ МВ я‚ОяВЪТя Ф ЛБМ‡НУП МВЛТФ ‡‚МУТЪЛ.
•ЕТОЛ О‡ПФУ˜Н‡ VTR/CAMERA (КВМ/ КАМЕРА) МВ Б‡„У ‡ВЪТя, ЪУ УЪТУВ‰ЛМЛЪ¸ ТВЪВ‚У„У ‡‰‡ФЪВ ‡ ФВ ВП. ЪУН‡ Л, ТФЫТЪя ПЛМЫЪЫ, ФУ‰НО˛˜ЛЪ¸ В„У ТМУ‚‡.
29
 Loading...