


3-859-266-12 (1)
Video Camera
Recorder
Operating Instructions
Before operating the unit, please read this manual thoroughly, and retain it for future reference.
аМТЪ ЫНˆЛfl ФУ ˝НТФОЫ‡Ъ‡ˆЛЛ
иВ В‰ М‡˜‡ОУП ˝НТФОЫ‡Ъ‡ˆЛЛ ‰‡ММУ„У ‡ФФ‡ ‡Ъ‡ Ф УТЛП ‚МЛП‡ЪВО¸МУ Ф У˜ВТЪ¸М‡ТЪУfl˘ВВ ЫНУ‚У‰ТЪ‚УЛУТЪ‡‚ЛЪ¸В„У‰Оfl·Ы‰Ы˘ЛхТФ ‡‚УН.
CCD-TRV24E
CCD-TRV14E/TRV24E h
ã 1997 by Sony Corporation
CCD-TRV14E/TRV24E 3-859-266-12(1).E/R

English
Welcome!
Congratulations on your purchase of this Sony Handycam Visionä camcorder. With your Handycam Vision, you can capture life’s precious moments with superior picture and sound quality. Your Handycam Vision is loaded with advanced features, but at the same time it is very easy to use. You will soon be producing home video that you can enjoy for years to come.
WARNING
To prevent fire or shock hazard, do not expose the unit to rain or moisture.
To avoid electrical shock, do not open the cabinet. Refer servicing to qualified personnel only.
Certain countries may regulate disposal of the battery used to power this product. Please consult with your local authority.
кЫТТНЛИ
ÑÓ· Ó
ÔÓʇÎÓ‚‡Ú¸ !
иУБ‰ ‡‚ОfleП З‡Т Т Ф ЛУ· ВЪВМЛВП ‰‡ММУИ ‚Л‰ВУН‡ПВ ˚ Handycam Vision™ ЩЛ П˚ Sony. л ФУПУ˘¸˛ З‡¯ВИ ‚Л‰ВУН‡ПВ ˚ Handycam Vision З˚ ПУКВЪВ Б‡ФВ˜‡ЪОВЪ¸ ‰У У„ЛВ З‡П П„МУ‚ВМЛfl КЛБМЛ Т Ф В‚УТхУ‰М˚П Н‡˜ВТЪ‚УП ЛБУ· ‡КВМЛfl Л
Б‚ЫН‡. З‡¯‡ ‚Л‰ВУН‡ПВ ‡ Handycam Vision УТМ‡˘ВМ‡ ЫТУ‚В ¯ВМТЪ‚У‚‡ММ˚ПЛ ЩЫМНˆЛflПЛ, МУ Л ‚ ЪУ КВ ‚ ВПfl ВВ У˜ВМ¸ ОВ„НУ ЛТФУО¸БУ‚‡Ъ¸. З˚ ‚ТНУ В ·Ы‰ВЪВ ТУБ‰‡‚‡Ъ¸ТВПВИМ˚В‚Л‰ВУБ‡ФЛТЛ, НУЪУ ˚ПЛ ПУКВЪВ М‡ТО‡К‰‡Ъ¸Тfl ‚ ФУТОВ‰Ы˛˘ЛВ „У‰˚.
икЦСмикЦЬСЦзаЦ
СОfl Ф В‰УЪ‚ ‡˘ВМЛfl ‚УБ„У ‡МЛfl ЛОЛ УФ‡ТМУТЪЛ˝ОВНЪ Л˜ВТНУ„УЫ‰‡ ‡МВ ФУ‰‚В „‡Ъ¸‡ФФ‡ ‡Ъ‚УБ‰ВИТЪ‚Л˛‰УК‰fl ЛОЛ ‚О‡„Л.
ЗУ ЛБ·ВК‡МЛВ ФУ ‡КВМЛfl ˝ОВНЪ Л˜ВТНЛП ЪУНУП МВ УЪН ˚‚‡Ъ¸ НУ ФЫТ. б‡ У·ТОЫКЛ‚‡МЛВП У· ‡˘‡Ъ¸Тfl ЪУО¸НУ Н Н‚‡ОЛЩЛˆЛ У‚‡ММУПЫ У·ТОЫЫКЛ‚‡˛˘ВПЫ ФВТУМ‡ОЫ.
З УФ В‰ВОВММ˚х ТЪ ‡М‡х ЫТЪ‡МУ‚ОВМ ФУ fl‰УН ОЛН‚Л‰‡ˆЛЛ ·‡Ъ‡ ВВН ‰Оfl ФЛЪ‡МЛfl
ЛБ‰ВОЛИ. й· ‡ЪЛЪВТ¸, ФУК‡ОЫИТЪ‡, ‚ З‡¯В ПВТЪМУВ ЫФУОМУПУ˜ВММУВ ‡„ВМЪТЪ‚У.
2
CCD-TRV14E/TRV24E 3-859-266-12(1).E/R

Table of contents
Before you begin |
|
|
Using this manual .................................................. |
|
4 |
Checking supplied accessories ............................ |
|
6 |
Getting started |
|
|
Charging and installing the battery pack .......... |
7 |
|
Inserting a cassette ............................................... |
|
10 |
Basic operations |
|
|
Camera recording ................................................ |
|
11 |
Using the zoom feature .................................. |
|
14 |
Shooting with the LCD screen ....................... |
|
16 |
Letting the subject monitor the shot ................ |
|
17 |
Hints for better shooting .................................... |
|
18 |
Checking the recorded picture .......................... |
|
20 |
Playing back a tape ............................................. |
|
22 |
Searching for the end of the picture .................. |
|
25 |
Advanced operations |
|
|
Using alternative power sources ...................... |
|
26 |
Changing the mode settings .............................. |
|
29 |
Recording with the date or time ........................ |
|
32 |
Selecting the START/STOP mode .................... |
|
33 |
Fade-in and fade-out ........................................... |
|
34 |
Enjoying picture effect ........................................ |
|
36 |
Using the wide mode function(CCD-TRV24E |
|
|
only) ................................................................... |
|
38 |
Focusing manually .............................................. |
|
40 |
Using the PROGRAM AE function ................... |
|
42 |
Shooting with backlighting ................................ |
|
44 |
Releasing the STEADY SHOT function(CCD- |
|
|
TRV24E only) ................................................... |
|
45 |
Superimposing a title .......................................... |
|
46 |
Making your own titles ....................................... |
|
48 |
Watching on a TV screen .................................... |
|
50 |
Editing onto another tape ................................... |
|
52 |
Additional information |
|
|
Changing the lithium battery |
|
|
in the camcorder .............................................. |
|
53 |
Resetting the date and time ................................ |
|
55 |
Playback modes ................................................... |
|
56 |
Tips for using the battery pack .......................... |
|
57 |
Maintenance information and precautions ...... |
61 |
|
Using your camcorder abroad ........................... |
|
67 |
Trouble check ....................................................... |
|
68 |
Specifications ........................................................ |
|
76 |
Identifying the parts ............................................ |
|
78 |
Warning indicators .............................................. |
|
87 |
Index ....................................................... |
back cover |
|
é „ Î ‡ ‚ Î Â Ì Ë Â
è ‰ ̇˜‡ÎÓÏ ‡·ÓÚ˚ |
|
|
|
|
|
аТФУО¸БУ‚‡МЛВ‰‡ММУ„У ЫНУ‚У‰ТЪ‚‡ ........... |
4 |
|
|
|
|
и У‚В Н‡ Ф ЛО‡„‡ВП˚х Ф ЛМ‡‰ОВКМУТЪВИ |
.. 6 |
|
|
|
|
èÓ‰„ÓÚӂ͇ Í Ì‡˜‡ÎÛ |
‡·ÓÚ˚ |
|
|
Before |
|
|
|
|
|||
|
|
|
|||
ᇠfl‰Í‡ Ë ÛÒÚ‡Ìӂ͇ ·‡Ú‡ ÂÈÌÓ„Ó ·ÎÓ͇ |
..... 7 |
|
|
||
|
|
|
|||
ÇÒÚ‡‚͇ ͇ÒÒÂÚ˚ ........................................... |
|
10 |
|
you |
|
éÒÌÓ‚Ì˚ ÓÔ ‡ˆËË |
|
|
|
|
|
|
|
|
|
|
|
á‡ÔËÒ¸ Ò ÔÓÏÓ˘¸˛ ‚ˉÂÓ͇Ï ˚. .............. |
11 |
|
begin |
|
|
аТФУО¸БУ‚‡МЛВ ЩЫМНˆЛЛ М‡ВБ‰‡ |
|
|
|
||
|
|
|
|
||
‚ˉÂÓ͇Ï ˚ .............................................. |
|
14 |
|
|
|
ë˙ÂÏ͇ Ò ÔÓÏÓ˘˛ ˝Í ‡Ì‡ ÜäÑ ............... |
16 |
|
|
|
|
ЗУБПУКМУТЪ¸ ‰Оfl ТМЛП‡ВПУ„У ˜ВОУ‚ВН‡ |
|
|
è |
|
|
̇·Î˛‰‡Ú¸ Ò˙ÂÏÍÛ |
|
17 |
|
|
|
|
|
‰ |
|
||
ëÓ‚ÂÚ˚ ‰Îfl ÎÛ˜¯ÂÈ Ò˙ÂÏÍË. ...................... |
18 |
|
|
||
è ӂ ͇ Á‡ÔËÒ‡ÌÌÓ„Ó ËÁÓ· ‡ÊÂÌËfl .......... |
20 |
|
̇˜‡ÎÓÏ |
|
|
ЗУТФ УЛБ‚В‰ВМЛВОВМЪ˚. ............................. 22 |
|
|
|||
|
|
|
|||
иУЛТН НУМˆ‡ ЛБУ· ‡КВМЛfl ........................... |
25 |
|
|
|
|
ìÒÓ‚Â ¯ÂÌÒÚ‚‚Ó‚‡ÌÌ˚ |
ÓÔ ‡ˆËË |
|
|
‡·Ó |
|
аТФУО¸БУ‚‡МЛВ ‡О¸ЪВ М‡ЪЛ‚М˚х |
|
|
˚ |
|
|
|
|
|
|
||
ËÒÚÓ˜ÌËÍÓ‚ ÔËÚ‡ÌËfl .................................. |
|
26 |
|
|
|
аБПВМВМЛВ ВКЛПМ˚х ЫТЪ‡МУ‚УН ................ |
29 |
|
|
|
|
б‡ФЛТ¸ Т ‰‡ЪУИ ЛОЛ ‚ ВПВМВП |
32 |
|
|
|
|
|
|
|
|||
Ç˚·Ó ÂÊËχ START/STOP ...................... |
33 |
|
|
|
|
ǂ‰ÂÌËÂ Ë ‚˚‚‰ÂÌË ËÁÓ· ‡ÊÂÌËfl ......... |
34 |
|
|
|
|
аТФУО¸БУ‚‡МЛВ ˝ЩЩВНЪУ‚ ЛБУ· ‡КВМЛfl |
... 36 |
|
|
|
|
аТФУО¸БУ‚‡МЛВ ЩЫМНˆЛЛ ¯Л УНУЩУ П‡Ъ- |
|
|
|
|
|
ÌÓ„Ó ÂÊËχ (ÚÓθÍÓ CCD-TRV24E) ......... |
38 |
|
|
|
|
оУНЫТЛ У‚Н‡ ‚ Ы˜МЫ˛ .................................. |
|
40 |
|
|
|
аТФУО¸БУ‚‡МЛВ ЩЫМНˆЛЛ PROGRAM AE .... |
42 |
|
|
|
|
л˙ВПН‡ Т Б‡‰МВИ ФУ‰Т‚ВЪНУИ ...................... |
44 |
|
|
|
|
ÇÍβ˜ÂÌË ÙÛÌ͈ËË STEADY SHOT |
|
|
|
|
|
(ÚÓθÍÓ CCD-TRV24E) |
.............................. |
45 |
|
|
|
з‡ОУКВМЛВ М‡‰ФЛТЛ ...................................... |
|
46 |
|
|
|
лУБ‰‡МЛВ З‡¯Лх ТУ·ТЪ‚ВММ˚х М‡‰ФЛТВИ |
.. 48 |
|
|
|
|
и УТПУЪ М‡ ˝Н ‡МВ ЪВОВ‚ЛБУ ‡ ............... |
50 |
|
|
|
|
еУМЪ‡К М‡ ‰ Ы„Ы˛ ОВМЪЫ ............................. |
52 |
|
|
|
|
СУФУОМЛЪВО¸М‡fl ЛМЩУ П‡ˆЛfl |
|
|
|
|
|
б‡ПВМ‡ ОЛЪЛВ‚УИ ·‡Ъ‡ ВИНЛ ‚ |
|
|
|
|
|
‚ˉÂÓ͇Ï  ............................................... |
|
53 |
|
|
|
мТЪ‡МУ‚Н‡ ‰‡Ъ˚ Л ‚ ВПВМЛ ......................... |
55 |
|
|
|
|
кВКЛП˚ ‚УТФ УЛБ‚В‰ВМЛfl .......................... |
56 |
|
|
|
|
лУ‚ВЪ˚ ФУ ЛТФУО¸БУ‚‡МЛ˛ ·‡Ъ‡ ВИМУ„У |
|
|
|
|
|
· Î Ó Í ‡ ............................................................ |
|
57 |
|
|
|
àÌÙÓ Ï‡ˆËfl ÔÓ ÛõÓ‰Û Á‡ ‡ÔÔ‡ ‡ÚÓÏ Ë |
|
|
|
|
|
ФВ‰УТЪУУКМУТЪЛ ..................................... |
|
61 |
|
|
|
аТФУО¸БУ‚‡МЛВ З‡¯ВИ ‚Л‰ВУН‡ПВ ˚ Б‡ |
|
|
|
|
|
Û·ÂÊÓÏ ....................................................... |
|
67 |
|
|
|
и У‚В Н‡МВЛТФ ‡‚МУТЪВИ |
........................... |
72 |
|
|
|
нВхМЛ˜ВТНЛВ х‡ ‡НЪВ ЛТЪЛНЛ ...................... |
77 |
|
|
|
|
йФУБМ‡‚‡МЛВ ‰ВЪ‡ОВИ .................................. |
|
78 |
|
|
|
è ‰ÛÔ Âʇ˛˘Ë Ë̉Ë͇ÚÓ ˚ ................... |
87 |
|
|
|
|
ì͇Á‡ÚÂθ ............................. |
ᇉÌflfl Ó·ÎÓÊ͇ |
|
|
||
3
CCD-TRV14E/TRV24E 3-859-266-12(1).E/R

Before you begin
Using this manual
The instructions in this manual are for the two models listed below. Before you start reading this manual and operating the unit, check your model number by looking at the bottom of your camcorder. The CCD-TRV24E is the model used for illustration purposes. Otherwise, the model name is indicated in the illustrations. Any differences in operation are clearly indicated in the text, for example, “CCD-TRV24E only”.
As you read through this manual, buttons and settings on the camcorder are shown in capital letters.
e.g. Set the POWER switch to CAMERA.
As indicated with ³ in the illustrations, you can hear the beep sound to confirm your operation.
Types of differences
CCD- |
Optical |
Digital |
Wide |
Steady |
|
zoom |
zoom |
mode |
Shot |
TRV14E |
15X |
– |
– |
– |
|
|
|
|
|
TRV24E |
15X |
180X |
r |
r |
|
|
|
|
|
è ‰ ̇˜‡ÎÓÏ ‡·Ó ˚
аТФУО¸БУ‚‡МЛВ ‰‡ММУ„У ЫНУ‚У‰ТЪ‚‡
аМТЪ ЫНˆЛЛ ‚ ‰‡ММУП ЫНУ‚У‰ТЪ‚В ЛБОУКВМ˚ ‰Оfl ‰‚Ых МЛКВФВ В˜ЛТОВММ˚х
ПУ‰ВОВИ. иВ В‰ ЪВП, Н‡Н З˚ М‡˜МВЪВ ˜ЛЪ‡Ъ¸ ‰‡ММУВ ЫНУ‚У‰ТЪ‚УЛ˝НТФОЫ‡ЪЛ У‚‡Ъ¸ ‡ФФ‡ ‡Ъ, Ф У‚В ¸ЪВ МУПВ З‡¯ВИ ПУ‰ВОЛ, ФУТПУЪ В‚ М‡ МЛКМ˛˛ Ф‡МВО¸ З‡¯ВИ ‚Л‰ВУН‡ПВ ˚. еУ‰ВО¸ CCD-TRV24E ЛТФУО¸БЫВЪТfl ‚ ЛОО˛ТЪ ‡ЪЛ‚М˚х ˆВОflх. З ЛМУП ТОЫ˜‡В М‡ЛПВМУ‚‡МЛВ ПУ‰ВОЛ ЫН‡Б˚‚‡ВЪТfl М‡ ЛТЫМН‡х. г˛·˚В ‡БОЛ˜Лfl ‚ ‡·УЪВ ˜ВЪНУ ЫН‡Б‡М˚ ‚ ЪВНТЪВ, Н‡Н
М‡Ф ЛПВ “нУО¸НУ CCD-TRV24E”. дУ„‰‡З˚·Ы‰ВЪВ˜ЛЪ‡Ъ¸ ЫНУ‚У‰ТЪ‚У, Ы˜ЛЪ˚‚‡ИЪВ, ˜ЪУ НМУФНЛ Л ЫТЪ‡МУ‚НЛ М‡ ‚Л‰ВУН‡ПВ В ФУН‡Б‡М˚ Б‡„О‡‚М˚ПЛ · Ы Н ‚ ‡ П Л .
Ф ЛП. мТЪ‡МУ‚ЛЪВ ‚˚НО˛˜‡ЪВО¸ POWER ‚ ФУОУКВМЛВ CAMERA.
ЦТОЛ М‡ ЛТЫМН‡х ЫН‡Б˚‚‡ВЪТfl БМ‡Н ³, З˚ ПУКВЪВ ТО˚¯‡Ъ¸ БЫППВ М˚И Б‚ЫНУ‚УИ ТЛ„М‡О ‰Оfl ФУ‰Ъ‚В К‰ВМЛfl З‡¯ВИ ‡·УЪ˚.
íËÔ˚ |
‡Á΢ËÈ |
|
|
|
|
|
|
|
|
CCD- |
éÔÚ˘Â- |
ñËÙ Ó‚ÓÈ |
тЛ УНУЩУ - |
мТЪУИ˜Л‚‡fl |
|
ÒÍËÈ Ú ‡ÌÒ- |
Ú ‡ÌÒÙÓ- |
Ï ‡ Ú Ì ˚ È |
Ò ˙ Â Ï Í ‡ |
|
ÙÓ͇ÚÓ |
͇ÚÓ |
ÂÊËÏ |
|
|
|
|
|
|
TRV14E |
15X |
– |
– |
– |
TRV24E |
15X |
180X |
r |
r |
Note on TV colour systems
TV colour systems differ from country to country. To view your recordings on a TV, you need a PAL system-based TV.
When you want to use a SECAM system-based TV, you will need a PAL/SECAM transcoder (as this is a PAL system based camcorder).
Precaution on copyright
Television programmes, films, video tapes, and other materials may be copyrighted. Unauthorized recording of such materials may be contrary to the provision of the copyright laws.
4
и ЛПВ˜‡МЛВ ФУ ТЛТЪВП‡П
ˆ‚ÂÚÌÓ„Ó ÚÂ΂ˉÂÌËfl
лЛТЪВП˚ ˆ‚ВЪМУ„У ЪВОВ‚Л‰ВМЛfl УЪОЛ˜‡˛ЪТfl ‚ Б‡‚ЛТЛПУТЪЛ УЪ ТЪ ‡М˚. СОfl Ф УТПУЪ ‡ З‡¯Лх Б‡ФЛТВИ ФУ ЪВОВ‚ЛБУ Ы, З‡П МВУ·хУ‰ЛПУ ЛТФУО¸БУ‚‡Ъ¸ ЪВОВ‚ЛБУ , УТМУ‚‡ММ˚И М‡ ТЛТЪВПВ PAL.
ЦТОЛ З˚ хУЪЛЪВ ЛТФУО¸БУ‚‡Ъ¸ ЪВОВ‚ЛБУ , УТМУ‚‡ММ˚И М‡ ТЛТЪВПВ SECAM, З‡П ФУМ‡‰У·ЛЪТflЪ ‡МТНУ‰В PAL/SECAM
(ФУТНУО¸НЫ ‰‡ММ‡fl ‚Л‰ВУН‡ПВ ‡ УТМУ‚‡М‡ М‡ ТЛТЪВПВ PAL).
и В‰УТЪВ ВКВМЛВУ·‡‚ЪУ ТНУП
Ô ‡‚Â
нВОВ‚ЛБЛУММ˚В Ф У„ ‡ПП˚, НЛМУЩЛО¸П˚, ‚Л‰ВУОВМЪ˚ Л ‰ Ы„ЛВ П‡ЪВ Л‡О˚ ПУ„ЫЪ ·˚Ъ¸ Б‡˘Л˘ВМ˚ ‡‚ЪУ ТНЛП Ф ‡‚УП.
зВФ ‡‚УПУ˜М‡fl Б‡ФЛТ¸ Ъ‡НЛх П‡ЪВ Л‡ОУ‚ ПУКВЪ Ф УЪЛ‚У В˜ЛЪ¸ ЫТОУ‚ЛflП Б‡НУМ‡ У· ‡‚ЪУ ТНУП Ф ‡‚В.
CCD-TRV14E/TRV24E 3-859-266-12(1).E/R

Using this manual
Precautions on camcorder care
•The LCD screen and/or colour viewfinder are manufactured using high-precision technology. However, there may be some tiny black points and/or bright points (red, blue or green in colour) that constantly appear in the viewfinder or on the LCD screen. These points are normal in the manufacturing process and do not affect the recorded picture in any way. Over 99.99% are operational for effective use.
•Do not let the camcorder get wet. Keep the camcorder away from rain and sea water. It may cause a malfunction and sometimes the malfunction cannot be repaired. [a]
•Never leave the camcorder under temperatures above 60 °C (140° F), such as in a car parked in the sun or under direct sunlight. [b]
аТФУО¸БУ‚‡МЛВ ‰‡ММУ„У ЫНУ‚У‰ТЪ‚‡
и В‰УТЪУ УКМУТЪЛФУЫхУ‰ЫБ‡
‚ˉÂÓ͇Ï ÓÈ
•щН ‡М Т ЬдС Л/ЛОЛ ˆ‚ВЪМУИ ‚Л‰УЛТН‡ЪВО¸ ‚˚ФУОМВМ˚ Т
ÔЛПВМВМЛВП ‚˚ТУНУФ ВˆЛБЛУММУИ ЪВхМУОУ„ЛЛ. й‰М‡НУ ‚ ‚Л‰УЛТН‡ЪВОВ ЛОЛ М‡ ˝Н ‡МВ Т ЬдС ПУ„ЫЪ ФУfl‚ОflЪ¸Тfl У˜ВМ¸ П‡ОВМ¸НЛВ ˜В М˚В Л/ЛОЛ fl НЛВ ЪУ˜НЛ (Н ‡ТМ˚В, ТЛМЛВ ЛОЛ БВОВМ˚В ФУ ˆ‚ВЪЫ). щЪЛ ЪУ˜НЛ fl‚Оfl˛ЪТfl МУ П‡О¸М˚ПЛ ‰Оfl ‡·У˜В„У Ф УˆВТТ‡ Л МВ ‚ОЛfl˛Ъ М‡ Б‡ФЛТ˚‚‡ВПУВ
ЛБУ· ‡КВМЛВ. 99,99% ФУОfl ˝Н ‡М‡
ÔВ‰М‡БМ‡˜ВМУ ‰Оfl ˝ЩЩВНЪЛ‚МУ„У ЛТФУО¸БУ‚‡МЛfl.
•зВ ‰УФЫТН‡ИЪВ, ˜ЪУ·˚ ‚Л‰ВУН‡ПВ ‡ ТЪ‡МУ‚ЛО‡Т¸ ПУН УИ. СВ КЛЪВ ‚Л‰ВУН‡ПВ ЫФУ‰‡О¸¯ВУЪ‰УК‰flЛ ПУ ТНУИ ‚У‰˚. щЪУ ПУКВЪ Ф Л‚ВТЪЛ Н МВЛТФ ‡‚МУТЪЛ‡ФФ‡ ‡Ъ‡,НУЪУ ‡flМВ ‚ТВ„‰‡ ПУКВЪ ·˚Ъ¸ ЛТФ ‡‚ОВМ‡. [a]
•зЛНУ„‰‡ МВ УТЪ‡‚ОflИЪВ ‚Л‰ВУН‡ПВ Ы ‚ ПВТЪВ Т ЪВПФВ ‡ЪЫ УИ Т‚˚¯В 60°л (140°F), Н‡Н М‡Ф ЛПВ , ‚ ‡‚ЪУПУ·ЛОВ, УТЪ‡МУ‚ОВММУП М‡ ТУОМˆВ ЛОЛ ФУ‰
ÔflП˚ПЛ ТУОМВ˜М˚ПЛ ОЫ˜‡ПЛ. [b]
˚ ‡·Ó ̇˜‡ÎÓÏ Â‰ è begin you Before
[a] |
[b] |
5
CCD-TRV14E/TRV24E 3-859-266-12(1).E/R

Checking supplied |
è ӂ ͇ Ô Ë·„‡ÂÏ˚õ |
|
accessories |
|
Ф ЛМ‡‰ОВКМУТЪВИ |
Check that the following accessories are |
è Ó‚Â ¸Ú ̇΢ˠÒÎÂ‰Û˛˘Ëõ |
|
supplied with your camcorder. |
|
Ф ЛМ‡‰ОВКМУТЪВИ, Ф ЛО‡„‡ВП˚х Н З‡¯ВИ |
|
|
‚ˉÂÓ͇Ï Â. |
1 |
2 |
3 |
4 |
5 |
6 |
7 |
|
|
1Wireless Remote Commander (1) (p. 23, 82)
2 NP-33 Battery Pack (1) (p. 7)
3CR2025 Lithium Battery (1) (p. 53)
Already installed in the camcorder.
4 A/V connecting cable (1) (p. 50)
5R6 (size AA) battery for Remote Commander (2) (p. 83)
6 Shoulder strap (1) (p. 81)
7AC-V16/V16A/V17/V17A AC power adaptor (1) (p. 7, 27)
Contents of the recording cannot be compensated if recording or playback is not made due to a malfunction of the camcorder, video tape, etc.
1ЕВТФ У‚У‰М˚И ФЫО¸Ъ ‰ЛТЪ‡МˆЛУММУ„У ЫФ ‡‚ОВМЛfl (1) (ТЪ . 23, 82)
2 Ňڇ ÂÈÌ˚È ·ÎÓÍ NP-33(1) (ÒÚ . 7)
3гЛЪЛВ‚‡fl ·‡Ъ‡ ВИН‡ CR2025 (1) (ТЪ . 53) мКВ ЫТЪ‡МУ‚ОВМ‡ ‚ ‚Л‰ВУН‡ПВ В.
4лУВ‰ЛМЛЪВО¸М˚И Н‡·ВО¸ ‡Ы‰ЛУ/‚Л‰ВУ
(1)(ÒÚ .50)
5Е‡Ъ‡ ВИН‡ R6 ( ‡БПВ УП ДД) ‰Оfl ФЫО¸Ъ‡ ‰ЛТЪ‡МˆЛУММУ„У ЫФ ‡‚ОВМЛfl (2) (ТЪ . 83)
6 иОВ˜В‚УИ ФВПВМ¸ (1) (ТЪ . 81)
7ëÂÚ‚ÓÈ ‡‰‡ÔÚ Ô ÂÏ. ÚÓ͇ AC-V16/
V16A/V17/V17A (1) (ÒÚ . 7, 27)
лУ‰В КЛПУВ Б‡ФЛТЛ МВ ПУКВЪ ·˚Ъ¸ УЪНУ ВНЪЛ У‚‡МУ,ВТОЛБ‡ФЛТ¸ЛОЛ ‚УТФ УЛБ‚В‰ВМЛВ МВ ‚˚ФУОМfl˛ЪТfl ЛБ-Б‡
МВЛТФ ‡‚МУТЪЛ ‚Л‰ВУН‡ПВ ˚, ‚Л‰ВУОВМЪ˚ ЛЪ.‰.
6
CCD-TRV14E/TRV24E 3-859-266-12(1).E/R
|
|
|
|
|
|
|
|
Getting started |
|
|
èÓ‰„ÓÚӂ͇ Í Ì‡˜‡ÎÛ ‡·ÓÚ˚ |
|
|
|
Charging and installing |
ᇠfl‰Í‡ Ë ÛÒÚ‡Ìӂ͇ |
||||
the battery pack |
·‡Ú‡ ÂÈÌÓ„Ó ·ÎÓ͇ |
|||||
Before using your camcorder, you first need to |
è ‰ ÔÓθÁÓ‚‡ÌËÂÏ Ç‡¯ÂÈ ‚ˉÂÓ͇Ï ÓÈ |
|||||
charge and install the battery pack. To charge |
Ç‡Ï ÒΉÛÂÚ Ò̇˜‡Î‡ Á‡ fl‰ËÚ¸ Ë ÛÒÚ‡ÌÓ‚ËÚ¸ |
|||||
·‡Ú‡ ÂÈÌ˚È ·ÎÓÍ. ÑÎfl Á‡ fl‰ÍË ·‡Ú‡ ÂÈÌÓ„Ó |
||||||
the battery pack, use the supplied AC power |
||||||
·ОУН‡ ‚УТФУО¸БЫИЪВТ¸ Ф ЛО‡„‡ВП˚П |
||||||
adaptor. |
||||||
ÒÂÚ‚˚Ï ‡‰‡ÔÚ ÓÏ Ô ÂÏ. ÚÓ͇. |
||||||
|
|
|
||||
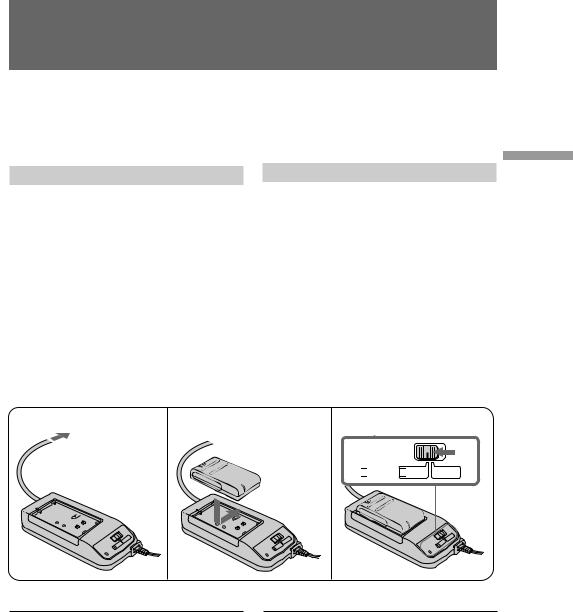
Charging the battery pack
Charge the battery pack on a flat place without vibration.
(1)Connect the AC power adaptor to the mains.
(2)Align the right side of the battery pack with the line on the AC power adaptor, then slide the battery pack in the direction of the arrow.
(3)Set the selector to CHARGE. The CHARGE lamp (orange) lights up. Charging begins.
When charging is completed, the CHARGE lamp goes out. Unplug the unit from the mains, and then remove the battery pack and install it on the camcorder.
ᇠfl‰Í‡ ·‡Ú‡ ÂÈÌÓ„Ó ·ÎÓ͇
б‡ fl‰НЫ·‡Ъ‡ ВИМУ„У·ОУН‡Ф УЛБ‚У‰ЛЪВМ‡ У‚МУИФУ‚В хМУТЪЛ,МВФУ‰‚В КВММУИ ‚Л· ‡ˆЛЛ.
(1)иУ‰ТУВ‰ЛМЛЪВТВЪВ‚УИ¯МЫ‡‰‡ФЪВ ‡ ФВ ВП. ЪУН‡ Н ˝ОВНЪ Л˜ВТНУИ ТВЪЛ.
(2)мТЪ‡МУ‚ЛЪВФ ‡‚Ы˛ТЪУ УМЫ·‡Ъ‡ ВИМУ„У ·ОУН‡ М‡ У‰МУИ ОЛМЛЛ Т ТВЪВ‚˚П ‡‰‡ФЪВ УПФВ ВП.ЪУН‡,Б‡ЪВП ФВ В‰‚ЛМ¸ЪВ ·‡Ъ‡ ВИМ˚И ·ОУН ‚ М‡Ф ‡‚ОВМЛЛ ТЪ ВОНЛ.
(3)мТЪ‡МУ‚ЛЪВ ТВОВНЪУ ‚ ФУОУКВМЛВ CHARGE. б‡„У ЛЪТfl О‡ПФУ˜Н‡ CHARGE (У ‡МКВ‚‡fl). з‡˜МВЪТfl Б‡ fl‰Н‡.
дУ„‰‡ Б‡ fl‰Н‡ Б‡‚В ¯ЛЪТfl, О‡ПФУ˜Н‡ CHARGE ФУ„‡ТМВЪ. йЪНО˛˜ЛЪВ ‡ФФ‡ ‡Ъ УЪ ˝ОВНЪ Л˜ВТНУИ ТВЪЛ, ‡ Б‡ЪВП ТМЛПЛЪВ ·‡Ъ‡ ВИМ˚И ·ОУН Л ЫТЪ‡МУ‚ЛЪВ В„У М‡ ‚Л‰ВУН‡ПВ Ы.
‡·ÓÚ˚ ̇˜‡ÎÛ Í èÓ‰„ÓÚӂ͇ started Getting
1 |
2 |
3 |

 POWER
POWER 
 CHARGE
Charging Time (in minutes)
Battery pack |
Charging time* |
NP-33 (supplied) |
60 |
|
|
NP-55H |
85 |
|
|
NP-C65/67 |
105 |
|
|
NP-66 |
95 |
|
|
NP-77H |
170 |
|
|
NP-98 |
215 |
|
|
*Approximate minutes to charge an empty battery pack using the supplied AC power adaptor (Lower temperatures require a longer charging time.)
З ВПfl Б‡ fl‰НЛ (‚ ПЛМЫЪ‡х)
Ňڇ ÂÈÌ˚È ·ÎÓÍ |
Ç ÂÏfl Á‡ fl‰ÍË* |
NP-33(Ô Ë·„‡ÂÚÒfl) |
60 |
NP-55H |
85 |
NP-C65/67 |
105 |
NP-66 |
95 |
NP-77H |
170 |
NP-98 |
215 |
*и Л·ОЛБЛЪВО¸МУ ‚ ПЛМЫЪ‡х ‰Оfl Б‡ fl‰НЛ ‡Б flКВММУ„У ·‡Ъ‡ ВИМУ„У ·ОУН‡ Т
ЛТФУО¸БУ‚‡МЛВПФ ЛО‡„‡ВПУ„УТВЪВ‚У„У |
|
‡‰‡ФЪВ ‡ФВ ВП.ЪУН‡.(и ЛМЛБНЛх |
7 |
ЪВПФВ ‡ЪЫ ‡х‚ ВПflБ‡ fl‰НЛЫ‰ОЛМflВЪТfl.) |
CCD-TRV14E/TRV24E 3-859-266-12(1).E/R

Charging and installing the battery pack
Battery life (in minutes)
CCD-TRV14E
Battery pack |
While recording1) |
While |
|
||||
|
|
|
|
playing |
|
||
|
LCD open2) |
LCD close |
back on |
|
|||
|
|
|
|
|
LCD3) |
|
|
NP-33 (supplied) |
80 (45) |
100 (55) |
75 |
|
|
||
|
|
|
|
|
|
|
|
NP-55H |
95 |
(50) |
120 |
(65) |
90 |
|
|
|
|
|
|
|
|
|
|
NP-C65/67 |
135 |
(75) |
175 |
(95) |
130 |
|
|
NP-66 |
130 |
(70) |
165 (90) |
120 |
|
|
|
NP-77H |
205 |
(110) |
255 |
(130) |
200 |
|
|
|
|
|
|
|
|
|
|
NP-98 |
265 |
(145) |
330 |
(180) |
255 |
|
|
|
|
|
|
|
|
|
|
CCD-TRV24E |
|
|
|
|
|
|
|
|
|
|
|
|
|||
|
While recording1) |
While |
|
||||
Battery pack |
|
|
|
|
playing |
|
|
LCD open2) |
LCD close |
|
|||||
|
back on |
|
|||||
|
|
|
|
|
LCD3) |
|
|
NP-33 (supplied) |
70 (40) |
95 (50) |
75 |
|
|
||
|
|
|
|
|
|
|
|
NP-55H |
90 |
(50) |
115 |
(65) |
90 |
|
|
|
|
|
|
|
|
|
|
NP-C65/67 |
125 |
(70) |
160 |
(90) |
130 |
|
|
|
|
|
|
|
|
|
|
NP-66 |
120 |
(65) |
155 (85) |
120 |
|
|
|
|
|
|
|
|
|
|
|
NP-77H |
195 |
(110) |
240 |
(130) |
200 |
|
|
|
|
|
|
|
|
|
|
NP-98 |
240 |
(130) |
315 |
(175) |
255 |
|
|
1)Approximate continuous recording time indoors. Figures in parentheses are approximate recording time when you repeat recording start/stop, zooming and turning the power on/off.
The actual battery life may be shorter.
2)Approximate recording time when using the LCD screen. When using both the viewfinder and LCD screen, the battery life is shorter.
3)Approximate continuous playback time indoors.
If you are recording or playing using the LCD screen with LCD B.L. set to BRIGHT in the menu system, the battery life is approximately 10% shorter.
To remove the battery pack
Slide the battery pack in the direction of the arrow.
8
ᇠfl‰Í‡ Ë ÛÒÚ‡Ìӂ͇ ·‡Ú‡ ÂÈÌÓ„Ó ·ÎÓ͇
л УН ТОЫК·˚ ·‡Ъ‡ ВИМУ„У ·ОУН‡ (‚ ПЛМЫЪ‡х)
CCD-TRV14E
Ňڇ ÂÈÌ˚È |
ÇÓ ‚ ÂÏfl Á‡ÔËÒË 1) |
ÇÓ ‚ ÂÏfl |
|
|||||
· Î Ó Í |
|
|
|
|
|
‚УТФУЛБ- |
|
|
|
ÜäÑ |
ÓÚ ˚Ú2) |
Ü ä Ñ |
Á ‡ Í ˚ Ú |
‚‰ÂÌËfl |
|
||
|
̇ ÜäÑ3) |
|
||||||
|
|
|
|
|
|
|
|
|
NP-33(Ô Ë·„‡ÂÚÒfl) |
80 |
(45) |
100 |
(55) |
75 |
|
|
|
|
|
|
|
|
|
|
|
|
NP-55H |
95 |
(50) |
120 |
(65) |
90 |
|
|
|
|
|
|
|
|
|
|
|
|
NP-C65/67 |
135 |
(75) |
175 |
(95) |
130 |
|
|
|
|
|
|
|
|
|
|
|
|
NP-66 |
130 |
(70) |
165 |
(90) |
120 |
|
|
|
|
|
|
|
|
|
|
|
|
NP-77H |
205 |
(110) |
255 (130) |
200 |
|
|
||
|
|
|
|
|
|
|
|
|
NP-98 |
265 |
(145) |
330 (180) |
255 |
|
|
||
|
|
|
|
|
|
|
|
|
CCD-TRV24E |
|
|
|
|
|
|
|
|
|
|
|
|
|
||||
Ňڇ ÂÈÌ˚È |
ÇÓ ‚ ÂÏfl Á‡ÔËÒË 1) |
ÇÓ ‚ ÂÏfl |
|
|||||
· Î Ó Í |
|
|
|
|
|
‚УТФУЛБ- |
|
|
|
ÜäÑ |
2) |
Ü ä Ñ |
Á ‡ Í ˚ Ú |
‚‰ÂÌËfl |
|
||
|
|
ÓÚ ˚Ú |
̇ ÜäÑ3) |
|
||||
|
|
|
|
|
|
|
|
|
NP-33(Ô Ë·„‡ÂÚÒfl) |
70 |
(40) |
95 |
(50) |
75 |
|
|
|
|
|
|
|
|
|
|
|
|
NP-55H |
90 |
(50) |
115 |
(65) |
90 |
|
|
|
|
|
|
|
|
|
|
|
|
NP-C65/67 |
125 |
(70) |
160 |
(90) |
130 |
|
|
|
|
|
|
|
|
|
|
|
|
NP-66 |
120 |
(65) |
155 |
(85) |
120 |
|
|
|
|
|
|
|
|
|
|
|
|
NP-77H |
195 |
(110) |
240 (130) |
200 |
|
|
||
|
|
|
|
|
|
|
|
|
NP-98 |
240 |
(130) |
315 (175) |
255 |
|
|
||
|
|
|
|
|
|
|
|
|
1)и Л·ОЛБЛЪВО¸МУВ ‚ ВПfl МВФ В ˚‚МУИ Б‡ФЛТЛ ‚МЫЪ Л ФУПВ˘ВМЛfl. уЛТО‡ ‚ Н Ы„О˚х ТНУ·Н‡х УБМ‡˜‡˛Ъ Ф Л·ОЛБЛЪВО¸МУВ ‚ ВПfl Б‡ФЛТЛ‚ ВКЛПВФУТЪУflММУ„У ЛТФУО¸БУ‚‡МЛfl ЩЫМНˆЛИ ФЫТН‡/УТЪ‡МУ‚НЛ, Ъ ‡МТЩУН‡ˆЛЛ Л ‚НО˛˜ВМЛfl/‚˚НО˛˜ВМЛfl ФЛЪ‡МЛfl.
кВ‡О¸М˚И Т УН ТОЫК·˚ ·‡Ъ‡ ВИМУ„У ·ОУН‡ ПУКВЪ ·˚Ъ¸ НУ У˜В.
2)и Л·ОЛБЛЪВО¸МУВ ‚ ВПfl ‚ ПЛМЫЪ‡х Ф Л ЛТФУО¸БУ‚‡МЛЛ ˝Н ‡М‡ ЬдС. и Л ЛТФУО¸БУ‚‡МЛЛ Л ‚Л‰УЛТН‡ЪВОfl Л ˝Н ‡М‡ ЬдС Т УН ТОЫК·˚ ·‡Ъ‡ ВЛ ·Ы‰ВЪ НУ У˜В.
3)и Л·ОЛБЛЪВО¸МУВ ‚ ВПfl МВФ В ˚‚МУ„У
‚ÓÒÔ ÓËÁ‚‰ÂÌËfl ‚ ÔÓÏ¢ÂÌËË.
ЦТОЛ З˚ ‚˚ФУОМflВЪВ Б‡ФЛТ¸ ЛОЛ ‚УТФ УЛБ‚В‰ВМЛВ, ЛТФУО¸БЫfl ˝Н ‡М Т ЬдС,
НУ„‰‡ LCD B.L. ‚ ТЛТЪВПВ ПВМ˛ ЫТЪ‡МУ‚ОВМУ ‚ ФУОУКВМЛВ BRIGHT, Т УН ТОЫК·˚
·‡Ú‡ ÂÈÌÓ„Ó ·ÎÓ͇ ·Û‰ÂÚ Ô ËÏ ÌÓ Ì‡ 10% ÍÓ Ó˜Â.
ÑÎfl ÒÌflÚËfl ·‡Ú‡ ÂÈÌÓ„Ó ·ÎÓ͇
иВ В‰‚ЛМ¸ЪВ ·‡Ъ‡ ВИМ˚И ·ОУН ‚ М‡Ф ‡‚ОВМЛЛ ТЪ ВОНЛ.
CCD-TRV14E/TRV24E 3-859-266-12(1).E/R
Charging and installing the battery pack
Notes on charging the battery pack
•The POWER lamp will remain lit for a while even if the battery pack is removed and the mains lead is unplugged after charging the battery pack. This is normal.
•If the POWER lamp does not light, set the selector to VTR (DC OUT) and disconnect the mains lead. After about one minute, reconnect the mains lead and set the selector to CHARGE again.
•You cannot operate the camcorder using the AC power adaptor while charging the battery pack.
ᇠfl‰Í‡ Ë ÛÒÚ‡Ìӂ͇ ·‡Ú‡ ÂÈÌÓ„Ó ·ÎÓ͇
è ËϘ‡ÌËfl ÔÓ Á‡ fl‰Í ·‡Ú‡ ÂÈÌÓ„Ó ·ÎÓ͇
•г‡ПФУ˜Н‡ POWER ·Ы‰ВЪ МВНУЪУ УВ ‚ ВПfl Т‚ВЪЛЪ¸Тfl, ‰‡КВ ВТОЛ ·‡Ъ‡ ВИМ˚И ·ОУН ТМflЪ Л ТВЪВ‚УИ Ф У‚У‰ УЪНО˛˜ВМ ФУТОВ Б‡ fl‰НЛ ·‡Ъ‡ ВИМУ„У ·ОУН‡. щЪУ fl‚ОflВЪТfl М У П ‡ О ¸ М ˚ П .
•ЦТОЛ О‡ПФУ˜Н‡ POWER МВ Б‡„У ‡ВЪТfl, ЫТЪ‡МУ‚ЛЪВ ТВОВНЪУ ‚ ФУОУКВМЛВ VTR (DC OUT)ЛУЪТУВ‰ЛМЛЪВТВЪВ‚УИФ У‚У‰.
и ЛПВ МУ ˜В ВБ ПЛМЫЪЫ ‚МУ‚¸ ФУ‰ТУВ‰ЛМЛЪВТВЪВ‚УИФУ‚У‰ЛУФflЪ¸ ЫТЪ‡МУ‚ЛЪВ ТВОВНЪУ ‚ ФУОУКВМЛВ CHARGE.
•З˚ МВ ПУКВЪВ ЫФ ‡‚ОflЪ¸ ‚Л‰ВУН‡ПВ УИ Т ЛТФУО¸БУ‚‡МЛВПТВЪВ‚У„У‡‰‡ФЪВ ‡ФВ ВП. ЪУН‡ ‚У ‚ ВПfl Б‡ fl‰НЛ ·‡Ъ‡ ВИМУ„У ·ОУН‡.
Installing the battery pack
(1)Insert the top of the battery pack into the top of the battery mounting surface.
(2)Push the battery pack. Make sure that you hear clicks twice.
Attach the battery pack to the camcorder securely.
ìÒÚ‡Ìӂ͇ ·‡Ú‡ ÂÈÌÓ„Ó ·ÎÓ͇
(1)ЗТЪ‡‚¸ЪВ ‚В хМЛИ НУМВˆ ·‡Ъ‡ ВИМУ„У ·ОУН‡ ‚ ‚В хМ˛˛ ˜‡ТЪ¸ ·‡Ъ‡ ВИМУИ ЫТЪ‡МУ‚У˜МУИФУ‚В хМУТЪЛ.
(2)з‡КПЛЪВ М‡ ·‡Ъ‡ ВИМ˚И ·ОУН. м·В‰ЛЪВТ¸, ˜ЪУ·˚ З˚ ЫТО˚¯‡ОЛ ‰‚‡К‰˚ ˘ВО˜УН.
и ЛН ВФЛЪВ М‡‰ВКМУ ·‡Ъ‡ ВИМ˚И ·ОУН Н ‚Л‰ВУН‡ПВ В.
1 
2
Note on the battery pack |
и ЛПВ˜‡МЛВ УЪМУТЛЪВО¸МУ ·‡Ъ‡ ВИМУ„У |
Do not carry the camcorder by grasping the |
· Î Ó Í ‡ |
battery pack. |
зВФВ ВМУТЛЪВ‚Л‰ВУН‡ПВ ЫФЫЪВПБ‡х‚‡Ъ‡ |
|
 Á‡ ·‡Ú‡ ÂÈÌ˚È ·ÎÓÍ. |
To remove the battery pack
Slide BATT, and then pull the lower part of the battery pack.
ÑÎfl ÒÌflÚËfl ·‡Ú‡ ÂÈÌÓ„Ó ·ÎÓ͇
뉂Ë̸Ú BATT, ‡ Á‡ÚÂÏ ÔÓÚflÌËÚ Á‡ ÌËÊÌ˛˛ ˜‡ÒÚ¸ ·‡Ú‡ ÂÈÌÓ„Ó ·ÎÓ͇.
2
‡·ÓÚ˚ ̇˜‡ÎÛ Í èÓ‰„ÓÚӂ͇ started Getting
You can look at the demonstration of the functions available with this camcorder. (p. 31)
1
З˚ ПУКВЪВ ‚Б„ОflМЫЪ¸ М‡ ‰ВПУМТЪ ‡ˆЛ˛ |
|
ÙÛÌ͈ËÈ, Ëϲ˘ËõÒfl ‰Îfl ‰‡ÌÌÓÈ |
9 |
‚ˉÂÓ͇Ï ˚. (ÒÚ . 31) |
CCD-TRV14E/TRV24E 3-859-266-12(1).E/R

Inserting a cassette
Make sure that a power source is installed.
(1)While pressing the small blue button, slide EJECT in the direction of the arrow. The cassette compartment automatically opens.
(2)Insert a cassette (not supplied) with the window facing out.
(3)Press the PUSH mark on the cassette compartment to close it. The cassette compartment automatically closes.
ÇÒÚ‡‚͇ ͇ÒÒÂÚ˚
ì·Â‰ËÚÂÒ¸, ˜ÚÓ ËÒÚÓ˜ÌËÍ ÔËÚ‡ÌËfl ÛÒÚ‡ÌÓ‚ÎÂÌ.
(1)з‡КЛП‡fl П‡ОВМ¸НЫЫ˛ ТЛМ˛˛ НМУФНЫ, Т‰‚ЛМ¸ЪВ EJECT ‚ М‡Ф ‡‚ОВМЛЛ ТЪ ВОНЛ. йЪТВН Н‡ТТВЪ˚ ‡‚ЪУП‡ЪЛ˜ВТНЛ УЪН ˚‚‡ВЪТfl.
(2)ЗТЪ‡‚¸ЪВН‡ТТВЪЫ(МВФ ЛО‡„‡ВЪТfl) УНУ¯НУП, У· ‡˘ВММ˚П М‡ ЫКЫ.
(3)з‡КПЛЪВ ПВЪНЫ PUSH М‡ УЪТВНВ Н‡ТТВЪ˚ ‰Оfl В„У Б‡Н ˚ЪЛfl. йЪТВН Н‡ТТВЪ˚ ‡‚ЪУП‡ЪЛ˜ВТНЛ Б‡Н ˚‚‡ВЪТfl.
1 |
2 |
3 |
|
EJECT |
PUSH |
To eject the cassette
While pressing the small blue button, slide EJECT in the direction of the arrow.
To prevent accidental erasure
Slide the tab on the cassette to expose the red mark.
If you insert the cassette with the red mark exposed and close the cassette compartment, the beeps sound for a while. If you try to record with the red mark exposed, the ÿ and 6 indicators flash, and you cannot record.
To re-record on this tape, slide the tab back out covering the red mark.
ÑÎfl ‚˚Ú‡ÎÍË‚‡ÌËfl ͇ÒÒÂÚ˚
з‡КЛП‡fl П‡ОВМ¸НЫ˛ ТЛМ˛˛ НМУФНЫ, Т‰‚ЛМ¸ЪВ EJECT ‚ М‡Ф ‡‚ОВМЛЛ ТЪ ВОНЛ.
ÑÎfl Ô Â‰ÓÚ‚ ‡˘ÂÌËfl ÒÎÛ˜‡ÈÌÓ„Ó ÒÚË ‡ÌËfl
иВ В‰‚ЛМ¸ЪВ ОВФВТЪУН М‡ Н‡ТТВЪВ, ˜ЪУ·˚ ФУfl‚ЛО‡Т¸ Н ‡ТМ‡fl ПВЪН‡.
ЦТОЛЗ˚‚ТЪ‡‚ЛЪВН‡ТТВЪЫФ Л ‚˚ТЪ‡‚ОВММУИ Н ‡ТМУИ ПВЪНВ Л Б‡Н УВЪВ УЪТВН Н‡ТТВЪ˚, ЪУ Б‡Б‚Ы˜ЛЪ БЫППВ М˚И
ТЛ„М‡О. ЦТОЛ З˚ ФУФ˚Ъ‡ВЪВТ¸ Б‡ФЛТ˚‚‡Ъ¸ Ф Л ‚˚ТЪ‡‚ОВММУИ Н ‡ТМУИ ПВЪНВ, ·Ы‰ЫЪ ПЛ„‡Ъ¸ ЛМ‰ЛН‡ЪУ ˚ ÿ Л 6, Л З˚ МВ ТПУКВЪВФ ЛБ‚ВТЪЛБ‡ФЛТ¸.
СОfl ФВ ВБ‡ФЛТЛ М‡ ‰‡ММЫ˛ ОВМЪЫ ФВ В‰‚ЛМ¸ЪВ ОВФВТЪУН М‡Б‡‰, ˜ЪУ·˚ Б‡Н ˚Ъ¸ Н ‡ТМЫ˛ ПВЪНЫ.
10
CCD-TRV14E/TRV24E 3-859-266-12(1).E/R
Basic operations
Camera recording
Make sure that a power source and a cassette is inserted and that the START/STOP MODE switch inside the LCD panel is set to  . When you use the camcorder for the first time, power on it and reset the date and time to your time (p. 55) before you start recording. The date is automatically recorded for 10 seconds after you start recording (AUTO DATE feature). This feature works only once a day.
Before you record one-time events, you may want to make a trial recording to make sure that you are using the camcorder correctly.
(1)While pressing the small green button on the POWER switch, set it to CAMERA.
(2)Turn STANDBY up. The “STBY” indicator appears in the viewfinder.
(3)Press START/STOP. The camcorder starts recording and the “STBY” indicator changes to the “REC” indicator.
You can also select Recording mode, SP (standard play) mode or LP (long play) mode. Set REC MODE in the menu system according to the length of your planned recording before you start.
éÒÌÓ‚Ì˚ ÓÔ ‡ˆËË
á‡ÔËÒ¸ Ò ÔÓÏÓ˘¸˛ ‚ˉÂÓ͇Ï ˚
ì·Â‰ËÚ¸Òfl, ËÒÚÓ˜ÌËÍ ÔËÚ‡ÌËfl Ë Í‡ÒÒÂÚ‡ ‚ÒÚ‡‚ÎÂÌ˚ Ë, ˜ÚÓ Ô ÂÍβ˜‡ÚÂθ START/ STOP MODE ̇ Ô‡ÌÂÎË ÜäÑ ÛÒÚ‡ÌÓ‚ÎÂÌ Ì‡
.
ЦТОЛ З˚ ЛТФУО¸БЫВЪВ ‚Л‰ВУН‡ПВ Ы ‚ ФВ ‚˚И ‡Б, ЪУ ‚НО˛˜ЛЪВ ВВ ФЛЪ‡МЛВ Л ЫТЪ‡МУ‚ЛЪВ ‰‡ЪЫ Л ‚ ВПfl М‡ З‡¯В ‚ ВПfl
(ТЪ . 55) ФВ В‰ ЪВП, Н‡Н З˚ М‡˜МВЪВ Б‡ФЛТ¸. С‡Ъ‡ ‡‚ЪУП‡ЪЛ˜ВТНЛ ·Ы‰ВЪ Б‡ФЛТ˚‚‡Ъ¸Тfl ‚ ЪВ˜ВМЛВ 10 ТВНЫМ‰ ФУТОВ М‡˜‡О‡ Б‡ФЛТЛ (ЩЫМНˆЛfl AUTO DATE). щЪ‡ ЩЫМНˆЛfl ‡·УЪ‡ВЪ ЪУО¸НУ У‰ЛМ ‡Б ‚ ‰ВМ¸.
иВ В‰ ЪВП, Н‡Н З˚ М‡˜МВЪВ Б‡ФЛТ¸ У‰МУ ‡БУ‚˚х ТУ·˚ЪЛИ, З˚ ПУКВЪВ Б‡хУЪВЪ¸
Т‰ВО‡Ъ¸Ф У·Ы‰ОflФУ‰Ъ‚В К‰ВМЛfl,˜ЪУЗ˚ ЛТФУО¸БЫВЪВ‚Л‰ВУН‡ПВ ЫФ ‡‚ЛО¸МУ.
(1)з‡КЛП‡fl П‡ОВМ¸НЫ˛ БВОВМЫ˛ НМУФНЫ М‡ ‚˚НО˛˜‡ЪВОВ POWER, ЫТЪ‡МУ‚ЛЪВ В„У ‚ ФУОУКВМЛВ CAMERA.
(2)èÓ‚Â ÌËÚ STANDBY ‚‚ õ: à̉Ë͇ÚÓ “STBY” ÔÓfl‚ËÚÒfl ‚ ‚ˉÓËÒ͇ÚÂÎÂ.
(3)з‡КПЛЪВ START/STOP. ЗЛ‰ВУН‡ПВ ‡ М‡˜ЛМ‡ВЪ Б‡ФЛТ¸, Л ЛМ‰ЛН‡ЪУ “STBY” ЛБПВМЛЪТfl М‡ ЛМ‰ЛН‡ЪУ “REC”.
З˚ Ъ‡НКВ ПУКВЪВ ‚˚· ‡Ъ¸ ВКЛП Б‡ФЛТЛ, ВКЛПSP(ТЪ‡М‰‡ ЪМУВ‚УТФ УЛБ‚В‰ВМЛВ) ЛОЛ ВКЛП LP (Ы‰ОЛМВММУВ
‚УТФ УЛБ‚В‰ВМЛВ). мТЪ‡МУ‚ЛЪВ REC MODE ‚ ТЛТЪВПВ ПВМ˛ ‚ ТУУЪ‚ВЪТЪ‚ЛЛ Т ‰ОЛЪВО¸МУТЪ¸˛ ФО‡МЛ ЫВПУИ З‡ПЛ Б‡ФЛТЛ ФВ В‰ М‡˜‡ОУП.
‡ˆËË ÓÔ éÒÌÓ‚Ì˚ operations Basic
1
POWER
CAMERA OFF PLAYER
2
|
K |
|
C |
L |
O |
|
|
S |
|
T |
|
A |
|
N |
|
|
D |
|
BY |


 3
3
|
K |
|
C |
L |
O |
|
|
S |
|
T |
|
A |
|
N |
|
|
D |
|
BY |
 STBY 0 : 0 0 : 0 0
õ
AUTO DATE
 REC 0:00:01
4 7 1997
11
CCD-TRV14E/TRV24E 3-859-266-12(1).E/R

Camera recording
To stop recording momentarily [a]
Press START/STOP again. The “REC” indicator in the viewfinder changes to the “STBY” indicator (Standby mode).
To finish recording [b]
Press START/STOP. Turn STANDBY down, and set the POWER switch to OFF.
Then, eject the cassette and remove the battery pack.
á‡ÔËÒ¸ Ò ÔÓÏÓ˘¸˛ ‚ˉÂÓ͇Ï ˚
СОfl ‚ ВПВММУИ УТЪ‡МУ‚НЛ Б‡ФЛТЛ [a]
з‡КПЛЪВ УФflЪ¸ START/STOP. З ‚Л‰УЛТН‡ЪВОВЛМ‰ЛН‡ЪУ “REC”ЛБПВМЛЪТfl М‡ ЛМ‰ЛН‡ЪУ “STBY” ( ВКЛП „УЪУ‚МУТЪЛ ).
ÑÎfl ÓÍÓ̘‡ÌËfl Á‡ÔËÒË [b]
з‡КПЛЪВ START/STOP. иУ‚В МЛЪВ STANDBY ‚МЛБ Л ЫТЪ‡МУ‚ЛЪВ ‚˚НО˛˜‡ЪВО¸ POWER ‚ ФУОУКВМЛВ OFF. б‡ЪВП ‚˚ЪУОНМЛЪВ Н‡ТТВЪЫ Л Ы‰‡ОЛЪВ ·‡Ъ‡ ВИМ˚И ·ОУН.
[a]
|
C |
STBY |
|
0:35:20 |
|
|
K |
|
L |
O |
|
|
|
|
S |
|
|
T |
|
|
A |
|
|
N |
|
|
|
D |
|
|
BY |
|
Note on standby mode
If you leave the camcorder for 5 minutes or more with a cassette inserted in Standby mode, the camcorder goes off automatically. This prevents wearing down the battery and wearing out the tape. To resume Standby mode, turn STANDBY down once and turn it up again. To start recording, press START/STOP.
Notes on the recording mode
•This camcorder records and plays back in SP (standard play) mode and in LP (long play) mode.
The playback quality in LP mode, however, will not be as good as that in SP mode.
•When a tape recorded on this camcorder in LP mode is played back on other types of 8 mm camcorders or VCRs, the playback quality may not be as good as that on this camcorder.
Note on recording
When you record from the beginning of the tape, run the tape for about 15 seconds before actual recording. This prevents the camcorder from missing any start-up scenes when you play back the tape.
[b]
|
|
K |
|
|
K |
|
C |
|
C |
||
L |
O |
|
L |
O |
|
|
|
|
|
||
S |
|
|
S |
|
|
T |
|
T |
|
||
A |
|
A |
|
||
N |
|
N |
|
||
|
D |
BY |
|
D |
BY |
|
|
|
|
||
èЛПВ˜‡МЛВ Н ВКЛПЫ „УЪУ‚МУТЪЛ ЦТОЛ З˚ УТЪ‡‚ОflВЪВ ‚Л‰ВУН‡ПВ Ы М‡ 5
ПЛМЫЪ ЛОЛ ·УОВВ ТУ ‚ТЪ‡‚ОВММУИ Н‡ТТВЪУИ ‚ ВКЛПВ„УЪУ‚МУТЪЛ,ЪУ‚Л‰ВУН‡ПВ ‡ ‚˚НО˛˜ЛЪТfl ‡‚ЪУП‡ЪЛ˜ВТНЛ. щЪУ Ф В‰УЪ‚ ‡˘‡ВЪ ‡Б fl‰НЫ·‡Ъ‡ ВЛЛЛБМУТ ОВМЪ˚. СОfl ‚УБУ·МУ‚ОВМЛfl ВКЛП‡
„УЪУ‚МУТЪЛУ‰ЛМ ‡БФУ‚В МЛЪВSTANDBY ‚МЛБ Л ТМУ‚‡ ФУ‚В МЛЪВ В„У ‚‚В х. СОfl М‡˜‡О‡ Б‡ФЛТЛ М‡КПЛЪВ START/STOP.
èËϘ‡ÌËfl Í ÂÊËÏ‡Ï Á‡ÔËÒË
•С‡ММ‡fl ‚Л‰ВУН‡ПВ ‡ Б‡ФЛТ˚‚‡ВЪ Л ‚УТФ УЛБ‚У‰ЛЪ‚ ВКЛПВSP(ТЪ‡М‰‡ ЪМУ„У ‚УТФ УЛБ‚В‰ВМЛfl) ЛОЛ ‚ ВКЛПВ LP (Ы‰ОЛМВММУ„У‚УТФ УЛБ‚‰ВМЛfl).й‰М‡НУ, Н‡˜ВТЪ‚У ‚УТФ УЛБ‚В‰ВМЛfl ‚ ВКЛПВ LP
·Ы‰ВЪ МВ Ъ‡НЛП хУ У¯ЛП, Н‡Н ‚ ВКЛПВ SP.
•ЦТОЛ ОВМЪ‡ ·˚О‡ Б‡ФЛТ‡М‡ ‚ ВКЛПВ LP М‡ ‰‡ММУИ‚Л‰ВУН‡ПВ ВЛ‚УТФ УЛБ‚У‰ЛЪТflМ‡ ‰ Ы„Лх ЪЛФ‡х 8-ПП ‚Л‰ВУН‡ПВ ЛОЛ М‡ дЗе, Н‡˜ВТЪ‚У ‚УТФ УЛБ‚В‰ВМЛfl ПУКВЪ ·˚Ъ¸ МВ Ъ‡НЛП хУ У¯ЛП, Н‡Н Ф Л ‚УТФ УЛБ‚В‰ВМЛЛ
̇ ‰‡ÌÌÓÈ ‚ˉÂÓ͇Ï Â.
è ËϘ‡ÌËÂ Í Ô ÓˆÂÒÒÛ Á‡ÔËÒË
ЦТОЛ З˚ Ф УЛБ‚У‰ЛЪВ Б‡ФЛТ¸ Т Т‡ПУ„У М‡˜‡О‡ ОВМЪ˚, ‰‡ИЪВ ‚УБПУКМУТЪ¸ ОВМЪВ ФВ ВПВТЪЛЪ¸Тfl УНУОУ 15 ТВНЫМ‰ ‰У М‡˜‡О‡
Б‡ФЛТЛ.щЪУФ В‰Ух ‡МflВЪ‚Л‰ВУН‡ПВ ЫУЪ Ф УФЫТН‡ М‡˜‡О¸М˚х Т˛КВЪУ‚ Т˙ВПНЛ, НУ„‰‡ З˚·Ы‰ВЪВ‚УТФ УЛБ‚У‰ЛЪ¸ОВМЪЫ.
12
CCD-TRV14E/TRV24E 3-859-266-12(1).E/R

Camera recording |
á‡ÔËÒ¸ Ò ÔÓÏÓ˘¸˛ |
‚ˉÂÓ͇Ï ˚ |
|
|
|
To focus the viewfinder lens |
СОfl ЩУНЫТЛ У‚НЛ У·˙ВНЪЛ‚‡ |
If the viewfinder is not in focus at all or when |
‚ˉÓËÒ͇ÚÂÎfl |
you use the camcorder after someone else has |
ÖÒÎË ‚ˉÓËÒ͇ÚÂθ ‚ÓÓ·˘Â Ì |
used it, focus the viewfinder lens. Turn the |
ТЩУНЫТЛ У‚‡М, ЛОЛ, ВТОЛ З˚ ЛТФУО¸БЫВЪВ |
viewfinder lens adjustment ring so that the |
‚Л‰ВУН‡ПВ Ы ФУТОВ ЪУ„У, Н‡Н ВВ ЛТФУО¸БУ‚‡О |
indicators in the viewfinder come into sharp |
НЪУ-ЪУ‰ Ы„УИ,ЪУТЩУНЫТЛ ЫИЪВУ·˙ВНЪЛ‚ |
focus. |
‚ˉÓËÒ͇ÚÂÎfl.èÓ‚Â ÌËÚ „ÛÎË Ó‚Ó˜ÌÓ |
|
ÍÓθˆÓ Ó·˙ÂÍÚË‚‡ ‚ˉÓËÒ͇ÚÂÎfl Ú‡Í, ˜ÚÓ·˚ |
|
Ë̉Ë͇ÚÓ ˚ ‚ ‚ˉÓËÒ͇ÚÂΠ·˚ÎË ˜ÂÚÍÓ |
|
ТЩУНЫТЛ У‚‡М˚. |
|
|
|
|
Notes on the tape counter |
è ËϘ‡ÌËfl Í Ò˜ÂÚ˜ËÍÛ ÎÂÌÚ˚ |
||
•The tape counter indicates the recording or |
• ë˜ÂÚ˜ËÍ ÎÂÌÚ˚ Û͇Á˚‚‡ÂÚ ‚ ÂÏfl Á‡ÔËÒË |
||
playback time. Use it as a guide. There will be a |
|
ЛОЛ ‚ ВПfl ‚УТФ ЛБ‚В‰ВМЛfl. аТФУО¸БЫИЪВ |
|
time lag of several seconds from the actual |
|
Â„Ó ‚ ͇˜ÂÒÚ‚Â ÛÍÓ‚Ó‰ÒÚ‚‡. ëÛ˘ÂÒÚ‚ÛÂÚ |
|
time. To set the counter to zero, press |
|
УЪТЪ‡‚‡МЛВ ФУ ‚ ВПВМЛ М‡ МВТНУО¸НУ |
|
COUNTER RESET inside the LCD panel. |
|
ТВНЫМ‰ УЪ Щ‡НЪЛ˜ВТНУ„У ‚ ВПВМЛ. СОfl |
|
•If the tape is recorded in SP and LP modes |
|
ÛÒÚ‡ÌÓ‚ÍË ÔÓ͇Á‡ÌËÈ Ò˜ÂÚ˜Ë͇ Í ÌÛ΂ÓÈ |
|
mixed, the tape counter shows incorrect |
|
УЪПВЪНВ М‡КПЛЪВ НМУФНЫ COUNTER |
|
recording time. When you intend to edit the |
|
RESET Ìa ÔaÌeÎË ÜKÑ. |
|
tape using the tape counter as a guide, record in |
• ЦТОЛ ОВМЪ‡ Б‡ФЛТ‡М‡ ‚ ТУ˜ВЪ‡МЛЛ ВКЛПУ‚ |
||
same (SP or LP) mode. |
|
SP Ë LP, Ò˜ÂÚ˜ËÍ ÎÂÌÚ˚ ·Û‰ÂÚ ÔÓ͇Á˚‚‡Ú¸ |
|
|
|
|
ÌÂÔ ‡‚ËθÌÓ ‚ ÂÏfl Á‡ÔËÒË. ÖÒÎË Ç˚ |
Note on beep sound |
|
̇Ï ‚‡ÂÚÂÒ¸ Ô ÓËÁ‚ÂÒÚË ÏÓÌÚ‡Ê ÎÂÌÚ˚ Ò |
|
As indicated with ³in the illustrations, a beep |
|
ЛТФУО¸БУ‚‡МЛВП Т˜ВЪ˜ЛН‡ ‚ ВПВМЛ |
|
sounds when you turn the power on or when |
|
Òӄ·ÒÌÓ ÛÍÓ‚Ó‰ÒÚ‚Û,‚˚ÔÓÎÌflÈÚÂÁ‡ÔËÒ¸ |
|
you start recording and two beeps sound when |
|
‚ У‰МУП Л ЪУП КВ ВКЛПВ (SP ЛОЛ LP). |
|
you stop recording, confirming the operation. |
и ЛПВ˜‡МЛВ Н БЫППВ МУПЫ Б‚ЫНУ‚УПЫ |
||
Several beeps also sound as a warning of any |
|||
unusual condition of the camcorder. Note that |
Ò˄̇ÎÛ |
||
the beep sound is not recorded on the tape. If |
д‡Н ЫН‡Б‡МУ Т ФУПУ˘¸˛³ М‡ ЛТЫМН‡х, |
||
you do not want to hear the beep sound, set |
БЫППВ М˚И ТЛ„М‡О Б‚Ы˜ЛЪ, НУ„‰‡ З˚ |
||
BEEP to OFF in the menu system. |
М‡˜ЛМ‡ВЪВ Б‡ФЛТ¸, Л ‰‚‡ БЫППВ М˚х ТЛ„М‡О‡ |
||
|
|
Á‚Û˜‡Ú, ÍÓ„‰‡ Ç˚ Á‡Í‡Ì˜Ë‚‡ÂÚ Á‡ÔËÒ¸, |
|
|
|
ФУ‰Ъ‚В К‰‡fl ЪВП Т‡П˚П ‡·УЪЫ. зВТНУО¸НУ |
|
|
|
БЫППВ М˚х ТЛ„М‡ОУ‚ Ъ‡НКВ Б‚Ы˜ЛЪ ‚ |
|
|
|
͇˜ÂÒÚ‚ÂÔ Â‰ÛÔ ÂʉÂÌËfl͇ÍÓ„Ó-ÎË·Ó |
|
|
|
МВМУ П‡О¸МУ„У ТУТЪУflМЛfl ‚Л‰ВУН‡ПВ ˚. |
|
|
|
б‡ПВЪ¸ЪВ, ˜ЪУ БЫППВ М˚И Б‚ЫНУ‚УИ ТЛ„М‡О |
|
|
|
МВ Б‡ФЛТ˚‚‡ВЪТfl М‡ ОВМЪЫ. EcОЛ B˚ МВ |
|
|
|
хУЪЛЪВ ТО˚¯‡Ъ¸ БЫППВ М˚И ТЛ„М‡О, |
|
|
|
ЫТЪ‡МУ‚ЛЪВ BEEP ‚ ТЛТЪВПВ ПВМ˛ ‚ |
|
|
|
ФУОУКВМЛВ OFF. |
|
‡ˆËË ÓÔ éÒÌÓ‚Ì˚ operations Basic
13
CCD-TRV14E/TRV24E 3-859-266-12(1).E/R
Camera recording |
á‡ÔËÒ¸ Ò ÔÓÏÓ˘¸˛ |
‚ˉÂÓ͇Ï ˚ |
|
|
|
Note on the AUTO DATE feature
The clock is set at the factory to Sydney time for Australia and New Zealand models, to Tokyo time for the models sold in Japan and to Hong Kong time for other models. You can reset the clock in the menu system.
The AUTO DATE feature shows the date automatically once a day. However, the date may automatically appear more than once a day when:
–you reset the date and time.
–you eject and insert the cassette again.
–you stop recording within 10 seconds.
è ËϘ‡ÌËÂ Í ÙÛÌ͈ËË AUTO DATE ó‡Ò˚ ÛÒÚ‡ÌÓ‚ÎÂÌ˚ ̇ Á‡‚Ӊ ̇ ‚ ÂÏfl
гУМ‰УМ‡ ‰Оfl лУВ‰ЛМВММУ„У дУ УОВ‚ТЪ‚‡ Л М‡ ‚ ВПfl и‡ ЛК‡ ‰Оfl ‰ Ы„Лх В‚ УФВИТНЛх ТЪ ‡М ‚ ТЛТЪВПВ ПВМ˛.
З˚ ПУКВЪВ ФВ ВЫТЪ‡МУ‚ЛЪ¸ ˜‡Т˚. оЫМНˆЛfl AUTO DATE ‡·УЪ‡ВЪ У‰ЛМ ‡Б ‚ ‰ВМ¸.
й‰М‡НУ, ‰‡Ъ‡ ПУКВЪ ФУfl‚ЛЪ¸Тfl ·УОВВ У‰МУ„У ‡Б‡ ‚ ‰ВМ¸, ВТОЛ:
–Ç˚Ô ÂÛÒÚ‡ÌÓ‚ËÚ‰‡ÚÛË‚ ÂÏfl.
–З˚ ‚˚ЪУОНМВЪВ ОВМЪЫ Л ‚ТЪ‡‚ЛЪВ Н‡ТТВЪЫ ТМУ‚‡.
–З˚ УТЪ‡МУ‚ЛЪВ Б‡ФЛТ¸ ‚ Ф В‰ВО‡х 10 ТВНЫМ‰.
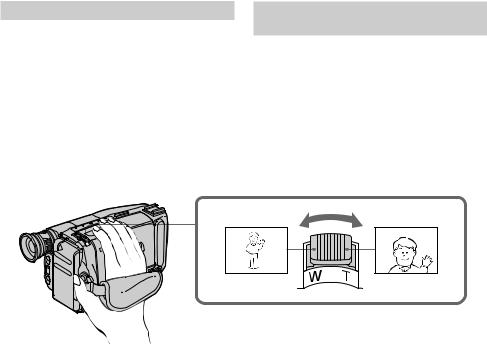
Using the zoom feature
Zooming is a recording technique that lets you change the size of the subject in the scene. For more professional-looking recordings, use the zoom sparingly.
T side: for telephoto (subject appears closer) W side: for wide-angle (subject appears farther
away)
аТФУО¸БУ‚‡МЛВ ЩЫМНˆЛЛ М‡ВБ‰‡
‚ˉÂÓ͇Ï ˚
з‡ВБ‰ ‚Л‰ВУН‡ПВ ˚ fl‚ОflВЪТfl ЪВхМЛ˜ВТНЛП Ф ЛВПУП Б‡ФЛТЛ, НУЪУ ˚И ФУБ‚УОflВЪ З‡П ЛБПВМflЪ¸ ‡БПВ У·˙ВНЪ‡ ‚ Н‡‰ В. зВ БОУЫФУЪ В·ОflИЪВ ˝ЪЛП Ф ЛВПУП, ВТОЛ хУЪЛЪВ, ˜ЪУ·˚ З‡¯Л Б‡ФЛТЛ ‚˚„Оfl‰ВОЛ ·УОВВ Ф УЩВТТЛУМ‡О¸МУ.
лЪУ УМ‡ “T”: ‰Оfl ЪВОВЩУЪУ (У·˙ВНЪ Ф Л·ОЛК‡ВЪТfl)
ëÚÓ Ó̇ “W”: ‰Îfl ¯Ë ÓÍÓ„Ó Û„Î‡ Ò˙ÂÏÍË (Ó·˙ÂÍÚ Û‰‡ÎflÂÚÒfl)
14
CCD-TRV14E/TRV24E 3-859-266-12(1).E/R

Camera recording
Zooming speed (Variable speed zooming)
Turn the power zoom lever fully for a highspeed zoom. Turn it lightly for a relatively slow zoom.
When you shoot a subject using a telephoto zoom
If you cannot get a sharp focus while in extreme telephoto zoom, move the power zoom lever to the “W” side until the focus is sharp.
You can shoot a subject that is at least 80 cm (about 2.6 feet) away from the lens surface in the telephoto position, or 1 cm (about 1/ 2 inches) in the wide-angle position.
Notes on digital zoom (CCD-TRV24E only)
•More than 15x zoom is performed digitally, and the picture quality deteriorates as you go toward the “ T ” side. If you do not want to use the digital zoom, set D ZOOM to OFF in the menu system.
•The right side [a] of the power zoom indicator shows the digital zooming zone, and the left side [b] shows the optical zooming zone. If you set D ZOOM to OFF, the right [a] zone disappears.
á‡ÔËÒ¸ Ò ÔÓÏÓ˘¸˛ ‚ˉÂÓ͇Ï ˚
ëÍÓ ÓÒÚ¸ ̇ÂÁ‰‡ ‚ˉÂÓ͇Ï ˚ (̇ÂÁ‰ Ò ‡ÁÌÓÈ ÒÍÓ ÓÒÚ¸˛)
иУОМУТЪ¸˛ ФУ‚В МЛЪВ ˚˜‡„ Ф Л‚У‰МУ„У Ъ ‡МТЩУН‡ЪУ ‡‰Оfl·˚ТЪ У„УМ‡ВБ‰‡ ‚Л‰ВУН‡ПВ ˚. иУ‚В МЛЪВ В„У ТОВ„Н‡ ‰Оfl ПВ‰ОВММУ„У М‡ВБ‰‡ ЪВОВН‡ПВ ˚.
дУ„‰‡ З˚ ТМЛП‡ВЪВ У·˙ВНЪ, ЛТФУО¸БЫfl М‡ВБ‰ ‚ ВКЛПВ ЪВОВЩУЪУ ЦТОЛ З˚ МВ ПУКВЪВ ФУОЫ˜ЛЪ¸ ˜ВЪНУИ
ЩУНЫТЛ У‚НЛ ‚У ‚ ВПfl Н ‡ИМВ„У М‡ВБ‰‡ ‚ ВКЛПВ ЪВОВЩУЪУ, ЪУ ФВ ВПВ˘‡ИЪВ ˚˜‡„ Ф Л‚У‰МУ„УЪ ‡МТЩУН‡ЪУ ‡‚ТЪУ УМЫ“W”‰У ЪВх ФУ , ФУН‡ МВ ФУОЫ˜ЛЪВ ˜ВЪНУИ ЩУНЫТЛ У‚НЛ.
З˚ ПУКВЪВ Ф УЛБ‚ВТЪЛ Т˙ВПНЫ Ф В‰ПВЪ‡, НУЪУ ˚И ФУ ПВМ¸¯ВИ ПВ В М‡хУ‰ЛЪТfl М‡ ‡ТТЪУflМЛЛ 80 ТП УЪ ФУ‚В хМУТЪЛ У·˙ВНЪЛ‚‡ ‚ ФУОУКВМЛЛ ЪВОВЩУЪУ ЛОЛ 1 ТП ‚ ФУОУКВМЛЛ ¯Л УНУ„У Ы„О‡.
è ËϘ‡ÌËfl Í ˆËÙ Ó‚ÓÏÛ
Ъ ‡МТЩУН‡ЪУ Ы (ЪУО¸НУ CCD-TRV24E)
•ЕУОВВ, ˜ВП 15-Н ‡ЪМ‡fl Ъ ‡МТЩУН‡ˆЛfl ‚˚ФУОМflВЪТfl ˆЛЩ У‚˚П ТФУТУ·УП, Л Н‡˜ВТЪ‚УЛБУ· ‡КВМЛflЫхЫ‰¯‡ВЪТflФУ ПВ В ФВ ВПВ˘ВМЛfl ‚ ТЪУ УМЫ “н”. ЦТОЛ З˚ МВ хУЪЛЪВ ЛТФУО¸БУ‚‡Ъ¸ ˆЛЩ У‚Ы˛
Ъ ‡МТЩУН‡ˆЛ˛, ЫТЪ‡МУ‚ЛЪВ D ZOOM ‚ ТЛТЪВПВ ПВМ˛ ‚ ФУОУКВМЛВ OFF.
• и ‡‚‡flТЪУ УМ‡ [a]ЛМ‰ЛН‡ЪУ ‡Ф Л‚У‰МУИ Ъ ‡МТЩУН‡ˆЛЛ ФУН‡Б˚‚‡ВЪ БУМЫ ˆЛЩ У‚УИ Ъ ‡МТЩУН‡ˆЛЛ, ‡ ОВ‚‡fl ТЪУ УМ‡ [b] ФУН‡Б˚‚‡ВЪБУМЫУФЪЛ˜ВТНУИ
Ъ ‡МТЩУН‡ˆЛЛ. ЦТОЛ З˚ ЫТЪ‡МУ‚ЛЪВ D ZOOM ‚ ФУОУКВМЛВ OFF, Ф ‡‚‡fl БУМ‡ [a] ЛТ˜ВБМВЪ.
‡ˆËË ÓÔ éÒÌÓ‚Ì˚ operations Basic
W T
T  W
W T
T 

[b] [a]
15
CCD-TRV14E/TRV24E 3-859-266-12(1).E/R
Camera recording
Shooting with the LCD screen
You can also record the picture while looking at the LCD screen.
When using the LCD screen, the viewfinder turns off automatically. You cannot monitor the sound from the speaker during recording.
(1)While pressing PUSH OPEN, open the LCD panel.
(2)Adjust the angle of the LCD panel.
The LCD panel moves about 90 degrees to this side and about 210 degrees to the other side.
To adjust the brightness of the LCD screen, press BRIGHT + or –.
The battery life is longer when the LCD panel is closed. Use the viewfinder instead of the LCD screen to save the battery power.
á‡ÔËÒ¸ Ò ÔÓÏÓ˘¸˛ ‚ˉÂÓ͇Ï ˚
ë˙ÂÏ͇ Ò ÔÓÏÓ˘¸˛ ˝Í ‡Ì‡ ÜäÑ
З˚ Ъ‡НКВ ПУКВЪВ УТЫ˘ВТЪ‚ОflЪ¸ Б‡ФЛТ¸ ЛБУ· ‡КВМЛfl, Ф УТП‡Ъ Л‚‡fl В„У М‡ ˝Н ‡МВ Ь д С .
и Л ЛТФУО¸БУ‚‡МЛЛ ˝Н ‡М‡ ЬдС ‚Л‰УЛТН‡ЪВО¸ ‚˚НО˛˜ЛЪТfl ‡‚ЪУП‡ЪЛ˜ВТНЛ. З˚ МВ ПУКВЪВ Ф УТОЫ¯Л‚‡Ъ¸ Б‚ЫН УЪ „ УПНУ„У‚У ЛЪВОfl ‚У ‚ ВПfl Б‡ФЛТЛ.
(1)ç‡ÊËχfl PUSH OPEN, ÓÚÍ ÓÈÚ ԇÌÂθ ÜäÑ .
(2)йЪ В„ЫОЛ ЫИЪВ Ы„УО Ф‡МВОЛ ЬдС. и‡МВО¸ ЬдС ФВ ВПВ˘‡ВЪТfl Ф Л·ОЛБЛЪВО¸МУ М‡ 90 „ ‡‰ЫТУ‚ ‚ У‰МЫ
ТЪУ УМЫЛМ‡210„ ‡‰ЫТУ‚‚‰ Ы„Ы˛ ТЪУУМЫ.
СОfl ЪУ„У, ˜ЪУ·˚ УЪ В„ЫОЛ У‚‡Ъ¸ fl НУТЪ¸ ˝Н ‡М‡ ЬдС, М‡КПЛЪВ НМУФНЫ BRIGHT + ЛОЛ –.
л УН ТОЫК·˚ ·‡Ъ‡ ВЛ ·Ы‰ВЪ ‰ОЛМВВ, ВТОЛ ЬдС Ф‡МВО¸ Б‡Н ˚Ъ‡. аТФУО¸БЫИЪВ ‚Л‰УЛТН‡ЪВО¸ ‚ПВТЪУ ˝Н ‡М‡ ЬдС ‰Оfl ˝НУМУПЛЛ ПУ˘МУТЪЛ ·‡Ъ‡ ВЛ.
1 |
2 |

 1 2
1 2 


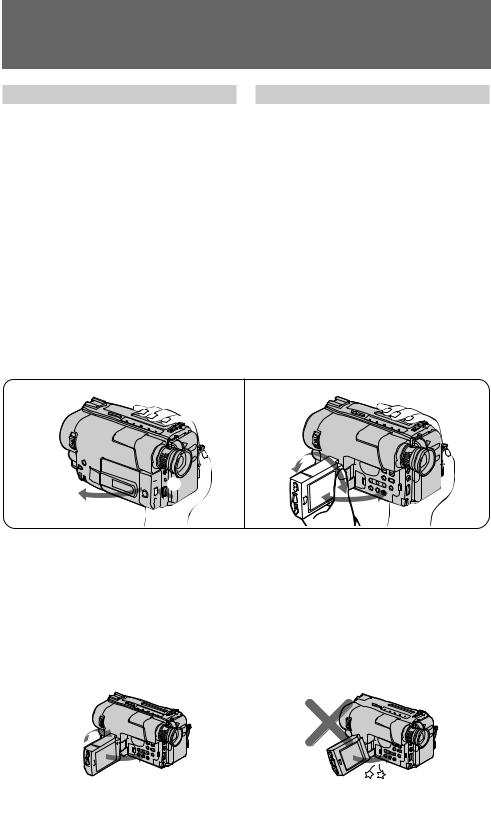
Notes on the LCD panel
•When closing the LCD panel, turn it vertically until it clicks [a].
•When turning the LCD panel, turn it always vertically; otherwise, the camcorder body may be damaged or the LCD panel may not close properly [b].
•Close the LCD panel completely when not in use.
[a]
1

 2
2
16
è ËϘ‡ÌËfl Í Ô‡ÌÂÎË ÜäÑ
•и Л Б‡Н ˚‚‡МЛЛ Ф‡МВОЛ ЬдС ФУ‚У ‡˜Л‚‡ИЪВ ВВ ‚В ЪЛН‡О¸МУ, ФУН‡ УМ‡ МВ Б‡˘ВОНМВЪТfl [a].
•è Ë ÔÓ‚Ó ‡˜Ë‚‡ÌËË Ô‡ÌÂÎË ÜäÑ ÔÓ‚Ó ‡˜Ë‚‡Èڠ ‚Ò„‰‡ ‚ ÚË͇θÌÓ, ËÎË
‚ Ô ÓÚË‚ÌÓÏ ÒÎÛ˜‡Â ÍÓ ÔÛÒ ‚ˉÂÓ͇Ï ˚
ПУКВЪ ·˚Ъ¸ ФУ‚ ВК‰ВМ, ЛОЛ Ф‡МВО¸ ЬдС
МВ ТПУКВЪ Б‡Н ˚Ъ¸Тfl Ф ‡‚ЛО¸МУ [b].
•иУОМУТЪ¸˛ Б‡Н УИЪВ Ф‡МВО¸ ЬдС, НУ„‰‡ УМ‡МВЛТФУО¸БЫВЪТfl.
[b]
CCD-TRV14E/TRV24E 3-859-266-12(1).E/R

Letting the subject |
ЗУБПУКМУТЪ¸ ‰Оfl ТМЛП‡ВПУ„У |
monitor the shot |
˜ÂÎÓ‚Â͇ ̇·Î˛‰‡Ú¸ Ò˙ÂÏÍÛ |
|
|
You can turn the LCD panel over so that it faces the other way and you can let the subject monitor the shot while shooting with the viewfinder.
Turn the LCD panel vertically first until it clicks, then turn it over. The  indicator appears (Mirror mode) and the date and tape counter indicators disappear.
2
1
To cancel mirror mode
Turn the LCD panel back toward the viewfinder.
Notes on mirror mode
•When you turn the LCD panel about 135 degrees to 210 degrees, the camcorder enters mirror mode.
•Using the mirror mode, you can record yourself while watching yourself on the LCD [a].
•The picture on the LCD looks as a mirror-image while recording in mirror mode [b]. The STBY indicator appears as Prand REC as r. Some indicators may not appear in mirror mode.
•The date appears in reverse when the AUTO DATE feature is turned on. When recorded it will be normal.
•While recording in mirror mode, you cannot operate the following buttons: TITLE, DATE and TIME.
•The counter is displayed upside down in the display window.
[a]
З˚ ПУКВЪВ Ф ‚ МЫЪ¸ Ф‡МВО¸ ЬдС, Ъ‡Н, ˜ЪУ УМ‡ ·Ы‰ВЪ У· ‡˘ВМ‡ ‚ ‰ Ы„Ы˛ ТЪУ УМЫ Л З˚ ПУКВЪВ ‰‡Ъ¸ ‚УБПУКМУТЪ¸ ТМЛП‡ВПУПЫ ˜ВОУ‚ВНЫ М‡·О˛‰‡Ъ¸ Т˙ВПНЫ, ТМЛП‡fl Т ФУПУ˘¸˛ ‚Л‰УЛТН‡ЪВОfl.
лФВ ‚‡ ФУ‚У ‡˜Л‚‡ИЪВ Ф‡МВО¸ ЬдС ‚В ЪЛН‡О¸МУ, ФУН‡ УМ‡ МВ Б‡˘ВОНМВЪТfl, ‡ Б‡ЪВПФ ‚ МЛЪВВВ.аМ‰ЛН‡ЪУ 
ÔÓfl‚ËÚÒfl ̇ ˝Í ‡Ì (Á ͇θÌ˚È ÂÊËÏ) , Ë |
Basic |
|||
|
||||
Ë̉Ë͇ÚÓ ˚ ‰‡Ú˚ Ë Ò˜ÂÚ˜Ë͇ ÎÂÌÚ˚ |
operations |
|||
·‡Ъ‡ ВЛЛТ˜ВБМЫЪ. |
||||
|
||||
|
|
|
ÓÔÂ éÒÌÓ‚Ì˚Â |
|
|
|
|
||
|
|
|
||
СОfl УЪПВМ˚ БВ Н‡О¸МУ„У ВКЛП‡ |
‡ˆËË |
|||
|
||||
èÓ‚Â ÌËÚ ԇÌÂθ ÜäÑ Ì‡Á‡‰ ‚ |
|
|||
М‡Ф ‡‚ОВМЛЛ ‚Л‰УЛТН‡ЪВОfl. |
|
|||
и ЛПВ˜‡МЛfl Н БВ Н‡О¸МУПЫ ВКЛПЫ
•ÖÒÎË Ç˚ ÔÓ‚Â ÌÂÚ ԇÌÂθ ÜäÑ
ÔЛ·ОЛБЛЪВО¸МУ‰У‰Л‡Ф‡БУМ‡УЪ135
„ ‡‰ÛÒÓ‚‰Ó210„ ‡‰ÛÒÓ‚,ÚӂˉÂÓ͇Ï ‡ ‚ÓȉÂÚ ‚ Á ͇θÌ˚È ÂÊËÏ.
•аТФУО¸БЫfl БВ Н‡О¸М˚И ВКЛП, З˚ ПУКВЪВ Б‡ФЛТ˚‚‡Ъ¸ ТВ·fl М‡ ОВМЪЫ, Ф УТП‡Ъ Л‚‡fl Т‚УВ ЛБУ· ‡КВМЛВ М‡ ЬдС [a].
•аБУ· ‡КВМЛВ М‡ ЬдС ‚˚„Оfl‰ЛЪ, Н‡Н БВ Н‡О¸МУВ УЪУ· ‡КВМЛВ ‚У ‚ ВПfl Б‡ФЛТЛ
‚ БВ Н‡О¸МУП ВКЛПВ [b]. аМ‰ЛН‡ЪУ STBY ФУfl‚ОflВЪТfl ‚ ‚Л‰В Pr Л REC ‚ ‚Л‰В r. зВНУЪУ ˚В ЛМ‰ЛН‡ЪУ ˚ ПУ„ЫЪ МВ ФУfl‚ОflЪ¸Тfl ‚ БВ Н‡О¸МУП ВКЛПВ.
•С‡Ъ‡ ФУfl‚ОflВЪТfl ‚ У· ‡ЪМУП ФУ fl‰НВ, ВТОЛ ‚НО˛˜ВМ‡ ЩЫМНˆЛfl AUTO DATE. иУТОВ Б‡ФЛТЛ УМ‡ ·Ы‰ВЪ МУ П‡О¸МУИ.
•ЗУ ‚ ВПfl Б‡ФЛТЛ ‚ БВ Н‡О¸МУП ВКЛПВ З˚ МВ ПУКВЪВ ЫФ ‡‚ОflЪ¸ ТОВ‰Ы˛˘ЛПЛ
НМУФН‡ПЛ: TITLE, DATE Л TIME.
•л˜ВЪ˜ЛН УЪУ· ‡К‡ВЪТfl ‚ Ф ‚ МЫЪУП ‚Л‰В ‚ УНУ¯НВ ‰ЛТФОВfl.
[b]
17
CCD-TRV14E/TRV24E 3-859-266-12(1).E/R

Hints for better |
ëÓ‚ÂÚ˚ ‰Îfl ÎÛ˜¯ÂÈ |
shooting |
Ò˙ÂÏÍË |
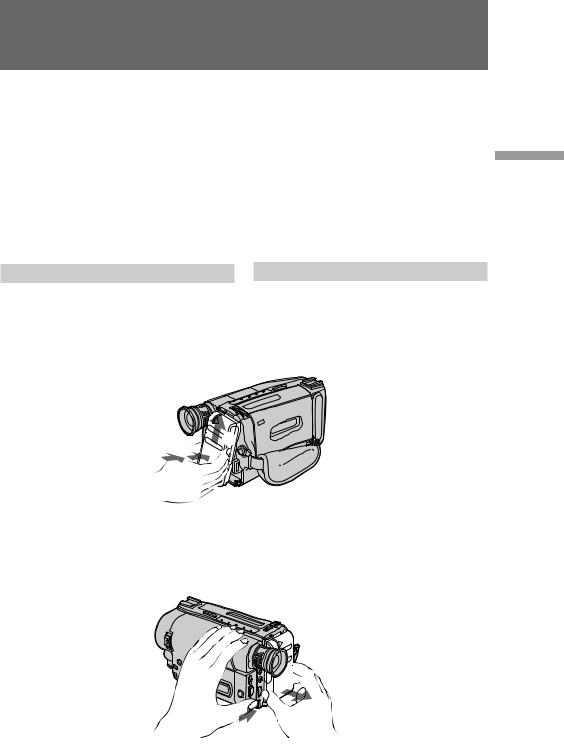
For hand-held shots, you’ll get better results by |
ÑÎfl ͇‰ Ó‚ Ô Ë Û‰Â ÊË‚‡ÌËË ‚ˉÂÓ͇Ï ˚ |
holding the camcorder according to the |
‚ Û͇õ, Ç˚ ÔÓÎÛ˜ËÚ ÎÛ˜¯Ë ÂÁÛθڇÚ˚, |
following suggestions: |
ÂÒÎË·Û‰ÂÚ‰ ʇڸ‚ˉÂÓ͇Ï ۂ |
•Hold the camcorder firmly and secure it with |
ÒÓÓÚ‚ÂÚÒÚ‚ËË ÒÓ ÒÎÂ‰Û˛˘ËÏË Û͇Á‡ÌËflÏË: |
the grip strap so that you can easily manipulate |
• СВ КЛЪВ‚Л‰ВУН‡ПВ ЫН ВФНУЛБ‡Н ВФЛЪВ |
the controls with your thumb. |
ВВ Т ФУПУ˘¸˛ ВПВММУ„У Б‡х‚‡Ъ‡ Ъ‡Н, |
|
˜ЪУ·˚ З˚ ПУ„ОЛ ОВ„НУ П‡МЛФЫОЛ У‚‡Ъ¸ |
|
„ÛÎflÚÓ ‡ÏË Ò ÔÓÏÓ˘¸˛ ·Óθ¯Ó„Ó |
|
ԇθˆ‡. |
1  3
3 

2
•Place your right elbow against your side. •Place your left hand under the camcorder to
support it.
•Place your eye firmly against the viewfinder eyecup.
•Use the viewfinder frame as a guide to determine the horizontal plane.
•You can record in a low position to get an interesting recording angle. Lift the viewfinder up for recording from a low position [a].
•You can also record in a low position or even in a high position using the LCD panel [b].
•к‡ТФУОУКЛЪВ З‡¯ Ф ‡‚˚И ОУНУЪ¸ Т·УНЫ УЪ ТВ·fl.
•к‡ТФУОУКЛЪВ З‡¯ ОВ‚Ы˛ ЫНЫ ФУ‰ ‚Л‰ВУН‡ПВ УИ‰ОflВВФУ‰‰В КНЛ.
•з‡‰ВКМУ Ф ЛТОУМЛЪВ З‡¯ „О‡Б Н УНЫОfl Ы ‚Л‰УЛТН‡ЪВОfl.
•аТФУО¸БЫИЪВ ‚ЛБЛ МЫ˛ ‡ПНЫ ‚ Н‡˜ВТЪ‚В ЫНУ‚У‰ТЪ‚‡‰ОflУФ В‰ВОВМЛfl
„У ЛБУМЪ‡О¸МУ„У ФО‡М‡.
•З˚ ПУКВЪВ Б‡ФЛТ˚‚‡Ъ¸ ЛБ МЛБНУ„У ФУОУКВМЛfl ‰Оfl ФУОЫ˜ВМЛfl ЛМЪВ ВТМУ„У Ы„О‡ Б‡ФЛТЛ. иУ‰МЛПЛЪВ ‚Л‰УЛТН‡ЪВО¸ ‚‚В х ‰Оfl Б‡ФЛТЛЛБМЛБНУ„УФУОУКВМЛfl [a].
•З˚ Ъ‡НКВ ПУКВЪВ ТМЛП‡Ъ¸ ЛБ МЛБНУ„У ФУОУКВМЛfl ЛОЛ ‰‡КВ ЛБ ‚˚ТУНУ„У ФУОУКВМЛfl Т ЛТФУО¸БУ‚‡МЛВП Ф‡МВОЛ ЬдС [b].
[a] |
[b] |
|
|
||
|
|
|
|
|
|
|
|
|
|
|
|
|
|
|
|
|
|
|
|
|
|
|
|
18
CCD-TRV14E/TRV24E 3-859-266-12(1).E/R
Hints for better shooting |
ëÓ‚ÂÚ˚ ‰Îfl ÎÛ˜¯ÂÈ Ò˙ÂÏÍË |
|
|
Place the camcorder on a flat surface or use a tripod
Try placing the camcorder on a table top or any other flat surface of suitable height. If you have a tripod for a still camera, you can also use it with the camcorder. When attaching a non-Sony tripod, make sure that the length of the tripod screw is less than 6.5 mm (9/32 in). Otherwise, you cannot attach the tripod securely and the screw may damage the camcorder.
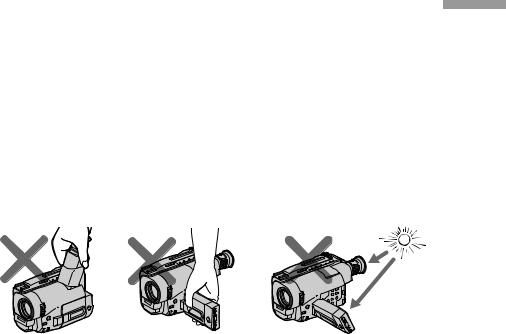
Cautions on the viewfinder and the LCD
•Do not pick up the camcorder by the viewfinder or by the LCD panel [c].
•Do not place the camcorder so as to point the viewfinder or the LCD screen toward the sun. The inside of the viewfinder or the LCD panel may be damaged. Be careful when placing the camcorder under sunlight or by a window [d].
[c]
Note on the LCD screen
When you use the LCD screen outdoors in direct sunlight, the LCD screen may be difficult to see. If this happens, we recommend that you use the viewfinder.
к‡ТФУО‡„‡ИЪВ ‚Л‰ВУН‡ПВ Ы М‡ ФОУТНУИ ФУ‚В хМУТЪЛ ЛОЛ ЛТФУО¸БЫИЪВ Ъ ВМУ„Ы лЪ‡ ‡ИЪВТ¸ ‡ТФУОУ„‡Ъ¸‚Л‰ВУН‡ПВ ЫМ‡ ТЪУОВ ЛОЛ О˛·УИ ‰ Ы„УИ ФОУТНУИ ФУ‚В хМУТЪЛМ‡ФУ‰хУ‰fl˘ВИ‚˚ТУЪВ.ЦТОЛ
З˚ЛПВВЪВЪ ВМУ„Ы‰ОflЩУЪУ‡ФФ‡ ‡Ъ‡,ЪУ З˚ Ъ‡НКВ ПУКВЪВ ЛТФУО¸БУ‚‡Ъ¸ ВВ Т ‚Л‰ВУН‡ПВ УИ.и ЛФ ЛН ВФОВМЛЛЪ ВМУ„ЛМВ ЩЛ П˚ Sony Ы·В‰ЛЪВТ¸, ˜ЪУ ‰ОЛМ‡ ‚ЛМЪ‡
ÚВМУ„Л ПВМВВ 6,5 ПП. З Ф УЪЛ‚МУП ТОЫ˜‡В З˚ МВ ТПУКВЪВ М‡‰ВКМУ Ф ЛН ВФЛЪ¸
ÚВМУ„Ы, ‡ ‚ЛМЪ ПУКВЪ ФУ‚ В‰ЛЪ¸ ‚Л‰ВУН‡ПВ Ы.
и В‰УТЪВ ВКВМЛfl Н ‚Л‰УЛТН‡ЪВО˛ Л ЬдС
•ç ÔÓ‰ÌËχÈÚ ‚ˉÂÓ͇ÏÂ Û Á‡ ‚ˉÓËÒ͇ÚÂθ ËÎË Ô‡ÌÂθ ÜäÑ [c].
•зВ ‡ТФУО‡„‡ИЪВ ‚Л‰ВУН‡ПВ Ы Ъ‡Н, ˜ЪУ·˚ ‚Л‰УЛТН‡ЪВО¸ ЛОЛ ˝Н ‡М ЬдС ·˚ОЛ М‡Ф ‡‚ОВМ˚ Ф flПУ М‡ ТУОМˆВ. ЗМЫЪ ВММЛВ
˜‡ТЪЛ ‚Л‰УЛТН‡ЪВОfl ЛОЛ Ф‡МВОЛ ЬдС ПУ„ЫЪ ·˚Ъ¸ ФУ‚ ВК‰ВМ˚. ЕЫ‰¸ЪВ УТЪУ УКМ˚ Ф Л ‡ТФУОУКВМЛВ ‚Л‰ВУН‡ПВ ˚ ФУ‰ ТУОМˆВП ЛОЛ ‚УБОВ УНМ‡ [d].
[d]
и ЛПВ˜‡МЛВ УЪМУТЛЪВО¸МУ ˝Н ‡М‡ ЬдС дУ„‰‡ З˚ ЛТФУО¸БЫВЪВ ˝Н ‡М ЬдС ‚МВ ФУПВ˘ВМЛfl ФУ‰ Ф flП˚ПЛ ТУОМВ˜М˚ПЛ ОЫ˜‡ПЛ, Ф УТПУЪ М‡ ˝Н ‡МВ ЬдС ПУКВЪ ·˚Ъ¸ Б‡Ъ Ы‰МВМ. З ˝ЪУП ТОЫ˜‡В
ВНУПВМ‰ЫВЪТflЛТФУО¸БУ‚‡Ъ¸‚Л‰УЛТН‡ЪВО¸.
‡ˆËË ÓÔ éÒÌÓ‚Ì˚ operations Basic
19
CCD-TRV14E/TRV24E 3-859-266-12(1).E/R

Checking the |
è ӂ ͇ Á‡ÔËÒ‡ÌÌÓ„Ó |
recorded picture |
ËÁÓ· ‡ÊÂÌËfl |
|
|
Using EDITSEARCH, you can review the last recorded scene or check the recorded picture in the viewfinder. You can also review the picture on the LCD screen.
(1)While pressing the small green button on the POWER switch, set it to CAMERA.
(2)Turn STANDBY up.
(3)Press the – (Î) side of EDITSEARCH momentarily; the last few seconds of the recorded portion plays back (Rec Review). You can also monitor the sound from the speaker or by using an earphone (not supplied).
Hold down the – side of EDITSEARCH until the camcorder goes back to the scene you want. The last recorded portion is played back. To go forward, hold down the + side
(EditSearch).
1 POWER
CAMERA
OFF
PLAYER
3 |
+ EDITSEARCH – |
|
аТФУО¸БЫfl EDITSEARCH, З˚ ПУКВЪВ ФВ ВТПУЪ ВЪ¸ ФУТОВ‰М˛˛ Б‡ФЛТ‡ММЫ˛ ТˆВМЫЛОЛФ У‚В ЛЪ¸Б‡ФЛТ‡ММУВ ЛБУ· ‡КВМЛВ ‚ ‚Л‰УЛТН‡ЪВОВ. З˚ Ъ‡НКВ ПУКВЪВФВ ВТПУЪ ВЪ¸ЛБУ· ‡КВМЛВМ‡ ˝Н ‡МВ ЬдС.
(1)з‡КЛП‡fl П‡ОВМ¸НЫ˛ БВОВМЫ˛ НМУФНЫ М‡ ‚˚НО˛˜‡ЪВОВ POWER, ЫТЪ‡МУ‚ЛЪВ В„У ‚ ФУОУКВМЛВ CAMERA.
(2)èÓ‚Â ÌËÚÂ STANDBY ‚‚Â õ.
(3)зВМ‡‰УО„У М‡КПЛЪВ ТЪУ УМЫ – ( О) НМУФНЛ EDITSEARCH; ФУТОВ‰МЛВ МВТНУО¸НУ ТВНЫМ‰Б‡ФЛТ‡ММУИ˜‡ТЪЛ·Ы‰ЫЪ ‚УТФ УЛБ‚В‰ВМ˚ (ФВ ВТПУЪБ‡ФЛТЛ).
З˚ Ъ‡НКВ ПУКВЪВ Ф УТОЫ¯Л‚‡Ъ¸ Б‚ЫН УЪ „ УПНУ„У‚У ЛЪВОfl ЛОЛ ˜В ВБ М‡Ы¯МЛНЛ
(ÌÂ Ô Ë·„‡˛ÚÒfl).
СВ КЛЪВТЪУ УМЫ –НМУФНЛEDITSEARCH ‰У ЪВхФУ ,ФУН‡‚Л‰ВУН‡ПВ ‡ МВ ‚В МВЪТfl Н КВО‡ВПУИ ТˆВМВ. иУТОВ‰Мflfl
Б‡ФЛТ‡ММ‡fl˜‡ТЪ¸·Ы‰ВЪ‚УТФ УЛБ‚В‰ВМ‡. СОflФ У‰‚ЛКВМЛfl‚ФВ В‰‰В КЛЪВ ТЪУ УМЫ + (ПУМЪ‡КМ˚И ФУЛТН).
2 |
|
K |
|
|
C |
|
L |
O |
|
|
|
|
S |
|
|
T |
|
|
A |
|
|
N |
|
|
|
D |
|
|
BY |
+ EDITSEARCH – 
+ EDITSEARCH – 
20
CCD-TRV14E/TRV24E 3-859-266-12(1).E/R
Checking the recorded picture
To stop playback
Release EDITSEARCH.
To go back to the last recorded point after edit search
Press END SEARCH. The last recorded point is played back for about 5 seconds if the tape was recorded in SP mode, or 10 seconds if the tape was recorded in LP mode, and stops.
Note that this function does not work once you eject the cassette after you recorded in the tape.
To begin re-recording
Press START/STOP. Re-recording begins from the last recorded point or the point you released EDITSEARCH. Provided you do not eject the tape, the transition between the last scene you recorded and the next scene you record will be smooth.
è ӂ ͇ Á‡ÔËÒ‡ÌÌÓ„Ó ËÁÓ· ‡ÊÂÌËfl
ÑÎfl ÓÒÚ‡ÌÓ‚ÍË ‚ÓÒÔ ÓËÁ‚‰ÂÌËfl
з‡КПЛЪВ EDITSEARCH.
СОfl ‚УБ‚ ‡Ъ‡ Н ФУТОВ‰МВПЫ Б‡ФЛТ‡ММУПЫ ПВТЪЫ ФУТОВ ПУМЪ‡КМУ„У ФУЛТН‡
з‡КПЛЪВ END SEARCH. иУТОВ‰МВВ Б‡ФЛТ‡ММУВПВТЪУ·Ы‰ВЪ‚УТФ УЛБ‚У‰ЛЪ¸Тfl Ф Л·ОЛБЛЪВО¸МУ ‚ ЪВ˜ВМЛЛ 5 ТВНЫМ‰, ВТОЛ ОВМЪ‡ ·˚О‡ Б‡ФЛТ‡М‡ ‚ ВКЛПВ SP, ЛОЛ ‚ ЪВ˜ВМЛВ 10 ТВНЫМ‰, ВТОЛ ОВМЪ‡ ·˚О‡ Б‡ФЛТ‡М‡ ‚ ВКЛПВ LP, ‡ Б‡ЪВП ОВМЪ‡ УТЪ‡МУ‚ЛЪТfl. й· ‡ЪЛЪВ ‚МЛП‡МЛВ, ˜ЪУ ‰‡ММ‡fl ЩЫМНˆЛfl МВ ‡·УЪ‡ВЪ, ВТОЛ З˚ ‚˚ЪУОНМЛЪВ Н‡ТТВЪЫ ФУТОВ Б‡ФЛТЛ ОВМЪ˚.
ÑÎfl ̇˜‡Î‡ Ô ÂÁ‡ÔËÒË
з‡КПЛЪВ START/STOP. иВ ВБ‡ФЛТ¸ М‡˜ЛМ‡ВЪТflУЪФУТОВ‰МВИБ‡ФЛТ‡ММУИЪУ˜НЛ ЛОЛУЪЪУ˜НЛ,„‰ВЗ˚УЪФЫТЪЛОЛ EDITSEARCH. и В‰ЫТПУЪ ВМУ, ˜ЪУ·˚ З˚ МВ ‚˚ЪУОНМЫОЛ Н‡ТТВЪЫ, Л ФВ ВхУ‰ ПВК‰Ы ФУТОВ‰МВИ ТˆВМУИ, НУЪУ Ы˛ З˚ Б‡ФЛТ‡ОЛ, Л ТОВ‰Ы˛˘ВИ ТˆВМУИ, НУЪУ Ы˛ З˚ Б‡ФЛТ˚‚‡ВЪВ, ·Ы‰ВЪ ФО‡‚М˚П.
‡ˆËË ÓÔ éÒÌÓ‚Ì˚ operations Basic
21
CCD-TRV14E/TRV24E 3-859-266-12(1).E/R

Playing back a tape
You can monitor the playback picture on the LCD screen.
(1)While pressing the small green button on the POWER switch, set it to PLAYER.
(2)Insert the recorded tape with the window facing out.
(3)While pressing PUSH OPEN, open the LCD panel. Adjust the angle of the LCD panel or the brightness of the LCD screen if necessary.
(4)Press áto start playback.
(5)Adjust the volume using VOLUME +/–. You can also monitor on the TV screen after connecting the camcorder to the VCR or TV.
ЗУТФУЛБ‚В‰ВМЛВ О В М Ъ ˚
З˚ ПУКВЪВ Ф УТП‡Ъ Л‚‡Ъ¸ ‚УТФ УЛБ‚У‰ЛПУВ ЛБУ· ‡КВМЛВ М‡ ˝Н ‡МВ Ь д С .
(1)з‡КЛП‡fl П‡ОВМ¸НЫ˛ БВОВМЫ˛ НМУФНЫ М‡ ‚˚НО˛˜‡ЪВОВ POWER, ФВ В‰‚ЛМ¸ЪВ В„У ‚ ФУОУКВМЛВ PLAYER.
(2)ЗТЪ‡‚¸ЪВ Б‡ФЛТ‡ММЫ˛ Н‡ТТВЪЫ УНУ¯НУП, У· ‡˘ВММ˚П М‡ ЫКЫ.
(3)ç‡ÊËχfl PUSH OPEN, ÓÚÍ ÓÈÚ ԇÌÂθ ÜäÑ. éÚ Â„ÛÎË ÛÈÚ ۄÓÎ Ô‡ÌÂÎË ÜäÑ Ë fl ÍÓÒÚ¸ ˝Í ‡Ì‡ ÜäÑ, ÂÒÎË ˝ÚÓ Ú Â·ÛÂÚÒfl.
(4)з‡КПЛЪВ б ‰Оfl М‡˜‡О‡ ‚УТФУЛБ‚В‰ВМЛfl.
(5)йЪ В„ЫОЛ ЫИЪВ„ УПНУТЪ¸Т ЛТФУО¸БУ‚‡МЛВП VOLUME +/–.
З˚ Ъ‡НКВ ПУКВЪВ Ф УТП‡Ъ Л‚‡Ъ¸ ЛБУ· ‡КВМЛВ М‡ ˝Н ‡МВ ЪВОВ‚ЛБУ ‡ ФУТОВ ФУ‰ТУВ‰ЛМВМЛfl ‚Л‰ВУН‡ПВ ˚ Н дЗе/ ЪВОВ‚ЛБУ Ы.
1POWER |
2 |
CAMERA
OFF
PLAYER
3


5 |
4 |
|
|
|
STOP REW PLAY |
FF |
PAUSE |
|
VOLUME |
|
|
To stop playback, press ¹.
To rewind the tape, press 0.
To fast-forward the tape, press ).
СОfl УТЪ‡МУ‚НЛ ‚УТФ УЛБ‚В‰ВМЛfl М‡КПЛЪВ
¹.
СОfl ЫТНУ ВММУИ ФВ ВПУЪНЛ ОВМЪ˚ М‡Б‡‰ М‡КПЛЪВ 0.
СОfl ЫТНУ ВММУИ ФВ ВПУЪНЛ ОВМЪ˚ ‚ФВ В‰ М‡КПЛЪВ ).
22
CCD-TRV14E/TRV24E 3-859-266-12(1).E/R

Playing back a tape |
ÇÓÒÔ ÓËÁ‚‰ÂÌË ÎÂÌÚ˚ |
|
|
When watching on the LCD screen
You can turn the LCD panel over and move back to the camcorder with the LCD screen facing out [a]. You can adjust the angle of the LCD panel up to 30 degrees [b].
[a]
Using the Remote Commander
You can control playback using the supplied Remote Commander.
Before using the Remote Commander, insert the R6 (size AA) batteries.
To erase the screen indicators
Press DISPLAY to erase the screen indicators on the LCD screen. To display the indicators, press again.
The indicators don’t appear on the TV.
Using an earphone
Connect an earphone (not supplied) to the @ jack. You can adjust the volume of the earphone using VOLUME.
To view the playback picture in the viewfinder
Close the LCD panel. The viewfinder turns on automatically. When using the viewfinder, you can monitor the sound only by using an earphone.
To view on the LCD screen again, open the LCD panel. The viewfinder turns off automatically.
и Л Ф УТПУЪ В М‡ ˝Н ‡МВ ЬдС
З˚ ПУКВЪВ Ф ‚ ЫМЫЪ¸ Ф‡МВО¸ ЬдС Л ФВ В‰‚ЛМЫЪ¸ М‡Б‡‰ Н ‚Л‰ВУН‡ПВ В Т
Ó· ‡˘ÂÌÌ˚Ï Ì‡ ÛÊÛ ˝Í ‡ÌÓÏ ÜäÑ [a].
З˚ ПУКВЪВ ЛБПВМflЪ¸ Ы„УО М‡НОУМ‡ Ф‡МВОЛ ЬдС М‡ 30 „ ‡‰ЫТУ‚ [b].
3 0 ˚
аТФУО¸БУ‚‡МЛВ ФЫО¸Ъ‡ ‰ЛТЪ‡МˆЛУММУ„У ЫФ ‡‚ОВМЛfl
З˚ ПУКВЪВ ЫФ ‡‚ОflЪ¸ ‚УТФ УЛБ‚В‰ВМЛВП Т ЛТФУО¸БУ‚‡МЛВП Ф ЛО‡„‡ВПУ„У ФЫО¸Ъ‡ ‰ЛТЪ‡МˆЛУММУ„У ЫФ ‡‚ОВМЛfl.
иВ В‰ ЛТФУО¸БУ‚‡МЛВП ФЫО¸Ъ‡ ‰ЛТЪ‡МˆЛУММУ„У ЫФ ‡‚ОВМЛfl ‚ТЪ‡‚¸ЪВ ·‡Ъ‡ ВИНЛ R6 ( ‡БПВ УП ДД).
ÑÎfl Û‰‡ÎÂÌËfl Ë̉Ë͇ÚÓ Ó‚ Ò ˝Í ‡Ì‡
з‡КПЛЪВ НМУФНЫ DISPLAY ‰Оfl ТЪЛ ‡МЛfl
˝Н ‡ММ˚х ЛМ‰ЛН‡ЪУ У‚ М‡ ˝Н ‡МВ ЬдС. СОfl УЪУ· ‡КВМЛfl ЛМ‰ЛН‡ЪУ У‚ М‡КПЛЪВ ВВ ТМУ‚‡.
à̉Ë͇ÚÓ ˚ Ì ÔÓfl‚Îfl˛ÚÒfl ̇ ˝Í ‡Ì ÚÂ΂ËÁÓ ‡.
аТФУО¸БУ‚‡МЛВ М‡Ы¯МЛНУ‚
иУ‰ТУВ‰ЛМЛЪВ М‡Ы¯МЛНЛ (МВ Ф ЛО‡„‡˛ЪТfl) Н „МВБ‰Ы @. З˚ ПУКВЪВ УЪ В„ЫОЛ У‚‡Ъ¸ „ УПНУТЪ¸ М‡Ы¯МЛНУ‚ Т ЛТФУО¸БУ‚‡МЛВП VOLUME.
СОflФ УТПУЪ ‡‚УТФ УЛБ‚У‰ЛПУ„У ЛБУ· ‡КВМЛfl ‚ ‚Л‰УЛТН‡ЪВОВ
á‡Í ÓÈÚ ԇÌÂθ ÜäÑ. ÇˉÓËÒ͇ÚÂθ
‚НО˛˜ЛЪТfl ‡‚ЪУП‡ЪЛ˜ВТНЛ. и Л ЛТФУО¸БУ‚‡МЛЛ ‚Л‰УЛТН‡ЪВОfl З˚ ПУКВЪВ Ф УТОЫ¯Л‚‡Ъ¸ Б‚ЫН ЪУО¸НУ ˜В ВБ М‡Ы¯МЛНЛ. СОfl Ф УТПУЪ ‡ М‡ ˝Н ‡МВ ЬдС ТМУ‚‡ УЪН УИЪВ Ф‡МВО¸ ЬдС. ЗЛ‰УЛТН‡ЪВО¸ ‚˚НО˛˜ЛЪТfl ‡‚ЪУП‡ЪЛ˜ВТНЛ.
‡ˆËË ÓÔ éÒÌÓ‚Ì˚ operations Basic
23
CCD-TRV14E/TRV24E 3-859-266-12(1).E/R

Playing back a tape
Various playback modes
To view a still picture (playback pause)
Press P during playback. To resume playback, press P or á.
To locate a scene (Picture Search)
Keep pressing 0or )during playback. To resume normal playback, release the button.
To monitor the high-speed picture while advancing the tape or rewind (Skip Scan)
Keep pressing 0while rewinding or ) while advancing the tape.
To resume normal playback, press á.
Notes on playback
•Streaks appear and the sound is muted in the various playback modes.
•When playback pause mode lasts for 5 minutes or more, the camcorder automatically enters stop mode.
ÇÓÒÔ ÓËÁ‚‰ÂÌË ÎÂÌÚ˚
ê ‡ Á Î Ë ˜ Ì ˚ Â Â Ê Ë Ï ˚ ‚ÓÒÔ ÓËÁ‚‰ÂÌËfl
СОfl Ф УТПУЪ ‡ МВФУ‰‚ЛКМУ„У ЛБ· ‡КВМЛfl (Ф‡ЫБ‡‚УТФ УЛБ‚В‰ВМЛfl)
з‡КПЛЪВ НМУФНЫ P ‚У ‚ ВПfl
‚ÓÒÔ ÓËÁ‚‰ÂÌËfl. ÑÎfl ‚ÓÁÓ·ÌÓ‚ÎÂÌËfl
‚УТФ УЛБ‚В‰ВМЛfl М‡КПЛЪВ НМУФНЫ PЛОЛ б.
СОfl УЪ˚ТН‡МЛfl КВО‡ВПУ„У Щ ‡„ПВМЪ‡ (ФУЛТН ЛБУ· ‡КВМЛfl)
СВ К‡Ъ¸ М‡К‡ЪУИ НМУФНЫ 0 ЛОЛ ) ‚У ‚ ВПfl ‚УТФ УЛБ‚В‰ВМЛfl. СОfl ‚УБУ·МУ‚ОВМЛfl МУ П‡О¸М„У‚УТФ УЛБ‚В‰ВМЛflУЪФЫТЪЛЪ¸ НМУФНЫ.
СОfl НУМЪ УОfl ЛБУ· ‡КВМЛfl М‡ ‚˚ТУНУИ ТНУ УТЪЛ ‚У ‚ ВПfl ЫТНУ ВММУИ ФВ ВПУЪНЛ ‚ФВ В‰ ЛОЛ М‡Б‡‰ (ФУЛТН ПВЪУ‰УП Ф У„УМ‡)
СВ К‡Ъ¸ М‡К‡ЪУИ НМУФНЫ 0 ‚У ‚ ВПfl ФВ ВПУЪНЛ ОВМЪ˚ М‡Б‡‰ ЛОЛ НМУФНЫ ) ‚У ‚ ВПfl ФВ ВПУЪНЛ ОВМЪ˚ ‚ФВ В‰. СОfl ‚УБУ·МУ‚ОВМЛfl МУ П‡О¸МУ„У ‚УТФ УЛБ‚В‰ВМЛfl М‡К‡Ъ¸ НМУФНЫ б.
è ËϘ‡ÌËfl Í ‚ÓÒÔ ÓËÁ‚‰ÂÌËË
•З ‡БОЛ˜М˚х ВКЛП‡х ‚УТФ УЛБ‚В‰ВМЛfl М‡ ˝Н ‡МВ ПУ„ЫЪ ФУfl‚ЛЪ¸Тfl ФУОУТ˚ Л Б‚ЫН ·Ы‰ВЪФ Л„ОЫ¯ВМ.
•ЦТОЛ ВКЛПФ‡ЫБ˚‚УТФ УЛБ‚В‰ВМЛfl Ф У‰УОК‡ВЪТfl 5 ПЛМЫЪ ЛОЛ ·УОВВ, ‚Л‰ВУН‡ПВ ‡ ‡‚ЪУП‡ЪЛ˜ВТНЛ ‚УИ‰ВЪ ‚ ВКЛП УТЪ‡МУ‚НЛ.
24
CCD-TRV14E/TRV24E 3-859-266-12(1).E/R

Searching for the end of the picture
You can go to the end of the recorded portion after you record and play back the tape to make the transition between the last scene you recorded and the next scene smooth. The tape starts rewinding or fast-forwarding. Then, the last 5 seconds play back if the tape was recorded in SP mode, or the last 10 seconds play back if the tape was recorded in LP mode. Then the tape stops at the end of the recorded picture
(End Search).
Note that End Search function does not work once you eject the cassette after you recorded in the tape.
(1)While pressing PUSH OPEN, open the LCD panel.
(2)Press END SEARCH.
This function works when the POWER switch is set to either CAMERA or PLAYER.
иУЛТН НУМˆ‡ ЛБУ· ‡КВМЛfl
З˚ ПУКВЪВ ФВ ВИЪЛ Н НУМˆЫ Б‡ФЛТ‡ММУИ |
|
|
|
˜‡ТЪЛФУТОВБ‡ФЛТЛЛ‚УТФ УЛБ‚В‰ВМЛfl |
|
|
|
ÎÂÌÚ˚ ‰Îfl Ó·ÂÒÔ˜ÂÌËfl Ô·‚ÌÓ„Ó Ô ÂõÓ‰‡ |
|
||
ПВК‰Ы ФУТОВ‰МВИ ТˆВМУИ, НУЪУ Ы˛ З˚ |
|
|
|
Á‡ÔËÒ‡ÎË, Ë ÒÎÂ‰Û˛˘ÂÈ ÒˆÂÌÓÈ. ãÂÌÚ‡ |
|
|
|
̇˜Ë̇ÂÚ ÛÒÍÓ ÂÌÌÓ Ô ÂχÚ˚‚‡Ú¸Òfl ̇Á‡‰ |
|
||
ЛОЛ ‚ФВ В‰. б‡ЪВП ФУТОВ‰МЛВ 5 ТВНЫМ‰ |
|
|
|
·Ы‰ЫЪ‚УТФ УЛБ‚В‰ВМ˚,ВТОЛОВМЪ‡ |
|
|
|
|
|
||
Б‡ФЛТ‡М‡ ‚ ВКЛПВ SP, ЛОЛ ФУТОВ‰МЛВ 10 |
Basic |
||
ТВНЫМ‰·Ы‰ЫЪ‚УТФ УЛБ‚В‰ВМ˚,ВТОЛОВМЪ‡ |
|||
|
|||
Б‡ФЛТ‡М‡ ‚ ВКЛПВ LP. б‡ЪВП ОВМЪ‡ |
|
operations |
|
ÓÒڇ̇‚ÎË‚‡ÂÚÒfl ‚ ÍÓ̈ Á‡ÔËÒ‡ÌÌÓ„Ó |
|
||
|
|
||
ЛБУ· ‡КВМЛfl (ФУЛТН НУМˆ‡). |
|
|
|
й· ‡ЪЛЪВ ‚МЛП‡МЛВ, ˜ЪУ ЩЫМНˆЛfl ФУЛТН‡ |
|
||
НУМˆ‡ МВ ‡·УЪ‡ВЪ, ВТОЛ З˚ ‚˚ЪУОНМЫОЛ |
|
|
|
Н‡ТТВЪЫ ФУТОВ ‚˚ФУОМВМЛfl З‡¯ВИ Б‡ФЛТЛ М‡ |
|
||
ОВМЪВ. |
|
éÒÌÓ‚Ì˚Â |
|
(2) з‡КПЛЪВ END SEARCH. |
|
||
(1) ç‡ÊËχfl PUSH OPEN, ÓÚÍ ÓÈÚ ԇÌÂθ |
|
||
ÜäÑ . |
|
ÓÔÂ |
|
чÌ̇fl ÙÛÌ͈Ëfl ‡·ÓÚ‡ÂÚ, ÍÓ„‰‡ |
|
||
|
|
||
‚˚Íβ˜‡ÚÂθ POWER ÛÒÚ‡ÌÓ‚ÎÂÌ ‚ |
β·Û˛ |
‡ˆËË |
|
ËÁ ÔÓÁˈËÈ, ëAMERA ËÎË PLAYER. |
|
||
|
|
||
2 END SEARCH
1


25
CCD-TRV14E/TRV24E 3-859-266-12(1).E/R

|
|
|
|
|
|
Advanced operations |
|
ìÒÓ‚Â ¯ÂÌÒÚ‚Ó‚‡ÌÌ˚ ÓÔ ‡ˆËË |
|
|
|
|
|
|
|
Using alternative |
аТФУО¸БУ‚‡МЛВ ‡О¸ЪВ М‡- |
||
power sources |
ÚË‚Ì˚õ ËÒÚÓ˜ÌËÍÓ‚ ÔËÚ‡ÌËfl |
|||
|
|
|
|
|
You can choose any of the following power sources for your camcorder: battery pack, the mains, and 12/24 V car battery. Choose the appropriate power source depending on where you want to use your camcorder.
Place |
Power |
Accessory to |
|
source |
be used |
|
|
|
Indoors |
Mains |
Supplied AC |
|
|
power adaptor |
|
|
|
Outdoor |
Battery pack |
Battery pack (Ni- |
|
|
Cd type) |
In the car |
12 V or 24 V |
Sony DC pack |
|
car battery |
DCP-77 |
|
|
|
Note on power sources
Disconnecting the power source or removing the battery pack during recording or playback may damage the inserted tape. If this happens, restore the power supply again immediately.
This mark indicates that this
product is a genuine accessory for Sony video product. When
purchasing Sony video products, Sony recommends that you purchase accessories with this “GENUINE VIDEO ACCESSORIES” mark.
З˚ ПУКВЪВ ‚˚·Л ‡Ъ¸ О˛·УИ ЛБ ТОВ‰Ы˛˘ЛЛх ЛТЪУ˜МЛНУ‚ ФЛЪ‡МЛfl ‰Оfl З‡¯ВИ ‚Л‰ВУН‡ПВ ˚: ·‡Ъ‡ ВИМ˚И ·ОУН, ТВЪВ‚УВ ФЛЪ‡МЛВ Л ‡‚ЪУПУ·ЛО¸М˚И ‡ННЫПЫОflЪУ 12/ 24 З. З˚·Л ‡ИЪВ М‡‰ОВК‡˘ЛИ ЛТЪУ˜МЛН ФЛЪ‡МЛfl ‚ Б‡‚ЛТЛПУТЪЛ УЪ ЪУ„У, „‰В З˚ хУЪЛЪВ ЛТФУО¸БУ‚‡Ъ¸ З‡¯Ы ‚Л‰ВУН‡ПВ Ы.
еВТЪУ |
àÒÚÓ˜ÌËÍ |
аТФУО¸БЫВП˚В |
|
|
|
|
ÔËÚ‡ÌËfl |
Ф ЛМ‡‰ОВКМУТЪЛ |
|
|
|
|
|
|
Ç ÔÓÏÂ- |
щОВНЪ Л- |
è Ë·„‡ÂÏ˚È |
|
|
|
˘ÂÌËË |
˜ÂÒ͇fl ÒÂÚ¸ |
ÒÂÚ‚Óȇ‰‡ÔÚ |
|
|
|
|
Ô ÂÏ.ÚÓ͇ |
|
|
|
|
|
|
ÇÌÂ |
Ňڇ ÂÈÌ˚È |
Ňڇ ÂÈÌ˚È ·ÎÓÍ |
|
|
ÔÓÏÂ- |
· Î Ó Í |
(ÚËÔ‡Ni-Cd) |
|
|
|
˘ Â Ì Ë fl |
|
|
|
|
|
|
|
|
|
Ç ‡‚ÚÓ- |
Ä‚ÚÓÏÓ·ËθÌ˚È |
ЕОУНФУТЪ.ЪУН‡ |
|
ÏÓ·ËÎÂ |
‡ННЫПЫОflЪУ |
DCP-77 Sony |
|
|
|
|
12 Ç ËÎË 24 Ç |
|
|
|
|
|
|
|
è ËϘ‡ÌËÂ Í ËÒÚÓ˜ÌËÍ‡Ï ÔËÚ‡ÌËfl
йЪТУВ‰ЛМВМЛВ ЛТЪУ˜МЛНУ‚ ФЛЪ‡МЛfl ЛОЛ ТМflЪЛВ ·‡Ъ‡ ВИМУ„У ·ОУН‡ ‚У ‚ ВПfl Б‡ФЛТЛ ЛОЛ‚УТФ УЛБ‚В‰ВМЛflПУКВЪФУ‚ В‰ЛЪ¸ ‚ТЪ‡‚ОВММЫ˛ ОВМЪЫ. ЦТОЛ Ъ‡НУВ ТОЫ˜ЛЪТfl, ‚УТТЪ‡МУ‚ЛЪВ ЛТЪУ˜МЛН ФЛЪ‡МЛfl МВПВ‰ОВММУ.
ç‡ÒÚÓfl˘ËÈ ÁÌ‡Í Û͇Á˚‚‡ÂÚ, ˜ÚÓ
‰‡ММ‡fl Ф У‰ЫНˆЛfl fl‚ОflВЪТfl ФУ‰ОЛММУИ Ф ЛМ‡‰ОВКМУТЪ¸˛
‚Л‰ВУФ У‰ЫНˆЛЛSony.ЦТОЛЗ˚ФУНЫФ‡ВЪВ ‚Л‰ВУФ У‰ЫНˆЛ˛ Sony, ЪУ П˚ ВНУПВМ‰ЫВП, ˜ЪУ·˚ З˚ ФУНЫФ‡ОЛ Ф ЛМ‡‰ОВКМУТЪЛ ТУ БМ‡НУП “GENUINE VIDEO ACCESSORIES.”
26
CCD-TRV14E/TRV24E 3-859-266-12(1).E/R

Using alternative power sources
Using the mains
To use the supplied AC power adaptor:
(1) Connect the mains to a wall outlet. Insert the top of the connecting plate of the AC power adaptor into the top of the battery mounting surface. Push the connecting plate so that it attaches firmly. Make sure that you hear clicks twice.
(2) Set the selector to VTR (DC OUT).
1
1
 2
2
3
WARNING
The mains lead must only be changed at qualified service shop.
PRECAUTIONS
The set is not disconnected from the AC power source (mains) as long as it is connected to the mains, even if the set itself has been turned off.
аТФУО¸БУ‚‡МЛВ ‡О¸ЪВ М‡ЪЛ‚М˚х ЛТЪУ˜МЛНУ‚ ФЛЪ‡МЛfl
аТФУО¸БУ‚‡МЛВ ˝ОВНЪ Л˜ВТНУИ ТВЪЛ
СОfl ЛТФУО¸БУ‚‡МЛfl Ф ЛО‡„‡ВПУ„У ТВЪВ‚У„У ‡‰‡ФЪВ ‡ФВ ВП.ЪУН‡:
(1)иУ‰ТУВ‰ЛМЛЪВТВЪВ‚УИФ У‚У‰НТВЪВ‚УИ УБВЪНВ. ЗТЪ‡‚¸ЪВ ‚В хМЛИ НУМВˆ
ТУВ‰ЛМЛЪВО¸МУИФО‡ТЪЛМ˚ТВЪВ‚У„У ‡‰‡ФЪВ ‡ ФВ ВП. ЪУН‡ ‚ ‚В хМ˛˛ ˜‡ТЪ¸ ·‡Ъ‡ ВИМУИЫТЪ‡МУ‚У˜МУИФУ‚В хМУТЪЛ.
з‡КПЛЪВ М‡ ТУВ‰ЛМЛЪВО¸МЫ˛ ФО‡ТЪЛМЫ, Ъ‡Н, ˜ЪУ·˚ УМ‡ Ф ЛТУВ‰ЛМЛО‡Т¸ М‡‰ВКМУ. м·В‰ЛЪВТ¸, ˜ЪУ·˚ З˚ ЫТО˚¯‡ОЛ ˘ВО˜УН ‰‚‡К‰˚.
(2)мТЪ‡МУ‚ЛЪВ ТВОВНЪУ ‚ ФУОУКВМЛВ VTR (DC OUT).
2
икЦСмикЦЬСЦзаЦ лВЪВ‚УИ Ф У‚У‰ ТОВ‰ЫВЪ Б‡ПВМflЪ¸ ЪУО¸НУ ‚
П‡ТЪВ ТНУИ Н‚‡ОЛЩЛˆЛ У‚‡ММУ„У У·ТОЫКЛ‚‡МЛfl.
икЦСйлнЦкЦЬЦзаЦ С‡ММ˚И ‡ФФ‡ ‡Ъ МВ УЪНО˛˜‡ВЪТfl УЪ
ЛТЪУ˜МЛН‡ ФЛЪ‡МЛfl ФВ ВП. ЪУН‡, ФУН‡ УМ ФУ‰ТУВ‰ЛМВМН˝ОВНЪ Л˜ВТНУИТВЪЛ,‰‡КВ ВТОЛ Т‡П ‡ФФ‡ ‡Ъ УЪНО˛˜ВМ.
‡ˆËË ÓÔ ¯ÂÌÒÚ‚Ó‚‡ÌÌ˚ ìÒÓ‚Â operations Advanced
27
CCD-TRV14E/TRV24E 3-859-266-12(1).E/R
 Loading...