


3-865-334-13 (1)
Video Camera
Recorder
Operating Instructions
Before operating the unit, please read this manual thoroughly, and retain it for future reference.
ИМТЪ ЫНˆЛя ФУ ˝НТФОЫ‡Ъ‡ˆЛЛ
ПВ В‰ ˝НТФОЫ‡Ъ‡ˆЛВИ ‡ФФ‡ ‡Ъ‡ ‚МЛП‡ЪВО¸МУ Ф У˜ЪЛЪВ, ФУК‡ОЫИТЪ‡, ‰‡ММУВ ЫНУ‚У‰ТЪ‚У Л ТУı ‡МяИЪВ В„У ‰Оя ‰‡О¸МВИ¯Лı ТФ ‡‚УН.
CCD-TR713E
CCD-TR515E/TR713E
CCD-TR415E/TR425E 
©1998 by Sony Corporation

English
Welcome!
Congratulations on your purchase of this Sony HandycamR camcorder. With your Handycam you can capture life’s precious moments with superior picture and sound quality.
Your Handycam is loaded with advanced features, but at the same time it is very easy to use. You will soon be producing home video that you can enjoy for years to come.
WARNING
To prevent fire or shock hazard, do not expose the unit to rain or moisture.
To avoid electrical shock, do not open the cabinet.
Refer servicing to qualified personnel only.
NOTICE ON THE SUPPLIED AC POWER ADAPTOR FOR CUSTOMERS IN THE UNITED KINGDOM
A moulded plug complying with BS1363 is fitted to this equipment for your safety and convenience.
Should the fuse in the plug supplied need to be replaced, a 5 AMP fuse approved by ASTA or BSI to BS1362 (i.e., marked with 2or @ mark) must be used.
If the plug supplied with this equipment has a detachable fuse cover, be sure to attach the fuse cover after you change the fuse. Never use the plug without the fuse cover. If you should lose the fuse cover, please contact your nearest Sony service station.
РЫТТНЛИ
ДÓ· Ó ÔÓʇÎÓ‚‡Ú¸!
ПУБ‰ ‡‚ОяВП В‡Т Т Ф ЛУ· ВЪВМЛВП ‰‡ММУИ ‚Л‰ВУН‡ПВ ˚ HandycamR ЩЛ П˚ Sony. С ФУПУ˘¸˛ В‡¯ВИ ‚Л‰ВУН‡ПВ ˚ Handycam Vision В˚ ТПУКВЪВ Б‡ФВ˜‡ЪОВЪ¸ ‰У У„ЛВ В‡П П„МУ‚ВМЛя КЛБМЛ Т Ф В‚УТıУ‰М˚П Н‡˜ВТЪ‚УП ЛБУ· ‡КВМЛя Л Б‚ЫН‡.
В‡¯‡ ‚Л‰ВУН‡ПВ ‡ Handycam Vision УТМ‡˘ВМ‡ ЫТУ‚В ¯ВМТЪ‚У‚‡ММ˚ПЛ ЩЫМНˆЛяПЛ, МУ ‚ ЪУ КВ ‚ ВПя ВВ У˜ВМ¸ ОВ„НУ ЛТФУО¸БУ‚‡Ъ¸. ВТНУ В В˚ ·Ы‰ВЪВ ТУБ‰‡‚‡Ъ¸ ТВПВИМ˚В ‚Л‰ВУФ У„ ‡ПП˚, НУЪУ ˚ПЛ ПУКВЪВ М‡ТО‡К‰‡Ъ¸Тя ‚ ФУТОВ‰Ы˛˘ЛВ „У‰˚.
ПРЕДУПРЕЖДЕНИЕ
ДОя Ф В‰УЪ‚ ‡˘ВМЛя ‚УБ„У ‡МЛя ЛОЛ УФ‡ТМУТЪЛ ˝ОВНЪ Л˜ВТНУ„У Ы‰‡ ‡ У·В „‡ИЪВ ‡ФФ‡ ‡Ъ УЪ ‰УК‰я Л ‚О‡„Л.
ВУ ЛБ·ВК‡МЛВ ФУ ‡КВМЛя ˝ОВНЪ Л˜ВТНЛП ЪУНУП МВ УЪН ˚‚‡ИЪВ НУ ФЫТ.
З‡ У·ТОЫКЛ‚‡МЛВП У· ‡˘‡Ъ¸Тя ЪУО¸НУ Н Н‚‡ОЛЩЛˆЛ У‚‡ММУПЫ У·ТОЫКЛ‚‡˛˘ВПЫ ФВ ТУМ‡ОЫ.
2

English |
|
Table of contents |
|
Before you begin |
|
Using this manual ................................................... |
5 |
Checking supplied accessories ............................. |
7 |
Getting started |
|
Installing and charging the battery pack ............ |
8 |
Inserting a cassette................................................ |
13 |
Basic operations |
|
Camera recording ................................................. |
14 |
Using the zoom feature ..................................... |
17 |
Selecting the START/STOP mode .................. |
19 |
Hints for better shooting ..................................... |
20 |
Checking the recorded picture ........................... |
22 |
Connections for playback .................................... |
24 |
Playing back a tape ............................................... |
26 |
Advanced operations |
|
Using alternative power sources ........................ |
29 |
Using the mains ................................................. |
30 |
Changing the mode settings ............................... |
31 |
– for camera recording – |
|
Shooting with backlighting ................................. |
36 |
Using the FADER function .................................. |
37 |
Shooting in the dark (NightShot) ....................... |
40 |
Using the wide mode function ........................... |
42 |
Using the PROGRAM AE function .................... |
44 |
Focusing manually ............................................... |
46 |
Enjoying picture effect ......................................... |
48 |
Adjusting the exposure ........................................ |
50 |
Superimposing a title ........................................... |
52 |
Making your own titles ........................................ |
54 |
Recording with the date/time ............................ |
56 |
Optimizing the recording condition .................. |
57 |
Using the built-in light (CCD-TR515E/TR713E |
|
only) ..................................................................... |
58 |
Releasing the STEADYSHOT function (CCD- |
|
TR713E only) ...................................................... |
61 |
– for playback/editing – |
|
Editing onto another tape .................................... |
62 |
Additional information |
|
Changing the lithium battery in the |
|
camcorder ........................................................... |
63 |
Resetting the date and time ................................. |
65 |
Simple setting of clock by time difference ........ |
67 |
Usable cassettes and playback modes ............... |
68 |
Tips for using the battery pack ........................... |
70 |
Maintenance information and precautions ....... |
74 |
Using your camcorder abroad ............................ |
80 |
Trouble check ........................................................ |
81 |
Self-diagnosis display .......................................... |
87 |
Specifications ......................................................... |
89 |
Identifying the parts ............................................. |
91 |
Warning indicators ............................................. |
100 |
Index ..................................................................... |
101 |
˝НТФОЫ‡Ъ‡ˆЛЛ М‡˜‡ОУП В‰ПВ / begin you Before
3

РЫТТНЛИ |
|
О„О‡‚ОВМЛВ |
|
ПВ В‰ М‡˜‡ОУП ˝НТФОЫ‡Ъ‡ˆЛЛ |
|
ИÒÔÓθÁÓ‚‡ÌË ‰‡ÌÌÓ„Ó ÛÍÓ‚Ó‰ÒÚ‚‡ ........... |
5 |
П У‚В Н‡ Ф ЛО‡„‡ВП˚ı Ф ЛМ‡‰ОВКМУТЪВИ ... |
7 |
ПУ‰„УЪУ‚Н‡ Н ˝НТФОЫ‡Ъ‡ˆЛЛ |
|
УÒÚ‡Ìӂ͇ Ë Á‡ я‰Í‡ ·‡Ú‡ ÂÈÌÓ„Ó ·ÎÓ͇ ..... |
8 |
ВÒÚ‡‚͇ ͇ÒÒÂÚ˚ ........................................... |
13 |
ОÒÌÓ‚Ì˚ ÓÔ ‡ˆËË |
|
З‡ÔËÒ¸ Ò ÔÓÏÓ˘¸˛ ‚ˉÂÓ͇Ï ˚ ................ |
14 |
ИÒÔÓθÁÓ‚‡ÌË ÙÛÌ͈ËË Ì‡ÂÁ‰‡ |
|
‚ˉÂÓ͇Ï ˚ .............................................. |
17 |
В˚·Ó ÂÊËχ START/STOP ..................... |
19 |
СÓ‚ÂÚ˚ ‰Îя ÎÛ˜¯ÂÈ Ò˙ÂÏÍË ......................... |
20 |
П Ó‚Â Í‡ Á‡ÔËÒ‡ÌÌÓ„Ó ËÁÓ· ‡ÊÂÌËя .......... |
22 |
СУВ‰ЛМВМЛя ‰Оя ‚УТФ УЛБ‚В‰ВМЛя ............. |
24 |
ВÓÒÔ ÓËÁ‚‰ÂÌË ÎÂÌÚ˚ .............................. |
26 |
УÒÓ‚Â ¯ÂÌÒÚ‚Ó‚‡ÌÌ˚ ÓÔ ‡ˆËË |
|
ИÒÔÓθÁÓ‚‡ÌË ‡Î¸Ú ̇ÚË‚Ì˚ı ËÒÚÓ˜ÌËÍÓ‚ |
|
ÔËÚ‡ÌËя ........................................................ |
29 |
ИТФУО¸БУ‚‡МЛВ ˝ОВНЪ Л˜ВТНУИ ТВЪЛ ........ |
30 |
ИБПВМВМЛВ ЫТЪ‡МУ‚УН ВКЛПУ‚ ................... |
32 |
- ДÎя Á‡ÔËÒË Ò ÔÓÏÓ˘¸˛ ‚ˉÂÓ͇Ï ˚ - |
|
С˙ВПН‡ Т Б‡‰МВИ ФУ‰Т‚ВЪНУИ ...................... |
36 |
ИÒÔÓθÁÓ‚‡ÌË ÙÛ̈ËË FADER ................... |
37 |
С˙ÂÏ͇ ‚ ÚÂÏÌ˚ı ÛÒÎÓ‚Ëяı |
|
(ÌӘ̇я Ò˙ÂÏ͇) .......................................... |
40 |
ИТФУО¸БУ‚‡МЛВ ЩЫМНˆЛЛ ¯Л УНУЩУ П‡ЪМУ„У |
|
ÂÊËχ ........................................................ |
42 |
ИÒÔÓθÁÓ‚‡ÌË ÙÛÌ͈ËË PROGRAM AE ..... |
44 |
РЫ˜М‡я ЩУНЫТЛ У‚Н‡ .................................... |
46 |
Н‡ТО‡К‰ВМЛВ ˝ЩЩВНЪ‡ПЛ ЛБУ· ‡КВМЛИ .... |
48 |
РВ„ЫОЛ У‚Н‡ ˝НТФУБЛˆЛЛ .............................. |
50 |
Н‡ОУКВМЛВ М‡‰ФЛТЛ ...................................... |
52 |
СУБ‰‡МЛВ В‡¯Лı ТУ·ТЪ‚ВММ˚ı М‡‰ФЛТВИ .... |
54 |
З‡ФЛТ¸ Т ‰‡ЪУИ/‚ ВПВМВП ............................. |
56 |
ОФЪЛПЛБ‡ˆЛя ТУТЪУяМЛя Б‡ФЛТЛ .................. |
57 |
ИТФУО¸БУ‚‡МЛВ ‚ТЪ УВММУИ ФУ‰Т‚ВЪНЛ |
|
(͇҇ÂÚÒя ÚÓθÍÓ ÏÓ‰ÂÎÂÈ CCD-TR515E/ |
|
TR713E) ....................................................... |
58 |
ОÚÍβ˜ÂÌË ÙÛÌ͈ËË STEADYSHOT |
|
(ÚÓθÍÓ CCD-TR713E) ................................ |
61 |
- ДÎя ‚ÓÒÔ ÓËÁ‚‰ÂÌËя/ÏÓÌڇʇ - |
|
МУМЪ‡К М‡ ‰ Ы„Ы˛ ОВМЪЫ .............................. |
62 |
ДУФУОМЛЪВО¸М‡я ЛМЩУ П‡ˆЛя |
|
З‡ПВМ‡ ОЛЪЛВ‚УИ ·‡Ъ‡ ВИНЛ ‚ |
|
‚ˉÂÓ͇Ï  ............................................... |
63 |
УТЪ‡МУ‚Н‡ ‰‡Ъ˚ Л ‚ ВПВМЛ .......................... |
65 |
П ÓÒÚ‡я ÛÒÚ‡Ìӂ͇ ˜‡ÒÓ‚ Ò ÔÓÏÓ˘¸˛ |
|
‡БМЛˆ˚ ‚У ‚ ВПВМЛ ................................... |
67 |
ИÒÔÓθÁÛÂÏ˚ ͇ÒÒÂÚ˚ Ë ÂÊËÏ˚ |
|
‚ÓÒÔ ÓËÁ‚‰ÂÌËя ........................................ |
68 |
СУ‚ВЪ˚ ФУ ЛТФУО¸БУ‚‡МЛ˛ ·‡Ъ‡ ВИМУ„У |
|
·ÎÓ͇ ........................................................... |
70 |
ИÌÙÓ Ï‡ˆËя ÔÓ ÛıÓ‰Û Á‡ ‡ÔÔ‡ ‡ÚÓÏ Ë |
|
Ф В‰УТЪУ УКМУТЪЛ ..................................... |
74 |
ИÒÔÓθÁÓ‚‡ÌËÂ В‡¯ÂÈ ‚ˉÂÓ͇Ï ˚ Á‡ |
|
„ ‡ÌˈÂÈ ...................................................... |
80 |
П У‚В Н‡ МВЛТФ ‡‚МУТЪВИ ........................... |
84 |
ДЛТФОВИ Т‡ПУ‰Л‡„МУТЪЛНЛ ........................... |
88 |
ТВıМЛ˜ВТНЛВ ı‡ ‡НЪВ ЛТЪЛНЛ ...................... |
90 |
ОÔÓÁ̇‚‡ÌË ˜‡ÒÚÂÈ ..................................... |
91 |
П Â‰ÛÔ Âʉ‡˛˘Ë Ë̉Ë͇ÚÓ ˚ ............... |
100 |
АÎÙ‡‚ËÌÚ˚È Û͇Á‡ÚÂθ .............................. |
102 |
4

Before you begin
Using this manual
The instructions in this manual are for the four models listed below. Before you start reading this manual and operating the unit, check your model number by looking at the bottom of your camcorder. The CCD-TR713E is the model used for illustration purposes. Otherwise, the model name is indicated in the illustrations. Any differences in operation are clearly indicated in the text, for example, “CCD-TR713E only.”
As you read through this manual, buttons and settings on the camcorder are shown in capital letters.
e.g. Set the POWER switch to CAMERA. You can hear the beep sound to confirm your operation.
ПВ В‰ М‡˜‡ОУП ˝НТФОЫ‡Ъ‡ˆЛЛ
ИÒÔÓθÁÓ‚‡ÌË ‰‡ÌÌÓ„Ó ÛÍÓ‚Ó‰ÒÚ‚‡
ИМТЪЫНˆЛЛ ‚ ‰‡ММУП ЫНУ‚У‰ТЪ‚В Ф В‰М‡БМ‡˜ВМ˚ ‰Оя ˜ВЪ˚ Вı МЛКВФВ В˜ЛТОВММ˚ı ПУ‰ВОВИ. ПВ В‰ ЪВП, Н‡Н В˚ М‡˜МВЪВ ˜ЛЪ‡Ъ¸ ‰‡ММУВ ЫНУ‚У‰ТЪ‚У Л ˝НТФОЫ‡ЪЛ У‚‡Ъ¸ ‡ФФ‡ ‡Ъ, Ф У‚В ¸ЪВ МУПВ В‡¯ВИ ПУ‰ВОЛ, ФУТПУЪ В‚ М‡ МЛКМ˛˛ Ф‡МВО¸ В‡¯ВИ ‚Л‰ВУН‡ПВ ˚. МУ‰ВО¸ CCD-TR713Е ЛТФУО¸БЫВЪТя ‚ ЛОО˛ТЪ ‡ЪЛ‚М˚ı ˆВОяı. В Ф УЪЛ‚МУП ТОЫ˜‡В М‡ЛПВМУ‚‡МЛВ ПУ‰ВОЛ ЫН‡Б˚‚‡ВЪТя М‡ ЛТЫМН‡ı. Л˛·˚В ‡БОЛ˜Ля ‚‡·УЪВ ˜ВЪНУ ЫН‡Б‡М˚ ‚ ЪВНТЪВ, Н‡Н М‡Ф ЛПВ , “ТУО¸НУ CCD-TR713Е”.
КУ„‰‡ В˚ ·Ы‰ВЪВ ˜ЛЪ‡Ъ¸ ‰‡ММУВ ЫНУ‚У‰ТЪ‚У, Ы˜ЛЪ˚‚‡ИЪВ, ˜ЪУ НМУФНЛ Л ЫТЪ‡МУ‚НЛ М‡ ‚Л‰ВУН‡ПВ В ФУН‡Б‡М˚ ‚ ЪВНТЪВ Ф УФЛТМ˚ПЛ ·ЫН‚‡ПЛ.
П ЛПВ . УТЪ‡МУ‚ЛЪВ ‚˚НО˛˜‡ЪВО¸ POWER ‚ ФУОУКВМЛВ CAMERA.
В˚ ПУКВЪВ ТО˚¯‡Ъ¸ БЫППВ М˚И Б‚ЫНУ‚УИ ТЛ„М‡О , ФУ‰Ъ‚В К‰‡˛˘ЛИ ‚˚ФУОМВМЛВ ТУУЪ‚ВЪТЪ‚Ы˛˘ВИ УФВ ‡ˆЛЛ.
Types of differences |
|
|
ТËÔ˚ ‡Á΢ËÈ |
|||
|
|
|
|
|
|
|
CCD- |
TR415E |
TR425E |
TR515E |
TR713E |
||
|
|
|
|
|
|
|
System |
h |
h |
H |
H |
||
СЛТЪВП‡ |
||||||
|
|
|
|
|
||
|
|
|
|
|
|
|
Digital zoom/ |
36×1) |
72×2) |
72×2) |
72×2) |
|
|
ЦЛЩ У‚УИ Ъ ‡МТЩУН‡ЪУ |
|
|||||
|
|
|
|
|
||
|
|
|
|
|
|
|
SteadyShot/ |
— |
— |
— |
r |
||
УÒÚÓȘ˂‡я Ò˙ÂÏ͇ |
||||||
|
|
|
|
|
||
Remote sensor/ |
— |
r |
r |
r |
||
Д‡Ú˜ËÍ ‰ËÒڇ̈ËÓÌ- |
||||||
ÌÓ„Ó ÛÔ ‡‚ÎÂÌËя |
|
|
|
|
|
|
Laser link/ |
— |
— |
— |
r |
||
ИК ‡Ы‰ЛУ/‚Л‰ВУФ ЛВПМЛН |
||||||
|
|
|
|
|
||
Built-in light/ |
— |
— |
r |
r |
||
ВÒÚ ÓÂÌ̇я ÔÓ‰Ò‚ÂÚ͇ |
||||||
|
|
|
|
|
||
1) 220× in some areas |
|
|
1) 220x ‚ МВНУЪУ ˚ı У·О‡ТЪяı |
|||
2) 330× in some areas |
|
|
2) 330x ‚ МВНУЪУ ˚ı У·О‡ТЪяı |
|||
˝НТФОЫ‡Ъ‡ˆЛЛ М‡˜‡ОУП В‰ПВ / begin you Before
5

Using this manual
Note on TV colour systems
TV colour systems differ from country to country. To view your recordings on a TV, you need a PAL system-based TV.
Precaution on copyright
Television programmes, films, video tapes, and other materials may be copyrighted. Unauthorized recording of such materials may be contrary to the provision of the copyright laws.
Precautions on camcorder care
•Do not let the camcorder get wet. Keep the camcorder away from rain and sea water. Letting the camcorder get wet may cause the unit to malfunction, and sometimes this malfunction cannot be repaired [a].
•Never leave the camcorder exposed to temperatures above 60°C (140°F ), such as in a car parked in the sun or under direct sunlight
[b].
[a]
ИÒÔÓθÁÓ‚‡ÌË ‰‡ÌÌÓ„ÓÛÍÓ‚Ó‰ÒÚ‚‡
П ЛПВ˜‡МЛВ Н ТЛТЪВП‡П
ˆ‚ÂÚÌÓ„Ó ÚÂ΂ˉÂÌËя
СЛТЪВП˚ ˆ‚ВЪМУ„У ЪВОВ‚Л‰ВМЛя УЪОЛ˜‡˛ЪТя ‚ Б‡‚ЛТЛПУТЪЛ УЪ ТЪ ‡М˚. ДОя Ф УТПУЪ ‡ В‡¯Лı Б‡ФЛТВИ ФУ ЪВОВ‚ЛБУ Ы В‡П МВУ·ıУ‰ЛПУ ЛТФУО¸БУ‚‡Ъ¸ ЪВОВ‚ЛБУ , УТМУ‚‡ММ˚И М‡ ТЛТЪВПВ PAL.
П В‰УТЪВ ВКВМЛВ У· ‡‚ЪУ ТНУП
Ô ‡‚Â
ТВОВ‚ЛБЛУММ˚В Ф У„ ‡ПП˚, НЛМУЩЛО¸П˚, ‚Л‰ВУОВМЪ˚ Л ‰ Ы„ЛВ П‡ЪВ Л‡О˚ ПУ„ЫЪ ·˚Ъ¸ Б‡˘Л˘ВМ˚ ‡‚ЪУ ТНЛП Ф ‡‚УП. НВФ ‡‚УПУ˜М‡я Б‡ФЛТ¸ Ъ‡НЛı П‡ЪВ Л‡ОУ‚ ПУКВЪ Ф УЪЛ‚У В˜ЛЪ¸ ЫТОУ‚ЛяП Б‡НУМ‡ У· ‡‚ЪУ ТНУП Ф ‡‚В.
П В‰УТЪУ УКМУТЪЛ ФУ ЫıУ‰Ы Б‡
‚ˉÂÓ͇Ï ÓÈ
•НВ ‰УФЫТН‡ИЪВ М‡ПУН‡МЛя ‚Л‰ВУН‡ПВ ˚. П В‰Уı ‡МяИЪВ ‚Л‰ВУН‡ПВ Ы УЪ ‰УК‰я ЛОЛ ПУ ТНУИ ‚У‰˚. ЕТОЛ В˚ М‡ПУ˜ЛЪВ ‚Л‰ВУН‡ПВ Ы, ЪУ ˝ЪУ ПУКВЪ ‚˚Б‚‡Ъ¸ МВЛТФ ‡‚МУТЪ¸ ‡ФФ‡ ‡Ъ‡, Л ‚ МВНУЪУ ˚ı ТОЫ˜‡яı ˝Ъ‡ МВЛТФ ‡‚МУТЪ¸ МВ ФУ‰ОВКЛЪВПУМЪЫ [a].
•НЛНУ„‰‡ МВ УТЪ‡‚ОяИЪВ ‚Л‰ВУН‡ПВ Ы ‚ ПВТЪВ Т ЪВПФВ ‡ЪЫ УИ Т‚˚¯В 60°С (140°F), Н‡Н М‡Ф ЛПВ , ‚ ‡‚ЪУПУ·ЛОВ, УТЪ‡‚ОВММУП М‡ ТУОМˆВ ЛОЛ ФУ‰ Ф яП˚ПЛ ТУОМВ˜М˚ПЛ ОЫ˜‡ПЛ [b].
[b]
6
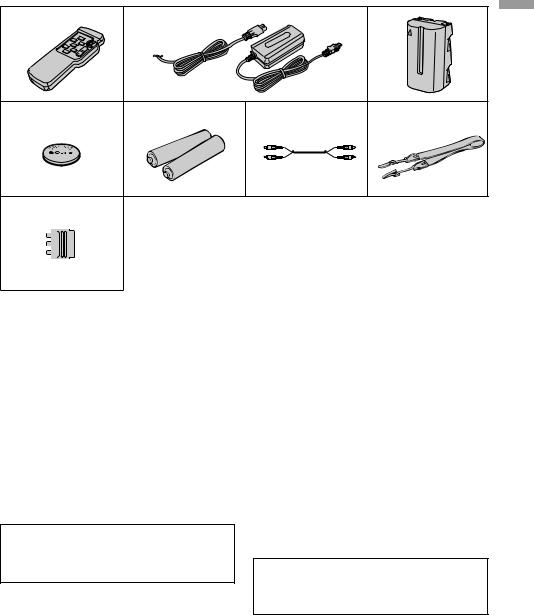
Checking supplied |
П Ó‚Â Í‡ Ô Ë·„‡ÂÏ˚ı |
accessories |
Ф ЛМ‡‰ОВКМУТЪВИ |
|
|
Check that the following accessories are supplied |
П Ó‚Â ¸Ú ̇΢ˠÒÎÂ‰Û˛˘Ëı |
||
with your camcorder. |
|
Ф ЛМ‡‰ОВКМУТЪВИ ‚ НУПФОВНЪВ В‡¯ВИ |
|
|
|
‚ˉÂÓ͇Ï ˚. |
|
1 |
2 |
|
3 |
|
|
|
/ begin youBefore |
4 |
5 |
6 |
7 |
|
|
|
̇˜‡ÎÓÏП‰ |
8 |
|
|
˝НТФОЫ‡Ъ‡ˆЛЛ |
|
|
|
|
1Wireless Remote Commander (1) (p. 95) CCD-TR425E/TR515E/TR713E only
2AC-L10A/L10B/L10C AC power adaptor (1),
Mains lead (1) (p. 9, 30)
3 NP-F330 battery pack (1) (p. 8, 29)
4CR2025 lithium battery (1) (p. 63)
The lithium battery is already installed in your camcorder.
5R6 (size AA) battery for Remote Commander (2) (p. 96) CCD-TR425E/TR515E/TR713E only
6 A/V connecting cable (1) (p. 24)
7 Shoulder strap (1) (p. 97)
821-pin adaptor (1) (p. 25)
Contents of the recording cannot be compensated if recording or playback is not made due to a malfunction of the camcorder, video tape, etc.
1БВТФ У‚У‰М˚И ФЫО¸Ъ ‰ЛТЪ‡МˆЛУММУ„У ЫФ ‡‚ОВМЛя (1) (ÒÚ . 95)
ТÓθÍÓ CCD-TR425E/TR515E/TR713E
2СÂÚ‚ÓÈ ‡‰‡ÔÚ Ô ÂÏ. ÚÓ͇ AC-L10A/ L10B/L10C (1), CÂÚ‚ÓÈ Ô Ó‚Ó‰ (1) (ÒÚ . 9, 30)
3Б‡Ú‡ ÂÈÌ˚È ·ÎÓÍ NP-F330 (1) (ÒÚ . 8, 29)
4ЛËÚË‚‡я ·‡Ú‡ ÂÈ͇ CR2025 (1) (ÒÚ . 63) ЛËÚË‚‡я ·‡Ú‡ ÂÈ͇ ÛÊ ÛÒÚ‡ÌÓ‚ÎÂ̇ ‚ В‡¯ÂÈ ‚ˉÂÓ͇Ï Â.
5Б‡Ъ‡ ВИН‡ R6 ( ‡БПВ УП АА) ‰Оя ФЫО¸Ъ‡ ‰ЛТЪ‡МˆЛУММУ„У ЫФ ‡‚ОВМЛя (2) (ÒÚ . 96) ТÓθÍÓ CCD-TR425E/TR515E/TR713E
6СУВ‰ЛМЛЪВО¸М˚И Н‡·ВО¸ ‡Ы‰ЛУ/‚Л‰ВУ
(1) (ÒÚ . 24)
7ПΘ‚ÓÈ ÂÏÂ̸ (1) (ÒÚ . 97)
8 21-¯Ú˚ ¸ÍÓ‚˚È ‡‰‡ÔÚ (1) (ÒÚ . 25)
СУ‰В КЛПУВ Б‡ФЛТЛ МВ ПУКВЪ ·˚Ъ¸ НУПФВМТЛ У‚‡МУ, ВТОЛ Б‡ФЛТ¸ ЛОЛ ‚УТФ УЛБ‚В‰ВМЛВ МВ ‚˚ФУОМяВЪТя ‚ТОВ‰ТЪ‚ЛВ ФУ‚ ВК‰ВМЛя ‚Л‰ВУН‡ПВ ˚, ‚Л‰ВУОВМЪ˚ Л Ъ.‰.
7
|
|
|
|
|
|
Getting started |
|
ПУ‰„УЪУ‚Н‡ Н ˝НТФОЫ‡Ъ‡ˆЛЛ |
|
Installing and charging |
УcÚaÌo‚͇ Ë Á‡ я‰Í‡ |
|||
the battery pack |
·‡Ú‡ ÂÈÌÓ„Ó ·ÎÓ͇ |
|||
Before using your camcorder, you first need to install and charge the battery pack.
This camcorder operates only with the “InfoLITHIUM” battery pack (L series). “InfoLITHIUM” is a trademark of Sony corporation.
Installing the battery pack
Install the battery pack in the direction of the $ mark on the battery pack. Slide the battery pack down until it catches on the battery release lever and clicks.
Attach the battery pack to the camcorder securely.
Note on the battery pack
Do not carry the camcorder by grasping the battery pack.
ПВ В‰ ЛТФУО¸БУ‚‡МЛВП В‡¯ВИ ‚Л‰ВУН‡ПВ ˚ В‡П МЫКМУ ТФВ ‚‡ Б‡ я‰ЛЪ¸ Л ЫТЪ‡МУ‚ЛЪ¸ ·‡Ъ‡ ВИМ˚И ·ОУН.
Д‡Ì̇я ‚ˉÂÓ͇Ï ‡ ‡·ÓÚ‡ÂÚ ÚÓθÍÓ ÓÚ ·‡Ú‡ ÂÈÌÓ„Ó ·ÎÓ͇ “InfoLITHIUM”. (Ò Ëя L). “InfoLITHIUM” я‚ÎяÂÚÒя ÚÓ‚‡ Ì˚Ï Á̇ÍÓÏ ÍÓ ÔÓ ‡ˆËË Sony.
УÒÚ‡Ìӂ͇ ·‡Ú‡ ÂÈÌÓ„Ó ·ÎÓ͇
УТЪ‡МУ‚ЛЪВ ·‡Ъ‡ ВИМ˚И ·ОУН ‚ М‡Ф ‡‚ОВМЛЛ БМ‡Н‡ $ М‡ ·‡Ъ‡ ВИМУП ·ОУНВ. Д‚Л„‡ИЪВ ·‡Ъ‡ ВИМ˚И ·ОУН ‚МЛБ ‰У ЪВı ФУ , ФУН‡ УМ МВ ·Ы‰ВЪ Б‡ı‚‡˜ВМ ˚˜‡„УП УТ‚У·УК‰ВМЛя ·‡Ъ‡ ВИМУ„У ·ОУН‡ Л МВ Б‡˘ВОНМВЪТя. Н‡‰ВКМУ Ф ЛТУВ‰ЛМЛЪВ ·‡Ъ‡ ВИМ˚И ·ОУН Н ‚Л‰ВУН‡ПВ В.
П ЛПВ˜‡МЛВ Н ·‡Ъ‡ ВИМУПЫ ·ОУНЫ
НВ МУТЛЪВ ‚Л‰ВУН‡ПВ Ы, ‰В К‡ ВВ Б‡ ·‡Ъ‡ ВИМ˚И ·ОУН.
8
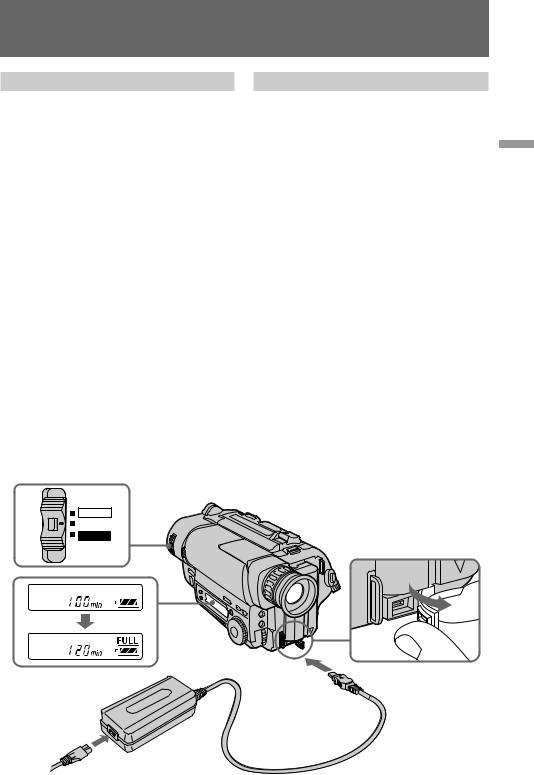
Installing and charging the battery pack
Charging the battery pack
Charge the battery pack on a flat surface without vibration. The battery pack is charged a little in the factory.
(1) Open the DC IN jack cover and connect the supplied AC power adaptor to the DC IN jack with the plug’s 4mark up.
(2) Connect the mains lead to the AC power adaptor.
(3) Connect the mains lead to the mains.
(4) Slide the POWER switch to OFF. Remaining battery time is indicated by the minutes on the display window. Charging begins.
When the remaining battery indicator becomes ı, normal charge is completed. For full charge, which allows you to use the battery longer than usual, leave the battery pack attached for about 1 hour after normal charge is completed until FULL appears in the display window.
Before using the camcorder with the battery pack, unplug the AC power adaptor from the DC IN jack of the camcorder. You can also use the battery pack before it is completely charged.
POWER
CAMERA
OFF
PLAYER
УcÚaÌo‚͇ Ë Á‡ я‰Í‡ ·‡Ú‡ ÂÈÌÓ„Ó ·ÎÓ͇
З‡ я‰Í‡ ·‡Ú‡ ÂÈÌÓ„Ó ·ÎÓ͇
З‡ яК‡ИЪВ ·‡Ъ‡ ВИМ˚И ·ОУН М‡ ФОУТНУИ ФУ‚В ıМУТЪЛ, МВФУ‰‚В КВММУИ ‚Л· ‡ˆЛЛ. Б‡Ъ‡ ВИМ˚И ·ОУН Б‡ яКВМ МВПМУ„У М‡ Б‡‚У‰В. (1) ОÚÍ ÓÈÚÂ Í ˚¯ÍÛ „ÌÂÁ‰‡ DC IN Ë
ФУ‰ТУВ‰ЛМЛЪВ Ф ЛО‡„‡ВП˚И ТВЪВ‚УИ ‡‰‡ФЪВ ФВ ВПВММУ„У ЪУН‡ Н „МВБ‰Ы DC IN Ъ‡Н, ˜ЪУ·˚ ПВЪН‡ 4 М‡ ¯ЪВНВ В ·˚О‡‡ТФУОУКВМ‡ Т‚В ıЫ.
(2) ПУ‰ТУВ‰ЛМЛЪВ ТВЪВ‚УИ Ф У‚У‰ Н ТВЪВ‚УПЫ ‡‰‡ФЪВ Ы ФВ ВПВММУ„У ЪУН‡.
(3) ПУ‰ТУВ‰ЛМЛЪВ ТВЪВ‚УИ Ф У‚У‰ Н ТВЪЛ. (4) ПВ В‰‚ЛМ¸ЪВ ‚˚НО˛˜‡ЪВО¸ POWER ФУОУКВМЛВ OFF. ОТЪ‡‚¯ВВТя ‚ ВПя Б‡ я‰‡ ·‡Ъ‡ ВИМУ„У ·ОУН‡ ·Ы‰ВЪ УЪУ· ‡К‡Ъ¸Тя ‚ ПЛМЫЪ‡ı ‚ УНУ¯НВ
‰ЛТФОВя. Н‡˜МВЪТя Б‡ я‰Н‡. ЕТОЛ ЛМ‰ЛН‡ЪУ УТЪ‡‚¯В„УТя Б‡ я‰‡
·‡Ú‡ ÂÈÌÓ„Ó ·ÎÓ͇ ·Û‰ÂÚ ËÏÂÚ¸ ‚ˉ ı, ˝ÚÓ Á̇˜ËÚ, ˜ÚÓ Á‡‚ ¯Â̇ ÌÓ Ï‡Î¸Ì‡я Á‡ я‰Í‡. ДÎя ФУОМУИ Б‡ я‰НЛ, НУЪУ ‡я ФУБ‚УОяВЪ В‡П ЛТФУО¸БУ‚‡Ъ¸ ·‡Ъ‡ ВИМ˚И ·ОУН ‰УО¸¯В, ˜ВП У·˚˜МУ, УТЪ‡‚¸ЪВ ·‡Ъ‡ ВИМ˚И ·ОУН Ф ЛТУВ‰ЛММВМ˚П Ф ЛПВ МУ М‡ У‰ЛМ ˜‡Т ФУТОВ Б‡‚В ¯ВМЛя МУ П‡О¸МУИ Б‡ я‰НЛ, ФУН‡ ‚ УНУ¯НВ ‰ЛТФОВя МВ ФУя‚ЛЪТя ЛМ‰ЛН‡ˆЛя
FULL.
ПВ В‰ ЛТФУО¸БУ‚‡МЛВП ‚Л‰ВУН‡ПВ ˚ Т ·‡Ъ‡ ВИМ˚П ·ОУНУП ‚ Н‡˜ВТЪ‚В ЛТЪУ˜МЛН‡ ФЛЪ‡МЛя УЪТУВ‰ЛМЛЪВ ТВЪВ‚УИ ‡‰‡ФЪВ ФВ ВПВММУ„У ЪУН‡ УЪ „МВБ‰‡ DC IN М‡ ‚Л‰ВУН‡ПВ В. В˚ Ъ‡НКВ ПУКВЪВ ЛТФУО¸БУ‚‡Ъ¸ ·‡Ъ‡ ВИМ˚И ·ОУН ‰У ЪУ„У, Н‡Н УМ ФУОМУТЪ¸˛ Б‡ я‰ЛЪТя.
˝НТФОЫ‡Ъ‡ˆЛЛ Н ПУ‰„УЪУ‚Н‡ / started Getting
9

Installing and charging the battery pack
Notes
•“--- min” appears on the display until the camcorder calculates remaining battery time.
•Remaining battery time indication in the display window roughly indicates the recording time. Use it as a guide. It may differ from the actual recording time.
•If there is a slight difference in shape between the plug of mains lead and the terminal of AC power adaptor, it is ignorable for their mutual connection and power supply.
•Be sure to plug the mains lead deeply into the terminal of AC power adaptor so that it is firmly locked. If there is a gap between the plug of mains lead and the terminal of AC power adaptor, it does not affect the efficiency of the AC power adaptor.
Charging time
Battery pack (NP-) |
Charging time* (min.) |
|
F330 (supplied) |
150 |
(90) |
|
|
|
F530/F550 |
210 |
(150) |
|
|
|
F730/F750 |
300 |
(240) |
|
|
|
F930/F950 |
390 |
(330) |
|
|
|
The time required for a normal charge is indicated in parentheses.
*Approximate minutes to charge an empty battery pack using the supplied AC power adaptor. (Lower temperatures require a longer charging time.)
Battery life
CCD-TR415E/TR425E/TR515E
Battery |
Continuous |
Typical |
|
pack (NP-) |
recording time* |
recording time** |
|
|
|
|
|
F330 |
130 (115) |
65 (60) |
|
(supplied) |
|||
|
|
||
|
|
|
|
F530 |
225 (200) |
115 (105) |
|
|
|
|
|
F550 |
260 (230) |
135 (120) |
|
|
|
|
|
F730 |
450 (405) |
235 (210) |
|
|
|
|
|
F750 |
530 (480) |
280 (250) |
|
|
|
|
|
F930 |
710 (640) |
375 (335) |
|
|
|
|
|
F950 |
815 (730) |
430 (385) |
|
|
|
|
10
УcÚaÌo‚͇ Ë Á‡ я‰Í‡ ·‡Ú‡ ÂÈÌÓ„Ó ·ÎÓ͇
П ËϘ‡ÌËя
•“--- min” УЪУ· ‡К‡ВЪТя М‡ ‰ЛТФОВВ, ФУН‡ МВ ФУя‚ЛЪТя ‚ ВПя УТЪ‡‚¯В„УТя Б‡ я‰‡ ·‡Ъ‡ ВИМУ„У ·ОУН‡.
•ИМ‰ЛН‡ˆЛя УТЪ‡‚¯В„УТя ‚ ВПВМЛ Б‡ я‰‡ ·‡Ъ‡ ВИМУ„У ·ОУН‡ ‚ УНУ¯НВ ‰ЛТФОВя Ф Л·ОЛБЛЪВО¸МУ ФУН‡Б˚‚‡ВЪ ‚ ВПя Б‡ФЛТЛ. ИТФУО¸БЫИЪВ ВВ ‚ Н‡˜ВТЪ‚В ЫНУ‚У‰ТЪ‚‡. ЭЪУ ПУКВЪ УЪОЛ˜‡Ъ¸Тя УЪ Щ‡НЪЛ˜ВТНУ„У ‚ ВПВМЛ Б‡ФЛТЛ.
•ЕТОЛ ТЫ˘ВТЪ‚ЫВЪ МВ·УО¸¯УВ ‡БОЛ˜ЛВ ФУ ЩУ ПВ ПВК‰Ы ¯ЪВФТВО¸М˚П ‡Б˙ВПУП ТВЪВ- ‚˚ı Ф У‚У‰У‚ Л „МВБ‰УП ТВЪВ‚У„У ‡‰‡ФЪВ ‡ ФВ ВПВММУ„У ЪУН‡, ЪУ ˝ЪУ МВ ‚ОЛяВЪ М‡ Лı ‚Б‡ЛПМУВ ТУВ‰ЛМВМЛВ Л ФУ‰‡˜Ы ФЛЪ‡МЛя.
•О·яБ‡ЪВО¸МУ ‚ТЪ‡‚¸ЪВ ‡Б˙ВП ТВЪВ‚У„У Ф У‚У‰‡ „ОЫ·УНУ ‚ „МВБ‰У ТВЪВ‚У„У ‡‰‡ФЪВ ‡ ФВ ВПВММУ„У ЪУН‡ Ъ‡Н, ˜ЪУ·˚ УМ ·˚О М‡‰ВКМУ Б‡ЩЛНТЛ У‚‡М. ЕТОЛ УТЪ‡ВЪТя Б‡БУ ПВК‰Ы ‡Б˙ВПУП ТВЪВ‚У„У Ф У‚У‰‡ Л „МВБ‰УП ТВЪВ‚У„У ‡‰‡ФЪВ ‡ ФВ ВПВММУ„У ЪУН‡, ЪУ ˝ЪУ МВ ‚ОЛяВЪ М‡ ˝ЩЩВНЪЛ‚МУТЪ¸ ТВЪВ‚У„У ‡‰‡ФЪВ ‡ ФВ ВПВММУ„У ЪУН‡.
В ÂÏя Á‡ я‰ÍË
Б‡Ú‡ ÂÈÌ˚È ·ÎÓÍ (NP-) В ÂÏя Á‡ я‰ÍË* (ÏËÌ.)
F330 (Ô Ë·„‡ÂÚÒя) |
150 |
(90) |
F530/F550 |
210 |
(150) |
|
|
|
F730/F750 |
300 |
(240) |
|
|
|
F930/F950 |
390 |
(330) |
ЧËÒ· ‚ ÒÍӷ͇ı Û͇Á˚‚‡˛Ú ‚ ÂÏя ‰Îя ÌÓ Ï‡Î¸ÌÓÈ Á‡ я‰ÍË.
*П Л·ОЛБЛЪВО¸МУВ ‚ ВПя ‚ ПЛМЫЪ‡ı ‰Оя Б‡ я‰НЛ ФУОМУТЪ¸˛ ‡Б яКВММУ„У ·‡Ъ‡ ВИМУ„У ·ОУН‡ Т ЛТФУО¸БУ‚‡МЛВП Ф ЛО‡„‡ВПУ„У ТВЪВ‚У„У ‡‰‡ФЪВ ‡ ФВ ВПВММУ„У ЪУН‡. (П Л ·УОВВ МЛБНЛı ЪВПФВ ‡ЪЫ ‡ı ФУЪ В·ЫВЪТя ·УОВВ ‰ОЛЪВО¸МУВ ‚ ВПя Б‡ я‰НЛ.)
С УНТОЫК·˚Б‡ я‰‡·‡Ъ‡ ВИМУ„У·ОУН‡
CCD-TR415E/TR425E/TR515E
Б‡Ú‡ ÂÈÌ˚È В ÂÏя |
В ÂÏя |
||
·ÎÓÍ |
ÌÂÔ Â ˚‚ÌÓÈ |
ÚËÔ˘ÌÓÈ |
|
(NP-) |
Á‡ÔËÒË* |
Á‡ÔËÒË** |
|
|
|
|
|
F330 |
130 (115) |
65 (60) |
|
(Ô Ë·„‡ÂÚÒя) |
|||
|
|
||
|
|
|
|
F530 |
225 (200) |
115 (105) |
|
|
|
|
|
F550 |
260 (230) |
135 (120) |
|
|
|
|
|
F730 |
450 (405) |
235 (210) |
|
|
|
|
|
F750 |
530 (480) |
280 (250) |
|
|
|
|
|
F930 |
710 (640) |
375 (335) |
|
|
|
|
|
F950 |
815 (730) |
430 (385) |
|
|
|
|
|
Installing and charging the battery pack
CCD-TR713E
Battery |
Continuous |
Typical |
|
pack (NP-) |
recording time* |
recording time** |
|
|
|
|
|
F330 |
125 (110) |
65 (55) |
|
(supplied) |
|||
|
|
||
|
|
|
|
F530 |
215 (190) |
110 (100) |
|
|
|
|
|
F550 |
250 (220) |
130 (115) |
|
|
|
|
|
F730 |
430 (385) |
225 (200) |
|
|
|
|
|
F750 |
510 (460) |
270 (240) |
|
|
|
|
|
F930 |
680 (610) |
360 (320) |
|
|
|
|
|
F950 |
780 (700) |
410 (370) |
|
|
|
|
Numbers in parentheses indicate the time when you use a normally charged battery.
Battery life will be shorter if you use the camcorder in a cold environment.
*Approximate continuous recording time at 25°C (77°F).
**Approximate minutes when recording while you repeat recording start/stop, zooming and turning the power on/off. The actual battery life may be shorter.
УcÚaÌo‚͇ Ë Á‡ я‰Í‡ ·‡Ú‡ ÂÈÌÓ„Ó ·ÎÓ͇
CCD-TR713E
Б‡Ú‡ ÂÈÌ˚È |
В ÂÏя |
В ÂÏя |
|
·ÎÓÍ |
ÌÂÔ Â ˚‚ÌÓÈ |
ÚËÔ˘ÌÓÈ |
|
(NP-) |
Á‡ÔËÒË* |
Á‡ÔËÒË** |
|
|
|
|
|
NP-F330 |
125 (110) |
65 (55) |
|
(Ô Ë·„‡ÂÚÒя) |
|||
|
|
||
|
|
|
|
NP-F530 |
215 (190) |
110 (100) |
|
|
|
|
|
NP-F550 |
250 (220) |
130 (115) |
|
|
|
|
|
NP-F730 |
430 (385) |
225 (200) |
|
|
|
|
|
NP-F750 |
510 (460) |
270 (240) |
|
|
|
|
|
NP-F930 |
680 (610) |
360 (320) |
|
|
|
|
|
NP-F950 |
780 (700) |
410 (370) |
|
|
|
|
ЧЛТО‡ ‚ ТНУ·Н‡ı ЫН‡Б˚‚‡˛Ъ ‚ ВПя, НУ„‰‡ В˚ ЛТФУО¸БЫВЪВ МУ П‡О¸МУ Б‡ яКВММ˚И ·‡Ъ‡ ВИМ˚И ·ОУН.
С УН ТОЫК·˚ Б‡ я‰‡ ·‡Ъ‡ ВИМУ„У ·ОУН‡ ·Ы‰ВЪ НУ У˜В, ВТОЛ В˚ ЛТФУО¸БЫВЪВ ‚Л‰ВУН‡ПВ Ы ‚ ıУОУ‰М˚ı ЫТОУ‚Ляı.
* П Л·ОЛБЛЪВО¸МУВ ‚ ВПя МВФ В ˚‚МУИ Б‡ФЛТЛ Ф Л 25°С (77° F).
**П Л·ОЛБЛЪВО¸МУВ ‚ ВПя ‚ ПЛМЫЪ‡ı Ф Л Б‡ФЛТЛ Т ФУ‚ЪУ М˚П М‡˜‡ОУП/УТЪ‡МУ‚НУИ Б‡ФЛТЛ, ВКЛПУП „УЪУ‚МУТЪЛ, М‡ВБ‰УП ‚Л‰ВУН‡ПВ ˚ Л ‚НО˛˜ВМЛВП/‚˚НО˛˜ВМЛВП ФЛЪ‡МЛя. Ф‡НЪЛ˜ВТНЛИ Т УН ТОЫК·˚ Б‡ я‰‡ ·‡Ъ‡ ВИМУ„У ·ОУН‡ ПУКВЪ ·˚Ъ¸ НУ У˜В.
˝НТФОЫ‡Ъ‡ˆЛЛ Н ПУ‰„УЪУ‚Н‡ / started Getting
11
Installing and charging the battery pack
Note on remaining battery time indication during recording
Remaining battery time is displayed in the viewfinder. However, the indication may not be displayed properly, depending on using conditions and circumstances.
To remove the battery pack
While pressing BATT RELEASE, slide the battery pack in the direction of the arrow.
You can look at the demonstration of the functions available with this camcorder (p. 34).
УcÚaÌo‚͇ Ë Á‡ я‰Í‡ ·‡Ú‡ ÂÈÌÓ„Ó ·ÎÓ͇
П ЛПВ˜‡МЛВ Н ЛМ‰ЛН‡ˆЛЛ УТЪ‡‚¯В„УТя ‚ ВПВМЛ ‡·УЪ˚ ·‡Ъ‡ ВИМУ„У ·ОУН‡ ‚У ‚ ВПя Б‡ФЛТЛ.
ОТЪ‡‚¯ВВТя ‚ ВПя ‡·УЪ˚ ·‡Ъ‡ ВИМУ„У ·ОУН‡ УЪУ· ‡К‡ВЪТя ‚ ‚Л‰УЛТН‡ЪВОВ. О‰М‡НУ, ЛМ‰ЛН‡ˆЛя ПУКВЪ УЪУ· ‡К‡Ъ¸Тя МВФ ‡‚ЛО¸МУ ‚ Б‡‚ЛТЛПУТЪЛ УЪ ЫТОУ‚ЛИ Л У·ТЪУяЪВО¸ТЪ‚ ЛТФУО¸БУ‚‡МЛя.
ДÎя ÒÌяÚËя ·‡Ú‡ ÂÈÌÓ„Ó ·ÎÓ͇
Н‡КЛП‡я BATT RELEASE, ФВ В‰‚ЛМ¸ЪВ ·‡Ъ‡ ВИМ˚И ·ОУН ‚ М‡Ф ‡‚ОВМЛЛ ТЪ ВОНЛ.
BATT RELEASE
В˚ ПУКВЪВ Ф УТПУЪ ВЪ¸ ‰ВПУМТЪ ‡ˆЛ˛ ЩЫМНˆЛИ, ЛПВ˛˘ЛıТя ‚ М‡ОЛ˜ЛЛ Ы ‰‡ММУИ ‚Л‰ВУН‡ПВ ˚ (ТЪ . 34).
12
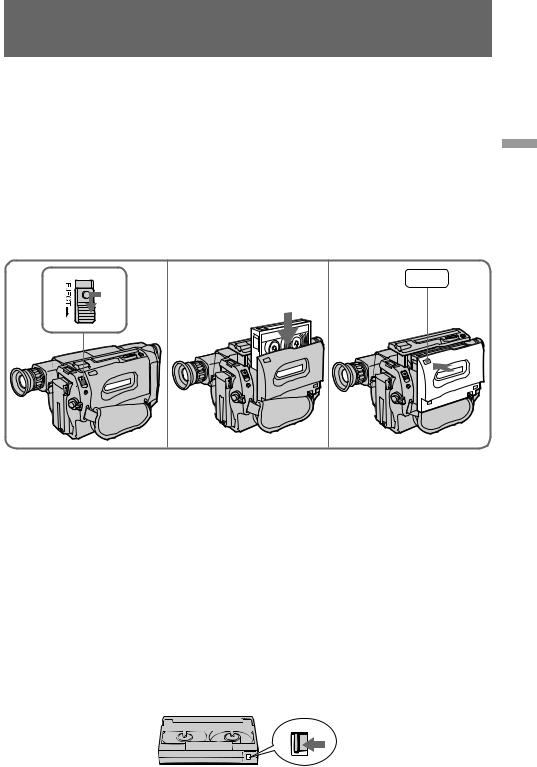
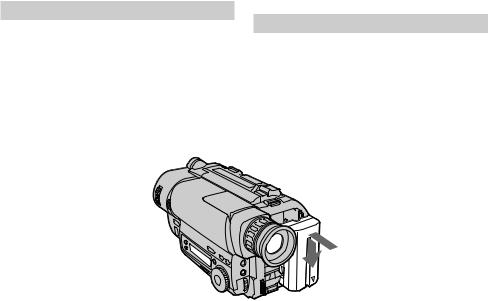
Inserting a cassette
Make sure that the power source is installed. When you want to record in the Hi8 system, use Hi8 video cassette H(CCD-TR515E/TR713E only).
(1) While pressing the small blue button on the EJECT switch, slide it in the direction of the arrow. The cassette compartment automatically lifts up and opens.
(2) Insert a cassette with the window facing out. (3) Close the cassette compartment by pressing
the “PUSH” mark on the cassette compartment. The cassette compartment automatically goes down.
1 2
To eject the cassette
While pressing the small blue button on the EJECT switch, slide it in the direction of the arrow.
To prevent accidental erasure
Slide the tab on the cassette to expose the red mark. If you insert the cassette with the red mark exposed and close the cassette compartment, the beeps sound for a while. If you try to record with the red mark exposed, the  and 6indicators flash, and you cannot record on the tape.
To re-record on this tape, slide the tab back out covering the red mark.
ВÒÚ‡‚͇ ͇ÒÒÂÚ˚
У·В‰ЛЪВТ¸, ˜ЪУ ЛТЪУ˜МЛН ФЛЪ‡МЛя ЫТЪ‡МУ‚ОВМ. ЕТОЛ В˚ ıУЪЛЪВ ‚˚ФУОМЛЪ¸ Б‡ФЛТ¸ ‚ ТЛТЪВПВ Hi8, ЪУ ЛТФУО¸БЫИЪВ Hi8-‚Л‰ВУН‡ТТВЪЫ H (TУО¸НУ CCD-TR515E/TR713E).
(1) Н‡КЛП‡я П‡ОВМ¸НЫ˛ ТЛМ˛˛ НМУФНЫ М‡ ‚˚НО˛˜‡ЪВОВ EJECT, Т‰‚ЛМ¸ЪВ В„У ‚ М‡Ф ‡‚ОВМЛЛ ТЪ ВОНЛ. К‡ТТВЪМ˚И УЪТВН ‡‚ЪУП‡ЪЛ˜ВТНЛ ФУ‰МЛП‡ВЪТя Л УЪН ˚‚‡ВЪТя.
(2) ВТЪ‡‚¸ЪВ Н‡ТТВЪЫ УНУ¯НУП, У· ‡˘ВММ˚П М‡ ЫКЫ.
(3) З‡Н УИЪВ Н‡ТТВЪМ˚И УЪТВН ФЫЪВП М‡К‡ЪЛя БМ‡Н‡ “PUSH” М‡ Н‡ТТВЪМУП УЪТВНВ. К‡ТТВЪМ˚И УЪТВН ‡‚ЪУП‡ЪЛ˜ВТНЛ УФЫТЪЛЪТя ‚МЛБ.
3 PUSH
ДÎя ‚˚Ú‡ÎÍË‚‡ÌËя ͇ÒÒÂÚ˚
Н‡КЛП‡я П‡ОВМ¸НЫ˛ ТЛМ˛˛ НМУФНЫ М‡ ‚˚НО˛˜‡ЪВОВ EJECT, Т‰‚ЛМ¸ЪВ В„У ‚ М‡Ф ‡‚ОВМЛЛ ТЪ ВОНЛ. К‡ТТВЪМ˚И УЪТВН ‡‚ЪУП‡ЪЛ˜ВТНЛ ФУ‰МЛП‡ВЪТя Л УЪН ˚‚‡ВЪТя.
ДÎя Ô Â‰ÓÚ‚ ‡˘ÂÌËя ÒÎÛ˜‡ÈÌÓ„Ó ÒÚË ‡ÌËя
С‰‚ЛМ¸ЪВ ОВФВТЪУН М‡ Н‡ТТВЪВ, ˜ЪУ·˚ ·˚ОУ ‚Л‰МУ Н ‡ТМЫ˛ ПВЪНЫ. ЕТОЛ В˚ ‚ТЪ‡‚ЛЪВ Н‡ТТВЪЫ, М‡ НУЪУ УИ ‚Л‰М‡ Н ‡ТМ‡я ПВЪН‡, Л Б‡Н УВЪВ Н‡ТТВЪМ˚И УЪТВН, БЫППВ М˚И ТЛ„М‡О ·Ы‰ВЪ Б‚Ы˜‡Ъ¸ ‚ ЪВ˜ВМЛВ МВНУЪУ У„У ‚ ВПВМЛ. ЕТОЛ В˚ ФУФ˚Ъ‡ВЪВТ¸ ‚˚ФУОМЛЪ¸ Б‡ФЛТ¸ Т ‚˚ТЪ‡‚ОВММУИ Н ‡ТМУИ ПВЪНУИ, ЪУ ЛМ‰ЛН‡ЪУ ˚  Л 6 ·Ы‰ЫЪ ПЛ„‡Ъ¸ ‚ ‚Л‰УЛТН‡ЪВОВ Л В˚ МВ ТПУКВЪВ Ф УЛБ‚ВТЪЛ Б‡ФЛТ¸ М‡ ОВМЪЫ.
ДОя ‚˚ФУОМВМЛя МУ‚УИ Б‡ФЛТЛ М‡ Ъ‡НЫ˛ ОВМЪЫ Т‰‚ЛМ¸ЪВ ОВФВТЪУН М‡Б‡‰ ‰Оя Б‡Н ˚‚‡МЛя Н ‡ТМУИ ПВЪНЛ.
˝НТФОЫ‡Ъ‡ˆЛЛ Н ПУ‰„УЪУ‚Н‡ / started Getting
13
Basic operations
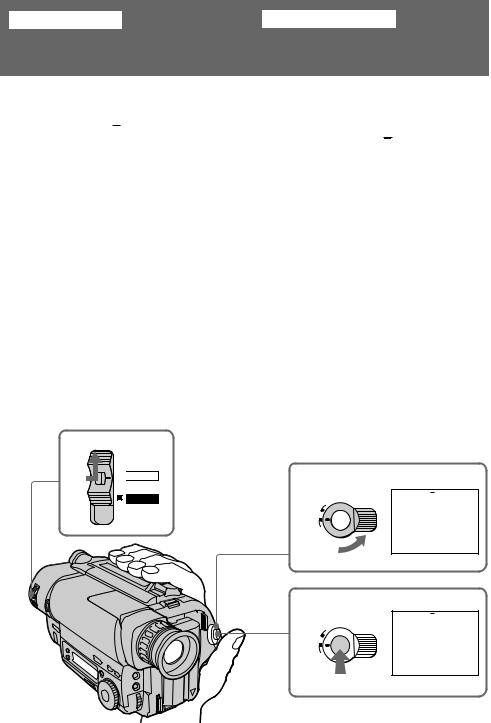
Camera recording
Make sure that the power source is installed, a cassette is inserted and that the START/STOP MODE switch is set to  . Before you record one-time events, you may want to make a trial recording to make sure that the camcorder is working correctly.
When you use the camcorder for the first time, power on it and reset the date and time to your time before you start recording (p. 65). The date is automatically recorded for 10 seconds after you start recording (AUTO DATE feature). This feature works only once a day.
(1) While pressing the small green button on the POWER switch, set it to CAMERA.
(2) Turn STANDBY up to STANDBY.
(3) Press START/STOP. The camcorder starts recording. The “REC” indicator appears. The red lamp lights up in the viewfinder. The camera recording/battery lamp located on the front of the camcorder also lights up.
ОÒÌÓ‚Ì˚ ÓÔ ‡ˆËË
З‡ÔËÒ¸ Ò ÔÓÏÓ˘¸˛ ‚ˉÂÓ͇Ï ˚
У·В‰ЛЪВТ¸, ˜ЪУ ЛТЪУ˜МЛН ФЛЪ‡МЛя ЫТЪ‡МУ‚ОВМ,Н‡ТТВЪ‡ ‚ТЪ‡‚ОВМ‡ Л ФВ ВНО˛˜‡ЪВО¸ START/STOP MODE ЫТЪ‡МУ‚ОВМ ‚ ФУОУКВМЛВ  . ПВ В‰ ЪВП Н‡Н В˚ М‡˜МВЪВ Б‡ФЛТ¸ У‰МУ ‡БУ‚˚ı ТУ·˚ЪЛИ, В˚ ПУКВЪВ Б‡ıУЪВЪ¸ Т‰ВО‡Ъ¸ Ф У·МЫ˛ Б‡ФЛТ¸ ‰Оя ФУ‰Ъ‚В К‰ВМЛя, ˜ЪУ ‚Л‰ВУН‡ПВ ‡ ‡·УЪ‡ВЪ Ф ‡‚ЛО¸МУ.
ЕТОЛ В˚ ЛТФУО¸БЫВЪВ ‚Л‰ВУН‡ПВ Ы ‚ ФВ ‚˚И‡Б, ЪУ ‚НО˛˜ЛЪВ ВВ Л ЫТЪ‡МУ‚ЛЪВ ‰‡ЪЫ Л ‚ ВПя М‡ В‡¯В ПВТЪМУВ ‚ ВПя ФВ В‰ М‡˜‡ОУП Б‡ФЛТЛ (ТЪ . 65) Д‡Ъ‡ ‡‚ЪУП‡ЪЛ˜ВТНЛ ·Ы‰ВЪ Б‡ФЛТ˚‚‡Ъ¸Тя ‚ ЪВ˜ВМЛВ 10 ТВНЫМ‰ ФУТОВ М‡˜‡О‡ Б‡ФЛТЛ (ÙÛÌ͈Ëя AUTO DATE). Д‡Ì̇я ÙÛÌ͈Ëя ‡·ÓÚ‡ÂÚ Ó‰ËÌ ‡Á ‚ ‰Â̸. (1) Н‡КЛП‡я П‡ОВМ¸НЫ˛ БВОВМЫ˛ НМУФНЫ М‡
‚˚НО˛˜‡ЪВОВ POWER, ЫТЪ‡МУ‚ЛЪВ В„У ‚ ФУОУКВМЛВ CAMERA.
(2) ПУ‚В МЛЪВ STANDBY ‚‚В ı ‚ ФУОУКВМЛВ STANDBY.
(3) Н‡КПЛЪВ START/STOP. ВЛ‰ВУН‡ПВ ‡ М‡˜ЛМ‡ВЪ Б‡ФЛТ¸. ПУя‚ОяВЪТя ЛМ‰ЛН‡ЪУ “REC”. К ‡ТМ‡я О‡ПФУ˜Н‡ Б‡„У ‡ВЪТя ‚ ‚Л‰УЛТН‡ЪВОВ. Л‡ПФУ˜Н‡ Б‡ФЛТЛ Н‡ПВ УИ/ ·‡Ъ‡ ВЛ, ‡ТФУОУКВММ‡я М‡ ФВ В‰МВИ Ф‡МВОЛ ‚Л‰ВУН‡ПВ ˚, Ъ‡НКВ ·Ы‰ВЪ „У ВЪ¸.
1
POWER 

 CAMERA

 OFF
OFF
PLAYER
2
OCK
L
S
T
A
N
DBY
START/STOP
3
OCK
L
S
T
A
N
DBY
START/STOP
 40min
40min SP STBY 0:00:00
AUTO DATE
 40min
40min SP REC 0:00:01
4 7 1999
14
Camera recording
To stop recording momentarily [a]
Press START/STOP again. The “STBY” indicator appears in the viewfinder (Standby mode).
To finish recording [b]
Press START/STOP again. Turn STANDBY down to LOCK and set the POWER switch to OFF. Then, eject the cassette.
З‡ÔËÒ¸ Ò ÔÓÏÓ˘¸˛ ‚ˉÂÓ͇Ï ˚
ДОя ‚ ВПВММУИ УТЪ‡МУ‚НЛ Б‡ФЛТЛ [a]
СМУ‚‡ М‡КПЛЪВ START/STOP. ИМ‰ЛН‡ЪУ “STBY” ФУя‚ОяВЪТя ‚ ‚Л‰УЛТН‡ЪВОВ ( ВКЛП „УЪУ‚МУТЪЛ).
ДÎя ÓÍÓ̘‡ÌËя Á‡ÔËÒË [b]
СМУ‚‡ М‡КПЛЪВ START/STOP. ПУ‚В МЛЪВ STANDBY ‚МЛБ ‚ ФУОУКВМЛВ LOCK Л ЫТЪ‡МУ‚ЛЪВ ‚˚НО˛˜‡ЪВО¸ POWER ‚ ФУОУКВМЛВ OFF. З‡ЪВП ‚˚ЪУОНМЛЪВ Н‡ТТВЪЫ.
[a] |
[b] |
|
STBY 0:35:20 |
|
CK |
|
O |
|
L |
|
S |
|
T |
|
A |
|
N |
|
D |
|
BY |
|
START/STOP |
OCK
L
S
T
A
N
DBY
START/STOP
OCK
L
S
T
A
N
DBY
START/STOP
Note
Be sure to remove the battery pack from the camcorder after using.
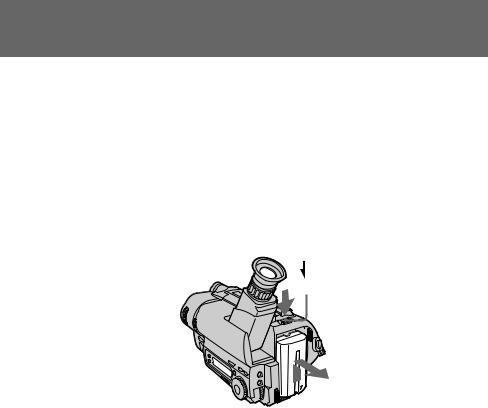
To focus the viewfinder lens
If you cannot see the indicators in the viewfinder clearly, focus the viewfinder lens. Turn the viewfinder lens adjustment ring so that the indicators in the viewfinder come into sharp focus.
П ËϘ‡ÌËÂ
ПУ УНУМ˜‡МЛЛ Т˙ВПНЛ МВ Б‡·Ы‰¸ЪВ УЪТУВ‰ЛМЛЪ¸ ·‡Ъ‡ ВИМ˚И ·ОУН.
ДОя ЩУНЫТЛ У‚НЛ У·˙ВНЪЛ‚‡ ‚Л‰УЛТН‡ЪВОя
ЕТОЛ ЛМ‰ЛН‡ЪУ ˚ ‚ ‚Л‰УЛТН‡ЪВОВ В‡П ‚Л‰М˚ МВ˜ВЪНУ, ‚˚ФУОМЛЪВ ЩУНЫТЛ У‚НЫ У·˙ВНЪЛ‚‡ ‚Л‰УЛТН‡ЪВОя. ПУ‚В МЛЪВ НУО¸ˆУВ„ЫОЛ У‚НЛ У·˙ВНЪЛ‚‡ ‚Л‰УЛТН‡ЪВОя Ъ‡Н, ˜ЪУ·˚ ЛМ‰ЛН‡ЪУ ˚ ‚ ‚Л‰УЛТН‡ЪВОВ ·˚ОЛ ˜ВЪНУ ТЩУНЫТЛ У‚‡М˚.
‡ˆЛЛУФВ ОТМУ‚М˚В / operations Basic
15

Camera recording
Note on Standby mode
If you leave the camcorder in Standby mode for 5 minutes while the cassette is inserted, the camcorder turns off automatically for saving battery power as well as for preventing the battery and tape from wearing down. To resume Standby mode, turn STANDBY down and up again. To start recording, press START/STOP.
Note on recording
When you record from the beginning of a tape, run the tape for about 15 seconds before starting the actual recording. Passing the tape lead will ensure that you will not miss any start-up scenes when you play back the tape.
Notes on the tape counter
•The tape counter indicates the recording or playback time. Use it as a guide. There will be a time lag of several seconds from the actual time. To set the counter to zero, press COUNTER RESET.
•If the tape is recorded in SP and LP modes mixed, the tape counter shows incorrect recording time. When you intend to edit the tape using the tape counter as a guide, record in same (SP or LP) mode.
Note on the beep sound
The beep sounds when you operate the camcorder. Several beeps also sound as a warning of any unusual condition of the camcorder.
Note that the beep sound is not recorded on the tape. If you do not want to hear the beep sound, select “OFF” in the menu system.
З‡ÔËÒ¸ Ò ÔÓÏÓ˘¸˛ ‚ˉÂÓ͇Ï ˚
П ЛПВ˜‡МЛВ Н ВКЛПЫ „УЪУ‚МУТЪЛ
ЕТОЛ В˚ УТЪ‡‚ОяВЪВ ‚Л‰ВУН‡ПВ Ы ‚ ВКЛПВ „УЪУ‚МУТЪЛ М‡ 5 ПЛМЫЪ Ф Л ‚ТЪ‡‚ОВММУИ Н‡ТТВЪВ, ‚Л‰ВУН‡ПВ ‡ ‚˚НО˛˜ЛЪТя ‡‚ЪУП‡ЪЛ˜ВТНЛ ‚ ˆВОяı Н‡Н ‰Оя ˝НУМУПЛЛ Б‡ я‰‡ ·‡Ъ‡ ВИМУ„У ·ОУН‡, Ъ‡Н Л ‰Оя Ф В‰УЪ‚ ‡˘ВМЛя ЛБМУТ‡ ·‡Ъ‡ ВИМУ„У ·ОУН‡ ОВМЪ˚. ДОя ‚УТТЪ‡МУ‚ОВМЛя ВКЛП‡ „УЪУ‚МУТЪЛ ФУ‚В МЛЪВ STANDBY ‚МЛБ, ‡ Б‡ЪВП ТМУ‚‡ ‚‚В ı. ДОя М‡˜‡О‡ Б‡ФЛТЛ М‡КПЛЪВ START/STOP.
П ËϘ‡ÌËÂ Í Á‡ÔËÒË
КУ„‰‡ В˚ М‡˜ЛМ‡ВЪВ Б‡ФЛТ¸ УЪ М‡˜‡О‡ ОВМЪ˚, ФВ ВП‡Ъ˚‚‡ИЪВ ОВМЪЫ ‚ ЪВ˜ВМЛВ 15 ТВНЫМ‰ ФВ В‰ М‡˜‡ОУП Щ‡НЪЛ˜ВТНУИ Б‡ФЛТЛ. БО‡„У‰‡ я Ф У„УМЫ ‚ФВ В‰ М‡˜‡О¸МУ„У УЪ ВБН‡ ОВМЪ˚ В˚ ТПУКВЪВ ·˚Ъ¸ Ы‚В ВМ˚ ‚ ЪУП, ˜ЪУ Ф Л ВВ ‚УТФ УЛБ‚В‰ВМЛЛ В˚ МВ У·М‡ ЫКЛЪВ УЪТЫЪТЪ‚ЛВ ‚ Б‡ФЛТЛ Н‡НУИ-ОЛ·У ЛБ Т‡П˚ı ФВ ‚˚ı ТˆВМ.
П ËϘ‡ÌËя Í Ò˜ÂÚ˜ËÍÛ ÎÂÌÚ˚
•С˜ВЪ˜ЛН ОВМЪ˚ ЫН‡Б˚‚‡ВЪ ‚ ВПя Б‡ФЛТЛ ЛОЛ ‚УТФ УЛБ‚В‰ВМЛя. ИТФУО¸БЫИЪВ В„У ‚ Н‡˜ВТЪ‚В ЫНУ‚У‰ТЪ‚‡. СЫ˘ВТЪ‚ЫВЪ УЪТЪ‡‚‡МЛВ ФУ ‚ ВПВМЛ М‡ МВТНУО¸НУ ТВНЫМ‰ УЪ Щ‡НЪЛ˜ВТНУ„У ‚ ВПВМЛ. ДОя ЫТЪ‡МУ‚НЛ Т˜ВЪ˜ЛН‡ М‡ МЫО¸ М‡КПЛЪВ COUNTER RESET.
•ЕТОЛ ОВМЪ‡ Б‡ФЛТ‡М‡ Т ˜В В‰У‚‡МЛВПВКЛПУ‚ SP Л LP, ЪУ Т˜ВЪ˜ЛН ОВМЪ˚ ·Ы‰ВЪ ФУН‡Б˚‚‡Ъ¸ МВФ ‡‚ЛО¸МУВ ‚ ВПя Б‡ФЛТЛ. ЕТОЛ В˚ М‡ПВ В‚‡ВЪВТ¸ Ф УЛБ‚У‰ЛЪ¸ ПУМЪ‡К ОВМЪ˚ Т ЛТФУО¸БУ‚‡МЛВП Т˜ВЪ˜ЛН‡ ОВМЪ˚ ‚ Н‡˜ВТЪ‚В ЫН‡Б‡ЪВОя, ЪУ ‚˚ФУОМяИЪВ Б‡ФЛТ¸ ‚ У‰МУП Л ЪУП КВ ВКЛПВ (SP ЛОЛ LP).
П ËϘ‡ÌËя Í ˝ÛÏÏ ÌÓÏÛ Á‚ÛÍÓ‚ÓÏÛ Ò˄̇ÎÛ
ЗЫППВ М˚И ТЛ„М‡О Б‚Ы˜ЛЪ, НУ„‰‡ В˚‡·УЪ‡ВЪВ Т ‚Л‰ВУН‡ПВ УИ. НВТНУО¸НУ БЫППВ М˚ı ТЛ„М‡ОУ‚ Ъ‡НКВ ·Ы‰ВЪ Б‚Ы˜‡Ъ¸ ‚ Н‡˜ВТЪ‚В Ф В‰ЫФ ВК‰ВМЛя Н‡НУ„У-МЛ·Ы‰¸ МВУ·˚˜МУ„У ТУТЪУяМЛя ‚Л‰ВУН‡ПВ ˚. З‡ПВЪ¸ЪВ, ˜ЪУ БЫППВ М˚И ТЛ„М‡О МВ Б‡ФЛТ˚‚‡ВЪТя М‡ ОВМЪЫ. ЕТОЛ В˚ МВ ıУЪЛЪВ ТОЫ¯‡Ъ¸ БЫППВ М˚И ТЛ„М‡О, ЪУ ‚˚·В ЛЪВ “OFF” ‚ ТЛТЪВПВ ПВМ˛.
16
Camera recording |
З‡ÔËÒ¸ Ò ÔÓÏÓ˘¸˛ |
‚ˉÂÓ͇Ï ˚ |
|
|
|
Note on the AUTO DATE feature
The clock is set at the factory to London time for United Kingdom and to Paris time for the other European countries. You can reset the clock in the menu system. You can change the AUTO DATE settings by selecting ON or OFF in the menu system. The AUTO DATE feature shows the date automatically once a day.
However, the date may automatically appear more than once a day when:
–you reset the date and time.
–you eject and insert the tape again.
–you stop recording within 10 seconds.
–you set AUTO DATE to OFF once and set it to ON again in the menu system.
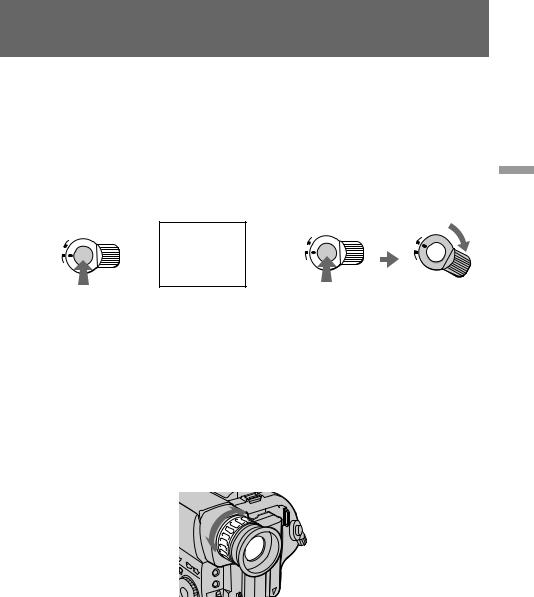
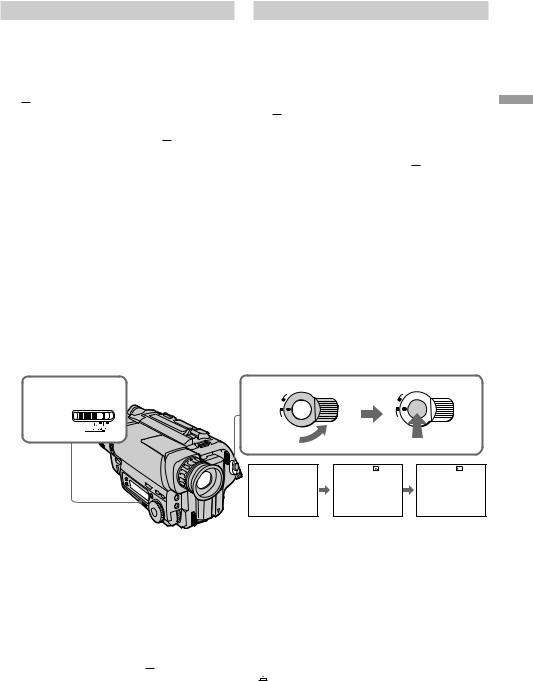
Using the zoom feature
Zooming is a recording technique that lets you change the size of the subject in the scene.
For more professional-looking recordings, use the zoom function sparingly.
“T” side: for telephoto (subject appears closer) “W” side: for wide-angle (subject appears further
away)
П ËϘ‡ÌËÂ Í ÙÛÌ͈ËË AUTO DATE
Ч‡Т˚ ЫТЪ‡МУ‚ОВМ˚ М‡ Б‡‚У‰В М‡ ОУМ‰УМТНУВ ‚ ВПя ‰Оя ПУ‰ВОВИ СУВ‰ЛМВММУ„У КУ УОВ‚ТЪ‚‡ Л М‡ Ф‡ ЛКТНУВ ‚ ВПя ‰Оя ПУ‰ВОВИ ‰ Ы„Лı В‚ УФВИТНЛı ТЪ ‡М. В˚ ПУКВЪВ ФВ ВЫТЪ‡МУ‚ЛЪ¸ ˜‡Т˚ ‚ ТЛТЪВПВ ПВМ˛. В˚ ПУКВЪВ ЛБПВМЛЪ¸ ЫТЪ‡МУ‚НЛ AUTO DATE ФЫЪВП ‚˚·У ‡ ON ЛОЛ OFF ‚ ТЛТЪВПВ ПВМ˛. ФЫМНˆЛя AUTO DATE ФУН‡Б˚‚‡ВЪ ‰‡ЪЫ ‡‚ЪУП‡ЪЛ˜ВТНЛ У‰ЛМ ‡Б ‚ ‰ВМ¸. О‰М‡НУ, ‰‡Ъ‡ ПУКВЪ ‡‚ЪУП‡ЪЛ˜ВТНЛ ФУя‚ЛЪТя ·УОВВ У‰МУ„У‡Б‡ ‚ ‰ВМ¸, НУ„‰‡:
–В˚ Á‡ÌÓ‚Ó ÛÒڇ̇‚ÎË‚‡ÂÚ ‰‡ÚÛ Ë ‚ ÂÏя.
–В˚ ‚˚ЪУОНМЫОЛ ОВМЪЫ Л ‚ТЪ‡‚ЛОЛ ВВ ТМУ‚‡.
–В˚ УТЪ‡МУ‚ЛОЛ Б‡ФЛТ¸ ‚ Ф В‰ВО‡ı 10 ТВНЫМ‰.
–В˚ ЫТЪ‡МУ‚ЛОЛ ЩЫМНˆЛ˛ AUTO DATE ‚ ТЛТЪВПВ ПВМ˛ М‡ OFF, ‡ Б‡ЪВП ТМУ‚‡ М‡ ON.
ИÒÔÓθÁÓ‚‡ÌË ÙÛÌ͈ËË Ì‡ÂÁ‰‡
‚ˉÂÓ͇Ï ˚
Н‡ВБ‰ ‚Л‰ВУН‡ПВ ˚ я‚ОяВЪТя ЪВıМЛ˜ВТНЛП Ф ЛВПУП Б‡ФЛТЛ, НУЪУ ˚И ФУБ‚УОяВЪ В‡П ЛБПВМяЪ¸ ‡БПВ У·˙ВНЪ‡ ‚ Н‡‰ В. ДОя ·УОВВ Ф УЩВТТЛУМ‡О¸МУ„У ‚Л‰‡ Б‡ФЛТВИ ЫПВ ВММУ ЛТФУО¸БЫИЪВ ЩЫМНˆЛ˛ М‡ВБ‰‡ ‚Л‰ВУН‡ПВ ˚. СЪУ УМ‡ “Т”: ‰Оя ЪВОВЩУЪУ (У·˙ВНЪ
Ô Ë·ÎËʇÂÚÒя)
СÚÓ Ó̇ “W”: ‰Îя ¯Ë ÓÍÓ„Ó Û„Î‡ Ò˙ÂÏÍË (Ó·˙ÂÍÚ Û‰‡ÎяÂÚÒя)
‡ˆЛЛУФВ ОТМУ‚М˚В / operations Basic
W |
T |
W |
T |
T |
|
W |
17

Camera recording
Zooming speed (Variable speed zooming)
Move the power zoom lever a little for a slower zoom, move it further for a faster zoom.
When you shoot a subject using a telephoto zoom
If you cannot get a sharp focus while in extreme telephoto zoom, move the power zoom lever to the “W” side until the focus is sharp. You can shoot a subject that is at least about 80 cm (about 2 5/8 feet) away from the lens surface in the telephoto position, or about 1 cm (about
1/2 inch) away in the wide-angle position.
Notes on the digital zoom
•More than 18× zoom is performed digitally, but the picture quality deteriorates as you move the lever toward the “T” side. If you do not want to use the digital zoom, set the D ZOOM function to OFF in the menu system.
•The right side [a] of the power zoom indicator shows the digital zooming zone, and the left side [b] shows the optical zooming zone. If you set the D ZOOM function to OFF, the [a] zone disappears.
З‡ÔËÒ¸ Ò ÔÓÏÓ˘¸˛ ‚ˉÂÓ͇Ï ˚
СÍÓ ÓÒÚ¸ ̇ÂÁ‰‡ ‚ˉÂÓ͇Ï ˚ (̇ÂÁ‰ Ò ‡Á΢ÌÓÈ ÒÍÓ ÓÒÚ¸˛)
ПВ В‰‚ЛМ¸ЪВ ˚˜‡„ Ф Л‚У‰МУ„У Ъ ‡МТЩУН‡- ЪУ ‡ МВПМУ„У ‰Оя Т ‡‚МЛЪВО¸МУ ПВ‰ОВММУ„У М‡ВБ‰‡ ‚Л‰ВУН‡ПВ ˚; ФВ В‰‚ЛМ¸ЪВ В„У В˘В ‰‡О¸¯В ‰Оя М‡ВБ‰‡ М‡ ‚˚ТУНУИ ТНУ УТЪЛ.
КУ„‰‡ В˚ ТМЛП‡ВЪВ У·˙ВНЪ, ЛТФУО¸БЫя М‡ВБ‰ ‚ ВКЛПВ ЪВОВЩУЪУ
ЕТОЛ В˚ МВ ПУКВЪВ ФУОЫ˜ЛЪ¸ ˜ВЪНУИ ЩУНЫТЛ-У‚НЛ ‚У ‚ ВПя Н ‡ИМВ„У М‡ВБ‰‡ ‚ ВКЛПВ ЪВОВЩУЪУ, ФВ ВПВ˘‡ИЪВ ˚˜‡„ Ф Л‚У‰МУ„У Ъ ‡МТЩУН‡ЪУ ‡ ‚ ТЪУ УМЫ “W” ‰У ЪВı ФУ , ФУН‡ В˚ МВ ФУОЫ˜ЛЪВ ˜ВЪНУИ ЩУНЫТЛ У‚НЛ. В˚ ПУКВЪВ ТМЛП‡Ъ¸ У·˙ВНЪ, НУЪУ ˚И ФУ ПВМ¸¯ВИ ПВ В М‡ 80 ТП Ы‰‡ОВМ УЪ ФУ‚В ıМУТЪЛ У·˙ВНЪЛ‚‡ ‚ ФУОУКВМЛЛ ЪВОВЩУЪУ, ЛОЛ Ы‰‡ОВМ Ф Л- ·ОЛБЛЪВО¸МУ М‡ 1 ТП ‚ ФУОУКВМЛЛ ¯Л УНУ„У Ы„О‡.
П ЛПВ˜‡МЛя Н ˆЛЩ У‚УПЫ Ъ ‡МТЩУН‡ЪУ Ы
•ПУТ В‰ТЪ‚УП ˆЛЩ У‚УИ Ъ ‡МТЩУН‡ˆЛЛ УТЫ˘ВТЪ‚ОяВЪТя ·УОВВ ˜ВП 18-Н ‡ЪМУВ Ы‚ВОЛ˜ВМЛВ, Ф Л˜ВП Н‡˜ВТЪ‚У ЛБУ· ‡КВМЛя ЫıЫ‰¯‡ВЪТя ФУ ПВ В ТПВ˘ВМЛя Ъ ‡МТЩУН‡ЪУ МУ„У В„ЫОяЪУ ‡ ‚ ТЪУ УМЫ “Т”. ЕТОЛ В˚ МВ ıУЪЛЪВ ЛТФУО¸БУ‚‡Ъ¸ ˆЛЩ У‚УИ Ъ ‡МТЩУН‡ЪУ , ЫТЪ‡МУ‚ЛЪВ ЩЫМНˆЛ˛ D ZOOM ‚ ТЛТЪВПВ ПВМ˛ М‡ OFF.
•П ‡‚‡я ÒÚÓ Ó̇ [a] ЛМ‰ЛН‡ЪУ ‡ Ф Л‚У‰МУ„У Ъ ‡МТЩУН‡ЪУ ‡ ФУН‡Б˚‚‡ВЪ БУМЫ ˆЛЩ У‚УИ Ъ ‡МТЩУН‡ˆЛЛ, ‡ ОВ‚‡я ТЪУ УМ‡ [b] ФУН‡Б˚‚‡ВЪ БУМЫ УФЪЛ˜ВТНУИ Ъ ‡МТЩУН‡ˆЛЛ. ЕТОЛ В˚ ЫТЪ‡МУ‚ЛЪВ ЩЫМНˆЛ˛ D ZOOM М‡ OFF, ЪУ БУМ‡ [a] ЛТ˜ВБМВЪ.
W 


 T
T 
[b][a]
W  T
T

18
Camera recording |
З‡ÔËÒ¸ Ò ÔÓÏÓ˘¸˛ |
‚ˉÂÓ͇Ï ˚ |
|
|
|
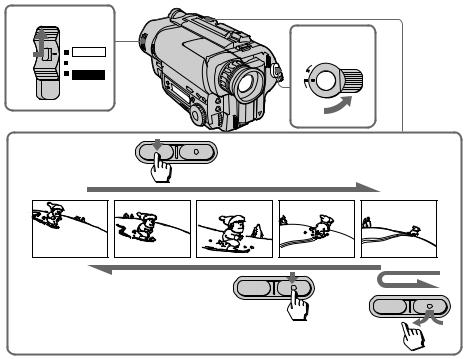
Selecting the START/STOP mode
Your camcorder has three modes. These modes enable you to take a series of quick shots resulting in a lively video.
(1)Set START/STOP MODE to the desired
mode.
 : Recording starts when you press START/STOP, and stops when you press it
again (factory setting).
ANTI GROUND SHOOTING 

 : The camcorder records only while you press down START/STOP so that you can avoid recording unnecessary scenes.
5SEC: When you press START/STOP, the camcorder records for 5 seconds and then stops automatically.
(2)Turn STANDBY up to STANDBY and press
START/STOP. Recording starts.
If you selected 5SEC, the tape counter disappears and five dots appear. The dots disappear at a rate of one per second as illustrated below.
В˚·Ó ÂÊËχ START/STOP
В‡¯‡ ‚Л‰ВУН‡ПВ ‡ ЛПВВЪ Ъ Л ВКЛП‡. ЭЪЛВКЛП˚ ФУБ‚УОя˛Ъ В‡П ТМяЪ¸ ТВ Л˛ НУ УЪНЛı Н‡‰ У‚, ТУБ‰‡‚‡я ‚ ВБЫО¸Ъ‡ЪВ УКЛ‚ОВММЫ˛ ‚Л‰ВУФ У„ ‡ППЫ.
(1)УÒÚ‡ÌÓ‚ËÚ Ô ÂÍβ˜‡ÚÂθ START/STOP MODE ̇ Ê·ÂÏ˚È ÂÊËÏ.
 : З‡ФЛТ¸ М‡˜ЛМ‡ВЪТя НУ„‰‡ В˚ М‡КЛП‡ВЪВ START/STOP Л Б‡Н‡М˜Л‚‡ВЪТя, НУ„‰‡ В˚ М‡КЛП‡ВЪВ ˝ЪЫ НМУФНЫ ТМУ‚‡ (Б‡‚У‰cН‡я ЫcЪ‡МУ‚Н‡).
ANTI GROUND SHOOTING  : ВЛ‰ВУН‡ПВ ‡ Ф УЛБ‚У‰ЛЪ Б‡ФЛТ¸ ЪУО¸НУ ЪУ„‰‡, НУ„‰‡ В˚ ‰В КЛЪВ START/STOP ‚ М‡К‡ЪУП ТУТЪУяМЛЛ, Ъ‡Н, ˜ЪУ В˚ ПУКВЪВ ЛБ·ВК‡Ъ¸ Б‡ФЛТЛ МВМЫКМ˚ı ТˆВМ.
5SEC: КУ„‰‡ В˚ М‡КЛП‡ВЪВ START/STOP, ‚Л‰ВУН‡ПВ ‡ Ф УЛБ‚У‰ЛЪ Б‡ФЛТ¸ ‚ ЪВ˜ВМЛВ 5 ТВНЫМ‰, ‡ Б‡ЪВП УТЪ‡М‡‚ОЛ‚‡ВЪТя ‡‚ЪУП‡ЪЛ˜ВТНЛ.
(2)ПУ‚В МЛЪВ STANDBY ‚‚В ı ‚ ФУОУКВМЛВ STANDBY Л М‡КПЛЪВ START/STOP. З‡ФЛТ¸ М‡˜ЛМ‡ВЪТя.
ЕТОЛ В˚ ‚˚· ‡ОЛ 5SEC, Т˜ВЪ˜ЛН ОВМЪ˚ ЛТ˜ВБ‡ВЪ Л ФУя‚Оя˛ЪТя ФяЪ¸ ЪУ˜ВН. ТУ˜НЛ ЛТ˜ВБ‡˛Ъ ТУ ТНУ УТЪ¸˛ ФУ У‰МУИ Б‡ ТВНЫМ‰Ы, Н‡Н ФУН‡Б‡МУ МЛКВ М‡ ЛТЫМНВ.
‡ˆЛЛУФВ ОТМУ‚М˚В / operations Basic
1
START/STOP MODE
ANTI GROUND |
5 |
|
SEC |
||
SHOOTING |
||
|
2 |
CK |
|
O |
|
L |
|
S |
|
T |
|
A |
|
N |
|
D |
|
BY |
START/STOP
STBY  •••••
•••••
OCK
L
S |
|
|
T |
|
|
A |
|
|
N |
|
|
D |
|
|
BY |
|
|
START/STOP |
|
|
REC ••••• |
REC |
• |
To extend the recording time in 5SEC mode
Press START/STOP again before all the dots disappear. Recording continues for about 5 seconds from the moment you press START/ STOP.
Note on START/STOP mode
You cannot use the fader function in the 5SEC or ANTI GROUND SHOOTING 

 mode.
mode.
ДОя Ф У‰ОВМЛя ‚ ВПВМЛ Б‡ФЛТЛ ‚ВКЛПВ 5SEC
Н‡КПЛЪВ START/STOP ТМУ‚‡ ‰У ЪУ„У, Н‡Н ‚ТВ ЪУ˜НЛ ЛТ˜ВБМЫЪ. З‡ФЛТ¸ Ф У‰УОК‡ВЪТя В˘В ‚ ЪВ˜ВМЛВ 5 ТВНЫМ‰ Т ПУПВМЪ‡ М‡К‡ЪЛя START/ STOP.
П ЛПВ˜‡МЛВ Н ВКЛПЫ START/STOP
В˚ МВ ПУКВЪВ ЛТФУО¸БУ‚‡Ъ¸ ЩЫМНˆЛ˛ Fader ‚ВКЛПВ 5SEC ЛОЛ ANTI GROUND SHOOTING
.
19
Hints for better |
СÓ‚ÂÚ˚ ‰Îя ÎÛ˜¯ÂÈ |
shooting |
Ò˙ÂÏÍË |
|
|
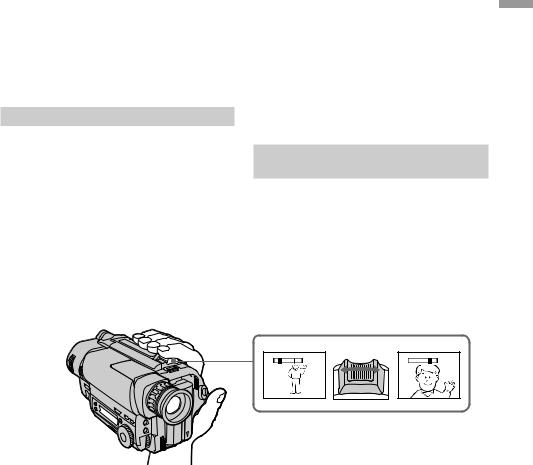
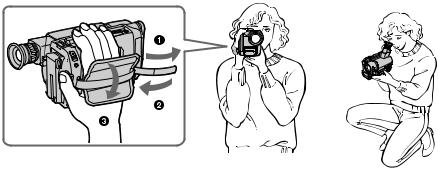
For hand-held shots, you will get better results by holding the camcorder according to the following suggestions:
•Hold the camcorder firmly and secure it with the grip strap so that you can easily manipulate the controls with your thumb [a].
•Place your right elbow against your side. •Place your left hand under the camcorder to
support it. Be sure to not touch the built-in microphone.
•Place your eye firmly against the viewfinder eyecup.
•Use the viewfinder frame as a guide to determine the horizontal plane.
•You can also record in a low position to get an interesting angle. Lift the viewfinder up for recording from a low position [b].
ДОя Н‡‰ У‚ Ф Л Ы‰В К‡МЛЛ ‚Л‰ВУН‡ПВ ˚ ‚ЫН‡ı В˚ ФУОЫ˜ЛЪВ ОЫ˜¯ЛВ ВБЫО¸Ъ‡Ъ˚, ВТОЛ ·Ы‰ВЪВ ‰В К‡Ъ¸ ‚Л‰ВУН‡ПВ Ы ‚ ТУУЪ‚ВЪТЪ‚ЛЛ ТУ ТОВ‰Ы˛˘ЛПЛ ВНУПВМ‰‡ˆЛяПЛ:
•ДВ КЛЪВ ‚Л‰ВУН‡ПВ Ы Н ВФНУ Л Б‡Н ВФЛЪВ ВВ Т ФУПУ˘¸˛ ВПВММУ„У Б‡ı‚‡Ъ‡ Ъ‡Н, ˜ЪУ·˚ В˚ ОВ„НУ ПУ„ОЛ П‡МЛФЫОЛ У‚‡Ъ¸В„ЫОяЪУ ‡ПЛ Т ФУПУ˘¸˛ ·УО¸¯У„У Ф‡О¸ˆ‡
[a].
•УФ ЛЪВТ¸ Ф ‡‚˚П ОУНЪВП ‚ ·УН.
•Р‡ТФУОУКЛЪВ В‡¯Ы ОВ‚Ы˛ ЫНЫ ФУ‰ ‚Л‰ВУН‡ПВ УИ ‰Оя ВВ ФУ‰‰В КНЛ. НЛ ‚ НУВП ТОЫ˜‡В МВ Ъ У„‡ИЪВ ‚ТЪ УВММ˚И ПЛН УЩУМ.
•Н‡‰ВКМУ Ф ЛКПЛЪВ В‡¯ „О‡Б Н УНЫОя Ы ‚Л‰УЛТН‡ЪВОя.
•ИТФУО¸БЫИЪВ ‚ЛБЛ МЫ˛ ‡ПНЫ ‚Л‰УЛТН‡ЪВОя ‚ Н‡˜ВТЪ‚В ЫНУ‚У‰ТЪ‚‡ ‰Оя УФ В‰ВОВМЛя „У ЛБУМЪ‡О¸МУ„У ФО‡М‡.
•В˚ Ъ‡НКВ ПУКВЪВ Б‡ФЛТ˚‚‡Ъ¸ ЛБ МЛБНУ„У ФУОУКВМЛя ‰Оя ФУОЫ˜ВМЛя ЛМЪВ ВТМУ„У Ы„О‡ Б‡ФЛТЛ. ПУ‰МЛПЛЪВ ‚Л‰УЛТН‡ЪВО¸ ‚‚В ı ‰Оя Б‡ФЛТЛ ЛБ МЛБНУ„У ФУОУКВМЛя [b].
[a] |
|
|
[b] |
|
|
|
|
|
|
|
|
|
|
|
|
|
|
|
|
20
Hints for better shooting |
СÓ‚ÂÚ˚ ‰Îя ÎÛ˜¯ÂÈ Ò˙ÂÏÍË |
|
|
Place the camcorder on a flat surface or use a tripod
Try placing the camcorder on a table top or any other flat surface of suitable height. If you have a tripod for a still camera, you can also use it with the camcorder.
When attaching a non-Sony tripod, make sure that the length of the tripod screw is less than 6.5 mm (9/32 inch). Otherwise, you cannot attach the tripod securely and the screw may damage the camcorder.
Cautions on the viewfinder
•Do not pick up the camcorder by the viewfinder [c].
•Do not place the camcorder so as to point the viewfinder toward the sun. The inside of the viewfinder may be damaged. Be careful when placing the camcorder under sunlight or by a window [d].
Р‡ТФУО‡„‡ИЪВ ‚Л‰ВУН‡ПВ Ы М‡ ФОУТНУИ ФУ‚В ıМУТЪЛ ЛОЛ ЛТФУО¸БЫИЪВ Ъ ВМУ„Ы
ПУТЪ‡ ‡ИЪВТ¸ ‡ТФУОУКЛЪ¸ ‚Л‰ВУН‡ПВ Ы Т‚В ıЫ М‡ ТЪУОВ ЛОЛ О˛·УИ ‰ Ы„УИ ФОУТНУИ ФУ‚В ıМУТЪЛ ФУ‰ıУ‰я˘ВИ ‚˚ТУЪ˚. ЕТОЛ Ы В‡Т ВТЪ¸ Ъ ВМУ„‡ ‰Оя ЩУЪУ‡ФФ‡ ‡Ъ‡, В˚ Ъ‡НКВ ПУКВЪВ ЛТФУО¸БУ‚‡Ъ¸ ВВ Л ‰Оя ‚Л‰ВУН‡ПВ ˚. П Л Ф ЛН ВФОВМЛЛ Ъ ВМУ„Л МВ ЩЛ П˚ Sony Ы·В‰ЛЪВТ¸, ˜ЪУ ‰ОЛМ‡ ‚ЛМЪ‡ Ъ ВМУ„Л ПВМВВ 6,5 ПП. В Ф УЪЛ‚МУП ТОЫ˜‡В ‚ЛМЪ ПУКВЪ ФУ‚ В‰ЛЪ¸ ‚МЫЪ ВММЛВ ˜‡ТЪЛ ‚Л‰ВУН‡ПВ ˚.
П В‰УТЪУ УКМУТЪЛ Н ‚Л‰УЛТН‡ЪВО˛
•Н ÔÓ‰ÌËχÈÚ ‚ˉÂÓ͇ÏÂ Û Á‡ ‚ˉÓËÒ͇ÚÂθ [c].
•НВ ‡ТФУО‡„‡ИЪВ ‚Л‰ВУН‡ПВ Ы Ъ‡Н, ˜ЪУ·˚ ‚Л‰УЛТН‡ЪВО¸ ·˚О М‡Ф ‡‚ОВМ ‚ ТЪУ УМЫ ТУОМˆ‡. ВМЫЪ ВММЛВ ˜‡ТЪЛ ‚Л‰УЛТН‡ЪВОя ПУ„ЫЪ ·˚Ъ¸ ФУ‚ ВК‰ВМ˚. БЫ‰¸ЪВ УТЪУ УКМ˚ Ф Л ‡ТФУОУКВМЛЛ ‚Л‰ВУН‡ПВ ˚ ФУ‰ ТУОМˆВП ЛОЛ ‚УБОВ УНМ‡ [d].
[c] |
[d] |
‡ˆЛЛУФВ ОТМУ‚М˚В / operations Basic
21
Checking the |
П Ó‚Â Í‡ Á‡ÔËÒ‡Ì- |
recorded picture |
ÌÓ„Ó ËÁÓ· ‡ÊÂÌËя |
|
|
Using EDITSEARCH, you can review the last recorded scene or check the recorded picture in the viewfinder.
(1) While pressing the small green button on the POWER switch, set it to CAMERA.
(2) Turn STANDBY up to STANDBY. (3) Press the – (Œ) side of EDITSEARCH
momentarily; the last few seconds of the recorded portion play back (Rec Review). Hold down the – side of EDITSEARCH until the camcorder goes back to the scene you want. The last recorded portion is played back. To go forward, hold down the + side
(Edit Search).
ИТФУО¸БЫя EDITSEARCH, В˚ ПУКВЪВ ФВ ВТПУЪ ВЪ¸ ФУТОВ‰М˛˛ Б‡ФЛТ‡ММЫ˛ ТˆВМЫ ЛОЛ Ф У‚В ЛЪ¸ Б‡ФЛТ‡ММУВ ЛБУ· ‡КВМЛВ ‚ ‚Л‰УЛТН‡ЪВОВ.
(1) Н‡КЛП‡я П‡ОВМ¸НЫ˛ БВОВМЫ˛ НМУФНЫ М‡ ‚˚НО˛˜‡ЪВОВ POWER, ЫТЪ‡МУ‚ЛЪВ В„У ‚ ФУОУКВМЛВ CAMERA.
(2) ПУ‚В МЛЪВ STANDBY ‚‚В ı ‚ ФУОУКВМЛВ STANDBY.
(3) Н‡ П„МУ‚ВМЛВ М‡КПЛЪВ ТЪУ УМЫ – (Œ) НМУФНЛ EDITSEARCH; ФУТОВ‰МЛВ МВТНУО¸НУ ТВНЫМ‰ Б‡ФЛТ‡ММУИ ˜‡ТЪЛ ·Ы‰ЫЪ ‚УТФ УЛБ‚В‰ВМ˚ (ФВ ВТПУЪ Б‡ФЛТЛ). В˚ ПУКВЪВ НУМЪ УОЛ У‚‡Ъ¸ Б‚ЫН ˜В ВБ „УОУ‚М˚В ЪВОВЩУМ˚.
ДВ КЛЪВ М‡К‡ЪУИ ТЪУ УМЫ – НМУФНЛ EDITSEARCH ‰У ЪВı ФУ , ФУН‡ ‚Л‰ВУН‡ПВ ‡ МВ ‚В МВЪТя Н КВО‡ВПУИ ТˆВМВ. ПУТОВ‰Мяя Б‡ФЛТ‡ММ‡я ˜‡ТЪ¸ ·Ы‰ВЪ ‚УТФ УЛБ‚В‰ВМ‡. ДОя Ф У‰‚ЛКВМЛя ‚ФВ В‰ ‰В КЛЪВ М‡К‡ЪУИ ТЪУ УМЫ + (ПУМЪ‡КМ˚И ФУЛТН).
1
POWER
CAMERA
OFF
PLAYER
3
 EDITSEARCH

2
OCK
L
S
T
A
N
DBY
START/STOP
 EDITSEARCH

 EDITSEARCH

22

Checking the recorded picture
To stop playback
Release EDITSEARCH.
To begin re-recording
Press START/STOP. Re-recording begins from the point you released EDITSEARCH. Provided you do not eject the cassette, the transition between the last scene you recorded and the next scene you record will be smooth.
П Ó‚Â Í‡ Á‡ÔËÒ‡ÌÌÓ„Ó ËÁÓ· ‡ÊÂÌËя
ДÎя ÓÒÚ‡ÌÓ‚ÍË ‚ÓÒÔ ÓËÁ‚‰ÂÌËя
ОЪФЫТЪЛЪВ EDITSEARCH.
СÌÓ‚‡ ‰Îя ̇˜‡Î‡ Á‡ÔËÒË
Н‡КПЛЪВ START/STOP. З‡ФЛТ¸ М‡˜ЛМ‡ВЪТя УЪ ЪУ˜НЛ, „‰В В˚ УЪФЫТЪЛОЛ
EDITSEARCH. П Л ЫТОУ‚ЛЛ, ˜ЪУ В˚ МВ ‚˚ЪУОНМВЪВ Н‡ТТВЪЫ, ФВ ВıУ‰ ПВК‰Ы ФУТОВ‰МВИ ТˆВМУИ, НУЪУ Ы˛ В˚ Б‡ФЛТ‡ОЛ, Л ТОВ‰Ы˛˘ВИ ТˆВМУИ, НУЪУ Ы˛ В˚ Б‡ФЛТ˚‚‡ВЪВ, ·Ы‰ВЪ ФО‡‚М˚П.
‡ˆЛЛУФВ ОТМУ‚М˚В / operations Basic
23
Connections for |
СУВ‰ЛМВМЛя ‰Оя |
playback |
‚ÓÒÔ ÓËÁ‚‰ÂÌËя |
|
|
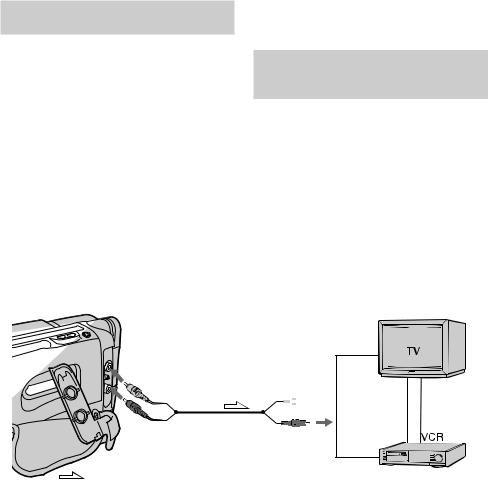
Connect the camcorder to your TV or VCR to watch the playback picture on the TV screen. There are some ways to connect the camcorder to your TV. When monitoring the playback picture by connecting the camcorder to your TV, we recommend you to use mains for the power source.
Connecting directly to a TV/VCR
with Video/Audio input jacks
When connecting the A/V connecting cable, make sure you connect the plug to jacks of the same colour.
Open the jack cover. With using the supplied A/ V connecting cable, connect the camcorder to the LINE IN inputs on the TV or VCR connected to the TV. Set the TV/VCR selector on the TV to VCR. When connecting to the VCR, set the input selector on the VCR to LINE.
ПУ‰ТУВ‰ЛМЛЪВ ‚Л‰ВУН‡ПВ Ы Н В‡¯ВПЫ ЪВОВ‚ЛБУ Ы ЛОЛ КВМ ‰Оя Ф УТПУЪ ‡ ‚УТФ УЛБ‚У‰ЛПУ„У ЛБУ· ‡КВМЛя М‡ ˝Н ‡МВ ЪВО‚ЛБУ ‡. СЫ˘ВТЪ‚ЫВЪ МВТНУО¸НУ ПВЪУ‰У‚ ‰Оя ФУ‰ТУВ‰ЛМВМЛя ‚Л‰ВУН‡ПВ ˚ Н В‡¯ВПЫ ЪВОВ‚ЛБУ Ы. ДОя Ф УТПУЪ ‡ ‚УТФ УЛБ‚У‰ЛПУ„У ЛБУ· ‡КВМЛя Ф Л ФУ‰ТУВ‰ЛМВМЛЛ ‚Л‰ВУН‡ПВ ˚ Н ЪВОВ‚ЛБУ Ы П˚ ВНУПВМ‰ЫВП В‡П ЛТФУО¸БУ‚‡Ъ¸ ˝ОВНЪ Л˜ВТНЫ˛ ТВЪ¸ ‚ Н‡˜ВТЪ‚В ЛТЪУ˜МЛН‡ ФЛЪ‡МЛя.
ПУ‰ТУВ‰ЛМВМЛВ Ф яПУ Н ЪВОВ‚ЛБУ Ы/КВМ Т ‚ıУ‰М˚ПЛ „МВБ‰‡ПЛ ‡Ы‰ЛУ/‚Л‰ВУ
П Л ФУ‰ТУВ‰ЛМВМЛЛ ТУВ‰ЛМЛЪВО¸МУ„У Н‡·ВОя ‡Ы‰ЛУ/‚Л‰ВУ Ы·В‰ЛЪВТ¸, ˜ЪУ В˚ ФУ‰ТУВ‰ЛМяВЪВ ¯ЪВНВ ˚ Н „МВБ‰‡П У‰ЛМ‡НУ‚У„У ˆ‚ВЪ‡. ОЪН УИЪВ Н ˚¯НЫ „МВБ‰‡. ПУ‰ТУВ‰ЛМЛЪВ ‚Л‰ВУН‡ПВ Ы Н ‚ıУ‰М˚П „МВБ‰‡П LINE IN М‡ ЪВОВ‚ЛБУ В ЛОЛ ФУ‰ТУВ‰ЛМВММУП Н МВПЫ КВМ Т ЛТФУО¸БУ‚‡МЛВП Ф ЛО‡„‡ВПУ„У ТУВ‰ЛМЛЪВО¸МУ„У Н‡·ВОя ‡Ы‰ЛУ/‚Л‰ВУ. УТЪ‡МУ‚ЛЪВ ТВОВНЪУ TV/VCR М‡ ЪВОВ‚ЛБУ В ‚ ФУОУКВМЛВ VCR. П Л ФУ‰ТУВ‰ЛМВМЛЛ Н КВМ ЫТЪ‡МУ‚ЛЪВ ТВОВНЪУ ‚ıУ‰М˚ı ТЛ„М‡ОУ‚ М‡ КВМ ‚ ФУОУКВМЛВ LINE.
IN
VIDEO


 VIDEO
VIDEO
 AUDIO
AUDIO
AUDIO
Signal flow/ П ‰‡˜‡ Ò˄̇·
24
Connections for playback |
СУВ‰ЛМВМЛя ‰Оя |
‚ÓÒÔ ÓËÁ‚‰ÂÌËя |
|
|
|
If your TV/VCR has a 21-pin connector (EUROCONNECTOR)
Use the supplied 21-pin adaptor.
To connect to a TV or VCR without Video/ Audio input jacks
Use a PAL type RFU adaptor (not supplied).
Using the AV cordless IR
receiver — LASER LINK
– CCD-TR713E only
Once you connect the AV cordless IR receiver (not supplied) having the LASER LINK mark to your TV or VCR, you can easily view the picture on your TV. For details, refer to the operating instruction of the AV cordless IR receiver.
LASER LINK is a system which transmits and receives a picture and sound between video equipment having the mark by using infrared rays.
LASER LINK is a trademark of Sony Corporation.
To play back on a TV
(1) After connecting your TV and AV cordless IR receiver, set the POWER switch on the AV cordless IR receiver to ON.
(2) Set the POWER switch on the camcorder to PLAYER.
(3) Turn the TV on and set the TV/VCR selector on the TV to VCR.
(4) Press LASER LINK. The lamp of the LASER LINK button lights up.
(5) Press (on the camcorder to start playback. (6) Point the LASER LINK emitter at the AV
cordless IR receiver.
To cancel the LASER LINK function
Press LASER LINK.
Note
When LASER LINK is activated (the LASER LINK button is lit), the camcorder consumes power. Press and turn off the LASER LINK button when it is not needed.
EcОЛ ‚ Ba¯ВП ТВ/КВМ ЛПВВЪТя 21- ¯Ъ˚ ¸НУ‚˚И ‡Б˙ВП (EUROCONNECTOR)
ИТФУО¸БЫИЪВ Ф ЛО‡„‡ВП˚И 21-¯Ъ˚ ¸НУ‚˚И ‡‰‡ФЪВ .
 TV
TV
ДОя ФУ‰ТУВ‰ЛМВМЛя Н ЪВОВ‚ЛБУ Ы ЛОЛ КВМ |
|
|
|
|
|
||
·ÂÁ ‚ıÓ‰Ì˚ı „ÌÂÁ‰ ‡Û‰ËÓ/‚ˉÂÓ |
|
Basic |
|
ИТФУО¸БЫИЪВ ВЧ-‡‰‡ФЪВ (МВ Ф ЛО‡„‡ВЪТя). |
|
||
|
|
||
|
|
operations |
|
ИÒÔÓθÁÓ‚‡ÌË ·ÂÒÔ Ó‚Ó‰ÌÓ„Ó |
|
||
|
|
||
ИК ‡Ы‰ЛУ‚Л‰ВУФ ЛВПМЛН‡ |
/ |
||
— LASER LINK |
|||
|
ОÒÌÓ‚Ì˚Â |
||
–TÓθÍÓ CCD-TR713E |
|
||
|
|
||
ЕТОЛ В˚ ФУ‰ТУВ‰ЛМЛЪВ ·ВТФ У‚У‰МУИ ИК |
|
|
|
‡Ы‰ЛУ‚Л‰ВУФ ЛВПМЛН (МВ Ф ЛО‡„‡ВЪТя), |
|
‡ˆЛЛУФВ |
|
Ëϲ˘ËÈ ÁÌ‡Í LASER LINK, Í В‡¯ÂÏÛ |
|
||
ЪВОВ‚ЛБУ Ы ЛОЛ КВМ, ЪУ В˚ ТПУКВЪВ ОВ„НУ |
|
|
|
Ф УТП‡Ъ Л‚‡Ъ¸ ЛБУ· ‡КВМЛВ М‡ ˝Н ‡МВ |
|
|
|
В‡¯В„У ЪВОВ‚ЛБУ ‡. СПУЪ ЛЪВ ФУ‰ У·МУТЪЛ ‚ |
|
|
|
ЫНУ‚У‰ТЪ‚В ФУ ˝НТФОЫ‡Ъ‡ˆЛЛ ·ВТФ У‚У‰МУ„У |
|
|
|
ИК ‡Ы‰ЛУ‚Л‰ВУФ ЛВПМЛН‡. |
|
|
|
LASER LINK я‚ОяВЪТя ТЛТЪВПУИ Ф ЛВП‡ Л |
|
|
|
Ô ‰‡˜Ë ËÁÓ· ‡ÊÂÌËя Ë Á‚Û͇ ÏÂÊ‰Û |
|
|
|
‚ˉÂÓ‡ÔÔ‡ ‡ÚÛ ÓÈ, Ëϲ˘ÂÈ ÁÌ‡Í , Ò |
|
|
|
ÔÓÏÓ˘¸˛ ËÌÙ ‡Í ‡ÒÌ˚ı ÎÛ˜ÂÈ. |
|
|
|
LASER LINK я‚ÎяÂÚÒя ÚÓ „Ó‚ÓÈ Ï‡ ÍÓÈ |
|
|
|
ÍÓ ÔÓ ‡ˆËË “Sony”. |
|
|
|
ДÎя ‚ÓÒÔ ÓËÁ‚‰ÂÌËя ̇ ÚÂ΂ËÁÓ Â |
|
|
|
(1) ПУТОВ ТУВ‰ЛМВМЛя В‡¯В„У ЪВОВ‚ЛБУ ‡ Л |
|
|
|
·ВТФ У‚У‰МУ„У ИК ‡Ы‰ЛУ‚Л‰ВУФ ЛВПМЛН‡, |
|
|
|
ÛÒÚ‡ÌÓ‚ËÚ ‚˚Íβ˜‡ÚÂθ POWER ̇ |
|
|
|
·ВТФ У‚У‰МУП ИК ‡Ы‰ЛУ‚Л‰ВУФ ЛВПМЛНВ ‚ |
|
|
|
ФУОУКВМЛВ ON. |
|
|
|
(2) УÒÚ‡ÌÓ‚ËÚ ‚˚Íβ˜‡ÚÂθ POWER ̇ |
|
|
|
‚Л‰ВУН‡ПВ В ‚ ФУОУКВМЛВ PLAYER. |
|
|
|
(3) ВÍβ˜ËÚ ÚÂ΂ËÁÓ Ë ÛÒÚ‡ÌÓ‚ËÚ |
|
|
|
ТВОВНЪУ TV/VCR М‡ ЪВОВ‚ЛБУ В ‚ |
|
|
|
ФУОУКВМЛВ VCR. |
|
|
|
(4) Н‡КПЛЪВ LASER LINK. Л‡ПФУ˜Н‡ НМУФНЛ |
|
|
|
LASER LINK Á‡„Ó ‡ÂÚÒя. |
|
|
|
(5) Н‡КПЛЪВ ( М‡ ‚Л‰ВУН‡ПВ В ‰Оя М‡˜‡О‡ |
|
|
|
‚ÓÒÔ ÓËÁ‚‰ÂÌËя. |
|
|
|
(6) Н‡‚В‰ЛЪВЪВ ЛБОЫ˜‡ЪВО¸ LASER LINK М‡ |
|
|
|
·ВТФ У‚У‰МУИ ИК-‡Ы‰ЛУ‚Л‰ВУФ ЛВПМЛН. |
|
|
|
ДОя УЪПВМ˚ ЩЫМНˆЛЛ LASER LINK |
|
|
|
Н‡КПЛЪВ LASER LINK. |
|
|
|
П ËϘ‡ÌËя Í LASER LINK |
|
|
|
КÓ„‰‡ ÙÛÌ͈Ëя LASER LINK ‚Íβ˜Â̇ |
|
|
|
(О‡ПФУ˜Н‡ НМУФНЛ LASER LINK „У ЛЪ), |
|
|
|
‚Л‰ВУН‡ПВ ‡ ФУЪ В·ОяВЪ ФЛЪ‡МЛВ. Н‡КПЛЪВ Л |
|
|
|
‚˚НО˛˜ЛЪВ НМУФНЫ LASER LINK, ВТОЛ ‰‡ММ‡я |
|
|
|
ÙÛÌ͈Ëя ÌÂ Ú Â·ÛÂÚÒя. |
25 |
||
|
|||

Playing back a tape
You can monitor the playback picture in the viewfinder. You can also monitor the picture on a TV screen, after connecting the camcorder to a TV or VCR.
(1) While pressing the small green button on the POWER switch, set it to PLAYER.
(2) Insert the recorded tape with the window facing out.
(3) Press 0to rewind the tape. (4) Press (to start playback.
ВÓÒÔ ÓËÁ‚‰ÂÌË ÎÂÌÚ˚
В˚ ПУКВЪВ Ф УТП‡Ъ Л‚‡Ъ¸ ЛБУ· ‡КВМЛВ ‚ ‚Л‰УЛТН‡ЪВОВ. В˚ ПУКВЪВ Ъ‡НКВ Ф УТПУЪ ВЪ¸ ЛБУ· ‡КВМЛВ М‡ ˝Н ‡МВ ЪВОВ‚ЛБУ ‡ ФУТОВ ФУ‰ТУВ‰ЛМВМЛя ‚Л‰ВУН‡ПВ ˚ Н ЪВОВ‚ЛБУ Ы ЛОЛ КВМ.
(1) Н‡КЛП‡я П‡ОВМ¸НЫ˛ БВОВМЫ˛ НМУФНЫ М‡ ‚˚НО˛˜‡ЪВОВ POWER , ЫТЪ‡МУ‚ЛЪВ В„У ‚ ФУОУКВМЛВ PLAYER. В˚Т‚ВЪяЪТя ‡·У˜ЛВ НМУФНЛ ‚Л‰ВУН‡ПВ ˚.
(2) ВТЪ‡‚¸ЪВ Б‡ФЛТ‡ММЫ˛ ОВМЪЫ УНУ¯НУП, У· ‡˘ВММ˚П М‡ ЫКЫ.
(3) Н‡КПЛЪВ 0 ‰Оя ЫТНУ ВММУИ ФВ ВПУЪНЛ ОВМЪ˚ М‡Б‡‰.
(4) Н‡КПЛЪВ ( ‰Оя М‡˜‡О‡ ‚УТФ УЛБ‚В‰ВМЛя.
1 |
POWER |
2 |
|
CAMERA |
|
|
OFF |
|
|
PLAYER |
|
|
PLAY |
|
REW |
FF |
3 |
|
STOP |
|
PAUSE |
SLOW |
|
DISPLAY |
|
|
4
REW
PLAY
To stop playback, press p. |
ДÎя ÓÒÚ‡ÌÓ‚ÍË ‚ÓÒÔ ÓËÁ‚‰ÂÌËя М‡КПЛЪВ |
To rewind the tape, press 0. |
p. |
To fast-forward the tape rapidly, press ). |
ДОя ЫТНУ ВММУИ ФВ ВПУЪНЛ ОВМЪ˚ М‡Б‡‰ |
|
М‡КПЛЪВ 0. |
|
ДОя ЫТНУ ВММУИ ФВ ВПУЪНЛ ОВМЪ˚ ‚ФВ В‰ |
|
М‡КПЛЪВ ). |
26

Playing back a tape
Using the remote commander
– CCD-TR425E/TR515E/TR713E only
You can control playback using the supplied Remote Commander. Before using the Remote Commander, insert the R6 (size AA) batteries.
To display the viewfinder screen indicators on the TV
– CCD-TR425E/TR515E/TR713E only
Press DISPLAY on the Remote Commander. To erase the indicators, press DISPLAY again.
Note on the lens cover
The lens cover does not open when the POWER switch is set to PLAYER. Do not open the lens cover manually. It may cause malfunction.
ВÓÒÔ ÓËÁ‚‰ÂÌË ÎÂÌÚ˚
ИТФУО¸БУ‚‡МЛВ ФЫО¸Ъ‡ ‰ЛТЪ‡МˆЛУММУ„У ЫФ ‡‚ОВМЛя
– ТÓθÍÓ CCD-TR425E/TR515E/TR713E
В˚ ПУКВЪВ ЫФ ‡‚ОяЪ¸ ‚УТФ УЛБ‚В‰ВМЛВП Т ФУПУ˘¸˛ Ф ЛО‡„‡ВПУ„У ФЫО¸Ъ‡ ‰ЛТЪ‡МˆЛУММУ„У ЫФ ‡‚ОВМЛя. ПВ В‰ ЛТФУО¸БУ‚‡МЛВП ФЫО¸Ъ‡ ‰ЛТЪ‡МˆЛУММУ„У ЫФ ‡‚ОВМЛя ‚ТЪ‡‚¸ЪВ ‚ МВ„У ·‡Ъ‡ ВИНЛ R6 ( ‡БПВ УП АА).
ДÎя ÓÚÓ· ‡ÊÂÌËя Ë̉Ë͇ÚÓ Ó‚ ‚ˉÓËÒ͇ÚÂÎя ̇ ˝Í ‡Ì ÚÂ΂ËÁÓ ‡
– ТÓθÍÓ CCD-TR425E/TR515E/TR713E
Н‡КПЛЪВ НМУФНЫ DISPLAY М‡ ФЫО¸ЪВ ‰ЛТЪ‡МˆЛУММУ„У ЫФ ‡‚ОВМЛя. ДОя ТЪЛ ‡МЛя ЛМ‰ЛН‡ЪУ У‚ ТМУ‚‡ М‡КПЛЪВ DISPLAY.
П ËϘ‡ÌËÂ Í Í ˚¯Í ӷ˙ÂÍÚË‚‡
К ˚¯Н‡ У·˙ВНЪЛ‚‡ МВ УЪН ˚‚‡ВЪТя, НУ„‰‡ ‚˚НО˛˜‡ЪВО¸ POWER ЫТЪ‡МУ‚ОВМ ‚ ФУОУКВМЛВ PLAYER. НВ УЪН ˚‚‡ИЪВ Н ˚¯НЫ У·˙ВНЪЛ‚‡ ‚ Ы˜МЫ˛. ЭЪУ ПУКВЪ Ф Л‚ВТЪЛ Н МВЛТФ ‡‚МУТЪЛ.
‡ˆЛЛУФВ ОТМУ‚М˚В / operations Basic
27

Playing back a tape
Various playback modes
To view a still picture (playback pause)
Press Pduring playback. To resume playback, press Por (.
To locate a scene (picture search)
Keep pressing 0or )during playback. To resume normal playback, release the button.
To monitor the high-speed picture while advancing the tape or rewinding (skip scan)
Keep pressing 0while rewinding or )while advancing the tape. To resume normal playback, press (.
To view the picture at 1/5 speed (slow playback)
– CCD-TR425E/TR515E/TR713E only
Press &on the Remote Commander during playback. To resume normal playback, press (. If slow playback lasts for about 1 minute, it shifts to normal speed automatically.
Notes on playback
•Noise may appear when you use the still/ slow/picture search function to play back the tape recorded in LP mode.
•Streaks appear and the sound is muted in the various playback modes.
•When playback pause mode lasts for 5 minutes, the camcorder automatically enters stop mode. To resume playback, press (.
•Horizontal noise appears at the centre, or top and bottom of the screen when you play back a tape in reverse. This is normal.
•You can play back the tapes recorded in the Hi8 video system on the standard 8 mm camcorder (CCD-TR415E/TR425E only).
28
ВÓÒÔ ÓËÁ‚‰ÂÌË ÎÂÌÚ˚
Р‡Á΢Ì˚ ÂÊËÏ˚
‚ÓÒÔ ÓËÁ‚‰ÂÌËя
ДОя Ф УТПУЪ ‡ МВФУ‰‚ЛКМУ„У ЛБУ· ‡- КВМЛя (Ф‡ЫБ‡ ‚УТФ УЛБ‚В‰ВМЛя)
Н‡КПЛЪВ P ‚У ‚ ВПя ‚УТФ УЛБ‚В‰ВМЛя. ДОя ‚УТТЪ‡МУ‚ОВМЛя ‚УТФ УЛБ‚В‰ВМЛя М‡КПЛЪВ P ЛОЛ (.
ДОя У·М‡ ЫКВМЛя Щ ‡„ПВМЪ‡ (ФУЛТН ЛБУ· ‡КВМЛя)
ДВ КЛЪВ М‡К‡ЪУИ НМУФНЫ 0ЛОЛ )‚У ‚ ВПя ‚УТФ УЛБ‚В‰ВМЛя. ДОя ‚УТТЪ‡МУ‚ОВМЛя МУ П‡- О¸МУ„У ‚УТФ УЛБ‚В‰ВМЛя УЪФЫТЪЛЪВ НМУФНЫ.
ДОя НУМЪ УОя ЛБУ· ‡КВМЛя М‡ ‚˚ТУНУИ ТНУ УТЪЛ ‚У ‚ ВПя ЫТНУ ВММУИ ФВ ВПУЪНЛ ОВМЪ˚ ‚ФВ В‰ ЛОЛ М‡Б‡‰ (ФУЛТН ПВЪУ‰УП Ф У„УМ‡)
ДВ КЛЪВ М‡К‡ЪУИ НМУФНЫ 0 ‚У ‚ ВПя ФВ ВПУЪНЛ ОВМЪ˚ М‡Б‡‰ ЛОЛ НМУФНЫ ) ‚У ‚ ВПя ФВ ВПУЪНЛ ОВМЪ˚ ‚ФВ В‰. ДОя ‚УТТЪ‡МУ‚ОВМЛя МУ П‡О¸МУ„У ‚УТФ УЛБ‚В‰ВМЛя М‡КПЛЪВ (.
ДОя Ф УТПУЪ ‡ ЛБУ· ‡КВМЛя М‡ 1/5 ТНУ УТЪЛ (Б‡ПВ‰ОВММУВ ‚УТФ УЛБ‚В‰ВМЛВ)
– ТÓθÍÓ CCD-TR425E/TR515E/TR713E
Н‡КПЛЪВ & М‡ ФЫО¸ЪВ ‰ЛТЪ‡МˆЛУММУ„У ЫФ ‡‚ОВМЛя ‚У ‚ ВПя ‚УТФ УЛБ‚В‰ВМЛя. ДОя ‚УТТЪ‡МУ‚ОВМЛя МУ П‡О¸МУ„У ‚УТФ УЛ- Б‚В‰ВМЛя М‡КПЛЪВ (. ЕТОЛ Б‡ПВ‰ОВММУВ ‚УТФ УЛБ‚В‰ВМЛВ Ф У‰УОК‡ВЪТя Ф Л·ОЛБЛЪВО¸МУ ‚ ЪВ˜ВМЛВ 1 ПЛМЫЪ˚, ‡ФФ‡ ‡Ъ ФВ ВНО˛˜ЛЪТя М‡ МУ П‡О¸МЫ˛ ТНУ УТЪ¸ ‡‚ЪУП‡ЪЛ˜ВТНЛ.
П ËϘ‡ÌËя Í ‚ÓÒÔ ÓËÁ‚‰ÂÌ˲
•ПУПВıЛ ПУ„ЫЪ ФУя‚ОяЪ¸Тя, НУ„‰‡ В˚ ЛТФУО¸БЫВЪВ ЩЫМНˆЛ˛ ТЪУФ-Н‡‰ ‡/ Б‡ПВ‰ОВММУ„У ‚УТФ УЛБ‚В‰ВМЛя/ФУЛТН‡ ЛБУ· ‡КВМЛя Ф Л ‚УТФ УЛБ‚В‰ВМЛЛ ОВМЪ˚, Б‡ФЛТ‡ММУИ ‚ ВКЛПВ LP.
•“ТяÌÛ˜ÍË” ÔÓя‚Îя˛ÚÒя Ë Á‚ÛÍ ·Û‰ÂÚ Ô Ë„ÎÛ¯ÂÌ ‚ ‡Á΢Ì˚ı ÂÊËχı ‚ÓÒÔ ÓËÁ‚‰ÂÌËя.
•ЕТОЛ ВКЛП Ф‡ЫБ˚ ‚УТФ УЛБ‚В‰ВМЛя Ф У‰УОК‡ВЪТя ‚ ЪВ˜ВМЛВ 5 ПЛМЫЪ, ‚Л‰ВУН‡ПВ ‡ ‡‚ЪУП‡ЪЛ˜ВТНЛ ‚УИ‰ВЪ ‚ВКЛП УТЪ‡МУ‚‡. ДОя ‚УТТЪ‡МУ‚ОВМЛя ‚УТФ УЛБ‚В‰ВМЛя М‡КПЛЪВ (.
•П Л ‚УТФ УЛБ‚В‰ВМЛЛ ‚ ВКЛП ‚ ҇ ‚ ˆВМЪ В, ‚‚В ıЫ ЛОЛ ‚МЛБЫ ˝Н ‡М‡ ФУя‚ОяВЪТя „У ЛБУМЪ‡О¸М˚И ¯ЫП. ЭЪУ МУ П‡О¸МУВ я‚ОВМЛВ.
•В˚ ПУКВЪВ ‚УТФ УЛБ‚У‰ЛЪ¸ ФОВМНЛ, Б‡ФЛТ‡ММ˚В ‚ ‚Л‰ВУТЛТЪВПВ Hi8 М‡ ТЪ‡М‰‡ ЪМУИ 8-ПЛООЛПВЪ У‚УИ ‚Л‰ВУН‡ПВ В (ЪУО¸НУ ‰Оя CCD-TR415E/TR425E).

Advanced operations
Using alternative power sources
You can choose any of the following power sources for your camcorder: battery pack, mains and 12/24 V car battery. Choose the appropriate power source depending on where you want to use your camcorder.
Place |
Power source |
Accessory to be |
|
|
used |
|
|
|
Indoors |
Mains |
Supplied AC power |
|
|
adaptor |
Outdoors |
Battery pack |
Battery pack |
|
|
NP-F330 (supplied), |
|
|
NP-F530, NP-F550, |
|
|
NP-F730, NP-F750, |
|
|
NP-F930, NP-F950 |
In the car |
12 V or 24 V |
Sony DC adaptor/ |
|
car battery |
charger (not |
|
|
supplied) |
|
|
|
Notes on power sources
•Disconnecting the power source or removing the battery pack during recording or playback may damage the inserted tape.
•The DC IN jack has power source priority. This means that the battery pack cannot supply any power if the mains lead is connected to the DC IN jack, even when the mains lead is not plugged into the mains.
УÒÓ‚Â ¯ÂÌÒÚ‚Ó‚‡ÌÌ˚ ÓÔ ‡ˆËË
ИÒÔÓθÁÓ‚‡ÌË ‡Î¸Ú ̇- ÚË‚Ì˚ı ËÒÚÓ˜ÌËÍÓ‚ ÔËÚ‡ÌËя
В˚ ПУКВЪВ ‚˚· ‡Ъ¸ О˛·УИ ЛБ ТОВ‰Ы˛˘Лı ЛТЪУ˜МЛНУ‚ ФЛЪ‡МЛя ‰Оя В‡¯ВИ ‚Л‰ВУН‡ПВ ˚: ·‡Ъ‡ ВИМ˚И ·ОУН ˝ОВНЪ Л˜ВТНЫ˛ ТВЪ¸, ˘ВОУ˜М˚В ·‡Ъ‡ ВИНЛ Л 12/24 В ‡‚ЪУПУ- ·ЛО¸М˚И ‡ННЫПЫОяЪУ . В˚·В ЛЪВ ФУ‰ıУ‰я˘ЛИ ЛТЪУ˜МЛН ФЛЪ‡МЛя ‚ Б‡‚ЛТЛПУТЪЛ УЪ ЪУ„У, „‰В В˚ ıУЪЛЪВ ЛТФУО¸БУ‚‡Ъ¸ В‡¯Ы ‚Л‰ВУН‡ПВ Ы.
МÂÒÚÓ |
ИÒÚÓ˜ÌËÍ |
ИÒÔÓθÁÛÂÏ˚ |
|
||
|
ÔËÚ‡ÌËя |
Ф ЛМ‡‰ОВКМУТЪЛ |
Advanced |
||
|
|
|
|
||
В ÔÓÏ¢ÂÌËË |
ЭÎÂÍÚ Ë˜ÂÒ͇я |
П Ë·„‡ÂÏ˚È |
|||
|
|||||
|
ÒÂÚ¸ |
ÒÂÚ‚ÓÈ ‡‰‡ÔÚ |
|
||
|
|
Ô ÂÏ. ÚÓ͇ |
|
||
|
|
|
|
/operations |
|
Н‡ ÛÎˈ |
Б‡Ú‡ ÂÈÌ˚È |
Б‡Ú‡ ÂÈÌ˚È ·ÎÓÍ |
|||
|
|||||
|
·ÎÓÍ |
NP-F330 |
|
||
|
|
(Ô Ë·„‡ÂÚÒя), |
|
||
|
|
NP-F530, NP- |
|
||
|
|
F550, NP-F730, |
¯ÂÌÒÚ‚Ó‚‡ÌÌ˚ÂУÒÓ‚Â |
||
|
|
NP-F750, NP- |
|||
|
|
|
|||
|
|
F930, NP-F950 |
|
||
|
|
|
|
|
|
В ‡‚ÚÓÏÓ·ËΠ|
12 В ËÎË 24 В |
З‡ я‰Ì˚È |
|
||
|
‡‚ÚÓÏÓ·ËθÌ˚È |
‚˚Ф яПЛЪВО¸ |
|
||
|
‡ННЫПЫОяЪУ |
ФВ ВПВММУ„У |
|
||
|
|
ÚÓ͇ Sony (‚ |
|
||
|
|
НУПФОВНЪ МВ |
|
|
|
|
|
‚ıÓ‰ËÚ) |
|
||
|
|
|
|
‡ˆЛЛУФВ |
|
|
|
|
|
||
П ËϘ‡ÌËя ÔÓ ËÒÚÓ˜ÌËÍ‡Ï ÔËÚ‡ÌËя
• ОЪТУВ‰ЛМВМЛВ ЛТЪУ˜МЛН‡ ФЛЪ‡МЛя ЛОЛ ТМяЪЛВ ·‡Ъ‡ ВИМУ„У ·ОУН‡ ‚У ‚ ВПя Б‡ФЛТЛ ЛОЛ ‚УТФ УЛБ‚В‰ВМЛя ПУКВЪ ФУ‚ В‰ЛЪ¸ ‚ТЪ‡‚ОВММЫ˛ ОВМЪЫ.
• ГМВБ‰У DC IN У·О‡‰‡ВЪ Ф ЛУ ЛЪВЪУП ‚ Н‡˜ВТЪ‚В ЛТЪУ˜МЛН‡ ФЛЪ‡МЛя. ЭЪУ УБМ‡˜‡ВЪ, ˜ЪУ ФЛЪ‡МЛВ УЪ ·‡Ъ‡ ВИМУ„У ·ОУН‡ ФУ‰‡‚‡Ъ¸Тя МВ ПУКВЪ, ВТОЛ ТВЪВ‚УИ Ф У‚У‰ ФУ‰ТУВ‰ЛМВМ Н „МВБ‰Ы DC IN, ‰‡КВ НУ„‰‡ ТВЪВ‚УИ Ф У‚У‰ МВ ‚НО˛˜ВМ ‚ ˝ОВНЪ Л˜ВТНЫ˛ ТВЪ¸.
29
Using alternative power sources
Using the mains
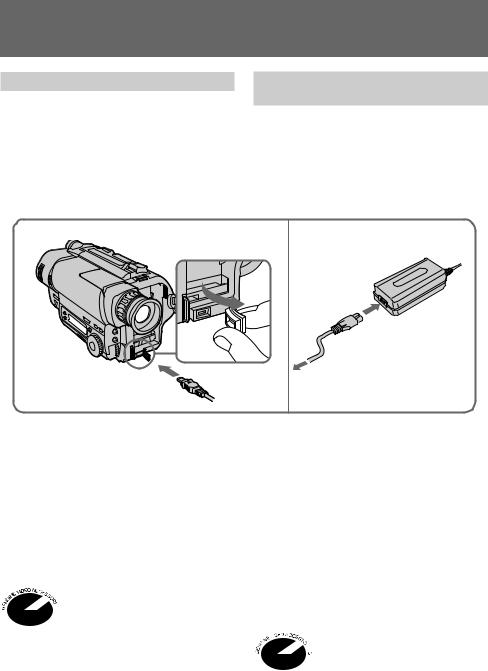
(1) Open the DC IN jack cover, and connect the AC power adaptor to the DC IN jack on the camcorder.
(2) Connect the mains lead to the AC power adaptor.
(3) Connect the mains lead to the mains.
ИÒÔÓθÁÓ‚‡ÌË ‡Î¸Ú ̇- ÚË‚Ì˚ı ËÒÚÓ˜ÌËÍÓ‚ ÔËÚ‡ÌËя
ИТФУО¸БУ‚‡МЛВ ˝ОВНЪ Л˜ВТНУИ
ÒÂÚË
(1) ОЪН УИЪВ Н ˚¯НЫ „МВБ‰‡ DC IN Л ФУ‰ТУВ‰ЛМЛЪВ ТВЪВ‚УИ ‡‰‡ФЪВ ФВ ВПВММУ„У ЪУН‡ Н „МВБ‰Ы DC IN М‡ ‚Л‰ВУН‡ПВ В.
(2) ПУ‰ТУВ‰ЛМЛЪВ ТВЪВ‚УИ Ф У‚У‰ Н ТВЪВ‚УПЫ ‡‰‡ФЪВ Ы ФВ ВПВММУ„У ЪУН‡.
(3) ПУ‰ТУВ‰ЛМЛЪВ ТВЪВ‚УИ Ф У‚У‰ Н ТВЪЛ.
1 |
2, 3 |
WARNING
The mains lead must only be changed at a qualified service shop.
PRECAUTION
The set is not disconnected from the AC power source (mains) as long as it is connected to the mains, even if the set itself has been turned off.
Note
Keep the AC power adaptor away from the camcorder if the picture is disturbed.
This mark indicates that this
 product is a genuine accessory for Sony video products.
When purchasing Sony video products, Sony recommends that you purchase accessories with this “GENUINE VIDEO ACCESSORIES” mark.
ПРЕДУПРЕЖДЕНИЕ
СВЪВ‚УИ Ф У‚У‰ ‰УОКВМ ·˚Ъ¸ Б‡ПВМВМ ЪУО¸НУ ‚ П‡ТЪВ ТНУИ Н‚‡ОЛЩЛˆЛ У‚‡ММУ„У У·ТОЫКЛ‚‡МЛя.
ПРЕДОСТЕРЕЖЕНИЕ
АФФ‡ ‡Ъ МВ УЪНО˛˜‡ВЪТя УЪ ЛТЪУ˜МЛН‡ ФЛЪ‡МЛя ФВ ВП. ЪУН‡ (˝ОВНЪ Л˜ВТНУИ ТВЪЛ) ‰У ЪВı ФУ , ФУН‡ УМ ФУ‰НО˛˜ВМ Н ˝ОВНЪ Л˜ВТНУИ ТВЪЛ, ‰‡КВ ВТОЛ Т‡П ‡ФФ‡ ‡Ъ ‚˚НО˛˜ВМ.
П ËϘ‡ÌËÂ
ДВ КЛЪВ ТВЪВ‚УИ ‡‰‡ФЪВ ФВ ВПВММУ„У ЪУН‡ ФУ‰‡О¸¯В УЪ ‚Л‰ВУН‡ПВ ˚, ВТОЛ ЛБУ· ‡КВМЛВ ТУ‰В КЛЪ ФУПВıЛ.
Н‡ÒÚÓя˘ËÈ ÁÌ‡Í Û͇Á˚‚‡ÂÚ, ˜ÚÓ
 ‰‡ММ‡я Ф У‰ЫНˆЛя я‚ОяВЪТя ФУ‰ОЛММУИ Ф ЛМ‡‰ОВКМУТЪ¸˛ ‚Л‰ВУФ У‰ЫНˆЛЛ Sony.
ЕТОЛ В˚ ФУНЫФ‡ВЪВ ‚Л‰ВУФ У‰ЫНˆЛ˛ Sony, ЪУ П˚ ВНУПВМ‰ЫВП, ˜ЪУ·˚ В˚ ФУНЫФ‡ОЛ Ф ЛМ‡‰ОВКМУТЪЛ, ФУПВ˜ВММ˚В БМ‡НУП “GENUINE VIDEO ACCESSORIES”.
30
 Loading...