


January 30, 2008
After CD Architect™ software is installed and you start it for the first time, the registration wizard appears. This wizard offers easy steps that allow you to register the software online with Sony Creative Software Inc. Alternatively, you may register online at http://www.sonycreativesoftware.com/ at any time.
Registering your product will provide you with access to a variety of technical support options, notification of product updates, and special promotions exclusive to registered CD Architect users.
Registration assistance
If you do not have access to the Internet, registration assistance is available during normal weekday business hours. Please contact our Customer Service department by dialing one of the following numbers:
Telephone/Fax |
Country |
|
1-800-577-6642 |
(toll-free) |
US, Canada, and Virgin Islands |
+608-204-7703 |
|
for all other countries |
1-608-250-1745 |
(Fax) |
All countries |
Customer service/sales
For a detailed list of Customer Service options, we encourage you to visit http://www.sonycreativesoftware.com/support/custserv.asp. Use the following numbers for telephone support during normal weekday business hours:
Telephone/Fax/E-mail |
Country |
|
1-800-577-6642 |
(toll-free) |
US, Canada, and Virgin Islands |
+608-204-7703 |
|
for all other countries |
1-608-250-1745 |
(Fax) |
All countries |
Technical support
For a detailed list of Technical Support options, we encourage you to visit http://www.sonycreativesoftware.com/support/default.asp. To listen to your support options, please call 608-256-5555.
Note: Customers who have purchased the full version of CD Architect receive 60 days of complimentary phone support. The complimentary support begins the date of your first call. (Registration is required to receive this complimentary support.) Please call (608) 204-7704 if you need assistance with your full version product.
About your rights in CD Architect software
CD Architect software is licensed to you under the terms of the End User License Agreement you entered into with Sony Creative Software Inc.
About your privacy
Sony Creative Software Inc. respects your privacy and is committed to protecting personal information. Your use of the software is governed by the Software Privacy Policy. Please review its contents carefully as its terms and conditions affect your rights with respect to the information that is collected by the software. For your reference, a copy of the Software Privacy Policy is located at http:// www.sonycreativesoftware.com/corporate/privacy.asp.
Proper use of software
CD Architect software is not intended and should not be used for illegal or infringing purposes, such as the illegal copying or sharing of copyrighted materials. Using CD Architect software for such purposes is, among other things, against United States and international copyright laws and contrary to the terms and conditions of the End User License Agreement. Such activity may be punishable by law and may also subject you to the breach remedies set forth in the End User License Agreement.
Legal notices
Vegas, Vegas+DVD, DVD Architect, Vegas Movie Studio, Vegas Movie Studio+DVD, DVD Architect Studio, ACID, Music Studio,
Sony Sound Series, Groove Mapping, Groove Cloning, CD Architect, Sound Forge, Audio Studio, and Cinescore are trademarks or registered trademarks of Sony Creative Software Inc., or its affiliates in the United States and other countries. All other trademarks or registered trademarks are the property of their respective owners in the United States and other countries.
Thomson Fraunhofer MP3
MPEG Layer-3 audio coding technology licensed from Fraunhofer IIS and Thomson.
Supply of this product does not convey a license nor imply any right to distribute content created with this product in revenue generating broadcast systems (terrestrial, satellite, cable and/or other distribution channels), streaming applications (via internet, intranets and/or other networks), other content distribution systems (pay-audio or audio on demand applications and the like) or on physical media (compact discs, digital versatile discs, semiconductor chips, hard drives, memory cards and the like).
An independent license for such use is required. For details, please visit: http://mp3licensing.com.
Microsoft DirectX programming interface
Portions utilize Microsoft® DirectX® technologies. Copyright © 1999 – 2008 Microsoft Corporation. All rights reserved.
Microsoft Windows Media 9
Portions utilize Microsoft Windows Media® technologies. Copyright © 1999 – 2008 Microsoft Corporation. All rights reserved.
Real, RealMedia, RealAudio, and RealVideo applications
2008 RealNetworks, Inc. Patents Pending. All rights reserved. Real®, Real Media®, RealAudio®, RealVideo®, and the Real logo are trademarks or registered trademarks of RealNetworks, Inc. in the United States and other countries.
Apple Macintosh Audio Interchange File Format (AIFF) file format
Apple® Macintosh® Audio Interchange™ File Format (AIFF) is a trademark of Apple, Inc. in the United States and other countries.
FLAC/Ogg File Formats
©2008, Xiph.org Foundation
Neither the name of the Xiph.org Foundation nor the names of its contributors may be used to endorse or promote products derived from this software without specific prior written permission.
This software is provided by the copyright holders and contributors “as is” and any express or implied warranties, including, but not limited to, the implied warranties of merchantability and fitness for a particular purpose are disclaimed. In no event shall the foundation or contributors be liable for any direct, indirect, incidental, special, exemplary, or consequential damages (including, but not limited to, procurement of substitute goods or services; loss of use, data, or profits; or business interruption) however caused and on any theory of liability, whether in contract, strict liability, or tort (including negligence or otherwise) arising in any way out of the use of this software, even if advised of the possibility of such damage.

Sony Creative Software Inc.
1617 Sherman Avenue
Madison, WI 53704
USA
The information contained in this manual is subject to change without notice and does not represent a guarantee or commitment on behalf of Sony Creative Software Inc., in any way. All updates or additional information relating to the contents of this manual will be posted on the Sony Creative Software Inc. Web site, located at http://www.sonycreativesoftware.com/. The software is provided to you under the terms of the End User License Agreement and Software Privacy Policy, and must be used and/or copied in accordance therewith. Copying or distributing the software except as expressly described in the End User License Agreement is strictly prohibited. No part of this manual may be reproduced or transmitted in any form or for any purpose without the express written consent of Sony Creative Software Inc.
Copyright © 2008. Sony Creative Software Inc.
Program Copyright © 2008. Sony Creative Software Inc. All rights reserved.

Table of 
Contents 
Overview of CD Technology. . . . . . . . . . . . . . . . . . . . . . . . . . . . . . . . . . . . . . . . . . . . . . . . . . . . . . . . . 7
Evolution of CD-R devices technology. . . . . . . . . . . . . . . . . . . . . . . . . . . . . . . . . . . . . . . . . . . . . . . . . . 7
CD-ROM technology basics . . . . . . . . . . . . . . . . . . . . . . . . . . . . . . . . . . . . . . . . . . . . . . . . . . . . . . . . . . . . . . . . . 7 From CD-ROM to CD-R . . . . . . . . . . . . . . . . . . . . . . . . . . . . . . . . . . . . . . . . . . . . . . . . . . . . . . . . . . . . . . . . . . . . . . 7
CD-Recordable standards. . . . . . . . . . . . . . . . . . . . . . . . . . . . . . . . . . . . . . . . . . . . . . . . . . . . . . . . . . . . . . 8
System use area . . . . . . . . . . . . . . . . . . . . . . . . . . . . . . . . . . . . . . . . . . . . . . . . . . . . . . . . . . . . . . . . . . . . . . . . . . . . 8 Information area . . . . . . . . . . . . . . . . . . . . . . . . . . . . . . . . . . . . . . . . . . . . . . . . . . . . . . . . . . . . . . . . . . . . . . . . . . . . 9
CD error detection and corrections . . . . . . . . . . . . . . . . . . . . . . . . . . . . . . . . . . . . . . . . . . . . . . . . . . . 10 The CD-R technology . . . . . . . . . . . . . . . . . . . . . . . . . . . . . . . . . . . . . . . . . . . . . . . . . . . . . . . . . . . . . . . . . 11
Track-at-Once . . . . . . . . . . . . . . . . . . . . . . . . . . . . . . . . . . . . . . . . . . . . . . . . . . . . . . . . . . . . . . . . . . . . . . . . . . . . . 11
Disc-at-Once (Single Session) . . . . . . . . . . . . . . . . . . . . . . . . . . . . . . . . . . . . . . . . . . . . . . . . . . . . . . . . . . . . . . 11
Introduction . . . . . . . . . . . . . . . . . . . . . . . . . . . . . . . . . . . . . . . . . . . . . . . . . . . . . . . . . . . . . . . . . . . . . . .13
System requirements. . . . . . . . . . . . . . . . . . . . . . . . . . . . . . . . . . . . . . . . . . . . . . . . . . . . . . . . . . . . . . . . . 13 Installing CD Architect software. . . . . . . . . . . . . . . . . . . . . . . . . . . . . . . . . . . . . . . . . . . . . . . . . . . . . . . 13 Getting help . . . . . . . . . . . . . . . . . . . . . . . . . . . . . . . . . . . . . . . . . . . . . . . . . . . . . . . . . . . . . . . . . . . . . . . . . 14
Online help . . . . . . . . . . . . . . . . . . . . . . . . . . . . . . . . . . . . . . . . . . . . . . . . . . . . . . . . . . . . . . . . . . . . . . . . . . . . . . . . 14 What’sThis? help . . . . . . . . . . . . . . . . . . . . . . . . . . . . . . . . . . . . . . . . . . . . . . . . . . . . . . . . . . . . . . . . . . . . . . . . . . . 15 Help on the Web . . . . . . . . . . . . . . . . . . . . . . . . . . . . . . . . . . . . . . . . . . . . . . . . . . . . . . . . . . . . . . . . . . . . . . . . . . . 15
Learning the CD Architect Workspace . . . . . . . . . . . . . . . . . . . . . . . . . . . . . . . . . . . . . . . . . . . . . .17
Main window . . . . . . . . . . . . . . . . . . . . . . . . . . . . . . . . . . . . . . . . . . . . . . . . . . . . . . . . . . . . . . . . . . . . . . . . 17
Main window components . . . . . . . . . . . . . . . . . . . . . . . . . . . . . . . . . . . . . . . . . . . . . . . . . . . . . . . . . . . . . . . . . 17 Toolbar . . . . . . . . . . . . . . . . . . . . . . . . . . . . . . . . . . . . . . . . . . . . . . . . . . . . . . . . . . . . . . . . . . . . . . . . . . . . . . . . . . . . 17
Timeline . . . . . . . . . . . . . . . . . . . . . . . . . . . . . . . . . . . . . . . . . . . . . . . . . . . . . . . . . . . . . . . . . . . . . . . . . . . . . 18
Marker bar . . . . . . . . . . . . . . . . . . . . . . . . . . . . . . . . . . . . . . . . . . . . . . . . . . . . . . . . . . . . . . . . . . . . . . . . . . . . . . . . . 18 Ruler . . . . . . . . . . . . . . . . . . . . . . . . . . . . . . . . . . . . . . . . . . . . . . . . . . . . . . . . . . . . . . . . . . . . . . . . . . . . . . . . . . . . . . 19 CD layout bar . . . . . . . . . . . . . . . . . . . . . . . . . . . . . . . . . . . . . . . . . . . . . . . . . . . . . . . . . . . . . . . . . . . . . . . . . . . . . . 19 Time display . . . . . . . . . . . . . . . . . . . . . . . . . . . . . . . . . . . . . . . . . . . . . . . . . . . . . . . . . . . . . . . . . . . . . . . . . . . . . . . 19 Transport bar controls . . . . . . . . . . . . . . . . . . . . . . . . . . . . . . . . . . . . . . . . . . . . . . . . . . . . . . . . . . . . . . . . . . . . . 19 Scrub control . . . . . . . . . . . . . . . . . . . . . . . . . . . . . . . . . . . . . . . . . . . . . . . . . . . . . . . . . . . . . . . . . . . . . . . . . . . . . . 19
Window docking area . . . . . . . . . . . . . . . . . . . . . . . . . . . . . . . . . . . . . . . . . . . . . . . . . . . . . . . . . . . . . . . . 19
Explorer window - Alt+1 . . . . . . . . . . . . . . . . . . . . . . . . . . . . . . . . . . . . . . . . . . . . . . . . . . . . . . . . . . . . . . . . . . . 20 Trimmer window - Alt+2 . . . . . . . . . . . . . . . . . . . . . . . . . . . . . . . . . . . . . . . . . . . . . . . . . . . . . . . . . . . . . . . . . . . 21 Mixer window - Alt+3 . . . . . . . . . . . . . . . . . . . . . . . . . . . . . . . . . . . . . . . . . . . . . . . . . . . . . . . . . . . . . . . . . . . . . . 21 Media Pool - Alt+4 . . . . . . . . . . . . . . . . . . . . . . . . . . . . . . . . . . . . . . . . . . . . . . . . . . . . . . . . . . . . . . . . . . . . . . . . . 21 Playlist window - Alt+5 . . . . . . . . . . . . . . . . . . . . . . . . . . . . . . . . . . . . . . . . . . . . . . . . . . . . . . . . . . . . . . . . . . . . . 22 Track List window - Alt+6 . . . . . . . . . . . . . . . . . . . . . . . . . . . . . . . . . . . . . . . . . . . . . . . . . . . . . . . . . . . . . . . . . . 22 Plug-Ins window - Alt+7 . . . . . . . . . . . . . . . . . . . . . . . . . . . . . . . . . . . . . . . . . . . . . . . . . . . . . . . . . . . . . . . . . . . 22
Keyboard command reference. . . . . . . . . . . . . . . . . . . . . . . . . . . . . . . . . . . . . . . . . . . . . . . . . . . . . . . . 23
Project file . . . . . . . . . . . . . . . . . . . . . . . . . . . . . . . . . . . . . . . . . . . . . . . . . . . . . . . . . . . . . . . . . . . . . . . . . . . . . . . . . 23 Magnification and view . . . . . . . . . . . . . . . . . . . . . . . . . . . . . . . . . . . . . . . . . . . . . . . . . . . . . . . . . . . . . . . . . . . . 23 Cursor placement, loop region, and time selection . . . . . . . . . . . . . . . . . . . . . . . . . . . . . . . . . . . . . . . . . . 24
TABLE OF CONTENTS | 1
Event selection and editing . . . . . . . . . . . . . . . . . . . . . . . . . . . . . . . . . . . . . . . . . . . . . . . . . . . . . . . . . . . . . . . . 24 Playback and preview . . . . . . . . . . . . . . . . . . . . . . . . . . . . . . . . . . . . . . . . . . . . . . . . . . . . . . . . . . . .26
Timeline . . . . . . . . . . . . . . . . . . . . . . . . . . . . . . . . . . . . . . . . . . . . . . . . . . . . . . . . . . . . . . . . . . . . . . . . . . . . . . . . . . 26 Trimmer commands . . . . . . . . . . . . . . . . . . . . . . . . . . . . . . . . . . . . . . . . . . . . . . . . . . . . . . . . . . . . . . . . . . . . . . . 26 Miscellaneous . . . . . . . . . . . . . . . . . . . . . . . . . . . . . . . . . . . . . . . . . . . . . . . . . . . . . . . . . . . . . . . . . . . . . . . . . . . . . 27 Mouse wheel shortcuts . . . . . . . . . . . . . . . . . . . . . . . . . . . . . . . . . . . . . . . . . . . . . . . . . . . . . . . . . . . . . . . . . . . . 27
Signal flow. . . . . . . . . . . . . . . . . . . . . . . . . . . . . . . . . . . . . . . . . . . . . . . . . . . . . . . . . . . . . . . . . . . . . . . . . . . 28
Getting Started . . . . . . . . . . . . . . . . . . . . . . . . . . . . . . . . . . . . . . . . . . . . . . . . . . . . . . . . . . . . . . . . . . . .29
Creating a project. . . . . . . . . . . . . . . . . . . . . . . . . . . . . . . . . . . . . . . . . . . . . . . . . . . . . . . . . . . . . . . . . . . . 29 Setting project properties . . . . . . . . . . . . . . . . . . . . . . . . . . . . . . . . . . . . . . . . . . . . . . . . . . . . . . . . . . . . 29
Audio tab . . . . . . . . . . . . . . . . . . . . . . . . . . . . . . . . . . . . . . . . . . . . . . . . . . . . . . . . . . . . . . . . . . . . . . . . . . . . . . . . . 29 Ruler tab . . . . . . . . . . . . . . . . . . . . . . . . . . . . . . . . . . . . . . . . . . . . . . . . . . . . . . . . . . . . . . . . . . . . . . . . . . . . . . . . . . 30 Summary tab . . . . . . . . . . . . . . . . . . . . . . . . . . . . . . . . . . . . . . . . . . . . . . . . . . . . . . . . . . . . . . . . . . . . . . . . . . . . . 30 CD Tab . . . . . . . . . . . . . . . . . . . . . . . . . . . . . . . . . . . . . . . . . . . . . . . . . . . . . . . . . . . . . . . . . . . . . . . . . . . . . . . . . . . . 30
Opening a project or CD image. . . . . . . . . . . . . . . . . . . . . . . . . . . . . . . . . . . . . . . . . . . . . . . . . . . . . . . 30
Opening a CD Architect project . . . . . . . . . . . . . . . . . . . . . . . . . . . . . . . . . . . . . . . . . . . . . . . . . . . . . . . . . . . . 30 Opening a CD image file . . . . . . . . . . . . . . . . . . . . . . . . . . . . . . . . . . . . . . . . . . . . . . . . . . . . . . . . . . . . . . . . . . . 31
Closing a project . . . . . . . . . . . . . . . . . . . . . . . . . . . . . . . . . . . . . . . . . . . . . . . . . . . . . . . . . . . . . . . . . . . . . 31 Saving a project. . . . . . . . . . . . . . . . . . . . . . . . . . . . . . . . . . . . . . . . . . . . . . . . . . . . . . . . . . . . . . . . . . . . . . 31
Saving a CD Architect project . . . . . . . . . . . . . . . . . . . . . . . . . . . . . . . . . . . . . . . . . . . . . . . . . . . . . . . . . . . . . . 31 Automatically saving a project . . . . . . . . . . . . . . . . . . . . . . . . . . . . . . . . . . . . . . . . . . . . . . . . . . . . . . . . . . . . . 32 Renaming a project (using Save As) . . . . . . . . . . . . . . . . . . . . . . . . . . . . . . . . . . . . . . . . . . . . . . . . . . . . . . . . 32
Rendering a CD image file. . . . . . . . . . . . . . . . . . . . . . . . . . . . . . . . . . . . . . . . . . . . . . . . . . . . . . . . . . . . 32 Adding media to a project . . . . . . . . . . . . . . . . . . . . . . . . . . . . . . . . . . . . . . . . . . . . . . . . . . . . . . . . . . . 33
Reviewing supported media file types . . . . . . . . . . . . . . . . . . . . . . . . . . . . . . . . . . . . . . . . . . . . . . . . . . . . . |
33 |
Previewing media files . . . . . . . . . . . . . . . . . . . . . . . . . . . . . . . . . . . . . . . . . . . . . . . . . . . . . . . . . . . . . . . . . . . . |
34 |
Using the Explorer window. . . . . . . . . . . . . . . . . . . . . . . . . . . . . . . . . . . . . . . . . . . . . . . . . . . . . . . . . . . 35
Learning the Explorer window . . . . . . . . . . . . . . . . . . . . . . . . . . . . . . . . . . . . . . . . . . . . . . . . . . . . . . . . . . . . . 35 Adding files to your project and creating CD tracks . . . . . . . . . . . . . . . . . . . . . . . . . . . . . . . . . . . . . . . . . 35 Using My Favorites folder . . . . . . . . . . . . . . . . . . . . . . . . . . . . . . . . . . . . . . . . . . . . . . . . . . . . . . . . . . . . . . . . . . 36
Using the Media Pool . . . . . . . . . . . . . . . . . . . . . . . . . . . . . . . . . . . . . . . . . . . . . . . . . . . . . . . . . . . . . . . . 36
Using Media Pool views . . . . . . . . . . . . . . . . . . . . . . . . . . . . . . . . . . . . . . . . . . . . . . . . . . . . . . . . . . . . . . . . . . . 37 Adding media to your project without creating events . . . . . . . . . . . . . . . . . . . . . . . . . . . . . . . . . . . . . 37 Adding media to the timeline . . . . . . . . . . . . . . . . . . . . . . . . . . . . . . . . . . . . . . . . . . . . . . . . . . . . . . . . . . . . . . 37 Creating events and tracks from the Media Pool . . . . . . . . . . . . . . . . . . . . . . . . . . . . . . . . . . . . . . . . . . . . 38 Replacing media in the Media Pool . . . . . . . . . . . . . . . . . . . . . . . . . . . . . . . . . . . . . . . . . . . . . . . . . . . . . . . . 38 Cleaning the Media Pool . . . . . . . . . . . . . . . . . . . . . . . . . . . . . . . . . . . . . . . . . . . . . . . . . . . . . . . . . . . . . . . . . . . 39 Removing a media file from the project . . . . . . . . . . . . . . . . . . . . . . . . . . . . . . . . . . . . . . . . . . . . . . . . . . . . 39 Extracting audio from CDs . . . . . . . . . . . . . . . . . . . . . . . . . . . . . . . . . . . . . . . . . . . . . . . . . . . . . . . . . . . . . . . . . 39
Working with events . . . . . . . . . . . . . . . . . . . . . . . . . . . . . . . . . . . . . . . . . . . . . . . . . . . . . . . . . . . . . . . . . 41
Understanding files and events . . . . . . . . . . . . . . . . . . . . . . . . . . . . . . . . . . . . . . . . . . . . . . . . . . . . . . . . . . . . |
41 |
Moving events along the timeline . . . . . . . . . . . . . . . . . . . . . . . . . . . . . . . . . . . . . . . . . . . . . . . . . . . . . . . . . |
41 |
2 | TABLE OF CONTENTS
Working with tracks . . . . . . . . . . . . . . . . . . . . . . . . . . . . . . . . . . . . . . . . . . . . . . . . . . . . . . . . . . . . . . . . . . 42
Creating tracks automatically . . . . . . . . . . . . . . . . . . . . . . . . . . . . . . . . . . . . . . . . . . . . . . . . . . . . . . . . . . . . . . 42 Creating tracks from existing events . . . . . . . . . . . . . . . . . . . . . . . . . . . . . . . . . . . . . . . . . . . . . . . . . . . . . . . . 42
Using the timeline. . . . . . . . . . . . . . . . . . . . . . . . . . . . . . . . . . . . . . . . . . . . . . . . . . . . . . . . . . . . . . . . . . . . 42 Viewing playbacks and previews. . . . . . . . . . . . . . . . . . . . . . . . . . . . . . . . . . . . . . . . . . . . . . . . . . . . . . 43
Using playback in CD Architect software . . . . . . . . . . . . . . . . . . . . . . . . . . . . . . . . . . . . . . . . . . . . . . . . . . . . 43 Playback reference . . . . . . . . . . . . . . . . . . . . . . . . . . . . . . . . . . . . . . . . . . . . . . . . . . . . . . . . . . . . . . . . . . . . . . . . 44 Scrubbing . . . . . . . . . . . . . . . . . . . . . . . . . . . . . . . . . . . . . . . . . . . . . . . . . . . . . . . . . . . . . . . . . . . . . . . . . . . . . . . . . 44 Previewing with Emulate CD Player Mode . . . . . . . . . . . . . . . . . . . . . . . . . . . . . . . . . . . . . . . . . . . . . . . . . . 44
Basic Editing Techniques . . . . . . . . . . . . . . . . . . . . . . . . . . . . . . . . . . . . . . . . . . . . . . . . . . . . . . . . . . .45
Getting around. . . . . . . . . . . . . . . . . . . . . . . . . . . . . . . . . . . . . . . . . . . . . . . . . . . . . . . . . . . . . . . . . . . . . . . 45
Changing focus . . . . . . . . . . . . . . . . . . . . . . . . . . . . . . . . . . . . . . . . . . . . . . . . . . . . . . . . . . . . . . . . . . . . . . . . . . . . 45
Making time and event selections. . . . . . . . . . . . . . . . . . . . . . . . . . . . . . . . . . . . . . . . . . . . . . . . . . . . . 45
Selecting multiple events . . . . . . . . . . . . . . . . . . . . . . . . . . . . . . . . . . . . . . . . . . . . . . . . . . . . . . . . . . . . . . . . . . 45 Selecting a time range . . . . . . . . . . . . . . . . . . . . . . . . . . . . . . . . . . . . . . . . . . . . . . . . . . . . . . . . . . . . . . . . . . . . . 46 Looping playback . . . . . . . . . . . . . . . . . . . . . . . . . . . . . . . . . . . . . . . . . . . . . . . . . . . . . . . . . . . . . . . . . . . . . . . . . . 46 Selecting events and a time range . . . . . . . . . . . . . . . . . . . . . . . . . . . . . . . . . . . . . . . . . . . . . . . . . . . . . . . . . . 46
Editing and ripple editing events . . . . . . . . . . . . . . . . . . . . . . . . . . . . . . . . . . . . . . . . . . . . . . . . . . . . . 47
Copying events . . . . . . . . . . . . . . . . . . . . . . . . . . . . . . . . . . . . . . . . . . . . . . . . . . . . . . . . . . . . . . . . . . . . . . . . . . . . 47 Cutting events . . . . . . . . . . . . . . . . . . . . . . . . . . . . . . . . . . . . . . . . . . . . . . . . . . . . . . . . . . . . . . . . . . . . . . . . . . . . . 48 Pasting events . . . . . . . . . . . . . . . . . . . . . . . . . . . . . . . . . . . . . . . . . . . . . . . . . . . . . . . . . . . . . . . . . . . . . . . . . . . . . 48 Duplicating events . . . . . . . . . . . . . . . . . . . . . . . . . . . . . . . . . . . . . . . . . . . . . . . . . . . . . . . . . . . . . . . . . . . . . . . . . 49 Inserting empty time . . . . . . . . . . . . . . . . . . . . . . . . . . . . . . . . . . . . . . . . . . . . . . . . . . . . . . . . . . . . . . . . . . . . . . 50 Trimming events . . . . . . . . . . . . . . . . . . . . . . . . . . . . . . . . . . . . . . . . . . . . . . . . . . . . . . . . . . . . . . . . . . . . . . . . . . 50 Splitting events . . . . . . . . . . . . . . . . . . . . . . . . . . . . . . . . . . . . . . . . . . . . . . . . . . . . . . . . . . . . . . . . . . . . . . . . . . . . 50 Slipping and sliding events . . . . . . . . . . . . . . . . . . . . . . . . . . . . . . . . . . . . . . . . . . . . . . . . . . . . . . . . . . . . . . . . 51 Deleting events . . . . . . . . . . . . . . . . . . . . . . . . . . . . . . . . . . . . . . . . . . . . . . . . . . . . . . . . . . . . . . . . . . . . . . . . . . . . 52
Crossfading events . . . . . . . . . . . . . . . . . . . . . . . . . . . . . . . . . . . . . . . . . . . . . . . . . . . . . . . . . . . . . . . . . . . 52
Using automatic crossfades . . . . . . . . . . . . . . . . . . . . . . . . . . . . . . . . . . . . . . . . . . . . . . . . . . . . . . . . . . . . . . . . 53 Sliding a crossfade . . . . . . . . . . . . . . . . . . . . . . . . . . . . . . . . . . . . . . . . . . . . . . . . . . . . . . . . . . . . . . . . . . . . . . . . . 53
Using the second audio layer . . . . . . . . . . . . . . . . . . . . . . . . . . . . . . . . . . . . . . . . . . . . . . . . . . . . . . . . . 53
Turning the second audio layer on or off . . . . . . . . . . . . . . . . . . . . . . . . . . . . . . . . . . . . . . . . . . . . . . . . . . . |
53 |
Moving events between layers . . . . . . . . . . . . . . . . . . . . . . . . . . . . . . . . . . . . . . . . . . . . . . . . . . . . . . . . . . . . . |
54 |
Adding events and tracks to a two-layer project . . . . . . . . . . . . . . . . . . . . . . . . . . . . . . . . . . . . . . . . . . . . |
54 |
Cutting, copying, or pasting events in the second audio layer . . . . . . . . . . . . . . . . . . . . . . . . . . . . . . . |
54 |
Adding volume envelopes in a two-layer project . . . . . . . . . . . . . . . . . . . . . . . . . . . . . . . . . . . . . . . . . . . . |
54 |
Using undo and redo . . . . . . . . . . . . . . . . . . . . . . . . . . . . . . . . . . . . . . . . . . . . . . . . . . . . . . . . . . . . . . . . . 54
Using undo . . . . . . . . . . . . . . . . . . . . . . . . . . . . . . . . . . . . . . . . . . . . . . . . . . . . . . . . . . . . . . . . . . . . . . . . . . . . . . . . 54 Using redo . . . . . . . . . . . . . . . . . . . . . . . . . . . . . . . . . . . . . . . . . . . . . . . . . . . . . . . . . . . . . . . . . . . . . . . . . . . . . . . . 55 Clearing the edit history . . . . . . . . . . . . . . . . . . . . . . . . . . . . . . . . . . . . . . . . . . . . . . . . . . . . . . . . . . . . . . . . . . . 55
Adding project markers and regions . . . . . . . . . . . . . . . . . . . . . . . . . . . . . . . . . . . . . . . . . . . . . . . . . . 55
Working with markers . . . . . . . . . . . . . . . . . . . . . . . . . . . . . . . . . . . . . . . . . . . . . . . . . . . . . . . . . . . . . . . . . . . . . 55
TABLE OF CONTENTS | 3
Working with regions . . . . . . . . . . . . . . . . . . . . . . . . . . . . . . . . . . . . . . . . . . . . . . . . . . . . . . . . . . . . . . . . . . . . . |
57 |
Working with CD layout markers . . . . . . . . . . . . . . . . . . . . . . . . . . . . . . . . . . . . . . . . . . . . . . . . . . . . . . . . . . . |
58 |
Using an external audio editing program . . . . . . . . . . . . . . . . . . . . . . . . . . . . . . . . . . . . . . . . . . . . . 58
Setting up an audio editing program . . . . . . . . . . . . . . . . . . . . . . . . . . . . . . . . . . . . . . . . . . . . . . . . . . . . . . |
58 |
Opening an audio editor from CD Architect software . . . . . . . . . . . . . . . . . . . . . . . . . . . . . . . . . . . . . . . |
58 |
Editing a media file’s source project . . . . . . . . . . . . . . . . . . . . . . . . . . . . . . . . . . . . . . . . . . . . . . . . . . 59
Advanced Editing Techniques. . . . . . . . . . . . . . . . . . . . . . . . . . . . . . . . . . . . . . . . . . . . . . . . . . . . . .61
Snapping events . . . . . . . . . . . . . . . . . . . . . . . . . . . . . . . . . . . . . . . . . . . . . . . . . . . . . . . . . . . . . . . . . . . . . 61
Enabling and disabling snapping . . . . . . . . . . . . . . . . . . . . . . . . . . . . . . . . . . . . . . . . . . . . . . . . . . . . . . . . . . 61 Quantizing to frames . . . . . . . . . . . . . . . . . . . . . . . . . . . . . . . . . . . . . . . . . . . . . . . . . . . . . . . . . . . . . . . . . . . . . . 61
Time compressing/stretching events . . . . . . . . . . . . . . . . . . . . . . . . . . . . . . . . . . . . . . . . . . . . . . . . . 61 Working with takes . . . . . . . . . . . . . . . . . . . . . . . . . . . . . . . . . . . . . . . . . . . . . . . . . . . . . . . . . . . . . . . . . . 61
Adding takes . . . . . . . . . . . . . . . . . . . . . . . . . . . . . . . . . . . . . . . . . . . . . . . . . . . . . . . . . . . . . . . . . . . . . . . . . . . . . . 62 Selecting takes . . . . . . . . . . . . . . . . . . . . . . . . . . . . . . . . . . . . . . . . . . . . . . . . . . . . . . . . . . . . . . . . . . . . . . . . . . . . 62 Previewing and selecting takes . . . . . . . . . . . . . . . . . . . . . . . . . . . . . . . . . . . . . . . . . . . . . . . . . . . . . . . . . . . . 62 Using takes to copy event attributes to a new event . . . . . . . . . . . . . . . . . . . . . . . . . . . . . . . . . . . . . . . . 62 Deleting takes . . . . . . . . . . . . . . . . . . . . . . . . . . . . . . . . . . . . . . . . . . . . . . . . . . . . . . . . . . . . . . . . . . . . . . . . . . . . . 62 Working with take names . . . . . . . . . . . . . . . . . . . . . . . . . . . . . . . . . . . . . . . . . . . . . . . . . . . . . . . . . . . . . . . . . . 63
Using the Trimmer window . . . . . . . . . . . . . . . . . . . . . . . . . . . . . . . . . . . . . . . . . . . . . . . . . . . . . . . . . . 64
Opening a file in the Trimmer . . . . . . . . . . . . . . . . . . . . . . . . . . . . . . . . . . . . . . . . . . . . . . . . . . . . . . . . . . . . . . 64 Making selections in the Trimmer . . . . . . . . . . . . . . . . . . . . . . . . . . . . . . . . . . . . . . . . . . . . . . . . . . . . . . . . . . 64 Adding selections to the timeline . . . . . . . . . . . . . . . . . . . . . . . . . . . . . . . . . . . . . . . . . . . . . . . . . . . . . . . . . . 65 Adding and saving regions and markers to a media file . . . . . . . . . . . . . . . . . . . . . . . . . . . . . . . . . . . . . 66 Opening a file in an external audio editor from the Trimmer . . . . . . . . . . . . . . . . . . . . . . . . . . . . . . . . 66
Using the Playlist window . . . . . . . . . . . . . . . . . . . . . . . . . . . . . . . . . . . . . . . . . . . . . . . . . . . . . . . . . . . . 66
Viewing the Playlist window . . . . . . . . . . . . . . . . . . . . . . . . . . . . . . . . . . . . . . . . . . . . . . . . . . . . . . . . . . . . . . . 66
Working with Events . . . . . . . . . . . . . . . . . . . . . . . . . . . . . . . . . . . . . . . . . . . . . . . . . . . . . . . . . . . . . . .69
Setting event switches . . . . . . . . . . . . . . . . . . . . . . . . . . . . . . . . . . . . . . . . . . . . . . . . . . . . . . . . . . . . . . . 69
Mute . . . . . . . . . . . . . . . . . . . . . . . . . . . . . . . . . . . . . . . . . . . . . . . . . . . . . . . . . . . . . . . . . . . . . . . . . . . . . . . . . . . . . . 69 Loop . . . . . . . . . . . . . . . . . . . . . . . . . . . . . . . . . . . . . . . . . . . . . . . . . . . . . . . . . . . . . . . . . . . . . . . . . . . . . . . . . . . . . . 69 Invert phase . . . . . . . . . . . . . . . . . . . . . . . . . . . . . . . . . . . . . . . . . . . . . . . . . . . . . . . . . . . . . . . . . . . . . . . . . . . . . . . 69 Normalize . . . . . . . . . . . . . . . . . . . . . . . . . . . . . . . . . . . . . . . . . . . . . . . . . . . . . . . . . . . . . . . . . . . . . . . . . . . . . . . . . 69
Accessing event properties. . . . . . . . . . . . . . . . . . . . . . . . . . . . . . . . . . . . . . . . . . . . . . . . . . . . . . . . . . . 70 Using audio event envelopes (ASR) . . . . . . . . . . . . . . . . . . . . . . . . . . . . . . . . . . . . . . . . . . . . . . . . . . . 70
Setting an audio event’s volume . . . . . . . . . . . . . . . . . . . . . . . . . . . . . . . . . . . . . . . . . . . . . . . . . . . . . . . . . . . |
70 |
Setting an event’s fade in and out . . . . . . . . . . . . . . . . . . . . . . . . . . . . . . . . . . . . . . . . . . . . . . . . . . . . . . . . . . |
71 |
The Envelope Edit tool . . . . . . . . . . . . . . . . . . . . . . . . . . . . . . . . . . . . . . . . . . . . . . . . . . . . . . . . . . . . . . . . . . . . |
71 |
Using timeline volume envelopes . . . . . . . . . . . . . . . . . . . . . . . . . . . . . . . . . . . . . . . . . . . . . . . . . . . . 71
Adding or removing a timeline volume envelope . . . . . . . . . . . . . . . . . . . . . . . . . . . . . . . . . . . . . . . . . . . 72 Adjusting the volume . . . . . . . . . . . . . . . . . . . . . . . . . . . . . . . . . . . . . . . . . . . . . . . . . . . . . . . . . . . . . . . . . . . . . 72 Adding or deleting envelope points . . . . . . . . . . . . . . . . . . . . . . . . . . . . . . . . . . . . . . . . . . . . . . . . . . . . . . . 72 Moving envelope points . . . . . . . . . . . . . . . . . . . . . . . . . . . . . . . . . . . . . . . . . . . . . . . . . . . . . . . . . . . . . . . . . . . 72
4 | TABLE OF CONTENTS
Using the Envelope Edit tool . . . . . . . . . . . . . . . . . . . . . . . . . . . . . . . . . . . . . . . . . . . . . . . . . . . . . . . . . . . . . . . 73 Adjusting fade properties . . . . . . . . . . . . . . . . . . . . . . . . . . . . . . . . . . . . . . . . . . . . . . . . . . . . . . . . . . . . . . . . . . 73 Showing or hiding a timeline volume envelope . . . . . . . . . . . . . . . . . . . . . . . . . . . . . . . . . . . . . . . . . . . . . 74 Locking envelopes to events . . . . . . . . . . . . . . . . . . . . . . . . . . . . . . . . . . . . . . . . . . . . . . . . . . . . . . . . . . . . . . . 74
Grouping events . . . . . . . . . . . . . . . . . . . . . . . . . . . . . . . . . . . . . . . . . . . . . . . . . . . . . . . . . . . . . . . . . . . . . 74
Creating a new group . . . . . . . . . . . . . . . . . . . . . . . . . . . . . . . . . . . . . . . . . . . . . . . . . . . . . . . . . . . . . . . . . . . . . . 74 Adding an event to an existing group . . . . . . . . . . . . . . . . . . . . . . . . . . . . . . . . . . . . . . . . . . . . . . . . . . . . . . 74 Removing events from a group . . . . . . . . . . . . . . . . . . . . . . . . . . . . . . . . . . . . . . . . . . . . . . . . . . . . . . . . . . . . 74 Clearing a group . . . . . . . . . . . . . . . . . . . . . . . . . . . . . . . . . . . . . . . . . . . . . . . . . . . . . . . . . . . . . . . . . . . . . . . . . . . 75 Suspending grouping temporarily . . . . . . . . . . . . . . . . . . . . . . . . . . . . . . . . . . . . . . . . . . . . . . . . . . . . . . . . . 75
Working with Tracks . . . . . . . . . . . . . . . . . . . . . . . . . . . . . . . . . . . . . . . . . . . . . . . . . . . . . . . . . . . . . . .77
Creating tracks from events. . . . . . . . . . . . . . . . . . . . . . . . . . . . . . . . . . . . . . . . . . . . . . . . . . . . . . . . . . . 77
Creating tracks automatically when you add events to the timeline . . . . . . . . . . . . . . . . . . . . . . . . . 77 Creating tracks from existing events . . . . . . . . . . . . . . . . . . . . . . . . . . . . . . . . . . . . . . . . . . . . . . . . . . . . . . . . 77
Inserting CD tracks . . . . . . . . . . . . . . . . . . . . . . . . . . . . . . . . . . . . . . . . . . . . . . . . . . . . . . . . . . . . . . . . . . . 78 Creating tracks from regions in a media file . . . . . . . . . . . . . . . . . . . . . . . . . . . . . . . . . . . . . . . . . . . 78 Adjusting pause time between tracks . . . . . . . . . . . . . . . . . . . . . . . . . . . . . . . . . . . . . . . . . . . . . . . . . 78
Automatically spacing tracks to the default pause time . . . . . . . . . . . . . . . . . . . . . . . . . . . . . . . . . . . . . |
78 |
Adjusting pause time on the timeline . . . . . . . . . . . . . . . . . . . . . . . . . . . . . . . . . . . . . . . . . . . . . . . . . . . . . . |
78 |
Adjusting pause time in the Track List window . . . . . . . . . . . . . . . . . . . . . . . . . . . . . . . . . . . . . . . . . . . . . . |
79 |
Creating hidden or bonus tracks . . . . . . . . . . . . . . . . . . . . . . . . . . . . . . . . . . . . . . . . . . . . . . . . . . . . . . 79 Locking events and tracks . . . . . . . . . . . . . . . . . . . . . . . . . . . . . . . . . . . . . . . . . . . . . . . . . . . . . . . . . . . . 79 Inserting a CD index . . . . . . . . . . . . . . . . . . . . . . . . . . . . . . . . . . . . . . . . . . . . . . . . . . . . . . . . . . . . . . . . . . 80 Reading subcodes from a CD . . . . . . . . . . . . . . . . . . . . . . . . . . . . . . . . . . . . . . . . . . . . . . . . . . . . . . . . . 80 Using the Track List window . . . . . . . . . . . . . . . . . . . . . . . . . . . . . . . . . . . . . . . . . . . . . . . . . . . . . . . . . . 80
Rearranging tracks . . . . . . . . . . . . . . . . . . . . . . . . . . . . . . . . . . . . . . . . . . . . . . . . . . . . . . . . . . . . . . . . . . . . . . . . . 80 Editing track position and length . . . . . . . . . . . . . . . . . . . . . . . . . . . . . . . . . . . . . . . . . . . . . . . . . . . . . . . . . . . 81 Editing track title and artist information . . . . . . . . . . . . . . . . . . . . . . . . . . . . . . . . . . . . . . . . . . . . . . . . . . . . 81 Editing pause time . . . . . . . . . . . . . . . . . . . . . . . . . . . . . . . . . . . . . . . . . . . . . . . . . . . . . . . . . . . . . . . . . . . . . . . . . 81 Toggling protection and emphasis flags . . . . . . . . . . . . . . . . . . . . . . . . . . . . . . . . . . . . . . . . . . . . . . . . . . . . 81 Editing ISRC codes . . . . . . . . . . . . . . . . . . . . . . . . . . . . . . . . . . . . . . . . . . . . . . . . . . . . . . . . . . . . . . . . . . . . . . . . . 81 Creating a track list (PQ list or cue sheet) . . . . . . . . . . . . . . . . . . . . . . . . . . . . . . . . . . . . . . . . . . . . . . . . . . . . 82
Moving tracks on the CD layout bar . . . . . . . . . . . . . . . . . . . . . . . . . . . . . . . . . . . . . . . . . . . . . . . . . . . 83
Changing a track’s starting or ending point . . . . . . . . . . . . . . . . . . . . . . . . . . . . . . . . . . . . . . . . . . . . . . . . . 83 Moving a track . . . . . . . . . . . . . . . . . . . . . . . . . . . . . . . . . . . . . . . . . . . . . . . . . . . . . . . . . . . . . . . . . . . . . . . . . . . . . 83
Adding Effects . . . . . . . . . . . . . . . . . . . . . . . . . . . . . . . . . . . . . . . . . . . . . . . . . . . . . . . . . . . . . . . . . . . . .85
Using effects . . . . . . . . . . . . . . . . . . . . . . . . . . . . . . . . . . . . . . . . . . . . . . . . . . . . . . . . . . . . . . . . . . . . . . . . . 85 What is a plug-in chain? . . . . . . . . . . . . . . . . . . . . . . . . . . . . . . . . . . . . . . . . . . . . . . . . . . . . . . . . . . . . . . 85 Applying effects to events . . . . . . . . . . . . . . . . . . . . . . . . . . . . . . . . . . . . . . . . . . . . . . . . . . . . . . . . . . . . 85
Adding a plug-in chain to an event . . . . . . . . . . . . . . . . . . . . . . . . . . . . . . . . . . . . . . . . . . . . . . . . . . . . . . . . . 85 Editing a plug-in chain . . . . . . . . . . . . . . . . . . . . . . . . . . . . . . . . . . . . . . . . . . . . . . . . . . . . . . . . . . . . . . . . . . . . . 88
TABLE OF CONTENTS | 5
Applying effects to the Master bus . . . . . . . . . . . . . . . . . . . . . . . . . . . . . . . . . . . . . . . . . . . . . . . . . . . 90
Default master effects . . . . . . . . . . . . . . . . . . . . . . . . . . . . . . . . . . . . . . . . . . . . . . . . . . . . . . . . . . . . . . . . . . . . . 90 Adding a plug-in chain to the Master bus . . . . . . . . . . . . . . . . . . . . . . . . . . . . . . . . . . . . . . . . . . . . . . . . . . 91 Editing a plug-in chain on the Master bus . . . . . . . . . . . . . . . . . . . . . . . . . . . . . . . . . . . . . . . . . . . . . . . . . . 93
Saving customized plug-in presets . . . . . . . . . . . . . . . . . . . . . . . . . . . . . . . . . . . . . . . . . . . . . . . . . . . 95 Saving plug-in chains as FX packages. . . . . . . . . . . . . . . . . . . . . . . . . . . . . . . . . . . . . . . . . . . . . . . . . 95 Editing saved FX packages . . . . . . . . . . . . . . . . . . . . . . . . . . . . . . . . . . . . . . . . . . . . . . . . . . . . . . . . . . . 96 Organizing your plug-ins. . . . . . . . . . . . . . . . . . . . . . . . . . . . . . . . . . . . . . . . . . . . . . . . . . . . . . . . . . . . . 96
Burning Audio CDs . . . . . . . . . . . . . . . . . . . . . . . . . . . . . . . . . . . . . . . . . . . . . . . . . . . . . . . . . . . . . . . .97
Using disc-at-once burning. . . . . . . . . . . . . . . . . . . . . . . . . . . . . . . . . . . . . . . . . . . . . . . . . . . . . . . . . . . 97 Rendering CD image files . . . . . . . . . . . . . . . . . . . . . . . . . . . . . . . . . . . . . . . . . . . . . . . . . . . . . . . . . . . . 97 Burning a disc . . . . . . . . . . . . . . . . . . . . . . . . . . . . . . . . . . . . . . . . . . . . . . . . . . . . . . . . . . . . . . . . . . . . . . . 97 Erasing a disc . . . . . . . . . . . . . . . . . . . . . . . . . . . . . . . . . . . . . . . . . . . . . . . . . . . . . . . . . . . . . . . . . . . . . . . . 99
Customizing CD Architect Software . . . . . . . . . . . . . . . . . . . . . . . . . . . . . . . . . . . . . . . . . . . . . . 101
Customizing the toolbar . . . . . . . . . . . . . . . . . . . . . . . . . . . . . . . . . . . . . . . . . . . . . . . . . . . . . . . . . . . . 101
Hiding and displaying the toolbar . . . . . . . . . . . . . . . . . . . . . . . . . . . . . . . . . . . . . . . . . . . . . . . . . . . . . . . . |
101 |
Reordering toolbar buttons . . . . . . . . . . . . . . . . . . . . . . . . . . . . . . . . . . . . . . . . . . . . . . . . . . . . . . . . . . . . . . . |
101 |
Adding buttons to the toolbar . . . . . . . . . . . . . . . . . . . . . . . . . . . . . . . . . . . . . . . . . . . . . . . . . . . . . . . . . . . . |
102 |
Removing buttons from the toolbar . . . . . . . . . . . . . . . . . . . . . . . . . . . . . . . . . . . . . . . . . . . . . . . . . . . . . . |
102 |
Customizing the time ruler . . . . . . . . . . . . . . . . . . . . . . . . . . . . . . . . . . . . . . . . . . . . . . . . . . . . . . . . . . 102
Changing the ruler format . . . . . . . . . . . . . . . . . . . . . . . . . . . . . . . . . . . . . . . . . . . . . . . . . . . . . . . . . . . . . . . . 102 Creating a time ruler offset . . . . . . . . . . . . . . . . . . . . . . . . . . . . . . . . . . . . . . . . . . . . . . . . . . . . . . . . . . . . . . . 103
Changing grid spacing . . . . . . . . . . . . . . . . . . . . . . . . . . . . . . . . . . . . . . . . . . . . . . . . . . . . . . . . . . . . . . 103 Setting CD Architect preferences . . . . . . . . . . . . . . . . . . . . . . . . . . . . . . . . . . . . . . . . . . . . . . . . . . . . 103
General tab . . . . . . . . . . . . . . . . . . . . . . . . . . . . . . . . . . . . . . . . . . . . . . . . . . . . . . . . . . . . . . . . . . . . . . . . . . . . . . 104 Preview tab . . . . . . . . . . . . . . . . . . . . . . . . . . . . . . . . . . . . . . . . . . . . . . . . . . . . . . . . . . . . . . . . . . . . . . . . . . . . . . 106 Editing tab . . . . . . . . . . . . . . . . . . . . . . . . . . . . . . . . . . . . . . . . . . . . . . . . . . . . . . . . . . . . . . . . . . . . . . . . . . . . . . . 107
Index . . . . . . . . . . . . . . . . . . . . . . . . . . . . . . . . . . . . . . . . . . . . . . . . . . . . . . . . . . . . . . . . . . . . . . . . . . . . . . . .i
6 | TABLE OF CONTENTS
Chapter 1  Overview of CD Technology
CDs have become the standard in audio distribution. Due to the comprehensive set of CD industry standards and formats, CDs have become the least expensive and most reliable vehicle for exchanging information.
Evolution of CD-R devices technology
To understand the CD-R (Compact Disc-Recordable) disc, it is first necessary to understand standard compact disc (CD ROM) technology and how it has evolved. A basic knowledge of this technology will deepen your understanding of what occurs every time you listen to a CD or create your own.
Digital audio places enormous demands on the medium to which it is being recorded. For example, 60 minutes of music that is recorded in stereo at a 16-bit quantization rate and 44.1 kHz sampling rate requires a capacity of just over five billion bits. Luckily, compact discs were designed with this requirement in mind. Unfortunately, for many years musicians were not able to utilize this storage technology.
Until 1988, the only means of placing music on a compact disc was through injection molding. This process required musicians to do their testing by recording music to tape and then forwarding it on to the manufacturer. This requirement resulted in a costly and time-consuming process.
In 1988, Phillips and Sony released the specifications for CD-R discs. It was under these standards that musicians were given the tools to record information onto CDs at home or in the studio.
CD-ROM technology basics
A standard Compact Disc-Read Only Memory (CD-ROM) disc is 4¾ inches in diameter and consists of aluminum, lacquer, and clear polycarbonate plastic. During CD molding process, the polycarbonate base has minute indentations stamped into it. Next, a highly reflective layer of aluminum is applied to the polycarbonate base. The aluminum and polycarbonate is then sealed with lacquer to protect the disc’s surface from scratching and dust.
How the information is stored
The information on CDs is represented by minute indentations in the polycarbonate base, called pits, separated by the surface of the aluminum layer, called the land. Both pits and lands represent zeros and the transition from one to the other represents a one.
Various lengths of pits and lands represent varying quantities of zeros, which represent the original audio signal. Generally, the frequency of the audio signal is represented by the rate of change in the numbers and the amplitude is represented by the magnitude of the numbers.
How the information is read
The CD player or drive directs a laser beam through the polycarbonate base and onto the aluminum layer. Because the CD is actually read from the bottom, pits in the CD are viewed as bumps. Light from the laser reflects off the aluminum surface and photo-detectors recognize the different intensities of the reflected light. The different intensities, caused by the pits and lands, are processed into zeros and ones. The CD player or drive then processes this binary data into music. Because nothing but light ever hits the discs, there is no degradation from repeated playings and the original audio signal never wears out.
From CD-ROM to CD-R
Commercially produced CDs have pits molded into them during manufacturing, whereas CD-Rs are blank. CD-Rs consist of a polycarbonate base and, instead of the reflective aluminum layer, CD-Rs contain a layer of organic dye. The organic dye is to the CD-R what the aluminum is to the CD-ROM: the recording medium.
OVERVIEW OF CD TECHNOLOGY | 7
There are four types of organic dye used in CD-R discs:
Organic Dye |
Description |
Cyanine |
Considered to be the standard in recording and is characterized by its bright emerald-green color. |
Metal-stabilized |
Visually indistinguishable from cyanine, but it is more resistant to age degradation. |
cyanine |
|
|
|
Phthalocyanine |
Considered to be superior in longevity but, for the most part, is identical in quality to cyanine-based CDs. Pale blue in |
|
color. To protect the dye and serve as the reflective conduit, a thin layer of gold is applied to the dye. |
|
|
Azo |
As durable as phthalocyanine. The use of a silver reflective conduit produces a bright blue color. |
Instead of carving the pits, the CD-R’s laser burns the organic dye to create optical marks on the disc's surface. The optical marks on the CD-R disc alter the reflectivity of the metallic layer (gold on CD-R, aluminum on CD-ROM). To a CD player or CD-ROM drive, the CD-R’s optical marks appear the same as the stamped pits on a standard CD-ROM. As a result, CD-R discs can be read by most CD players or CD ROM drives.
CD-Recordable standards
There are essentially two types of standards governing compact discs: physical and logical. The physical standard defines the “container” in which the information is stored. The logical standard defines the information that can be held in the container and in what particular sequence that information must be arranged.
Both the physical and logical standards are defined within the standards developed by Sony and Philips: Red, Yellow, Green, and Orange. Although we’d like to provide a very technical and compelling reason why these books are named as they are, we cannot. The reasoning is actually quite simple: the Red Book was so named because the color of the book cover was—you guessed it—red. The same applies for the other three books—they had a yellow cover, a green cover, and an orange cover, respectively. As a musician dealing with audio, you will primarily be concerned with the Red and Orange Book standards and their respective applications.
Standard |
Application |
Red Book |
Audio |
|
|
Yellow Book |
CD-Read Only Memory (CD-ROM) |
|
|
Green Book |
CD-Interactive (CD-I) |
|
|
Orange Book |
Recordable CDs |
|
|
The Red Book defines the specifications of every audio compact disc in every music store throughout the world. Red Book specifications define not only the information within the disc (digital audio recorded at 44.1 kHz), but also the disc size itself and the way in which the audio is arranged. It is the Red Book standard—the foundation upon which all other CD standards are built—that enables all audio compact discs to play in all audio compact disc players or drives. It is this interchangeability that has fueled the rapid growth of the CD music industry.
The Red Book specification allows audio data to be placed into separate tracks on a disc. To further accommodate recordability, the Orange Book Standard separates the CD-R into two primary areas: the system use area and the information area.
System use area
The system use areas contains both a power calibration area (PCA) and a program memory area (PMA).
Power calibration area
Within every recordable compact disc there is a PCA that is reserved specifically for testing the power of the CD-Recorder laser being used, and a count area which keeps track of how much available space is left in this area. For each recording session, a calibration is automatically performed to determine the optimal laser power for “burning” the disc. Over time, the power level of the laser will need to be adjusted to properly respond to changes in recording speed, temperature, humidity, and the condition of the disc. Each time this calibration occurs, it is incremented in the count area. A maximum of 99 calibrations can occur on one disc.
Program memory area
The program memory area (PMA) is used to record track numbers and their corresponding start and stop times. This area is updated each time a track is written to a disc, up to a maximum of 99 tracks.
8 | CHAPTER 1

Information area
Within the information area are three primary areas: lead-in, program, and lead-out.
Lead-in area
The lead-in area comprises approximately the first two minutes on any compact disc and is generally unused for recording actual audio data. The main purpose of this area is to store the table of contents (TOC), which keeps an account of each track's location on the disc. The TOC is written to the lead-in area of the disc once all of the information has been recorded to the disc. Before the TOC is written, only the recorder can access the disc. Once the TOC has been written to the disc, any CD player or drive can play the disc.
Program area
All audio data is generally contained within tracks in the program area. The program area on a standard CD can hold 74 minutes of audio, corresponding to the 74-minute maximum playing time of a standard CD-DA (Compact Disc-Digital Audio) disc. A maximum of 99 audio tracks can be contained in the program area, with each track normally holding one song.
Note: The Red Book specification allows for a theoretical maximum of 80 minutes of audio data on a disc. However, 80 minute CDs may not play correctly on all CD players.
Within each track on the compact disc, there are subdivided frames, 1/75th of a second in length and containing 2352 bytes. Each frame consists of audio data, parity bits, the synchronization word, and an 8-bit field, called a control byte.
The control byte is then broken down into separate subchannels—P, Q, R, S, T, U, V, and W—where each bit represents a subcode channel. All of these subchannel bits are used in the audio format.
Subcode channel P (first bit)
The P channel indicates what part of the disc is being read: lead-in, program, or lead-out. The P channel also indicates start times and end times for each track on the disc.
Subcode channel Q (second bit)
Compact disc players use the Q channel to display the music playing time. The Q channel is broken down into three modes:
Mode Description
Mode 1 Contains the running times from both the beginning of the disc (total disc time) and the beginning of the track (track relative time).
Mode 2 Identifies the track number, who recorded the track, where it was recorded, and in what year.
Mode 3 Identifies UPC media catalog number for the disc.
A special mode of Q data is stored within the lead-in area. This Q data contains information on twoor four-channel format, copy prohibit, and pre-emphasis.
OVERVIEW OF CD TECHNOLOGY | 9
Subcode channels R through W (remaining six bits)
Some CD players ignore the R-W channels, while others use them to display additional information, such as the title of the CD, name of the artist, and track titles, if the information is available on the CD.
A common term used when recording audio to a compact disc is “PQ editing”. PQ editing allows you to edit the P and Q channels on the disc. This allows you to increase the length of pause time between tracks and during Lead-In. Pause is the area on a disc that precedes audio tracks (between index 0 and index 1). The Red Book standard calls for a minimum of two seconds of pause time between tracks on all audio CDs, but with track editing, this can be virtually any length you desire.
Lead-out area
The lead-out area contains 90 seconds of silence (blank sectors) and indicates to the player that the end of the data has been reached.
The lead-out area is the portion of the disc most likely to be damaged as a result of handling. As you know, discs are most commonly handled by the edges. If audio was stored in these areas, it would likely become difficult for your CD player to read.
CD error detection and corrections
The error detection code and error correction code (EDC/ECC) found in each frame of the compact disc is essential to the success of the compact disc. Without it, any digital recording on tape or disc that has become damaged would sound just like a badly scratched LP. In fact, without error correction, the feasibility of digital audio would be destroyed.
Fortunately, when you scratch a CD, the nature of the data on the disc and the design of the CD player prevent any errors. By encoding all data recorded to the compact disc with a special error correction code, the CD player can use the code to correct damaged data and deliver the original audio. An example of how error correction works is as follows. Assume that the first line below represents information on an LP groove and that the second line represents information on a CD pit track:
With temperatures of -40ºF, Madison is the perfect vacation spot.
CD-Architect is here! CD-Architect is here!
Now place one of your fingers vertically over these two lines. This represents a scratch. As you can see, a portion of the message on the LP is gone forever, whereas the information on the CD can still be understood. By utilizing and comparing redundant data, the CD is able to read the message and overcome the effect of the damage. This error correction does have a cost though: messages using error correction require more storage space.
Before this error correction can take place, errors must first be detected. This is accomplished through the use of parity bits. A parity bit is a bit added to every data word, which makes the total number of 0s or 1s in the word even or odd. For example, a parity bit rule may state that all data words with an odd number of 1s are invalid and all data words with an even number of 1s are valid. The CD player would then eliminate all odd-numbered data words and keep all the others. Unfortunately, if a large error occurs and wipes out all of the parity bits and data, this method becomes useless. As a result, a multiple number of parity bits are used to detect errors. To provide additional help in dealing with large groups of errors, called burst errors, an error protection scheme called interleaving is used in conjunction with parity bits.
Interleaving is used to guard against burst errors and can be thought of as shuffling a deck of cards. Data is shuffled in the bit stream prior to recording so that consecutive words are never next to each other on the disc. When interleaved data is finally de-interleaved, consecutive errors are scattered throughout the disc and errors can be more easily corrected.
Interleaving is taken one step further by interleaving data numerous times over long and short time intervals. This process is called cross interleaving, and utilizes Cross Interleave Reed-Solomon Code (CIRC) to execute both parity checking, which checks for random errors, and cross interleaving, which permits parity bits to correct burst errors on the disc. By utilizing CIRC in the first two layers of error protection on each frame of the disc, the majority of all CD damage can be effectively repaired and replayed without any distinguishable difference.
It is important to remember that error correction does have its limitations. Depending on the severity and nature of the error, the damage may be so bad that no amount of ECC, EDC or TLC will bring back the music. In this case, you will hear a skip on the CD.
10 | CHAPTER 1
The CD-R technology
CD Recorder drives currently are available in a variety of different recording speeds. Single speed (1X) CD-R drives record in real time (same as the playback speed of the CD). Faster drives record at multiples of the playback speed, and as a result, reduce writing time. A six-speed (6X) drive, for example, can write a 74-minute CD in 12 minutes.
The primary concern when writing at speeds higher than 2X is ensuring that your computer can provide a fast, consistent data flow during the burning process. The biggest danger with writing CDs at high speeds is running out of data while the CD-R drive and software are working. If the computer cannot keep up with the CD-R drive being utilized, a buffer underrun will occur and your blank CD-R disc will be ruined.
Because the Orange Book specification only partially defines CD-R drives, many subtle differences among recorders have resulted. Different CD-Recorders use lasers of different intensities, which results in differences in the optimal marks created in the “burning” process. Buffers, writing modes, and interface type have also been left up to the discretion of the individual manufacturers.
Although consideration should be given to these subtle differences, keep in mind that all drive manufacturers must stay within certain defined ranges. Consequently, although lasers may be of varied intensities, they must all stay within the prescribed range of 4 to 8 milliwatts. Therefore, it is unlikely that writing quality will be significantly affected.
Writing speed, on the other hand, must be taken into consideration when choosing your CD-R disc. CD-R discs can come in one of four states: a pregrooved and time-stamped blank disc, a closed multisession disc, a finalized disc, and a partially recorded disc. CD-R discs are also formulated for optimum performance with CD-R drives recording at high writing speeds. The reason for this is simple. A laser of a certain intensity will create an optical mark depending on the speed in which the disc is spinning. Therefore, recording at a greater speed will affect the characteristics of the optical mark created. Due to this alteration, disc manufacturers have reformulated their discs to operate in accordance with the higher recording speed of the latest CD-R drives.
It is very important to find out what CD-R disc your drive manufacturer recommends. Some drives will check the make of the disc prior to playing and not let you write if it does not meet the drive specification.
Audio is recorded to the CD-R disc primarily in one of two fashions: track-at-once (TAO) or disc-at-once (DAO).
Track-at-Once
Track-at-once (TAO) writing records either one track or multiple tracks to the disc and results in a partially recorded disc. Because the data in the program area is written before the lead-in area (including the table of contents), the CD-R disc remains unplayable on most systems until you add the final track and perform a final fixation. The advantage of TAO writing is that you can record tracks onto the disc as you finish them versus waiting until you have finished your whole album. The downfalls of TAO writing lie in the loss of storage space and in the creation of run-out sectors, which are created as the laser shuts off after each writing session. Run-out sectors not only result in a loss of 13.5MB of disc space each time a session is written to the disc, but they also manifest themselves as “clicks” in the music. CD Architect™ does not use this method.
Disc-at-Once (Single Session)
Disc-at-once (DAO) writing, the method used in CD Architect, is the most common burning method in the music industry. This writing mode is used when creating a master disc to be sent to a disc manufacturer for mass replication. Disc-at-once works just as it sounds. Once the premastering software has created a cue sheet, the table of contents (TOC) is written to the lead-in area. At this point, the audio to be recorded is written to the CD in one recording session. After all of the audio has been written, a final fixation is automatically performed by writing the required silence to the lead-out area. This writing procedure is opposite of track-at-once writing, in which the TOC is written to the lead-in area after all data has been written to the disc.
Other than a computer capable of providing a fast data stream, the last item you will need to burn your own CDs is, of course, the item you just purchased: CD recording software. Undoubtedly, the most important part of the equation, CD recording software is the determining factor for operational ease, functionality, and overall performance.
Congratulations on choosing the best: CD Architect.
OVERVIEW OF CD TECHNOLOGY | 11
12 | CHAPTER 1

Chapter 2  Introduction
Welcome to CD Architect™ software, the easiest way to create your own Red Book audio CD compilations. With CD Architect software, you can nondestructively place, arrange, and edit audio files to produce professional audio CDs based on the Red Book specifications. You can build PQ lists automatically or manually by adding tracks and indices.
CD Architect software allows you to create sophisticated mixes and arrangements in an intuitive environment that can be customized to suit your preferences.
System requirements
In order to use CD Architect software, your computer must satisfy the following minimum specifications:
•Microsoft® Windows® 2000 SP4, Windows XP, or Windows Vista™
•500 MHz processor
•150 MB hard-disk space for program installation
•128 MB RAM
•Microsoft Windows-compatible sound card
•CD-ROM drive (for installation from CD only)
•Supported CD-Recordable drive
•Microsoft DirectX® Media 9.0 Run Time (included on CD-ROM)
•Internet Explorer 5.0 or later
Installing CD Architect software
Prior to installing CD Architect software, we recommend that you exit all open applications and temporarily turn off any virus protection.
Note: If you’re installing CD Architect software on a system running Windows 2000, Windows XP Home, or XP Professional, your user account must be a member of the Administrators group to install CD Architect and a member of the Power Users group (or higher) to register CD Architect software.
1.Insert the CD Architect CD-ROM. The CD Architect Installation screen appears if CD-ROM AutoPlay is enabled.
Note: If CD-ROM AutoPlay is turned off, click Start and choose Run. In the Run dialog, enter the CD-ROM drive’s letter and add :\setup.exe. Click OK to begin installation.
2.Click Install to begin the installation process.
3.Follow the on-screen prompts and enter the necessary information when required. At the final screen prompt, click
Finish.
INTRODUCTION | 13
Getting help
You can access two varieties of help within CD Architect software:
•Online help
•What’sThis? help (also referred to as context-sensitive help)
Online help
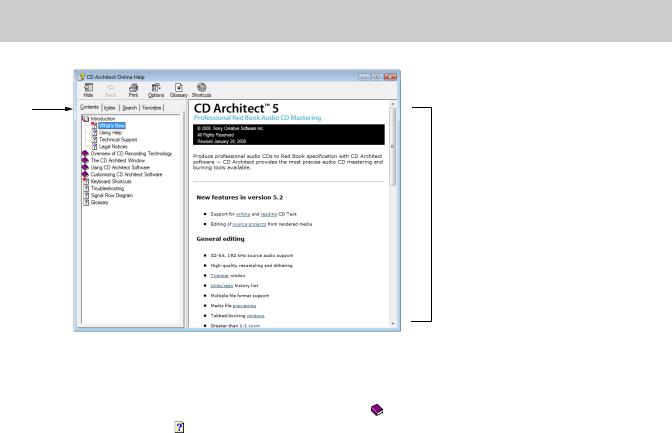
To access online help, choose Contents and Index from the Help menu or press F1.
Note: To view online help, Internet Explorer 4.0 or later must be installed on your system. Internet Explorer 5.0 is included on the CD Architect CD-ROM for your convenience.
Toolbar 
Tabs
Information pane
The following table describes the four tabs of the Online Help window.
Tab |
Description |
Contents |
Provides a list of available help topics. Click a closed book ( ) to open the pages, and then click on |
|
|
|
a topic page ( ). |
|
|
Index |
Provides a complete listing of the help topics available. Scroll through the list of available topics or |
|
type a word in the Type in the keyword to find box to quickly locate topics related to that word. |
|
Select the topic and click the Display button. |
|
|
Search |
Allows you to enter a keyword and display all of the topics in the online help that contain the |
|
keyword you have entered. Type a keyword in the Type in the word(s) to search for box and click |
|
the List Topics button. Select the topic from the list and click the Display button. |
|
|
Favorites |
Allows you to keep topics that you revisit often in a separate folder. To add a topic to your favorites, |
|
click the Add button on the Favorites tab. |
|
|
14 | CHAPTER 2
What’sThis? help
What’sThis? help allows you to view pop-up window descriptions for menus, buttons, and dialog boxes.
Menus and buttons
Choose What's This? from the Help menu, press Shift+F1, or click the What’sThis? help button  on the toolbar and then click any menu or button.
Dialog boxes
To use What’sThis? help in a dialog box, click the question mark button  in the upper-right corner of the dialog box and then click an item in the dialog box.
Help on the Web
Additional CD Architect software help and information is available on the Sony Creative Software Inc. Web site. Choose Sony on the Web from the Help menu to view a listing of Web pages pertaining to CD Architect software and Sony Creative Software Inc.. The software starts your system’s Web browser and attempts to connect to the appropriate page on the Sony Creative Software Inc. Web site.
INTRODUCTION | 15
16 | CHAPTER 2
Chapter 3  Learning the CD Architect Workspace
CD Architect™ software is designed to be an easy-to-use program with many tools that provide power and flexibility when preparing audio files prior to premastering a CD. As you will learn, many of the operations, menu items, and shortcut keys are common to other popular software applications.
Main window
When you start the application, the main window appears.
Title bar
Menu bar |
|
|
|
|
|
|
|
|
|
|
Marker bar |
||||||||||||
|
|
|
|
|
|
|
|
||||||||||||||||
Tool bar |
|
|
|
|
|
|
|
|
|
|
|
||||||||||||
|
|
|
|
|
|
|
|
|
|
||||||||||||||
Timeline |
|
|
|
|
|
|
|
|
|
|
|
|
|
|
|
|
|
|
|
|
Ruler |
||
|
|
|
|
|
|
|
|
|
|
|
|
|
|
|
|
|
|
|
|
||||
|
|
|
|
|
|
|
|
|
|
|
|
|
|
|
|
|
|
|
|
|
CD layout bar |
||
|
|
|
|
|
|
|
|
|
|
|
|
|
|
|
|
|
|
|
|
|
|
|
|
|
|
|
|
|
|
|
|
|
|
|
|
|
|
|
|
|
|
|
|
|
|
|
|
|
|
|
|
|
|
|
|
|
|
|
|
|
|
|
|
|
|
|
|
|
|
|
|
Time display |
|
|
|
|
|
|
|
|
|
|
|
|
|
|
|
|
|
|
Status selection fields |
||||
|
|
|
|
|
|
|
|
|
|
|
|
|
|
|
|
|
|
|
|
|
|
Transport bar controls |
|
Window
docking
area
 Status bar
The work area is divided into two primary area sections: the timeline and the window docking area. You can resize these sections by dragging the dividers between them.
Main window components
The following table describes the major components of the main window.
Component |
Description |
Title bar |
Displays the file name with a .cdp file extension. Double-click to maximize and restore the window. |
Menu bar |
Displays the menu headings for the available functions. |
Tool bar |
Provides quick access to frequently used commands. For more information, see Toolbar on |
|
page 17. |
|
|
Status bar |
Displays the amount of time available for adding CD tracks (Project Time Remaining). The |
|
application bases the program length on the blank CD in your drive, or will use the default CD |
|
length. To scan your drive and update the information display, click on the bar or choose Refresh |
|
Disc Status from the Disc menu. |
|
|
Toolbar
The toolbar allows you to quickly access the most commonly used functions and features in CD Architect software. From the Options menu, choose Customize Toolbar to specify which buttons are displayed.
New: Creates a new blank project using |
Extract Audio from CD: Extracts tracks from an |
default settings |
audio CD and adds them to your project as wave |
|
files |
|
|
Open: Opens an existing project or CD |
Enable Snapping: Select this button to turn on the |
image file |
Snap to Grid and Snap to Markers commands |
Open media: Adds media files to your project
Automatically Create Tracks: Select this button to automatically create CD tracks when you add media to the timeline
LEARNING THE CD ARCHITECT WORKSPACE | 17

New: Creates a new blank project using default settings
Extract Audio from CD: Extracts tracks from an audio CD and adds them to your project as wave files
|
|
Save: Saves the current project |
Automatic Crossfades: Select this button to |
|
|
|
automatically create a crossfade when two or more |
|
|
|
events overlap. |
|
|
|
|
|
|
Properties: Opens the Project Properties |
Ripple Edits: Select this button if you want to |
|
|
dialog box allowing you to make |
automatically shuffle existing events on tracks |
|
|
changes to the current project |
while cutting, copying, and pasting |
|
|
|
|
|
|
Cut: Deletes and copies the current |
Lock Envelopes to Events: Select this button to lock |
|
|
||
|
|
section to the clipboard |
the current envelope points and position so that |
|
|
||
|
|
|
the envelope points follow an event when it is |
|
|
|
moved along the timeline |
Copy: Copies the current selection to the clipboard
Lock Events and Tracks: Select this button if you want tracks to follow when you move events along the timeline.
|
|
Paste: Inserts the contents of the |
Use Second Audio Layer: Select this button to |
|
|
clipboard at the current cursor position |
enable a second layer of audio in the timeline |
|
|
||
|
|
|
|
|
|
Undo: This command will undo the last |
Normal Tool: Select this button when performing |
|
|
||
|
|
action performed |
normal editing functions |
|
|
Redo: Reverses the action of the Undo command
Envelope Tool: Select this button when you want to edit multiple envelopes without moving the actual events
Burn CD: Burns your project to a CD |
What’s This? Help: Select this button and then click |
|
on any item, including menu items, in the CD |
|
Architect window to view a pop-up description |
|
|
Timeline
The timeline is the area of the main window where you will be doing most of your work. You use the timeline to draw events from each track.
For more control over your projects, you can add a second audio layer to the timeline. Using this second layer, you can use envelopes to create more complex crossfades between CD tracks. For more information, see Using the second audio layer on page 53.
Marker bar
The marker bar is the area where you can place, name, and position markers and regions along the project’s timeline. These informational tags can serve as cues or reminders highlighting important events in your project.
18 | CHAPTER 3
Ruler
The ruler displays the time for your project. You may specify how the ruler measures time: seconds, samples, frames, etc.
CD layout bar
The CD layout bar displays information about the tracks you’ve created for your CD project. Each CD track in the CD layout bar shows the track’s number, active take name, and length.
Required pause time indicator
Note: Red indicators are drawn at both ends of the CD layout bar. The first indicator represents the required pause time at the beginning of the disc, and the second indicator represents the end of the disc (if the disc length is known)
Time display
The time display reflects the current cursor position on the timeline in minutes:seconds:frames format.
Transport bar controls
The transport bar contains the playback and cursor positioning buttons frequently used while working on and previewing your project.
Emulate CD Player: Changes the |
Pause: Pauses playback and leaves the cursor in |
behavior of playback controls to |
its current position |
simulate unmute fades applied by CD |
|
players |
|
|
|
Loop Playback: Plays only the events in |
Stop: Stops playback and returns the cursor to |
the loop region in a continuous mode |
its starting position |
|
|
Play From Start: Starts playback from |
Previous Track: Moves the cursor to the previous |
the beginning of the project regardless |
track or index |
of the cursor position |
|
|
|
Play: Starts playback from the cursor |
Next Track: Moves the cursor to the next track or |
position |
index |
|
|
Scrub control
The scrub control is used to play your project forward or backward for editing purposes. You may adjust playback speed by setting the speed control marker located beneath the scrub control. For more information, see Scrubbing on page 44.
Drag either forward or backward for playback
 Set playback speed
Window docking area
This area allows you to keep frequently used windows available, but out of the way, while you are working with a project. To dock a window, drag it to the docking area. Windows can be docked next to each other, subdividing the docking area, or they can be docked in a stack. When stacked, each window has a tab at the bottom with its name on it. Click the window’s tab to bring it to the top.
LEARNING THE CD ARCHITECT WORKSPACE | 19

Drag the handle on the left side of a docked window to remove a window from the docking area and float it.
Close window |
|
Drag the handle away |
|
from the docking area to |
|
Expand window |
|
|
|
||
|
float the window. |
|
|
|
|
|
|
|
To prevent docking, hold the Ctrl key when dragging near the docking area.
Explorer window - Alt+1
The Explorer window is similar to the Windows Explorer. Use the Explorer window to select media files to drag to the project timeline or add to the Media Pool. You can also use the Explorer window to perform common file management tasks such as creating folders, renaming files and folders, deleting files and folders. Use the Start Preview  and Auto Preview
  buttons to preview files before adding them to the project.
Preview selected media files before placing them in the project.
Select media to place in the project by dragging or double-clicking.
Select drive or folder
Add media to the Media Pool by right-clicking a file and choosing Add to Media Pool from the shortcut menu.
20 | CHAPTER 3

Trimmer window - Alt+2
The Trimmer window allows you to select portions of a piece of media that can be placed into events on the timeline.
Note: When a media file is placed in the Trimmer window, any regions or markers that were previously stored in the media file are displayed in the Trimmer.
Mixer window - Alt+3
The Mixer window allows you to access your project’s audio properties, add Master FX, and access the project and preview volumes from the Explorer, Trimmer and Media Pool windows.
Media Pool - Alt+4
The Media Pool helps you organize and manage the media files you’re using in a project. The information about these files is displayed in a highly flexible database that can be instantly sorted. Using the Media Pool, you can preview, add, or delete files, extract audio from a CD, and add files to the timeline, if desired.
LEARNING THE CD ARCHITECT WORKSPACE | 21

Playlist window - Alt+5
This window is a chronological list of the events in your timeline. You can use this window to edit each event’s start and end times, length, and active take name. You can also normalize an event.
Track List window - Alt+6
This window is a chronological list of all track and index markers in your project. You can use this window to edit each track’s start, end, and pause times, length, and title and artist name. You can also enable or disable copy protection and emphasis flags, and edit ISRC (International Standard Recording Code) information. For more information, see Using the Track List window on page 80.
Plug-Ins window - Alt+7
This window allows you to access effects and effects packages that can be applied to events and the master output. This window also allows you to rename and reorganize plug-ins. For more information, see Adding Effects on page 85.
22 | CHAPTER 3
Keyboard command reference
CD Architect keyboard commands are shortcuts that you can use while working with your project.
Project file
Command |
Keyboard shortcut |
Create new project |
Ctrl+N |
Open existing project |
Ctrl+O |
|
|
Open media file |
Ctrl+Shift+O |
|
|
Extract audio from CD |
Ctrl+R |
|
|
Burn CD |
Ctrl+W |
|
|
Project properties |
Alt+Enter |
|
|
Save project |
Ctrl+S |
|
|
Exit CD Architect |
Alt+F4 |
Magnification and view
Command |
Keyboard shortcut |
Set focus to timeline |
Alt+0 |
|
|
Explorer |
Alt+1 |
|
|
Trimmer |
Alt+2 |
|
|
Mixer |
Alt+3 |
|
|
Media Pool |
Alt+4 |
|
|
Playlist |
Alt+5 |
|
|
Track List |
Alt+6 |
|
|
Plug-Ins |
Alt+7 |
|
|
Next window |
F6 or Ctrl+Tab |
|
|
Previous window |
Shift+F6 or Ctrl+Shift+Tab |
|
|
Zoom in time (incremental) |
Up arrow |
|
|
Zoom out time (incremental) |
Down arrow |
|
|
Zoom in large increments or selection (if one exists) |
Ctrl+Up arrow |
|
|
Zoom out large increments or selection (if one exists) |
Ctrl+Down arrow |
|
|
Zoom in vertically |
Shift+Up arrow |
|
|
Zoom out vertically |
Shift+Down arrow |
|
|
Rebuild audio peaks |
F5 |
|
|
Minimize/restore the window docking area |
F11 |
|
|
LEARNING THE CD ARCHITECT WORKSPACE | 23

Cursor placement, loop region, and time selection
Note: Holding the Shift key in combination with cursor positioning shortcuts creates or extends a time selection.
Command |
Keyboard Shortcut |
Center view around cursor |
\ |
|
|
Go to |
Ctrl+G |
|
|
Set end of time selection |
Ctrl+Shift+G |
|
|
Go to beginning of selection or view (if no selection) |
Home |
|
|
Go to end of selection or view (if no selection) |
End |
|
|
Go to beginning of project |
Ctrl+Home or W |
|
|
Go to end of project |
Ctrl+End or E |
|
|
Toggle cursor between beginning and end of loop region |
Keypad 5 |
|
|
Move cursor to corresponding marker or select corresponding region 0-9 keys (not numeric keypad) |
|
|
|
Move left by grid marks |
Page Up |
|
|
Move right by grid marks |
Page Down |
|
|
Move to previous CD track |
Ctrl+Comma |
|
|
Move to next CD track |
Ctrl+Period |
|
|
Move to previous CD track or index |
Comma |
|
|
Move to next CD track or index |
Period |
|
|
Move left/right one pixel (when Quantize to Frames is turned off) |
Left/Right Arrow |
|
|
Move to previous/next marker |
Ctrl+Left/Right Arrow |
|
|
Move one frame left/right |
Alt+Left or Right Arrow |
|
|
Move left/right to event edit points including fade edges |
Ctrl+Alt+Left/Right Arrow |
|
|
Time select loop region |
Shift+Q |
|
|
Recover previous selection areas |
Backspace |
|
|
Set in and out points |
[ (in) and] (out) |
|
|
Create time selection while dragging on an event |
Ctrl+Shift+drag |
|
|
Switch focus between audio layers |
Tab |
|
|
Event selection and editing
Command |
Keyboard shortcut |
Range select |
Shift+click events |
|
|
Multiple select |
Ctrl+click individual events |
|
|
Select all |
Ctrl+A |
|
|
Unselect all |
Ctrl+Shift+A |
|
|
Cut selection |
Ctrl+X or |
|
Shift+Delete |
|
|
Copy selection |
Ctrl+C or |
|
Ctrl+Insert |
|
|
Paste |
Ctrl+V or |
|
Shift+Insert |
|
|
Paste insert |
Ctrl+Shift+V |
|
|
Paste repeat |
Ctrl+B |
|
|
Delete selection |
Delete |
|
|
Open in audio editor |
Ctrl+E |
|
|
Undo |
Ctrl+Z or |
|
Alt+Backspace |
|
|
Redo |
Ctrl+Shift+Z or |
|
Ctrl+Y |
|
|
Split |
S |
|
|
Trim/crop selected events |
Ctrl+T |
|
|
Rebuild Peaks |
F5 |
|
|
Normal editing tool |
Ctrl+D |
|
|
Switch to next editing tool |
D |
|
|
Switch to previous editing tool |
Shift+D |
|
|
Automatic crossfades |
X |
|
|
Move selected events up one layer |
Numeric Keypad 8 |
|
|
24 | CHAPTER 3

Command |
Keyboard shortcut |
Move selected events down one layer |
Numeric Keypad 2 |
|
|
Move selected events right one pixel |
Numeric Keypad 6 |
|
|
Move selected events left one pixel |
Numeric Keypad 4 |
|
|
Move selected events right on grid |
Ctrl+Numeric Keypad 6 |
|
|
Move selected events left on grid |
Ctrl+Numeric Keypad 4 |
|
|
Move selected events right one frame |
Alt+ Numeric Keypad 6 |
|
|
Move selected events left one frame |
Alt+ Numeric Keypad 4 |
|
|
Move selected events by the first selected event's length |
Ctrl+Alt+4 or 6 |
|
|
Copy events |
Ctrl+drag event |
Slip: move media within event without moving the event Alt+drag inside the event
Slip trim: moves the media with the edge as it is trimmed Alt+drag edge of event
Trim adjacent: trims selected event and adjacent event |
Ctrl+Alt+drag edge of event |
simultaneously |
|
|
|
Slide: trims both ends of event simultaneously |
Ctrl+Alt+drag middle of event |
|
|
Slide crossfade |
Ctrl+Alt+drag over a crossfade |
|
|
Stretch (compress) the media in the event while |
Ctrl+drag edge of event |
trimming |
|
|
|
Group selected events |
G |
|
|
Ungroup selected events |
U |
|
|
Clear group without deleting events |
Ctrl+U |
|
|
Select all events in group |
Shift+G |
|
|
Select next take |
N |
|
|
Select previous take |
Shift+N |
|
|
LEARNING THE CD ARCHITECT WORKSPACE | 25

Playback and preview
Command |
Keyboard shortcut |
Start/Stop playback |
Spacebar |
|
|
Play All |
Shift+Spacebar |
|
|
Play from any window |
Ctrl+Spacebar or F12 |
|
|
Stop playback |
Esc or Spacebar |
|
|
Start/pause playback |
Enter |
|
|
Looped playback |
Q |
|
|
Previous CD track |
Ctrl+comma |
|
|
Next CD track |
Ctrl + Period |
|
|
Previous track or index |
Comma or > |
|
|
Next track or index |
Period or < |
|
|
Scrub playback |
J, K, or L |
|
|
Tip: If you have a supported multimedia keyboard, you can use the Play/Pause, Stop, Prev Track, and Next Track buttons to control playback.
Timeline
Command |
Keyboard shortcut |
Quantize to frames |
Alt+F8 |
|
|
Enable/disable snapping |
F8 |
|
|
Snap to grid |
Ctrl+F8 |
|
|
Snap to markers |
Shift+F8 |
|
|
Ripple edit mode |
Ctrl+L |
|
|
Auto crossfade mode |
X |
|
|
Normal editing tool |
Ctrl+D |
|
|
Switch to next editing tool |
D |
|
|
Switch to previous editing tool |
Shift+D |
|
|
Group selected events |
G |
|
|
Ungroup selected events |
U |
|
|
Clear group without deleting events |
Ctrl+U |
|
|
Select all events in group |
Shift+G |
|
|
Insert/show/hide volume envelope |
V |
|
|
Insert/remove volume envelope |
Shift+V |
|
|
Insert marker |
M |
|
|
Insert region |
R |
|
|
Insert CD track |
T |
|
|
Insert CD track index |
I |
|
|
Maximize timeline vertically (window docking area will be |
F11 |
hidden) |
|
|
|
Trimmer commands
Many of the shortcuts that apply to the timeline also work in the Trimmer. This list highlights commands unique to the Trimmer.
Command |
Keyboard shortcut |
Add selection to end of project |
A |
|
|
Clear Trimmer History |
Ctrl+Shift+H |
|
|
Open in Audio Editor |
Ctrl+E |
|
|
Next media file in Trimmer |
Ctrl+Tab |
|
|
Previous media file in Trimmer |
Ctrl+Shift+Tab |
|
|
26 | CHAPTER 3
 Loading...