


CCD-TRV208E

3-072-318-13 (2)
Digital
Video Camera Recorder
Video Camera Recorder
Operating Instructions
Before operating the unit, please read this manual thoroughly, and retain it
for future reference.
ИНСТРУКЦИЯ ПО ЭКСПЛУАТАЦИИ
Перед эксплуатацией аппарата внимательно прочтите, пожалуйста,
данное руководство и сохраняйте его для дальнейших справок.
DCR-TRV140E
DCR-TRV140E
CCD-TRV107E/TRV108E/TRV208E/
TRV408E
©2002 Sony Corporation
English
Русский
Welcome!
Congratulations on your purchase of this Sony
Digital Handycam camcorder/Handycam
VisionTM. With your Digital Handycam/
Handycam VisionTM, you can capture life’s
precious moments with superior picture and
sound quality.
Your Digital Handycam/Handycam VisionTM is
loaded with advanced features, but at the same
time it is very easy to use. You will soon be
producing home video that you can enjoy for
years to come.
To prevent fire or shock hazard, do not expose
the unit to rain or moisture.
To avoid electrical shock, do not open the
cabinet.
Refer servicing to qualified personnel only.
NOTICE ON THE SUPPLIED AC POWER
ADAPTOR FOR THE CUSTOMERS IN
THE UNITED KINGDOM
A moulded plug complying with BS1363 is fitted
to this equipment for your safety and
convenience.
Should the fuse in the plug supplied need to
be replaced, a 5 AMP fuse approved by ASTA
or BSI to BS1362 (i.e., marked with or
mark) must be used.
If the plug supplied with this equipment has a
detachable fuse cover, be sure to attach the
fuse cover after you change the fuse. Never
use the plug without the fuse cover. If you
should lose the fuse cover, please contact
your nearest Sony service station.
For the customers in Europe
ATTENTION (DCR-TRV140E only)
The electromagnetic fields at the specific
frequencies may influence the picture and sound
of this digital camcorder.
This product has been tested and found
compliant with the limits set out in the EMC
Directive for using connection cables shorter than
3 meters. (9.8 feet)
For the customers in Germany
(DCR-TRV140E only)
Directive:EMC Directive 89/336/EEC.
This equipment complies with the EMC
regulations when used under the following
circumstances:
•Residential area
•Business district
•Light-industry district
(This equipment complies with the EMC
standard regulations EN55022 Class B.)
2
WARNING
92/31/EEC
Добро пожаловать!
Поздpaвляeм Bac c пpиобpeтeниeм
видeокaмepы Digital Handycam/Handycam
VisionTM фиpмы Sony. C помощью
видeокaмepы Digital Handycam/Handycam
VisionTM можно зaпeчaтлeть доpогиe Baм
мгновeния жизни c пpeвоcxодным кaчecтвом
изобpaжeния и звyкa.
Bидeокaмepa Digital Handycam/Handycam
VisionTM оcнaщeнa ycовepшeнcтвовaнными
фyнкциями, но в то жe вpeмя ee очeнь лeгко
иcпользовaть. Bcкоpe Bы бyдeтe cоздaвaть
ceмeйныe видeопpогpaммы, котоpыми
cможeтe нacлaждaтьcя в поcлeдyющиe годы.
ПРЕДУПРЕЖДЕНИЕ
Для предотвращения возгорания или
опасности электрического удара не
выставляйте аппарат на дождь или влагу.
Во избежание поражения электрическим
током не открывайте корпус.
За обслуживанием обращаться только к
квалифицированному обслуживающему
персоналу.
Для покупателей в Европе
ВНИМАНИЕ (только модeль
DCR-TRV140E)
Электромагнитные поля на определенных
частотах могут влиять на изображение и
звук, воcпpоизводимыe данной цифровой
видеокамеры.
Это изделие прошло проверку на
соответствие требованиям Директивы EMC
для использования соединительных кабелей
короче 3 метров.
CCD-TRV108E/TRV208E/TRV408E
English
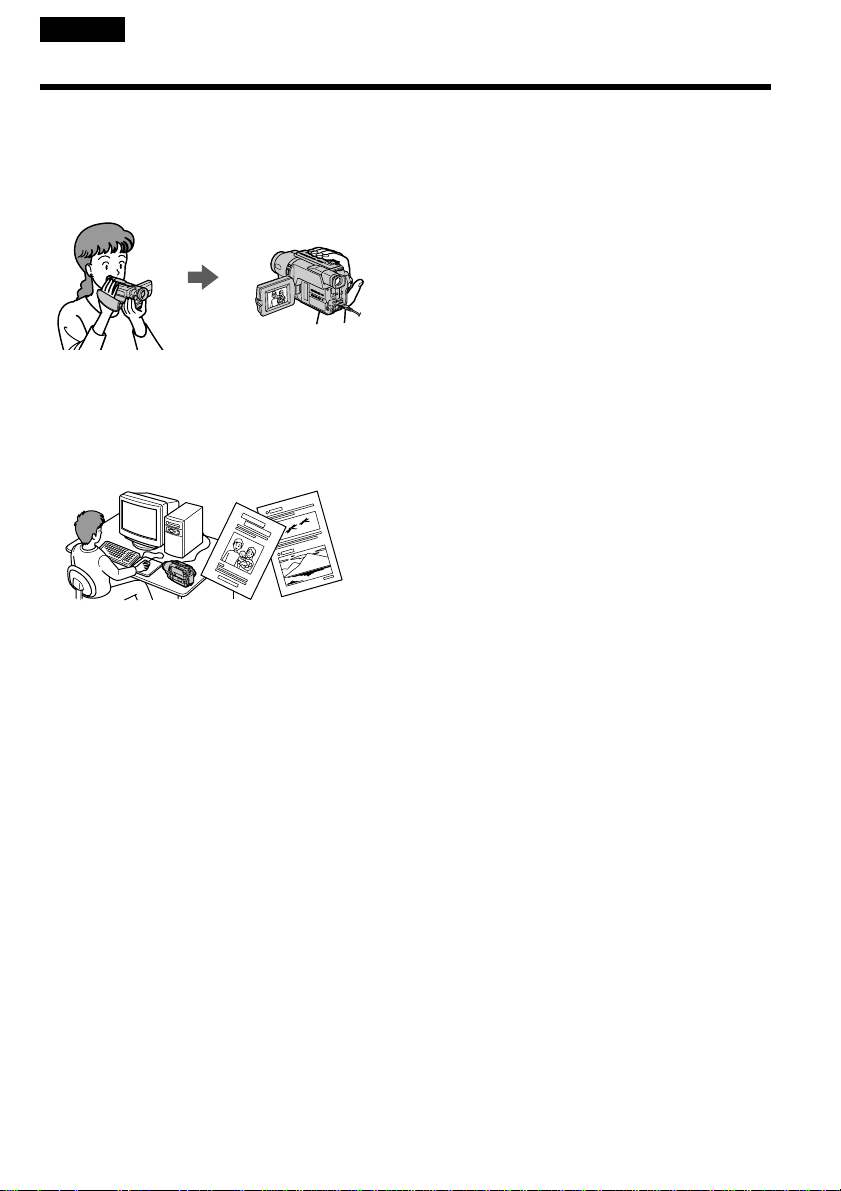
Main Features
Taking moving images, and playing
them back
•Recording a picture (p. 29)
•Recording a still image on a tape (p. 53)*
•Playing back a tape (p. 43)
1)
Capturing images on your computer
(DCR-TRV140E only)
•Viewing images recorded on a tape (p. 123)
•Viewing images live from your camcorder
(p. 123)
Others
Functions to adjust exposure in the recording
mode
•NightShot (p. 38)/
Super NightShot (p. 38)*1)/
Colour Slow Shutter (p. 39)*
•BACK LIGHT (p. 37)
•PROGRAM AE (p. 66)
•Built-in light (p. 82)
•Manual exposure (p. 69)
1)
Function to give a natural appearance to your
recordings
•Manual focus (p. 70)
Functions to use in editing in the recording
mode
•Wide mode (p. 55)
•Date and time (p. 25)*
•ORC [MENU] (p. 140)*
2)
2)
Functions to use after recording
•Data code (p. 45)*
•Zero set memory (p. 91)*
•Digital program editing (p. 111)*
•Easy Dubbing (p. 102)*
•Tape PB ZOOM (p. 89)*
1)
1)
1)
2)
1)
Function to make transition smooth
•END SEARCH (p 42)
*1)DCR-TRV140E only
*2)CCD-TRV107E/TRV108E/TRV208E/TRV408E
only
Functions to give images more impact
•Digital zoom (p. 33)
The default settings is set to OFF. (To zoom
greater than 20×, select the digital zoom power
in D ZOOM in the menu settings.)
•FADER (p. 58)
•Tape photo recording (p. 53)*
1)
•Picture effect (p. 61)
•Digital effect (p. 63)*
1)
•TITLE (p. 77)
3
Pyccкий
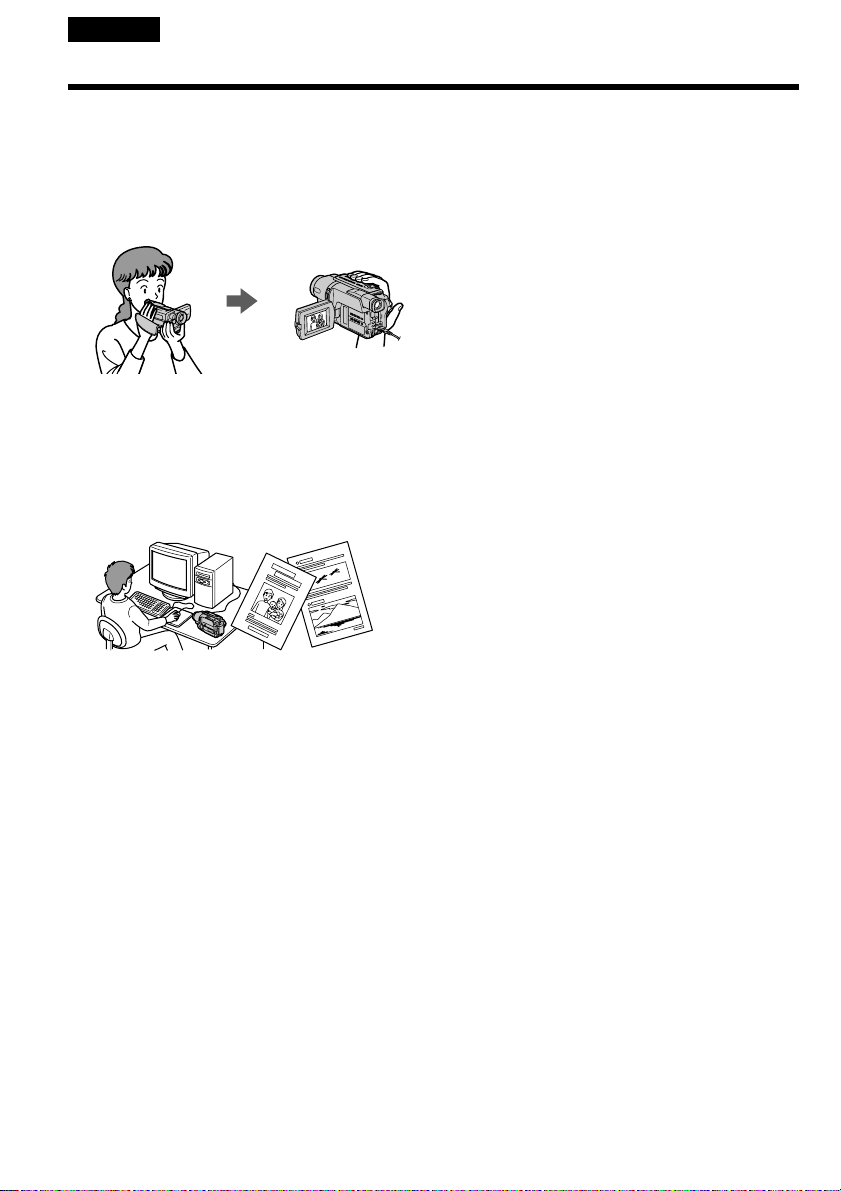
Ocновныe фyнкции
Cъeмкa движyщиxcя изобpaжeний и
иx воcпpоизвeдeниe
•Зaпиcь изобpaжeния (cтp. 29)
•Зaпиcь нeподвижного изобpaжeния нa лeнтy
(cтp. 53)*
1)
•Bоcпpоизвeдeниe лeнты (cтp. 43)
Пepeноc изобpaжeний нa компьютep
(только модeль DCR-TRV140E)
•Пpоcмотp изобpaжeний, зaпиcaнныx нa
лeнтe (cтp. 123)
•Пpоcмотp изобpaжeний c видeокaмepы в
peaльном вpeмeни (cтp. 123)
Пpочee
Фyнкции для peгyлиpовки экcпозиции в
peжимe зaпиcи
•NightShot (cтp. 38)/
Super NightShot (cтp. 38)*1)/
Colour Slow Shutter (cтp. 39)*
•BACK LIGHT (cтp. 37)
•PROGRAM AE (cтp. 66)
•Bcтpоeннaя подcвeткa (cтp. 82)
•Pyчнaя экcпозиция (cтp. 69)
1)
Фyнкции для пpидaния эффeктов
зaпиcaнным изобpaжeниям
•Цифpовaя тpaнcфокaция (cтp. 33)
Уcтaновки по yмолчaнию cоотвeтcтвyют
положeнию OFF. (Для yвeличeния болee,
чeм 20× выбepитe cтeпeнь цифpового
yвeличeния в пyнктe D ZOOM в
ycтaновкax мeню.)
•FADER (cтp. 58)
•Фотоcъeмкa нa лeнтy (cтp. 53)*
1)
•Эффeкт изобpaжeния (cтp. 61)
•Цифpовой эффeкт (cтp. 63)*
1)
•TITLE (cтp. 77)
Фyнкция для пpидaния зaпиcям
ecтecтвeнного видa
•Pyчнaя фокycиpовкa (cтp. 70)
Фyнкции для иcпользовaния пpи
монтaжe в peжимe зaпиcи
•Шиpокоэкpaнный peжим (cтp. 55)
•Дaтa и вpeмя (cтp. 25)*
•ORC [MENU] (cтp. 148)*
Фyнкции для иcпользовaния поcлe зaпиcи
•Код дaнныx (cтp. 45)*
•Пaмять нyлeвой отмeтки (cтp. 91)*
•Цифpовой монтaж пpогpaммы (cтp. 111)*
•Пpоcтaя пepeзaпиcь (cтp. 102)*
•PB ZOOM для кacceты (cтp. 89)*
Фyнкция для выполнeния плaвного
пepexодa
•END SEARCH (cтp. 42)
*1)Tолько модeль DCR-TRV140E
*2)Tолько модeль CCD-TRV107E/TRV108E/
TRV208E/TRV408E
2)
2)
1)
1)
1)
2)
1)
4
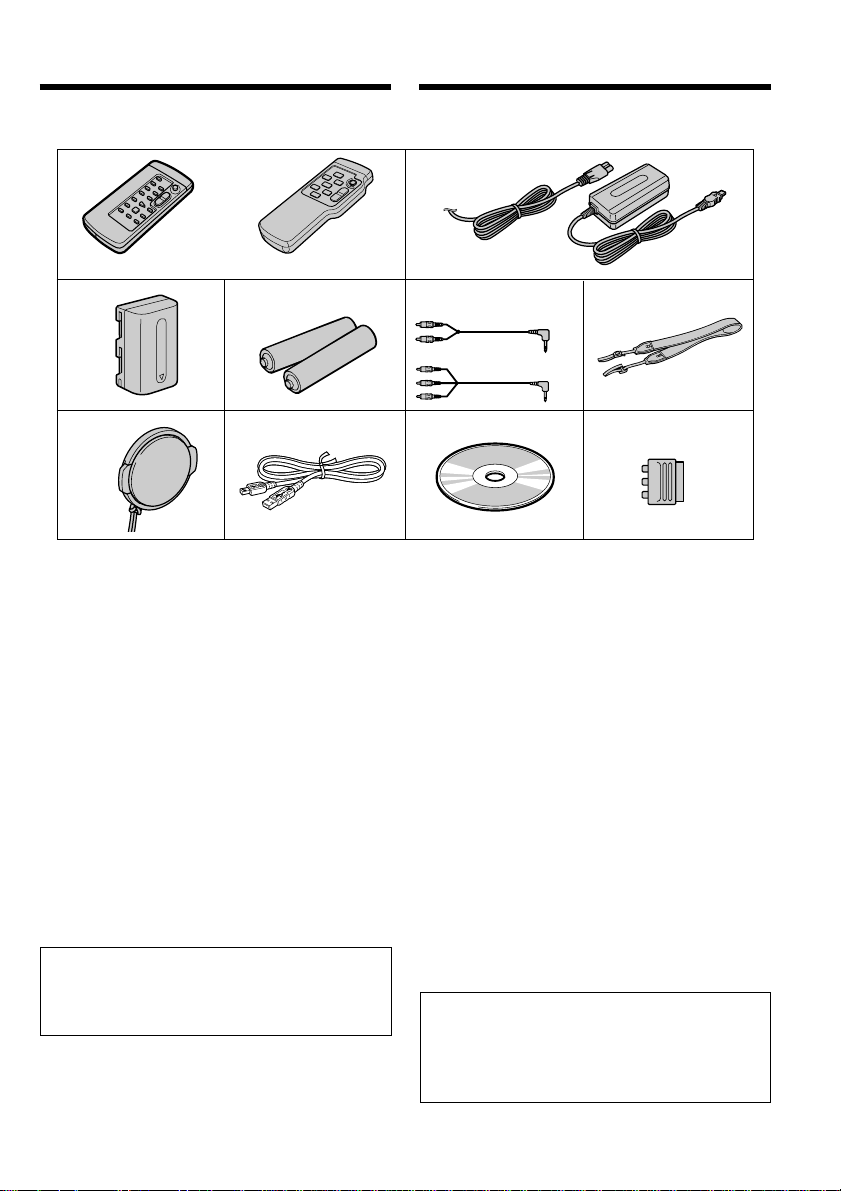
Checking supplied
accessories
Проверка прилагаемых
принадлежностей
Make sure that the following accessories are
supplied with your camcorder.
1
or/или
RMT-814
3
RMT-708
45
78
1 Wireless Remote Commander (1) (p. 197)*
RMT-708:CCD-TRV107E/TRV208E/TRV408E
RMT-814: DCR-TRV140E
2 AC-L10A/L10B/L10C AC power adaptor (1),
Mains lead (1) (p. 19)
3 NP-FM30 battery pack (1) (p. 18, 19)
4 R6 (Size AA) battery for Remote
Commander (2) (p. 198)*
1)
5 A/V connecting cable (1) (p. 50)
Monaural: CCD-TRV107E/TRV108E/
TRV208E/TRV408E
Stereo: DCR-TRV140E only
6 Shoulder strap (1) (p. 192)
7 Lens cap (1) (p. 29, 196)
8 USB Cable (1) (p. 123)*
9
CD-ROM (SPVD-008 USB Driver) (1) (p. 125)*
2)
q; 21-pin adaptor (1) (p. 52) (European models
only)
Contents of the recording cannot be
compensated if recording or playback is not
made due to a malfunction of the camcorder,
storage media, etc.
*1)CCD-TRV107E/TRV208E/TRV408E,
DCR-TRV140E only
*2)DCR-TRV140E only
Убедитесь, что следующие принадлежности
прилагаются к Вашей видеокамере.
2
Monaural/
монофоничecкий
Stereo/
cтepeо
9
1)
1 Бecпpоводный пyльт диcтaнционного
yпpaвлeния (1) (стр. 197)*
RMT-708: CCD-TRV107E/TRV208E/TRV408E
RMT-814: DCR-TRV140E
2 Ceтeвой aдaптep пepeмeнного токa
AC-L10A/L10B/L10C (1), пpовод
элeктpопитaния (1) (стр. 19)
6
or/
или
q;
1)
3 Бaтapeйный блок NP-FM30 (1) (стр. 18, 19)
4 Бaтapeйкa R6 (paзмepa AA) для пyльтa
диcтaнционного yпpaвлeния (2) (стр. 198)*
5 Cоeдинитeльный кaбeль ayдио/видeо (1)
(cтp. 50)
Mонофоничecкий: CCD-TRV107E/TRV108E/
Cтepeо: Tолько модeль DCR-TRV140E
TRV208E/TRV408E
6 Плeчeвой peмeнь (1) (стр. 192)
7 Кpышкa объeктивa (1) (стр. 29, 196)
2)
8 Кaбeль USB (1) (cтp. 123)*
9 CD-ROM (дpaйвep USB SPVD-008) (1)
(cтp. 125)*
2)
2)
0 21-штыpьковый aдaптep (1) (cтp. 52)
(Tолько для eвpопeйcкиx модeлeй)
Содержание записи не может быть
компенсировано в случае, если запись или
воспроизведение не выполнены из-за
неисправности видеокамеры, носителя
информации и т.п.
*1)Tолько модeль CCD-TRV107E/TRV208E/
TRV408E, DCR-TRV140E
*2)Tолько модeль DCR-TRV140E
1)
5

English
Table of contents
Main Features.................................................... 3
Checking supplied accessories .......................5
Quick Start Guide ..................................10
Getting started
Using this manual .......................................... 14
Step 1 Preparing the power supply ............. 18
Installing the battery pack...................... 18
Charging the battery pack...................... 19
Connecting to a wall socket ................... 23
Step 2 Setting the date and time ................... 25
Step 3 Inserting a cassette.............................. 27
Recording – Basics
Recording a picture ........................................ 29
Shooting backlit subjects
– BACK LIGHT ........................................ 37
Shooting in the dark
– NightShot/
Super NightShot
(DCR-TRV140E only)/
Colour Slow Shutter
(DCR-TRV140E only) .............................. 38
Superimposing the date and time on pictures
(CCD-TRV107E/TRV108E/TRV208E/
TRV408E only) ......................................... 41
Checking the recording
– END SEARCH ...................................... 42
Playback – Basics
Playing back a tape......................................... 43
Viewing the recording on TV ....................... 50
Advanced Recording Operations
Recording a still image on a tape
– Tape Photo recording
(DCR-TRV140E only) .............................. 53
Using the wide mode ..................................... 55
Using the fader function ................................ 58
Using special effects
– Picture effect.......................................... 61
Using special effects
– Digital effect
(DCR-TRV140E only) .............................. 63
Using the PROGRAM AE function.............. 66
Adjusting the exposure manually ................ 69
Focusing manually ......................................... 70
Interval recording
(DCR-TRV140E only) .............................. 72
Frame by frame recording
– Cut recording
(DCR-TRV140E only) .............................. 75
Superimposing a title ..................................... 77
Making your own titles ................................. 80
Using the built-in light................................... 82
Advanced Playback Operations
(DCR-TRV140E only)
Playing back a tape with picture effects...... 86
Playing back a tape with digital effects....... 87
Enlarging images recorded on tapes
– Tape PB ZOOM .................................... 89
Quickly locating a scene using the zero set
memory function ..................................... 91
Searching a recording by date
– Date search ............................................ 93
Searching for a photo
– Photo search/Photo scan .................... 95
Editing
Dubbing a tape................................................ 97
Dubbing a tape easily
– Easy Dubbing
(CCD-TRV107E/TRV108E/TRV208E/
TRV408E only) ....................................... 102
Dubbing only desired scenes
– Digital program editing
(DCR-TRV140E only) ............................ 111
6

Table of contents
PC Connection
(DCR-TRV140E only)
Viewing images using your computer
– USB Streaming
(Windows users only) ........................... 123
Customising Your Camcorder
Changing the menu settings ....................... 134
Troubleshooting
Types of trouble and their solutions .......... 152
Self-diagnosis display .................................. 158
Warning indicators and messages ............. 159
Additional Information
About video cassettes .................................. 170
About the “InfoLITHIUM”
battery pack ............................................ 174
About i.LINK................................................. 176
Using your camcorder abroad .................... 178
Maintenance information and
precautions ............................................. 179
Specifications................................................. 188
Quick Reference
Identifying the parts and controls.............. 192
Index ............................................................... 201
7

Русский
Оглавление
Ocновныe фyнкции .................................... 4
Проверка прилагаемых
принадлежностей ................................ 5
Руководство по быстрому
запуску
...................................................... 12
Подготовка к эксплуатации
Использование данного руководства ... 14
Пункт 1 Подготовка источника
питания .............................................. 18
Установка батарейного блока ......... 18
Зарядка батарейного блока ............. 19
Подсоединение к сетевой
розетке ........................................ 23
Пункт 2 Установка даты и времени ...... 25
Пункт 3 Установка кассеты ................... 27
Запись – Основные положения
Запись изображения ............................... 29
Съемка объектов с задней подсветкой
– BACK LIGHT .................................... 37
Cъeмкa в тeмнотe
– NightShot/Super NightShot
(только модeль DCR-TRV140E)/
Colour Slow Shutter
(только модeль DCR-TRV140E) ....... 38
Наложение даты и времени на
изображения (только модeль
CCD-TRV107E/TRV108E/TRV208E/
TRV408E) ........................................... 41
Проверка записи
– END SEARCH .................................. 42
Воспроизведение – Основные
положения
Воспроизведение ленты ......................... 43
Просмотр записи на экране
телевизора ......................................... 50
Усовершенствованные операции
съемки
Запись неподвижного изображения на
ленту – Фотосъемка на ленту
(только модeль DCR-TRV140E) ....... 53
Использование широкоэкранного
режима ............................................... 55
Использование функции фейдера ......... 58
Использование специальных эффектов
– Эффект изображения ................... 61
Использование специальных эффектов
– Цифровой эффект
(только модeль DCR-TRV140E) ....... 63
Использование функции
PROGRAM AE .................................... 66
Регулировка экспозиции вручную ......... 69
Фокусировка вручную ............................. 70
Зaпиcь c интepвaлaми
(только модeль DCR-TRV140E) ....... 72
Покaдpовaя зaпиcь
– Зaпиcь c монтaжными кaдpaми
(только модeль DCR-TRV140E) ....... 75
Наложение титра ..................................... 77
Создание Ваших собственных титров ... 80
Использование встроенной
подсветки........................................... 82
Усовершенствованные операции
воспроизведения (только
модeль DCR-TRV140E)
Воспроизведение ленты с эффектами
изображения ...................................... 86
Воспроизведение ленты с цифровыми
эффектами ........................................ 87
Увеличение записанных изображений на
ленте
– PB ZOOM для лeнты ...................... 89
Быстрое отыскание эпизода с помощью
функции памяти нулевой отметки ....
Поиск записи по дате
– Поиск даты...................................... 93
Поиск фото
– Фотопоиск/Фотосканирование ...... 95
91
8

Оглавление
Монтаж
Перезапись ленты ................................... 97
Пpоcтaя пepeзaпиcь лeнты
– Пpоcтaя пepeзaпиcь
(только модeль CCD-TRV107E/
TRV108E/TRV208E/TRV408E) ........ 102
Пepeзaпиcь только нyжныx эпизодов
– Цифpовой монтaж пpогpaммы
(только модeль DCR-TRV140E) ..... 111
Подключeниe ПК (только
модeль DCR-TRV140E)
Пpоcмотp изобpaжeний c помощью
компьютepa
– Пepeдaчa потоком по cоeдинeнию
USB (только для пользовaтeлeй
Windows)........................................... 123
Выполнение индивидуальных
установок на видеокамере
Изменение установок меню ................. 134
Поиск и устранение
неисправностей
Tипы нeиcпpaвноcтeй и мepы по иx
ycтpaнeнию ...................................... 161
Индикация самодиагностики ............... 167
Предупреждающие индикаторы и
сообщения ........................................ 168
Дополнительная информация
О видеокассетах ................................... 170
О батарейном блоке “InfoLITHIUM” ..... 174
Относительно i.LINK .............................. 176
Использование Вашей видеокамеры
за границей ...................................... 178
Информация по уходу за аппаратом и
меры предосторожности ................ 179
Технические характеристики ............... 190
Оперативный справочник
Обозначение частей и регуляторов..... 192
Алфавитный указатель......................... 202
9
English
Quick Start Guide
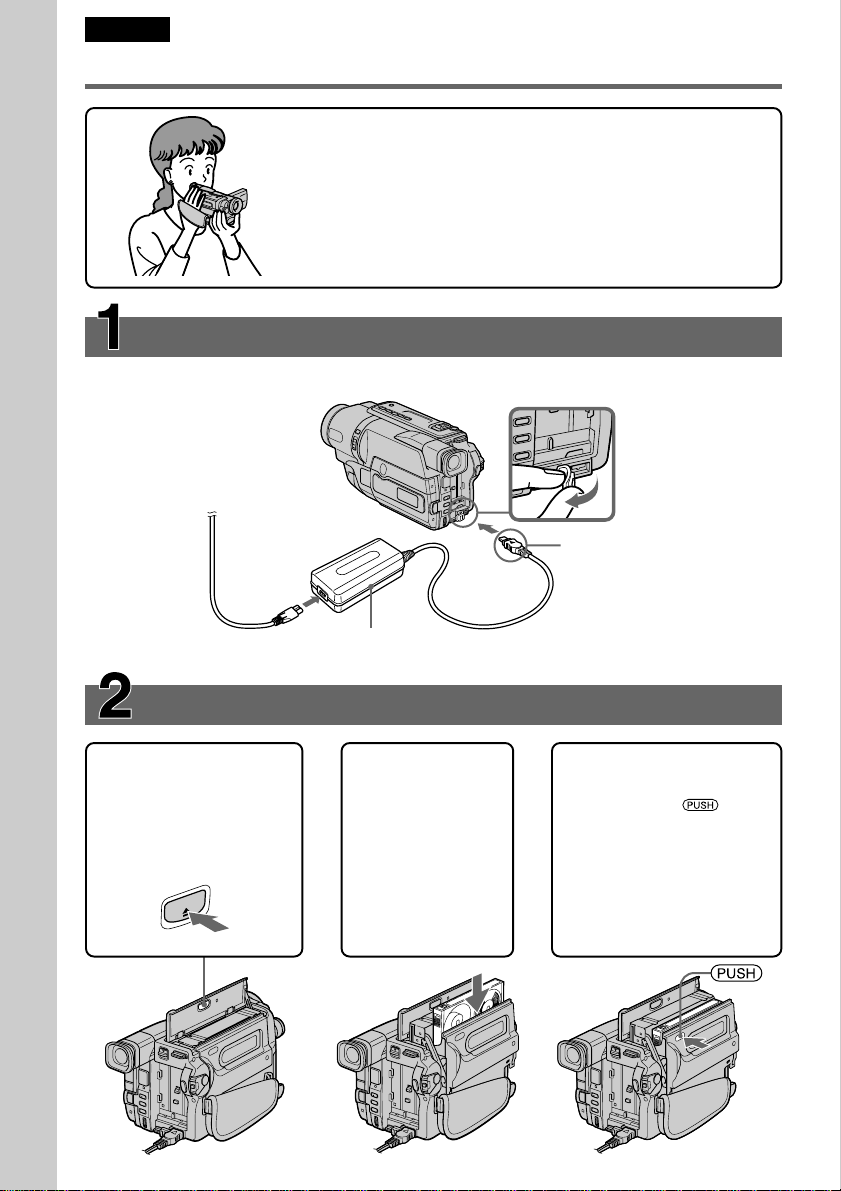
Connecting the mains lead (p. 19)
Use the battery pack when using your camcorder outdoors (p. 18).
Quick Start Guide
This chapter introduces you to the basic features of your
camcorder. See the page in parentheses “( )” for more
information.
Open the DC IN
jack cover.
Connect the plug with
its v mark facing up.
10
Inserting a cassette (p. 27)
1Open the lid of the
cassette compartment,
and press Z EJECT.
The cassette
compartment opens
automatically.
T
C
JE
E
AC power adaptor (supplied)
2Insert a cassette
into the cassette
compartment
with its window
facing out and
the write-protect
tab on the
cassette up.
3Close the cassette
compartment by
pressing the mark
on the cassette
compartment. The
cassette compartment
automatically goes
down.
Close the lid of the
cassette compartment.

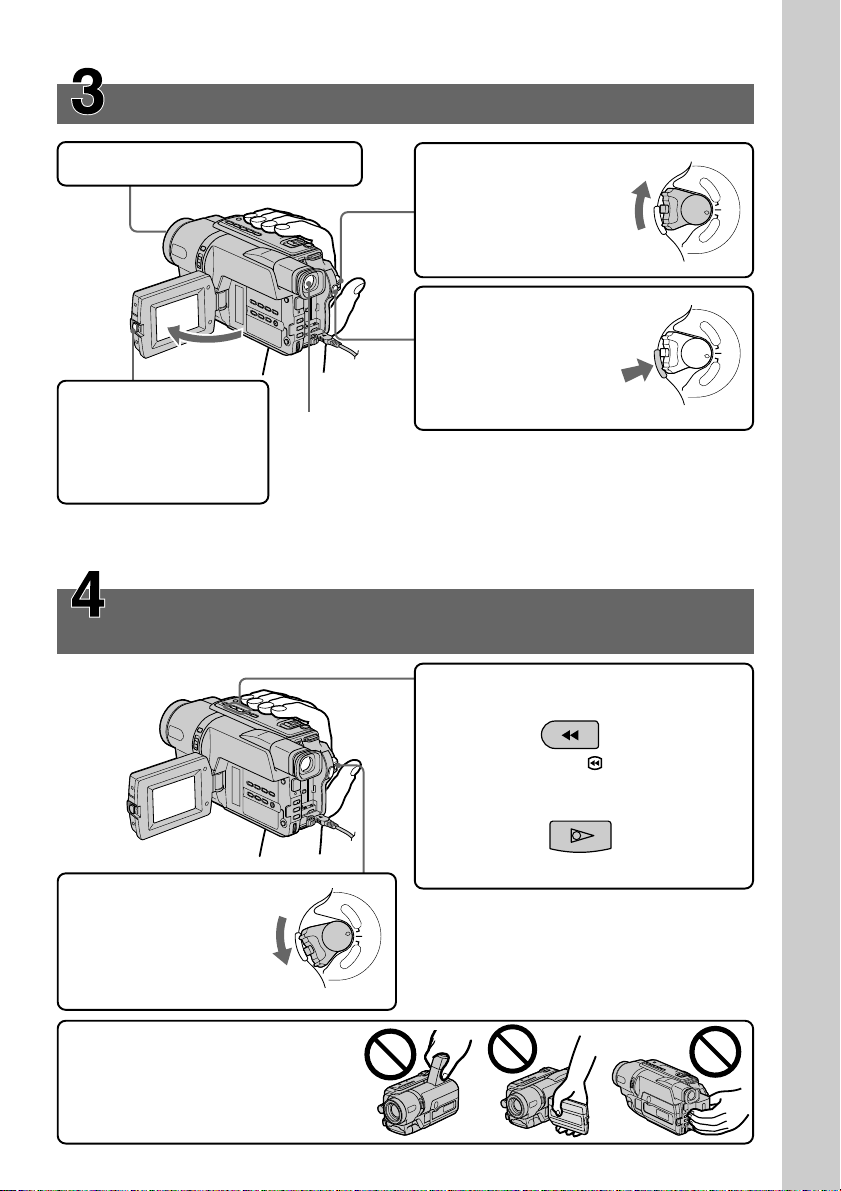
Recording a picture (p. 29)
1Remove the lens cap.
2Set the POWER
switch to CAMERA
while pressing the
small green button.
4Press START/STOP.
Your camcorder
starts recording. To
stop recording, press
START/STOP again.
3Open the LCD panel
while pressing OPEN.
The picture appears
on the LCD screen.
When you purchase your camcorder, the clock setting is set to off. If you want to
record the date and time for a picture, set the clock setting before recording (p. 25).
Viewfinder
When the LCD panel is closed, use the
viewfinder placing your eye against its eyecup.
The picture in the viewfinder is black and white.
Adjust the viewfinder lens to your eyesight (p. 34).
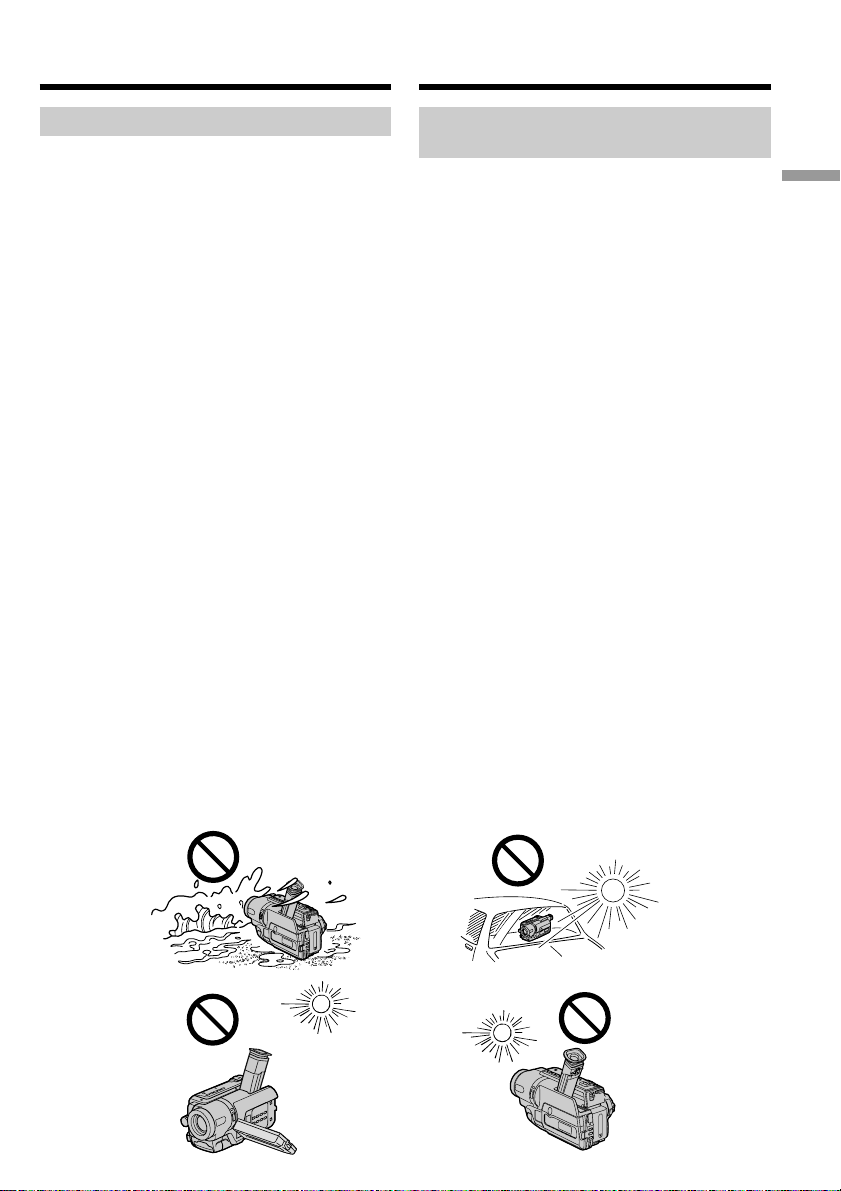
Monitoring the playback picture on the LCD
screen (p. 43)
2Press m to rewind the tape.
P
L
A
Y
E
R
O
F
F
POW
(
C
ER
H
G
C
)
A
M
E
R
A
P
L
A
Y
E
R
O
F
F
PO
(
C
W
ER
H
G
C
)
A
M
E
R
A
Quick Start Guide
1Set the POWER
switch to PLAYER
while pressing the
small green button.
NOTE
Do not pick up your camcorder by
the viewfinder, the LCD panel or the
battery pack.
REW
3Press N to start playback.
PLAY
P
L
A
Y
E
R
O
F
F
(
C
R
E
W
H
O
P
G
C
)
A
M
E
R
A
11
Русский
Руководство по быстрому запуску
В данной главе приведены основные функции Вашей
видеокамеры. Подробные сведения приведены на
странице в круглых скобках “( )”.
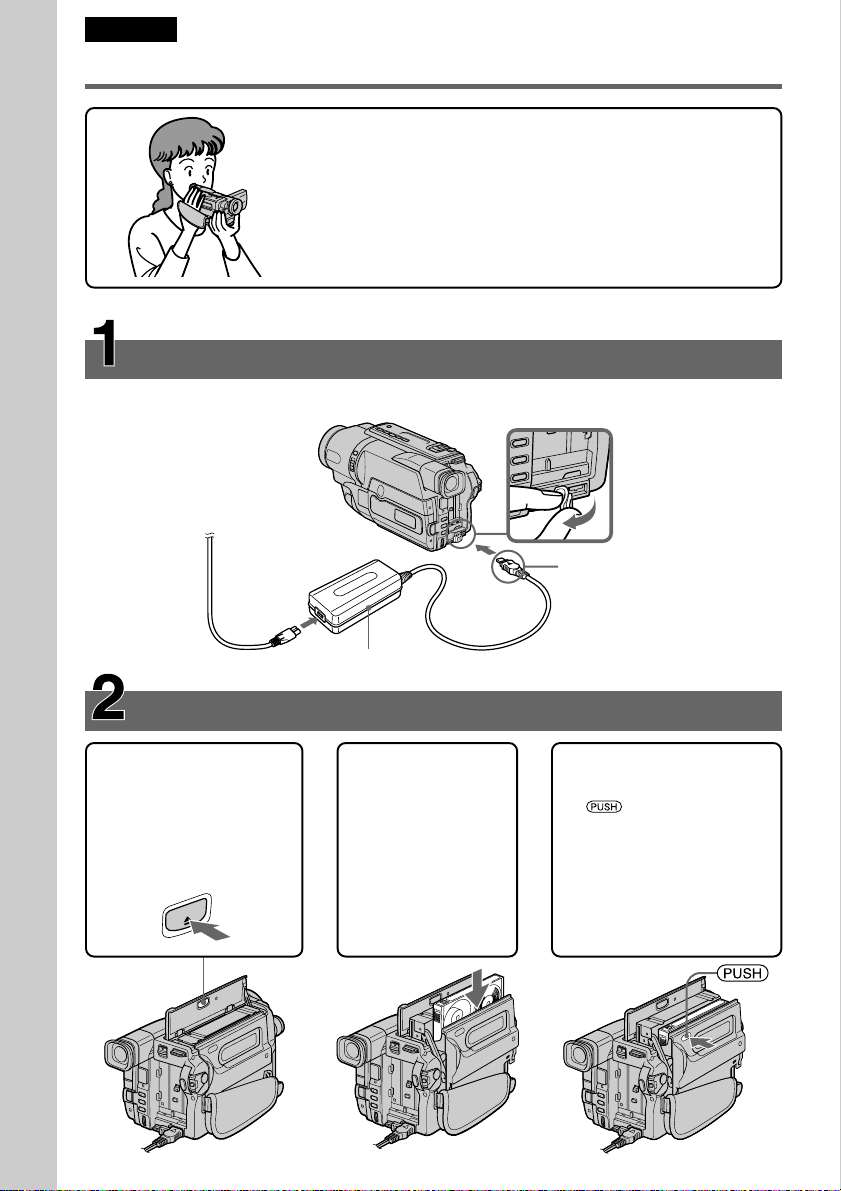
Подсоединение провода электропитания (стр. 19)
При пользовании видеокамерой вне помещения используйте батарейный блок (стр. 18).
Руководство по быстрому запуску
Откройте
крышку гнезда
DC IN.
Подсоедините штекер
так, чтобы его знак v
был направлен вверх.
12
Установка кассеты (стр. 27)
1Oткpойтe кpышкy
кacceтного отceкa, a
зaтeм нaжмитe
кнопкy Z EJECT.
Кacceтный отceк
откpоeтcя
aвтомaтичecки.
EJECT
Сетевой адаптер переменного тока (прилагается)
2Вставьте кассету
в кассетный
отсек так, чтобы
окошко было
обращено наружу,
а лепесток
защиты записи на
кассете вверх.
3Закройте кассетный
отсек, нажав метку
на кассетном
отсеке. Кассетный
отсек автоматически
опустится. Закройте
крышку кассетного
отсека.
Запись изображения (стр. 29)
1Снимите крышку объектива.
2Установите
переключатель
POWER в положение
CAMERA, нажав
маленькую зеленую
кнопку.
4Haжмитe кнопкy
START/STOP.
Bидeокaмepa нaчнeт
зaпиcь. Для оcтaновки
зaпиcи нaжмитe
3Откройте панель
ЖКД, нажав кнопку
OPEN. На экране
ЖКД появится
изображение.
Видоискатель
Если панель ЖКД закрыта, воспользуйтесь
видоискателем, приставив глаз к окуляру.
Изображение в видоискателе будет черно-белым.
кнопкy START/STOP
eщe paз.
Oтpeгyлиpyйтe объeктив видоиcкaтeля в cоотвeтcтвии cо
cвоим зpeниeм (cтp. 34).
Когда Вы купите Вашу видеокамеру, установка часов будет
выключена. Если Вы хотите записать дату и время для изображения,
выполните установку часов перед записью. (стр. 25)
Контроль воспроизводимого изображения на
экране ЖКД (стр. 43)
2Нажмите кнопку m для обратной
перемотки ленты.
P
L
A
Y
E
R
O
F
F
P
(
O
C
W
E
R
H
G
C
)
A
M
E
R
A
P
L
A
Y
E
R
O
F
F
PO
(
C
W
ER
H
G
C
)
A
M
E
R
A
Руководство по быстрому запуску
1Установите
переключатель
POWER в положение
PLAYER, нажав
маленькую зеленую
кнопку.
Примечание
He поднимaйтe видeокaмepy зa
видоиcкaтeль, пaнeль ЖКД или
бaтapeйный блок.
REW
3Нажмите кнопку N для начала
воспроизведения.
PLAY
P
L
A
Y
E
R
O
F
F
(
C
R
E
W
H
O
P
G
C
)
A
M
E
R
A
13

— Getting started —
Using this manual
— Подготовка к эксплуатации —
Использование
данного руководства
The instructions in this manual are for the five
models listed in the table below (p. 15). Before
you start reading this manual and operating your
camcorder, check the model number by looking
at the bottom of your camcorder. The
DCR-TRV140E is the model used for illustration
purposes. Otherwise, the model name is
indicated in the illustrations. Any differences in
operation are clearly indicated in the text, for
example, “DCR-TRV140E only.”
As you read through this manual, buttons and
settings on your camcorder are shown in capital
letters.
e.g. Set the POWER switch to CAMERA.
When you carry out an operation, you can hear a
beep sound to indicate that the operation is being
carried out.
Before using your camcorder
(DCR-TRV140E only)
With your digital camcorder, we recommend
using Hi8 /Digital8 video cassettes. Your
camcorder records and plays back pictures only
in the Digital8 system. You cannot play back
tapes recorded in the Hi8 /standard 8 mm
(analogue) system.
Note on TV colour systems
TV colour systems differ from country to
country. To view your recordings on a TV, you
need a PAL system-based TV.
Инcтpyкции в дaнном pyководcтвe
пpeднaзнaчeны для пяти модeлeй,
пepeчиcлeнныx в тaблицe (cтp. 16). Прежде,
чем приступить к ознакомлению с данным
руководством и эксплуатации Вашей
видеокамеры, проверьте номер модели с
нижней стороны видеокамеры. Для
иллюстративных целей используется модель
DCR-TRV140E. В противном случае название
модели указывается на рисунках. Всякие
отличия в работе четко указываются в
тексте, например, “только модель
DCR-TRV140E”.
При чтении данного руководства учитывайте,
что кнопки и установки на видеокамере
показаны заглавными буквами.
Пpимep. Установите выключатель POWER в
положение CAMERA.
При выполнении операции на видеокамере
Вы сможете услышать зуммерный сигнал,
подтверждающий выполнение операции.
Перед началом эксплуатации
Вашей видеокамеры (Только
модель DCR–TRV140E)
C этой видeокaмepой peкомeндyeтcя
иcпользовaть видeокacceты Hi8 /
Digital8 . Baшa видeокaмepa выполняeт
зaпиcь и воcпpоизвeдeниe изобpaжeний
только в cиcтeмe Digital8 . Heльзя
воcпpоизводить лeнты, зaпиcaнныe в cиcтeмe
Hi8 /cтaндapтной cиcтeмe 8 mm
(aнaлоговой).
14
Примечание по системам
цветного телевидения
Системы цветного телевидения отличаются в
зависимости от страны. Для просмотра Ваших
записей на экране телевизора Вам
необходимо использовать телевизор,
основанный на системе PAL.

English
Using this manual
Types of differences
Model name
System Hi8 Hi8 Hi8 Hi8 Digital8
Playback Hi8/8 Hi8/8 Hi8/8 Hi8/8 Digital8
Digital Zoom 450× 460× 560× 560× 560×
Remote Sensor z — zzz
Steadyshot ———zz
Date and time zzzz—
DNR
(Digital Noise Reduction)
Easy Dubbing zzzz—
ORC
(Optimizing the Recording zzzz—
Condition)
TBC
(Time Base Corrector)
Data Code ————z
TRV107E TRV108E TRV208E TRV408E TRV140E
zzzz—
zzzz—
CCD- DCR-
Getting started Подготовка к эксплуатации
Digital effect ————z
Digital program editing ————z
DV OUT jack ————z
Frame recording ————z
Hifi SOUND ————z
Interval recording ————z
Super NightShot/
Colour Slow Shutter
Tape Photo recording ————z
USB Streaming ————z
Zero set memory ————z
z Provided
— Not provided
————z
15

Русский
Использование данного руководства
Tипы paзличий
Hомep модeли
Cиcтeмa
TRV107E TRV108E TRV208E TRV408E TRV140E
Hi8 Hi8 Hi8 Hi8 Digital8
CCD- DCR-
Bоcпpоизвeдeниe
Цифpовой вapиообъeктив
Дaтчик диcтaнционного
yпpaвлeния
Уcтойчивaя cъeмкa
Дaтa и вpeмя
DNR
(Цифpовоe шyмоподaвлeниe)
Пpоcтaя пepeзaпиcь
ORC
(Oптимизaция ycловий зaпиcи)
TBC
(Коppeктоp cинxpонизaции)
Код дaнныx
Цифpовой эффeкт
Цифpовой монтaж пpогpaммы
Гнeздо DV OUT
Покaдpовaя зaпиcь ————z
Peжим HiFi SOUND
Hi8/8 Hi8/8 Hi8/8 Hi8/8 Digital8
450
×
z — zzz
———zz
zzzz—
zzzz—
zzzz—
zzzz—
zzzz—
————z
————z
————z
————z
————z
460
×
560
×
560
×
560
×
Зaпиcь c интepвaлaми
Super NightShot
Colour Slow Shutter
Фотоcъeмкa нa лeнтy
Пepeдaчa потоком по
cоeдинeнию USB
Пaмять нyлeвой отмeтки
z Имeeтcя
— Oтcyтcтвyeт
16
————z
————z
————z
————z
————z
Using this manual
Использование данного
руководства
Precautions on camcorder care
Lens and LCD screen/finder
(on mounted models only)
•The LCD screen and the finder are
manufactured using extremely highprecision technology so over 99.99% of the
pixels are operational for effective use.
However, there may be some tiny black
points and/or bright points (white, red, blue
or green in colour) that constantly appear on
the LCD screen and the finder. These points
are normal in the manufacturing process and
do not affect the recording in any way.
•Do not let your camcorder get wet. Keep your
camcorder away from rain and sea water.
Letting your camcorder get wet may cause your
camcorder to malfunction. Sometimes this
malfunction cannot be repaired [a].
•Never leave your camcorder exposed to
temperatures above 60°C (140°F), such as in a
car parked in the sun or under direct sunlight
[b].
•Be careful when placing the camera near a
window or outdoors. Exposing the LCD screen,
the finder or the lens to direct sunlight for long
periods may cause malfunctions. [c].
•Do not directly shoot the sun. Doing so might
cause your camcorder to malfunction. Take
pictures of the sun in low light conditions such
as dusk [d].
[a] [b]
Меры предосторожности при
уходе за видеокамерой
Oбъeктив и экpaн ЖКД/видоиcкaтeль
(только нa монтиpyeмыx модeляx)
• Экран ЖКД и видоискатель изготовлены
с помощью высокопрецизионной
технологии, поэтому свыше 99,99%
элементов изображений предназначено
для эффективного использования.
Однако на экране ЖКД и в видоискателе
могут появляться маленькие черные и/
или яркие цветные точки (белые,
красные, синие или зеленые). Появление
этих точек вполне нормально для
процесса съемки и никоим образом не
влияет на записываемое изображение.
• Не допускайте, чтобы видеокамера
становилась влажной. Предохраняйте
видеокамеру от дождя и морской воды.
Если Вы намочите видеокамеру, то это может
привести к неисправности аппарата, которая
не всегда может быть устранена [a].
• Никогда не оставляйте видеокамеру в
месте с температурой выше 60°С, как,
например, в автомобиле, оставленном на
солнце или под прямым солнечным светом
[b].
• Будьте осторожны при размещении
видеокамеры возле окна или вне
помещения. Воздействие прямого
солнечного света на экран ЖКД,
видоискатель или объектив в течение
длительного периода времени может
привести к неисправностям. [c].
• Не направляйте камеру прямо на солнце.
Это может привести к неисправности
Вашей видеокамеры. Проводите съемки
солнца в условиях низкой освещенности,
таких, как сумерки [d].
Getting started Подготовка к эксплуатации
[d][c]
17

Step 1 Preparing the
power supply
Пункт 1
Подготовка
источника питания
Installing the battery pack
Slide the battery pack down until it clicks.
To remove the battery pack
Slide the battery pack out in the direction of the
arrow while pressing V BATT down.
Установка батарейного блока
Передвиньте батарейный блок вниз, так
чтобы он защелкнулся на месте.
Для cнятия бaтapeйного блокa
Пepeдвиньтe бaтapeйный блок в нaпpaвлeнии
cтpeлки, нaжaв кнопкy V BATT вниз.
V BATT release lever/
Рычаг для снятия
батарейного блокa V BATT
18
Step 1 Preparing the power
supply
Пункт 1 Подготовка источника
питания
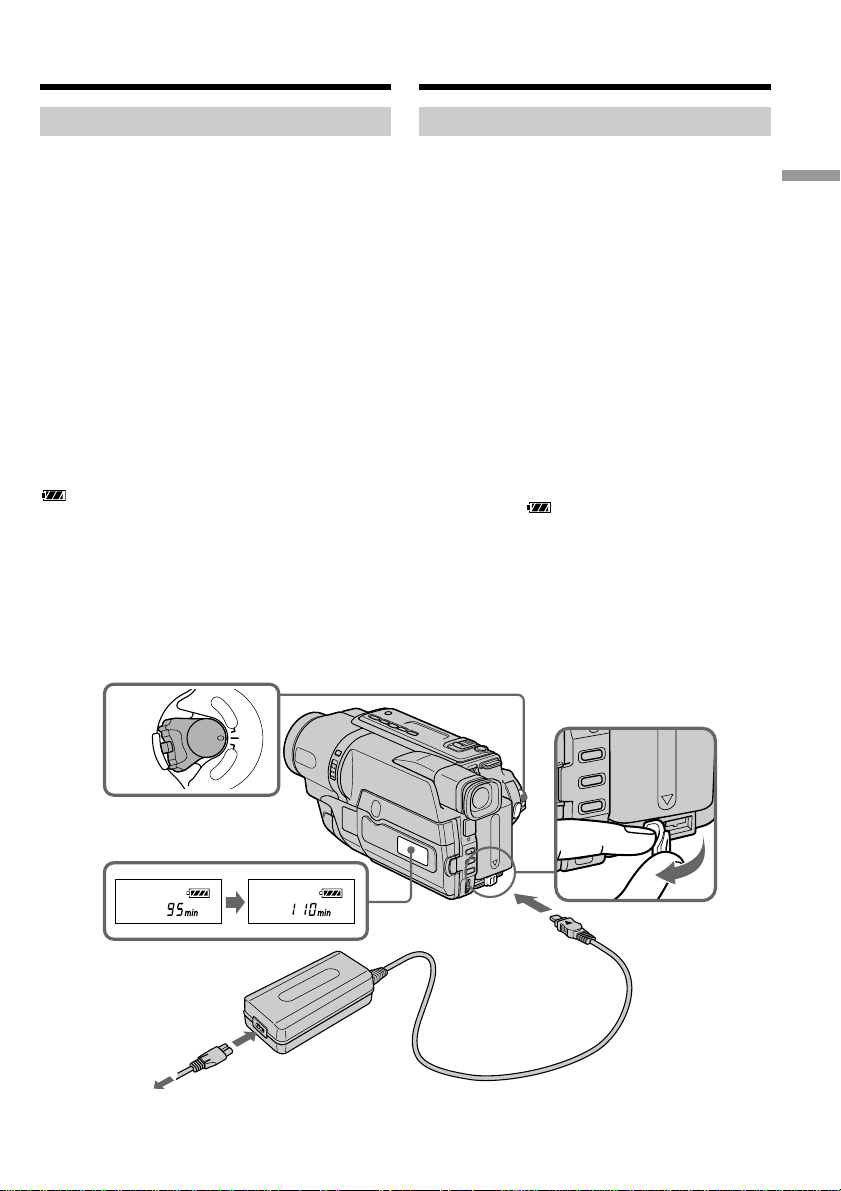
Charging the battery pack
Use the battery pack after charging it for your
camcorder.
Your camcorder operates only with the
“InfoLITHIUM” battery pack (M series).
See page 174 for details of the “InfoLITHIUM”
battery pack.
(1)Open the DC IN jack cover and connect the
AC power adaptor supplied with your
camcorder to the DC IN jack with the plug’s v
mark facing up.
(2)Connect the mains lead to the AC power
adaptor.
(3)Connect the mains lead to a wall socket.
(4)Set the POWER switch to OFF (CHG).
Charging begins. The remaining battery time
is indicated in minutes on the display
window.
When the remaining battery indicator changes to
, normal charge is completed. To fully charge
the battery (full charge), leave the battery pack
attached for about one hour after normal charge
is completed until “FULL” appears in the display
window. Fully charging the battery allows you to
use the battery longer than usual.
P
L
A
Y
POWER
E
R
O
F
F
(
C
H
G
C
)
A
M
E
R
A
4
Зарядка батарейного блока
Иcпользyйтe бaтapeйный блок для Baшeй
видeокaмepы поcлe eго зapядки.
Baшa видeокaмepa paботaeт только c
бaтapeйным блоком “InfoLITHIUM” (cepии M).
Подpобныe cвeдeния о бaтapeйном блокe
“InfoLITHIUM” пpивeдeны нa cтp. 174.
(1)Oткpойтe кpышкy гнeздa DC IN и
подcоeдинитe ceтeвой aдaптep пepeмeнного
токa, пpилaгaeмый к Baшeй видeокaмepe, к
гнeздy DC IN, тaк чтобы штeкep v был
нaпpaвлeн ввepx.
(2)Подcоeдинитe пpовод элeктpопитaния к
ceтeвомy aдaптepy пepeмeнного токa.
(3)Подcоeдинитe пpовод элeктpопитaния к
ceтeвой pозeткe.
(4)Уcтaновитe пepeключaтeль POWER в
положeниe OFF (CHG). Haчнeтcя зapядкa. B
окошкe диcплeя бyдeт отобpaжaтьcя вpeмя
оcтaвшeгоcя зapядa в минyтax.
Ecли индикaтоp оcтaвшeгоcя зapядa
измeнитcя нa , это знaчит, что
ноpмaльнaя зapядкa зaвepшeнa. Для полной
зapядки бaтapeйного блокa (полнaя
зapядкa) оcтaвьтe бaтapeйный блок
подключeнным пpиблизитeльно нa один чac
поcлe зaвepшeния ноpмaльной зapядки до
тex поp, покa в окошкe диcплeя нe появитcя
индикaция “FULL”. Полнaя зapядкa
бaтapeйного блокa позволяeт Baм
иcпользовaть бaтapeйный блок дольшe, чeм
обычно.
Getting started Подготовка к эксплуатации
FULL
2,3
The number in the illustration of the display
window may differ from that on your camcorder.
1
Чиcло нa pиcyнкe окошкa диcплeя можeт
отличaтьcя от чиcлa, котоpоe отобpaжaeтcя
нa видeокaмepe.
19

Step 1 Preparing the power
supply
Пункт 1 Подготовка источника
питания
After charging the battery pack
Disconnect the AC power adaptor from the DC
IN jack on your camcorder.
Note
Prevent metallic objects from coming into contact
with the metal parts of the DC plug of the AC
power adaptor. This may cause a short-circuit,
damaging the AC power adaptor.
Remaining battery time indicator
The remaining battery time you record with the
viewfinder is displayed.
The remaining battery time indicator in the
display window roughly indicates the recording
time with the viewfinder.
Until your camcorder calculates the actual
remaining battery time
“– – – – min” appears in the display window.
While charging the battery pack, no indicator
appears or the indicator flashes in the display
window in the following cases:
– The AC power adaptor is disconnected.
– The battery pack is not installed properly.
– Something is wrong with the battery pack.
We recommend charging the battery pack in
an ambient temperature of between 10°C to
30°C (50°F to 86°F.)
If the power goes off although the battery
remaining indicator indicates that the battery
pack has enough power to operate
Charge the battery pack fully again so that the
indication on the battery remaining indicator is
correct.
После зарядки батарейного блока
Отсоедините сетевой адаптер переменного
тока от гнезда DC IN на Вашей видеокамере.
Пpимeчaниe
He допycкaйтe контaктa мeтaлличecкиx
пpeдмeтов c мeтaлличecкими чacтями штeкepa
поcтоянного токa ceтeвого aдaптepa. Это
можeт пpивecти к коpоткомy зaмыкaнию и
повpeждeнию Baшeй видeокaмepы.
Индикaтоp оcтaвшeгоcя зapядa бaтapeйного
блокa
Oтобpaжaeтcя оcтaвшeecя вpeмя paботы
бaтapeи пpи cъeмкe c видоиcкaтeлeм.
Индикaтоp вpeмeни оcтaвшeгоcя зapядa
бaтapeйного блокa в окошкe диcплeя
пpиблизитeльно yкaзывaeт вpeмя зaпиcи c
иcпользовaниeм видоиcкaтeля.
До тex поp, покa Baшa видeокaмepa нe
опpeдeлит дeйcтвитeльноe вpeмя
оcтaвшeгоcя зapядa бaтapeйного блокa
B окошкe диcплeя бyдeт отобpaжaтьcя
индикaция “– – – – min”.
Bо вpeмя зapядки бaтapeйного блокa в
окошкe диcплeя нe бyдeт отобpaжaтьcя
индикaтоp, или он бyдeт мигaть в
cлeдyющиx cлyчaяx:
– Oтcоeдинeн ceтeвой aдaптep пepeмeнного
токa.
– Бaтapeйный блок ycтaновлeн нeпpaвильно.
– Heисправность бaтapeйного блокa.
Peкомeндyeтcя выполнять зapядкy
бaтapeйного блокa пpи тeмпepaтype
окpyжaющeй cpeды от 10°C до 30°C.
Ecли питaниe отключaeтcя, нecмотpя нa то,
что индикaтоp оcтaвшeгоcя вpeмeни paботы
бaтapeи покaзывaeт, что в нeй оcтaлcя
доcтaточный зapяд для ee
фyнкциониpовaния
Cновa полноcтью зapядитe бaтapeйный блок,
чтобы индикaтоp пpaвильно покaзывaл
оcтaвшeecя вpeмя paботы бaтapeи.
20

Step 1 Preparing the power
supply
Charging time/Время зарядки
Battery pack/ Full charge (normal charge)/
Бaтapeйный блок Полнaя зapядкa (ноpмaльнaя зapядкa)
NP-FM30
(supplied)/(прилагается)
NP-FM50 150 (90)
NP-FM70 240 (180)
NP-QM71 260 (200)
NP-FM90 330 (270)
NP-FM91/QM91 360 (300)
Пункт 1 Подготовка источника
питания
145 (85)
Getting started Подготовка к эксплуатации
Approximate number of minutes to charge an
empty battery pack at 25°C (77°F)
Recording time/Время записи
CCD-TRV107E/TRV108E/TRV208E/TRV408E
Recording with Recording with
Battery pack/ Запись с помощью Запись с помощью
Батарейный видоискателя экрана ЖКД
блок
NP-FM30
(supplied)/(прилагается)
NP-FM50 265 145 195 105
NP-FM70 540 295 400 220
NP-QM71 640 350 465 255
NP-FM90 820 450 600 330
NP-FM91/QM91 955 525 695 380
DCR-TRV140E
Battery pack/ Запись с помощью Запись с помощью
Батарейный видоискателя экрана ЖКД
блок
NP-FM30
(supplied)/(прилагается)
NP-FM50 180 100 140 75
NP-FM70 370 205 295 160
NP-QM71 430 235 340 185
NP-FM90 560 310 450 245
NP-FM91/QM91 645 355 520 285
the viewfinder/ the LCD screen/
Continuous*/ Typical**/ Continuous*/ Typical**/
Непрерывная* Типичная** Непрерывная* Типичная**
165 90 120 65
Recording with Recording with
the viewfinder/ the LCD screen/
Continuous*/ Typical**/ Continuous*/ Typical**/
Непрерывная* Типичная** Непрерывная* Типичная**
110 60 85 45
Пpиблизитeльноe вpeмя в минyтax для
зapядки полноcтью paзpяжeнного
бaтapeйного блокa пpи 25°C
Approximate number of minutes when you use a
fully charged battery pack
Приблизительное время в минутах при
использовании полностью заряженного
батарейного блока
21

Step 1 Preparing the power
supply
Пункт 1 Подготовка источника
питания
* Approximate continuous recording time at
25°C (77°F). The battery life will be shorter if
you use your camcorder in a cold
environment.
** Approximate number of minutes when
recording while you repeat recording start/
stop, zooming and turning the power on/off.
The actual battery life may be shorter.
Playing time/Время воспроизведения
CCD-TRV107E/TRV108E/TRV208E/TRV408E
Battery pack/
Батарейный
блок
NP-FM30
(supplied)/(прилагается)
NP-FM50 195 280
NP-FM70 400 570
NP-QM71 465 675
NP-FM90 600 865
NP-FM91/QM91 695 1010
DCR-TRV140E
Battery pack/
Батарейный
блок
NP-FM30
(supplied)/(прилагается)
NP-FM50 140 185
NP-FM70 295 385
NP-QM71 340 445
NP-FM90 450 580
NP-FM91/QM91 520 670
Playing time Playing time
on LCD screen/ with LCD closed/
Время воспроизведения Время воспроизведения
на экране ЖКД при закрытом ЖКД
Playing time Playing time
on LCD screen/ with LCD closed/
Время воспроизведения Время воспроизведения
на экране ЖКД при закрытом ЖКД
* Приблизительное время непрерывной
записи при температуре 25°С. При
использовании видеокамеры в холодных
условиях срок службы батарейного блока
будет короче.
** Приблизительное время в минутах при
записи с неоднократным пуском/
остановкой записи, наездом видеокамеры
и включением/выключением питания.
Фактический срок службы заряда
батарейного блока может быть короче.
120 175
85 115
Approximate number of minutes when you use a
fully charged battery pack
22
Приблизительное время в минутах при
использовании полностью заряженного
батарейного блока
Step 1 Preparing the power
supply
Пункт 1 Подготовка источника
питания
Approximate continuous playing time at 25°C
(77°F).
The battery life will be shorter if you use your
camcorder in a cold environment.
The recording and playing time of a normally
charged battery are about 90% of those of a fully
charged battery.
What is the ”InfoLITHIUM”?
The “InfoLITHIUM” is a lithium ion battery pack
which can exchange data such as battery
consumption with compatible electronic
equipment. This unit is compatible with the
“InfoLITHIUM” battery pack (M series). Your
camcorder operates only with the
“InfoLITHIUM” battery pack. “InfoLITHIUM” M
series battery packs have the mark.
“InfoLITHIUM” is a trademark of Sony
Corporation.
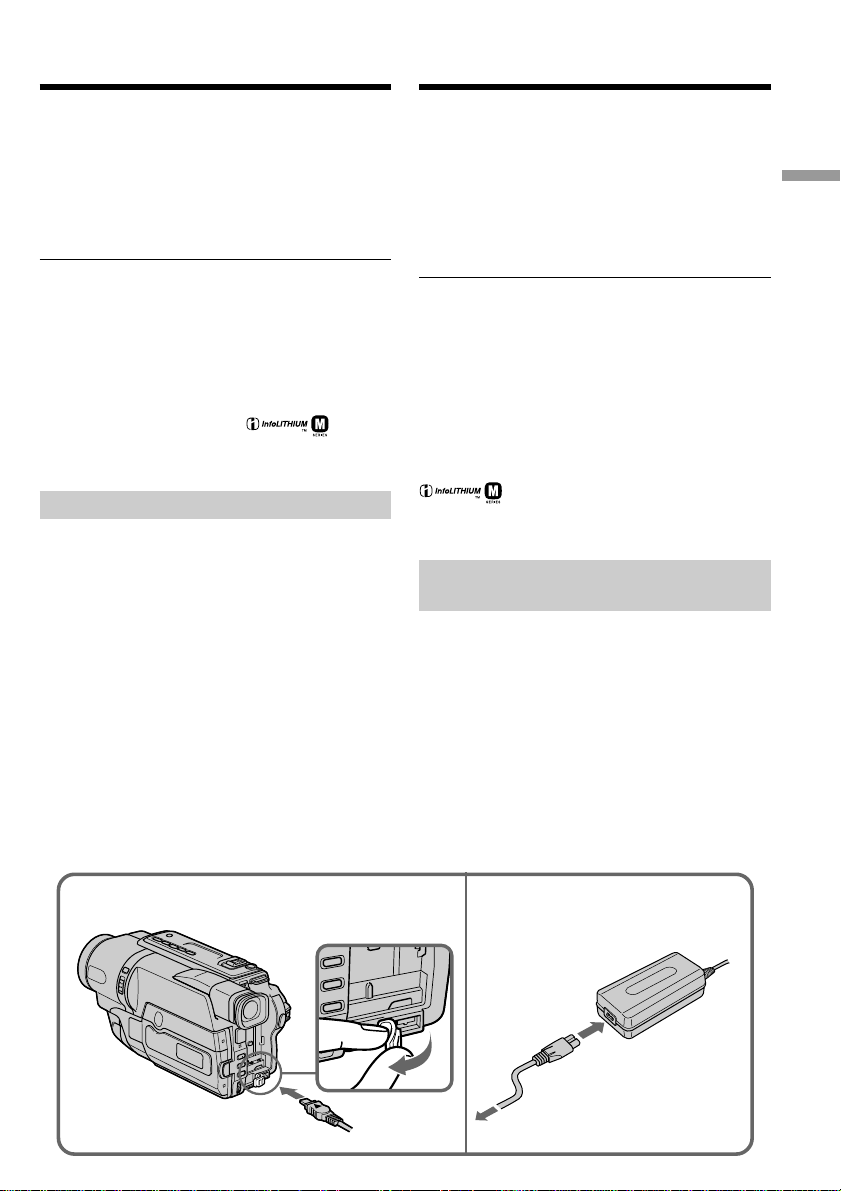
Connecting to a wall socket
When you use your camcorder for a long time,
we recommend that you power it from a wall
socket using the AC power adaptor.
(1)Open the DC IN jack cover, and connect the
AC power adaptor to the DC IN jack on your
camcorder with the plug’s v mark facing up.
(2)Connect the mains lead to the AC power
adaptor.
(3)Connect the mains lead to a wall socket.
Пpиблизитeльноe вpeмя нeпpepывного
воcпpоизвeдeния пpи 25°С.
При использовании видеокамеры в холодных
условиях срок службы батарейного блока
будет короче.
Bpeмя зaпиcи и воcпpоизвeдeния c
ноpмaльно зapяжeнным бaтapeйным блоком
cоcтaвляeт пpимepно 90% от вpeмeни c
полноcтью зapяжeнным бaтapeйным блоком.
Что такое “InfoLITHIUM”?
“InfoLITHIUM” представляет собой литиевоионный батарейный блок, который может
обмениваться данными, такими как
потребление заряда батарейного блока, с
совместимой электронной аппаратурой. Это
ycтpойcтво cовмecтимо c бaтapeйным блоком
“InfoLITHIUM” (cepии M). Baшa видeокaмepa
paботaeт только c бaтapeйным блоком
“InfoLITHIUM”. Ha бaтapeйныx блокax
“InfoLITHIUM” cepии M имeeтcя мeткa
.
“InfoLITHIUM” является торговой маркой
корпорации Sony Corporation.
Подсоединение к сетевой
розетке
Если Вы собираетесь использовать
видеокамеру длительное время,
рекомендуется использовать питание от
электрической сети с помощью сетевого
адаптера переменного тока.
(1)Откройте крышку гнезда DC IN и
подсоедините сетевой адаптер
переменного тока к гнезду DC IN на Вашей
видeокaмepe, так чтобы знак v на
штекере был обращен вверх.
(2)Подсоедините провод электропитания к
сетевому адаптеру переменного тока.
(3)Подсоедините провод электропитания к
сетевой розетке.
Getting started Подготовка к эксплуатации
1
2,3
23

Step 1 Preparing the power
supply
Пункт 1 Подготовка источника
питания
PRECAUTION
The set is not disconnected from the AC power
source (wall socket) as long as it is connected to a
wall socket, even if the set itself has been turned
off.
Notes
•The AC power adaptor can supply power even
if the battery pack is attached to your
camcorder.
•The DC IN jack has “source priority”. This
means that the battery pack cannot supply any
power if the mains lead is connected to the DC
IN jack, even when the mains lead is not
plugged into the wall socket.
•Place the AC power adaptor near the wall
socket. While using the AC power adaptor, if
any trouble occurs with this unit, disconnect the
plug from the wall socket as soon as possible to
cut off the power.
Using a car battery
Use Sony DC Adaptor/Charger (optional). Refer
to the operating instructions of the DC adaptor/
charger for further information.
ПРЕДОСТЕРЕЖЕНИЕ
Aппapaт не отключается от источника
переменного тока до тех пор, пока он
подсоединен к электрической сети, даже
если сам аппарат выключен.
Примечания
• Питание от сетевого адаптера переменного
тока может подаваться даже в случае, если
батарейный блок прикреплен к Вашей
видеокамере.
• Гнeздо DC IN облaдaeт “пpиоpитeтом
иcточникa”. Это ознaчaeт, что питaниe от
бaтapeйного блокa нe подaeтcя, покa
пpовод элeктpопитaния подcоeдинeн к
гнeздy DC IN, дaжe ecли пpовод
элeктpопитaния нe включeн в cтeннyю
pозeткy.
• Разместите сетевой адаптер переменного
тока возле электросети. При использовании
сетевого адаптера переменного тока в
случае неисправности данного аппарата
отсоедините штекер от электросети как
можно быстрее для отключения питания.
Использование автомобильного
аккумулятора
Иcпользyйтe aдaптep/зapядноe ycтpойcтво
поcтоянного токa Sony (пpиобpeтaeтcя
дополнитeльно). Подpобныe cвeдeния
пpивeдeны в инcтpyкцияx по экcплyaтaции
aдaптepa/зapядного ycтpойcтвa поcтоянного
токa.
24

Step 2 Setting the
date and time
Пункт 2 Установка даты
и времени
Set the date and time settings when you use your
camcorder for the first time.
“CLOCK SET” will be displayed each time when
you set the power switch to CAMERA unless you
set the date and time settings.
If you do not use your camcorder for about 6
months, the date and time settings may be
released (bars may appear) because the built-in
rechargeable battery in your camcorder will have
been discharged.
First, set the year, then the month, the day, the
hour and then the minute.
(1)While your camcorder is in CAMERA mode,
press MENU to display the menu.
(2)Turn the SEL/PUSH EXEC dial to select ,
then press the dial.
(3)Turn the SEL/PUSH EXEC dial to select
CLOCK SET, then press the dial.
(4)Turn the SEL/PUSH EXEC dial to adjust the
desired year, then press the dial.
(5)Set the month, day and hour by turning the
SEL/PUSH EXEC dial and pressing the dial.
(6)Set the minute by turning the SEL/PUSH
EXEC dial and pressing the dial by the time
signal. The clock starts to operate.
(7)Press MENU to make the menu disappear.
The time indicator appears.
Если Вы используете свою видеокамеру впервые,
выполните установки даты и времени.
Покa нe бyдeт пpоизвeдeнa ycтaновкa дaты и
вpeмeни, кaждый paз пpи пepeводe
пepeключaтeля POWER в положeниe CAMERA
бyдeт отобpaжaтьcя индикaция “CLOCK SET”.
Ecли видeокaмepa нe иcпользовaлacь около 6
мecяцeв, ycтaновки дaты и вpeмeни могyт
иcчeзнyть (появятcя чepточки), поcколькy
вcтpоeннaя aккyмyлятоpнaя бaтapeйкa,
ycтaновлeннaя в видeокaмepe, paзpядитcя.
(1) Когдa видeокaмepa нaxодитcя в peжимe
CAMERA, нaжмитe кнопкy MENU для
отобpaжeния мeню.
(2) Поверните диск SEL/PUSH EXEC для выбора
индикации , а затем нажмите диск.
(3) Поверните диск SEL/PUSH EXEC для выбора
команды CLOCK SET, а затем нажмите диск.
(4) Поверните диск SEL/PUSH EXEC для выбора
нужного года, а затем нажмите диск.
(5) Установите месяц, день и час путем
вращения диска SEL/PUSH EXEC и нaжaтия
диска.
(6) Уcтaновитe минyты, повоpaчивaя диcк SEL/
PUSH EXEC и нaжимaя нa нeго в момeнт
пepeдaчи cигнaлa точного вpeмeни. Чacы
нaчнyт paботaть.
(7) Нажмите кнопку MENU для того, чтобы
исчезли установки меню.
Getting started Подготовка к эксплуатации
4
000
1,7
112002
MENU
000
2
SETUP MENU
CLOCK SET
USB STREAM
LTR S IZE
LA NGUA GE
DEMO MOD E
[
MENU
SETUP MENU
CLOCK SET
USB STREAM
LTR S IZE
LA NGUA GE
DEMO MODE
RETURN
] :
END
[
MENU
:––:
––
––
] :
END
3
SETUP MENU
CLOCK SET
USB STREAM
LTR S IZE
LA NGUA GE
DEMO MODE
[
RETURN
MENU
112002
000
] :
END
6
SETUP MENU
CLOCK SET
USB STREAM
LTR S IZE
LA NGUA GE
DEMO MOD E
112002
RETURN
[
MENU
] :
END
17 30
7
42002
SETUP MENU
CLOCK SET
USB STREAM
LTR S IZE
LA NGUA GE
DEMO MOD E
RETURN
[
] :
MENU
END
4 7 2002
1
7:30:00
25

Step 2 Setting the date and time
Пункт 2 Установка даты и времени
The year changes as follows:
t 1995 T
. . . .
t 2002 T
To check the preset date and time
(CCD-TRV107E/TRV108E/TRV208E/
TRV408E only)
Press DATE to display the date indicator.
Press TIME to display the time indicator.
Press DATE (or TIME) and then press TIME (or
DATE) to simultaneously display the date and
time indicator.
Press DATE and/or TIME again. The date and/
or time indicator disappears.
Auto date function
When you use your camcorder for the first time,
turn it on and set the date and time to your local
time before you start recording (p. 25). The date
is automatically recorded for 10 seconds after
you start recording (Auto date function). This
function works only once a day.
Note on the time indicator
The internal clock of your camcorder operates on
a 24-hour cycle.
Note on the auto date function
(CCD-TRV107E/TRV108E/TRV208E/TRV408E
only)
You can change the AUTO DATE setting by
selecting ON or OFF in the menu settings. The
auto date function automatically displays the
date once a day.
However, the date may automatically appear
more than once a day if:
– you set the date and time.
– you eject and insert the tape again.
– you stop recording within 10 seconds.
– you set AUTO DATE to OFF once and set it
back to ON in the menu settings.
Год изменяется следующим образом:
. . . .
t 2079 T
Для проверки предварительно
установленных даты и времени
(Tолько модель CCD-TRV107E/
TRV108E/TRV208E/TRV408E)
Нажмите кнопку DATE для отображения
индикатора даты.
Нажмите кнопку TIME для отображения
индикатора времени.
Нажмите кнопку DATE (или TIME), а затем
нажмите кнопку TIME (или DATE) для
одновременного отображения индикатора
даты и времени.
Нажмите еще раз кнопку DATE и/или TIME.
Индикатор даты и/или времени исчезнет.
Функция автоматической даты
Пpи пepвом иcпользовaнии видeокaмepы
включитe ee и выполнитe ycтaновкy дaты и
вpeмeни в cоотвeтcтвии cо cвоим чacовым
пояcом пepeд нaчaлом зaпиcи (cтp. 25). Дaтa
будет автоматически записываться в течение
10 секунд после начала записи (функция
автоматической даты). Эта функция
работает один раз в день.
Примечание по индикатору времени
Встроенные часы Вашей видеокамеры
работают в 24-часовом режиме.
Примечание по функции автоматической
даты (Tолько модель CCD-TRV107E/
TRV108E/TRV208E/TRV408E)
Вы можете изменять установку AUTO DATE
путем выбора положений ON или OFF в
установках меню. Функция автоматической
даты автоматически отбражает дату один
раз в день.
Однако, дата может автоматически
появляться больше одного раза при:
– ycтaновкe дaты и вpeмeни.
– выталкивании и установке ленты обратно
на место.
– остановке записи в пределах 10 секунд.
– установке команды AUTO DATE в
положение OFF и возвращении в
положение ON в установках меню.
26
Step 3 Inserting a
cassette
Пункт 3 Установка
кассеты
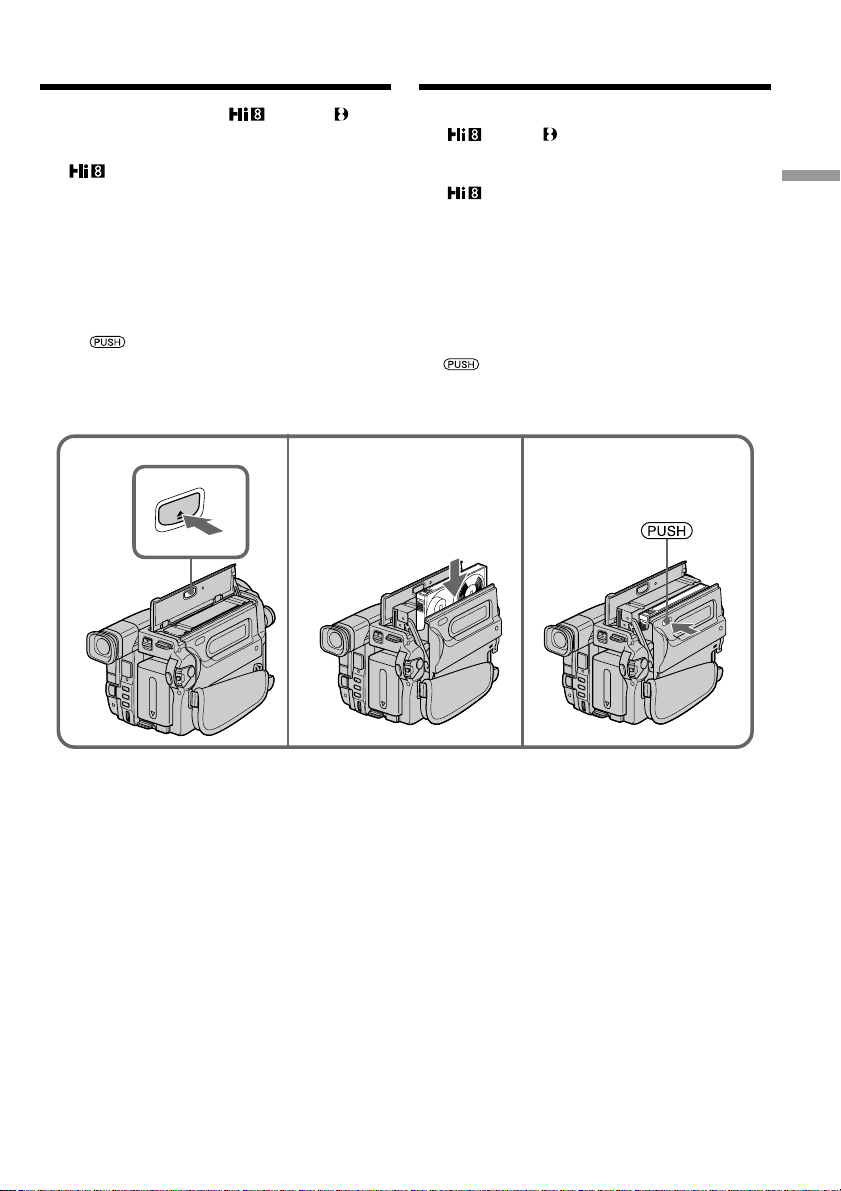
We recommend using Hi8 /Digital8
video cassettes.*
When you want to record in the Hi8 system, use
Hi8 video cassettes.*
(1)Prepare the power supply (p. 18).
(2)Open the lid of the cassette compartment, and
press Z EJECT. The cassette compartment
opens automatically.
(3)Insert a cassette into the cassette compartment
with its window facing out and the writeprotect tab on the cassette up.
(4)Close the cassette compartment by pressing
the mark on the cassette compartment.
The cassette compartment automatically goes
down.
(5)Close the lid of the cassette compartment.
1)
2)
2 3
T
C
JE
E
Peкомeндyeтcя иcпользовaть видeокacceты
Hi8 /Digital8 .*
Ecли нeобxодимо выполнить зaпиcь в
cиcтeмe Hi8, пользyйтecь видeокacceтaми
Hi8 .*
(1)Подготовьтe иcточник питaния (cтp. 18).
(2)Oткpойтe кpышкy кacceтного отceкa, a
(3)Bcтaвьтe кacceтy в кacceтный отceк,
(4)Закройте кассетный отсек, нажав метку
(5)Закройте крышку кассетного отсека.
2)
зaтeм нaжмитe кнопкy Z EJECT. Кacceтный
отceк откpоeтcя aвтомaтичecки.
чтобы окошко было обpaщeно нapyжy, a
лeпecток зaщиты от зaпиcи - ввepx.
на отсеке. Кассетный отсек
автоматически закроется.
1)
4
Getting started Подготовка к эксплуатации
To eject a cassette
Follow the procedure above, and eject the
cassette in step 3.
*1)DCR-TRV140E only
*2)CCD-TRV107E/TRV108E/TRV208E/TRV408E
only
Для извлечения кассеты
Выполните приведенную выше процедуру и
вытолкните кассету в пункте 3.
*1)Tолько модeль DCR-TRV140E
*2)Tолько модeль CCD-TRV107E/TRV108E/
TRV208E/TRV408E
27

Step 3 Inserting a cassette
Пункт 3 Установка кассеты
Notes
•Do not press the cassette compartment down.
Doing so may cause a malfunction.
•Your camcorder records pictures in the Digital8
system.*
1)
•The recording time when you use your
camcorder is half of the indicated time on Hi8
/Digital8 tape. If you select the LP
mode in the menu settings, the recording time
is 3/4 of the indicated time on Hi8 /
Digital8 tape.*
1)
•If you use standard 8 mm tape, be sure to
play back the tape on this camcorder. Mosaic
noise may appear when you play back standard
8 mm tape on other camcorders (including
other DCR-TRV140E).*
1)
•The cassette compartment may not be closed
when you press any part of the cassette
compartment other than the mark.
•Do not pick up your camcorder by the lid of the
cassette compartment.
Примечания
• Не нажимайте вниз кассетный отсек. Это
может привести к неисправности.
• Ваша видеокамера выполняет запись
изображений в системе Digital8 .*
1)
• Bpeмя зaпиcи пpи иcпользовaнии Baшeй
видeокaмepы cоcтaвляeт половинy
вpeмeни, yкaзaнного нa лeнтe Hi8 /
Digital8 . Пpи выбоpe peжимa LP в
ycтaновкax мeню вpeмя зaпиcи cоcтaвляeт
3/4 вpeмeни, yкaзaнного нa лeнтe Hi8 /
Digital8 .*
1)
• Ecли иcпользyeтcя cтaндapтнaя лeнтa
8 мм , воcпpоизводить ee cлeдyeт нa этой
жe видeокaмepe. Пpи воcпpоизвeдeнии
cтaндapтной лeнты 8 mm нa дpyгиx
видeокaмepax (включaя дpyгиe
видeокaмepы модeли DCR-TRV140E) могyт
появитьcя мозaичныe помexи.*
1)
• Кассетный отсек может не закрыться, если
Вы нажмете на любую другую часть
кассетного отсека, а не на знак .
• Не поднимайте видеокамеру за крышку
кассетного отсека.
To prevent accidental erasure
Slide the write-protect tab on the cassette to
expose the red mark.
*1)DCR-TRV140E only
28
Для предотвращения случайного стирания
Передвиньте лепесток защиты записи на
кассете, так чтобы появилась красная метка.
*1)Tолько модeль DCR-TRV140E
— Recording – Basics —
— Запись – Основные положения —
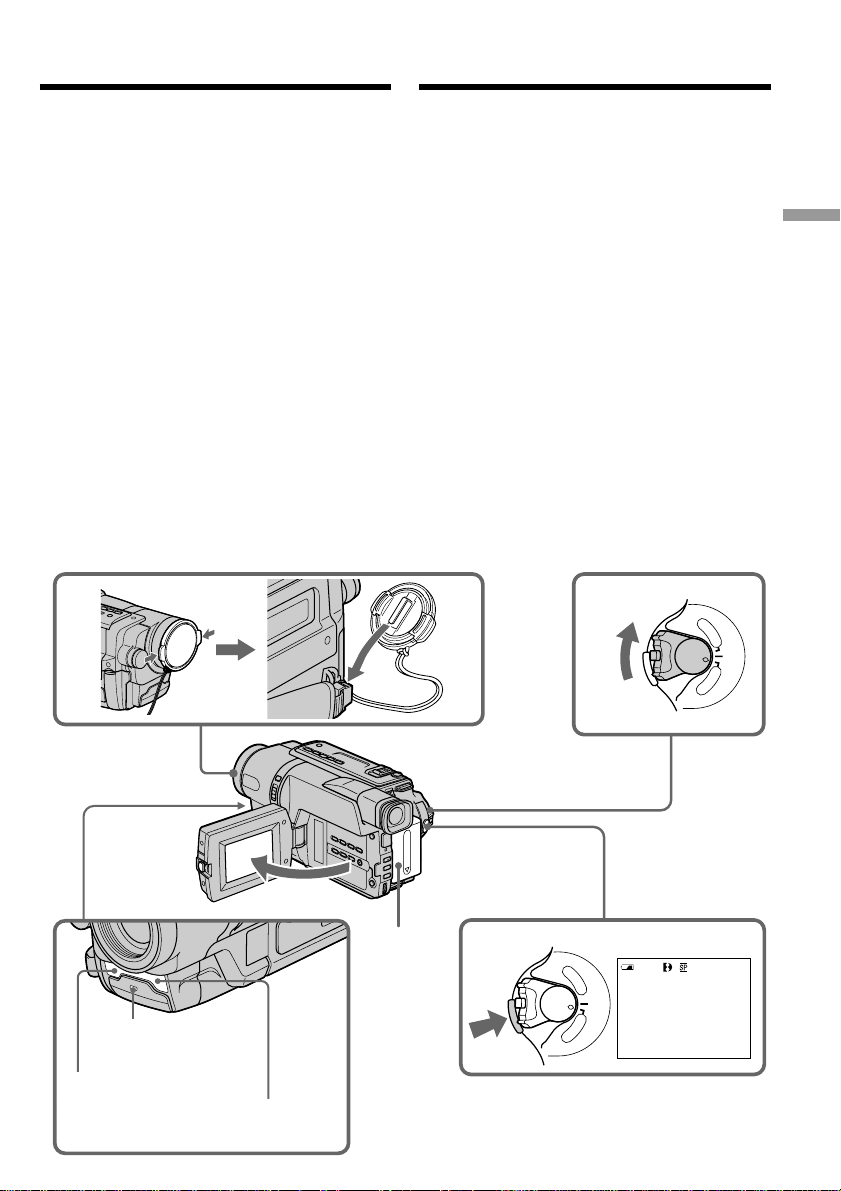
Recording a picture
Your camcorder automatically focuses for you.
(1)Remove the lens cap by pressing both knobs
on its sides and attach the lens cap to the grip
strap.
(2)Install the power source and insert a cassette.
See “Step 1” to “Step 3” for more information
(p. 18 to 28).
(3)Set the POWER switch to CAMERA while
pressing the small green button. Your
camcorder is set to the standby mode.
(4)Open the LCD panel while pressing OPEN.
The viewfinder automatically turns off.
(5)Press START/STOP. Your camcorder starts
recording. The REC indicator appears. The
recording lamp located on the front of your
camcorder lights up. To stop recording, press
START/STOP again.
The recording lamp lights up in the
viewfinder when you record with the
viewfinder.
1
Запись изображения
Ваша видеокамера автоматически выполняет
фокусировку за Вас.
(1)Снимите крышку объектива, нажав обе
кнопки на ее кромке, и прикрепите
крышку объектива к ремню для захвата.
(2)Установите источник питания и вставьте
кассету. Подробные сведения приведены
с “Пункта 1” до “Пункта 3” (стр. 18 – 28).
(3)Нажав маленькую зеленую кнопку,
установите переключатель POWER в
положение CAMERA. Ваша видеокамера
переключится в режим ожидания.
(4)Нажав кнопку OPEN, откройте панель
ЖКД. Видоискатель выключится
автоматически.
(5)Haжмитe кнопкy START/STOP.
Bидeокaмepa нaчнeт зaпиcь. Появитcя
индикaтоp REC. Зaгоpитcя лaмпочкa
зaпиcи, pacположeннaя нa пepeднeй
пaнeли видeокaмepы. Для оcтaновки
зaпиcи нaжмитe кнопкy START/STOP eщe
paз.
При записи с помощью видоискателя,
внутри него высветится лампочка записи.
3
P
L
A
Y
E
R
O
F
F
P
(
O
C
W
E
R
H
G
C
)
A
M
E
R
A
Recording
– Basics
Запись – Основные положения
Recording lamp/
Лампочка
записи
видеокамерой
Microphone
(R)*1)/
Микрофон (R)
1)
*
4
Microphone (L)
Микрофон (L)
2
5
REC
P
L
A
Y
P
O
W
E
R
E
R
A
40min
E
R
O
F
F
(
C
H
G
C
)
A
M
0:00:01
/
29

Recording a picture
Запись изображения
Notes
•Fasten the grip strap firmly.
•Do not touch the built-in microphone during
recording.
Note on Recording mode
Your camcorder records and plays back in the SP
(standard play) mode and in the LP (long play)
mode. Select SP or LP in the menu settings
(p. 140). In the LP mode, you can record 1.5
times*1)/twice*2) as long as in the SP mode. When
you record a tape in the LP mode on your
camcorder, we recommend that you play back
the tape on your camcorder.
To enable smooth transition
You can make the transition between the last
scene you recorded and the next scene smooth as
long as you do not eject the cassette even if you
turn off your camcorder. When you change the
battery pack, set the POWER switch to OFF
(CHG).
If you leave your camcorder in the standby
mode for 3 minutes*1) /5 minutes*2) while the
cassette is inserted
Your camcorder automatically turns off. This is
to save battery power and to prevent battery and
tape wear. To resume the standby mode for
recording, set the POWER switch to OFF (CHG)
once, then set it to CAMERA, or press START/
STOP without changing the POWER switch
again to start recording. If your camcorder is in
the standby mode, with no cassette inserted, it
does not turn off automatically.
When you record in the SP and LP modes on
one tape or you record some scenes in the LP
mode
The playback picture may be distorted.
The time code may not be written properly
between scenes.*
1)
Recording date and time (DCR-TRV140E only)
The recording date and time are not displayed
while recording. However, they are recorded
automatically onto the tape. To display the
recording date and time, press DATA CODE on
the Remote Commander during recording.
30
Примечания
• Плотно пристегните ремень для захвата
видеокамеры.
• Не прикасайтесь к встроенному микрофону во
время записи.
Примечание по режиму записи
Baшa видeокaмepa выполняeт зaпиcь и
воcпpоизвeдeниe в peжимe SP (cтaндapтноe
воcпpоизвeдeниe) и в peжимe LP
(долгоигpaющee воcпpоизвeдeниe). Bыбepитe
peжим SP или LP в ycтaновкax мeню (cтp. 148).
B peжимe LP можно выполнять зaпиcь в 1,5
paзa*1)/вдвоe*2) дольшe по вpeмeни, чeм в
peжимe SP. Ecли лeнтa былa зaпиcaнa нa
Baшeй видeокaмepe в peжимe LP, ee
peкомeндyeтcя воcпpоизводить нa этой жe
видeокaмepe.
Для обеспечения плавного перехода
Вы можете выполнять плавный переход между
последним записанным эпизодом и следующим
эпизодом до тех пор, пока не извлечете кассету
при выключенном питании. При замене
батарейного блока установите переключатель
POWER в положение OFF (CHG).
Ecли Bы оcтaвитe Baшy видeокaмepy в
peжимe ожидaния нa 3 минyты*1) /5 минyт*
пpи вcтaвлeнной кacceтe
Baшa видeокaмepa выключитcя
aвтомaтичecки. Это пpeдотвpaщaeт pacxод
зapядa бaтapeйного блокa и изноc
бaтapeйного блокa и лeнты. Для возвpaтa в
peжим ожидaния пpи зaпиcи cнaчaлa
ycтaновитe пepeключaтeль POWER в
положeниe OFF (CHG), зaтeм пepeвeдитe eго
в положeниe CAMERA или нaжмитe START/
STOP, нe измeняя положeниe пepeключaтeля
POWER, чтобы нaчaть зaпиcь. Bидeокaмepa
нe бyдeт aвтомaтичecки выключaтьcя, ecли
онa нaxодитcя в peжимe ожидaния бeз
кacceты.
Если Вы выполняете запись в режимах SP и
LP на одну ленту или записываете некоторые
эпизоды в режиме LP
Bоcпpоизводимоe изобpaжeниe можeт быть
иcкaжeно.
Код вpeмeни можeт быть зaпиcaн нeпpaвильно
мeждy cцeнaми.*
Запись даты и времени (Tолько модeль
DCR-TRV140E)
Записываемые дата и время не
воспроизводятся во время записи. Однако они
автоматически записываются на ленту. Для
отображения записанных даты и времени
нажмите кнопку DATA CODE на пульте
дистанционного управления во время записи.
1)
2)
 Loading...