


 Loading...
s s
issued by
BenQ Mobile GmbH & Co.OHG Haidenauplatz 1
D-81667 Munich
BenQ Mobile GmbH & Co.OHG
All rights reserved. Subject to availability. Rights of modification reserved.
Manufactured by BenQ Mobile GmbH & Co.OHG under trademark license of Siemens AG
www.siemens.com/s75
Designed for life S75
Table of Contents |
1 |
Safety precautions ..................... |
2 |
Phone overview ......................... |
4 |
Display symbols ......................... |
6 |
Getting started ........................... |
7 |
Switching on/off, PIN entry ...... |
10 |
General instructions ................ |
11 |
Security .................................... |
14 |
Text input ................................. |
16 |
Calling ...................................... |
18 |
Contacts ................................... |
20 |
Call records .............................. |
23 |
Camera ..................................... |
24 |
SMS/MMS ................................. |
26 |
E-mail ....................................... |
31 |
WAP push ................................. |
32 |
Voice mailbox/CB services ....... |
33 |
Internet .................................... |
34 |
Setup ........................................ |
36 |
Organiser .................................. |
46 |
Extras ........................................ |
48 |
Alarm clock ............................... |
51 |
Media player ............................. |
52 |
My stuff .................................... |
53 |
Mobile Phone Manager ............ |
56 |
Customer Care .......................... |
57 |
Care and maintenance ............. |
59 |
Product data ............................. |
60 |
Limited Manufacturer’s |
|
Guarantee ................................. |
62 |
Sýnýrlý Üretici Garantisi ........... |
63 |
SAR ........................................... |
64 |
Licence Agreement .................. |
65 |
Index ......................................... |
69 |
This is a summarised version of the User Guide. The complete version can be found on the Internet at this address: www.siemens.com/s75

2 |
Safety precautions |
Safety precautions
Information for parents
Please read the operating instructions and safety precautions carefully before use. Explain the content and the hazards associated with using the phone to your children.
Remember to comply with legal requirements and local restrictions when using the phone. For example in aeroplanes, petrol stations, hospitals or while driving.
Mobile phones can interfere with the functioning of medical devices such as hearing aids or pacemakers. Keep at least
20 cm/9 inches between phone and pacemaker. When using the mobile phone hold it to the ear which is further away from the pacemaker. For more information consult your doctor.
The ringtones (page 36), info tones (page 42) and handsfree talking are reproduced through the loudspeaker. Do not hold the phone to your ear when it rings or when you have switched on the handsfree function (page 18). Otherwise you risk serious permanent damage to your hearing.
Only use original Siemens batteries (100 % mercury-free) and charging devices. Otherwise you risk serious damage to health and property. The battery could explode, for instance.
Do not look at the LED (e.g. activated infrared port, flash LED) with optical magnifiers because of radiation.
This product complies with IEC/EN 60825-1 “Safety of Laser Products” for LED Class 1M products; such products are safe under reasonably foreseeable operating conditions.
Do not place the phone near to electromagnetic data carriers such as credit cards and floppy disks. Information stored on them could be lost.
Small parts such as the SIM card, sealing stop, lens ring and lens cap can be dismantled and swallowed by small children. The phone must therefore be stored out of the reach of small children.
The mains voltage specified on the power supply unit (V) must not be exceeded. Otherwise the charging device may be destroyed.
The power supply must be plugged into an easily accessible AC mains power socket when charging the battery. The only way to turn off the charging device after charging the battery is to unplug it.

Safety precautions |
3 |
You may only open the phone to replace the battery (100 % mercury-free) or SIM card. You must not open the battery under any circumstances. All other changes to this device are strictly prohibited and will invalidate the guarantee.
Please dispose of unwanted batteries and phones as permitted by the laws in your country.
The phone may cause interference in the vicinity of TV sets, radios and PCs.
Use only Siemens original accessories. This will avoid potential risks to health or property and ensure compliance with all relevant regulations.
Improper use will invalidate the guarantee! These safety instructions also apply to Siemens original accessories.
As mobile devices offer a range of functions, they can be used in positions other than the head, such as on the body. In this case, separation distance of 1.5 cm is required.
Bluetooth®
Your phone has a Bluetooth interface. This makes it possible to establish a wireless connection of your phone with a headset of a car kit, or with other Bluetooth-enabled devices.
In order to establish a secure link between the devices and to prevent a third party from
having access to your phone, you should observe the following points:
•The initial connection between two devices, what is called "pairing", should take place in familiar surroundings.
•Both devices must be able to identify themselves once by using a password/PIN. To ensure sufficient security, you should choose a 16-digit number combination for a password that would be difficult to guess (if a PIN has not been assigned).
•An automatic connection acceptance ("connection without confirmation") should only be used in exceptional cases.
•In general, only trustworthy devices should be linked in order to minimize security risks.
•You should restrict the "visibility" of your phone if possible. This will make it much more difficult for unknown devices to establish a connection with your phone. To do this, in the Bluetooth menu, set the option Visib.to others of Always visible to Not visible (page 39).
•The name of your phone is transmitted in a Bluetooth connection. The factory default is the "Bluetooth ID". The first time Bluetooth is activated, or later in the Bluetooth menu, you can change this name (My BT name, page 39).
•If Bluetooth is not needed, this function should be deactivated.
Before using Bluetooth accessories, or a mobile phone inside a vehicle, check the vehicle user guide for any limitations on the use of these products.

4 Phone overview
Phone overview
1 Softkeys |
7 Navigation keys |
|
|
|||||
The current functions of these keys are |
In standby mode: |
|
|
|||||
shown as §text§/symbol (e.g. p). |
G Open user profiles. |
|||||||
2 ACall key |
H Open contacts. |
|
|
|||||
Dial displayed/highlighted phone |
E Open inbox. |
|
|
|||||
numbers/names, take calls. In standby |
|
|
||||||
mode, show last phone numbers |
D Start the camera. |
|||||||
dialled. |
In lists, messages and menus: |
|||||||
3 BOn/Off/End key |
||||||||
I Scroll upwards/downwards. |
||||||||
• |
Switched off: press to switch on. |
During the conversation: |
||||||
• |
During a conversation or in an appli- |
|||||||
|
cation: press briefly to end. |
H Open contacts. |
|
|
||||
• In menus: return to standby mode. |
|
|
|
|
|
|
||
• In standby mode: |
|
|
|
|
|
|
||
|
press and hold to switch off the |
|
|
|
|
|
|
|
|
phone; |
|
|
|
|
|
|
|
|
press briefly: switch-off menu. |
á £ |
|
ß |
|
|||
4 Media player key |
|
|
||||||
01.10.2005 |
|
|
10:10 |
|
||||
Direct key for media player. |
|
Service provider |
||||||
5 Wildcard key |
|
|||||||
|
|
|
|
|
|
|||
Key for Internet access unless other- |
|
|
|
|
|
|
||
wise preconfigured. |
|
|
|
|
|
|
||
6 Centre key |
|
|
í |
|
|
|||
|
Inbox |
New SMS |
||||||
|
Press the centre key to open the |
|
|
|
|
|
|
|
|
ímain menu and to start an appli- |
|
|
|
|
|
|
|
cation or function (page 12).

Phone overview |
5 |
1Integrated antenna
2Loudspeaker
3XCamera key
4YMedia player activated: Play/pause.
Media player deactivated: Play.
5[/\Volume control
6Display
7Infrared interface (IrDA)
8*Ringtone
•Press and hold in standby mode: switch all acoustic signals on/off (except alarm clock).
•Press and hold on incoming call: switch off ringtone for this call only.
9#Key lock
Press and hold in standby mode: activate/deactivate key lock.
: Plug socket
! Slot for RS MultiMediaCard
1Car Kit holder
2Flash/torch
XPress and hold Xkey: switch torch on/off.
3Connection for external antenna
4Camera lens
5Mirror
á £ ß
01.10.2005 10:10
Service provider
Inbox íNew SMS

6 |
Display symbols |
Display symbols
Display symbols (selection)
á Signal strength
ÞBattery charge level, e.g. 50 %
L Contacts
P Call records
O Internet/Service provider portal
W Games
Q Organiser
M Messages
R Camera
S Extras
V Media player
N My stuff
U Alarm clock
T Setup
ÇAll calls are diverted.
½Ringer (beep) off
¹Alarm set
ÄKeypad locked
£Activated and available
² Browser is being connected
®IrDA transmission
Events (selection)
åSMS memory full
æMMS memory full
çPhone memory full
ÆNo network access
¿Inbox
Message symbols (selection)
mUnread
nRead
p Sent
r MMS notification received
tMMS with DRM contents (page 11)
uE-mail forwarded
vE-mail with attachment
l Voice mail received
Getting started |
7 |
Getting started
Your phone's display is covered with a protective film. Remove this before using the phone.
In rare cases static discharge can cause temporary
discoloration in the display. However, this will disappear within approx.
10 minutes.
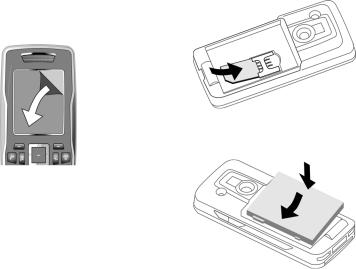
Inserting SIM card/ battery
The service provider supplies you with a SIM card on which all the important data for your line is stored. If the SIM card has been delivered in credit-card size, snap the smaller segment out and remove any rough edges.
•Place the SIM card in front of the slot with the contacts facing downwards. Then push the
SIM card fully into the holder using gentle pressure 1. Ensure that the chamfered corner is in the correct position.
1
•Insert the battery sideways into the phone 2, then press it downwards 3until it engages.
3
2
•To remove, press the retaining tab on the side of the battery, then lift the battery out.

8 |
Getting started |
•Insert the battery cover with the
retaining lugs underneath the camera lens 4, then press down at the back 5until it clicks into place.
4 5
•To remove, lift the battery cover up and off 6.
6
Additional information
Please switch off your phone before removing the battery!
1.8 and 3 volt SIM cards are supported. Please contact your service provider if you have a different card.
RS MultiMediaCard™
•To insert, lay the card in the carrying tray 1(ensure that the chamfered corner is in the correct position). Push the carrying tray
with the card into the phone until it clicks into place 2.
1
2
•Press the small button 3 to remove (e.g. with a pin). The card tray will pop out a little and you can remove it.
3
•Before removing the card, call up the Eject card function in the
My stuff options menu.
This saves data you have not yet saved and avoids losing data.
Getting started |
9 |
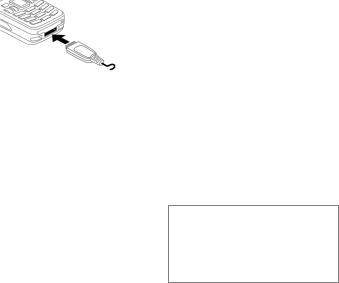
Charging the battery
Charging
The battery is not fully charged when delivered. Plug the charger cable into the bottom of the phone, plug the power supply unit into a mains power socket and charge for at least two hours (for charging via USB, see page 45). Do not interrupt the charging procedure prematurely.
àDisplay when charging is in progress.
Charging time
An empty battery is fully charged after about 2 hours. Charging is only possible within a temperature range of +5 °C to +45 °C. If the temperature rises/falls 5 °C above/below this, the charge symbol flashes a warning. The mains voltage specified on the power supply unit must not be exceeded.
Operating time
The operating time depends upon the respective conditions of use. Extreme temperatures considerably re-
duce the phone’s standby time. You should therefore avoid leaving the phone in the sun or on a radiator.
Talktime: up to 300 minutes Stand-by time: up to 300 hours
Charge icon not visible
If the battery has been discharged fully, the charge icon is not immediately visible when the power supply is plugged in. It will appear after up to two hours. In this case the battery is fully charged after 3 to 4 hours.
Only use the plug-in power supply unit included in delivery!
Display during operation
Charge level display during opera-
tion (empty–full):
Ý Þ ß
A beep sounds when the battery is nearly empty. The charge level of the battery is only displayed correctly after an uninterrupted charging/discharging cycle. You should therefore not remove the battery unnecessarily and where possible not terminate the charging process before completion.
Additional information
The power supply unit heats up when used for long periods. This is normal and not dangerous.
If the battery is removed for longer than 30 seconds, the clock must be reset.
10 |
Switching on/off, PIN entry |
Switching on/off, PIN entry
Switching on/off
B |
Press and hold the |
On/Off/End key. |
Entering PIN
The SIM card can be protected with a 4 to 8-digit PIN.
J |
Enter the PIN using the |
number keys. The charac- |
|
|
ters **** appear in the |
|
display to ensure nobody |
|
can read your PIN. Correct |
§OK§ |
with ]. |
Press the left softkey to |
|
|
confirm. Logging on to |
|
the network will take a |
|
few seconds. |
Additional information
Changing the PIN .........................page 14 Clearing SIM card barring ............page 15
Emergency number (SOS)
Only to be used in real emergencies!
By pressing the left softkey §SOS§ you can make an emergency call on any network without a SIM card and without entering a PIN (not available in all countries).
Switching your phone on for the first time
Time/date
Set the clock correctly once when getting started.
ìConfirm.
ñStart entry.
J |
First enter the date |
(day/month/year), then |
|
|
the time (24 hours, in- |
|
cluding seconds). |
ìConfirm. The time and date are updated.
Time zones
I |
Select the city in the |
desired time zone. |
ìConfirm.
General instructions |
11 |
General instructions
Standby mode
The phone is in standby mode and is ready for use when the name of the service provider appears on the display.
B |
Press the On/Off/End key |
to return to standby mode |
|
|
from any situation. |
Receiving signal
á Strong receiving signal.
âA weak signal reduces the call quality and may lead to loss of the connection. Change your location.
Digital Rights Mgmt. (DRM)
Remember that your phone has Digital Rights Management. The use of downloaded pictures, sounds or applications can be restricted by the suppliers, e.g., copy protection, use for a limited period of time only, number of times it can be used etc.
User guide
The following symbols are used to explain operation:
J |
Enter numbers, letters. |
B |
On/Off/End key |
A |
Call key |
<> |
Softkeys |
§Menu§ |
Displays a softkey |
|
function. |
íPress the centre key, e.g., to call up the menu.
D F E Press the navigation key H I G on the side marked with a triangle.
= |
Function dependent on the |
service provider. |
Main menu
The applications are shown with symbols in the main menu:
íCall up from standby mode using the centre key.
F/I Select application with the navigation key.
ìStart application.

12 |
General instructions |
Main menu options
§Options§ Open menu.
Search |
List output of the menu. |
Big letters |
Select one of two font |
|
sizes. |
Illumination |
Set display light brighter/ |
|
darker. |
Eject card |
Data backup before remov- |
|
ing the RS MultiMediaCard. |
Tabs
1 2 3 |
1 2 3 |
F |
Switch between the indi- |
vidual tabs. |
If an input field is activated on a tab, it is only possible to navigate within the field using the navigation key.
Menu controls
The steps needed to reach a function are shown in a condensed form in the user guide, e.g. to display record of missed calls in condensed form:
í¢P¢Calls dialled
This comprises the following steps:
íPressing the centre key opens the main menu in standby mode.
G |
Select the record applica- |
tion P. |
ìConfirm with the centre key.
H |
Select the function |
Calls dialled. |
ìConfirm with the centre key.
Centre key
The symbol in the centre of the lower line of the display shows the current function when the centre key is pressed.
í |
Main menu |
ý |
Send |
ì |
OK, confirm |
ö |
View |
ñ |
Change |
û |
Save |
ð |
Call |
ò |
Play |
ü |
Edit |
ô |
Record |
÷ |
Insert |
ó |
Pause |
ú |
Options |
õ |
Stop |
ù |
Camera |
ø |
Zoom |

General instructions |
13 |
Standard functions
Functions which appear repeatedly in the options menu are listed here.
§Options§ Open menu.
Edit |
Open the entry to edit. |
View |
Display entry. |
Delete |
Delete entry. |
New entry |
Create new entry. |
Sendö |
Select transmission service |
|
and medium for sending. |
Printö |
Printout on a suitable termi- |
|
nal via IrDA, Bluetooth or |
|
USB. |
Reply/ |
The sender becomes the |
Reply to all |
recipient, "Re:" is placed |
|
before the subject, and the |
|
received text is transferred |
|
into the new message. |
Save |
Store entry. |
Save to ª |
Save recipient in Contacts. |
Sort |
Set sort criteria |
|
(alphabetical, type, time). |
Rename |
Rename selected entry. |
Capacity |
Display memory capacity. |
Import |
Device ready to receive da- |
|
ta (vcard, vcal, vnotes) via |
|
IrDa or Bluetooth. |
Attributes |
Display properties of the |
|
highlighted object. |
Help |
Display help text. |
|
|
Printing via USB
This Mobile Printing Ready product is designed to provide easy printing from mobile phones by connecting the mobile phone with a USB data cable to the printer.
This product follows the guidelines Version 1.0 for PictBridge from Mobile Imaging and Printing Consortium (MIPC).
Highlighting mode
For some applications (e.g. deleting several SMS messages) you can highlight several entries on the tab in order to perform multiple functions at once.
§Options§ Open menu.
Mark text Activate highlighting mode.
I Select entry/entries.
ñHighlight or remove highlighting.
Additional highlighting functions:
§Options§ Open menu.
Mark all |
Highlight all entries. |
Unmark all |
Delete highlighting on all |
|
marked entries. |
Delete |
All highlighted entries are |
marked |
deleted. |

14 Security
Security
The phone and SIM card are protected against misuse by several security codes.
Keep these security codes in a safe place where you can access them again if required.
PIN codes
í¢T¢Security ¢PIN codes
¢Select function.
PIN control
The PIN is usually requested each time the phone is switched on. You can deactivate this feature but you risk unauthorised use of the phone. Some service providers do not permit deactivating the control.
PIN |
Protects your SIM card |
|
(personal identification |
|
number). |
PIN2 |
This is needed to set the |
|
charge detail display and to |
|
access additional functions on |
|
special SIM cards. |
PUK |
Key code. Used to unlock SIM |
PUK2 |
cards after the wrong PIN has |
|
been entered repeatedly. |
Phone |
Protects your phone. Must be |
code |
entered at the first security |
|
setting. |
ñEdit.
J |
Enter PIN. |
|
ìConfirm entry.
Change PIN
You can change the PIN to any
4 to 8-digit number you find easier to remember.
ñEdit.
J Enter current PIN.
ìConfirm.
J,ì Enter new PIN.
J,ì Repeat new PIN.

Security 15
Change PIN2
Proceed as for Change PIN.
Chg. phonecode
(Change phone code)
You define the phone code (4-8 digit number) the first time you call up a phone-code protected function (e.g. Direct call, page 43). It is then valid for all phone-code protected functions.
Following the third incorrect attempt, access to the phone code and the functions that use it is denied. If this happens please contact Siemens Service (page 57).
Clearing SIM card barrings
If the PIN is entered incorrectly three times, the SIM card is barred. Enter the PUK (MASTER PIN) provided by your service provider with the SIM card in accordance with the instructions. If the PUK (MASTER PIN) has been lost, please contact your service provider.
Preventing accidental activation
Even if PIN use is deactivated (page 10) confirmation is required to switch on the phone.
This prevents the phone from being switched on accidentally, e.g. when carried in a pocket or whilst you are on an aircraft.
B |
Press and hold. |
§OK§ |
Press. The phone |
|
switches on. |
§Cancel§ |
Press (or no further input) |
|
to stop switch-on proce- |
|
dure. The phone does not |
|
switch on. |
Connection with PCs
You can connect your phone to a PC using IrDA, Bluetooth or a data cable (accessories). The PC program MPM (Mobile Phone Manager) enables you to store data on your PC and, for example, synchronise the Addressbook with Outlook®, Lotus Notes™ and other Siemens phones (including Gigaset). You will find Mobile Phone Manager on the CD-ROM supplied or you can download it from the Internet at: www.siemens.com/s75
16 |
Text input |
Text input
Text input without T9
Press the number key repeatedly until the required character appears. After a brief interval the cursor will
advance. Example:
2
] |
Press briefly to delete the |
|
letter before the cursor, |
|
press and hold to erase the |
|
whole word. |
F |
Move the cursor |
(forward/back). |
#Press briefly: swap between abc, Abc, T9abc, T9Abc, 123.
Press and hold: all input variants are displayed.
* Press and hold: open text input menu.
0 Press once/repeatedly:
. , ? ! ’ " 0 + - ( ) @ / : _
Press and hold: write 0.
1 Inserts a space. Press twice = line break.
Special characters
*Press briefly:
1) |
¿ |
¡ |
_ |
; |
. |
, |
? |
! |
+ |
- |
" |
’ |
: |
* |
/ |
( |
) |
¤ |
¥ |
$ |
£ |
€ |
@ |
\ |
& |
# |
[ |
] |
{ |
} |
% |
~ |
< |
= |
> |
| |
^ |
` |
§ |
Γ |
∆ |
Θ |
Λ |
Ξ |
Π |
Σ |
Φ |
Ψ |
Ω |
|
|
|
|
1) Line break |
|
|
|
|
|
|
||
I/F Scroll to a character.
ìConfirm.
Text input menu
*Press and hold:
Input language, Mark text, Copy/Insert
Text input withT9
"T9" uses various key entries to deduce the correct word.
#Activate/deactivate T9.

Text input |
17 |
Writing with T9
It is best if you finish a word without looking at the display.
Simply press the keys where the relevant letter is located once.
1/E A blank space or moving to the right ends a word.
Do not use special characters such as Ä. Use standard characters only, e.g. A. T9 will do the rest.
T9 word suggestions
If several options are found in the dictionary for a word, the most probable is displayed first.
^Press. If this word is incorrect, press again.
^Keep pressing until the correct word is displayed.
To enter a word in the dictionary:
§Spell§ Select and enter the word without T9, then §Save§.
Correcting a word
F |
Move left or right, word |
by word, until the |
|
|
required word is |
|
§highlighted§. |
^Scroll through the T9 word suggestions again.
] Deletes the character to the left of the cursor and displays a new possible word.
Additional information
#Press briefly: swap between: abc, Abc, T9abc, T9Abc,
123. Status shown in top line of the display.
Press and hold: all input variants are displayed.
*Press briefly: select special characters (page 16).
Press and hold: opens text input menu (page 16).
T9® Text Input is licensed under one or more of the following: U.S. Pat. Nos. 5,187,480, 5,818,437, 5,945,928, 5,953,541, 6,011,554, 6,286,064, 6,307,548, 6,307,549, and 6,636,162, 6,646,573; Australian Pat. Nos. 727539, 746674, and 747901; Canadian Pat. Nos. 1,331,057, 2,302,595, and 2,227,904; Japan Pat. No. 3532780, 3492981; United Kingdom Pat. No. 2238414B; Hong Kong Standard Pat. No. HK1010924; Republic of Singapore Pat. No. 51383, 66959 and 71979; European Pat. Nos.
0 842 463 (96927260.8), 1 010 057 (98903671.0), 1 018 069 (98950708.2); Republic of Korea Pat. Nos. KR201211B1 and KR226206B1. People’s Republic of China Pat. Application Nos. 98802801.8, 98809472.X and 96196739.0; Mexico Pat. No. 208141; Russian Federation Pat. No. 2206118; and additional patents are pending worldwide.
Text modules
í¢M¢Templates ¢Text modules
Text modules can be stored in the phone for adding to your messages (SMS, MMS, e-mail).

18 Calling
Calling
J |
Enter number (always |
with area/international |
|
|
dialling code). |
|
] A short press clears |
|
the last digit, a long press |
|
clears the phone number. |
A |
Press the Call key. The dis- |
played phone number is |
|
|
dialled. |
Ending a call |
|
B |
Press briefly. |
Setting the volume |
|
[/\ |
Adjust the volume with |
|
the plus/minus keys. |
Last number redial |
|
A |
Press twice. The phone |
number last called is |
|
|
redialled. |
Call from the redial list: |
|
A |
Press once; choose phone |
number. |
|
A |
Dial phone number. |
Auto last number redial
§Options§ Open, then Auto dial. The phone number is dialled ten times at increasing time intervals.
Reminder
§Options§ Open, then Reminder.
A beep reminds you to redial the displayed phone number after 15 minutes.
Accepting a call
A Press.
Rejecting a call
B |
Press briefly. |
Additional information
Accept the call before bringing the telephone to your ear in order to avoid ear damage caused by the ringtones.
Handsfree
§Options§ Open, then activate/deactivate Handsfr. Always switch off "handsfree talking" before holding the phone to your ear. Otherwise, you will damage your hearing!
International dialling codes
0 Pressdisplayed.and hold until a "+" is §Options§ Open, then select Country.

Calling 19
Call options
Functions which are only available during the call are offered in the call menu.
Swapping between |
|
2 calls |
b |
Establishing a second connection
§Options§ Open, then Hold.
H/J Select phone number from Contacts or enter it manually. When the connection is established:
§Options§ Open call menu.
Swap Swap between the calls.
Incoming calls during a call
You will hear the "call waiting" tone (page 41) and have the following options:
•Accept the waiting call in addition to the first
§Swap§ Accept the call and put the current call on hold.
• Reject the waiting call
§Reject§ Reject or use §Divert§ to divert to the mailbox.
•Accept the waiting call and end the current call
B End call.
ðAccept new call.
End call(s)
B Press briefly.
§Yes§ |
Resume the held call. |
§No§ |
End all calls. |
Conference b
You can call up to 5 conference participants one after the other. When the first connection is established:
§Options§ Open, then Hold.
H/J Select phone number from Contacts or enter it manually. When the connection is established:
§Options§ |
Open, then use Conference |
|
to join in the held connec- |
|
tion. Repeat until all par- |
|
ticipants are connected. |
Ending |
|
B |
All calls in the conference |
finish simultaneously |
|
|
when the End key is |
|
pressed. |
Tone sequences (DTMF)
Enter tone sequences (digits) for remote access to an answering machine.
§Options§ Open, then select
Send DTMF.
20 Contacts
Contacts
í¢L
You can store up to 5000 entries in this phone directory, with several phone and fax numbers plus additional address details. Five tabs are offered for fast access:
All contacts, Groups, Online status, SIM,
Filter
H |
Open Contacts (in standby |
mode). |
|
F |
Switch between the indi- |
vidual tabs. |
|
Communication |
|
I |
Select contact. |
A |
Call selected |
contact. |
|
Or
§Options§ Open menu, then Create message, to start an Instant Message dialogue.
All contacts
Display all entries stored in the phone or on the SIM card in alphabetical order.
New entry
ìConfirm New entry. The tabs are displayed.
F |
Switch between the indi- |
vidual tabs: |
|
|
|
General |
First name, surname and im- |
sett. |
portant phone numbers. |
|
A ringtone, a picture, or video |
|
with sound can be assigned |
|
to each contact. |
Private |
General address information |
|
and additional communica- |
|
tion numbers such as fax and |
|
e-mail. |
Business |
Company information, ad- |
|
dress, communication |
|
numbers. |
Person |
Personal details such as date |
|
of birth, group membership |
|
and other notes. |
Online |
Contact information for In- |
status |
stant Messaging (page 30). |

Contacts 21
In the respective tabs:
I |
fields.Select required input |
J |
Enter at least one name/ |
company. Enter phone |
|
|
number with dialling |
|
code. |
úOpen menu and select
Save.
Viewing/editing entries
I Select required entry.
üOpen current tab to edit.
úOpen options menu.
Groups
You are offered 10 different groups to enable you to arrange your contacts clearly.
Editing group attributes
I Select group.
§Options§ Open menu and select
Attributes.
Adding a contact
Start function in the All contacts tab.
I |
Select contact, open |
§Options§ and select Add to |
|
|
group. A contact can only |
|
belong to one group. |
Online status
Display all contacts that have WV addresses (Instant Messages).
SIM
Display contacts on the SIM card.
New entry
ìConfirm New entry and name, enter phone number and select the storage location.
Viewing/editing entries
I |
Select required entry and |
edit üentry. |
Filter
Those entries which match the selected filter criteria are displayed, e.g. those containing a picture.
Loading...