


 Loading...
Issued by
Information and Communication mobile
Haidenauplatz 1
D-81667 Munich
© Siemens AG 2001
All rights reserved. Subject to availability. Rights of modification reserved.
Siemens Aktiengesellschaft
http://www.siemens.com/mobiles
Ref.No.: A31008-H4100-A1-6-7619
*A5B00025203891*
s S35i
User Guide
Information and
Communications
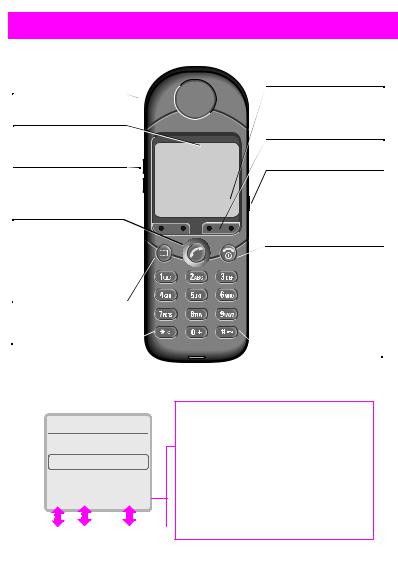
Overview |
1 |
|
Infrared Interface
(PC communication)
Display Indicators
Reception strength/ battery level.
Left Side Keys
Set volume/scroll up and down in the menus and messages.
Call Key
Dial the displayed phone number or name, accept calls. Display last calls in standby mode.
Phonebook
Display phonebook entries for easy calling.
Ringer On/Off
Hold down: Switch ringer on and off.
|
Menu |
|
|
Set the network and |
|
|
phone control functions. |
|
|
Soft Keys |
|
V \ |
(see below) |
|
6HUYLFH 3URYLGHU |
Right Side Keys |
|
Hold down to record |
||
|
||
|
(even during a call). |
|
$0(•> (18> |
Press briefly for play- |
|
|
back. |
|
|
On/Off/End |
|
|
Press briefly: |
|
|
End call or jump back to |
|
|
the previous menu level. |
|
|
Hold down: |
|
|
Activate/deactivate the |
|
|
phone or return to stand- |
|
|
by mode. |
|
|
Key Lock |
|
|
Hold down: |
|
|
Activate/ deactivate lock. |
F3KRQHERRN
2ZQ 1XPEHUV!1HZ (QWU\! %UHQGD
G T 37,216>
< &

Soft Keys
The current functions are shown in the display as symbols or text above the keys. Different functions are available by pressing either the left or the right end of the keys.
In standby, the soft keys enable fast ”name” dialling and menu access or access to a special service such as R SIM service.
|
|
|
|
2 |
Precautions |
|
|
|
|
|
|
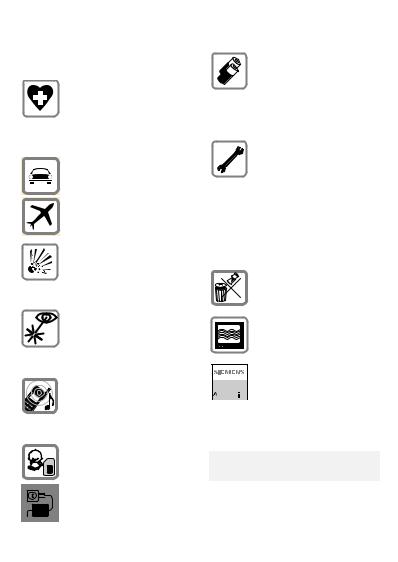
All radio transmitters are subject to restrictions such as:
Switch off in hospitals or in the vicinity of medical devices, e.g. pacemakers or hearing aids. Mobile phones can interfere with the function of these devices.
Always use the handsfree kit for calls while driving (page 75)!
Mobile phones must be switched off at all times in an aircraft. Prevent accidental activation.
Switch off near petrol stations, fuel depots, chemical plants or blasting operations. Mobile phones can interfere with the operation of technical installations.
Do not examine the active infra-red interface [Class 1 LED product (classified according to IEC 60825-1)] using optic magnification devices.
The ring tone is reproduced through the earpiece. To avoid damage to hearing, first accept the call, then hold the phone to the ear.
SIM card may be removed. Caution: small parts could be swallowed by children.
The mains voltage specified on the power supply unit must not be exceeded.
We recommend you use only original Siemens batteries (100% mercury-free) and charging devices. Otherwise considerable health risks and damage to the product cannot be excluded.
Neither the phone nor the battery (100% mercuryfree) may be opened under any circumstances. Changes to this device are strictly prohibited, as they will invalidate the type approval criteria required for operation of the unit.
Please note:
Dispose of used batteries and phones according to the legal regulations
Mobile phones can interfere with the operation of nearby TVs, radios, PCs.
We recommend you use only original Siemens ac-


 cessories to avoid possible
  damage and to comply with the existing regulations.
Improper use invalidates the guarantee.

Contents |
3 |
|
Overview...................................... |
1 |
Introduction................................. |
5 |
Symbols used ........................... |
5 |
Menu Entry ............................... |
5 |
Getting Started ........................... |
6 |
1. Insert SIM Card .................... |
6 |
2. Charge Battery ...................... |
7 |
3. Switch On ............................. |
7 |
Emergency Call (SOS)............... |
7 |
4. Enter PIN............................... |
8 |
Making Calls ................................ |
9 |
Dialling a Number...................... |
9 |
Ending a Call ............................. |
9 |
When a Number is Busy ......... |
10 |
Redialling ................................ |
10 |
Incoming Calls........................... |
11 |
Answering Calls ...................... |
11 |
Ending Calls ............................ |
11 |
Unwanted Calls....................... |
11 |
Turning off Ringer ................... |
11 |
Missed Calls............................ |
11 |
Phonebook................................. |
12 |
New Entry ............................... |
12 |
Calling from Phonebook.......... |
13 |
VIP Phonebook........................ |
13 |
<Own Numbers>.................... |
13 |
<New Entry> .......................... |
13 |
Phonebook Menu.................... |
14 |
Saving a Control Code............. |
16 |
Fast Access Keys....................... |
17 |
Soft Key .................................. |
17 |
Digit Key.................................. |
18 |
Fast Menu Access .................. |
18 |
During a Call .............................. |
19 |
Volume Control ....................... |
19 |
Call Waiting ............................. |
19 |
Play Back Recording ............... |
19 |
Notebook ................................ |
19 |
Conference/Toggling ............. |
20 |
In Call Menu ............................ |
21 |
Voice Memo .............................. |
22 |
Recording................................ |
22 |
Pause ...................................... |
22 |
Playback .................................. |
22 |
Main Menu Information ........... |
23 |
Main Menu.............................. |
23 |
SIM Services (optional) ........... |
23 |
Office & Fun............................... |
24 |
Internet ................................... |
24 |
Switch Key .............................. |
24 |
Internet Access....................... |
24 |
Browser Menu ........................ |
25 |
Profiles .................................... |
26 |
Phonebook Key ....................... |
28 |
Calendar .................................. |
29 |
Appointments ......................... |
30 |
Calculator ................................ |
32 |
Currency Conv. ....................... |
33 |
Business Card ......................... |
34 |
Games..................................... |
35 |
Chronometer........................... |
36 |
Messages ................................... |
37 |
Reading New Messages......... |
37 |
Creating a New Message ...... |
38 |
Text Input with “T9”............... |
40 |
Incoming / Outgoing................ |
43 |
Sending Business Cards ......... |
44 |
Setting..................................... |
44 |
Voice Message ...................... |
45 |
Information Services ............... |
47 |
Records ...................................... |
49 |
Calls missed............................ |
49 |
Calls received.......................... |
49 |
Calls dialled ............................. |
49 |
Alarms missed ........................ |
49 |
Profiles ....................................... |
50 |
Audio.......................................... |
51 |
Ringer Setting ........................ |
51 |
Volume ................................... |
51 |
Melodies ................................ |
51 |
Vibration .................................. |
51 |

|
|
|
|
|
|
4 |
|
Contents |
|
|
|
|
|
|
|
|
|
|
Call Screening ......................... |
51 |
|
|
|
|
Service Tones ........................ |
52 |
|
|
|
|
Record Melody ....................... |
52 |
|
|
|
Time/Charge .............................. |
53 |
|
|
|
|
|
Charges................................... |
53 |
|
|
|
|
Charge Setup .......................... |
53 |
|
|
|
Divert.......................................... |
54 |
|
|
|
|
|
Divert ...................................... |
54 |
|
|
|
|
Status Check........................... |
55 |
|
|
|
|
Clear all Diverts ....................... |
55 |
|
|
|
|
Reactivating Call Diversion...... |
55 |
|
|
|
|
Changing Phone Numbers ...... |
55 |
|
|
|
Setup.......................................... |
56 |
|
|
|
|
|
Menu Mode ............................ |
56 |
|
|
|
|
Phone...................................... |
56 |
|
|
|
|
Security ................................... |
58 |
|
|
|
|
Network .................................. |
59 |
|
|
|
|
During Calls............................. |
62 |
|
|
|
|
FAX/Data Mode ...................... |
63 |
|
|
|
|
Clock ....................................... |
64 |
|
|
|
|
Car Use ................................... |
64 |
|
|
|
|
Headset................................... |
64 |
|
|
|
Fax/Data ..................................... |
65 |
|
|
|
|
Display Symbols ....................... |
66 |
|
|
|
|
Tips on Use................................ |
67 |
|
|
|
|
Siemens Service ....................... |
68 |
|
|
|
|
Troubleshooting........................ |
69 |
|
|
|
|
Specifications............................ |
72 |
|
|
|
|
|
Licensing................................. |
72 |
|
|
|
|
Technical Specifications.......... |
72 |
|
|
|
Care / Security ........................... |
73 |
|
|
|
|
|
Care of your SIM Card............. |
73 |
|
|
|
Accessories................................ |
74 |
|
|
|
|
|
Data/Applications .................... |
74 |
|
|
|
|
Car Solutions........................... |
75 |
|
|
|
|
|
76 |
|
|
|
|
Index........................................... |
|
|
|
|
|
|
|
|
|
|

Introduction |
5 |
|
Symbols used
The following symbols are used to simplify operation:
-Inputters. of numbers or let-
<Soft key for the function displayed above.
$Press the soft key on the page displayed.
> |
Representation of a soft |
|
key function. |
DFunction depends on the service provider; separate registration may be necessary.
Menu Control
The menus provide access to important functions and settings for your telephone.
Main Menu
To reach the main menu, press the right soft key in standby mode (see page 8).
(18> Press.
Submenu
You can branch from the main menu into submenus for accessing functions and options.
Go Back
(Press this button briefly to go back one menu level.
(Hold this button down to return to standby mode.
Menu Entry
Menu entry is sometimes abbreviated in the operating instructions, e.g.:
(18> Î $XGLR Î 9ROXPH means
(18 Press to open the main menu.
<Scroll to the $XGLR menu item.
(/(&7> Press to open the $XGLR menu.
<Scroll to the 9ROXPH menu item.
(/(&7> Press to open the 9ROXPH menu.
|
|
|
|
6 |
Getting Started |
|
|
|
|
|
|
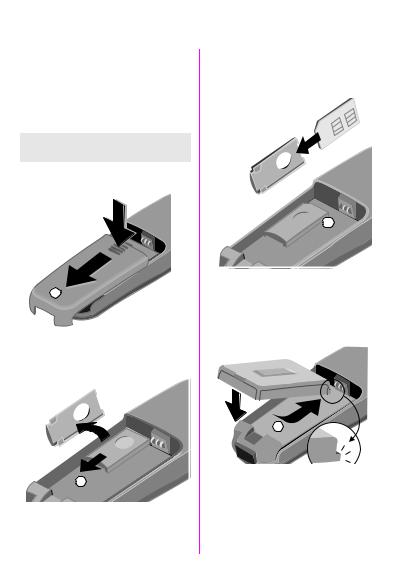
1. Insert SIM Card
Your service provider will supply a SIM card, containing all the key data about your line.
You may need to snap this out carefully from a credit card sized SIM.
If removing the battery, ensure the phone is switched off first.
•Unlock the battery cover (1) and lift it off (2).
n
o
•Slide out the SIM carrier (3), then turn it in the direction indicated by the arrow (4).
 q
q
p
•Insert the SIM card in the carrier
(5). Ensure the angled corner is positioned correctly and that contact is made.
r
s


 t
t
•Turn the SIM carrier until the SIM card faces the phone (6).
•Slide the SIM carrier into the phone until it clicks into place (7).
•Insert the battery into the phone (see below) and close the cover.
o n
Getting Started |
7 |
|
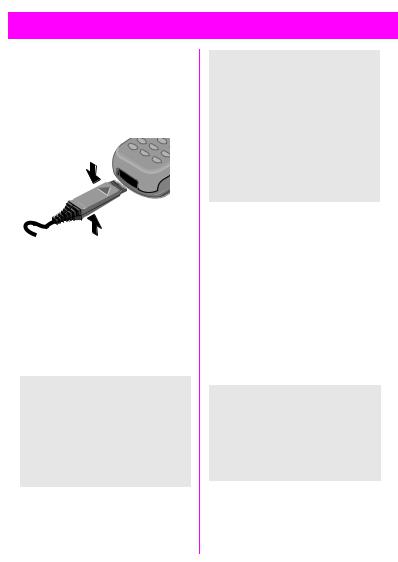
2. Charge Battery
The lithium ion battery is not yet fully charged, so:
•Insert the charger plug into the socket at the bottom of the phone.
•Plug charging unit into a mains power socket (ensure voltage range stated on charger is not exceeded).
The charging unit will heat up when used for longer periods. This is normal and is not dangerous.
,When charging is in progress.
'Charging is complete.
Charging Time
The unit is fully charged after 3.5 hours.
Variations in the power supply can lead to different charging times.
Telephoning
The telephone can be used while charging is in progress.
Usage Time
A fully charged battery can provide 60 to 220 hours standby time or 100 to 360 minutes talk time.
\Charging status display.
*A beep sounds when the battery is nearly empty.
The times specified above are average times. They may vary depending on personal usage and network conditions (see also "Technical Specifications", page 72).
3. Switch On
(Hold down to activate, in standby mode (see page 8) hold down to deactivate.
If the error message “Please insert your SIM card!” appears when you switch on, please check if the SIM card is correctly inserted.
Also, please note that older SIM cards (5 volt technology) cannot be used. Contact your service provider if you have questions or encounter problems with regard to the matter.
Emergency Call (SOS)
By pressing the > soft key you can make an emergency call on all networks even without a SIM card or PIN code.
This function must only be used in emergencies.

|
|
|
|
8 |
Getting Started |
|
|
|
|
|
|
4. Enter PIN
Your SIM card can be protected with a 4 - 8-digit PIN code to prevent misuse (depending on the SIM card).
-Enter your PIN code (shown as a series of
asterisks).
Correct any errors with W.
> Press the key on the right beneath the display (see figure).
+3OHDVH HQ
WHU \RXU
3,1
> W >
< )
It will take a few seconds to log on to the network.
When the name of the service provider appears on the display, the phone is in standby mode and is ready for use.
V\
6HUYLFH 3URYLGHU
|
|
|
|
$0(•> |
(18> |
|
|
|
|
|
|
Info
Wrong PIN?
The SIM card will be blocked after the third incorrect PIN entry (see "Troubleshooting", page 69).
See also “PIN Control” and “Change PIN” (see page 59).
Network Connection
VIndicatesstrength. incoming signal
8A weak signal reduces call quality and there may be a risk to call continuity.
If the signal is too weak, move to a window or open space.
The integrated antenna is located at the top of the phone. Do not interfere with this area unnecessarily while making a call, as this can impair the quality of your connection.
Your phone will automatically select another GSM network if you are abroad or outside your “home” network (see page 59).
SIM Services
RThis symbol is displayed when your SIM card supports special applications, such as banking (see page 23).

Making Calls |
9 |
|
Dialling a Number
The phone must be switched on (standby mode).
-Dial the required number with prefix (international dialling code if appropriate).
 V \
V \
_
Y Wd
WA short press clears the last digit, a long press the entire number.
dSave the number in the phonebook, see page 12.
:Press. The number displayed is dialled.
Ending a Call
(Press. The call is ended. You should also press this key if the person you called hangs up first.
Info
Setting the date/time, see page 64. Setting the language, see page 56.
International Dialling
Many international dialling codes are already stored in your phone. To retrieve these:
Press until a “+” symbol appears.
T ,67> |
Press. |
GT |
Select the required |
|
country from the list. |
(/(&7> |
Press. The international |
|
dialling code appears on |
|
the display. |
-Add the national number (the first 0 is omitted in many countries).
:Press. The number displayed is dialled.
Functions Available while Making a Call:
2/'> (see page 20)[ (18> (see page 21)
Easier Ways to Call
Easier, quicker and error-free dialling by:
•Redialling previous numbers.
•Automatically redialling busy numbers.
•Calling back unanswered/ received calls (see page 49).
or using the
•Phonebook (see page 12).
•Fast access (see page 17).
|
|
|
|
10 |
Making Calls |
|
|
|
|
|
|
When a Number is Busy
The following functions are available if the number you dial is busy:
Auto Redialling
V872 ,$/> Press to repeatedly dial a number in progressively longer intervals for up to 15 minutes. No other number can be dialled in this period.
End
))> Press.
or
(Press.
Every other function terminates this function.
Reminder
52037> Press for a reminder to dial the number again in 15 minutes (beeps and displays number).
Redialling
The last numbers you called are stored.
From your standby display:
:Press. Shows a list of last calls.
&DOOV GLDOOHG
&DURO
'HDQ
G T 37,216>
:Press again to redial the last call
or to redial a previous number:
;Scroll to highlight required number.
:Press to dial the number selected.
37,216> see page 49.
See page 49 for information on how to dial other stored numbers:
•Calls missed.
•Calls received.

Incoming Calls |
11 |
|
Answering Calls
To be able to receive calls, you must switch the phone on (standby mode).
 .
.

&DURO
(-(&7> V16:(5>
Press &
or
:Press.
Ending Calls
(Press.
Unwanted Calls
(-(&7> Press for the caller to hear the busy signal.
,9(57> This appears when “call diversion” is active (see page 54).
or
(Press.
Turning off Ringer
Hold down. The ringer is deactivated for the current call.
Missed Calls
Missed calls, i.e. unanswered calls are indicated by a 9icon.
Info
•The numbers of received or missed calls are saved (providing the network supports this function) so that you can return these calls (see page 49).
•An incoming call will interrupt any other use of the phone.
•Data, fax calls (see page 63).

|
|
|
|
12 |
Phonebook |
|
|
|
|
|
|
You can enter frequently dialled numbers with a name in the phonebook. The number is then dialled by simply selecting the entry.
If a call number is saved under a name, the name will appear on the display when a call is received from that number.
New Entry
-Enter the number always with the prefix and also, where applicable, with the international dialling code.
dPress.
-Enter the name for the number (see also “Text Entry”).
F1HZ (QWU\
&DURO_
Y W>
> Press.
:The number can be dialled straight away.
or
(End input and begin a new entry.
Info
The editor T9 cannot be used for entries in the phonebook (see page 40).
Text Entry
Press number keys repeatedly until the required character appears. The cursor advances after a short delay.
Press once for “A”, twice for “B”, etc.
WPress to erase the letter preceding the cursor, hold down to erase the whole name
Press to manually switch letter case. The first letter in each name is automatically written in UPPERCASE.
Press to switch between numbers and letters.
Press to create a blank.
b l Umlauts and numbers are displayed after the relevant letters.
Y S Controls cursor position.
Special Characters
Press the key repeatedly until the character appears.
|
Blank |
1 |
£ |
$ |
¥ |
|
|
|
|
|
|
|
|
|
|
|
|
|
+ |
0 |
- . |
, |
: ? ¿ |
|
||
! |
¡ |
“ ’ |
; |
_ |
|
|
||
|
|
|
||||||
|
A - a |
* |
/ ( ) < = > |
|
||||
|
% |
¤ |
|
|
|
|
|
|
|
A - 1 |
# |
@ |
& § Γ ∆ θ |
|
|||
Λ |
Ξ |
Π |
Σ Φ Ψ Ω |
|
||||
|
|
|
|
|
|
|
|
|
|
|
|
|
|
|
|
|
|

Phonebook |
13 |
|
Calling from Phonebook |
Info |
7Open the phonebook. Selection by Name in the Phonebook
/ |
; |
Write the first letter of re- |
7 |
Open the phonebook. |
||||
- |
quired name and/or scroll |
|
Use the digit keys to en- |
|||||
|
|
|
to highlight required |
|
ter the first letter of the |
|||
|
|
|
name. |
|
name required, e.g. |
|||
|
|
|
F3KRQHERRN |
|
For Paul. The phonebook |
|||
|
|
|
|
scrolls to the first entry |
||||
|
|
|
2ZQ 1XPEHUV! |
|
beginning with the letter |
|||
|
|
|
|
“P”. |
||||
|
|
|
|
|
|
|||
|
|
|
1HZ (QWU\! |
Extending Numbers |
||||
|
|
|
&DURO |
You can enter partial numbers in |
||||
|
|
|
G T 37,216> |
the phonebook (e.g. a company |
||||
|
|
|
number/PABX). |
|||||
: Dial the entry selected. |
These partial numbers can be ex- |
|||||||
tended before dialling: |
||||||||
VIP Phonebook |
7 |
Open the phonebook. |
||||||
/; Select the (partial) |
||||||||
|
|
|
|
|
- |
number. |
||
Important numbers can be trans- |
|
|||||||
|
|
|
||||||
ferred to the VIP Phonebook. |
37,216> |
Open the menu, |
||||||
7/ 7Press twice to open the |
|
select 9LHZ (QWU\. The |
||||||
|
phonebook entry is dis- |
|||||||
|
|
|
VIP Phonebook. Then pro- |
|
||||
|
|
|
|
played. |
||||
|
|
|
ceed as above. |
|
||||
|
|
|
- |
Add the extension |
||||
For information on adding new en- |
||||||||
number. |
||||||||
tries to the VIP Phonebook: see "VIP |
: |
Dial. |
||||||
Entry", page 14. |
||||||||
<Own Numbers> |
or conversely |
|||||||
- |
|
|
||||||
Depending on the SIM card, you |
Enter the (partial) |
|||||||
can enter up to six “own” numbers |
|
number. |
||||||
(e.g. fax). |
|
|
7 |
Open the phonebook. |
||||
|
|
|
|
|
||||
<New Entry> |
/; Select the extension |
|||||||
- |
number. |
|||||||
See page 12. |
|
|||||||
: |
The extension number is |
|||||||
|
|
|
|
|
||||
|
|
|
|
|
: |
added to the call number. |
||
|
|
|
|
|
Dial. |
|
||
|
|
|
|
|
|
|||
|
|
|
|
|
|
|
|
|

|
|
|
|
14 |
Phonebook |
|
|
|
|
|
|
Phonebook Menu
7Open the phonebook.
-/;Write the first letter of required name and/or scroll to highlight required name.
37,216> The menu is displayed; now select the required function.
###########
9LHZ (QWU\ (GLW (QWU\ 'HOHWH (QWU\ 9,3 (QWU\ 9RLFH 'LDOOLQJ /RFDWLRQ 6HQG 3ULQW &KHFN 6SDFH
'HO 3KRQH%RRN
###########
View Entry
Edit Entry
The entry is deleted from the phonebook after confirmation.
W/ - Change the number if necessary.
> Confirm.
W/ - Change the name if necessary.
> Confirm.
Delete Entry
The entry is deleted from the phonebook after confirmation.
VIP Entry
Only designate important numbers as VIP entries to ensure fast access (page 13).
Voice Dialling
You can assign voice recognition to a phonebook entry. When voice recognition is activated the number is dialled simply by saying the name.
Record Sample
Say the required name and repeat it when prompted. A beep will confirm successful recording.
Delete Sample
Voice dialling is removed from the entry and deleted.
Play Sample
You can display the entry using the phonebook menu.
!Entry with voice dialling.
To play an entry back, press the lower key on the left side of the phone.
Apply
In standby:
To select, press the lower key on the left side of the phone.
or |
use the soft key (setting, |
|
see page 17). |
Then say the name. The phone number will be dialled automatically.
Phonebook entries with pictures are not stored in the SIM (see also "Location", page 15).

Phonebook |
15 |
|
Location
A new phonebook entry can be stored as follows:
SIM Card F
Entries are automatically stored in your SIM card, enabling them to be transferred to another GSM phone.
Phone F
Phonebook entries with voice dialling are stored here.
If your SIM card is full, entries will overflow into this memory.
Special `
If you have a special SIM offering “Fixed Dialling Numbers”, you can restrict calls to entries in this phonebook. PIN2 is needed to change this (see page 59).
Send/Print
Send as Text
The phonebook entry can be sent as an SMS (see page 38).
The recipient can immediately enter the number in their phonebook.
Send via IrDA
The entry is transferred to another phone or to a suitable PC using infrared technology.
Print via IrDA
The entry is transferred to a suitable printer using infrared technology.
Check Space
You can check used and available capacity for:
F |
SIM card |
5 |
Special SIM card |
4 |
Phone memory |
!Voice recognition
Del. Phonebook
You can select the phonebook to be deleted. The phonebooks available for deletion depend on the SIM card used. You will be asked to enter a security code before the delete operation (see page 59).
FSIM card (PIN)
5Special SIM card (PIN2)
4Phone memory (phone code)
Info
•Always enter the full number with the area code
(e.g. 0171 for London).
•If you travel abroad often, you should enter all phonebook entries with the international dialling code (e.g. +49 for Germany).

|
|
|
|
16 |
Phonebook |
|
|
|
|
|
|
Saving a Control Code |
Info |
||
You can store phone numbers and |
Improved Phonebook Management |
||
control codes (digits) together in the |
|||
You can use the “SoftDataLink 3” |
|||
same way as a normal phonebook |
|||
entry. This is useful if you want to |
accessory to create and manage |
||
control an answerphone remotely. |
your phonebook entries via a PC/ |
||
- |
Enter the phone number. |
PDA (see "Accessories", page 74). |
|
Service Provider Expansions |
|||
Hold down until “+” Your service provider may have
|
|
|
appears (pause to |
added important service numbers |
||
|
|
|
establish connection). |
to your phonebook or can do this on |
||
- |
Enter the control code |
request. |
||||
Phonebook Restrictions |
||||||
|
|
|
(digits). |
|||
|
|
|
You can hold down |
Please note that the use of your |
||
|
|
|
phonebook can be restricted (nor- |
|||
|
|
|
again to create a further |
mal for some business applica- |
||
|
|
|
pause of three seconds to |
|||
|
|
|
tions). |
|||
|
|
|
ensure the digits are proc- |
|||
|
|
|
Incomplete phone numbers can be |
|||
|
|
|
essed correctly on the re- |
|||
|
|
|
ceiver side. |
identified with a “?” in a restricted |
||
|
d Press. |
phonebook. These numbers can be |
||||
|
completed before dialling. |
|||||
- |
Enter name. |
During a Call |
||||
|
> |
Save. |
You can also use the phonebook |
|||
|
during a call, e.g. to look up a |
|||||
|
|
|
|
|||
|
|
|
|
number or to send a control code. |
||
|
Alternatively, just save the control |
|||||
|
|
|
||||
|
code (digits) and send it during a |
|
|
|||
|
call (see page 21). |
|
|
|||
|
|
|
|
|
|
|
|
|
|
|
|
|
|

Fast Access Keys |
17 |
|
The left soft key and the number keys 2 to 9 can each be assigned an important phone number or one of the functions listed below.
The phone number can then be dialled, or the function can be started at the touch of a button.
• |
3KRQH 1XPEHU ................... |
(page 12) |
• |
,QWHUQHW .......................... |
(page 24) |
• |
:ULWH 0HVVDJH |
(page 38) |
• |
&DOHQGDU .......................... |
(page 29) |
• |
,U'$ (infrared)................. |
(page 63) |
• |
&DOFXODWRU ........................ |
(page 32) |
• &XUUHQF\ &RQY |
(page 33) |
|
• |
*DPHV .......................... |
(page 35) |
• 9RLFH 'LDOOLQJ ................... |
(page 14) |
|
• |
6HOHFW *URXS |
(page 61) |
Soft Key
V\
6HUYLFH 3URYLGHU
|
|
$0(•> |
(18> |
The left soft key can be used for fast access.
This may be temporarily replaced with I/ J, for example, for access to a new message.
Your service provider may have already programmed this key (e.g. access to “RSIM Services”).
Setting
When making initial settings:
$0(•> Press.
; Select a function.
If you select 3KRQH 1XPEHU the phonebook will be opened.
-/;Select a name by entering the first letter and/or scroll
to the relevant entry, e.g.
2IILFH
or
If you select an application (e.g. *DPHV), this is set directly on the
soft key.
(/(&7> Press.
Use
)),&(> Press.
> If a phone number is set on the fast access key, this is dialled or, alternatively, the application is started.
or
)),&(> Hold down.
Changing
)),&(> Press.+$1*(> Press.
Proceed as described above under “Setting”.
If you do not want to assign a function to the left soft key, then select the entry .

|
|
|
|
18 |
Fast Access Keys |
|
|
|
|
|
|
Digit Key
Digit keys 2 to 9 can be used as speed dialling numbers for fast access.
Digit key should be used for the phone number for checking the mailbox.
Setting
To set a digit key for the first time, e.g. 2:
Press the digit key.(7> Press.
; Select a function.
If 3KRQH 1XPEHU is selected, the phonebook is opened for a number to be chosen.
-/;Select a name by entering the first letter and/or scroll
to the relevant entry, e.g. 2IILFH
or
If you select an application (e.g. *DPHV), this is set directly on the soft
key.
(/(&7> Press.
Use
Either a stored phone number is dialled or a stored application is started. In standby mode:
Press.
The setting for 2 appears instead of the left soft key, e.g.:
$0(6> Press.
> Press.
or
Press.
:Press.
Changing
Press the digit key briefly; the current setting will appear (e.g. *DPHV).
$0(6> Press.
+$1*(> Proceed as described under “Setting”.
Fast Menu Access
All menu functions are numbered. A function can be selected directly by entering the number sequence.
For example, to activate the stopwatch:
(18> Press.
for 2IILFH )XQ
for &KURQRPHWHU
for 6WRSZDWFK
During a Call |
19 |
|
Volume Control
The volume can be adjusted using the keys on the left side of the phone.
Call Waiting |
D |
During a call you can be advised that there is another call waiting. You may need to register for this service and set your phone (see page 62). You will hear a special “call waiting tone” during the call.
 .
.

&DURO
(-(&7> :$3>
You have 3 options:
n Swap
:$3> This accepts the waiting call and places the current call on hold.
Call swapping:
You may swap back and forth between both calls (see page 20).
o Reject Waiting Call
(-(&7> Rejects the call; the caller hears a busy tone.
or
,9(57> If this is set, the call is diverted to the answerphone or mailbox, for example (see page 45).
pEnd Current Call, Answer New
(Press to end the current call. The waiting call will ring.
V16:(5> Answer the new call.
Play Back Recording
The keys on the right side of the phone can be used to play back a recording (see also page 67). The person called will also hear the recording (see "Voice Memo", page 22).
Notebook
You can enter a phone number during a call (the person on the other end may hear your entry). This number can be stored or called after you have ended the call.
|
|
|
|
20 |
During a Call |
|
|
|
|
|
|
Conference/Toggling D
You can call an additional number during a call.
You can swap back and forth between both calls or link all callers together in a conference. A conference can include up to 5 participants.
During a call, explain your intention:
V\
K <---> K
2/'> [ (18>
then press <.
The current call is put on hold.
-/ 7 Enter a phone number or select one from the phonebook.
:Establish the new connection.
Three options are now available:
n Swap
:$3> You may swap back and forth between the two calls as required.
If the current call is terminated you will be asked: “Return to call on hold?”
(6> Return to the held call.
2> The held call is terminated.
o Conference
[ (18> Press, select &RQIHUHQFH.
A held call is joined (conference line for up to 5 subscribers).
p End Connection
(Press. All calls are terminated.
Your service provider may not offer all the functions described.

During a Call |
21 |
|
In Call Menu
The following functions are only available during a call.
[ (18> The menu is displayed; now select the required function.
###########
9ROXPH &RQWURO 0LFURSKRQH RII &RQIHUHQFH +ROG &DOO 7LPH &RVW 6HQG '70) WRQHV &DOO 7UDQVIHU 0$,1 0(18
&DOO 6WDWXV
###########
Volume Control
T S> The left soft key or the keys on the side of the phone are used to adjust the handset volume.
If Car Kit Comfort is used, this arrangement does not affect the usual setting.
Microphone off
You can switch the microphone on or off. If it is switched off, the person on the other end will not be able to hear you.
Conference (see page 20)
Hold Call
The current call is placed on hold.
Time/Cost
You can check current call time and cost (if programmed, see page 53).
Send DTMF tones
You may transmit control codes (digits) for controlling an answerphone and other device.
From the Phonebook
Establish a connection with the device, then
[ (18> Open the call menu and select 6HQG '70) WRQHV.
7Press. Select the name of the control code in the phonebook.
Manual Entry
After a connection is established.
-/ > Enter the digits for the control code.
Call Transfer
Joins the original call to the second one. You are no longer connected to either call. This function may not be supported by all service providers.
MAIN MENU
This is fast way to access other menus, for example to check a message (see also page 23).
Call Status
All held and active calls are listed (e.g. participants in a conference).
|
|
|
|
22 |
Voice Memo |
|
|
|
|
|
|
The voice memo feature enables you to:
•Record a conversation - useful if you are given a phone number or address.
•Dictate a memo as a reminder or for others to hear.
•Add a memo to an appointment in the Organizer.
•Record a message and play it back to a caller (see for example “Silent Answer”, page 67).
Recording
Hold down the memo key on the right side of the phone for the duration of the recording.
A beep indicates the start of recording.
Release the key to stop recording.
9RLFH 0HPR
5HFRUG 6WRSSHG
/$<>
A beep will warn you when the memory is almost full (max. 20 seconds).
Pause
Release the memo key to pause, then press it again (within 10 seconds) to resume.
A pause of more than 10 seconds will end the recording.
A new memo always overwrites an existing memo
Soft keys
The soft keys can be used instead of the keys on the side of the phone.
Playback
Press the memo key briefly.
The person on the other end of the line can also listen to a recording during a call.

Main Menu Information |
23 |
|
Main Menu
The main menu gives you access to important phone functions and settings. In standby mode, this is accessed with the right soft key:
(18> Open the main menu.
The main menu contains the following functions:
###########
8VDJH +LQWV (operating instructions)
6,0 6HUYLFHV,QWHUQHW 2IILFH )XQ 0HVVDJHV 5HFRUGV 3URILOHV
$XGLR 7LPH &KDUJH 'LYHUW
6HWXS
###########
All menu items open a submenu in which the required functions can be selected.
(Press briefly to jump back one menu level.
Hold down to jump back to standby mode (see
page 8).
Menu Mode
To make it easier for new users to learn how to operate the phone, the comprehensive main menu is reduced to the key functions (see also page 56).
(18> Î 6HWXS Î 0HQX 0RGH
SIM Services (optional) D
Your service provider can offer special applications through the SIM card, such as homebanking, stock market, etc.
If you are registered for one of these services, the service name will appear at the top of the main menu or directly above the left soft key
RSIM service icon.
If there is more than one application, these are displayed in the “SIM Services” menu.
(18> Î 6,0 6HUYLFHV
With the SIM Services menu your phone is future-proof and will support additions to your service provider’s service. For further information contact your service provider.
Internet |
D |
(not always available)
Fast access to the Internet browser from the main menu.
For a more detailed description, see page 24.
A different function may have been assigned to this menu item by your service provider.
Loading...