


creative 2170
O w n e r ‘ s m a n u a l

This household sewing machine is designed to comply with IEC/EN 60335-2-28 and UL1594
IMPORTANT SAFETY INSTRUCTIONS
When using an electrical appliance, basic safety precautions should always be followed, including the following:
Read all instructions before using this household sewing machine.
DANGER - To reduce the risk of electric shock:
•A sewing machine should never be left unattended when plugged in. Always unplug this sewing machine from the electric outlet immediately after using and before cleaning.
•Always unplug before relamping. Replace bulb with same type rated 5 Watt.
WARNING - To reduce the risk of burns, fire, electric shock, or injury to persons:
•Do not allow to be used as a toy. Close attention is necessary when this sewing machine is used by or near children or infirm person.
•Use this sewing machine only for its intended use as described in this manual. Use only attachments recommended by the manufacturer as contained in this manual.
•Never operate this sewing machine if it has a damaged cord or plug, if it is not working properly, if it has been dropped or damaged, or dropped into water. Return the sewing machine to the nearest authorized dealer or service center for examination, repair, electrical or mechanical adjustment.
•Never operate the sewing machine with any air openings blocked. Keep ventilation openings of the Sewing machine and foot controller free from the accumulation of lint, dust, and loose cloth.
•Keep fingers away from all moving parts. Special care is required around the sewing machine needle.
•Always use the proper needle plate. The wrong plate can cause the needle to break.
•Do not use bent needles.
•Do not pull or push fabric while stitching. It may deflect the needle causing it to break.
•Switch the sewing machine off (“0”) when making any adjustment in the needle area, such as threading needle, changing needle, threading bobbin, or changing presser foot, etc.
•Always unplug the sewing machine from the electrical outlet when removing covers, lubricating, or when making any other user servicing adjustments mentioned in the instruction manual.
•Never drop or insert any object into any opening.
•Do not use outdoors.
•Do not operate where aerosol (spray) products are being used or where oxygen is being administrated.
•To disconnect, turn all controls to the off (“0”) position, then remove plug from outlet.
•Do not unplug by pulling on cord. To unplug, grasp the plug, not the cord.
•Hold plug when rewinding into cord reel. Do not allow plug to whip when rewinding.
SAVE THESE INSTRUCTIONS

Congratulations!
Congratulations on your choice of your Pfaff creative 2170!
As a sewing enthusiast, you have acquired one of the most advanced and innovative sewing and embroidery machines in the world; it will enable you to transform all your creative ideas into reality with unprecedented ease.
If you enjoy sewing to your heart’s content – without any compromises
– this machine will provide the key to exquisite items of clothing, fashion accessories and home textiles.
Do you enjoy embroidering, or want to create distinctive highlights?
Excellent! Your Pfaff creative 2170 will enable you to experience a totally new dimension of sewing and embroidery – and it is so easy to operate.
Switch on the machine and watch it light up. The multi-color touch screen welcomes you to the world of unlimited, creative possibilities. Make contact – just a touch is all it takes.
Before you start, please spend some time reading this Owner's Manual. Ideally, follow the information described directly on your new Pfaff creative 2170. This is the easiest way to discover its many creative facets.
But we don’t want to keep you any longer. Give a free rein to your imagination. Your Pfaff creative 2170 is bound to become a dependable partner in all your sewing ventures. Our specialist retailers will of course also be pleased to advise you at any time. Enjoy making your ideas become reality.
Table of Content
1
INTRODUCTION |
1:7-1:18 |
Stitch Chart |
1:8-1:10 |
Decorative stitches creative 2170 |
1:11-1:13 |
Machine |
1:14 |
Parts of the embroidery unit |
1:15 |
Parts of the embroidery hoop |
1:15 |
Standard accessories |
1:16-1:18 |
2
PREPARATIONS 2:1-2:24
Operating Instructions |
2:2 |
Voltage Switch |
2:2 |
Electrical connection |
2:2 |
Connecting the foot control |
2:2 |
Changing the presser foot |
2:5 |
The IDT (Integrated Dual Feed) |
2:6 |
Changing the needle |
2:7 |
The feed dogs |
2:7 |
Winding the bobbin from the spool pin |
2:8 |
Threading |
2:8 |
Winding from the second spool pin |
2:9 |
Winding from the third spool pin |
2:9 |
Bobbin winding while embroidering |
2:10 |
Winding a bobbin through the needle |
2:10 |
Setting the bobbin winding speed |
2:11 |
Inserting the bobbin and bobbin case |
2:12 |
Bobbin thread monitor |
2:12 |
Inserting the bobbin |
2:12 |
Inserting the bobbin case |
2:12 |
Correct top tension - How to get it |
2:13 |
Thread tension |
2:13 |
Thread the needle |
2:14 |
Needle threader |
2:14 |
Bobbin thread |
2:15 |
Threading the twin needle |
2:15 |
Presser foot lift |
2:16 |
Electronic knee lift |
2:16 |
General notes |
2:17 |
creative Data Manager |
2:18-2:19 |
How to update your machine |
2:20-2:23 |
3
SEWING |
3:1-3:28 |
|
Function Buttons |
|
3:2 |
Sewing mode functions |
|
3:3-3:6 |
Welcome screen |
|
3:7 |
Toolbar |
|
3:7-3:10 |
How to select a stitch |
|
3:11 |
Altering a utility stitch |
|
3:11 |
Altering a decorative stitch |
|
3:12 |
Tie-off |
|
3:12 |
Needle positions |
|
3:13 |
Mirroring |
|
3:13 |
Straight stitch |
|
3:14 |
Three-step Zigzag – stitch No 4 |
|
3:14 |
Basting program |
|
3:14 |
Buttonholes |
3:15-3:18 |
|
Inserting the sensormatic buttonhole guide |
3:15 |
|
Attaching buttonhole foot – No 5A |
|
3:15 |
Buttonhole with gimp thread |
|
3:17 |
Eyelet buttonhole with gimp thread |
3:17-3:18 |
|
Sewing on buttons |
|
3:19 |
Eyelets |
|
3:19 |
Darning |
|
3:20 |
Darning with the elastic stitch |
|
3:20 |
Overlock stitches |
|
3:21 |
Blindhem stitch – No 30 |
|
3:22 |
Elastic blind stitch – No 31 |
|
3:22 |
Bridging stitch - No 11 |
|
3:23 |
Crosshem stitch - No 13 |
|
3:23 |
Sewing in zippers - stitch No 1 |
|
3:23 |
Rolled hem with foot No. 7 |
|
3:24 |
Twin needle sewing |
|
3:24 |
Sewing Maxi stitches with a twin needle |
3:24 |
|
Four sewing directions |
3:25-3:26 |
|
Personal menu |
|
3:27 |
Demo |
|
3:28 |
Options for messages |
|
3:28 |
1:4

4 |
|
|
|
5 |
|
DECORATIVE SEWING |
4:1-4:28 |
EMBROIDERY |
5:1-5:70 |
||
General notes on decorative sewing |
|
|
4:2 |
The Embroidery window |
5:2-5:7 |
Selecting decorative stitches |
|
|
4:2 |
Context menu in embroidery |
5:8-5:9 |
Alter the stitch settings |
|
|
4:3 |
Embroidery accessories |
5:10 |
Sewing sequence |
|
|
4:4-4:10 |
Attaching the embroidery foot |
5:10 |
Create a sewing sequence |
|
|
4:5 |
Inserting a card |
5:10 |
Arrange stitches within a sewing sequence |
4:6 |
Lowering the feed dogs |
5:11 |
||
Adjust an existing sewing sequence |
|
|
4:7 |
Disengaging the IDT |
5:11 |
Inserting a stitch in the sewing sequence |
|
4:7 |
Removing the knee lift |
5:11 |
|
Inserting a stitch at the start |
|
|
|
Connecting the embroidery unit |
5:12 |
of a sewing sequence |
|
|
4:7 |
Embroidery hoop |
5:13 |
Save a sewing sequence |
|
|
4:8 |
Attach the hoop |
5:13 |
Close a sewing sequence without saving |
|
4:9 |
Remove the hoop |
5:13 |
|
Delete a sewing sequence |
|
|
4:9 |
Remove the embroidery unit |
5:13 |
Select and open a saved sewing sequence |
|
4:9 |
Get started to embroider |
5:14 |
|
Open from the machine‘s memory |
|
|
4:10 |
Hooping the fabric |
5:15 |
Open from a creative memory card |
|
|
4:10 |
Embroider single designs from a card |
5:16-5:17 |
Stitch Creator |
|
|
4:11 |
Color changing icon |
5:18 |
Placing single stitches |
|
|
4:13 |
|
|
Combining single parts of patterns |
|
|
4:14 |
|
|
More options to edit patterns |
|
|
4:15 |
|
|
Quilting |
|
4:16-4:19 |
|
|
|
Patchwork |
|
|
4:16 |
|
|
Piecing the quilt top |
|
|
4:18 |
|
|
Stitch in the Ditch |
|
|
4:18 |
|
|
Free-motion Stippling |
|
|
4:19 |
|
|
Quilt Appliqués |
|
|
4:19 |
|
|
Tapering |
|
|
4:20 |
|
|
Nostalgia/Heirloom |
|
|
4:22 |
|
|
Cross Stitch |
|
|
4:23 |
|
|
Antique hand embroidery stitches |
|
|
4:23 |
|
|
Free-motion Sewing |
|
|
4:24 |
|
|
MAXI Stitches |
|
|
4:24 |
|
|
Gathering with straight stitch |
|
|
4:25 |
|
|
Shell edging |
|
|
4:25 |
|
|
Alphabets |
|
|
4:26 |
|
|
Editing a word sequence |
|
|
4:27 |
|
|
Saving a word sequence |
|
|
4:27 |
|
|
Monogram |
|
|
4:28 |
|
|
1:5

Multi-color embroidery |
5:19 |
One color embroidery |
5:20 |
Move the design within the hoop |
5:20 |
Embroider |
5:21 |
Enlarged representation |
5:22 |
Positioning of designs in the embroidery hoop 5:22
Precise Positioning a design |
|
5:23-5:25 |
Jumping over stitches |
|
5:26 |
Embroider monograms and letters |
|
5:27-5:30 |
Arcing; embroidery combinations |
|
5:31-5:32 |
Automatic stitch building |
|
5:33-5:34 |
Zoom In |
|
5:35 |
The creative Data manager |
|
5:36 |
Working with source and destination fields |
|
|
in the creative Data Manager |
5:37 |
|
Working with a field in |
|
|
the creative Data Manager |
|
5:38-5:40 |
File formats |
|
5:40 |
Using the hoop adapter |
|
5:40 |
Automatic hoop positioning |
|
5:40 |
Prepare a creative memory card for saving |
5:41 |
|
Transferring designs from the PC to |
|
|
your Pfaff creative 2170 |
|
5:41 |
How to use the embroidery template |
|
|
Putting the embroidery in the right place |
||
Stabilizers |
|
|
Needles |
|
|
Threads |
|
|
Appliqué embroidery |
|
|
Cutwork embroidery |
|
|
BUILT IN DESIGNS |
|
|
|
|
5:42 |
|
|
5:42-5:43 |
|
|
5:44-5:45 |
|
|
5:45 |
|
|
5:46 |
|
|
5:47 |
|
|
5:47 |
6 |
|
5:49-5:70 |
|
|
|
MAINTENANCE |
6:1-6:11 |
|
Changing the needle plate |
|
6:2 |
Cleaning |
|
6:2 |
Changing the light bulb |
|
6:3 |
What to do if...? |
|
6:4-6:5 |
Index |
|
6:6-6:10 |
Technical Data |
|
6:11 |
1:6

INTRODUCTION

I n t r o d u c t i o n
Stitch Chart
Utility stitches
1. |
2. |
3. |
4. |
5. |
6. |
7. |
8. |
9. |
10. |
11. |
12. |
13. |
14. |
15. |
16. |
17. |
Stitch No. |
Description |
Application |
|
1 |
Straight stitch |
For seaming and topstitching. Many needle positions for edge stitching and |
|
|
|
sewing in zippers. |
|
2 |
Stretch triple straight stitch |
For reinforced seams such as stitch trouser, under arm seams or decorative |
|
|
|
topstitching. With many needle positions. |
|
3 |
Zigzag stitch |
For finishing seams on fabrics appliqué work and inserting lace. |
|
4 |
Three-step Zigzag stitch |
Strong stitch for seam finishes, sewing elastic, darning tears, and patches. |
|
5 |
Straight stitch reverse |
Program permanent reverse for decorative sequences. Also for bulky projects. |
|
6 |
Elastic overcast stitch |
Use to seam and overcast on woven and stretch fabrics. |
|
7 |
Honeycomb stitch |
Elastic, decorative stitch for ornamental hem finishing on stretch fabric, for |
|
|
|
decorative elastic application and sewing with elastic thread in the bobbin. |
|
8 |
Elastic stitch |
Strong stitch for seam finishes, sewing elastic, darning tears and patches. |
|
9 |
Triple stretch stitch |
For sewing elastic on sportswear and bathing suits. |
|
10 |
Z-Zigzag stitch |
For finishing seams on fabrics, appliqué, and inserting lace. |
|
11 |
Bridging stitch |
For bridging, decorative hemstitching and crazy quilting. |
|
12 |
Foundation Elastic stitch |
For joining overlapped seams on bulky fabrics such as leathers and terry cloth. |
|
13 |
Cross hem stitch |
Provides a highly elastic, decorative seam for hems on sportswear and Casual |
|
|
|
wear. |
|
14 |
Stretch triple zigzag stitch |
Elastic stitch for decorative hems and topstitching. |
|
15 |
Quilt stitch |
For topstitching quilt projects with a hand look stitch. |
|
16 |
Quilt stitch |
For topstitching quilt projects with a hand look stitch. |
|
17 |
Quilt stitch |
For topstitching quilt projects with a hand look stitch. |
|
|
|
|
1:8

Utility stitches
18. 19. 20. 21. 22. 23. 24. 25. 26. 27. 28. 29. 30. 31. 32. 47. 48.
Stitch No. Description
18Quilting, appliqué or pinstitching
19Closed overlock stitch
20Closed overlock stitch
21Open overlock stitch
22Zigzag stitch, right or left needle position
23Standard overlock stitch
24Finished Edge overlock stitch
25Light-knit fabric patching stitch
26Closed overlock stitch
27Stretch knit overlock stitch
28Overlock stitch
29Reinforced Overlock stitch
30Blindhem stitch
31Elastic blindhem
32Basting stitch
47Linen buttonhole
48Standard buttonhole
Application
For hand look quilt appliqué or pinstitching.
For joining and overcasting stretch fabrics in one operation. The closed seam prevents fabric edges from fraying.
For joining and overcasting stretch fabrics in one operation. The closed seam prevents fabric edges from fraying.
For joining and overcasting stretch fabric in one operation.
For appliqué couching over cords and creating eyelets.
For joining and overcasting stretch fabrics in one operation
For joining and overcasting stretch fabrics in one operation.
Use to mend light jersey knits. Also for a decorative hem and neckline finish.
For joining and overcasting stretch fabrics in one operation. The closed seam prevents fabric edges from fraying.
Join and overcast open knit fabrics and jersey.
For joining and overcasting stretch fabrics in one operation.
For joining and overcasting fraying fabrics. The knitted edge reinforces and prevents fraying on raw edge.
For securing hems invisibly on woven fabrics.
For securing hems invisibly and finishing the edge on stretch fabrics.
For basting projects pieces together.
Buttonholes for blouses, shirts and linen.
Basic buttonhole for blouses, shirts and jackets. Also for pillow cases.
n o i t c u d o r t n I
1:9

I n t r o d u c t i o n
Utility stitches
49.50. 51. 52. 53. 54. 55. 56. 57. 58. 59. 60. 61. 62. 63. 64. 65. 66.
Stitch No. |
Description |
Application |
|
49 |
Stretch buttonhole |
Buttonhole for stretch fabrics. |
|
50 |
Cross stitch buttonhole |
Decorative buttonhole for jackets and for embellishing other garments. |
|
51 |
Rounded buttonhole with |
Buttonholes for shirts, jackets and trousers. |
|
|
pointed bartack |
|
|
52 |
Rounded buttonhole with |
Buttonholes for shirts, jackets and trousers. |
|
|
lengthwise tack |
|
|
53 |
Rounded end buttonhole |
Buttonholes for shirts, jackets and trousers. |
|
|
with crosswise tack |
|
|
54 |
Eyelet buttonhole with |
Professional tailor's buttonhole, for denim jackets and trousers. Or as a |
|
|
pointed bartack |
decorative effect for kitchen and shower curtains. Add rings through the |
|
|
|
buttonholes to hang the curtains. |
|
55 |
Eyelet buttonhole with |
Professional tailor's buttonhole, for denim jackets and trousers. Or as a |
|
|
lengthwise bartack |
decorative effect for kitchen and shower curtains. Add rings through the |
|
|
|
buttonholes to hang the curtains. |
|
56 |
Professional eyelet |
Professional tailor's buttonhole, for denim jackets and trousers. Or as a |
|
|
buttonhole |
decorative effect for kitchen and shower curtains. Add rings through the |
|
|
|
buttonholes to hang the curtains. |
|
57 |
Rounded buttonhole |
Use for lightweight garments or jackets. |
|
58 |
Decorative Buttonhole with |
Decorative buttonhole for jackets and for embellishing other garments. |
|
|
triangle tack |
|
|
59 |
Button sewing program |
For applying two-hole or four-hole buttons. |
|
60 |
Bartack |
For applying belt loops and reinforcing pockets. |
|
61 |
Denim Bartack |
Decorative bartack for trouser and skirt pockets |
|
62 |
Decorative bartack |
Decorative bartack for trousers and skirts. |
|
63 |
Stippling stitch |
Random darning stitch for mending rips and tears. Also great as a decorative |
|
|
|
accent. |
|
64 |
Programmable Darning |
Programmable length for darning and repeat it for large repairs. |
|
|
stitch |
|
|
65 |
Programmable reinforced |
Programmable length for darning and repeat it for large repairs. Reinforced by |
|
|
Darning stitch |
horizontal stitches. |
|
66 |
Eyelet |
Create eyelets for garments and home textiles. Also great for decorating |
|
|
|
nostalgia projects. |
|
|
|
|
1:10
Decorative stitches creative 2170
Utility stitches Scalloped edgings
30 |
33 |
36 |
39 |
42 |
45 |
67 |
70 |
31 |
34 |
37 |
40 |
43 |
46 |
68 |
71 |
|
|
32 |
35 |
38 |
41 |
44 |
69 |
72 |
For the stitches 30, 31 and 32, you find a more detailed explanation in the Stitch overview on page 1:9.
Satin stitches
89 92 95 98 101 104 107 110 113 116
73 76 79 82 85 88
74 77 80 83 86
75 78 81 84 87
Quilt stitches
15 18 301 304 307 310
90 |
93 |
96 |
99 |
102 |
105 |
108 |
111 |
114 |
16 |
299 |
302 |
305 |
308 |
331 |
91 |
94 |
97 |
100 |
103 |
106 |
109 |
112 |
115 |
17 |
300 |
303 |
306 |
309 |
|
Cross stitches |
|
|
|
|
Hem stitches |
|
||||
117 |
120 |
123 |
126 |
129 |
132 |
135 |
137 |
140 |
143 |
146 |
118 |
121 |
124 |
127 |
130 |
133 |
136 |
138 |
141 |
144 |
|
119 |
122 |
125 |
128 |
131 |
134 |
|
139 |
142 |
145 |
|
n o i t c u d o r t n I
1:11

I n t r o d u c t i o n
Decorative stitches creative 2170
Leaves and Flowers |
|
|
|
|
Antique Embroidery stitches |
|
|
|
|||||||
147 |
150 |
153 |
156 |
159 |
162 |
165 |
332 |
311 |
314 |
317 |
320 |
323 |
326 |
329 |
334 |
148 |
151 |
154 |
157 |
160 |
163 |
166 |
|
312 |
315 |
318 |
321 |
324 |
327 |
330 |
335 |
149 |
152 |
155 |
158 |
161 |
164 |
167 |
|
313 |
316 |
319 |
322 |
325 |
328 |
333 |
|
Decorative stitches 1 |
|
|
|
|
|
|
|
|
|
Animal stitches |
|||||
168 |
171 |
174 |
177 |
180 |
183 |
186 |
189 |
192 |
195 |
337 |
340 |
343 |
223 |
226 |
229 |
169 |
172 |
175 |
178 |
181 |
184 |
187 |
190 |
193 |
196 |
338 |
341 |
344 |
224 |
227 |
230 |
170 |
173 |
176 |
179 |
182 |
185 |
188 |
191 |
194 |
336 |
339 |
342 |
345 |
225 |
228 |
351 |
Decorative stitches 2
197 |
200 |
203 |
206 |
209 |
212 |
215 |
218 |
221 |
347 |
350 |
198 |
201 |
204 |
207 |
210 |
213 |
216 |
219 |
222 |
348 |
|
199 |
202 |
205 |
208 |
211 |
214 |
217 |
220 |
346 |
349 |
|
1:12

Decorative stitches creative 2170
MAXI stitches
231 236 241 246 251 256
232 |
237 |
242 |
247 |
252 |
257 |
233 |
238 |
243 |
248 |
253 |
258 |
234 |
239 |
244 |
249 |
254 |
259 |
235 |
240 |
245 |
250 |
255 |
260 |
Alphabets
Script Block Outline Comic Cursive MAXI 1 MAXI 2
n o i t c u d o r t n I
1:13
I n t r o d u c t i o n
Machine overview
Parts of the creative 2170
1Top cover with stitch chart
2Multi-color touch screen
3Base plate
4Slide for lowering the feed dogs
5Connection for knee lift
6Feed dogs
7Free arm
8Presser foot holder with presser foot
9Needle threader
10Needle holder with set screw
11Thread cutter
12Reverse sewing button
13Signal lamp bobbin thread monitor
14Connection socket for embroidery unit
15Take-up lever
16Pre-tension device for threading and bobbin winding
17Thread guide for threading and bobbin winding
18Spool holder with spool cap
19Second spool holder
20Hole for third spool holder
21Bobbin winding control
22Bobbin winder
23Handwheel
24Contrast control for the display
25Front and rear card slots
26Release buttons for the card slots
27Voltage switchover
28Connection socket lead cord
29Connection socket foot control
30Main switch
31Accessory tray
32Needle plate
33Thread guides, right and left
34Sewing bulb (max. 5 W)
35Threading slot
36Carrying handle
37Thread snips button
38Pattern Start button
39Sew slow button
40Needle up/down button
41Presser foot lifter
42Integrated Dual feed /IDT
16 17 |
18 19 |
20 21 22 |
1
15
|
|
|
|
|
|
|
|
|
|
|
13 |
|
|
|
||||
|
|
|
|
|
|
|
|
|||||||||||
11 |
|
|
|
|
|
|
|
12 |
|
|
2 |
|||||||
|
|
|
|
|
||||||||||||||
|
|
|
|
|
|
|
|
|
|
|
|
|
|
|||||
|
|
|
|
|
|
|
|
|
|
|
|
|
||||||
9 |
|
|
|
|
10 |
|
|
|
|
|
||||||||
7 |
|
|
14 |
|
|
|||||||||||||
|
|
|
|
|
|
|
|
8 |
|
|
|
|
|
|
|
|||
6 |
|
|
|
|
|
|
|
|
|
|
|
|
|
|
|
|
|
|
|
|
|
|
|
|
|
|
|
|
|
|
|
|
|
|
|||
3
5 4
36
37383940
35 |
|
|
|
|
|
|
|
|
|
|
23 |
|
|
|
|
|
|
|
|
||||
34 |
|
|
33 |
41 |
|
|
|
24 |
|||
|
|
|
|
||||||||
|
|
|
|
|
|
25 |
|||||
|
|
|
|
|
|
|
|
||||
32 |
|
|
|
|
42 |
|
|
|
|||
|
|
|
|
|
|
|
|||||
|
|
|
|
|
|
|
|
|
|
|
|
|
|
|
|
|
|
|
|
|
|
|
|
31 |
26 |
|
30 |
28 |
27 |
29 |
|
|
1:14

50
51
49
52
48
46 45 44
47
53
54
55
56
57
Parts of the embroidery unit
44Connection plug to the machine
45Fastener for fitting to the machine
46Under arm guide
47Release button for removing the embroidery unit
48Pivot for embroidery arm
49Metal guide for fitting the embroidery hoop
50Release lever for removing the embroidery hoop
51Embroidery arm
52Recessed grip for raising and rotating the embroidery arm
Parts of the embroidery hoop
53Snap-in pin
54Two guide pins for retaining the hoop
55Ribs for fitting the clips
56Projections for placing the template
57Retaining screw for the fabric
n o i t c u d o r t n I
1:15
I n t r o d u c t i o n
Standard accessories
Standard presser foot
No. 0 A
Order No.: 820 244-096
Fancy stitch foot with
IDT No. 1 A (for IDT)
Order No.: 820 254-096
Fancy stitch foot No. 2 A (not suitable for IDT)
Order No.: 820 260-096
Maxi-stitch Embroidery foot No. 8 (not suitable for IDT)
Order No.: 820 259-096
Blindhem foot with IDT
No. 3
Order No.: 820 256-096
Zipper foot No. 4
Order No.: 820 248-096
Buttonhole foot No. 5 A
Order No.: 820 299-096
Buttonhole guide No. 10
Order No.: 820 294-096
Darning foot No. 6
Order No.: 820 243-096
Rolled hem foot No. 7
Order No.: 820 249-096
1:16

Creative Fantasy Embroidery foot
Order No: 820 280-096
Edge guide No. 3
Order No.: 820 251-096
|
|
|
|
|
|
1. |
Brush |
8 |
|
|
7 |
|
|
||
|
|
|
|
Order No.: 93-847-979-91 |
|||
|
|
|
|
|
|
2. |
Extra spool pin |
|
|
|
|
|
|
3. |
Seam ripper |
|
|
|
|
6 |
|
Order No.: 99-053-016-91 |
|
|
|
|
|
|
4. |
Bulb remover / Needle plate changer |
|
|
|
|
|
|
|
||
|
|
|
|
|
|
Order No.: 820 292-096 |
|
|
|
|
|
|
|
5. |
Bobbins |
|
|
|
|
|
|
6. |
Felt pad |
1 |
2 |
3 |
4 |
|
5 |
7. |
Spool caps |
|
8. |
Needles |
|||||
|
|
|
|
|
|
||
Stylus
Order No: 412 69 34-01
Stitch Card – Antique Quilt Stitches and Hand
Embroidery Stitches
Order No: 412 74 69-06
n o i t c u d o r t n I
1:17

I n t r o d u c t i o n
Embroidery unit
Embroidery hoops
1. creative HOOP 80 80x80mm, with adapter
Order No: 820 476-096
2.ROUND HOOP 120x115 mm
Order No: 93-039-343-44-000
3.Clips
Order No: 412 65 18-03
4.Hoop Adapter
Order No: 820 477-096
5.Embroidery template
Order No: 412 86 21 01
6.creative HOOP 225x140 mm
Order No: 93-039-340-44-000
1. File assistant File Assistant
Using the File Assistant you can download embroidery designs directly from the Internet and transfer them to your creative 2170.
Order No: 412 84 16-96
2.Creative gallery designs
3.USB cable
4.Quick embroidery packet
5.300 Embroidery card
6.Embroidery threads
Order No: 412 85 90-96
Knee lift
Order No.: 412 70 57 02
1.2.
3.4.
5. 6.
1 2
3
4 |
5 |
6 |
|
|
|
|
|
|
|
|
|
1:18

PREPARATIONS

P r e p a r a t i o n s
Operating Instructions
Voltage Switch
 220 - 240V / 120V
The sewing machine is set to the voltage 220 - 240V. To change the voltage to 120V (US/Canada), you must set the voltage switch on the underside of the machine to 120 V.
If you are unsure of the correct voltage for your country, please check with your authorized Pfaff sewing machine dealer or local electrical authorities before plugging in your machine.
Electrical connection
Connect the lead cord between the socket of the sewing machine and the wall outlet.
For the USA and Canada:
This sewing machine has a polarized plug (one blade wider than the other). To reduce the risk of electric shock, this plug is intended to fit in a polarized outlet only one way. If the plug does not fit fully in the outlet, reverse the plug. If it still does not fit, contact a qualified electrician to install the proper outlet.
DO NOT modify the plug in any way!
Connecting the foot control
Pull the retractable cord out of the foot control to a length that is comfortable for you. The foot control has an automatic cord-rewind reel for storage. Connect the plug of the foot control to the connection socket of the sewing machine.
The sewing speed is controlled by pressing the foot control.
The foot control ATK 0080 must be used for this sewing machine.
2:2
Main switch
When the main switch is switched on (switch function I) the sewing lightbulb lights up and the multi-color touch screen lights up.
The sewing machine is now ready to function. "0" = OFF
"I" = ON
Thread cutter
Pull the thread from the back to the front up over the thread cutter.
s n o i t a r a p e r P
Contrast of the screen
The contrast of the screen is adjustable. The setting can be re-adjusted with the screen control dial (A).
A
2:3

Carrying case
Place the enclosed lead cord, the foot control and instruction book into the storage compartment of the carrying case.
Lid
Open the lid upwards.
The stitches of the sewing machine are illustrated on the inside of the lid.
P r e p a r a t i o n s
Accessory tray
Open the accessory tray by placing your left index finger on the ridged area on the left of the lid and open the lid up and towards you.
Free arm
In order to sew using the free arm, swing the detachable accessory tray to the left and lift it up out of the hole. When replacing the accessory tray, make sure it is flush with the free arm of the sewing machine.
Note: Some fabrics have a lot of excess dye which can cause discoloration on other fabric but also on your sewing machine. This discoloring may be very difficult or impossible to remove.
Fleece and denim fabric (especially in red and blue) often contain a lot of excess dye.
If you suspect that your fabric/ready-to-wear garment contains a lot of excess dye, always pre-wash it before sewing/embroidering to avoid the discoloring.
2:4

Changing the presser foot
Snap off the presser foot
 Switch off the main switch.
Press the front part of the presser foot upwards and at the same time the rear part downwards until it disengages from the presser foot holder.
Snap on the presser foot
Place the presser foot under the presser foot holder, so that when the presser foot lift is lowered, the pins of the foot snap onto the presser foot holder.
s n o i t a r a p e r P
Check:
Please check that the presser foot is properly attached by raising the presser foot lift.
Note: If your Presser foot lift is disengaged because of the embroidery or free-motion, step on the foot control in a sewing stitch or disengage the free-motion icon.
2:5

P r e p a r a t i o n s
The IDT (Integrated Dual Feed)
For sewing any fabric precisely Pfaff provides the ideal solution: the Integrated Dual Feed, IDT system. As on industrial machines, the IDT feeds the fabric from the top and bottom at the same time at the same stitch length. The fabric is fed precisely. On light fabrics such as silk or rayon the dual feed prevents puckering of the seam. The even feeding action also ensures perfect matching of checked and striped fabrics. The IDT keeps all layers of quilt projects aligned to prevent stretching of the top layers.
Engaging the IDT
Important: For all work with the Integrated Dual Feed IDT, use presser feet with the center back cut-out.
Raise the presser foot. Press the IDT down until it engages.
Disengaging the IDT
Hold the IDT with two fingers at the ribbed ankle. Press the IDT down, then pull it away from you and release the IDT slowly upward.
2:6
 A
A
B
Changing the needle
A Switch off the main switch.
To remove: Lower the presser foot and set the needle to its highest position. Loosen the needle screw and pull the needle out downwards.
To insert: The flat side A of the needle must face to the rear. Lower the presser foot and insert the needle, pushing it up as far as it will go. Hold the needle and tighten the needle screw firmly.
The feed dogs
For certain sewing work such as free-motion quilting or darning or when embroidering, the feed dog must be lowered. On your Pfaff creative 2170 there are two different methods for lowering the feed dogs, one on the outside of the machine and one inside the bobbin door.
For either method:
Raise the presser foot before lowering the feed dog. Push slide A or B to the left.
To bring the feed dogs back up move the slide to the right.
s n o i t a r a p e r P
2:7
P r e p a r a t i o n s
Winding the bobbin from the spool pin
Choose a spool cap slightly larger in diameter than the spool. For example use the large spool cap for larger spools of thread, and the smallest cap with cone-type spools. Place the sewing thread on the spool pin. Slide the cap tightly against the spool.
Threading
Place the thread into guide (A) from front to back and pull it counterclockwise ABOVE the bobbin winder thread guide (B).
Wind the start of the thread around the bobbin several times in a clockwise direction.
Note: When bobbin winding always place the thread ABOVE the bobbin winder thread guide (B). Place a bobbin on the bobbin winder with the Pfaff logo up. Make sure the bobbin is secure on the bobbin winder by placing the small pin on the bobbin winder into the slot on the bobbin.
Switch on the main switch.
Start bobbin winding by pushing the bobbin winding lever to the right. You may need to adjust the Winding speed on the window in the multicolor touch screen as explained on page 2:11. As soon as the bobbin is full, the winding action will be stopped automatically. Cut the thread and remove the bobbin from the winder.
B
A
2:8
B
A
1.
2.
1. Winding from the second spool pin
Swing the second spool pin up and lock. Place a spool of thread with an appropriate spool cap on the spool pin.
2. Winding from the third spool pin
Insert the third spool pin in the hole provided. Place the appropriate spool cap and then a spool on the spool pin.
Threading
Place the thread into thread guide (A) from front to back and pull it counter clockwise above the bobbin winder thread guide (B). Wind the start of the thread around the bobbin several times in a clockwise direction.
Start bobbin winding by pushing the bobbin lever to the right. As soon as the bobbin is full, the winding action will be stopped automatically. Cut the thread and remove the bobbin from the winder
s n o i t a r a p e r P
2:9
P r e p a r a t i o n s
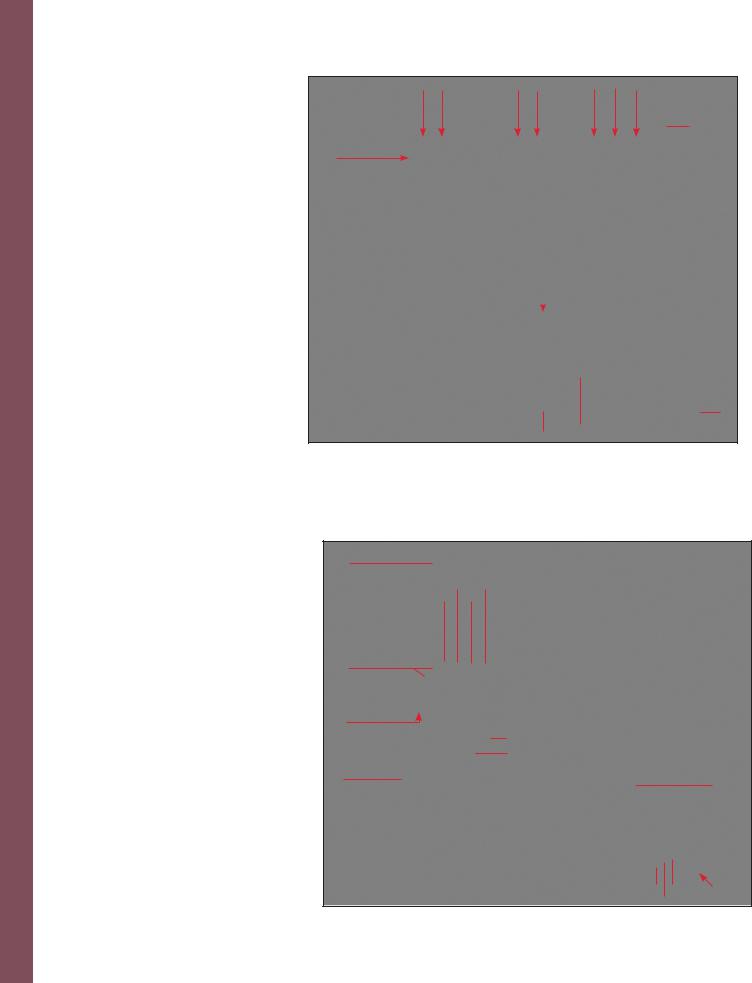
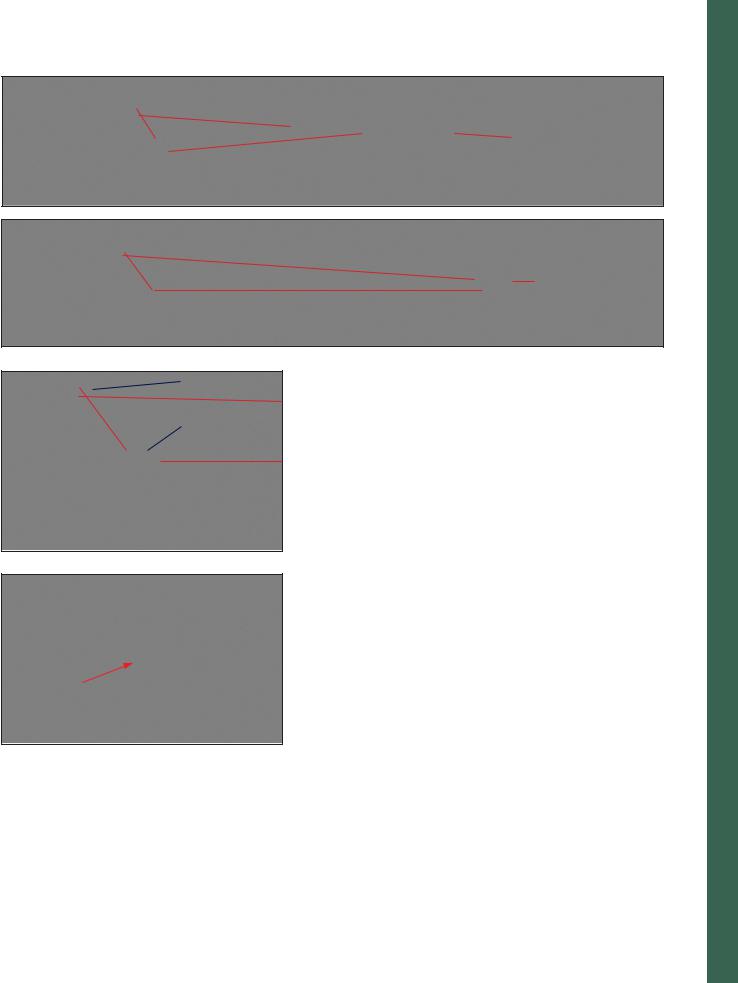
Bobbin winding while embroidering |
|
|
|
|
|
The creative 2170 has a thread guide for bobbin winding while |
|
|
embroidering. |
B |
|
The needle thread (red) is placed into the thread guide (A) and |
|
|
underneath the bobbin winder thread guide (B). Pull the bobbin thread |
|
|
|
|
|
(blue) counter clockwise above the bobbin winder thread guide. Wind |
|
|
the start of the thread around the bobbin several times in a clockwise |
|
|
direction. |
|
A |
|
|
|
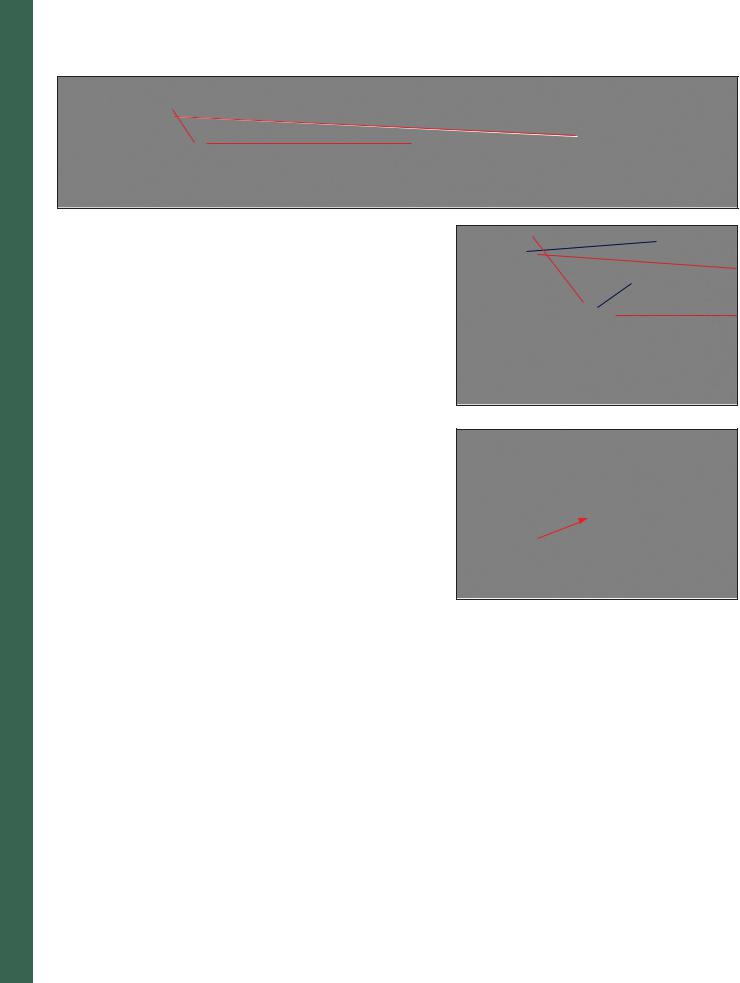
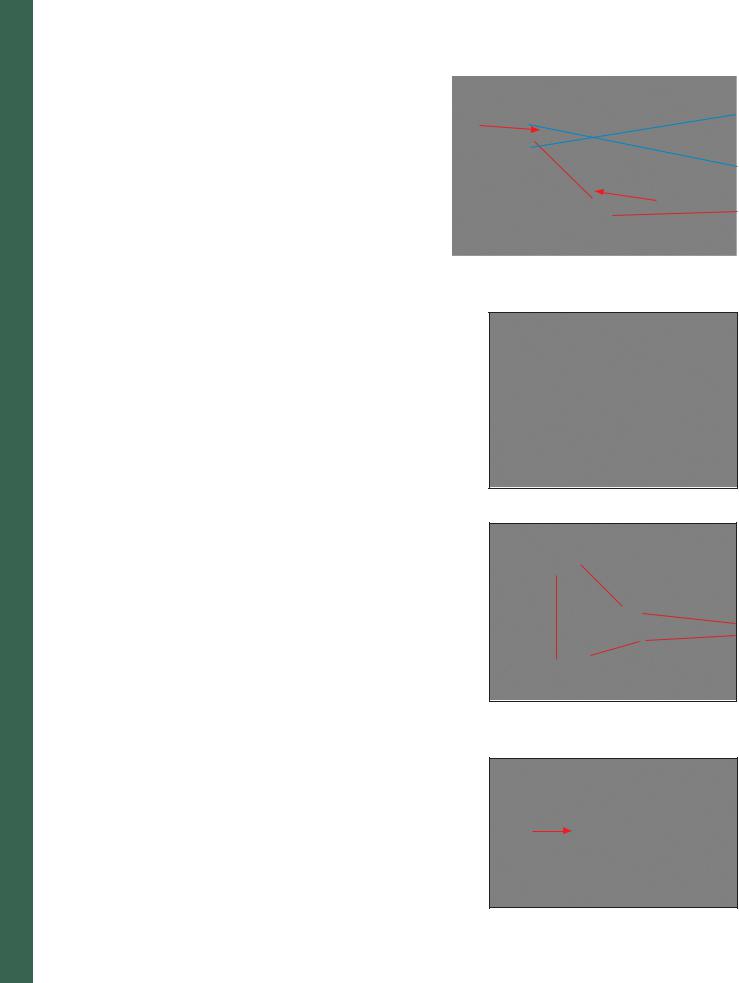
Winding a bobbin through the needle
It is possible to wind bobbins even when the machine is fully threaded (see page 2:14 for threading instructions).
Raise the presser foot. Pull the needle thread underneath the presser foot and upward through the right-hand threader slot.
Place the thread from left to right through the take-up lever (C).
Note: The take-up lever must be at its highest position.
C
Guide the thread to the right. Wind the start of the thread around the bobbin several times in a clockwise direction. Start bobbin winding by pushing the bobbin lever to the right. As soon as the bobbin is full, the winding action will be stopped automatically. Cut the thread and remove the bobbin from the winder.
Note: The thread knife next to the bobbin winder makes it easy to cut the thread after bobbin winding.
2:10

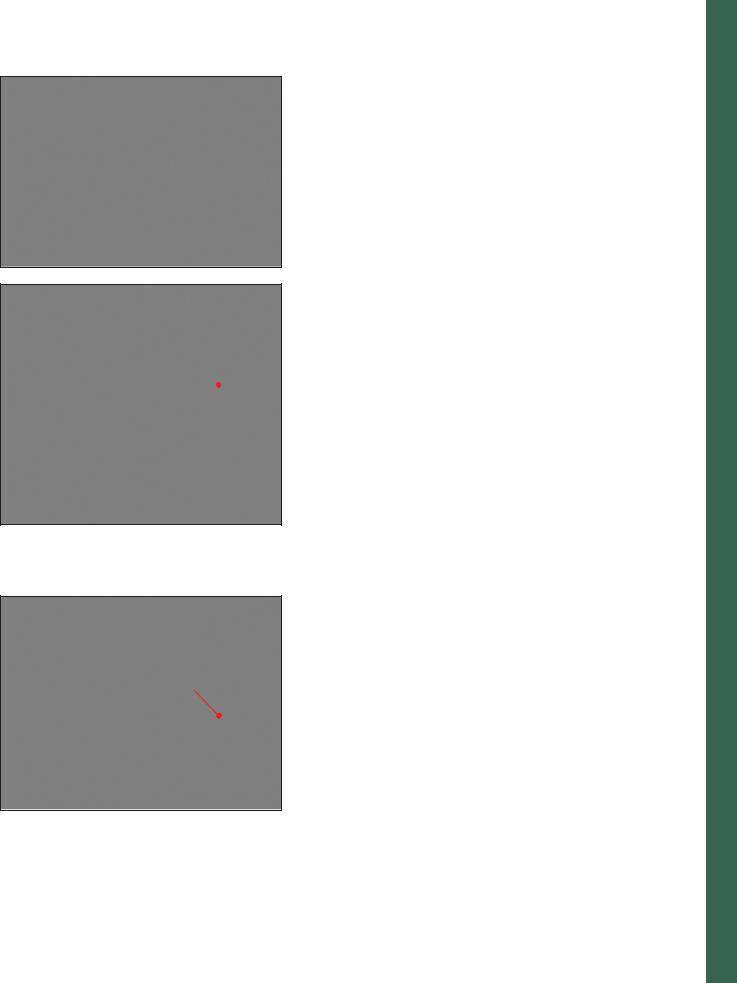
Setting the bobbin winding speed
You can select the speed in which the bobbin winding is wound when the machine is stopped. In the context menu (A), you will find an icon called Winding speed. If you touch that icon, a pop-up will appear where you can choose if you want the winding speed to be Slow, Medium or High.
If you touch the Show Dialog icon, a window for selecting the speed opens each time the bobbin winder is switched on.
The speed that you have selected can halved at any time by touching the half speed button.
Note: If you wind the bobbin while the sewing machine is running, the winding speed is automatically set to Low.
A
s n o i t a r a p e r P
2:11

P r e p a r a t i o n s
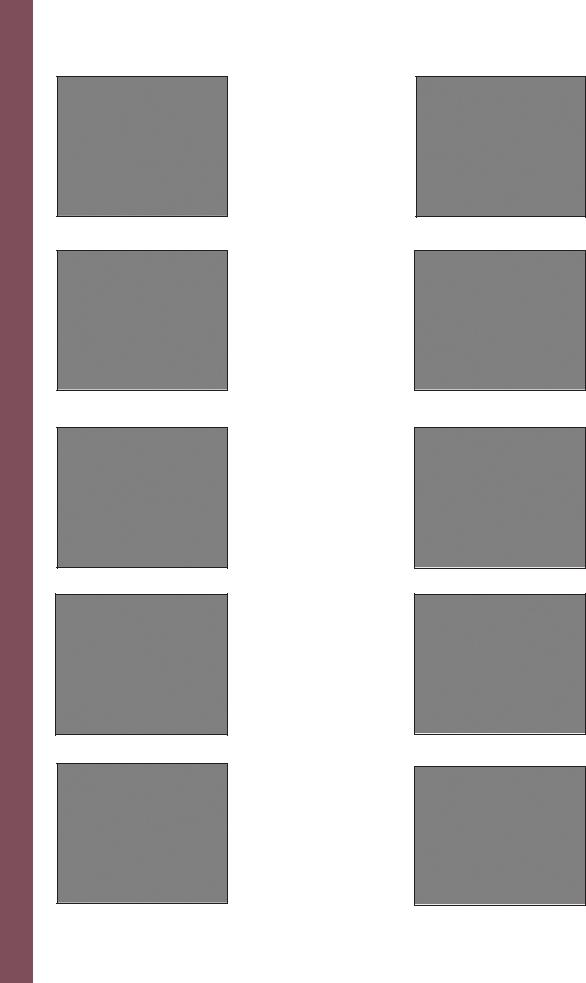
Inserting the bobbin and bobbin case
 Switch off the main switch.
Open the bobbin door at the left side swinging it open towards the front.
Lift the latch of the bobbin case and pull the bobbin case out of the machine. Release the latch and take the empty bobbin out of the bobbin case.
Bobbin thread monitor
When the bobbin thread is nearing its end the red light next to the reverse button flashes automatically. A warning message will also be given on your display. This function is only activated when the bobbin door is closed.
Inserting the bobbin
Insert the full bobbin (with the Pfaff logo facing towards the bobbin case) in the bobbin case. When doing so, pull the thread through slot (A), then under tension spring (B) until it rests in the opening (see arrow).
Check: Hold the bobbin case with the bobbin facing towards you. When you pull the thread, the bobbin must turn clockwise.
Inserting the bobbin case
Lift latch (E) and push the bobbin case fully onto pin (C) of the sewing hook. Opening (D) of the bobbin case must face upwards.
Check: Pull the bobbin thread sharply. The bobbin case must not fall out of the hook.
2:12
 Loading...