


hobby1142
O w n e r ´ s m a n u a l

|
7 |
6 |
5 |
4 |
3 |
2 |
|
|
|
|
|
|
|
8 |
|
|
|
|
|
28 |
|
|
|
|
|
|
|
9 |
|
|
|
|
|
27 |
10 |
|
|
21 |
|
|
26 |
|
|
20 |
|
|
|
|
11 |
|
|
|
|
|
|
18 |
|
19 |
|
|
|
|
12 |
|
|
|
|
||
|
|
|
|
|
||
14 |
|
|
|
|
|
25 |
|
|
|
|
|
|
|
15 |
|
|
|
|
|
24 |
|
|
|
|
|
23 |
16 17 |
22 |
12
11
20
3

Parts of your hobby™ 1142 sewing machine
1Bobbin winder stop
2Bobbin winder spindle
3Hole for extra spool pin
4Spool pin
5Carrying handle
6Bobbin thread guide
7Take-up lever
8Foot pressure dial
9Face plate
10Thread cutter
11Buttonhole lever
12Needle threader
13Slide for lowering the feed dog
14Needle plate
15Accessory tray
16Throat plate
17Throat plate release button
18Thumbscrew
19Needle screw
20Presser foot lifter
21Thread tension dial
22Reverse stitch lever
23Power switch
24Connecting socket
25Stitch length dial
26Stitch selector dial
27Handwheel
28Stitch width dial

Congratulations on purchasing your new PFAFF® hobby!
Your hobby is so easy to use and offers a whole range of features and accessories for you to explore. Please spend some time reading these operating instructions as it is
a great way to learn the machine and also to make full use of the features.
Your Pfaff dealer will be at your service with any help or advice you need.
We wish you many enjoyable hours of sewing !
Some fabrics have excess dye which can cause discoloration on other fabric but also on your sewing machine. This discoloring may be very difÀcult or
impossible to remove.
Fleece and denim fabric in especially red and blue often contain a lot of excess dye.
If you suspect that your fabric/ready-to-wear garment contains a lot of excess dye, always pre-wash it before sewing/ embroidering to avoid the discoloring.
This houshold sewing machine is designed to comply with IEC/EN 60335-2-28 and UL1594
IMPORTANT SAFETY INSTRUCTIONS
When using an electrical appliance, basic safety precautions should always be followed, including the following:
Read all instructions before using this household sewing machine.
DANGER - To reduce the risk of electric shock:
•A sewing machine should never be left unattended when plugged in. Always unplug this sewing machine from the electric outlet immediately after using and before cleaning.
•Always unplug before relamping. Replace bulb with same type rated 15 Watt.
WARNING - To reduce the risk of burns, Àre, electric shock, or injury to persons:
•This sewing machine is not intended for use by persons (including children) with reduced physical, sensory or mental capabilities, or lack of experience and knowledge, unless they have been given supervision or instruction concerning use of the sewing machine by a person responsible for their safety.
•Children should be supervised to ensure that they do not play with the sewing machine.
•Use this sewing machine only for its intended use as described in this manual. Use only attachments recommended by the manufacturer as contained in this manual.
•Never operate this sewing machine if it has a damaged cord or plug, if it is not working properly, if it has been dropped or damaged, or dropped into water. Return the sewing machine to the nearest authorised dealer or service center for examination, repair, electrical or mechanical adjustment.
•Never operate the sewing machine with any air openings blocked. Keep ventilation openings of the Sewing machine and foot controller free from the accumulation of lint, dust, and loose cloth.
•Keep Àngers away from all moving parts. Special care is required around the Sewing machine needle.
•Always use the proper needle plate. The wrong plate can cause the needle to break.
•Do not use bent needles.
•Do not pull or push fabric while stitching. It may deÁect the needle causing it to break.
•Wear safety glasses.
•Switch the sewing machine off (“0”) when making any adjustment in the needle area, such as threading needle, changing needle, threading bobbin, or changing presser foot, etc.
•Always unplug the sewing machine from the electrical outlet when removing covers, lubricating, or when making any other user servicing adjustments mentioned in the instruction manual.
•Never drop or insert any object into any opening.
•Do not use outdoors.
•Do not operate where aerosol (spray) products are being used or where oxygen is being administrated.
•To disconnect, turn all controls to the off (“0”) position, then remove plug from outlet.
•Do not unplug by pulling on cord. To unplug, grasp the plug, not the cord.
SAVE THESE INSTRUCTIONS

II Introduction
TABLE OF CONTENTS
Introduction
Standard accessories |
IV |
Optional accessories |
V |
Accessory tray |
V |
Stitch table |
VI |
1. Operate your hobby 1142
Carrying handle, carrying case |
1:2 |
Connecting the foot control |
1:2 |
Foot preassure dial |
1:3 |
Dropping the feed dog |
1:3 |
Presser foot lifter |
1:4 |
Changing the presser foot |
1:4 |
Removing and attaching |
|
the foot holder |
1:5 |
Changing the needle |
1:5 |
Bobbin winding |
1:6 |
Inserting the bobbin |
1:8 |
Threading the machine |
1:9 |
Needle threader |
1:10 |
Threading for twin needle |
1:11 |
Bringing up the bobbin thread |
1:12 |
Stitch selection |
1:13 |
Stitch length dial |
1:13 |
Adjusting stretch stitch balance |
1:14 |
Stitch width dial |
1:14 |
Variable needle position |
1:15 |
Reverse sewing |
1:15 |
Balancing needle thread tension |
1:16 |
2. Utility stitches and practical sewing
Basic sewing |
2:2 |
Free arm sewing |
2:4 |
Seam guides on the needle plate |
2:5 |
Turning a square corner |
2:5 |
Explanation of the sewing chart |
2:6 |
Straight stitch |
2:7 |
Stretch triple straight stitch |
2:8 |
Zigzag stitch |
2:8 |
Tricot stitch (Triple zigzag stitch) |
2:9 |
Honeycomb stitch |
2:9 |
Open overlock stitch (Knit stitch) |
2:10 |
Closed overlock stitch |
2:10 |
Blindhem |
2:11 |
Blindhem stitch (elastic) |
2:11 |
Automatic buttonhole |
2:12 |
Buttonhole with gimp thread |
2:14 |
Manual buttonhole |
2:14 |
Button sewing |
2:15 |
Sewing on zippers |
2:16 |
Sewing on patches |
2:18 |
Darning with the elastic stitch |
2:18 |
Repairing tears |
2:18 |

Introduction III
3. Maintenance and trouble-shooting
Cleaning |
3:2 |
Changing the light bulb |
3:3 |
Trouble-shooting |
3:4 |
Index |
3:6 |
Technical data |
3:8 |
|
|
|
|
IV Introduction
Standard accessories
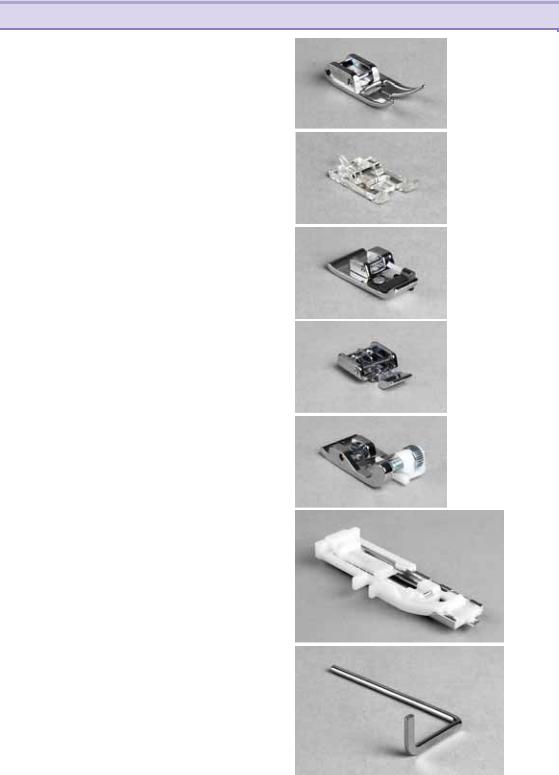
1Standard presser foot A
Part No. 820 546-096
2Buttonhole foot B
Part No. 820 547-096
3Overcasting foot C
Part No. 820 548-096
4Zipper foot E
Part No. 820 549-096
5Blindhem foot G
Part No. 820 550-096
6Automatic buttonhole foot R
Part No. 820 551-096
1
2
3
4
5
6
7 Edge Guide/Quilting Guide |
7 |
|
Part No. 820 552-096 |
||
|
||
|
|
|
|
|
Introduction V
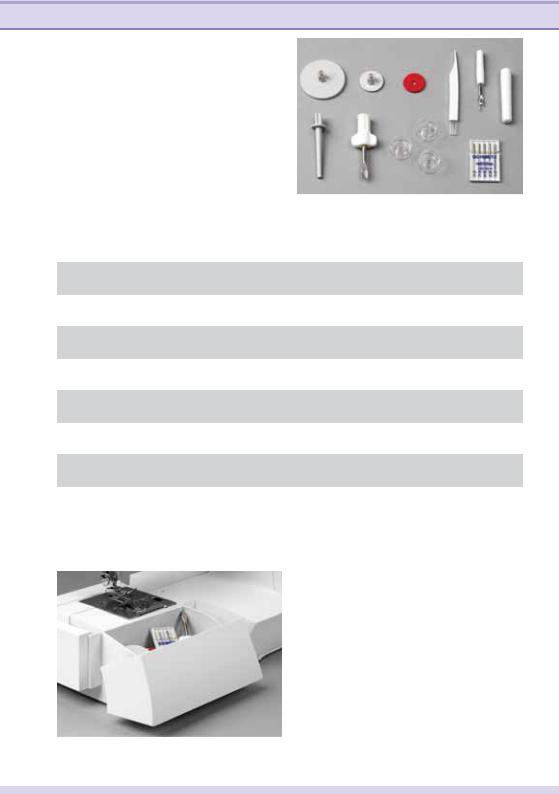
8-9 Spool cap |
13 Extra spool pin |
8 |
|
|
11 |
12 |
Part No. 4160424-01 |
Part No. 4160292-01 |
9 |
10 |
|||
10 Cushion felt |
14 Screwdriver |
|
|
|
||
|
|
|
|
|
||
Part No. 4160234-01 |
Part No. 4160422-01 |
|
|
|
|
|
11 Brush |
15 Bobbins |
|
|
|
|
|
Part No. 4160409-01 |
Part No. 4160233-01 |
|
|
|
|
|
12 Seam ripper |
16 Needles |
|
|
|
|
|
Part No. 4160304-01 |
Part No. 4160471-01 |
|
|
|
|
|
|
|
13 |
14 |
15 |
16 |
|
Optional accessories - available from your dealer
Bias binder foot |
820 554-096 Makes it easier to put bias tape on your projects, pre- |
|
|
|
fabricated or hand made |
Dual feeder with |
820 555-096 This foot will help the fabric move more smoothly, |
|
quilting guide |
|
feeding from both top and bottom |
Gathering foot |
820 556-096 When you want to have a nice gathering on a single |
|
|
|
layer of fabric |
Pintuck foot deep |
820 557-096 |
Make nice even rows of pintucks, with or without |
groove with yarn guide |
|
cording |
Piping foot |
820 558-096 |
The foot has grooves to make it easier to sew perfect |
|
|
piping |
Ribbon sewing foot |
820 559-096 |
Your ribbon is hold perfectly in place while you sew it |
|
|
onto your project |
Roller foot |
820 560-096 |
For a better feed on material like vinyl plastic and |
|
|
leather |
Accessory tray
Your sewing machine has a removable accessory tray which is also used as an extended work support. The enclosed accessories are numbered.

VI Introduction
Stitch table hobby 1142
Stitch
AButtonhole
BStraight stitch, needle position middle
CStraight stitch, needle position left
DZigzag stitch
ETriple zigzag stitch
FElastic blindhem stitch
GBlindhem stitch
HShell-edging stitch
J Greek stitch
MChecker satin stitch
NTriangle satin stitch
OOpen scallop
POval satin stitch
BStretch triple straight stitch, needle position middle
CStretch triple straight stitch, needle position left
DStretch triple zigzag stitch
EHoneycomb stitch
FEdge stitch wide
GEdge stitch narrow
HOpen overlock stitch
J Closed overlock stitch
MDecorative stitch
NDecorative stitch
ODecorative stitch
PDecorative stitch
Description
Standard buttonhole for blouses or bed linens
For all straight stitching and topstitching work up to 4 mm
For all sewing and topstitching work requiring a left needle position
For serging and appliqué
For stitching on elastic band, darning tears and patches
For invisible hem attachment and simultaneous serging. Also for stretch fabrics
For invisible hem attachment
For decorative hems on Àne materials, e.g. linen
A traditional decorative stitch e.g. for borders and towels
Satin decorative stitch Satin decorative stitch Satin decorative stitch Satin decorative stitch
For stretch seams, e.g. crotch seams on sportsand workwear
For stretch seams requiring a left needle position
For attaching elastic tape on elastic materials
For sewing on elastic threads, overlocking towelling and for decorative hem seams
For closing and serging one or more fabric layers For closing and serging one or more fabric layers
A closing and serging seam for stronger or nonfraying materials
A closing and serging seam for fraying materials A decorative stretch stitch
A decorative stretch stitch A decorative stretch stitch A decorative stretch stitch
1. Operate your hobby 1142
1:2 Operate your hobby 1142
Carrying handle
Lift up the carrying handle of the sewing machine from behind.
Carrying case
The carrying case, which is part of the basic equipment, protects your sewing machine from dust and damage while transporting.
Before putting on the carrying case, lift up the carrying handle.
Connecting the foot control
Before connecting to the power supply, make sure the voltage shown on the
machine conforms to your electrical power.
Connect the plug of the foot control to the connecting socket (A) of the sewing machine and to the wall socket. The sewing speed is regulated by pressing the foot control.
Make sure that you have the right type of foot control:
For USA and Canada, 120V - YC-482J (not shown)
For Europe, 230V - YC-190 For Australia, 240V - YC-190A
Main switch
When the main switch (B) is turned on, the sewing light bulb lights up. The sewing machine is now ready to use.
A
B
For the USA and Canada
This appliance has a polarized plug (one blade wider than the other). To reduce the risk of electric shock, this plug is intended to Àt in a polarized outlet only one way. If the plug does not Àt fully in the outlet, reverse the plug. If it still does not Àt, contact a qualiÀed electrician to install the proper outlet.
DO NOT modify the plug in any way.
|
Operate your hobby 1142 1:3 |
C |
Foot pressure dial |
Turn the foot pressure dial to adjust the |
|
|
foot pressure. |
|
The foot pressure dial should be set at |
|
“III” for regular sewing. |
|
Reduce the pressure to “II” for appliqué, |
|
cutwork, drawn work and basting. |
|
Set the setting mark (C) at “I” when |
|
sewing chiffon, lace, organdy and other |
|
Àne fabrics. |
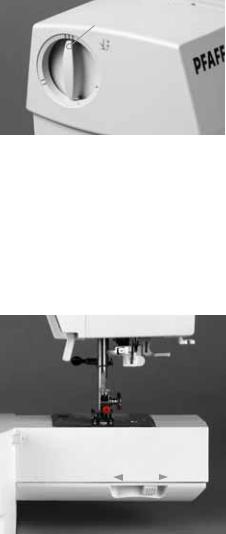
Dropping the feed dog
For certain sewing work, e.g. darning the feed dog has to be dropped.
The slide for lowering the feed dog is located underneath the free-arm bed on the backside of the machine.
|
|
|
|
|
To drop the feed dog, push the slide in |
|
|
|
|
|
the direction of the arrow, as shown in the |
D |
|
|
E |
picture (D). |
|
|
|
To raise the feed dog, push the silde in |
|||
|
|
|
|
|
|
|
|
|
|
|
the direction of the arrow, as shown in |
|
|
|
|
|
the picture (E), and turn the handwheel |
|
|
|
|
|
toward you. |
|
|
|
|
|
The feed dog must be up for regular |
|
|
|
|
|
sewing. |
|
|
|
|
|
|
|
|
|
|
|
|
1:4 Operate your hobby 1142
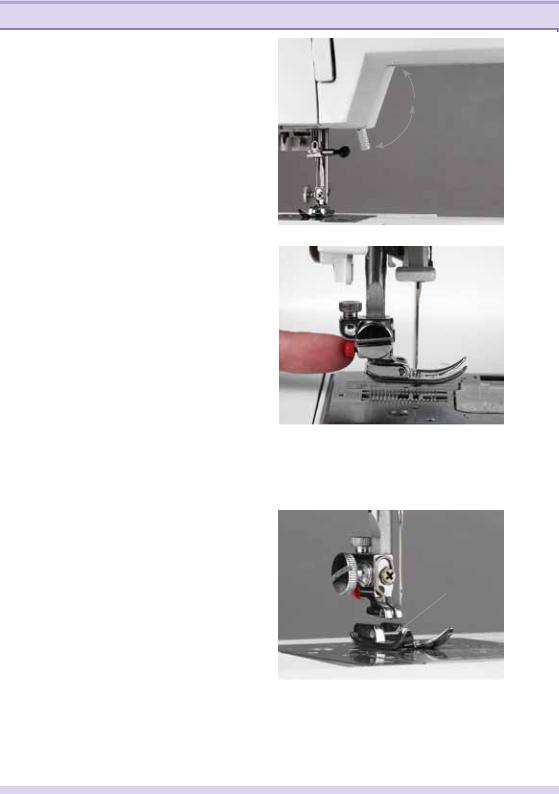
Presser foot lifter
The presser foot is raised or lowered with the presser foot lifter.
You can raise the foot about 1/4" (6 mm) higher than the normal up position for easy removal of the presser foot, or to help you place heavy fabric under the foot.
ALowered position
BNormal up position
CExtra lift position
Changing the presser foot
 Turn off the main switch.
Removing the presser foot
Raise the needle to its highest position by turning the handwheel.
Raise the presser foot, and press the red button on the back of the foot holder.
Engaging the presser foot
Place the desired presser foot, so that when the presser foot lifter is lowered, the pins (D) of the foot engage in the presser foot holder.
Note: Check that the presser foot is properly engaged by raising the presser foot lifter.
C
B
A
D
|
|
|
Operate your hobby 1142 1:5 |
|
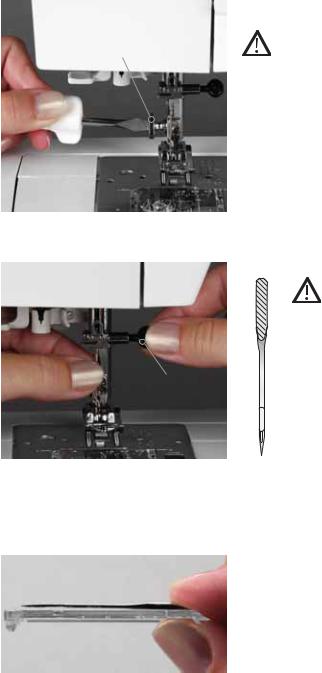
Removing and attaching the foot |
||
|
holder |
||
E |
|
|
Turn off the main switch. |
|
To remove the foot holder |
||
|
Remove the thumbscrew (E) by turning it |
||
|
counterclockwise with a screwdriver and |
||
|
remove the foot holder. |
||
|
To attach the foot holder |
||
|
Match the hole in the foot holder with |
||
|
the threaded hole in the presser bar. Fit |
||
|
the thumbscrew into the hole. Tighten |
||
|
the screw by turning it clockwise with a |
||
|
screwdriver. |
||
|
|
|
Changing the needle |
|
|
|
Turn off the main switch. |
|
|
|
To remove the needle |
|
|
|
Lower the presser foot and |
|
|
|
move the needle to its highest |
|
|
|
point. Now loosen the needle |
|
|
|
|
F |
|
|
screw (F) and pull the needle |
|
|
downwards. |
|
|
|
|
To insert the needle |
|
|
|
The Áat side of the needle |
|
|
|
must face to the rear. Lower |
|
|
|
the presser foot and insert the |
|
|
|
needle, pushing it up as far as |
|
it goes. Hold the needle and tighten the |
||
|
needle screw Àrmly. |
||
|
To check for a good needle: |
||
|
Put the Áat side of the needle onto |
||
|
something Áat (needle plate, glass etc.). |
||
|
The gap between the needle and the Áat |
||
|
surface should be consistent. |
||
|
Never use a bent or blunt needle. |
||
|
Note: Check the needle frequently for barbed |
||
|
or blunted points. |
||
|
A damaged needle can cause permanent |
||
|
snaps or runs in knits, Àne silks and silk- |
||
|
like fabrics. |
||
|
|
|
|
|
|
|
|
1:6 Operate your hobby 1142
Bobbin winding
Preparing the machine for bobbin winding
Pull out the handwheel to disengage the clutch.
Setting the spool
Place a spool of thread on the spool pin with the thread coming off the spool as shown in the picture.
Press the large spool cap (A) Àrmly |
A |
against the spool of thread. |
|
For a small spool, use the small spool cap |
|
(B). |
|
B
Pull the thread around the bobbin thread guide(C).
C
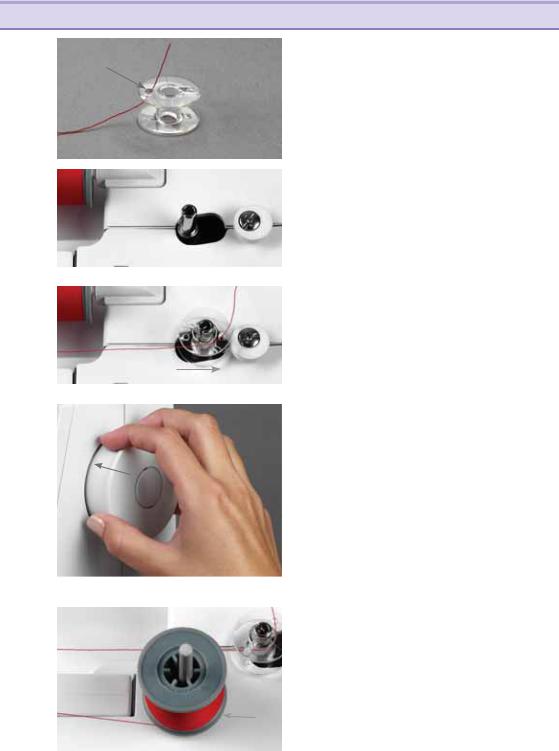
Operate your hobby 1142 1:7
Thread through the hole in the bobbin (D) D from the inside to the outside as shown in
the picture.
Place the bobbin on the bobbin winder spindle with the free end of the thread at the top.
Push the bobbin to the right.
Note: The bobbin can only be wound when it is moved fully to the right. Do not move the bobbin winder spindle while the machine is running.
Hold the end of the thread Àrmly and press the foot control. Stop the machine when the bobbin has made several turns, and cut the free thread end close to the bobbin.
Press the foot control again. When the bobbin is fully wound, it will stop automatically.
Push the bobbin to the left, remove it and cut the thread.
Push in the handwheel to engage the clutch.
Extra spool pin
If the machine is already threaded, you can easily wind thread from the second spool pin without unthreading the machine.
Insert the extra spool pin into the hole (E). Place the felt and a spool on the pin.
E |
Thread the machine for winding in the |
|
same way as before. |
|
|
|
|
 Loading...